Getting Started with Aptos: An Easy Guide for New Users
 John Fu Lin
Aptos is a Layer 1 blockchain that is very fast, has low latency, and is a secure place for building decentralized apps (dApps). In this article, we’ll cover these main points:
Setting up your development environment, including the Petra Wallet and necessary tools
Understanding the basics of Move, Aptos' smart contract programming language
Creating, testing, and deploying your first Aptos smart contract
Interacting with your deployed contract using the Aptos CLI
This guide will give you the basic knowledge to get started with the Aptos ecosystem. By the time you finish reading, you'll have a good understanding of Aptos' features and be ready to start building your own decentralized apps.
Initial Setups
Setup Wallet
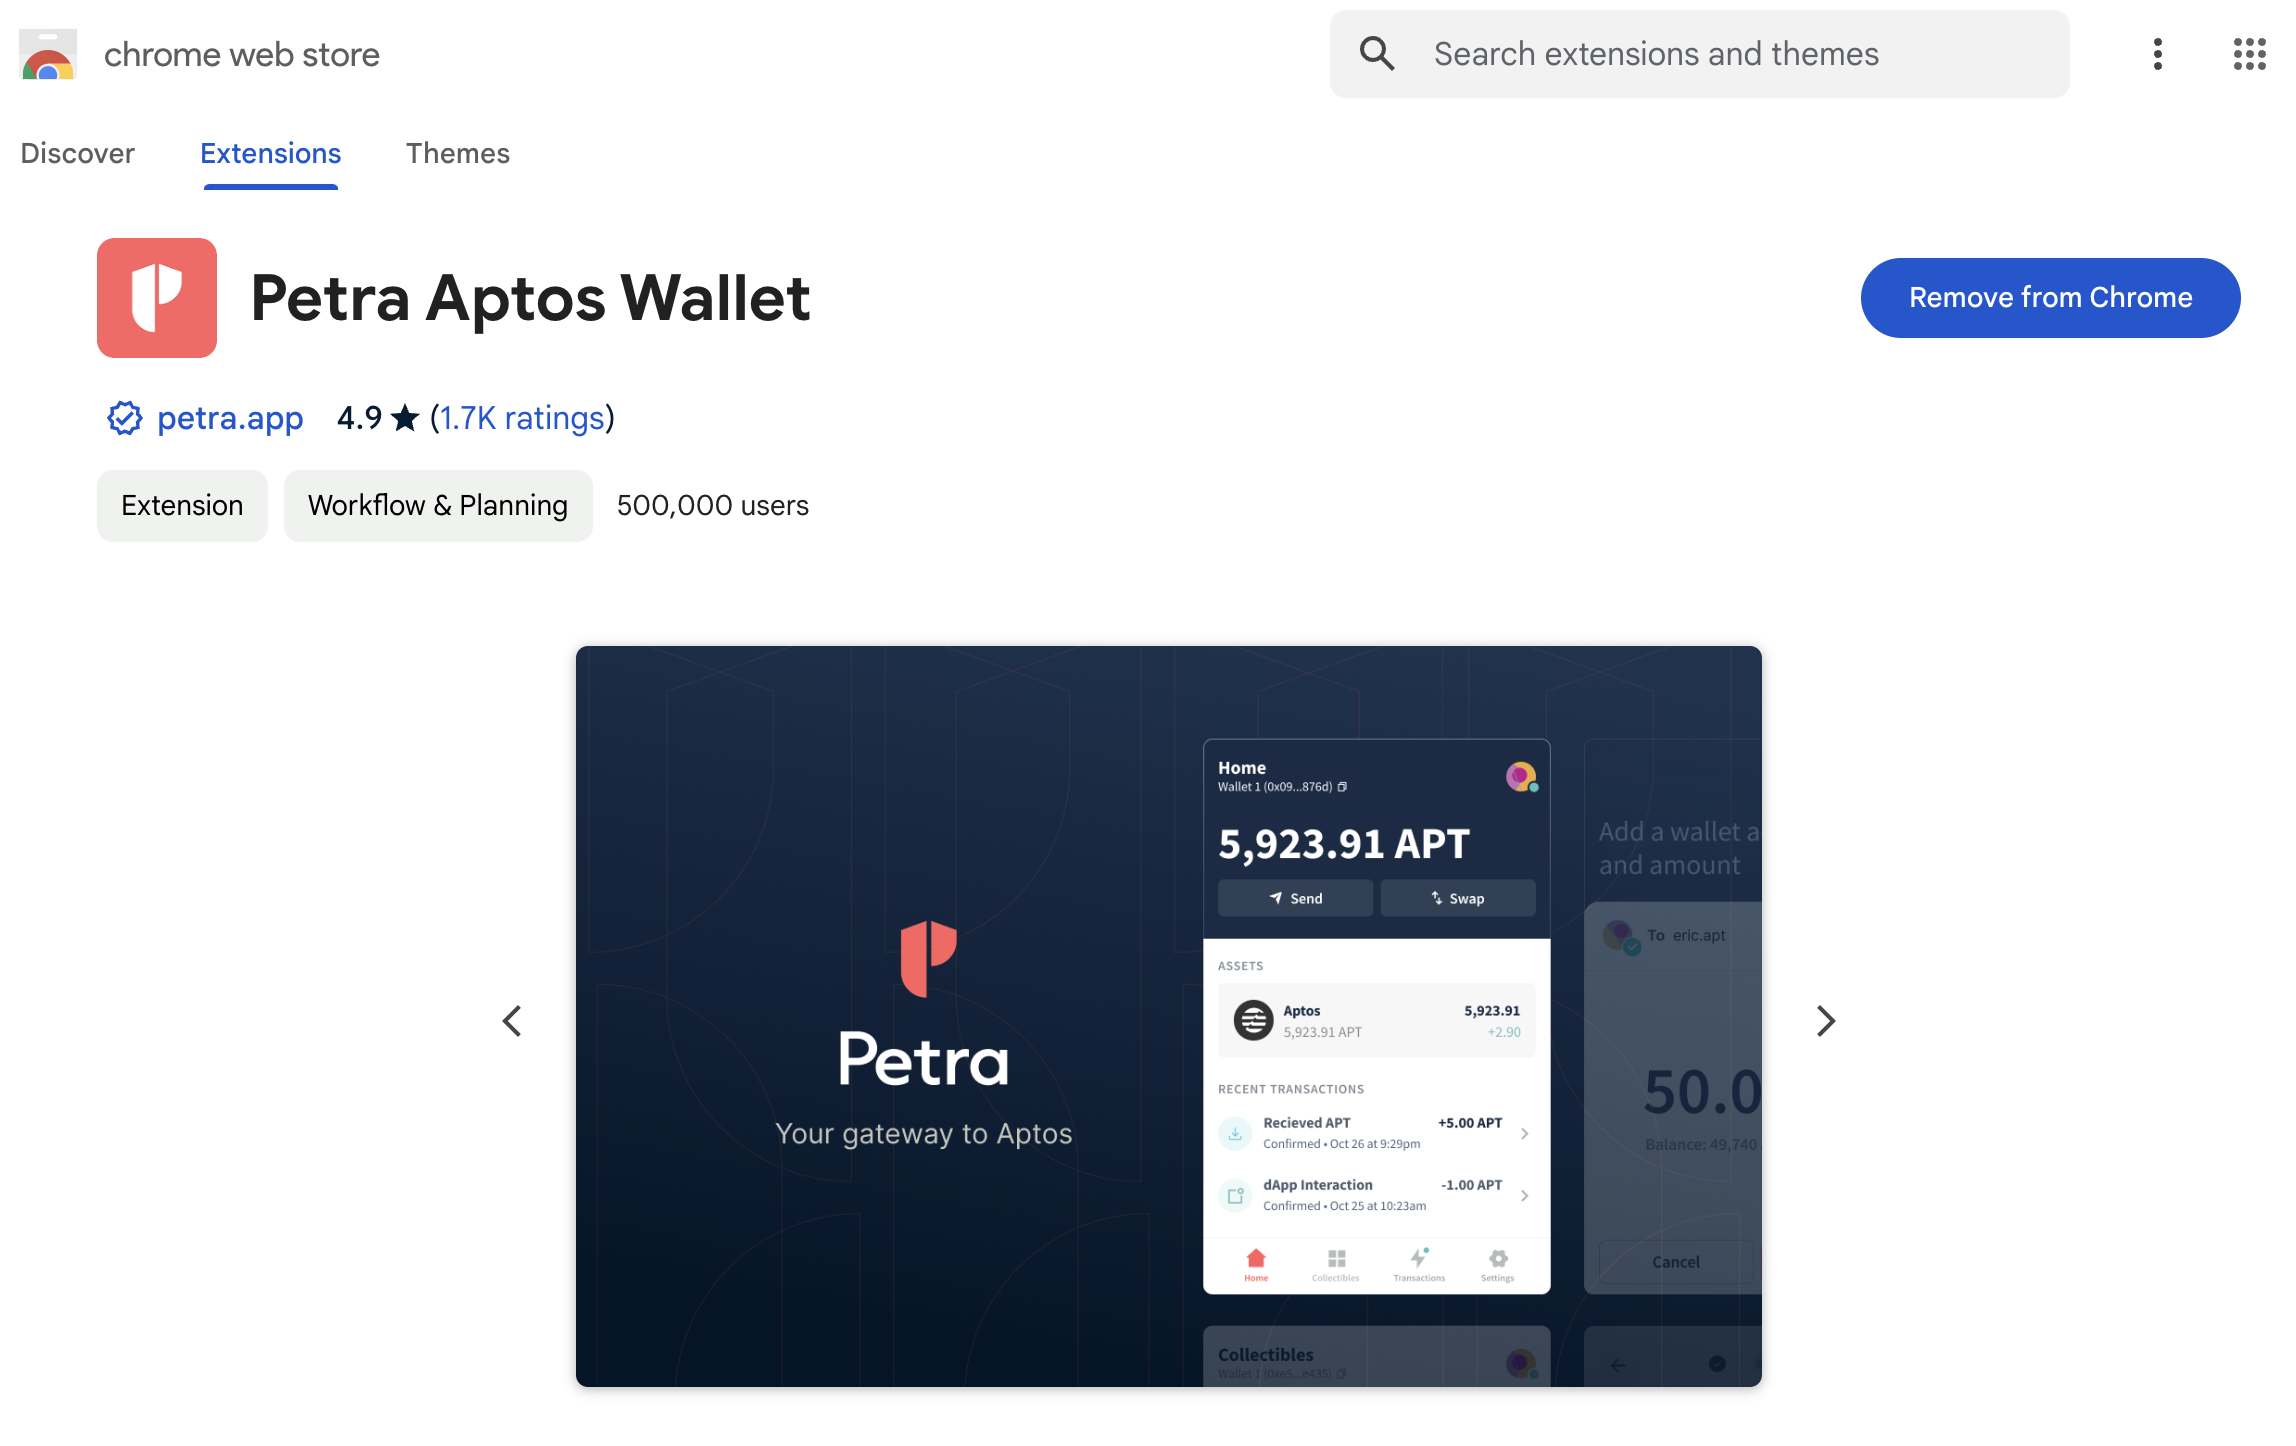
Install the Petra Wallet extension. Developed by Aptos Labs, it’s a secure crypto wallet that lets you:
Explore Web3 apps on Aptos
Manage keys and mnemonics
Transfer coins, view NFTs, and engage with DeFi and NFT marketplaces
Store multiple accounts securely
Faucet
Faucets distribute small amounts of cryptocurrency, in our case APT, for paying transaction fees and testing.
Replace <REPLACE_WITH_YOUR_WALLET_ADDRESS> with your address
curl --request POST \
  --url 'https://faucet.devnet.aptoslabs.com/mint?amount=10000&address=<REPLACE_WITH_YOUR_WALLET_ADDRESS>'
Setting up the Aptos CLI
Let's install the necessary tools like Node.js and the Aptos CLI. There are different installation methods available. For macOS and Linux users, you can use Homebrew.
brew install aptos
After the installation is complete, check if it is installed correctly with aptos --version.
If you have an older version installed with Homebrew, you can upgrade it with brew upgrade aptos.
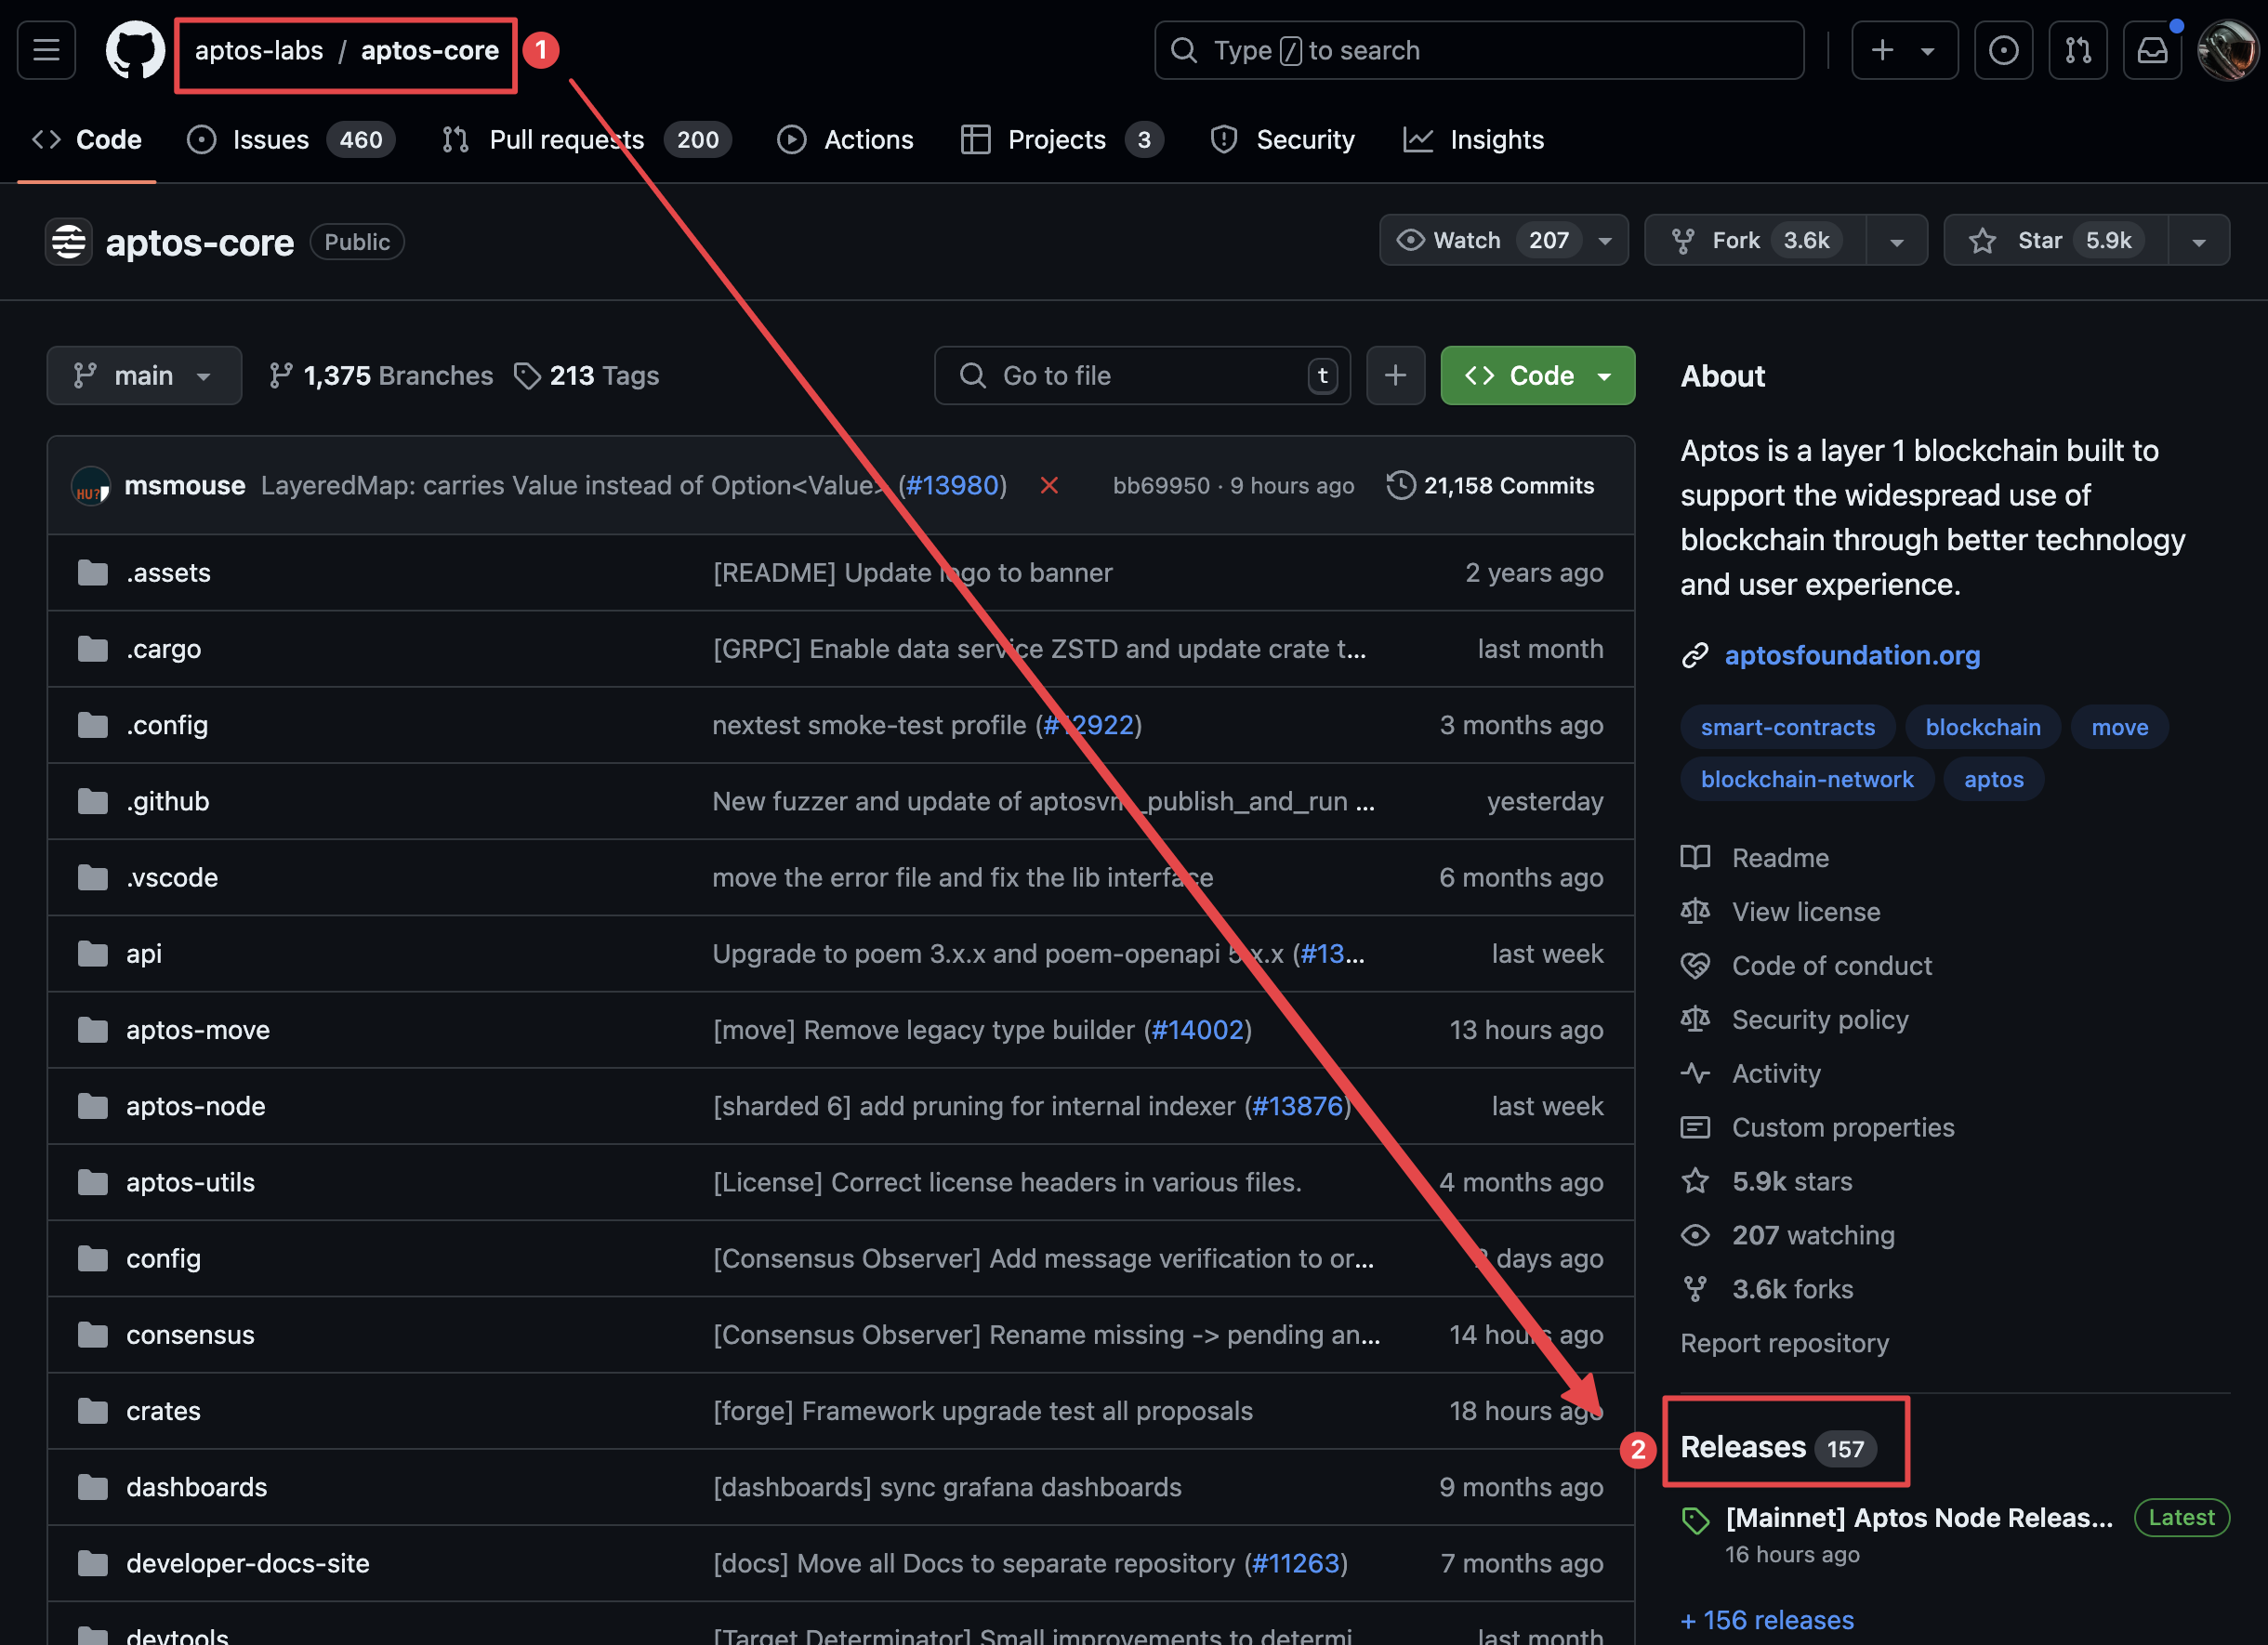
You can also install the Aptos CLI from a binary file. Visit https://github.com/aptos-labs/aptos-core and open the Releases section.
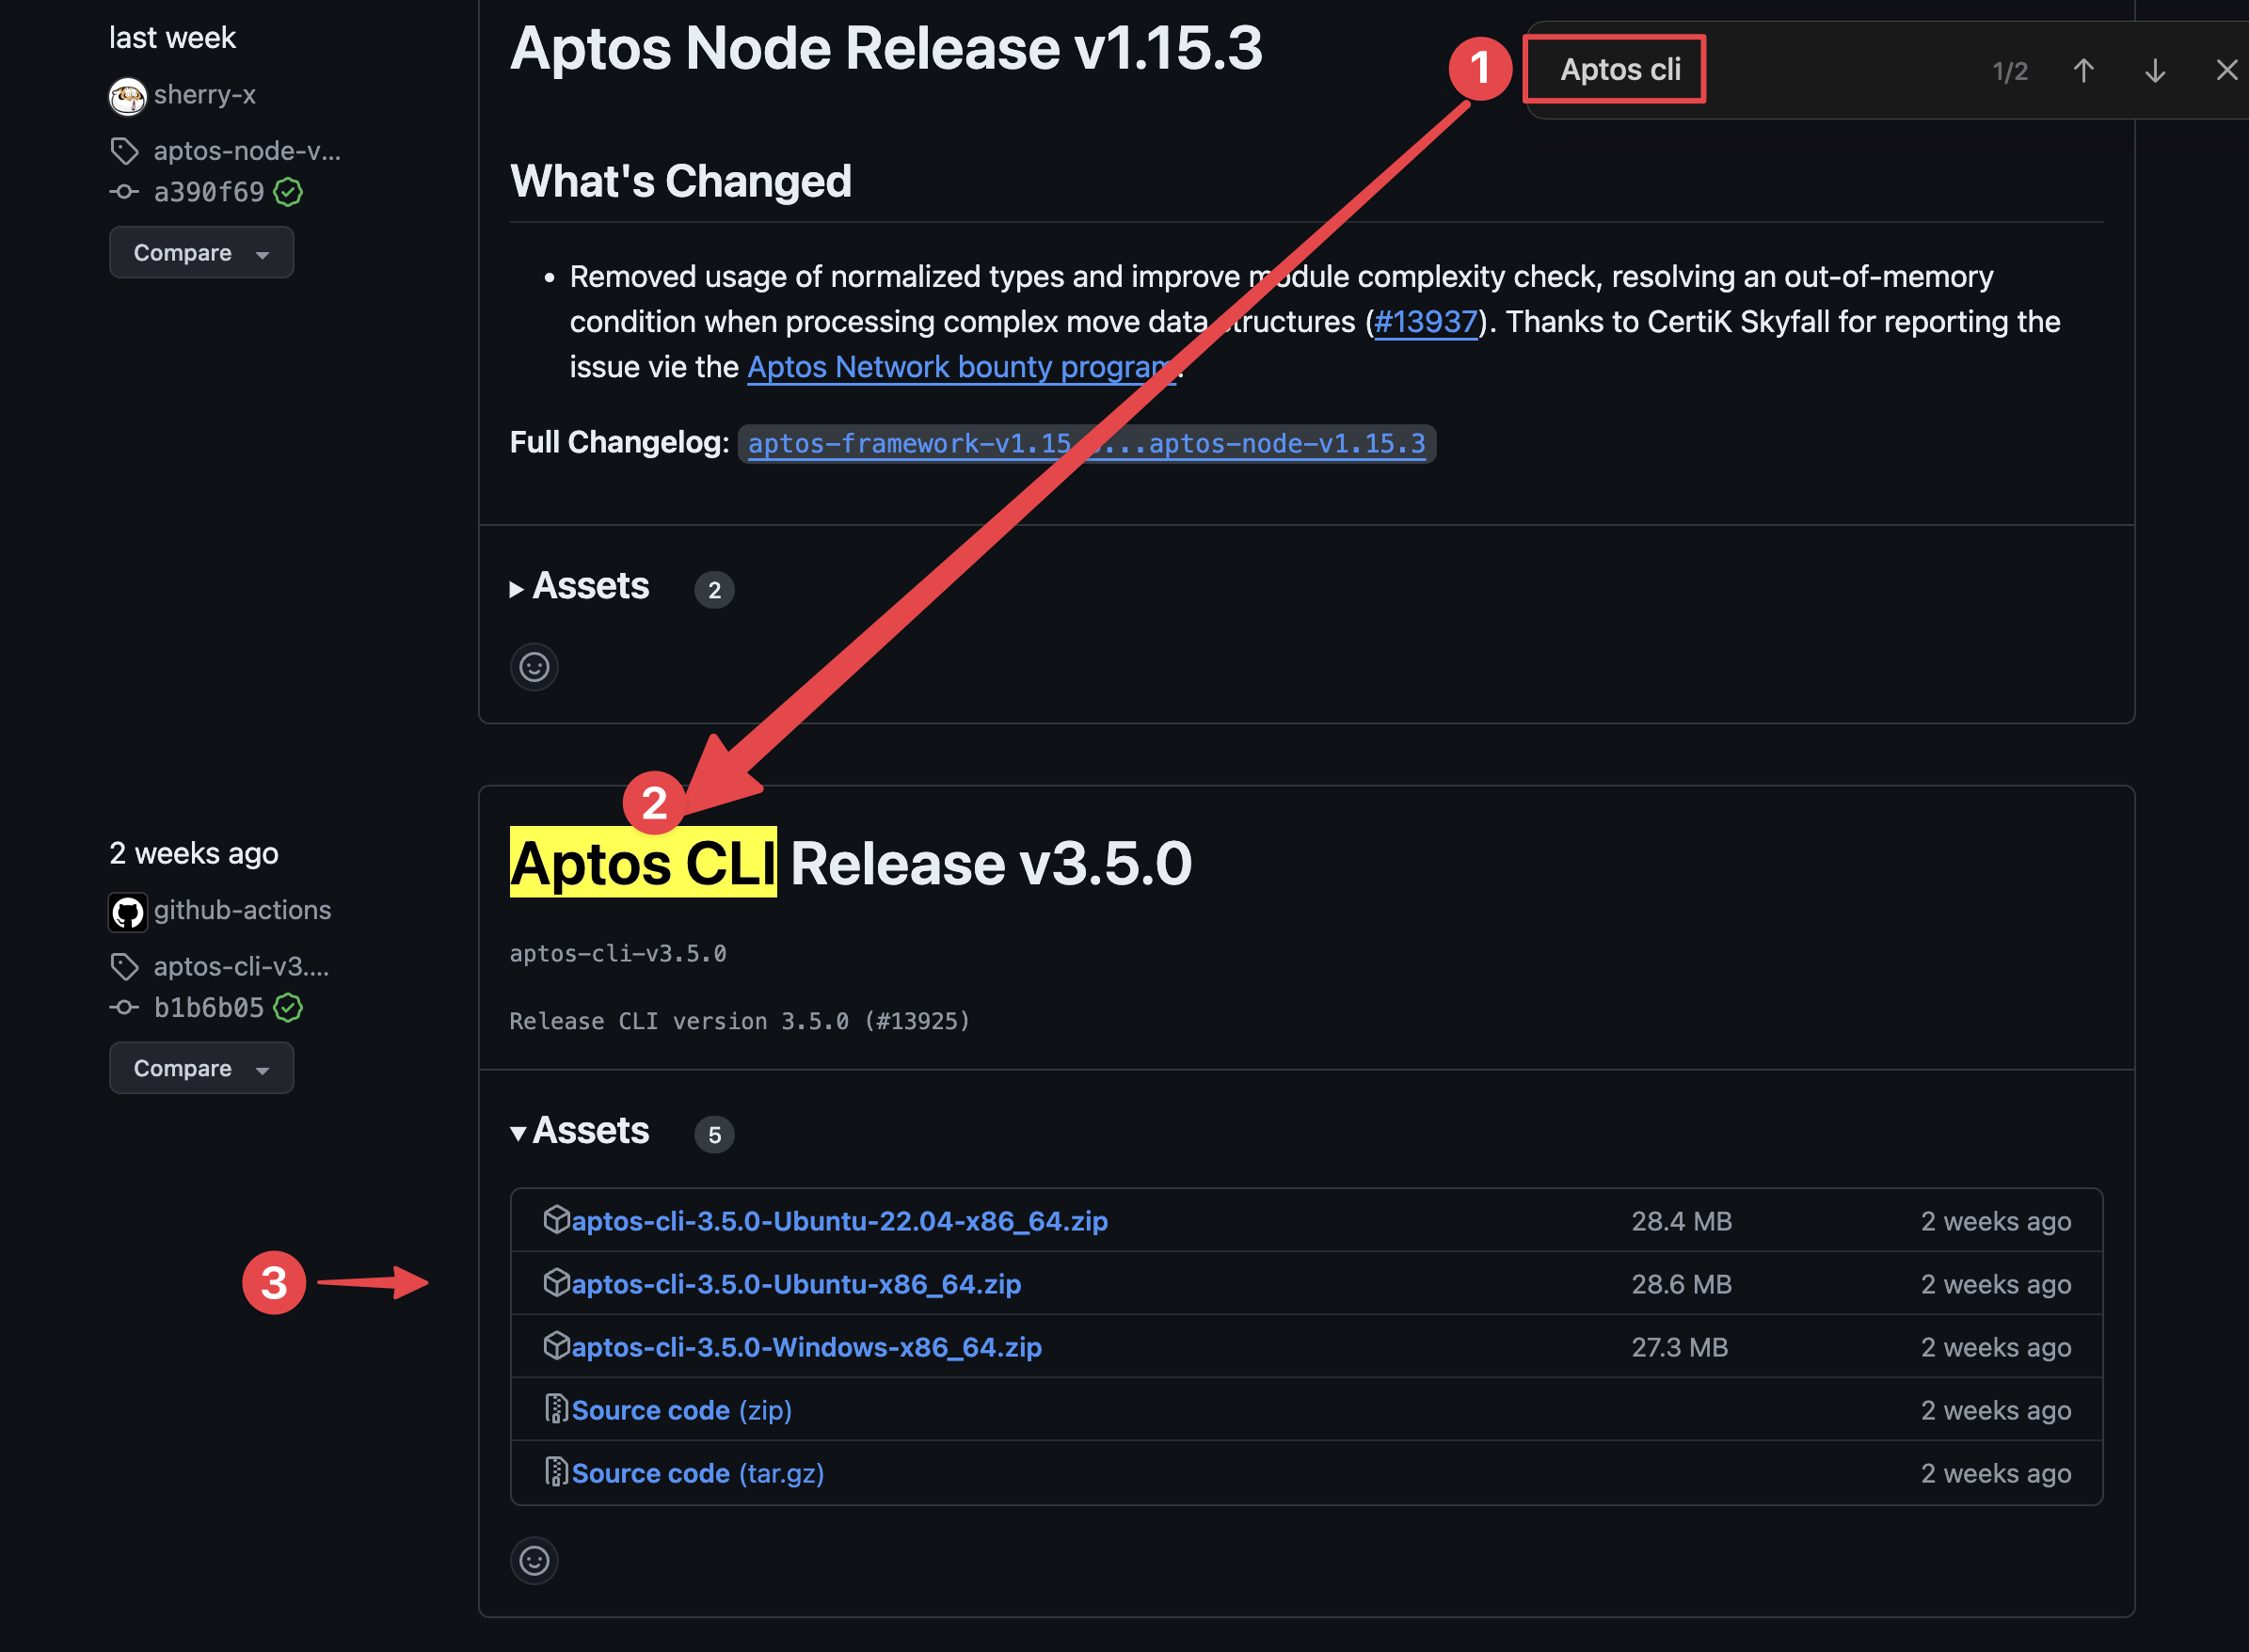
Then search for "Aptos CLI". Open the "Assets" dropdown to find the binaries.
Setup VSCode IDE
Download Visual Studio Code and install the aptos-move-analyzer extension. This Visual Studio Code plugin, developed by MoveBit, provides language support for the Aptos Move language. It includes:
Basic grammar and language configuration for Move (.move) files
Syntax highlighting
Commenting/uncommenting functionality
Simple context-unaware completion suggestions while typing
Other basic language features for Move files
The move-analyzer extension enhances your Move development experience in Visual Studio Code.
Start a Basic Aptos DApp
Using the create-aptos-dapp tool, you can set up a boilerplate project for a decentralized application (dapp). To get started, run the following command in your terminal.
npx create-aptos-dapp
It will open the wizard to set up the project.

You can choose between 3 starters: Boilerplate, Digital Asset, Fungible Asset. Find More info about the templates https://aptos.dev/en/build/create-aptos-dapp/templates/boilerplate
When choosing a network, you'll have the following options:
Mainnet: Use real money.
Testnet: Use fake money.
Devnet: Use fake money, but be aware that it gets wiped every week. This is good for testing incompatible contracts since everything gets reset.
It takes several minutes to install the node modules. Once installed, open the folder with an IDE.
Understanding Move
The key difference is that Sui Move uses an object-centric data model like Solana, while Aptos Move uses an address-centric model like Ethereum. This makes Sui better at handling parallel transactions.
Interfaces and implementations are the same on Aptos. For example, Coin is a standard. You can find all the standards here. In Ethereum, we have ERC20, which are interfaces where people can create different implementations. With Aptos, you trade some flexibility for standardization.
Upgrading Smart Contract
Move code upgrades on the Aptos blockchain occur at the Move package level. A package defines an upgrade policy in the Move.toml file.
[package]
name = "MyApp"
version = "0.0.1"
upgrade_policy = "compatible" // Add policy
...
Aptos Blockchain allows for easy upgrades while keeping stable addresses, ensuring compatibility with previous versions through its native upgrade policies. This makes updating smart contracts simpler compared to other blockchain networks.
immutable: The code cannot be upgraded and will remain the same forever.
compatible: These upgrades must be backward compatible, especially for storage and API.
Modules and Addresses
Modules are:
Building blocks of Move smart contracts
Contain functions and data structures
Stored on-chain as bytecode
Can be called by transaction scripts
Encapsulate logic for assets and interactions
Addresses are:
Account addresses are 32-byte (64 hex characters) unique identifiers
Can be prefixed with "0x", but removing leading zeros is generally limited to special addresses (0x0 to 0xa)
Used for transactions and asset transfers
Resource accounts:
Special type of account without a corresponding private key
Used by developers for autonomous operations on the blockchain
Primary purposes:
Storing resources independently
Publishing modules on-chain
Enable smart contracts to have autonomous control over assets and operations
Can automatically sign for transactions related to their published modules
Allow managing modules/resources without direct user involvement
Provide a way to separate contract logic from user accounts
State and Structs
State in Move consists of data stored on the blockchain, managed through resources and structs within modules. Resources ensure safety by preventing duplication and ensuring exclusive ownership. They are stored in the global state with the "key" attribute or within other structs with the "store" attribute.
There are four Move abilities for structs. These abilities control what actions are allowed for values of a given type.
copy: Allows value duplication
struct Copyable has copy { x: u64 } let a = Copyable { x: 10 };
let b = copy a; // Valid because Copyable has the copy ability
drop: Permits value deletion
struct Droppable has drop { y: u64 }
{
  let d = Droppable { y: 20 }; // d is discarded at end of scope
} // Valid because Droppable has the drop ability
key: Enables global storage access
struct Resource has key { z: u64 }
public fun store(account: &signer, value: u64) {
  move_to(account, Resource { z: value }); // Valid because Resource has the key ability
}
store: Allows storage within other structs
struct Inner has store { w: u64 }
struct Outer has key { inner: Inner }
// Valid because Inner has the store ability, allowing it to be stored within Outer
Functions
Functions are declared with the fun keyword, followed by name, parameters, return type, and body.
fun add(x: u64, y: u64): u64 {
    x + y
}
Function visibility
Default: internal (private)
public: accessible from anywherepublic(friend): accessible by friendsentry: can be directly invoked like scripts
acquires annotation is needed when accessing resources.
module 0x42::example {
    struct Balance has key {
        value: u64
    }

    public fun extract_balance(addr: address): u64 acquires Balance {
        let Balance { value } = move_from<Balance>(addr); // acquires needed
        value
    }

    public fun extract_and_add(sender: address, receiver: &signer) acquires Balance {
        let value = extract_balance(sender); // acquires needed here
        add_balance(receiver, value)
    }

    public fun add_balance(s: &signer, value: u64) {
        move_to(s, Balance { value })
    }
}
Using &signer as a parameter is common, especially for functions that need to act on a specific account or check permissions. It ensures that the caller has the authority to perform certain actions on the account.
module 0x42::example {
    use std::signer;

    struct MyResource has key {
        value: u64
    }

    public fun initialize(account: &signer) {
        let resource = MyResource { value: 0 };
        move_to(account, resource);
    }

    public fun increment(account: &signer) acquires MyResource {
        let addr = signer::address_of(account);
        let resource = borrow_global_mut<MyResource>(addr);
        resource.value += 1;
    }
}
Events
Events help you make historical queries. They are emitted during the execution of a transaction. Each Move module can define its own events and decide when to emit them during the module's execution.
Defined as struct types with the
#[event]attributeEmitted using
0x1::event::emit()Accessible in tests via native functions
Queryable through the GraphQL API
Write the Module
In the Aptos protocol, a Move module is a smart contract. Let's cover the main components one by one to build our module.
Module Structure
module module_addr::my_module {
    // Module contents
}
This defines a module named my_module under the module_addr address.
Resource Definition
struct MessageHolder has key {
    message: string::String,
    message_change_events: event::EventHandle<MessageChangeEvent>,
}
This defines a resource struct MessageHolder with the key ability, allowing it to be stored in global storage. It contains a message and an event handle to track message changes.
Event Definition
struct MessageChangeEvent has drop, store {
    from_message: string::String,
    to_message: string::String,
}
This defines an event struct to record message changes, with drop and store abilities.
View Function
#[view]
public fun get_message(addr: address): string::String acquires MessageHolder {
    assert!(exists<MessageHolder>(addr), error::not_found(ENO_MESSAGE));
    *&borrow_global<MessageHolder>(addr).message
}
A public view function to retrieve the message stored at a given address.
Entry Function
public entry fun set_message(account: signer, message: string::String)
acquires MessageHolder {
    // Function implementation
}
An entry function to set or update the message. It either creates a new MessageHolder or updates an existing one, and emits an event for the change.
Test Function
text#[test(account = @0x1)]
public entry fun sender_can_set_message(account: signer) acquires MessageHolder {
    // Test implementation
}
A test function to verify theset_messagefunctionality.
Here is the final code with everything combined: module.move
module module_addr::my_module {
    use std::error;
    use std::signer;
    use std::string;
    use aptos_framework::account;
    use aptos_framework::event;

    struct MessageHolder has key {
        message: string::String,
        message_change_events: event::EventHandle<MessageChangeEvent>,
    }

    struct MessageChangeEvent has drop, store {
        from_message: string::String,
        to_message: string::String,
    }

    const ENO_MESSAGE: u64 = 0;

    #[view]
    public fun get_message(addr: address): string::String acquires MessageHolder {
        assert!(exists<MessageHolder>(addr), error::not_found(ENO_MESSAGE));
        *&borrow_global<MessageHolder>(addr).message
    }

    public entry fun set_message(account: signer, message: string::String)
    acquires MessageHolder {
        let account_addr = signer::address_of(&account);
        if (!exists<MessageHolder>(account_addr)) {
            move_to(&account, MessageHolder {
                message,
                message_change_events: account::new_event_handle<MessageChangeEvent>(&account),
            })
        } else {
            let old_message_holder = borrow_global_mut<MessageHolder>(account_addr);
            let from_message = *&old_message_holder.message;
            event::emit_event(&mut old_message_holder.message_change_events, MessageChangeEvent {
                from_message,
                to_message: copy message,
            });
            old_message_holder.message = message;
        }
    }

    #[test(account = @0x1)]
    public entry fun sender_can_set_message(account: signer) acquires MessageHolder {
        let addr = signer::address_of(&account);
        aptos_framework::account::create_account_for_test(addr);
        set_message(account,  string::utf8(b"Hello, Blockchain"));

        assert!(
          get_message(addr) == string::utf8(b"Hello, Blockchain"),
          ENO_MESSAGE
        );
    }
}
This "Hello World" example demonstrates basic Move concepts such as module structure, resource definition, function types, and interaction with the Aptos framework. It offers a simple system for storing and retrieving messages, along with event logging.
Compiling, Testing, and Publishing
Now that we have the module, it is time to learn how to compile your Move code, run unit tests, and finally publish your module to the Aptos testnet.
Initiate the project
Open the terminal and run:
npm run move:init
It will generate a .aptos/config.yaml file containing a funded address on testnet with default settings.
Run the following script if you need more funds:
aptos account fund-with-faucet --account <PROJECT_NAME>
Compiling
This command compiles the Move package located in the move directory.
aptos move compile \
  --package-dir move \
  --named-addresses module_addr=my-aptos-dapp-testnet \
  --skip-fetch-latest-git-deps
The --named-addresses flag is crucial for resolving named addresses in the Move code. In this case, it maps the module_addr named address to the my-aptos-dapp-testnet account address. The --skip-fetch-latest-git-deps flag is used to prevent the compiler from fetching the latest versions of any Git dependencies, which can be useful for ensuring reproducible builds
Testing
aptos move test \
  --package-dir move \
  --named-addresses module_addr=my-aptos-dapp-testnet \
  --skip-fetch-latest-git-deps
Publishing
aptos move publish \
  --package-dir move \
  --named-addresses module_addr=my-aptos-dapp-testnet \
  --skip-fetch-latest-git-deps \
  --profile my-aptos-dapp-testnet
aptos move publish: This is the main command to publish a Move package.--package-dir move: Specifies the directory containing the Move package.--named-addresses module_addr=my-aptos-dapp-testnet: Sets the named address for the module.--skip-fetch-latest-git-deps: Skips fetching the latest Git dependencies.--profile my-aptos-dapp-testnet: Specifies the profile to use for this operation.
The terminal response looks like this:
Compiling, may take a little while to download git dependencies...
INCLUDING DEPENDENCY AptosFramework
INCLUDING DEPENDENCY AptosStdlib
INCLUDING DEPENDENCY MoveStdlib
BUILDING boilerplate_template
package size 1818 bytes
Do you want to submit a transaction for a range of [163300 - 244900] Octas at a gas unit price of 100 Octas? [yes/no] >
y
Transaction submitted: https://explorer.aptoslabs.com/txn/0x0e733f22749d0fd0b1dfbd2ee7c0e92cd866c475878eb2dfb857cbe4ca493621?network=testnet
{
  "Result": {
    "transaction_hash": "0x0e733f22749d0fd0b1dfbd2ee7c0e92cd866c475878eb2dfb857cbe4ca493621",
    "gas_used": 1633,
    "gas_unit_price": 100,
    "sender": "2e89176470e3eff01391f9ce7861defebdaf4df829f6333cf5adc322dfccb379",
    "sequence_number": 0,
    "success": true,
    "timestamp_us": 1721339368844105,
    "version": 5494476946,
    "vm_status": "Executed successfully"
  }
}
Interacting with your contract
We can interact with Let's see how to interact with your deployed contract using the CLI.
aptos move run --assume-yes \
  --profile my-aptos-dapp-testnet \
  --function-id 'my-aptos-dapp-testnet::my_module::set_message' \
  --args 'string:hello, blockchain'
aptos move run: This is the main command to run a Move function on the Aptos blockchain.--assume-yes: This flag automatically confirms any prompts during the command execution, making the process smoother.--profile my-aptos-dapp-testnet: This specifies the profile to use for the transaction. Profiles in Aptos CLI contain details like the account address and private key.--function-id 'my-aptos-dapp-testnet::my_module::set_message': This identifies the specific function to call. The function ID follows this structure:address::module_id::function_name. It has three parts:my-aptos-dapp-testnet: The account address where the module is published.my_module: The name of the Move module.set_message: The name of the function within the module.
--args 'string:hello, blockchain': This specifies the arguments to pass to the function. The arguments follow this format:type:value. In this case, it passes a string argument with the value "hello, blockchain".
On success, it will print:
Transaction submitted: https://explorer.aptoslabs.com/txn/0x429bab349cacff691ebfd1cf654ef0ff7bb18dc3910804a7a2b12542a6866155?network=testnet
{
  "Result": {
    "transaction_hash": "0x429bab349cacff691ebfd1cf654ef0ff7bb18dc3910804a7a2b12542a6866155",
    "gas_used": 467,
    "gas_unit_price": 100,
    "sender": "2e89176470e3eff01391f9ce7861defebdaf4df829f6333cf5adc322dfccb379",
    "sequence_number": 1,
    "success": true,
    "timestamp_us": 1721341068307503,
    "version": 5494518608,
    "vm_status": "Executed successfully"
  }
}
Viewing with your contract
To view the get_message function for the given Aptos module, you can use the following bash command:
aptos move view \
    --profile my-aptos-dapp-testnet \
    --function-id module_address::module_id::function_name \
    --args address:<account_address>
In my case
aptos move view \
--profile my-aptos-dapp-testnet \
    --function-id 0x2e89176470e3eff01391f9ce7861defebdaf4df829f6333cf5adc322dfccb379::my_module::get_message \
    --args address:0x2e89176470e3eff01391f9ce7861defebdaf4df829f6333cf5adc322dfccb379
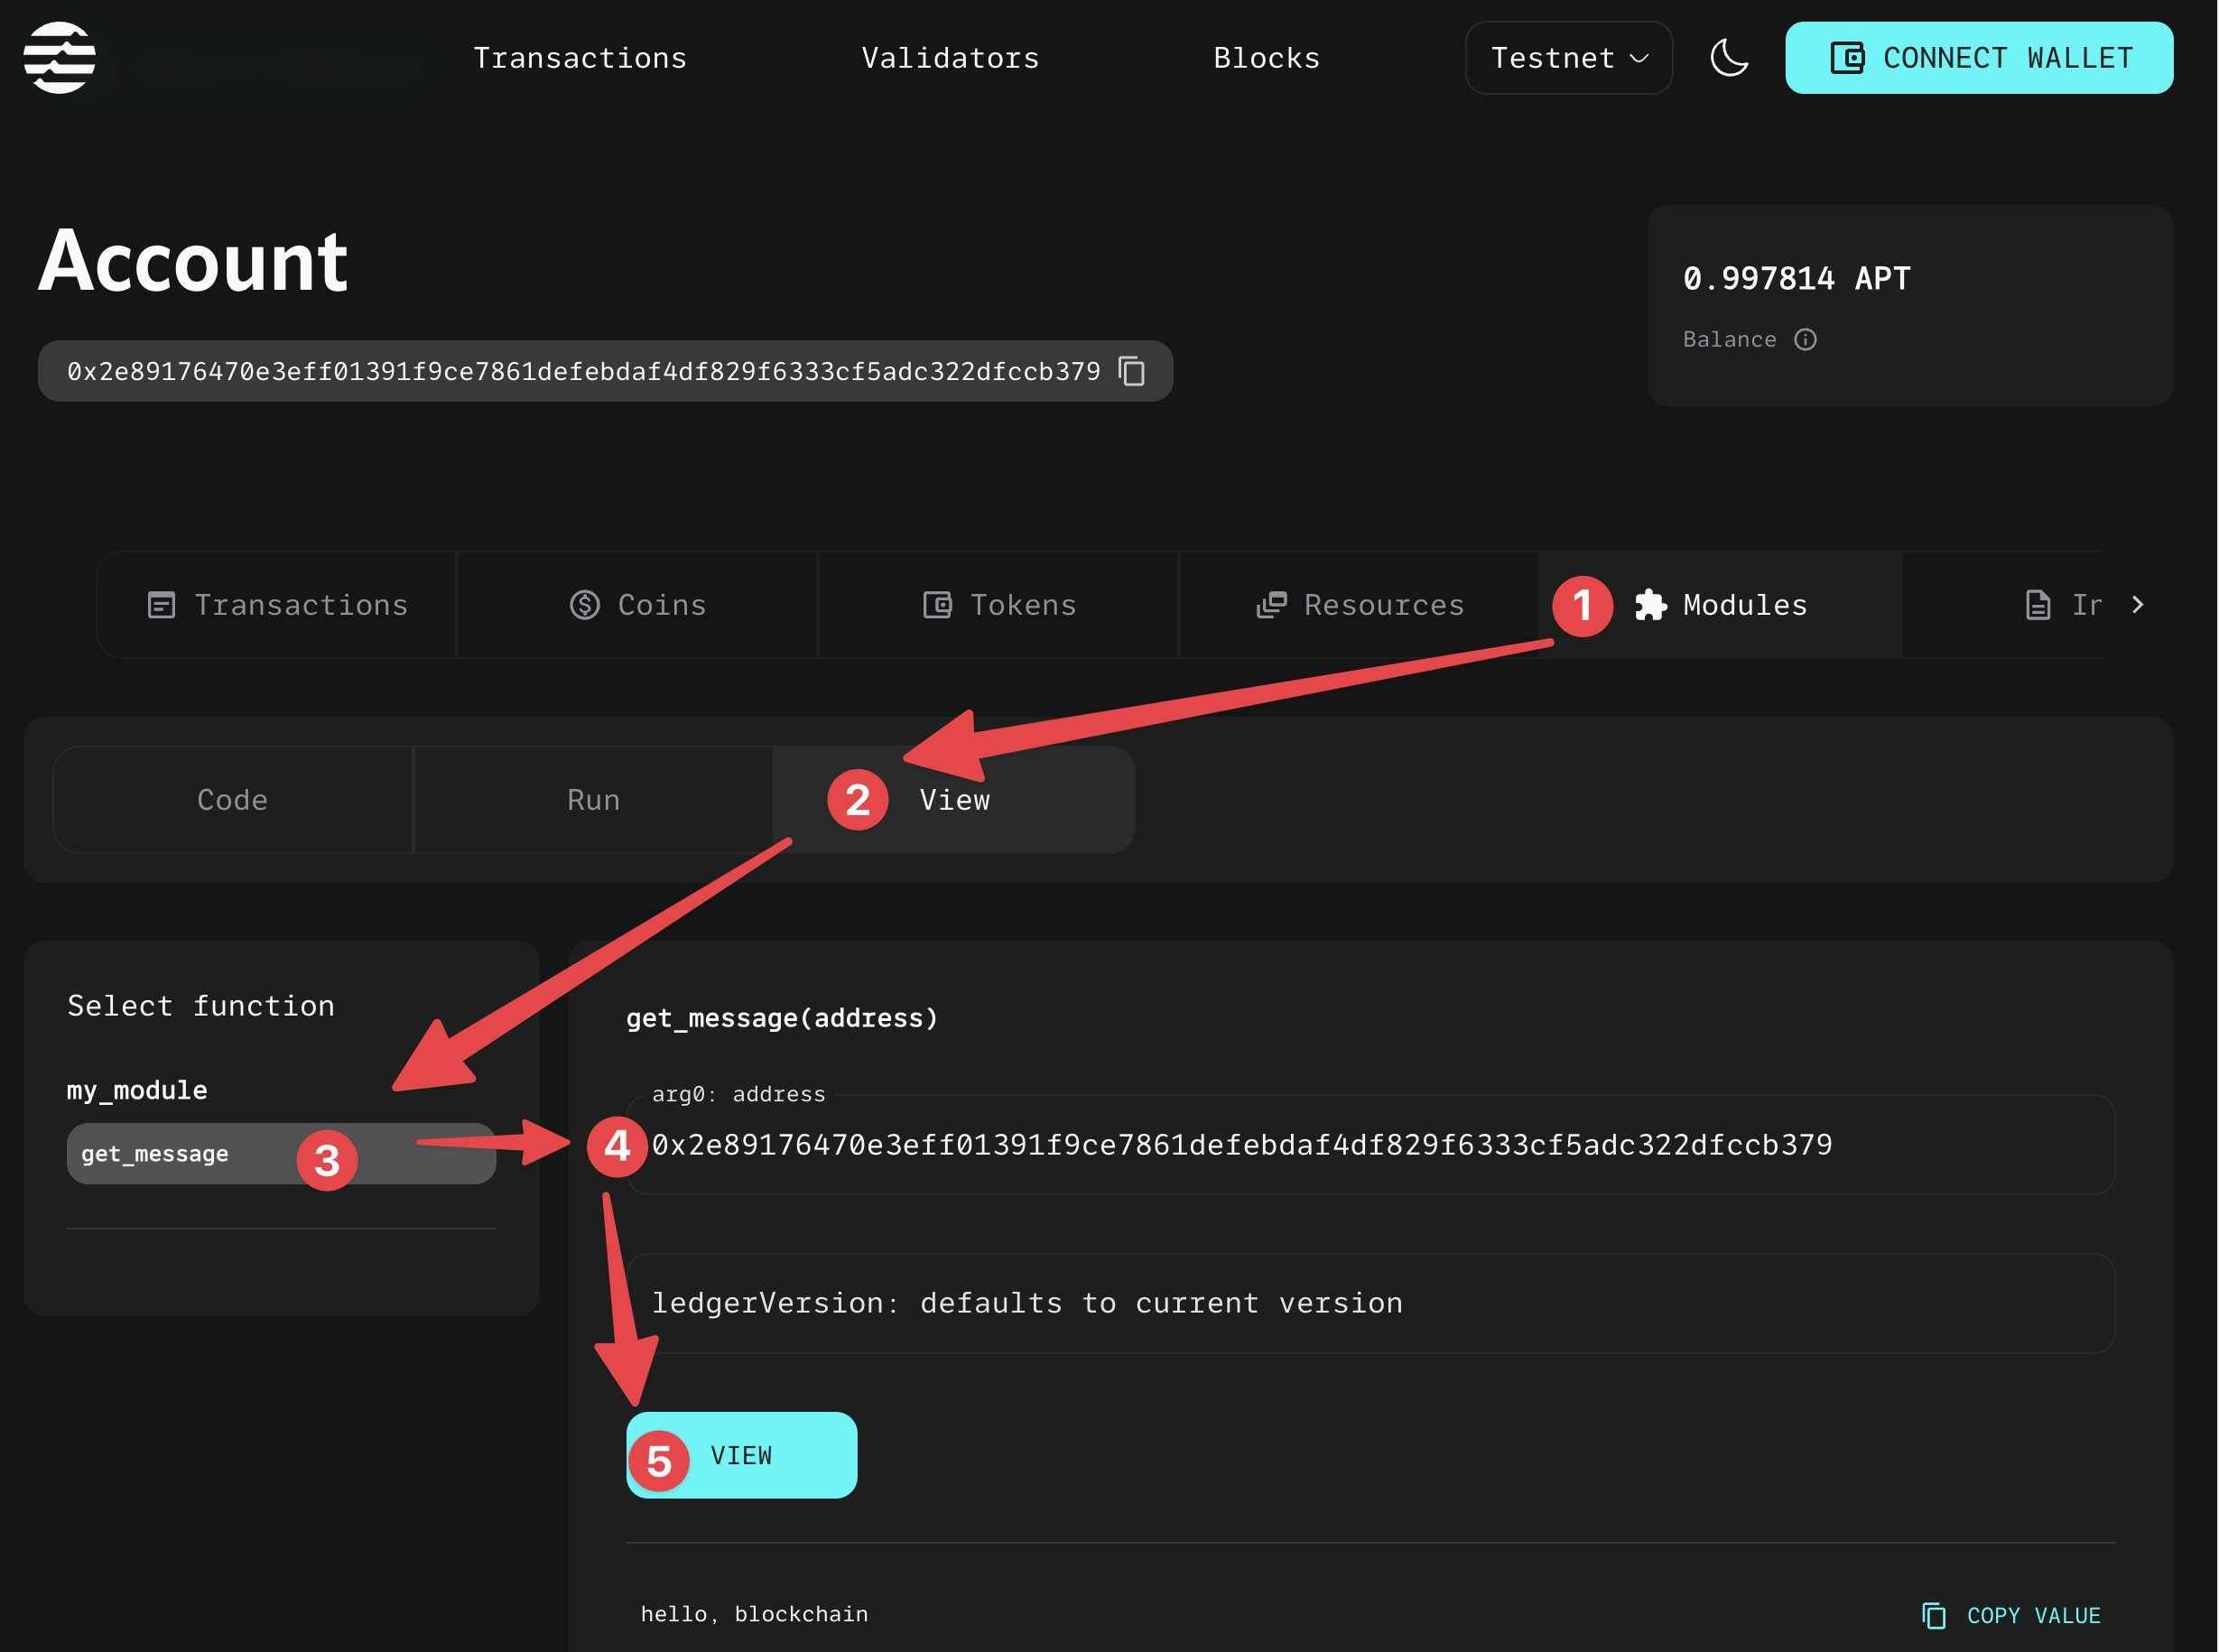
We can also go to the explorer, open the Modules section in the view tab, and use the explorer's user interface directly.
What Next?
To further your journey with Aptos development, you can continue experimenting with different modules and functions.
Explore more complex Move smart contracts
Integrate your dApp with a frontend using the Aptos SDK
Experiment with different Aptos standards (e.g., Tokens, NFTs)
Support
Need some help or want to chat with other Aptos developers? There are two main places you can go:
GitHub Discussions: The Aptos Labs team has an active GitHub Discussions forum where you can ask questions and join conversations. Check it out here: https://github.com/aptos-labs/aptos-developer-discussions/discussions
Discord Community For real-time help and to hang out with the community, the Aptos Discord server is a great spot: https://discord.com/invite/aptosnetwork
Subscribe to my newsletter
Read articles from John Fu Lin directly inside your inbox. Subscribe to the newsletter, and don't miss out.
Written by

John Fu Lin
John Fu Lin
Follow your curiosity.