Learn & Build Your First Dapp on Aptos Blockchain
 Degen HODLer
Introduction
Hey there, future blockchain wizard! 🧙♂️✨
In this article, we’re diving into the magical world of Aptos to build our very first full-stack Dapp. Whether you’re a Web3 newbie or a seasoned developer looking to conquer Aptos, this guide has got you covered. 🌐💪
By the end of this article, you’ll have a fully functional Dapp running on the Aptos blockchain. 🚀Feel the excitement? Let’s dive in and build something amazing together! 😊
What is a Dapp 🤔?
Dapp? D for ? let's understand
Imagine a Dapp (decentralized application) as a magical app that lives on a blockchain instead of a regular server. Because of this, it’s super secure, transparent, and can’t be easily shut down or messed with. 🛡️✨
These apps use smart contracts, which are like digital wizards that automatically follow the rules written in their code. This means Dapps can run on their own without needing a middleman. 🧙♂️💻
So, in short, Dapps are like enchanted apps that bring the magic of blockchain to life! 🪄🌐
Importance of Dapps in the Blockchain Ecosystem
Blockchains are distributed networks of nodes running as a global computer for computing your logic with no control and full transparency
Dapps play a crucial role in the blockchain ecosystem by enhancing security and transparency. Since a single entity doesn’t control them, they resist censorship. Smart contracts allow Dapps to operate autonomously, reducing the need for middlemen and helps in cost-cutting.
Let's cook 🍳 our first Dapp on the Aptos blockchain!
Overview of Aptos blockchain 🌐
The Aptos blockchain is designed with scalability, safety, reliability, and upgradeability as key principles, to match the path of cloud infrastructure as a trusted, scalable, cost-efficient, and continually improving platform for building widely-used applications.
key features that you can find only in Aptos Blockchain
It integrates and internally uses the Move language for fast and secure transaction execution ⚡
Through its parallel execution engine, It can efficiently support atomicity with arbitrarily complex transactions, enabling higher throughput and lower latency for real-world applications and simplifying development.
Developer-Friendly: It offers tools and resources to make it easier for developers to build and deploy Dapps.
Aptos is designed to support a wide range of applications, from finance to gaming, making it a versatile platform in the blockchain space. Read the whitepaper here.
Now you understand all the basics, turn on your desktop and put your hands on the keyboard to build your first application on Aptos!
If you're a developer transitioning from Ethereum to Aptos go through this link it will help you to relate and understand the terms easily.
Setting Up Your Development Environment🧑💻
Installing Node.js
Download Node.js:
Go to the Node.js official website.
Download the LTS version suitable for your operating system.
Install Node.js:
Run the installer and follow the prompts.
Verify the installation by opening your terminal and typing:
  node -v
  npm -v
You should see the versions of Node.js and npm displayed.
Setting up Aptos CLI
To install Aptos CLI for your specific system go through the following links
Verify the installation by opening your terminal and enter this command:
aptos --version
Now you're ready with your tools 🛠️ to build your next product on Aptos!
Basics of Move Programming Language 🦾
Introduction to Move
The Move programming language was originally created by a team of engineers at Facebook for the Diem Payment Network. Move is designed to be a platform-agnostic language to enable common libraries, tooling, and developer communities across diverse blockchains with vastly different data and execution models.
Why Move 🔑?
Move on Aptos supports the full language built by the team at Facebook, with additional extensions built to improve the security and the developer experience.
Aptos contracts are written using Move, a next generation language for secure, sandboxed, and formally verified programming which is used for multiple chains. Move allows developers to write programs that flexibly manage and transfer assets while providing security and protections against attacks on those assets.
Resources to learn Move Language :
Move tutorial
Move Book
Aptos Move by example
Aptos Learn
Writing a simple Move smart contract </>
hello_blockchain.move
module hello_blockchain::message {
    use std::error;
    use std::signer;
    use std::string;
    use aptos_framework::event;

    //:!:>resource
    struct MessageHolder has key {
        message: string::String,
    }
    //<:!:resource

    #[event]
    struct MessageChange has drop, store {
        account: address,
        from_message: string::String,
        to_message: string::String,
    }

    /// There is no message present
    const ENO_MESSAGE: u64 = 0;

    #[view]
    public fun get_message(addr: address): string::String acquires MessageHolder {
        assert!(exists<MessageHolder>(addr), error::not_found(ENO_MESSAGE));
        borrow_global<MessageHolder>(addr).message
    }

    public entry fun set_message(account: signer, message: string::String)
    acquires MessageHolder {
        let account_addr = signer::address_of(&account);
        if (!exists<MessageHolder>(account_addr)) {
            move_to(&account, MessageHolder {
                message,
            })
        } else {
            let old_message_holder = borrow_global_mut<MessageHolder>(account_addr);
            let from_message = old_message_holder.message;
            event::emit(MessageChange {
                account: account_addr,
                from_message,
                to_message: copy message,
            });
            old_message_holder.message = message;
        }
    }

    #[test(account = @0x1)]
    public entry fun sender_can_set_message(account: signer) acquires MessageHolder {
        let addr = signer::address_of(&account);
        aptos_framework::account::create_account_for_test(addr);
        set_message(account, string::utf8(b"Hello, Blockchain"));

        assert!(
            get_message(addr) == string::utf8(b"Hello, Blockchain"),
            ENO_MESSAGE
        );
    }
}
You can learn more about Move smart contracts in Aptos official documentation. Now we will move towards integration and client-server setup for our fullstack application.
Building Your First Dapp on Aptos ⚙️
We are going to make a Simple On-Chain Counter application to understand the functions of Move and integrations to smart contract through frontend 🚀.
Create root directory
aptos-counter-dappon your desktop.First, we will create Move Smart contracts which will contain all the functions to raise, decrease and view the counter.
cdinto theaptos-counter-dapproot directory, and create a newmovedirectory.cdinto the newmovedirectory and run:aptos move init --name counterThis command creates asources/directory and aMove.tomlfile inside themovedirectory.The
sourcesdirectory holds a collection of.movemodule files. When we compile the package using the CLI, the compiler will look for thesourcesdirectory and itsMove.tomlfile.Let's create a move module. In our move directory, run
aptos init --network testnet( we are going to deploy our application on Testnet )It will create
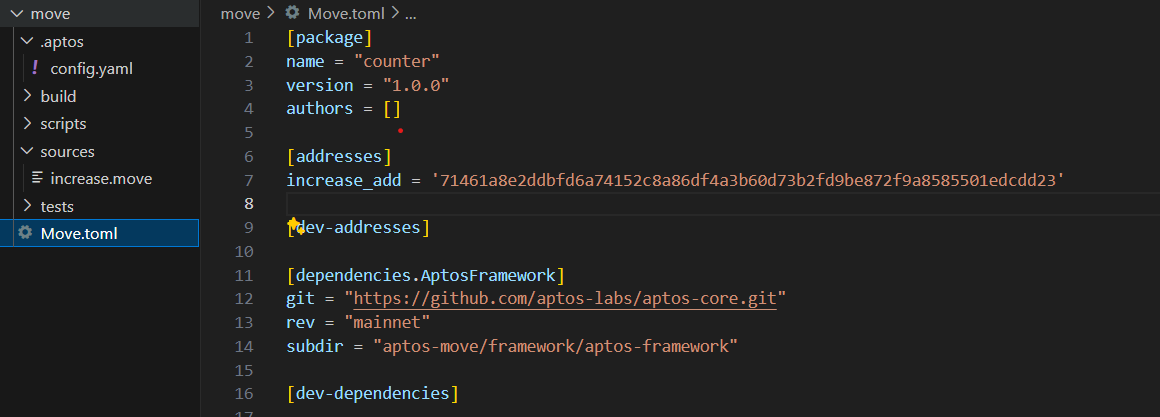
.aptosa folder in yourmovedirectory. Go to that folder you will findconfig.yamlfile, open it you will find the details resembling below image

- Open the
Move.tomlfile. Add the following code to that Move file, substituting your actual default profile account address from.aptos/config.yaml

Now you can create a new file
increase.movemodule into yoursourcedirectorymodule increase_add::increase { }Here
increase_addis the variable we just declared inMove.tomlandincreaseis the random name we selected for the moduleAdd our contract logic, compile and deploy it
- we need one variable to store our counter
- function for initializing the counter for specific address
- two separate functions for increasing and decreasing the counter as user prompted
- add some basic test casesThis is the overall logic we need to write in Move language in
increase.movethe file. Let's write our code step by stepWriting our
move module- Add dependencies and create simple
structfor holdingcountervariable
- Add dependencies and create simple
        module increase_add::increase {
            use std::signer;

            #[test_only]
            use aptos_framework::account;

            struct Count has key {
                count: u64
            }
        }
- Add a function to initialize
countervariable for specific addresses
        // remaining code

        // for intializing counter variable for the specific smart contract

            public entry fun createcounter(account: &signer) {
                let addr = signer::address_of(account);

                if (!exists<Count>(addr)) {
                    move_to(account, Count { count: 0 });
                }
            }
               const E_NOT_INITIALIZED: u64 = 1;
        }
- Now add final functions to increase and decrease the counter
        module increase_add::increase {
            use std::signer;

            #[test_only]
            use aptos_framework::account;

            struct Count has key {
                count: u64
            }

          // for intializing counter variable for the specific smart contract

            public entry fun createcounter(account: &signer) {
                let addr = signer::address_of(account);

                if (!exists<Count>(addr)) {
                    move_to(account, Count { count: 0 });
                }
            }


           const E_NOT_INITIALIZED: u64 = 1;

        // function for raising the counter value
            public entry fun raise_c(account: &signer) acquires Count {
                let signer_add = signer::address_of(account);
                assert!(exists<Count>(signer_add), E_NOT_INITIALIZED);
                let number_p = borrow_global_mut<Count>(signer_add);
                let counter = number_p.count + 1;
                    number_p.count = counter;
            }

         // function for decrementing the counter value

            public entry fun decrement_c(account: &signer) acquires Count {
                let signer_add = signer::address_of(account);
                assert!(exists<Count>(signer_add), E_NOT_INITIALIZED);
                let number_p = borrow_global_mut<Count>(signer_add);
                 let counter = number_p.count - 1;
                    number_p.count = counter;

            }

            #[test(admin = @0x123)]
            public entry fun test_flow(admin: signer) acquires Count {
                account::create_account_for_test(signer::address_of(&admin));
                createcounter(&admin);
                raise_c(&admin);
                decrement_c(&admin);
            }

        }
This is the final code for our move module
Compile & deploy your
increase.movemodule
Run commandaptos move compileto compile your move module before publishing it to the testnetthen test
aptos move test, see if you get similar output shown belowPS D:\aptos\aptos-counter-dapp\move> aptos move compile Compiling, may take a little while to download git dependencies... UPDATING GIT DEPENDENCY https://github.com/aptos-labs/aptos-core.git INCLUDING DEPENDENCY AptosFramework INCLUDING DEPENDENCY AptosStdlib INCLUDING DEPENDENCY MoveStdlib BUILDING counter { "Result": [ "71461a8e2ddbfd6a74152c8a86df4a3b60d73b2fd9be872f9a8585501edcdd23::increase" ] } PS D:\aptos\aptos-counter-dapp\move> aptos move test INCLUDING DEPENDENCY AptosFramework INCLUDING DEPENDENCY AptosStdlib INCLUDING DEPENDENCY MoveStdlib BUILDING counter Running Move unit tests [ PASS ] 0x71461a8e2ddbfd6a74152c8a86df4a3b60d73b2fd9be872f9a8585501edcdd23::increase::test_flow Test result: OK. Total tests: 1; passed: 1; failed: 0 { "Result": "Success" }Deploy/publish your smart contract to the testnet
If all you come to this step without any error
- Run:aptos move publish
- Enteryesin the prompt.
- That will compile, simulate, and finally publish your module into devnet. You should see a success message:PS D:\aptos\aptos-counter-dapp\move> aptos move publish Compiling, may take a little while to download git dependencies... UPDATING GIT DEPENDENCY https://github.com/aptos-labs/aptos-core.git INCLUDING DEPENDENCY AptosFramework INCLUDING DEPENDENCY AptosStdlib INCLUDING DEPENDENCY MoveStdlib BUILDING counter package size 1505 bytes Do you want to submit a transaction for a range of [150700 - 226000] Octas at a gas unit price of 100 Octas? [yes/no] > yes Transaction submitted: https://explorer.aptoslabs.com/txn/0x4d158ff6189b0ca05ed8cd3a952594f4a808796b6c014038b7a4e115dcb20e7c?network=testnet { "Result": { "transaction_hash": "0x4d158ff6189b0ca05ed8cd3a952594f4a808796b6c014038b7a4e115dcb20e7c", "gas_used": 1507, "gas_unit_price": 100, "sender": "71461a8e2ddbfd6a74152c8a86df4a3b60d73b2fd9be872f9a8585501edcdd23", "sequence_number": 0, "success": true, "timestamp_us": 1721653299563427, "version": 5511713975, "vm_status": "Executed successfully" } }
You can refer video guide if you encounter problems while deploying your move modules 💡
Now we have created our required move module increase.move & successfully deployed it to the testnet, you can find it live on Explorer via this link
Let's design our front-end side
In the root folder of the
aptos-counter-dappproject, run:npx create-react-app client --template typescript

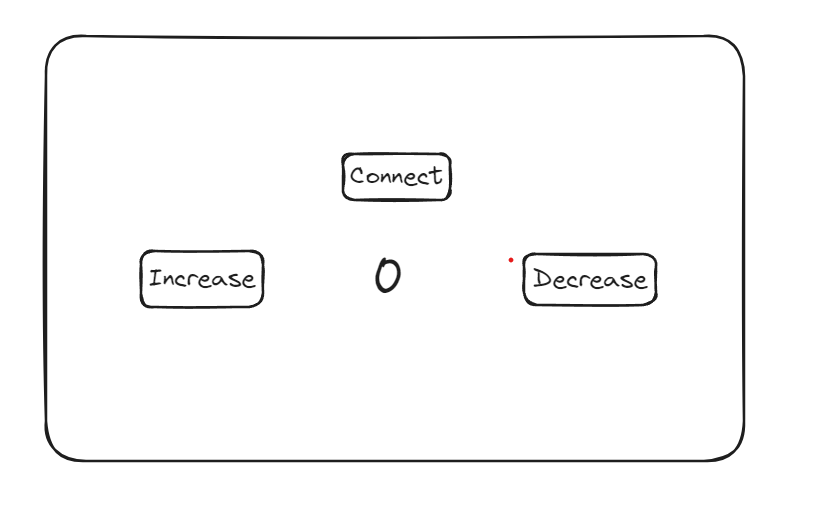
Our simple UI will look like this
- Now in your client folder, you need to install some dependencies
npm i antd@5.1.4
npm i @aptos-labs/wallet-adapter-react
npm i @aptos-labs/wallet-adapter-ant-design
npm i petra-plugin-wallet-adapter
We are working with Petra Wallet here, the above dependencies are for connecting the wallet with the react code
If you haven’t installed the Petra wallet extension yet:
Install Petra Wallet and open the Chrome extension.
Follow the user instructions on petra.app for help.
Switch to the Devnet network by clicking Settings > Network and selecting testnet.
Click the Faucet button to ensure you can receive test tokens.
Here I don't want to dive more into front-end libraries that we need to import, you can follow step by step guide to connect wallet to your front-end here
- The main part and logic come while integration of smart contracts into your frontend code - there are some basic practices you can follow while interacting with smart contracts
you need provider , network and module address to interact with smart contracts
- to fetch any data from the blockchain you can write such a function
    const fetch = async () => {
        if (!account) return;
        try {
          const todoListResource = await provider.getAccountResource(
            account?.address,
            `${moduleAddress}::increase::Count`,
          );
          let data = JSON.parse((todoListResource?.data as any).count);
          setCounter(data);
          if (reload) {
            window.location.reload();
          }
        }
        catch (e: any) {
          create_c();
        }
      }
to write and change state of variable in blockchain you can write such function
  const raise_cCounter = async () => {
      setTransactionInProgress(true);
      // build a transaction payload to be submited
      const payload = {
        type: "entry_function_payload",
        function: `${moduleAddress}::increase::raise_c`,
        type_arguments: [],
        arguments: [],
      };
      try {
        // sign and submit transaction to chain
        const response = await signAndSubmitTransaction(payload);
        // wait for transaction
        await provider.waitForTransaction(response.hash);
        window.location.reload();
      } catch (error: any) {
        console.log(error);
        // setAccountHasList(false);
      } finally {
        setTransactionInProgress(false);
      }
    };
Now you have a basic understanding of how you can import the smart contract function to the frontend and interact with it.
Just copy & paste the below code to the
app.tsxandindex.tsxapp.tsx
import { WalletSelector } from "@aptos-labs/wallet-adapter-ant-design";
import { Layout, Row, Col, Button, Spin } from "antd";

import React, { useEffect, useState } from "react";
import { useWallet,InputTransactionData } from "@aptos-labs/wallet-adapter-react";
import "@aptos-labs/wallet-adapter-ant-design/dist/index.css";
import { Network, Provider } from "aptos";

import "./index.css";
export const provider = new Provider(Network.TESTNET);
// change this to be your module account address
export const moduleAddress = "0x71461a8e2ddbfd6a74152c8a86df4a3b60d73b2fd9be872f9a8585501edcdd23";

function App() {
  const { account, signAndSubmitTransaction } = useWallet();
  const [counter, setCounter] = useState<number>(0);
  const [transactionInProgress, setTransactionInProgress] = useState<boolean>(false);
  const [accountHasList, setAccountHasList] = useState<boolean>(false);
  const [reload, setReload] = useState<number>(0);

  const fetch = async () => {
    if (!account) return;
    try {
      const todoListResource = await provider.getAccountResource(
        account?.address,
        `${moduleAddress}::increase::Count`,
      );
      let data = JSON.parse((todoListResource?.data as any).count);
      setCounter(data);
      if (reload) {
        window.location.reload();
      }
    }
    catch (e: any) {
      create_c();
    }
  }

  const create_c = async () => {
    if (!account) return [];
    setTransactionInProgress(true);
    // build a transaction payload to be submited
    const payload:InputTransactionData = {
      data: {

      function: `${moduleAddress}::increase::createcounter`,
      functionArguments: [],
      },
    };
    try {
      // sign and submit transaction to chain
      const response = await signAndSubmitTransaction(payload);
      // wait for transaction
      await provider.waitForTransaction(response.hash);
    } catch (error: any) {
      console.log(error);
    } finally {
      setTransactionInProgress(false);
    }
  };

  const raise_cCounter = async () => {
    setTransactionInProgress(true);
    // build a transaction payload to be submited
    const payload:InputTransactionData = {
      data: {

      function: `${moduleAddress}::increase::raise_c`,
      functionArguments: [],

      },
    };
    try {
      // sign and submit transaction to chain
      const response = await signAndSubmitTransaction(payload);
      // wait for transaction
      await provider.waitForTransaction(response.hash);
      window.location.reload();
    } catch (error: any) {
      console.log(error);
      // setAccountHasList(false);
    } finally {
      setTransactionInProgress(false);
    }
  };

  const decrement_cCounter = async () => {
    setTransactionInProgress(true);
    // build a transaction payload to be submited
    const payload:InputTransactionData = {
      data: {

      function: `${moduleAddress}::increase::decrement_c`,
      functionArguments: [],

      }
    };
    try {
      // sign and submit transaction to chain
      const response = await signAndSubmitTransaction(payload);
      // wait for transaction
      await provider.waitForTransaction(response.hash);
      window.location.reload();
    } catch (error: any) {
      console.log(error);
      // setAccountHasList(false);
    } finally {
      setTransactionInProgress(false);
    }
  };

  //Runs one Time
  useEffect(() => {
    fetch();
  }, [account?.address]);


  return (
    <>
      <div className="container mx-auto flex justify-center items-center h-[100vh] flex-col">
      <h1 className="text-5xl font-extrabold mb-20 text-center">OSM-.APT</h1>
      <Col style={{ textAlign: "right" , margin:"10px"  }}>
            <WalletSelector />
          </Col>
        <div className="w-[50%] flex justify-between mt-3">

          <div>
            <div className="group relative">
              <div className="absolute -inset-1 rounded-lg bg-gradient-to-r from-rose-400 via-fuchsia-500 to-indigo-500 opacity-75 blur transition duration-500 group-hover:opacity-100"></div>
              <button className="relative rounded-lg bg-black px-7 py-4 text-white"
              onClick={raise_cCounter}>Increase By One</button>
            </div>
          </div>

          <div><h1 className="text-8xl font-extrabold -mt-6">{counter? counter : 0}</h1></div>


          <div>
            <div className="group relative">
              <div className="absolute -inset-1 rounded-lg bg-gradient-to-r from-rose-400 via-fuchsia-500 to-indigo-500 opacity-75 blur transition duration-500 group-hover:opacity-100"></div>
              <button className="relative rounded-lg bg-black px-7 py-4 text-white"
              onClick={decrement_cCounter}>Decrease By One</button>
            </div>
          </div>

        </div>

      </div>

    </>
  );

}

export default App;
index.tsx
import { PetraWallet } from "petra-plugin-wallet-adapter";
import { AptosWalletAdapterProvider } from "@aptos-labs/wallet-adapter-react";
import React from "react";
import ReactDOM from "react-dom/client";
import App from "./App";
import reportWebVitals from "./reportWebVitals";

const wallets = [new PetraWallet()];

const root = ReactDOM.createRoot(document.getElementById("root") as HTMLElement);
root.render(
  <React.StrictMode>
    <AptosWalletAdapterProvider plugins={wallets} autoConnect={true}>
      <App />
    </AptosWalletAdapterProvider>
  </React.StrictMode>,
);

// If you want to start measuring performance in your app, pass a function
// to log results (for example: reportWebVitals(console.log))
// or send to an analytics endpoint. Learn more: https://bit.ly/CRA-vitals
reportWebVitals();
Install and add tailwind for UI
npm install -D tailwindcssnpx tailwindcss init
configure your index.css
@tailwind base;
@tailwind components;
@tailwind utilities;
You're finally done with your magical on-chain counter which is accessible anywhere from your specific address on Aptos blockchain, you can interact with the application and play around with the code!
Runnpm run start and see the magic you've crafted on the Aptos blockchain and marked 🥳your headstart into the Aptos ecosystem 🎉 🎉 🎉
encountered with some bugs ? refer this video 💡 :
Conclusion ✅
In this article, we guide you through building your first full-stack Dapp on the Aptos blockchain. Starting with an introduction to Dapps and their significance, we dive into the features of the Aptos blockchain and set up the development environment. We explain how to deploy a simple Move smart contract and integrate it with a React frontend to create an on-chain counter application. By the end, you'll have a functional Dapp and the foundational knowledge to explore further in the Aptos ecosystem.
Whole article is inspired by build-e2e-dapp on Aptos documentation, this article can be great headstart to understand the development on Aptos and you can build more complex application using it, thank you!
Let's build on Aptos together, we're coming with more such articles in this blog series to learn and build together #CodeCollision
Access the GitHub Code repo here
References 🔗
Official documentation
Tutorials and guides
Community forums and support channels
Subscribe to my newsletter
Read articles from Degen HODLer directly inside your inbox. Subscribe to the newsletter, and don't miss out.
Written by

Degen HODLer
Degen HODLer
Passionate web3 enthusiast, dev looking to explore web3.