Deploy a Python web app securely inside of private subnets in a VPC
 Bandhan Majumder
Table of contents
- What is VPC (Virtual Private Cloud)?
- Best way to create and deploy inside VPC :-
- First step: Create VPC
- Second step: Create an auto-scaling group
- Third step: Bastion host or Jump server
- Fourth step: Download the application
- Fifth step: Load balancer and target group for public subnet
- Sixth step: SSH the other remaining instance and install another application.
- Last step: Check if it is working or not
What is VPC (Virtual Private Cloud)?
With Amazon Virtual Private Cloud (Amazon VPC), we can launch AWS resources in a logically isolated virtual network that we've defined. This virtual network closely resembles a traditional network that we'd operate in our own data center, with the benefits of using the scalable infrastructure of AWS.
More on the official site.
Best way to create and deploy inside VPC :-
The best way to configure a VPC suggested by AWS is like:

Picture Source: AWS
According to the photo, we need;
2 availability zones: -
We need two availability zones as if any of AZ's data centers go down, we will still have the other availability zone to serve the traffic for us. Basically, to avoid the single point of failure.
Private and public subnet:-
EC2 instances inside the private subnet will be launched automatically in two AZ (availability zones) using auto-scaling groups. These servers will not have public IP addresses.
Others:-
We will deploy a NAT gateway and a Load balancer in the public subnet.
What is a NAT gateway?
We use a public NAT gateway to enable instances in a private subnet to send outbound traffic to the internet while preventing the internet from establishing connections to the instances. It's used for one-way communication.
First step: Create VPC
Go to services, and search for VPC. Click on that.
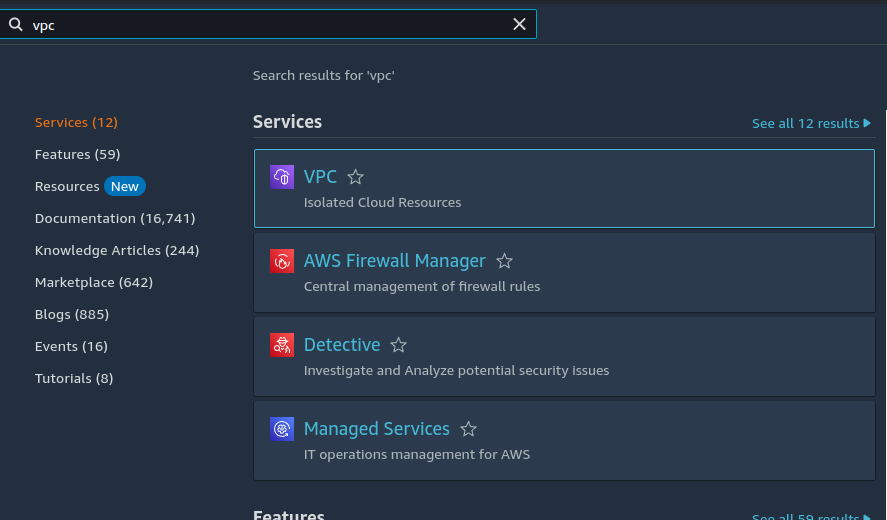
go to
vpcsand then click oncreate vpcin the right upper button.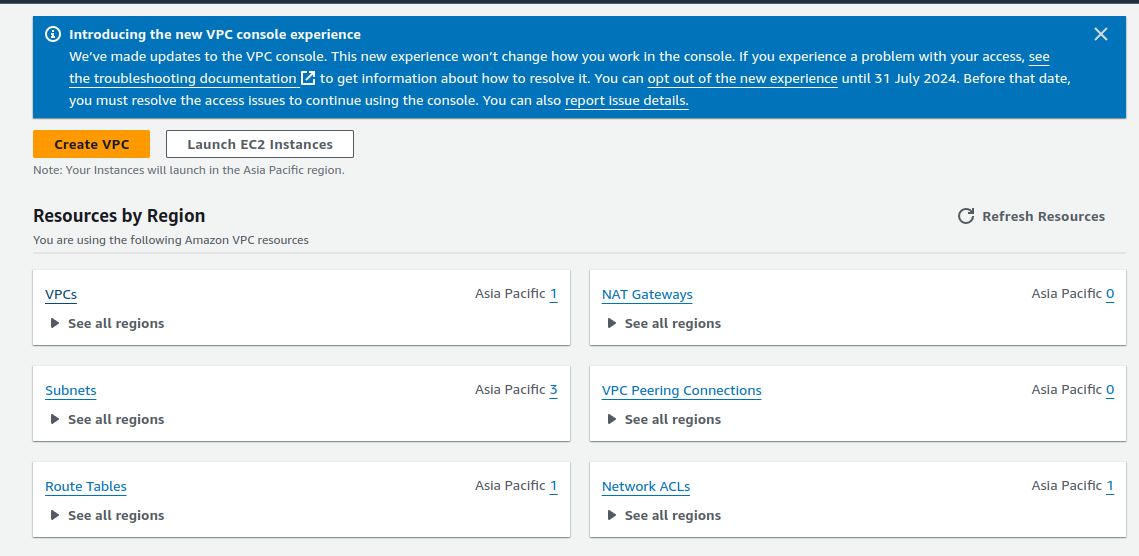
In the tab where mentions
resources to create, selectvpc and more. It will automatically create subnets, route tables, and network connections. Else we have to configure it manually.Give it any name. I have given
demoand kept theIPv4 and IPv6 CIDR blockas default. It will give up ~ 65k IPs to use for different purposes.Check out more about CIDR (Classless Inter-Domain Routing) here.
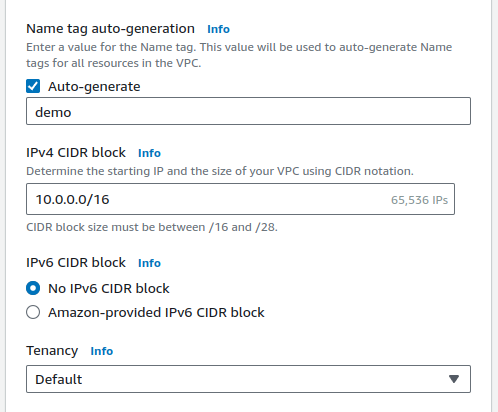
Select
number of availability zonesas 2 and both public & private subnets as 2.If you scroll down
customize subnets CIDR blocksit will show only a total of ~14k IPs that are allocated. But what about the rest of the IP's out of ~64k IP's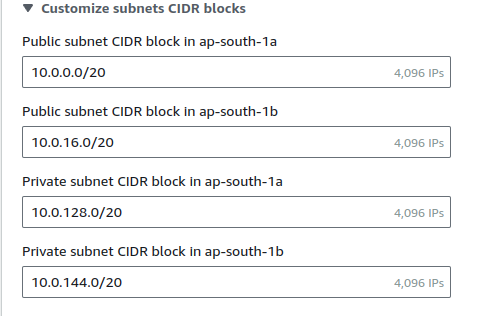
Not all the IPs are allocated. There are a lot of reasons for that.
The reasons:
 The remaining 49,152 IP addresses are still part of our VPC, but they're not allocated to any specific subnet. This is normal and often desirable. Here's why:

 Future expansion: We can use these IPs to create additional subnets later as our needs grow.
 Flexibility: Having unallocated address space allows to resize existing subnets if needed (though this requires recreating the subnet).
 Different subnet sizes: We might want to create smaller or larger subnets for specific purposes in the future.
 Reserved IPs: In each subnet, AWS reserves 5 IP addresses for internal use.
 Best practice: It's generally recommended not to use 100% of VPC's IP range immediately, as it limits future flexibility.
Select
NAT gatewaysas 1 per AZ.Select
VPC endpointas none as we don't want to connect our VPC to the other AWS services (eg: s3 bucket).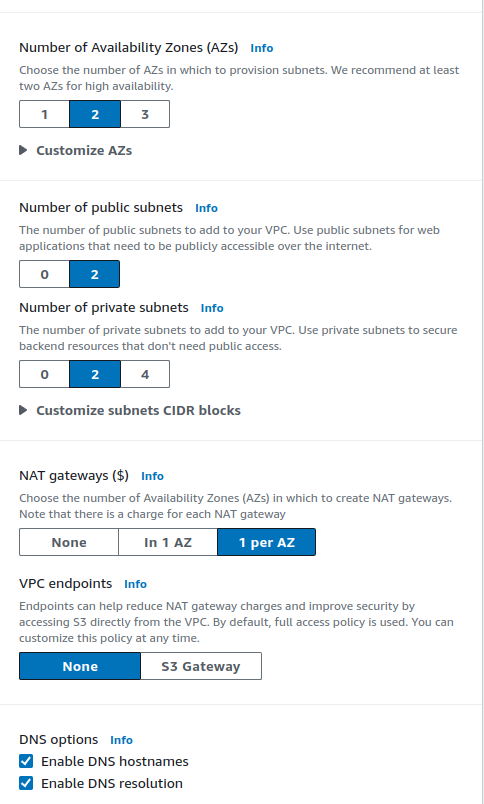
Keep the rest of the configuration as default.
Result:-
The preview will look like this:
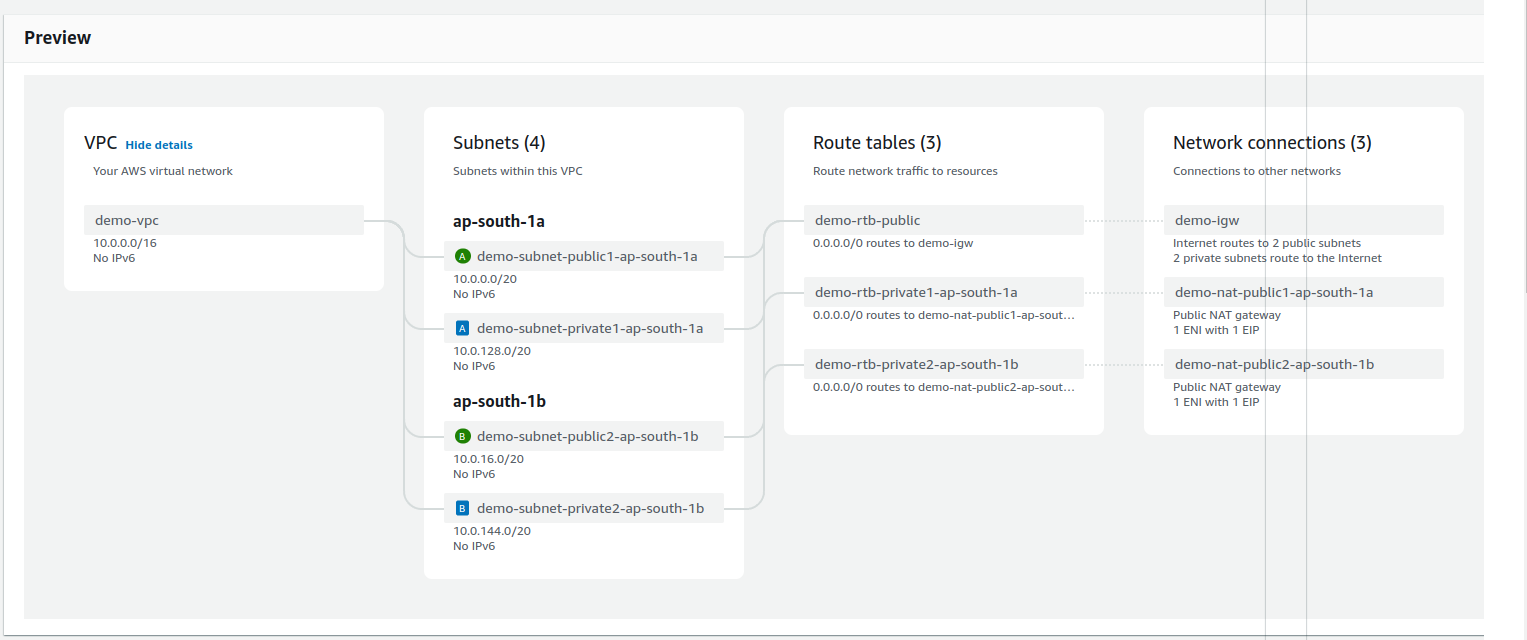
Route tables are used to give direction to the network flow happening inside. A route table is a set of rules which determines where the network from our subnets or gateway is dedicated.
While creating, it will go through several steps like this:-
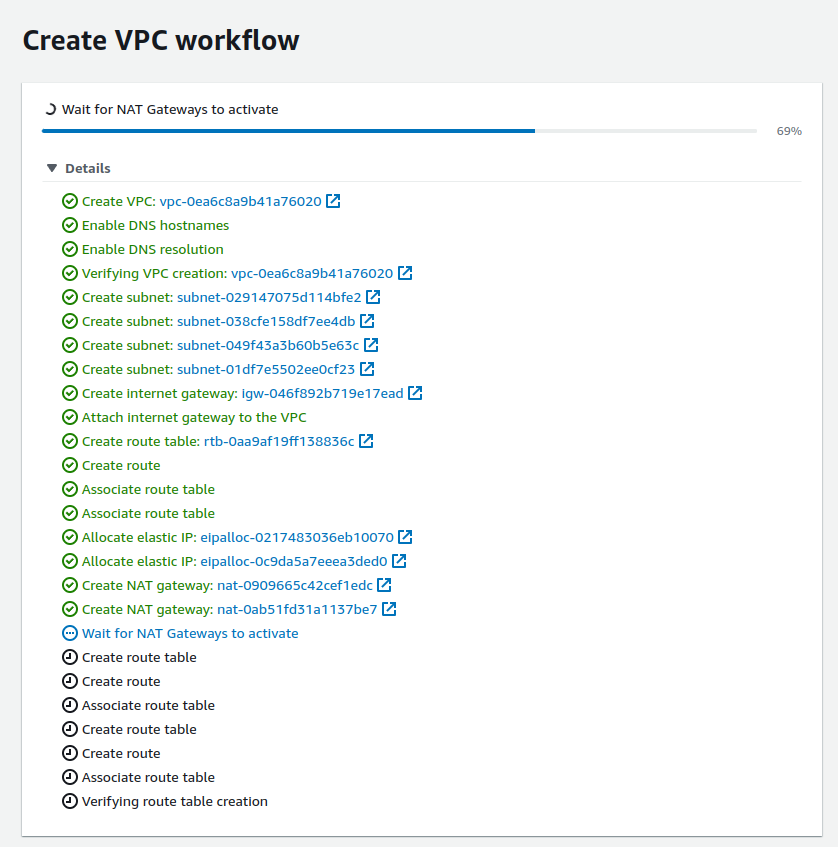
It may take some time for the NAT Gateways to activate. Go through each step to understand the components getting created. Click on
view vpcto see it in a dashboard.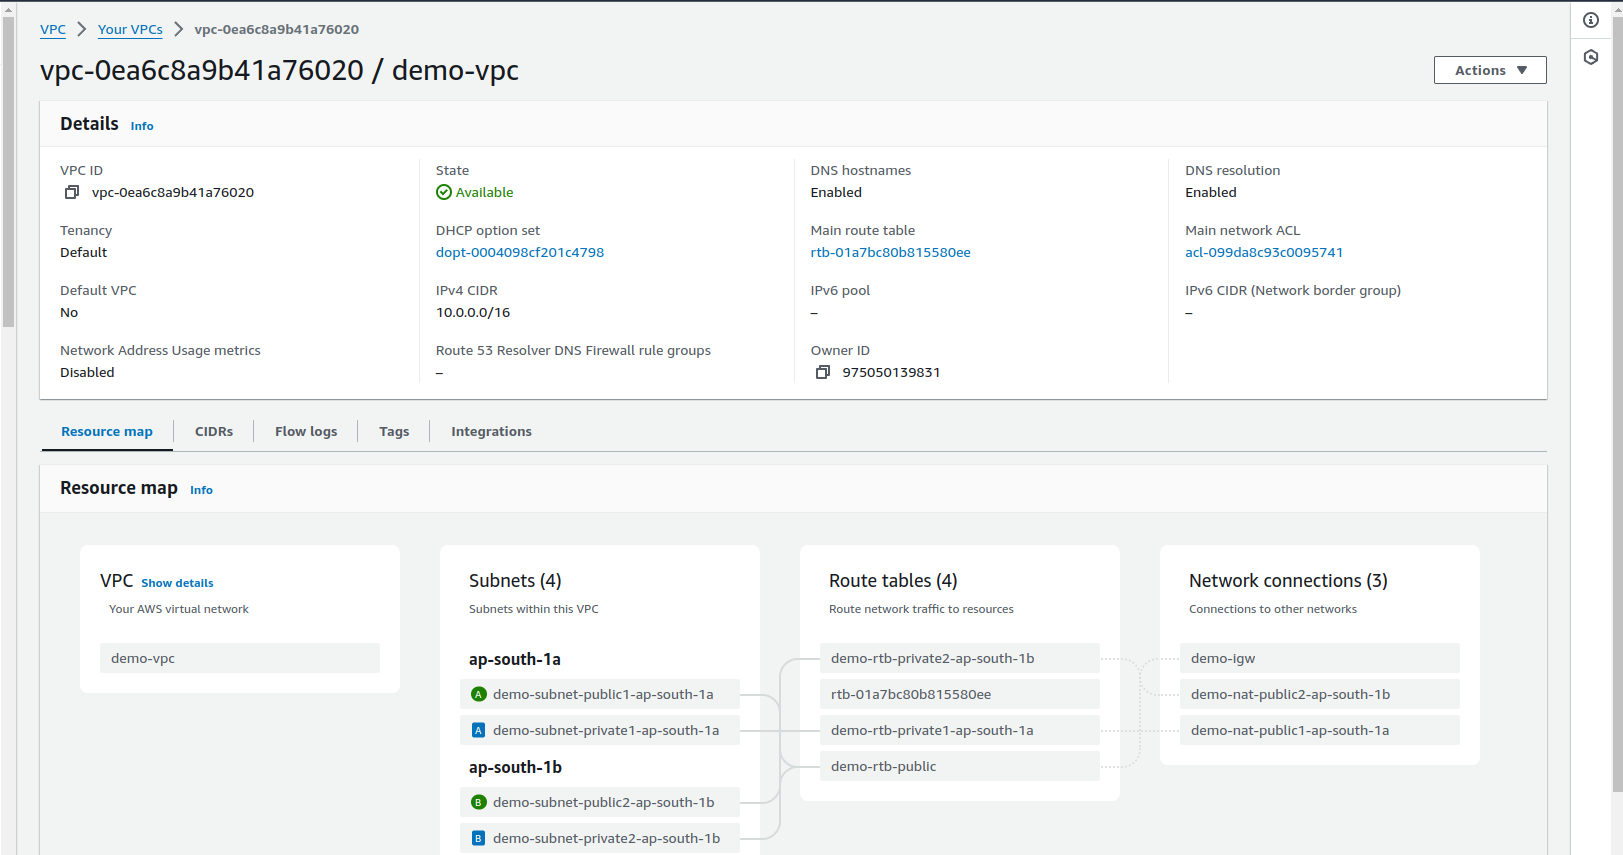
Second step: Create an auto-scaling group
Go to the services and search for an auto-scaling group
Click on Create ASG ( Auto Scaling Group)
In the below, there is an option
create a launch template. Left-click on it and open it in a new tab.Give name and description
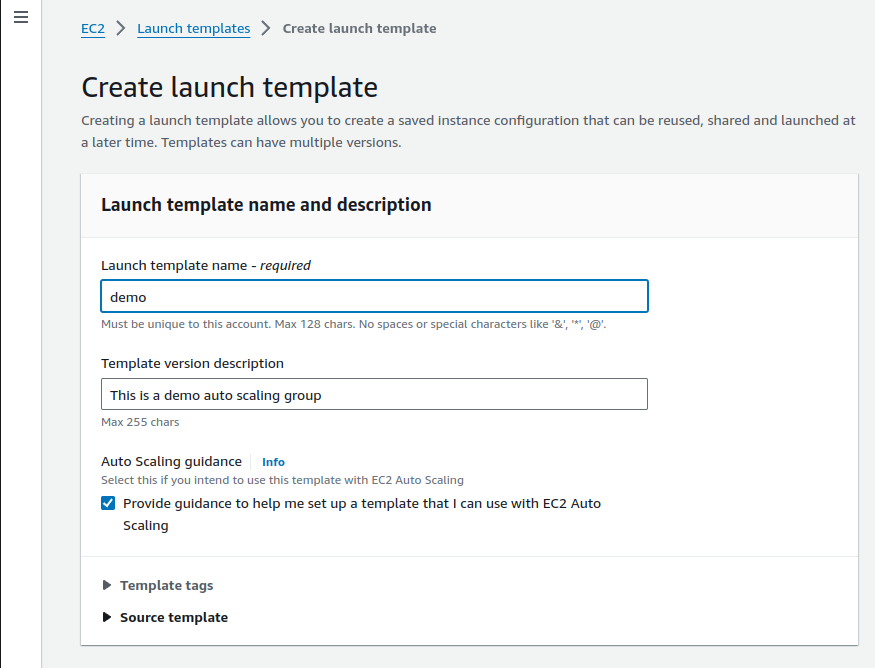
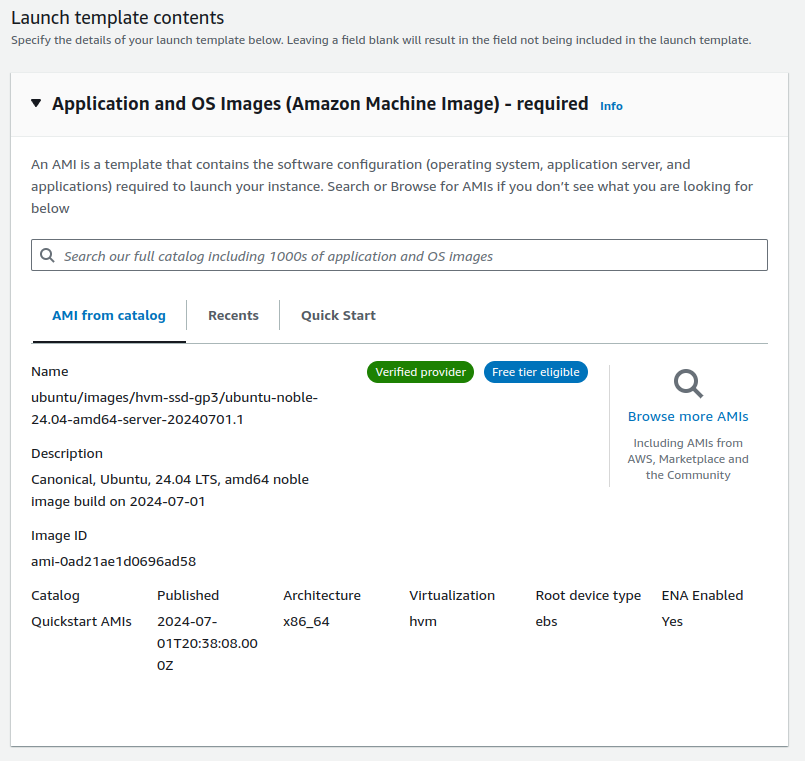
In the AMI (Amazon Machine Image) section select Ubuntu.
Select instance type as
t2.micro(free tier eligible) and your key pair as a key pair login. My key pair is named asUbuntu-key-pair.pem. If you don't have one, create a new one.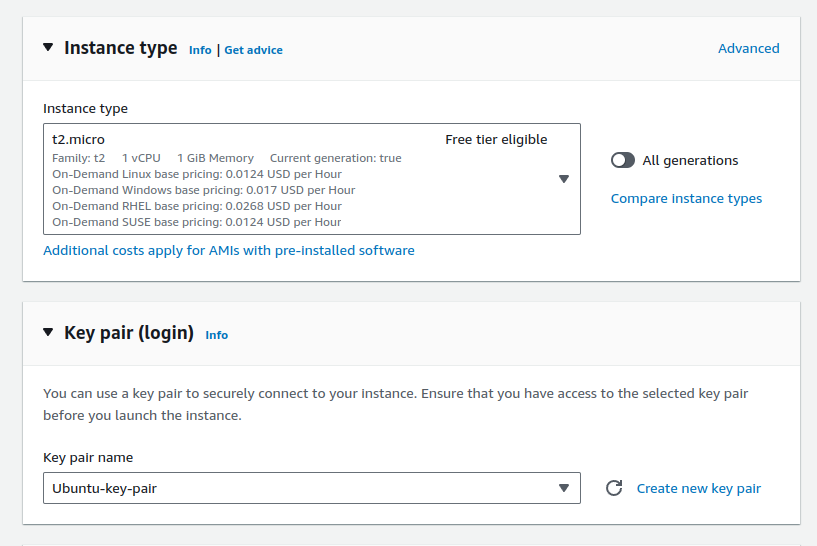
In the
network settingsarea, select Create Security Group and make sure to select VPC asdemo-vpc.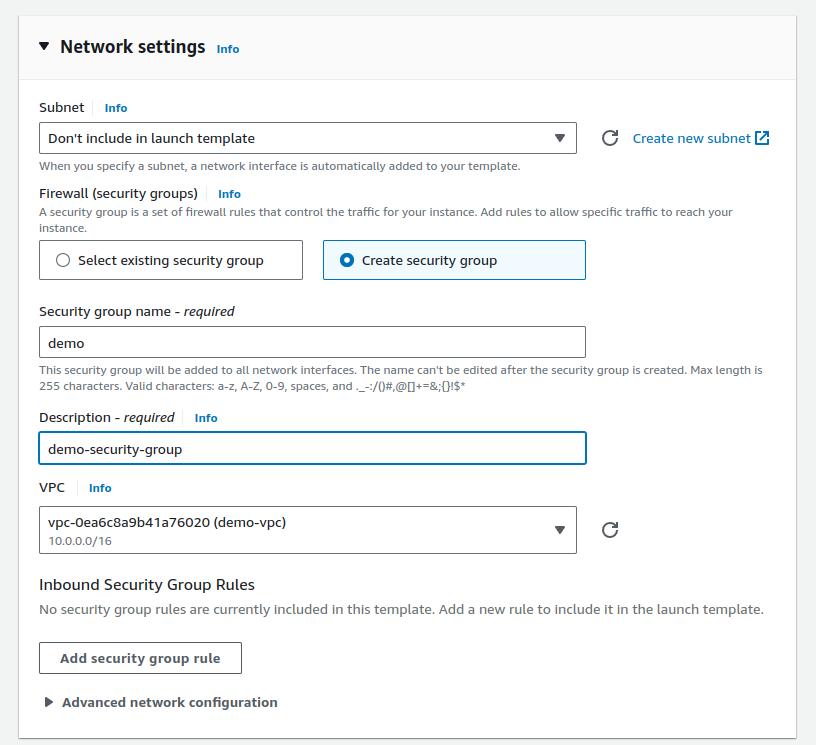
In the inbound security rules, add these 2 rules:
sshandcustom TCP at port 8000cause we will be deploying a Python application that will run on port 8080.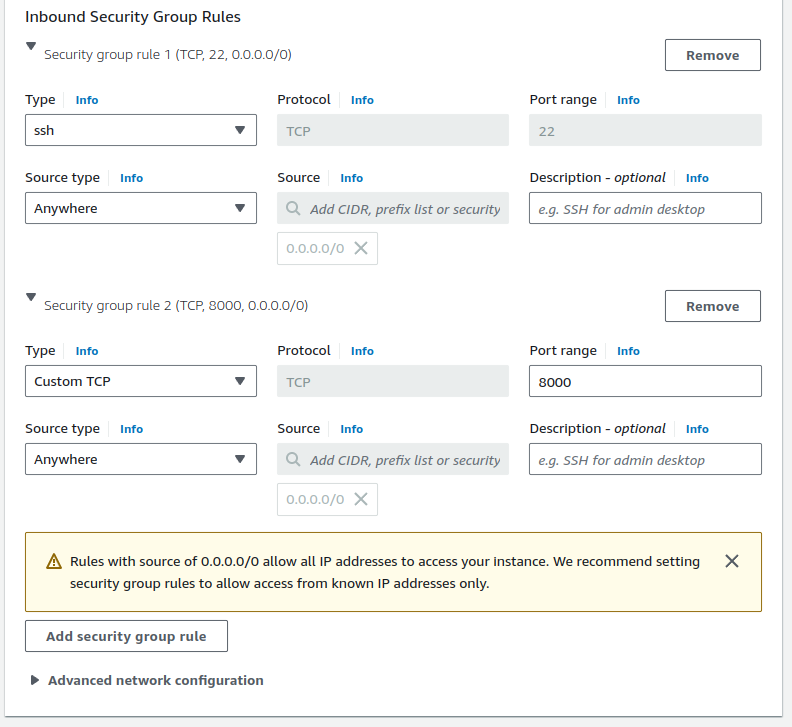
click on
create launch templatenow. You can also view it in the dashboard there.Return to the auto-scaling group select the template we just created and click next.
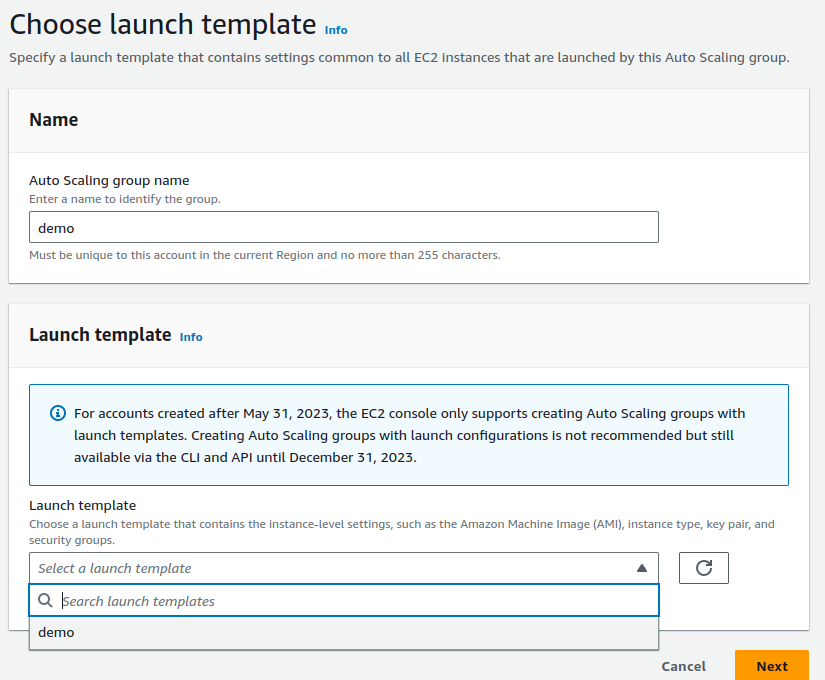
In the
Choose instance launch options, in the network section, choose VPC as our recently createddemo-vpc.Select
Availability Zones and subnetsthe private subnets of each availability zone as according to our configuration, Autoscaling groups will be present in the private subnets.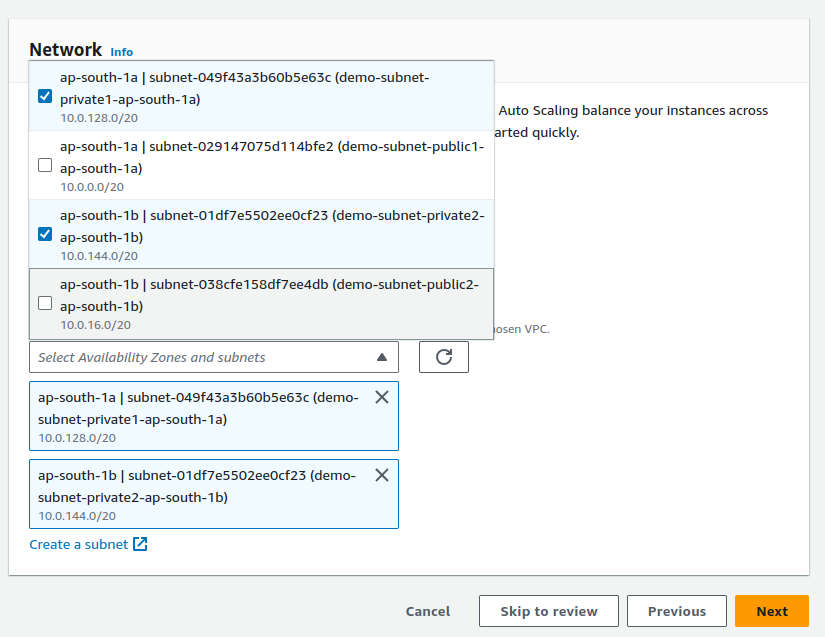
On the next page click on
nextas we don't need any load balancer in theprivate subnet. We need it in thepublic subnet.Select desired capacity as 2, minimum desired capacity as 2, and maximum desired capacity as 4. You can set the values according to you. Keep the rest of the things by default.
Next -> Next -> Create autoscaling group
After creating this, we will see two instances are getting started in different AZones. Do a reverse check by checking the EC2 dashboard.
Third step: Bastion host or Jump server
What is a bastion host?
As we don't have the public IP of the instances inside the private subnet, to deploy the application we will use one extra instance which will ssh into instances inside private subnets. So basically, a special purpose instance that provide secure access to our instances in private subnets.
To create a jump server, go to the EC2 service and create it just like we create a normal Ubuntu EC2 t2.micro instance while keeping these things in mind:
The key pair .pem file is downloaded.
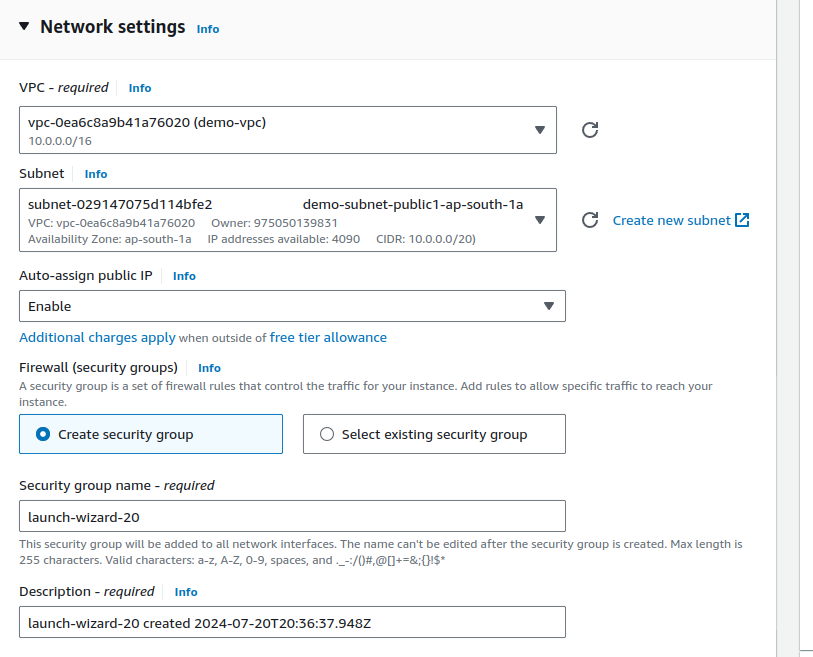
Make sure in the network settings you are selecting our created
demo-vpcas the VPC and checkingAuto-assign public IPas enable.Select subnet as public subnets and not private subnets.
Fourth step: Download the application
Connect the bastion host.
From your local PC ( where the .pem file is located), securely copy the key-pair
.pem fileusing the below command and make sure to replace the/path/to/your-key.pem,/path/to/local/file,username,instance-ipand the path you want to save this .pem file in the bastion host/path/to/destination.scp -i /path/to/your-key.pem /path/to/local/file username@instance-ip:/path/to/destination # exp: scp -i /home/bandhan/Downloads/Ubuntu-key-pair.pem /home/bandhan/Downloads/Ubuntu-key-pair.pem ubuntu@15.206.28.240:/home/ubuntuNow check the instance, there will be your .pem file.

Now use this file to access the instances in the private subnet using SSH. Use the private IP of those instances.
For example: To connect to the instance with a private IP and DNS name
ip-10-0-136-205.ap-south-1.compute.internal. Connect with the command;ssh -i Ubuntu-key-pair.pem ubuntu@10.0.136.205ssh -i <key-pair>.pem ubuntu@<priv_ip>After ssh, create an index.html file using the below command. Copy and paste to your bash and press enter.
 echo '<!DOCTYPE html>
 <html lang="en">
 <head>
     <meta charset="UTF-8">
     <meta name="viewport" content="width=device-width, initial-scale=1.0">
     <title>Python App</title>
     <style>
         body {
             background-color: #000;
             color: #0f0;
             font-family: Arial, sans-serif;
             text-align: center;
             margin-top: 20%;
         }
         .emoji {
             font-size: 2em;
         }
     </style>
 </head>
 <body>
     <div>
         <span class="emoji">🐍</span>
         <h1>Python App</h1>
         <p>AP-South-1A</p>
     </div>
 </body>
 </html>' > index.html
and that, run the following Python command to start the server on port 8080.
python3 -m http.server 8000
Fifth step: Load balancer and target group for public subnet
Go to Load Balancer and select
application load balancerGive a name of your choice.
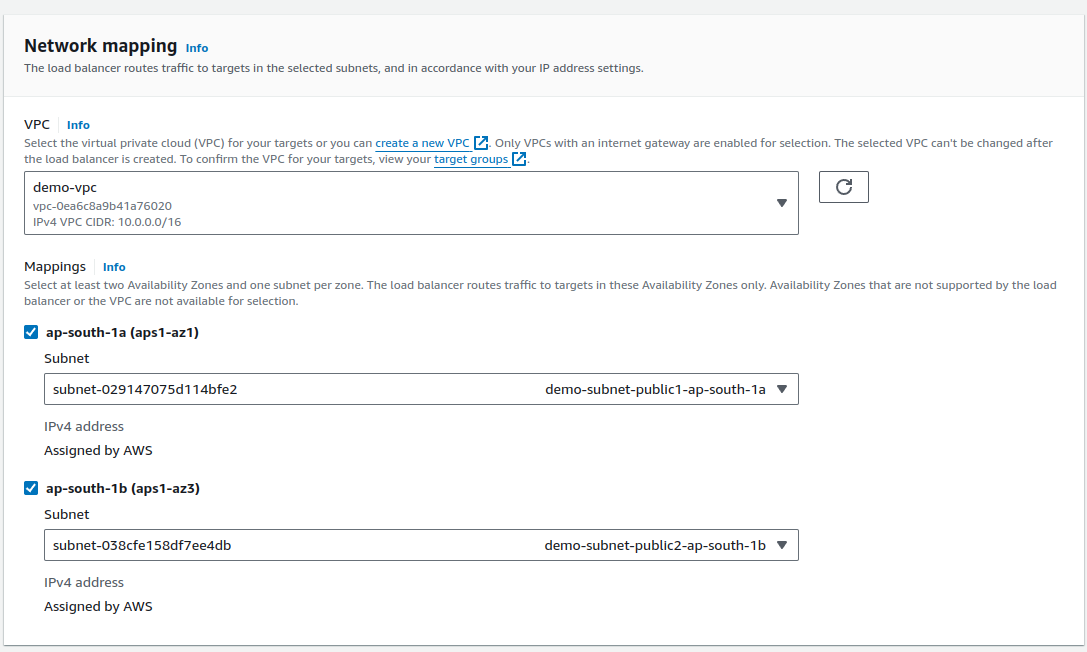
In the network mapping section, select VPC as the VPC we created (
demo-vpc).Select mapping as the public subnet of each AZ. Otherwise, it will throw an error.
Select security group as both
demoanddefault
Keep port as 80 as we will be accessing the load balancer at port 80.
Next, click on target groups and click on
create target group
In the configuration, the target type will be instances. The protocol port will be
8000as our application will run on port 8000.
Select VPC as the one we created & keep the rest of the things as default and give the name as
demoand click on next.From the list of the running instances, select the instances that are not bastion hosts and got created via autoscaling group in the private subnet and continue after clicking on create as pending below.

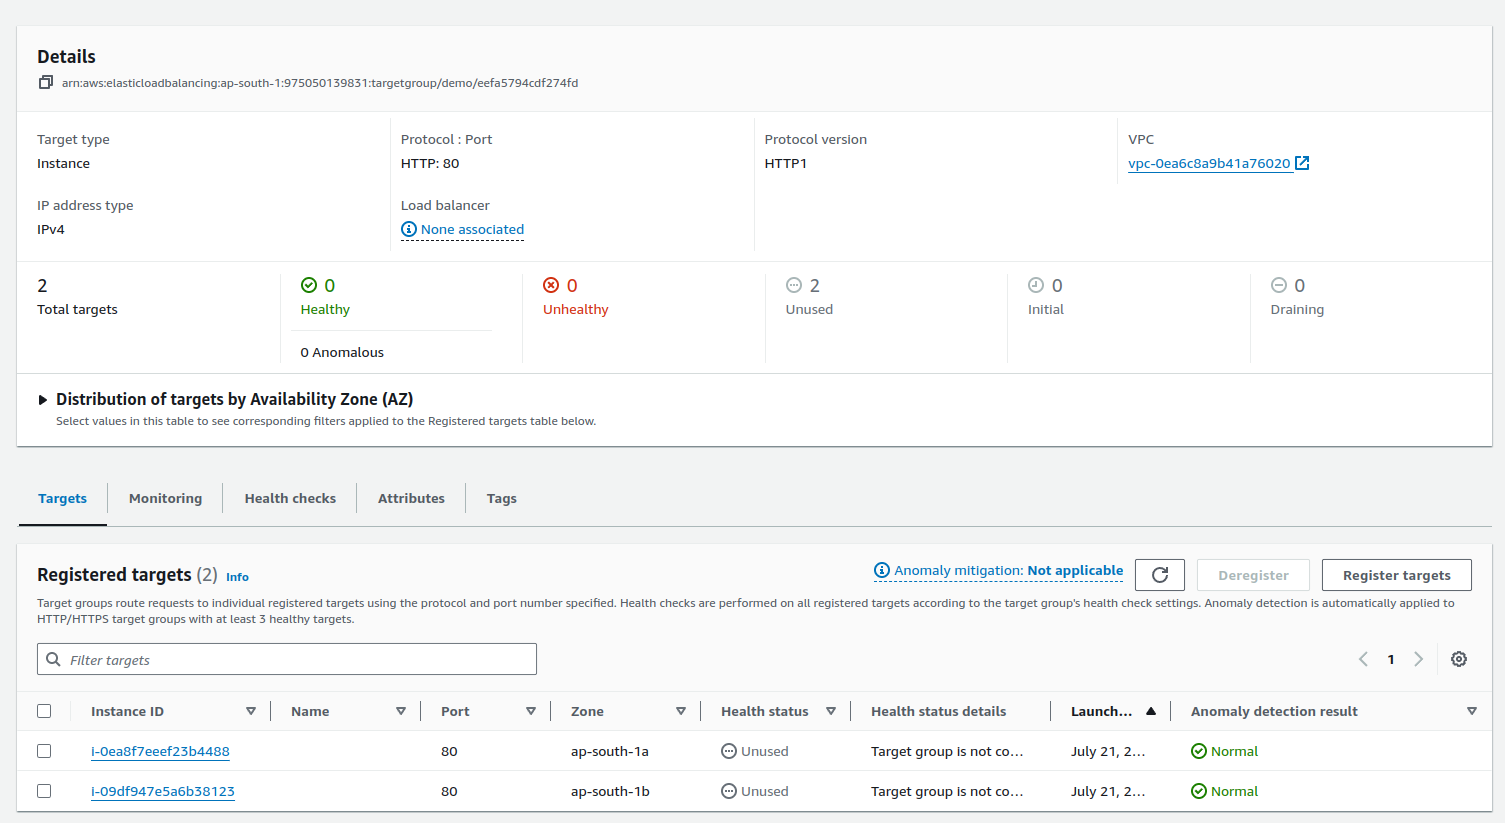
Go back to the load balancer settings and select target groups as
demo. And click on create load balancer.Tips: Refresh the page if target group is not showing
In the Load Balancer, the security group which are attached, check that TCP port 80, 8000 and SSH is allowed or not. If not, then allow them with editing the inbound rule.
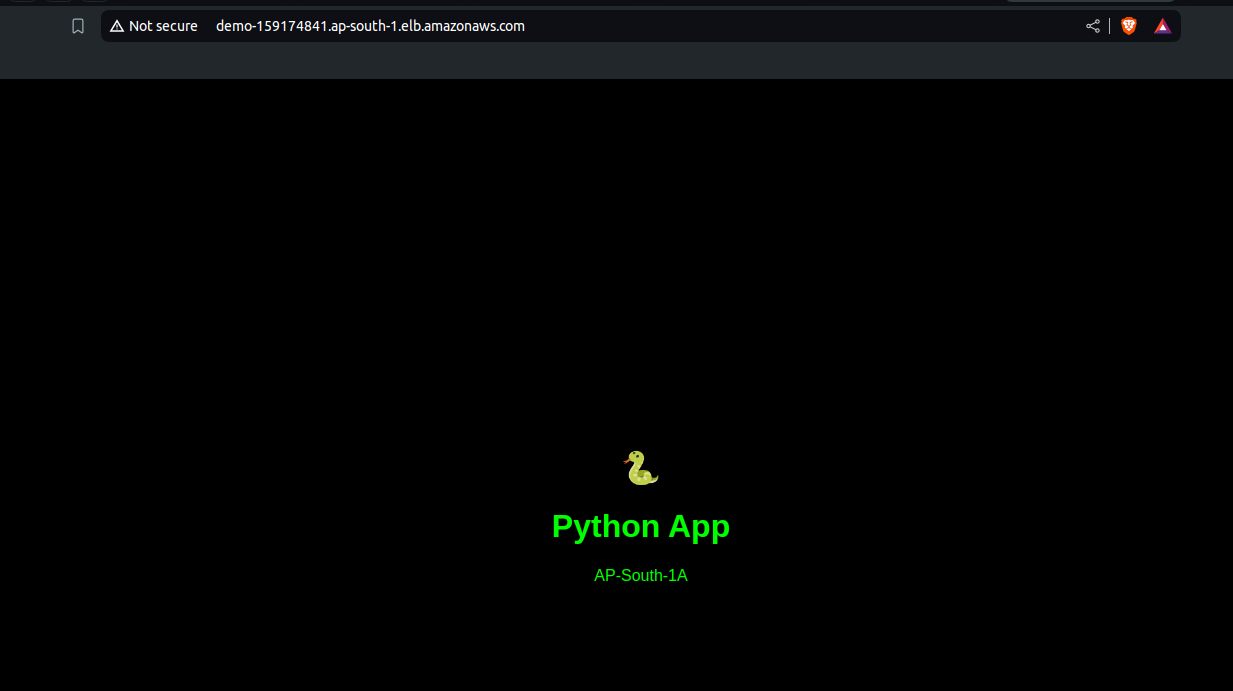
After that, grab the DNS of Load Balancer and paste it to a browser.
Sixth step: SSH the other remaining instance and install another application.
SSH into that with private IP and .pem file.
Run this
 echo '<!DOCTYPE html>
 <html lang="en">
 <head>
     <meta charset="UTF-8">
     <meta name="viewport" content="width=device-width, initial-scale=1.0">
     <title>Python App</title>
     <style>
         body {
             background-color: #000;
             color: #0f0;
             font-family: Arial, sans-serif;
             text-align: center;
             margin-top: 20%;
         }
         .emoji {
             font-size: 2em;
         }
     </style>
 </head>
 <body>
     <div>
         <span class="emoji">🐍</span>
         <h1>Python App</h1>
         <p>AP-South-1B</p>
     </div>
 </body>
 </html>' > index.html
Also, run this to start the server
python3 -m http.server 8000
Last step: Check if it is working or not
Reload fast the site, sometimes it shows this AP-SOUTH-1B
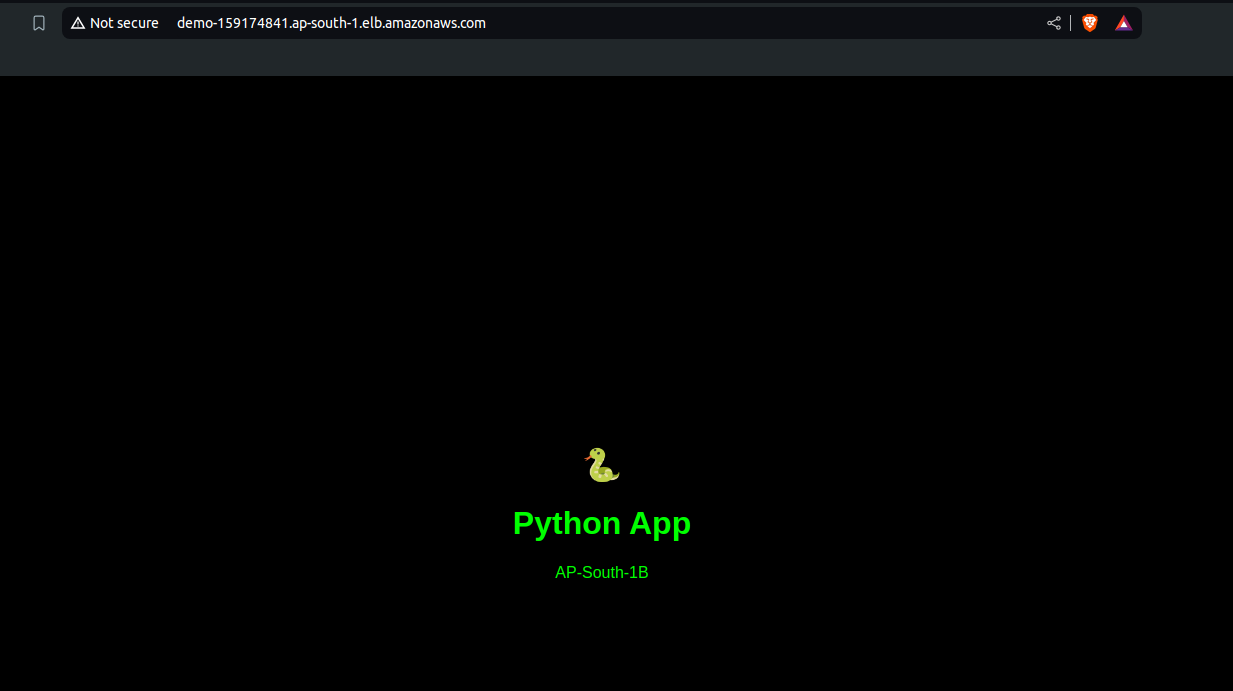
and sometimes it shows this AP-SOUTH-1A

We finally reached our goal to securely deploy application inside of a VPC.
Yay 🎉
Subscribe to my newsletter
Read articles from Bandhan Majumder directly inside your inbox. Subscribe to the newsletter, and don't miss out.
Written by

Bandhan Majumder
Bandhan Majumder
I am Bandhan from West Bengal, India. I write blogs on DevOps, Cloud, AWS, Security and many more. I am open to opportunities and looking for collaboration. Contact me with: bandhan.majumder4@gmail.com