Everything You Need To Know About Caching in NextJs
 9th Tech
Introduction
Although Next.js is a fantastic framework that greatly simplifies the process of developing intricate server-rendered React applications, there is one major issue. The caching mechanism of Next.js can quickly result in hard-to-debug and hard-to-fix issues in your code.
If you are unfamiliar with Next.js caching technique, you may feel as though you are always at odds with it rather than enjoying the advantages of its potency. For this reason, I'll explain in detail each component of Next.js cache functions in this post so you can finally stop battling with it and benefit from its amazing performance.
Here's a picture showing how all of Next.js caches work together. This may seem daunting, but by the end of this article you will know exactly what each stage in this procedure entails and how they work together.
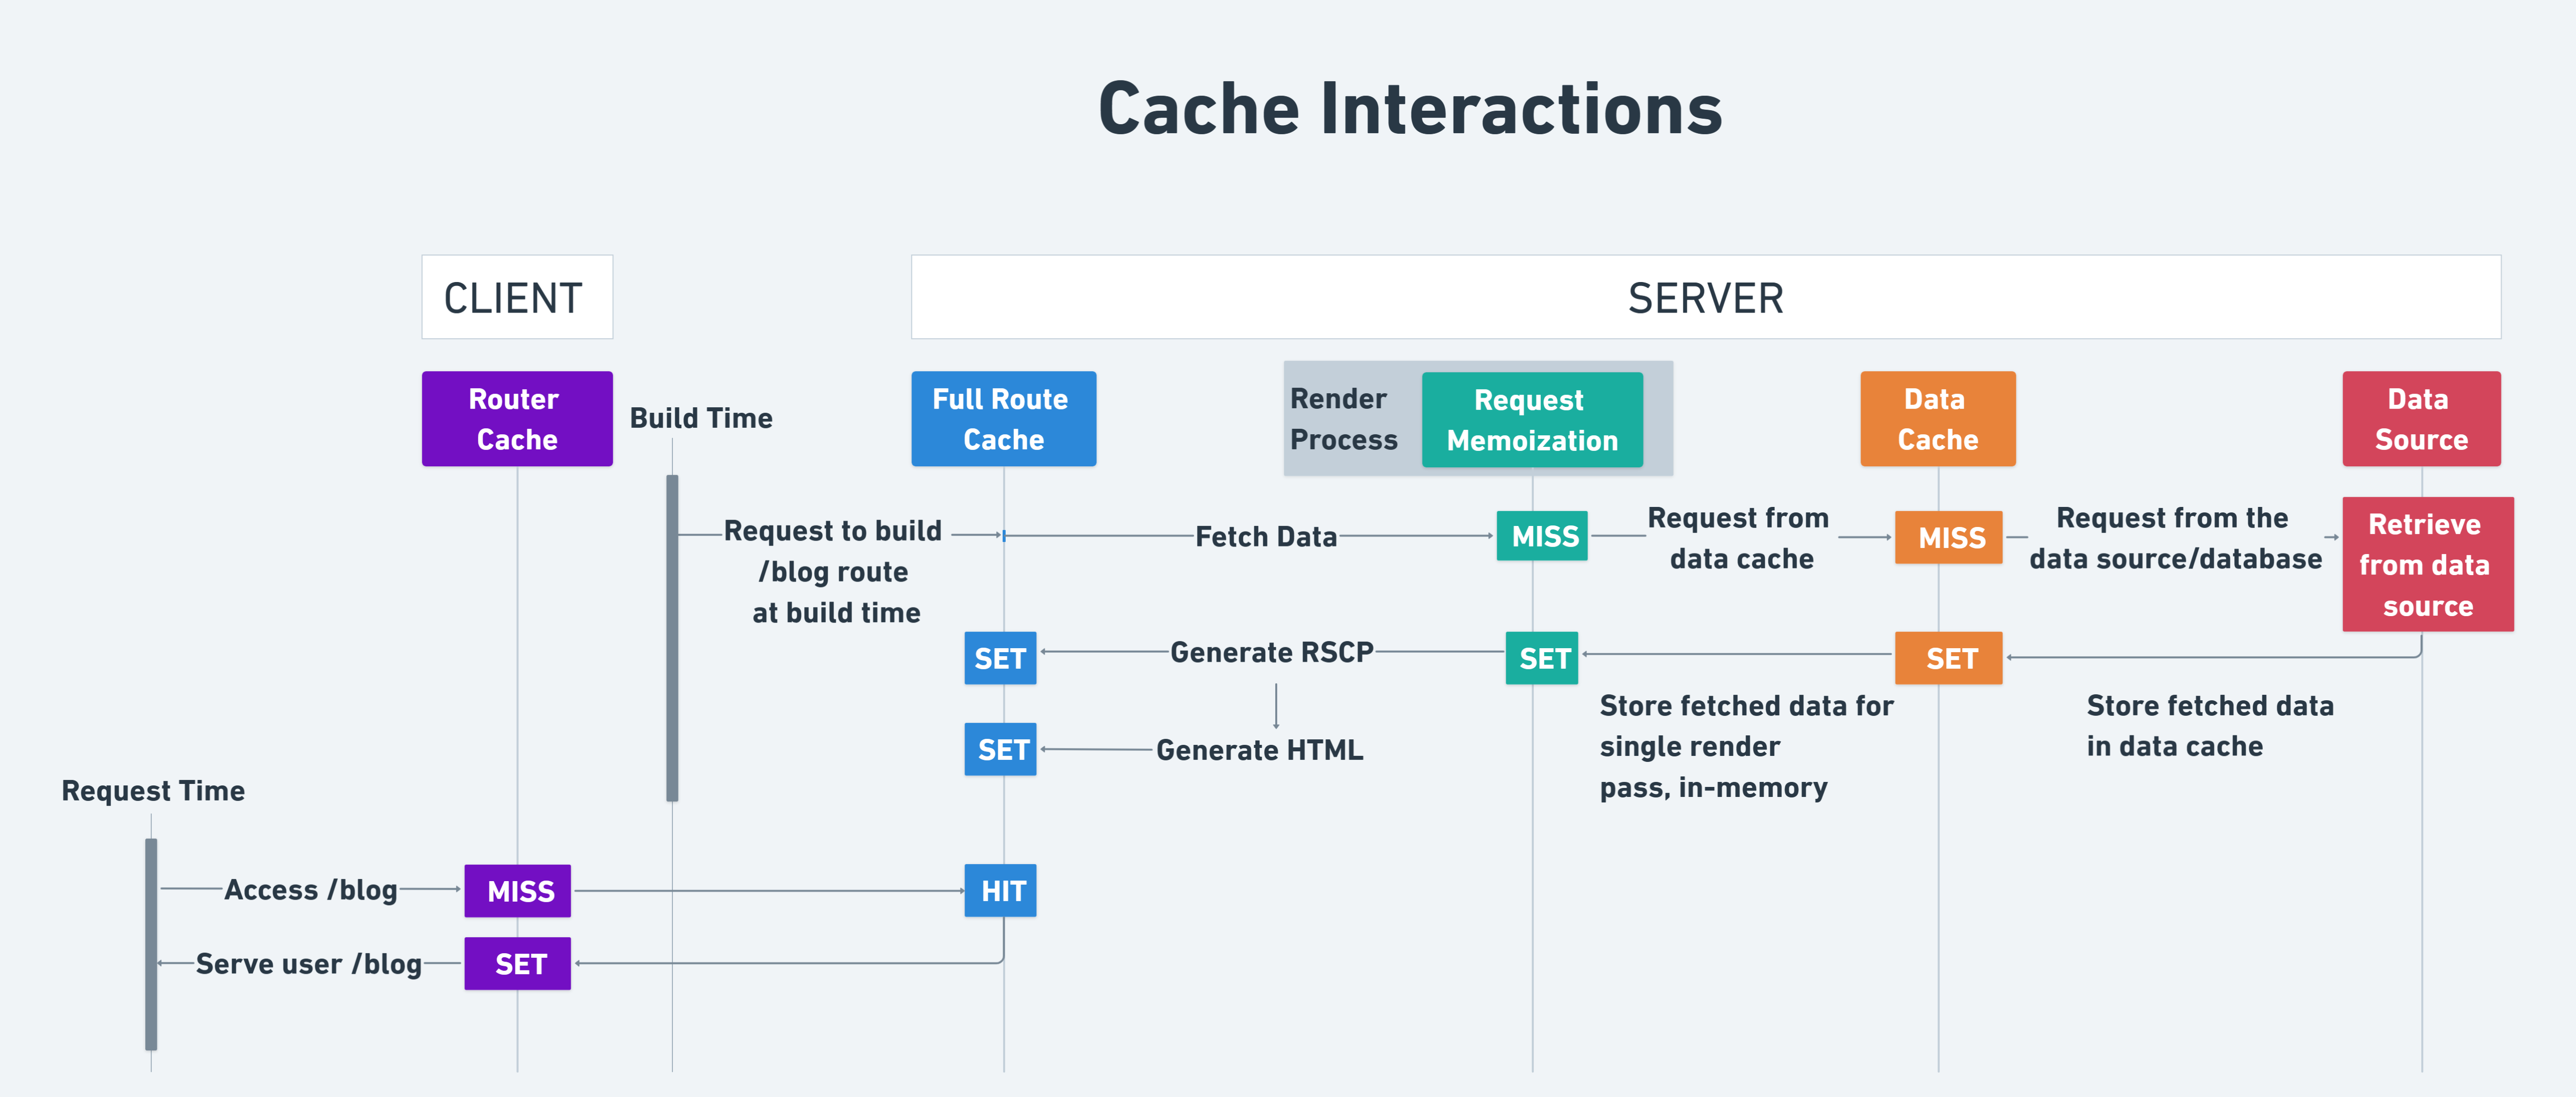
Noticed the terms "Build Time" and "Request Time" in the image above? Let me clarify these before we proceed so that there is no confusion moving forward through the article.
Build time is how long it took an application to build and deploy. The time cache will include anything that is cached during this process, which is primarily static stuff. Only when the application is rebuilt and redeployed does the build time cache get updated.
When a user requests a page, it is referred to as request time. Since we want to retrieve the data straight from the data source when the user makes queries, most data that is stored at request time is dynamic.
Caching Mechanisms
Understanding NextJs caching may appear difficult at first. Maybe because it is made up of four independent caching techniques, each of which operates at a different level of your application and interacts in ways that may appear complex
Four of which are:
Request Memoization
Data Cache
Full Route Cache
Router Cache
For each of the above, I'll go over their specialized responsibilities, where they're kept, how long they last, and how to manage them efficiently, including how to invalidate the cache and opt out. By the end of this article, you'll have a good understanding of how these methods work together to improve Next.js performance, it's going to be a deep dive, buckle up.
Request Memoization
One typical issue in React is the necessity to display the same information several times on the same page. The simplest way is to merely fetch the data at both locations where it is required, however this is not ideal because you are now sending two calls to your server for the identical data. Here's where Request Memorization comes in.
Request Memoization is a React feature that caches every fetch request made in a server component during the render cycle (the process of generating all of the components on a page). This means that if you perform a fetch request in one component and then repeat it in another, the second fetch request will not send a request to the server. Instead, it will use the cached value from the initial fetch call.
export default async function fetchUserData(userId) {
  // The `fetch` function is automatically cached by Next.js
  const res = await fetch(`https://api.example.com/users/${userId}`)
  return res.json();
}

export default async function Page({ params }) {
  const user = await fetchUserData(params.id)

  return <>
    <h1>{user.name}</h1>
    <UserDetails id={params.id} />
  </>
}

async function UserDetails({ id }) {
  const user = await fetchUserData(id)
  return <p>{user.name}</p>
}
The code above includes two components: Page and UserDetails. The first call to the fetchUserData() function in Page executes a fetch request as usual, but the result value is saved in the Request Memoization cache. The second call to fetchUserData by the UserDetails component does not result in a new "fetch" request. Instead, it utilizes the memoized value from the first time this fetch request was sent. This little enhancement significantly improves the performance of your application by lowering the number of requests sent to your server. It also makes it easier to design components because you don't have to worry about optimizing your fetch requests.
It is good to note that this cache is solely stored on the server, therefore it will only cache fetch requests done by your server components. Furthermore, this cache is totally erased at the start of each request, so it is only valid for the duration of one render cycle. This is not a problem, however, because the sole goal of this cache is to reduce duplicate fetch calls within a single render cycle.
Finally, it is also good to note that this cache will only save fetch requests made using the GET method. To be memoized, a fetch request must have the identical parameters (URL and options).
Caching Non-fetch Requests
By default, React caches just fetch requests, but you may want to cache other types of requests, such as database requests. To accomplish this, we can use React's cache function. Simply send the function you want to cache to cache, and it will return a memoized version of the function.
import { cache } from "react"
import { queryDatabase } from "./databaseClient"

export const fetchUserData = cache(userId => {
  // Direct database query
  return queryDatabase("SELECT * FROM users WHERE id = ?", [userId])
})
The first time fetchUserData() is used, it asks the database directly because there is no cached result. However, the following time this function is called with the same userId, the data is fetched from the cache. This Memoization, like fetch, is only valid for a single render pass and works in the same way.
Revalidation
Revalidation is the process of clearing a cache and populating it with new data. This is vital because if you don't refresh your cache, it will ultimately get stale and out of date. Fortunately, using Request Memoization, we don't have to worry about this because the cache is only valid for the duration of a single request and never needs to be revalidated.
Opting out
To opt out of this cache, we can provide an AbortController signal as a parameter in the fetch request.
async function fetchUserData(userId) {
  const { signal } = new AbortController()
  const res = await fetch(`https://api.example.com/users/${userId}`, {
    signal,
  })
  return res.json()
}
This will instruct React not to cache this fetch request in the Request Memoization cache, however I would not advice doing so unless you have a compelling reason, as this cache is really valuable and can significantly improve the performance of your application.
The image below illustrates how Request Memorization works.

NOTE
Data Cache
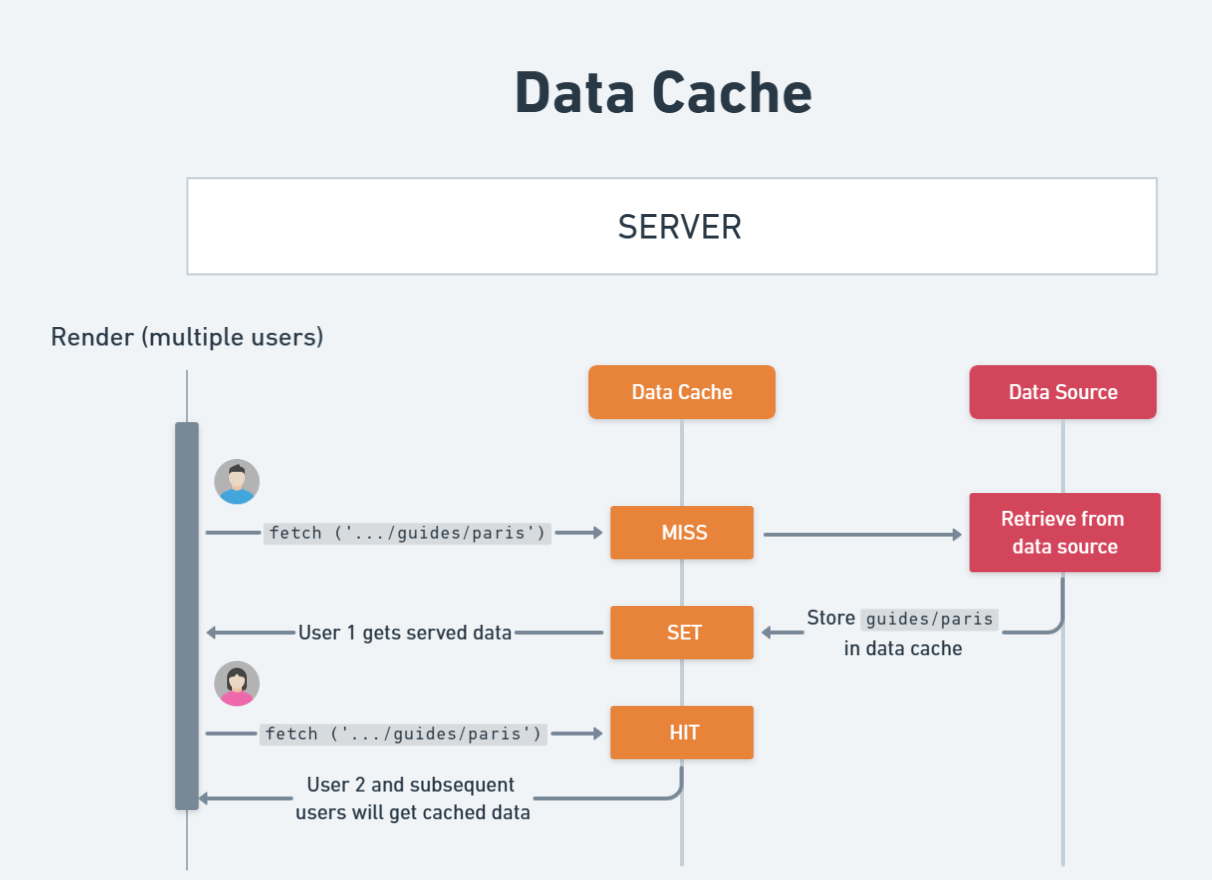
Request Memoization is useful for improving your app performance by reducing duplicate fetch requests, however it is ineffective for caching data across requests/users. This is where data caches come in. It is the final cache touched by Next.js before it retrieves your data from an API or database, and it is persistent over several requests/users.
Assume we have a basic page that requests an API to obtain guide info for a certain city.
export default async function Page({ params }) {
  const city = params.city
  const res = await fetch(`https://api.globetrotter.com/guides/${city}`)
  const guideData = await res.json()

  return (
    <div>
      <h1>{guideData.title}</h1>
      <p>{guideData.content}</p>
      {/* Render the guide data */}
    </div>
  )
}
This guide data doesn't change very often, therefore it doesn't make sense to fetch it every time someone requires it. Instead, we should cache that data across all queries so that it loads quickly for future users. Normally, this would be a hassle to construct, but Next.js handles it automatically with the Data Cache.
By default, every fetch request in your server components is cached in the Data Cache (which is located on the server) and used for all subsequent queries. This implies that if you have 100 users all seeking the same data, Next.js will make a single fetch request to your API and then cache that data for all 100 users.
Duration
The Data Cache differs a lot from the Request Memoization cache that it does not clear data unless you explicitly tell Next.js to do so. This data is even persisted across deployments, so when you deploy a new version of your application, the Data Cache is not emptied.
Revalidation
Since Next.js never clears the Data Cache, we need a mechanism to opt into revalidation, which is just the act of deleting data from the cache. In Next.js, there are two methods for doing this: time-based revalidation and on-demand revalidation.
Time-based Revalidation
The simplest technique to revalidate the Data Cache is to clear it automatically after a set amount of time. This can be accomplished in two ways.
const res = fetch(`https://api.globetrotter.com/guides/${city}`, {
  next: { revalidate: 3600 },
})
The first option is to add the next.revalidate parameter to your fetch request. This tells Next.js how long your data should be cached before it becomes stale. In the above example, we instruct Next.js to revalidate the cache every hour.
Another approach to specify a revalidation period is to use the revalidate segment config option.
export const revalidate = 3600

export default async function Page({ params }) {
  const city = params.city
  const res = await fetch(`https://api.globetrotter.com/guides/${city}`)
  const guideData = await res.json()

  return (
    <div>
      <h1>{guideData.title}</h1>
      <p>{guideData.content}</p>
      {/* Render the guide data */}
    </div>
  )
}
This will cause all fetch requests for this page to revalidate every hour, unless they have a more precise revalidation time configured.
The most important thing to grasp about time-based revalidation is how it manages stale data.
The initial fetch request will retrieve the data and store it in the cache. Each new fetch request made during the 1 hour revalidation interval we specified will use the cached data and generate no more fetch requests. After an hour, the first fetch request will still provide the cached data, but it will also run a fetch request to retrieve the freshly updated data and put it in the cache. This means that each subsequent fetch request will use the newly cached data. This technique, known as stale-while-revalidate, is Next.js uses.
On-demand Revalidation
If your data is not updated on a regular basis, you can utilize on-demand revalidation to refresh the cache only when new data becomes available. This is handy for invalidating the cache and retrieving new data from a blog only when a new article is published or a specified event happens.
This can be accomplished in one of two ways.
import { revalidatePath } from "next/cache"

export async function publishArticle({ city }) {
  createArticle(city)

  revalidatePath(`/guides/${city}`)
}
The revalidatePath function accepts a string path and clears the cache for all fetch requests on that route.
If you want to be more particular about which fetch requests to revalidate, use the revalidateTag function.
const res = fetch(`https://api.globetrotter.com/guides/${city}`, {
  next: { tags: ["city-guides"] },
})
Here, we added the city-guides tag to our fetch request so that it can be targeted using revalidateTag.
import { revalidateTag } from "next/cache"

export async function publishArticle({ city }) {
  createArticle(city)

  revalidateTag("city-guides")
}
Calling revalidateTag with a string clears the cache of all fetch requests containing that tag.
Opting out
There are some ways to opt out of the data cache.
no-store
const res = fetch(`https://api.globetrotter.com/guides/${city}`, {
  cache: "no-store",
})
By passing cache: "no-store" to your fetch request, you instruct Next.js not to cache this request in the Data Cache. This is useful when you have data that is continuously changing and want to fetch fresh each time. You may also use the noStore function to disable the Data Cache for all operations inside its scope.
import { unstable_noStore as noStore } from "next/cache"

function getGuide() {
  noStore()
  const res = fetch(`https://api.globetrotter.com/guides/${city}`)
}
unstable_, but it will be the recommended means of opting out of the Data Cache in future versions of Next.js.This is an decent approach to opt out of caching on a per-component or per-function basis, as all other opt-out methods will disable the Data Cache for the entire page.
export const dynamic = 'force-dynamic'
If we want to change the caching behavior for a full page rather than just a single fetch request, we can add this segment configuration option to the top level of our file. This forces the page to be dynamic and completely removes it from the Data Cache.
export const dynamic = "force-dynamic"
export const revalidate = 0
Another way to opt out the full page from the data cache is to use the revalidate segment config option with a value of 0.
export const revalidate = 0
This line is roughly the page-level equivalent of cache: "no-store". It applies to all requests on the page, guaranteeing that nothing is cached.
Caching Non-fetch Requests
So far, we've just seen how to cache fetch requests using the Data Cache, but there's a lot more we can do.
If we return to our prior example of city guides, we may want to extract data directly from our database. For this, we can use the default Next.js' cache function. This is similar to the React cache method, however it applies to the Data Cache rather than Request Memoization.
import { getGuides } from "./data"
import { unstable_cache as cache } from "next/cache"

const getCachedGuides = cache(city => getGuides(city), ["guides-cache-key"])

export default async function Page({ params }) {
  const guides = await getCachedGuides(params.city)
  // ...
}
unstable_, but it is the only way to cache non-fetch requests in the Data Cache.The code above is brief, but it may be perplexing if you are unfamiliar with the cache function.
The cache function accepts three parameters (but only two are required). The first option specifies which function you want to cache. In this example, it's the getGuides function. The second option specifies the cache key. Next.js needs a key to determine which cache is which. This key is an array of strings that must be unique for each cache you own. If two cache functions receive the same key array, they will be treated as the same request and stored in the same cache(similar to a fetch request with the same URL and params).
The third parameter is an optional options parameter that allows you to specify things like revalidation time and tags.
In our code, we cache the results of our getGuides function and store them in the cache under the key ["guides-cache-key"]. This means that if we call getCachedGuides with the same city twice, it will use the cached data rather than call getGuides again.
Full Route Cache
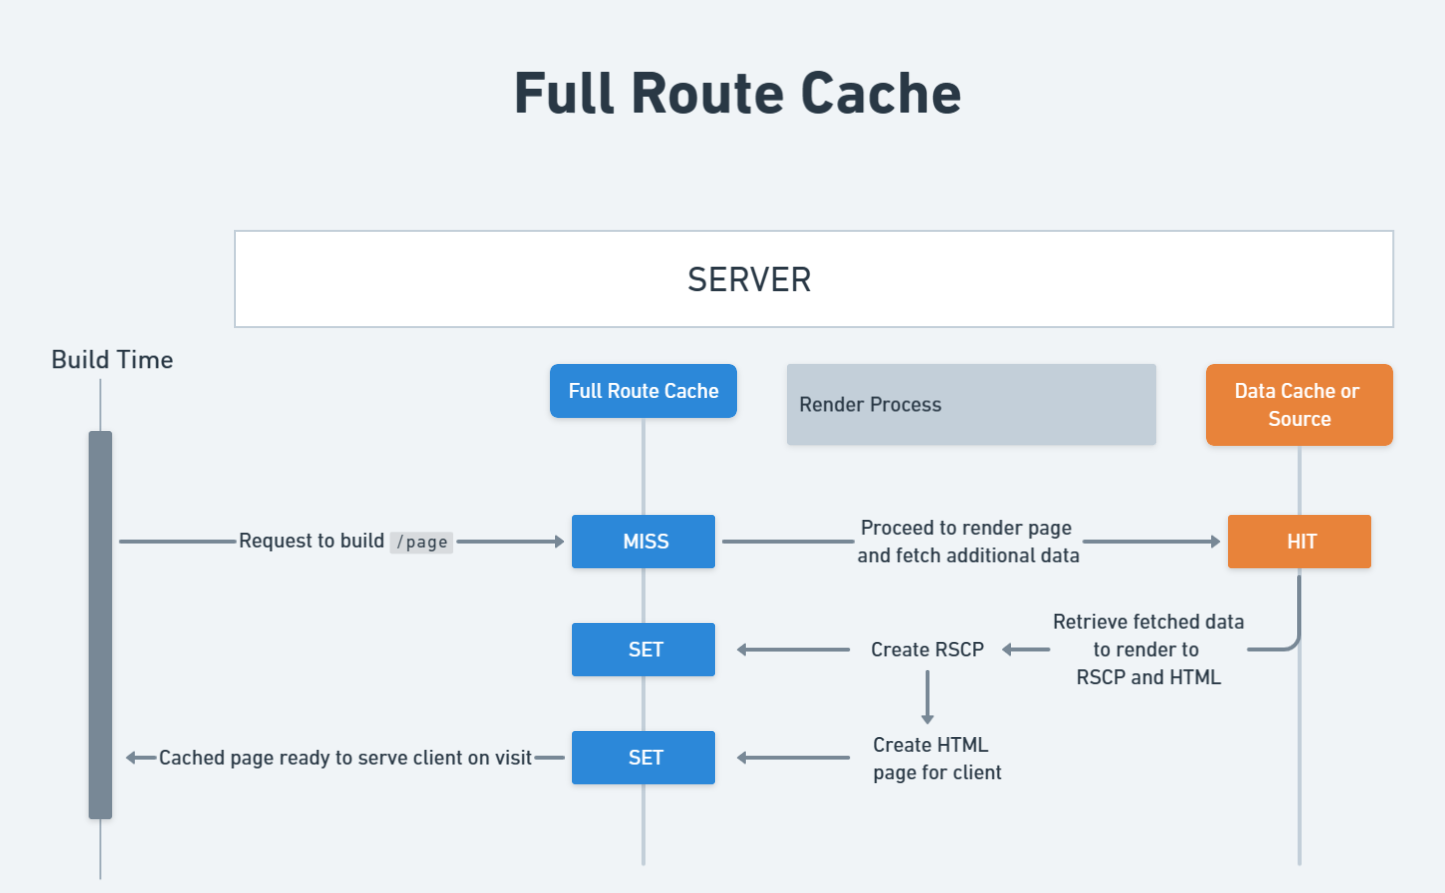
The third form of cache is the Full Route Cache, which is easier to grasp because it has far less configuration options than Data Cache. The major reason this cache is useful is because it allows Next.js to cache static pages at build time rather than having to generate them for each request separately.
In Next.js, the pages we serve to our clients are made up of HTML plus something called the React Server Component Payload. The payload includes instructions for how the client components should interact with the rendered server components to render the page. The Full Route Cache keeps the HTML and RSCP for static pages during the build
Now that we've learned what it saves, let's look at an example.
import Link from "next/link"

async function getBlogList() {
  const blogPosts = await fetch("https://api.example.com/posts")
  return await blogPosts.json()
}

export default async function Page() {
  const blogData = await getBlogList()

  return (
    <div>
      <h1>Blog Posts</h1>
      <ul>
        {blogData.map(post => (
          <li key={post.slug}>
            <Link href={`/blog/${post.slug}`}>
              <a>{post.title}</a>
            </Link>
            <p>{post.excerpt}</p>
          </li>
        ))}
      </ul>
    </div>
  )
}
Page, in the code above, will be cached at build time because it contains no dynamic data. More particular, its HTML and RSCP will be cached in the Full Router Cache so that it can be served more quickly when a user requests access. The only method to change this HTML/RSCP is to redeploy our program or manually invalidate the data cache that this page relies on.
NOTE
fetch request, we have dynamic data; however, Next.js caches this fetch request in the Data Cache, hence this page is deemed static. Dynamic data is data that changes with each page request, such as a dynamic URL parameter, cookies, headers, search parameters, and so on.The Full Route Cache, like the Data Cache, is saved on the server and persists across several requests and users; however, unlike the Data Cache, this cache is emptied each time you relaunch your application.
Opting out
You can opt out of the Full Route Cache in two ways.
The first option is to opt out of the Data Cache. If the data being retrieved for the page is not cached in the Data Cache, the Full Route Cache will not be used.
The second option is to use dynamic data on your page. Dynamic data comprises headers, cookies, and searchParams dynamic functions, as well as dynamic URL parameters like id in /blog/[id].
The image below shows the step-by-step method of how Full Route Cache works.
Router Cache
This final cache is a bit unusual in that it is the only one that is saved on the client rather than on the server. It can also be the source of several issues if not well understood. This is because it caches routes that a user accesses, so when they return to those routes, it utilizes the cached version and never makes a request to the server. While this strategy improves website loading times, it can also be annoying. Let's have a look at why.
export default async function Page() {
  const blogData = await getBlogList()

  return (
    <div>
      <h1>Blog Posts</h1>
      <ul>
        {blogData.map(post => (
          <li key={post.slug}>
            <Link href={`/blog/${post.slug}`}>
              <a>{post.title}</a>
            </Link>
            <p>{post.excerpt}</p>
          </li>
        ))}
      </ul>
    </div>
  )
}
When a user navigates to this website using the code I provided above, the HTML/RSCP is stored in the Router Cache. Similarly, when they visit to any of the /blog/${post.slug} routes, the HTML/RSCP is cached. This means that if the user returns to a previously visited page, it will retrieve the HTML/RSCP from the Router Cache rather than sending a request to the server.
Duration
The router cache is also unusual with its duration because it is determined by the kind of route. Static routes store the cache for 5 minutes, whereas dynamic routes only store the cache for 30 seconds. This means that if a user navigates to a static route and returns within 5 minutes, the cached version will be used. But if they return to it after 5 minutes, it will send a request to the server for the fresh HTML/RSCP. The same holds true for dynamic routes, except that the cache is only stored for 30 seconds rather than 5 minutes.
This cache is also only retained for the user's current session. This means that when the user closes the tab or refreshes the page, the cache is removed.
You may also manually revalidate this cache by removing the data cache created by a server action with revalidatePath/revalidateTag. You can also utilize the router.refresh function, which is available via the useRouter hook in the client. This will require the client to reload the page you are now viewing.
Revalidation
We covered two methods of revalidation in the preceding section, but there are many other options.
We can revalidate the Router Cache on demand, just like we did for the Data Cache. This means that revalidating the Data Cache using revalidatePath or revalidateTag will also revalidate the Router Cache.
Opting out
There is no option to opt out of the Router Cache, but given the variety of ways to revalidate the cache, this is not a major concern(don't take my word for it).
Here's an illustration that illustrates how the Router Cache works.

Conclusion
It can be difficult to understand how different caches function and interact with one another, but hopefully this article has helped. While the official documentation states that understanding of caching is not required to be productive with Next.js, I believe it is extremely beneficial to understand its behavior so that you can adjust the parameters that work best for your specific app.
The table below highlights the four caching techniques and their details.
| Cache | Description | Location | Revalidation Criteria |
| Data Cache | Stores data across user requests and deployments | Server | Time-based or on-demand revalidation |
| Request Memoization | Re-use values in same render pass for efficiency | Server | N/A, only lasts for the lifetime of a server request |
| Full Route Cache | Caches static routes at build time to improve performance | Server | Revalidated by revalidating Data Cache or redeploying the application |
| Router Cache | Stores navigated routes to optimize navigation experience | Client | Automatic invalidation after a specific time or when the data cache is cleared |
Subscribe to my newsletter
Read articles from 9th Tech directly inside your inbox. Subscribe to the newsletter, and don't miss out.
Written by
