Unlocking Jenkins: Advanced Plugin Configuration for a Superior DevOps Pipeline
 Vijay Kumar Singh
The Role of Jenkins in Modern CI/CD Pipelines
In today's fast-paced software development landscape, continuous integration and continuous delivery (CI/CD) have become essential practices for delivering high-quality software efficiently and reliably. At the heart of many CI/CD pipelines lies Jenkins, an open-source automation server that facilitates the automation of various stages of software development, from building and testing to deployment and monitoring.
Overview of Jenkins: A Versatile Tool for DevOps Engineers
Jenkins is a key part of CI/CD pipelines, helping development teams automate and simplify their workflows. By working with various tools and technologies, Jenkins automates repetitive tasks, improves code quality, and speeds up software delivery. Its strong plugin ecosystem allows Jenkins to be customized for any project's specific needs, making it a versatile tool for DevOps engineers.
Importance of Configuring Plugins: Unlocking Jenkin's Full Potential
The real strength of Jenkins comes from its wide range of plugins. These plugins let Jenkins work with other tools and services, making it more powerful and efficient. Setting up these plugins correctly is key to getting the most out of Jenkins in your CI/CD pipeline. Plugins are important at every step of the development process, from source control and project management to build automation and security scanning.
Use Cases:
Software Development Teams:
Scenario: Teams need to implement a CI/CD pipeline.
Solution: The blog provides a guide to set up Jenkins, configure plugins, and integrate tools, automating build, test, and deployment processes.
DevOps Engineers:
Scenario: Setting up Jenkins for a new project.
Solution: Offers instructions on installing Jenkins, configuring plugins, and integrating tools like Git, Jira, and Docker for a robust pipeline.
Organizations Adopting DevOps:
Scenario: Transitioning to a DevOps culture.
Solution: Explains Jenkins' role in automating development workflows, helping organizations improve collaboration and speed up delivery.
Freelancers and Consultants:
Scenario: Setting up CI/CD pipelines for clients.
Solution: Provides a straightforward guide to set up Jenkins, ensuring clients get an automated and well-integrated pipeline.
Students and New DevOps Engineers:
Scenario: Learning CI/CD practices.
Solution: Offers clear, step-by-step instructions to set up Jenkins, giving practical experience in building CI/CD pipelines.
Teams Enhancing Existing Pipelines:
Scenario: Improving an existing Jenkins pipeline.
Solution: Includes tips on integrating new tools and plugins to enhance functionality and efficiency.
Projects with Infrastructure as Code (IaC):
Scenario: Integrating IaC practices.
Solution: Discusses using IaC tools like Terraform with Jenkins to automate infrastructure setup.
Organizations Implementing Security Scanning:
Scenario: Adding security scanning to CI/CD.
Solution: Provides instructions for configuring Trivy in Jenkins, automating security checks to detect vulnerabilities early.
This blog will serve as a reference for setting up tools and plugins in Jenkins for future Jenkins-based projects on PowerToCloud.
Essential Tools for a Comprehensive CI/CD Pipeline
In this blog, we will explore how to install and configure Jenkins plugins for a comprehensive CI/CD pipeline that incorporates several essential tools:
Git: For version control, enabling efficient source code management.
Jira: For project management and issue tracking, ensuring smooth collaboration and task tracking.
Maven: For build automation, particularly useful in Java projects.
SonarQube: For code quality analysis, helping to maintain high standards in codebases.
Docker: For containerization, facilitating consistent environments across development, testing, and production.
Kubernetes: For container orchestration, managing deployments at scale.
Trivy: For security scanning, identifying vulnerabilities in container images.
Blackbox Exporter: For monitoring endpoints, ensuring application availability.
Prometheus: For metrics collection, providing insights into system performance.
Grafana: For data visualization, creating informative and actionable dashboards.
Provisioning Infrastructure:
If you are familiar with IaC tools like Terraform, installing all the required tools like Docker and Trivy during provisioning will be easy.
You can use
user_dataon Azure Cloud and themetadatafunction on GCP during provisioning. Whether you use IaC (Terraform) or do it manually, you can still use the scripts.Here is a repository where you can find the scripts needed to install the tools. I will keep it updated, so feel free to fork or star it.
%[https://github.com/vsingh55/DevOps-Toolbox.git]
You may also use an existing Git repository that contains modular Terraform code. I will keep it updated, so feel free to fork or star it.
%[https://github.com/vsingh55/Terraform-Modules-Azure.git]
I recommend visiting the blog to understand what a modular approach to Terraform code looks like and how it is executed.
If you have basic knowledge of modular Terraform, you can refer to the mini project blog listed below. It will also serve as a hands-on project for securely provisioning AKS using Terraform and Service Principal.
%[https://blogs.vijaysingh.cloud/automate-aks]
Setting Up Jenkins:
Java: As Jenkins requires Java to run so use java.sh.
Operating System: Jenkins can be installed on various operating systems, including Windows, macOS, and Linux.
- 💡I usually use Ubuntu, so the scripts and provisioning codes are set up accordingly.
Access Jenkins:
Open a web browser and navigate to
http://<your_server_ip>:8080.You will be prompted to unlock Jenkins. Find the initial admin password using:
sudo cat /var/lib/jenkins/secrets/initialAdminPassword
Getting
InitialAdminPassword:ssh -i <path/to/publickey> username@VMpublicIP sudo cat /var/lib/jenkins/secrets/initialAdminPasswordComplete Setup:
Enter the initial admin password on Jenkins web UI [
http://<your_server_ip>:8080] to unlock Jenkins.Follow the on-screen instructions to install recommended plugins.
Create your first admin user and complete the setup wizard.
Once the initial setup is complete, you can tailor Jenkins to meet the specific requirements of your project. Let's proceed to set up the necessary plugins, tools, and system configurations that you require.
Setting Up Essential Plugins
The process will be categorized in the following sections:
Required Tools to be installed on the server or virtual machine.
The configuration process within Jenkins.
Install Essential Plugins
Set Up Credentials
Configure Global Tools
Required Tools:
Before installing and configuring plugins in Jenkins, ensure that the following tools are installed on your server or virtual machine:
Java Development Kit (JDK): Required to run Jenkins and Maven.
Docker: For containerization such as Sonarqube Server, Nexus.
Trivy: For security scanning.
kubectl: For interacting with Kubernetes clusters.
Monitoring: Blackbox Exporter, Prometheus, Grafana.
The Configuration Process within Jenkins:
Installing Essential Plugins
To streamline the installation process, we'll install all necessary plugins in one go. Follow these steps:
Navigate to Manage Jenkins:
From the Jenkins dashboard, click on
Manage Jenkins.Click on
PluginsunderSystem Configuration.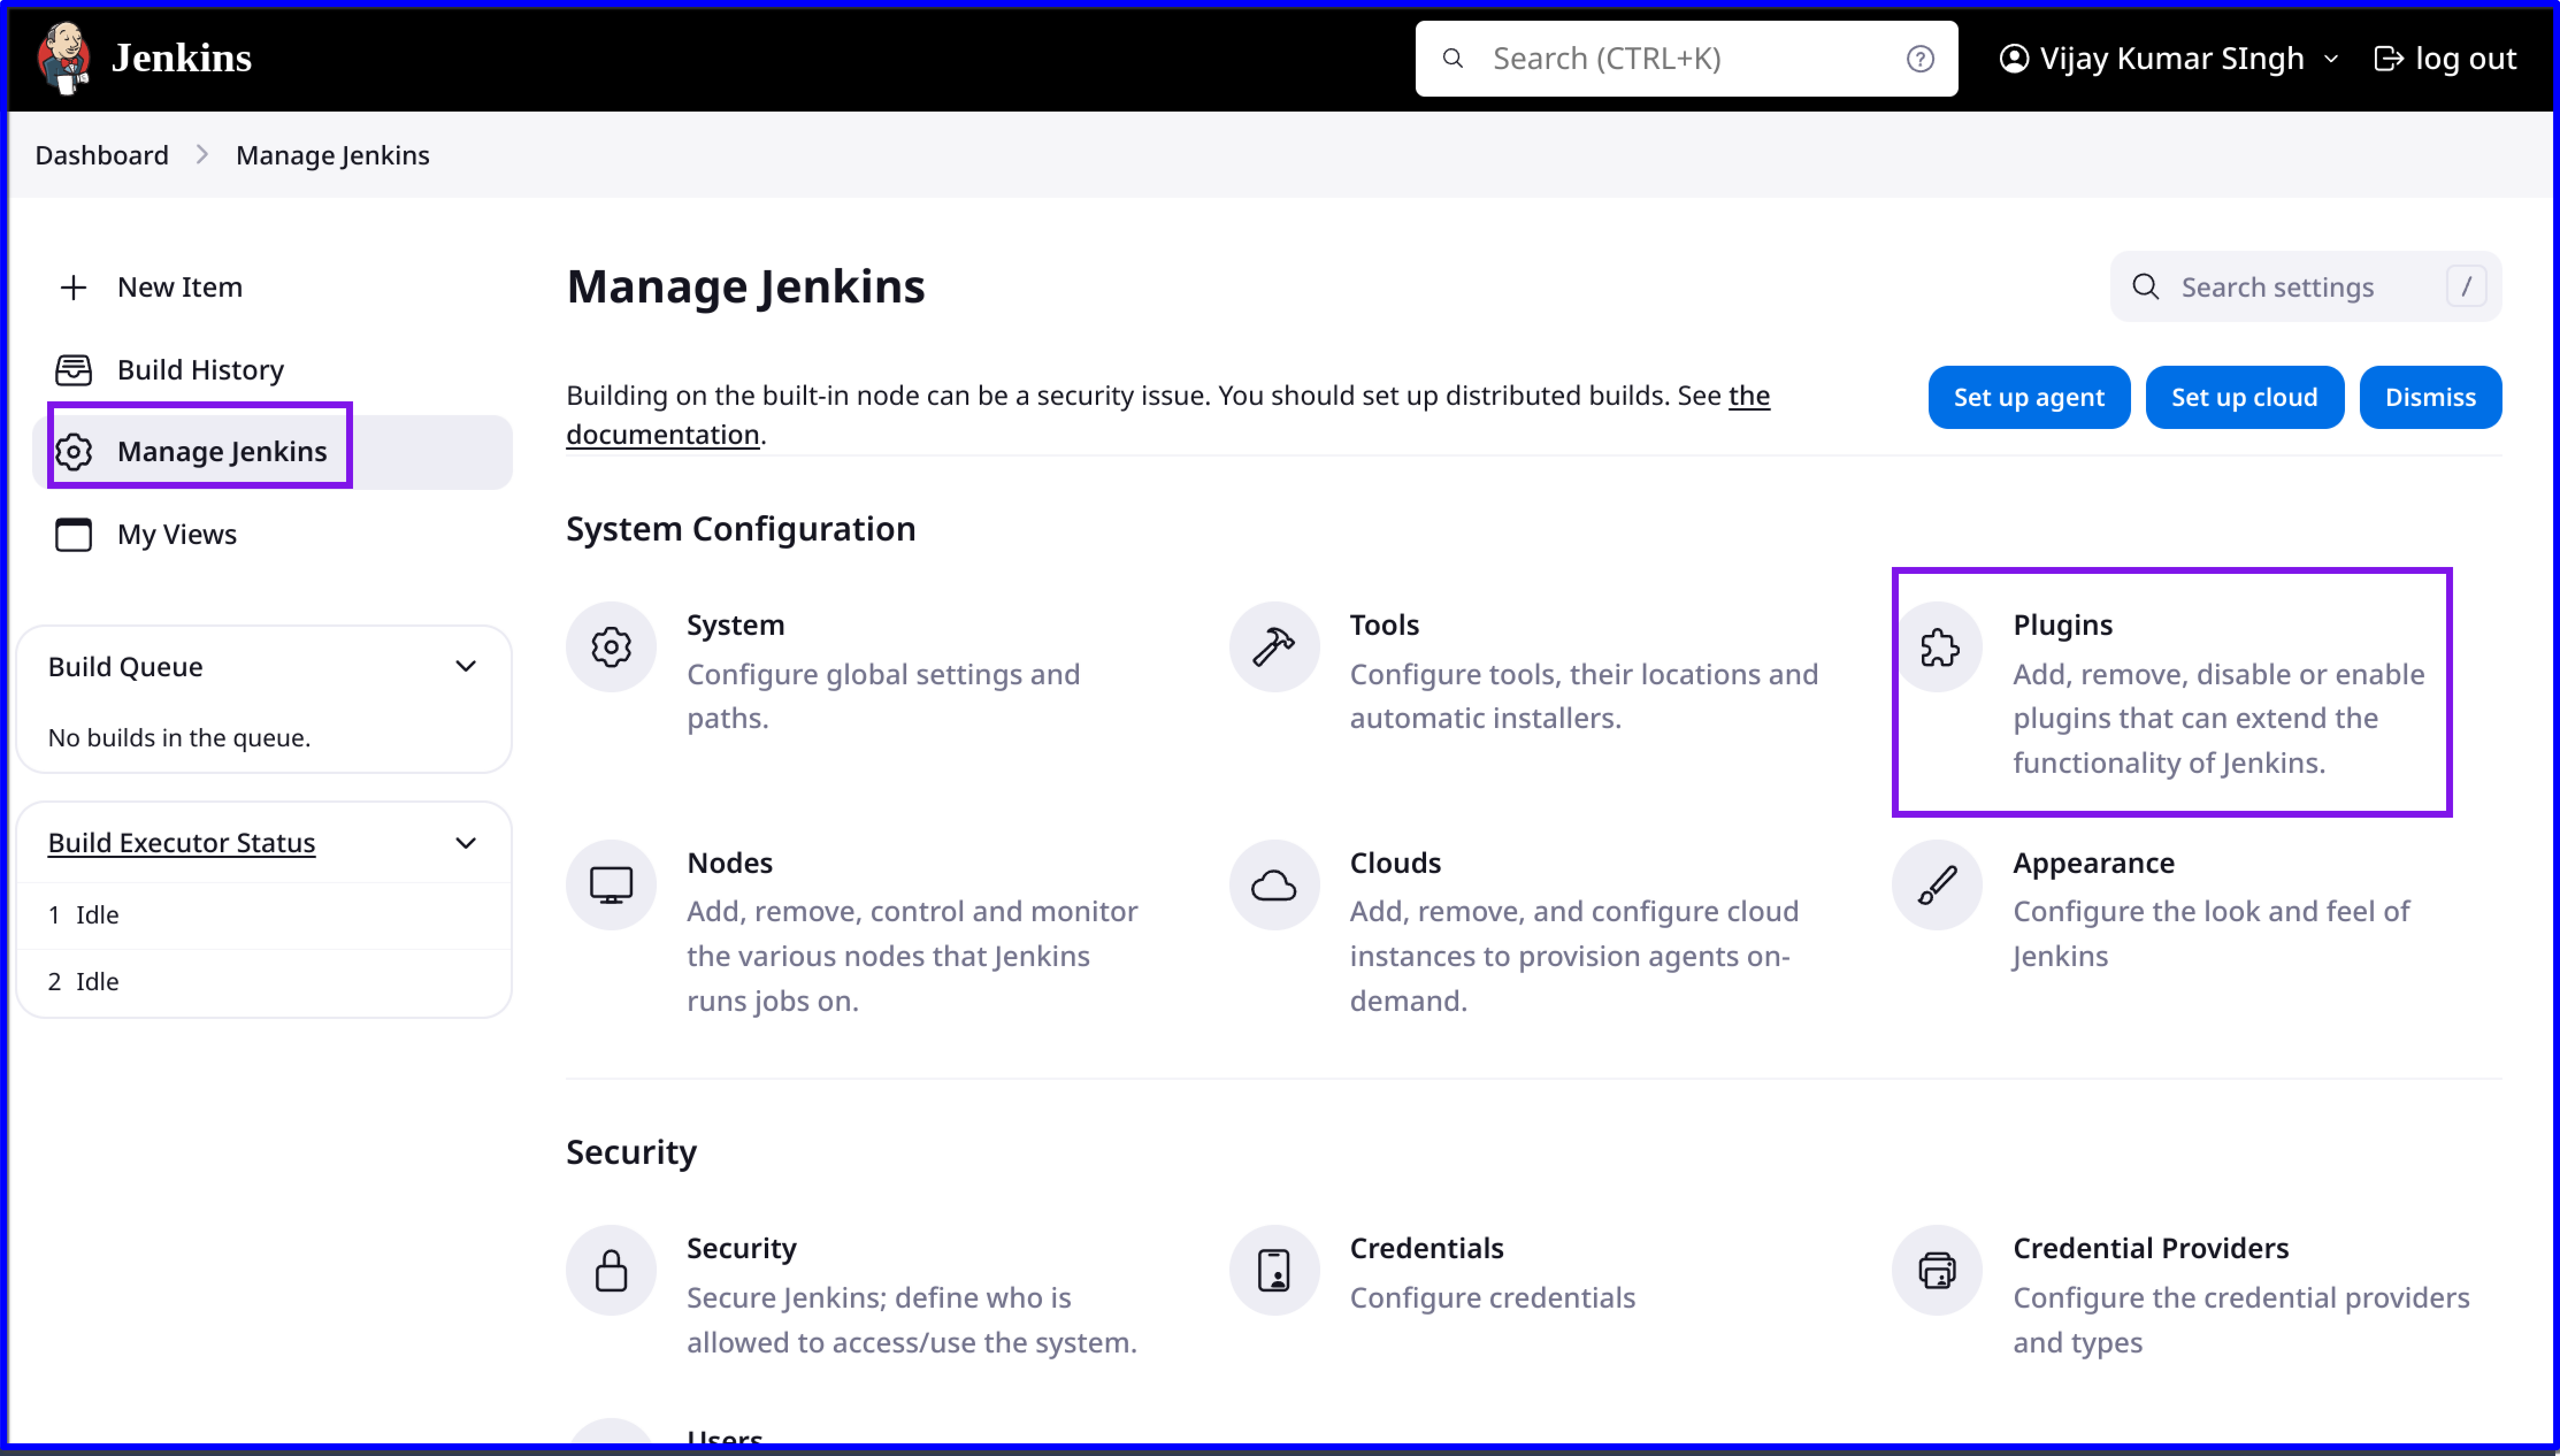
Under the
Availabletab, search for and select the required plugins:Git Plugin
Jira Plugin
Maven Integration Plugin
SonarQube Scanner Plugin
Docker Pipeline Plugin
Kubernetes Plugin
Trivy Plugin
Blackbox Exporter Plugin
Prometheus Plugin
Grafana Plugin
Click
Installto install the required plugins.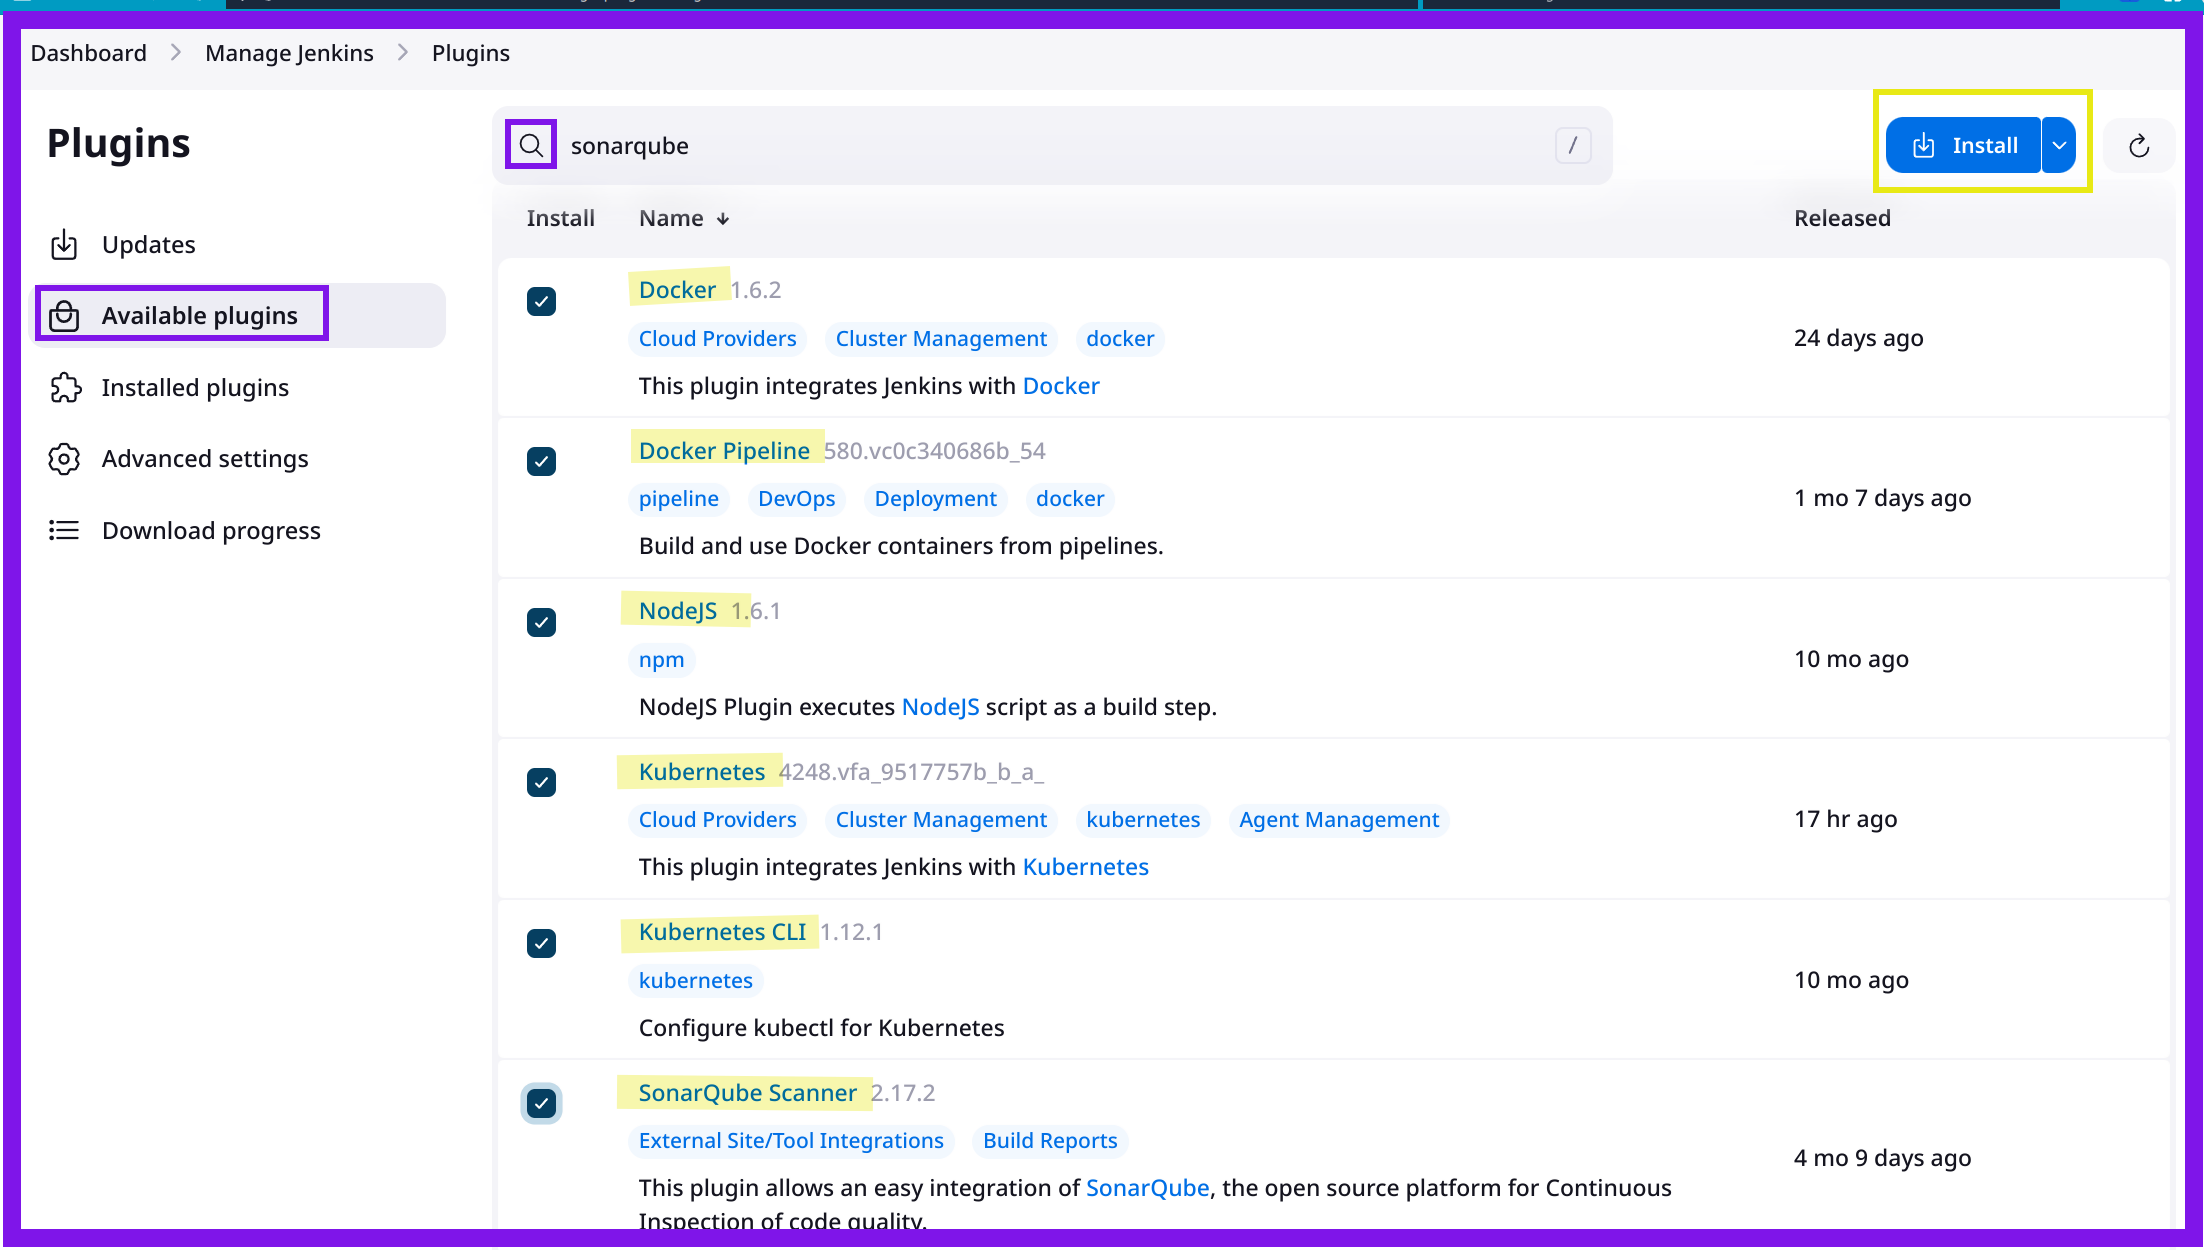
Set Up Credentials
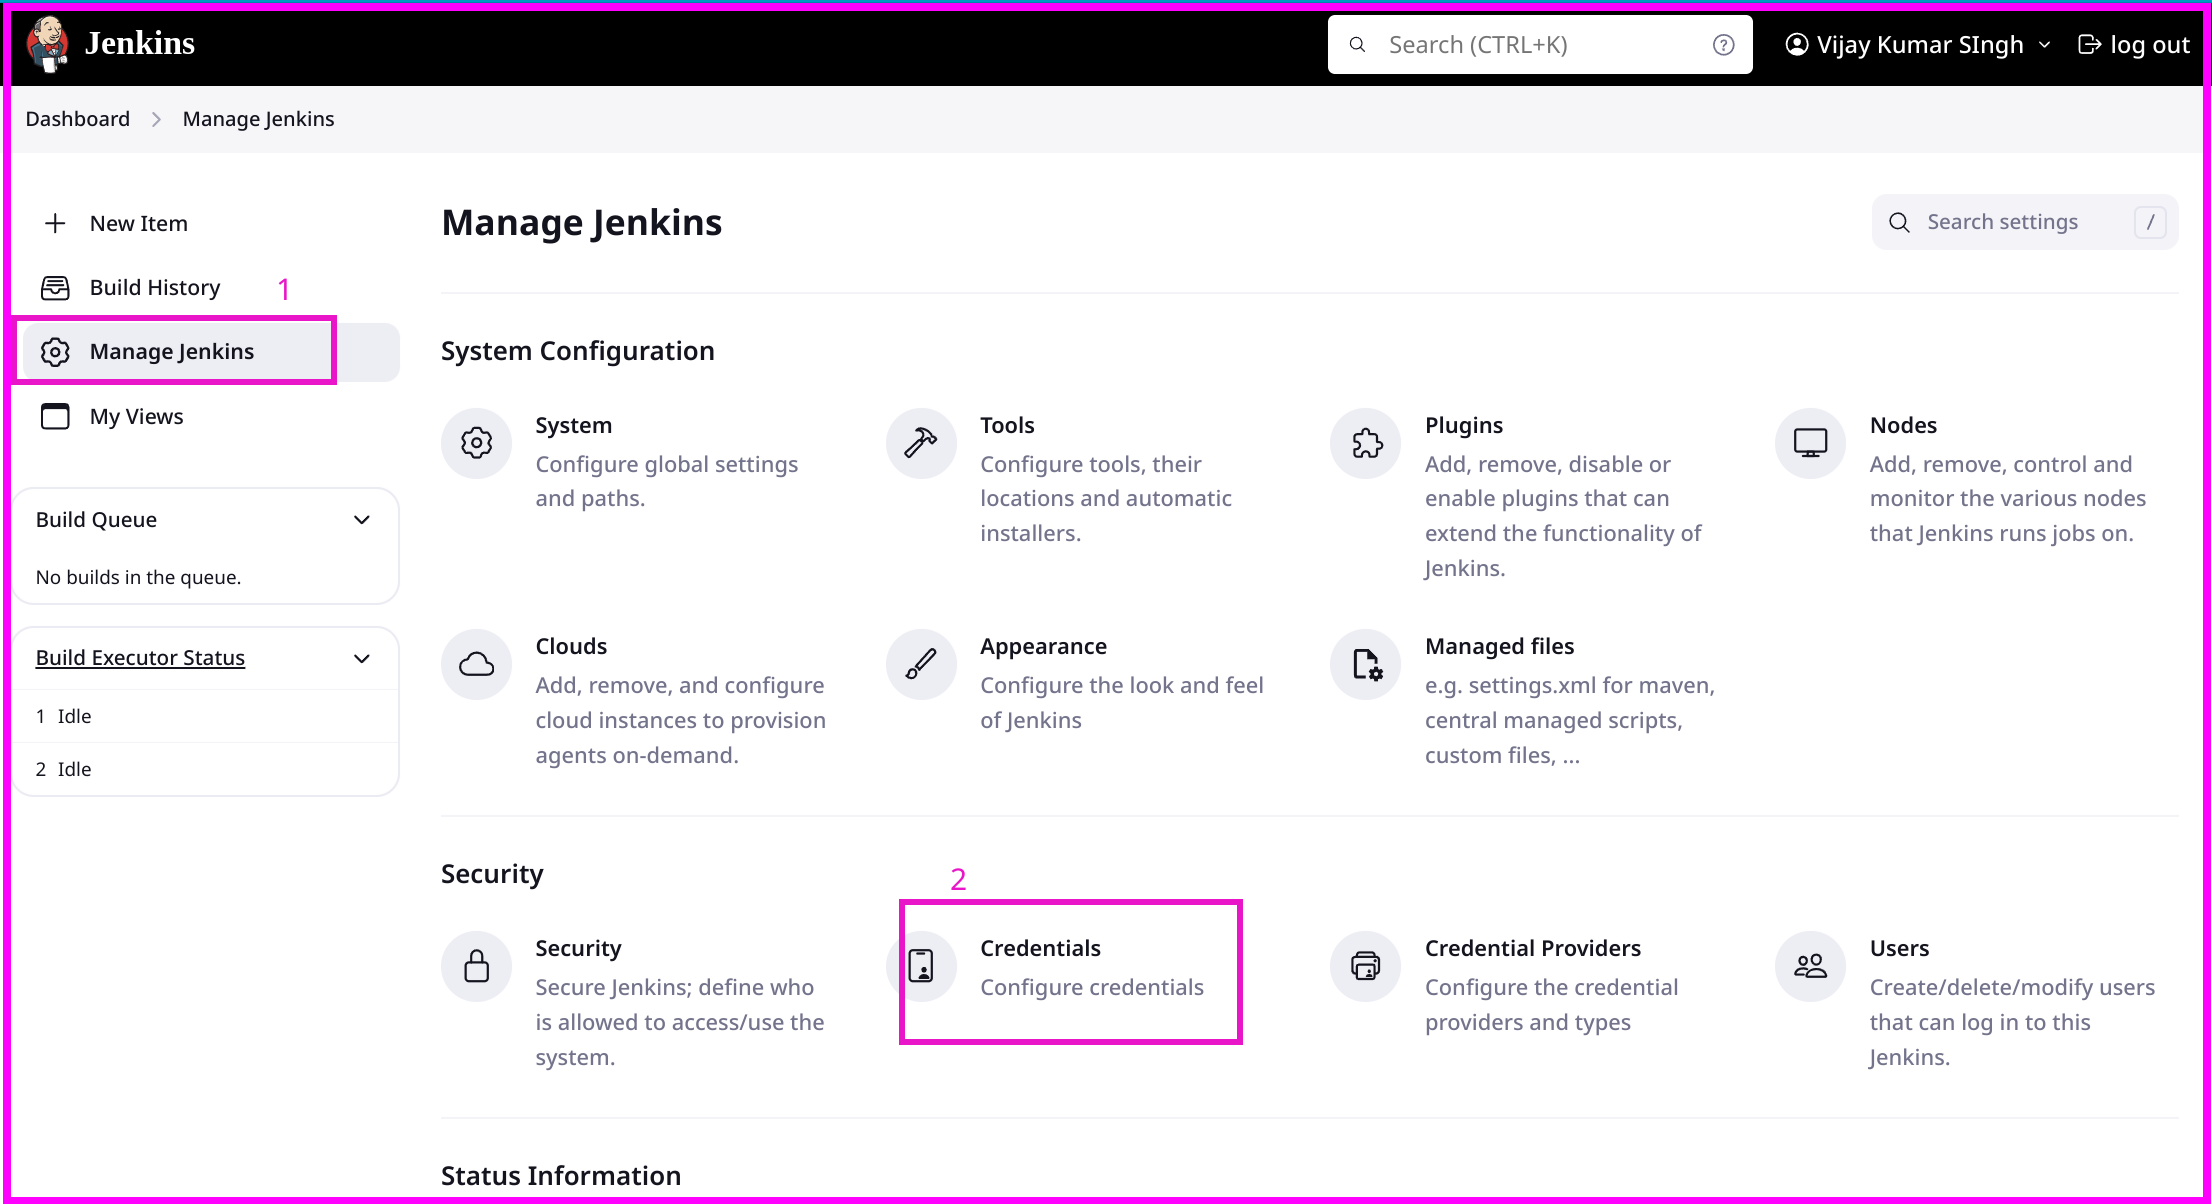
Go to
Manage Jenkins>Manage Credentials.Add credentials for all the tools.
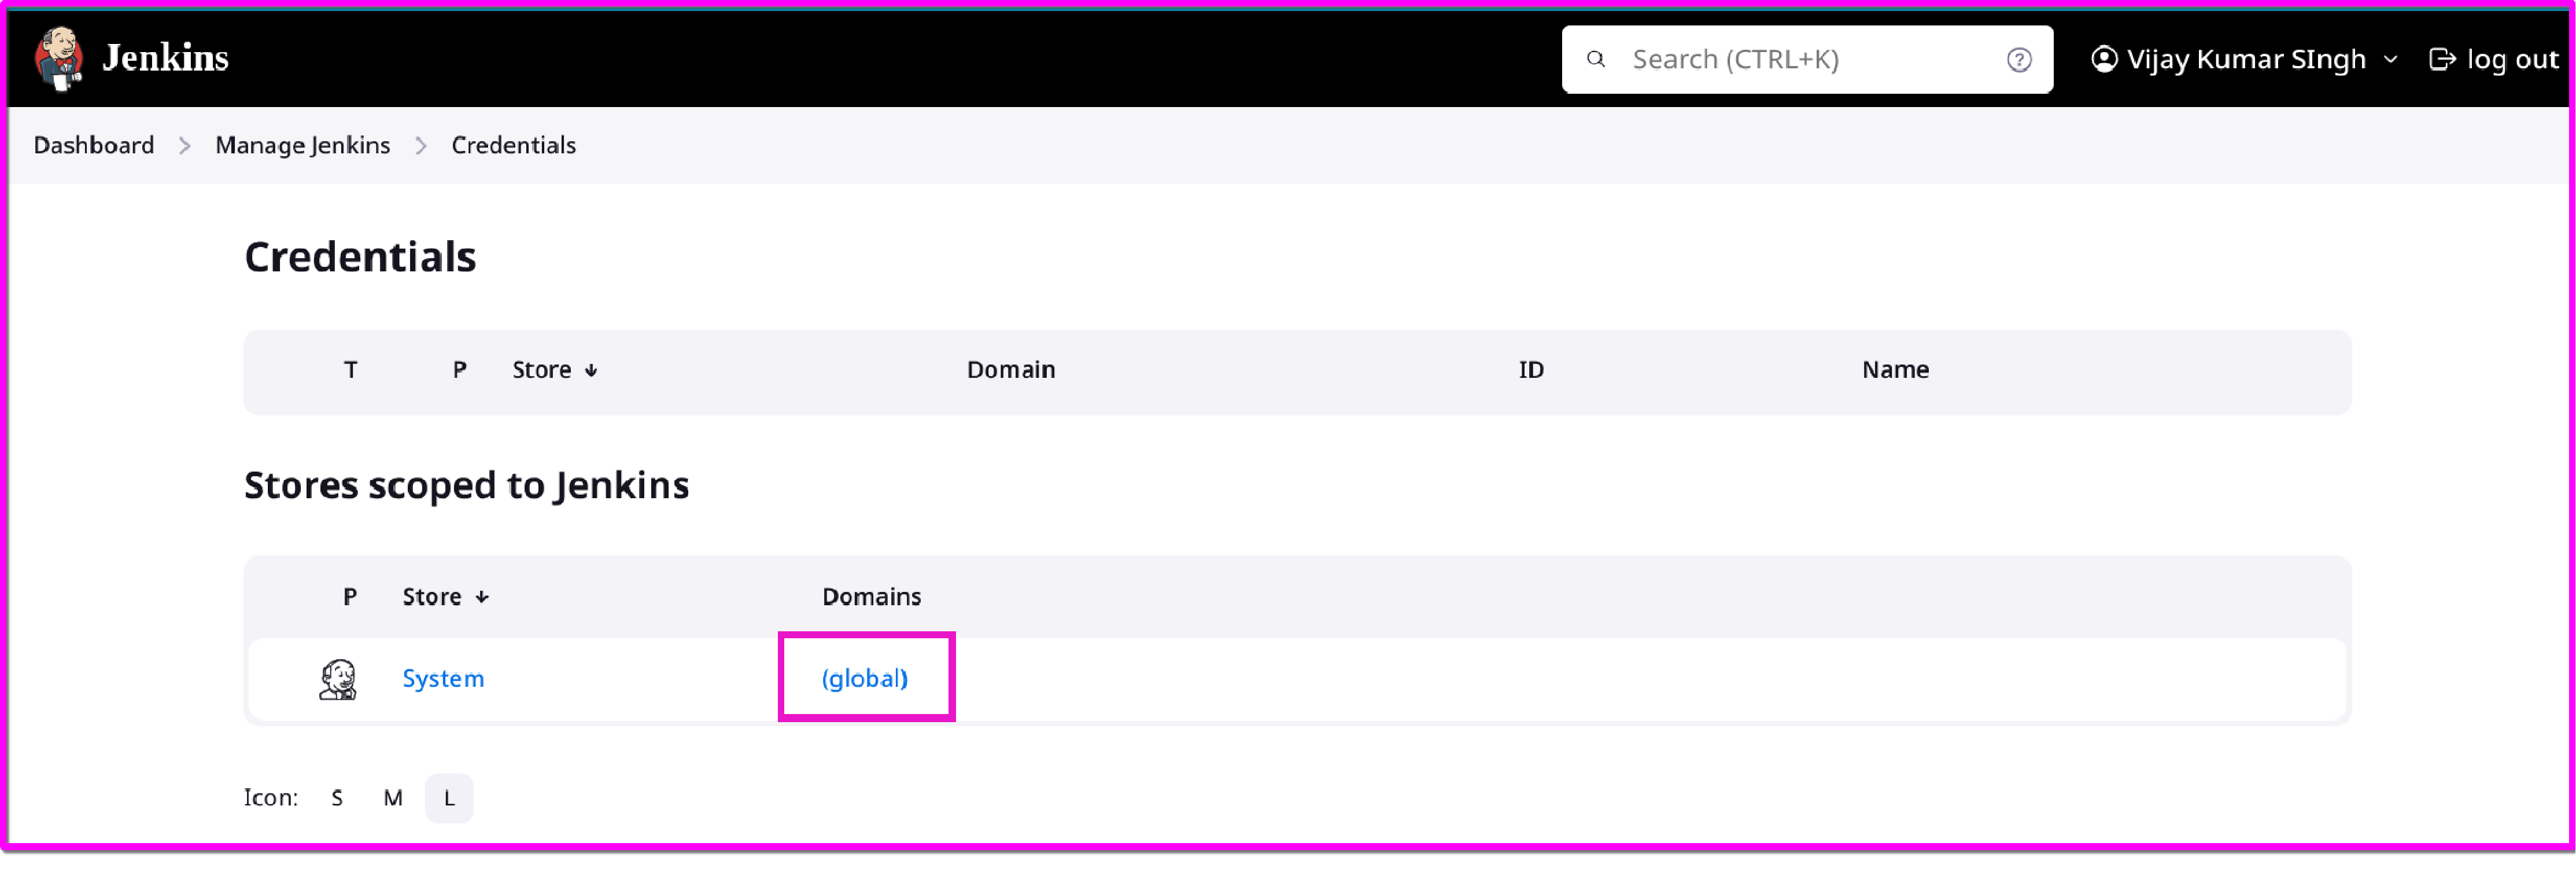

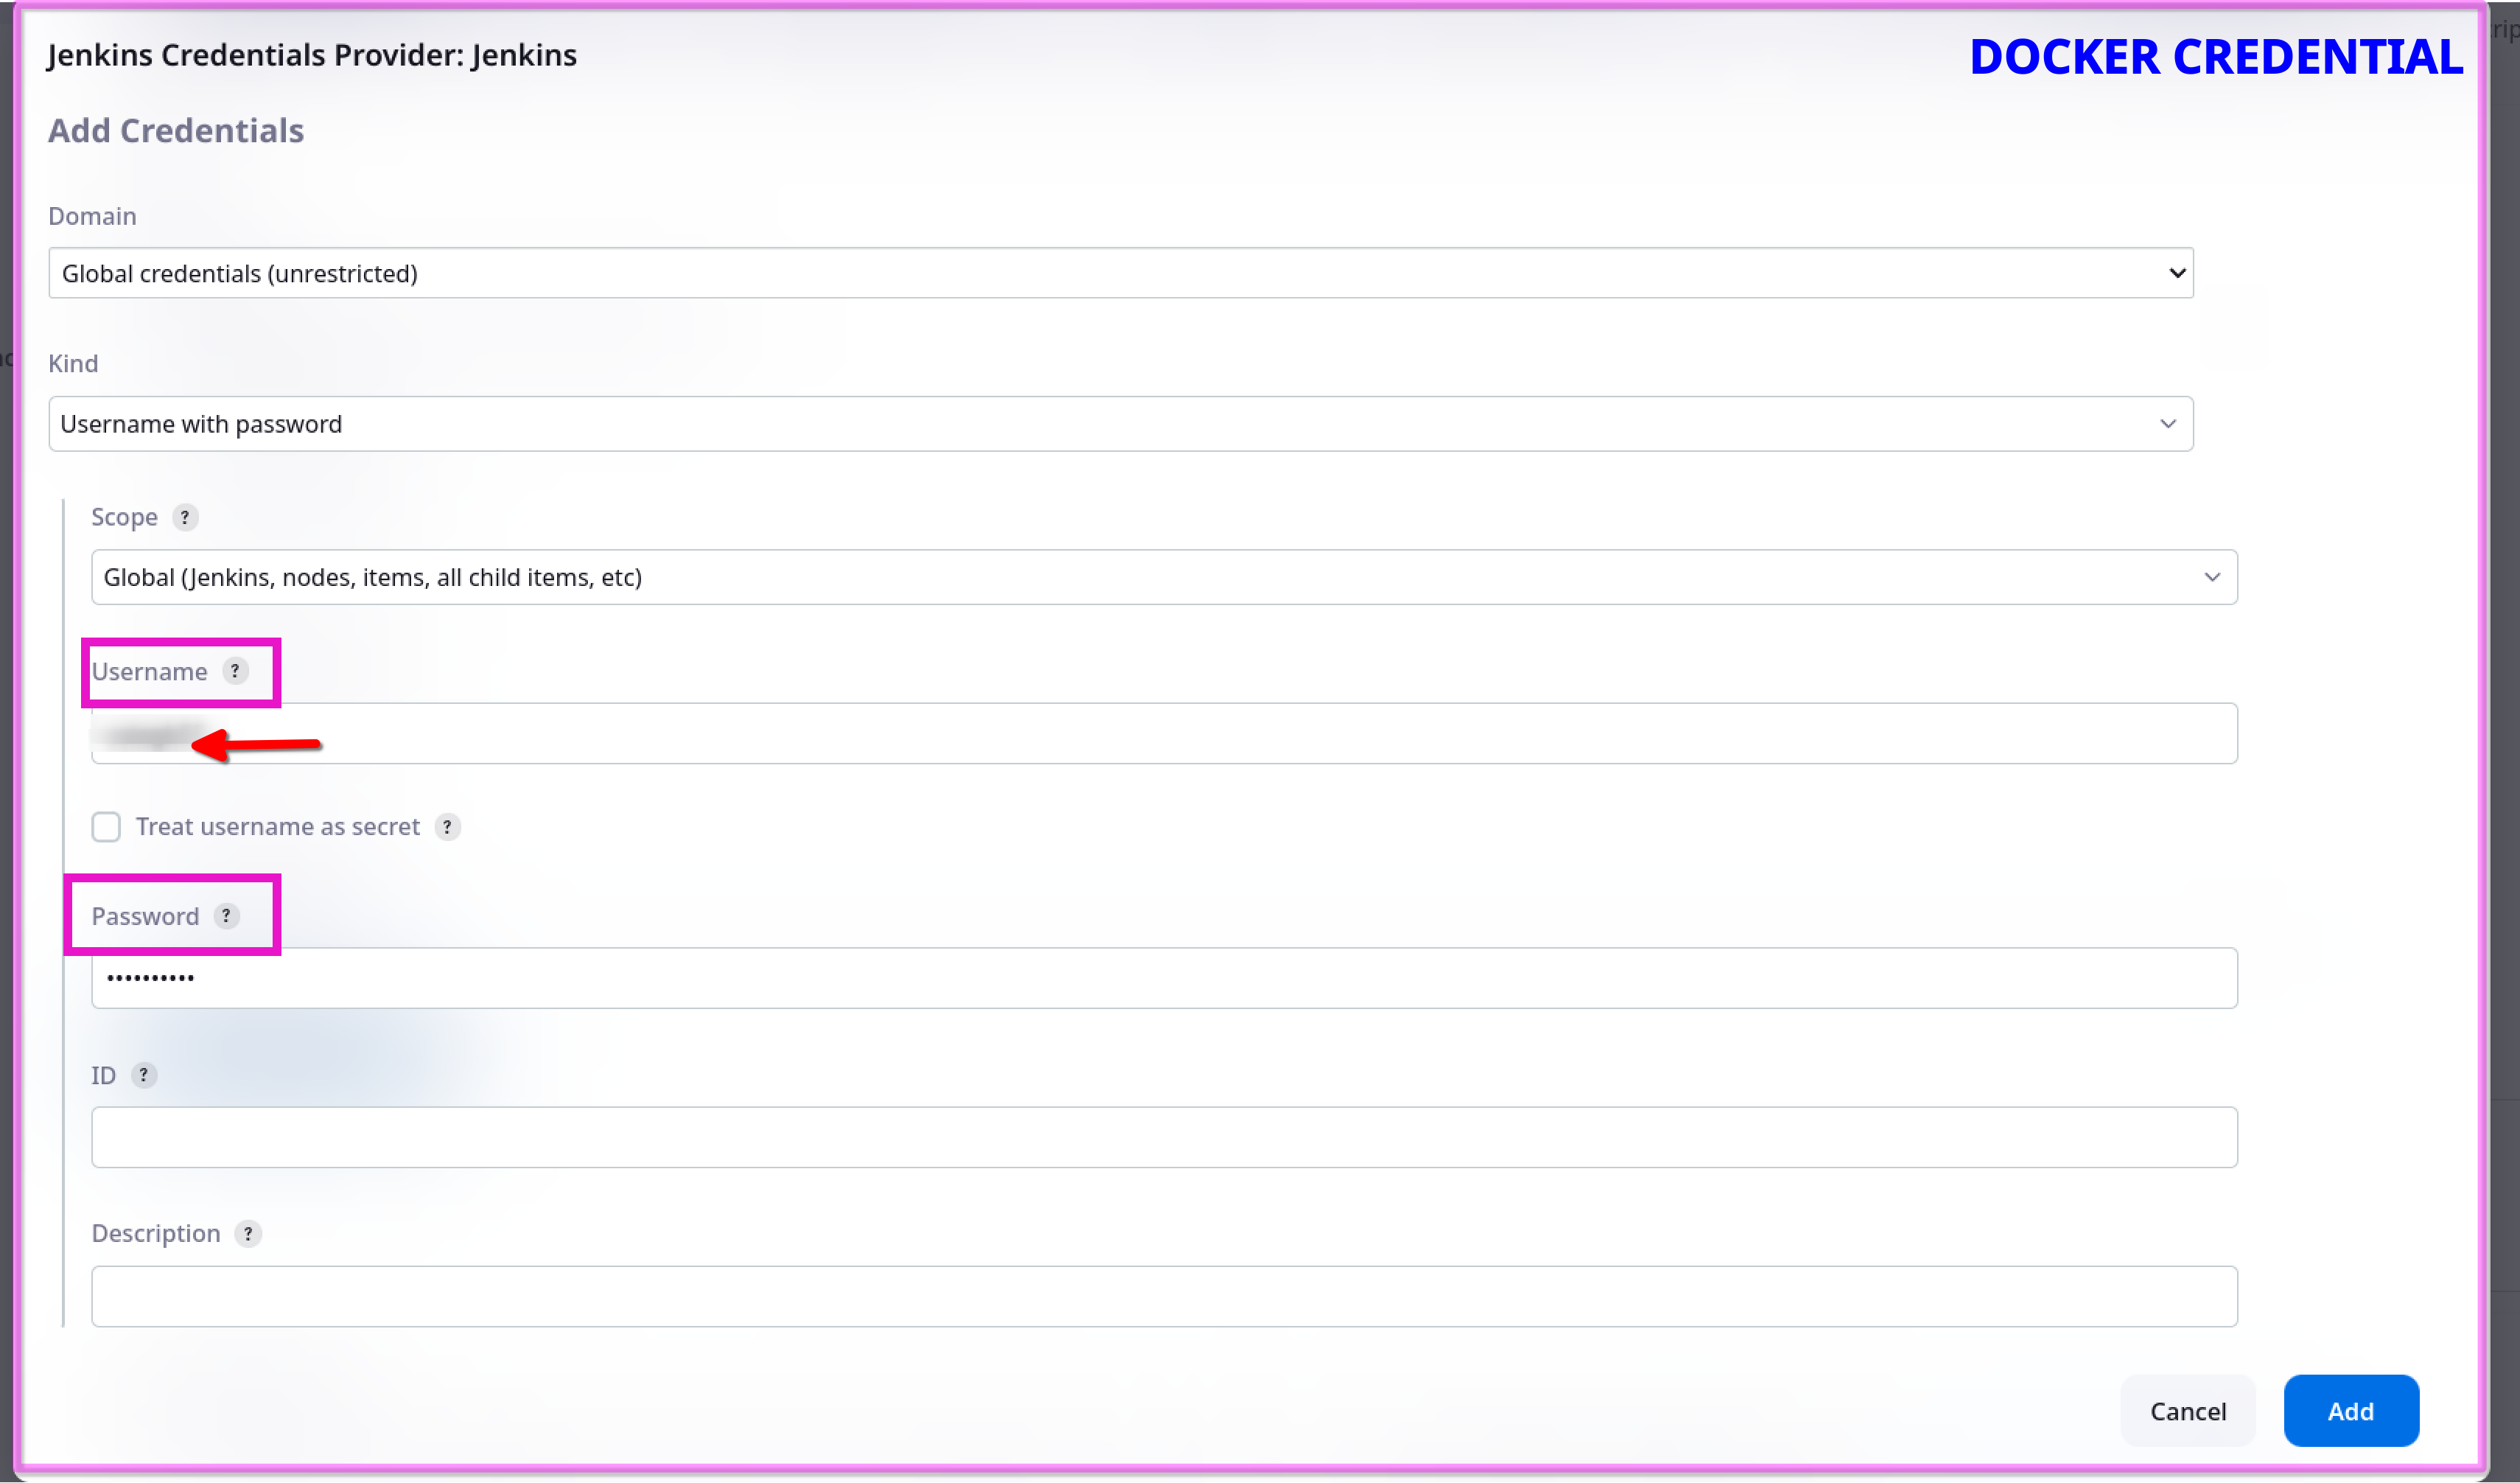
Docker (e.g., Docker Hub credentials)
First, choose the 'Kind' option, then enter your DockerHub username and password details. In the 'ID' field, input the name of the credential as desired, such as 'docker-crd'.
Git - If the repository is public, add credentials in the same manner as Docker, using a username and password. If the repository is private, you will need to obtain a GitHub personal access token and add the credential using the secret text "kind".
Jira (e.g., Jira username and password)
Kubernetes - Select "kind" is secret, print kubeconfig file from provisioned kubernetes and paste all the content in place of secret.
Gmail -Use your email ID and password, simply follow the same steps.
SonarQube -
Access
http://<SonarQube-VM-Public-IP>:9000in your web browser.Initial Username and password are admin then change your password now ready to go.
Now create administration token to access sonarqube server from jenkins follow the steps one by one as shown in figures.
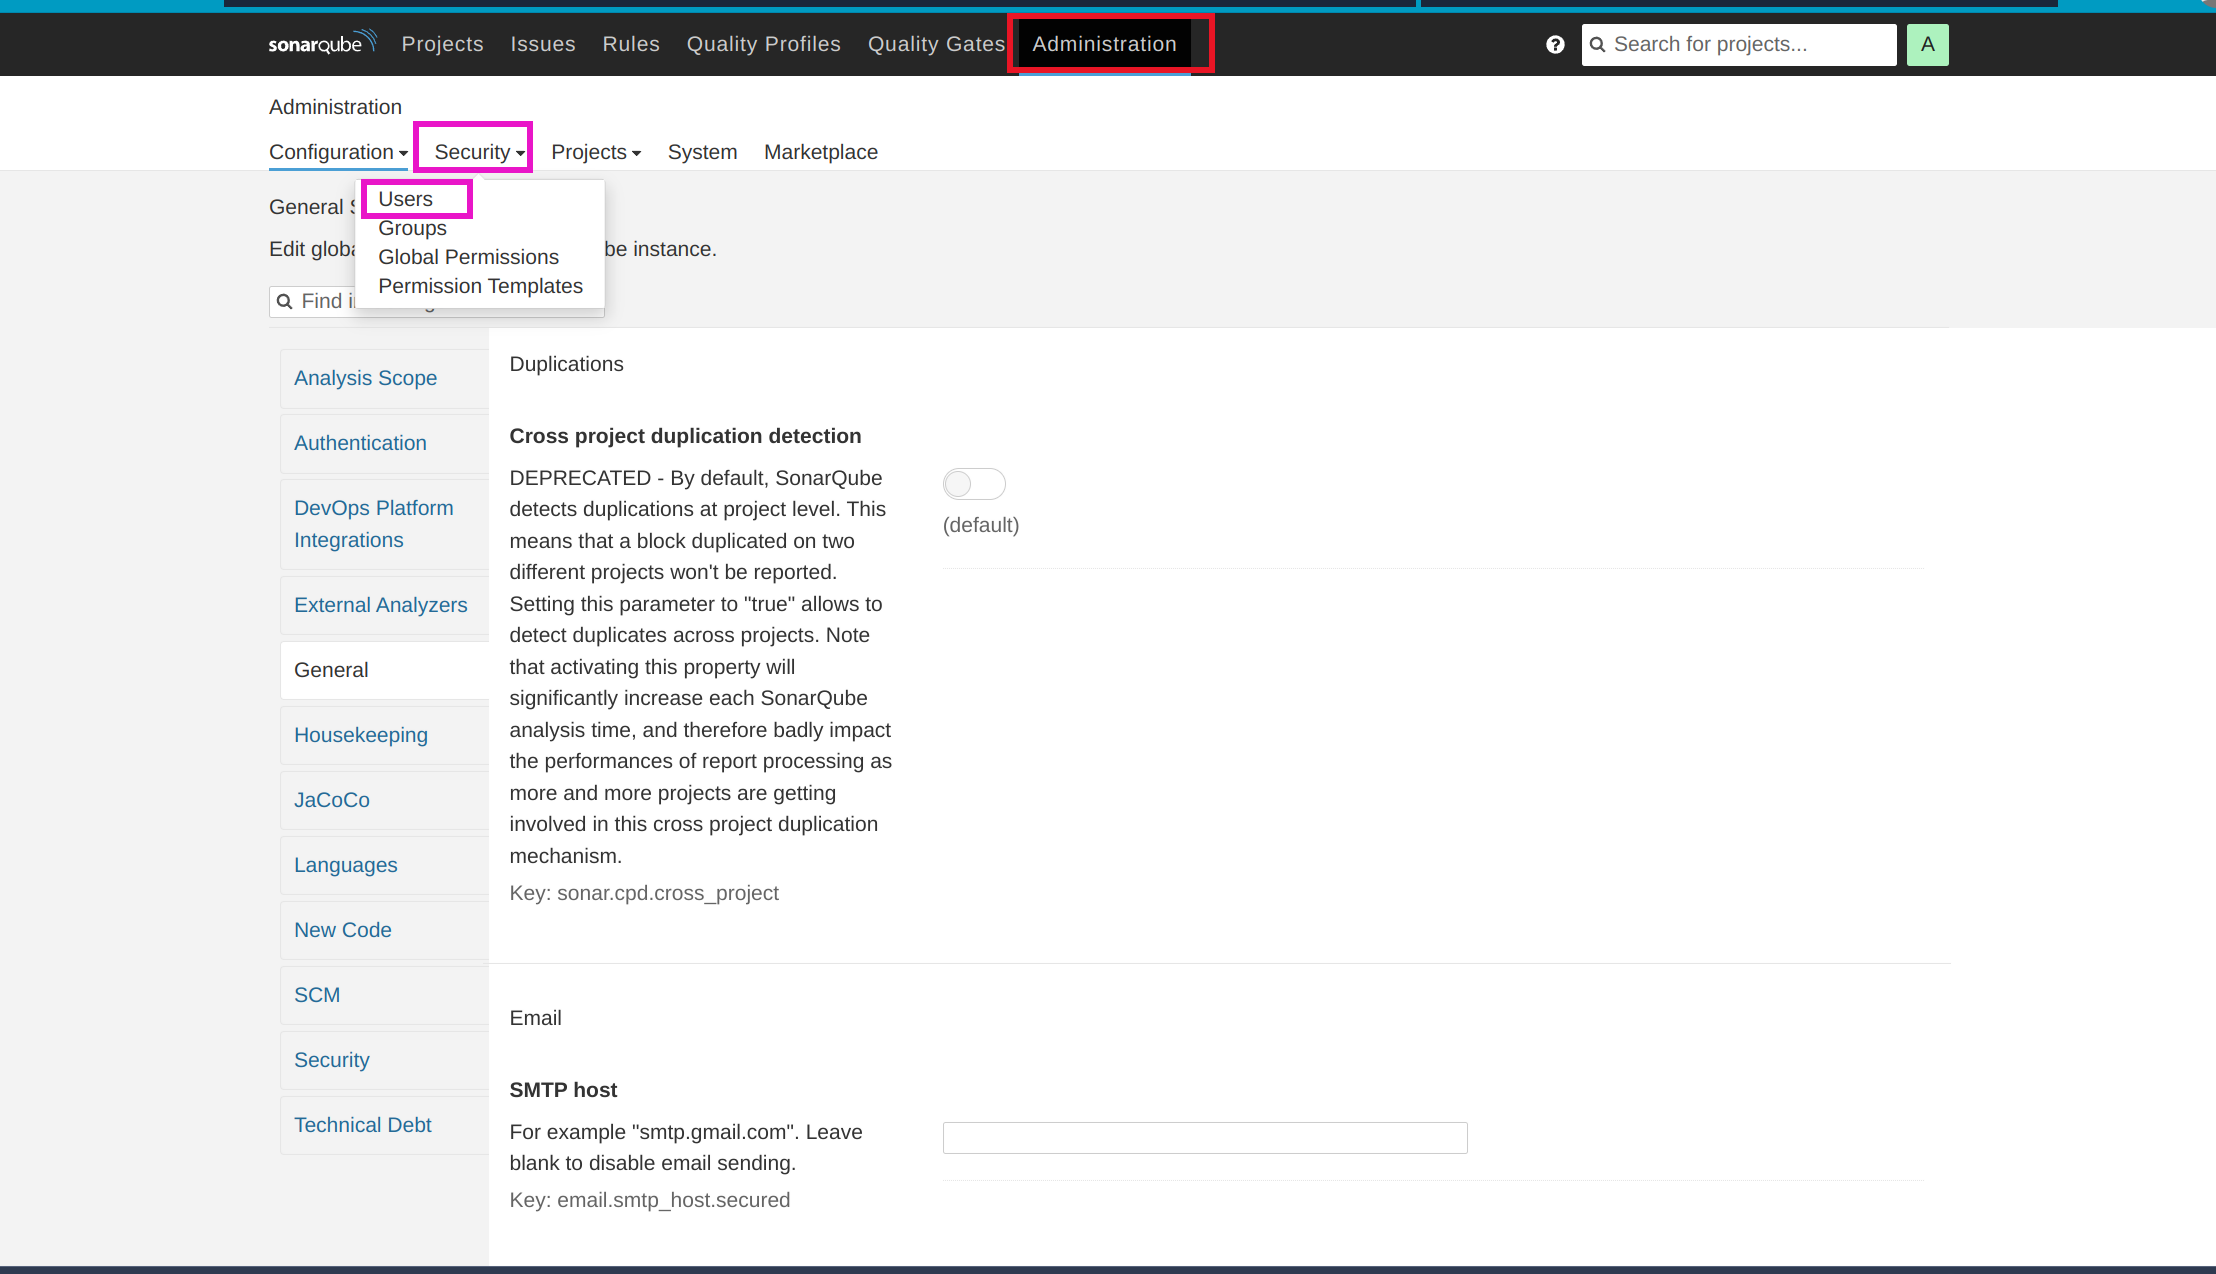

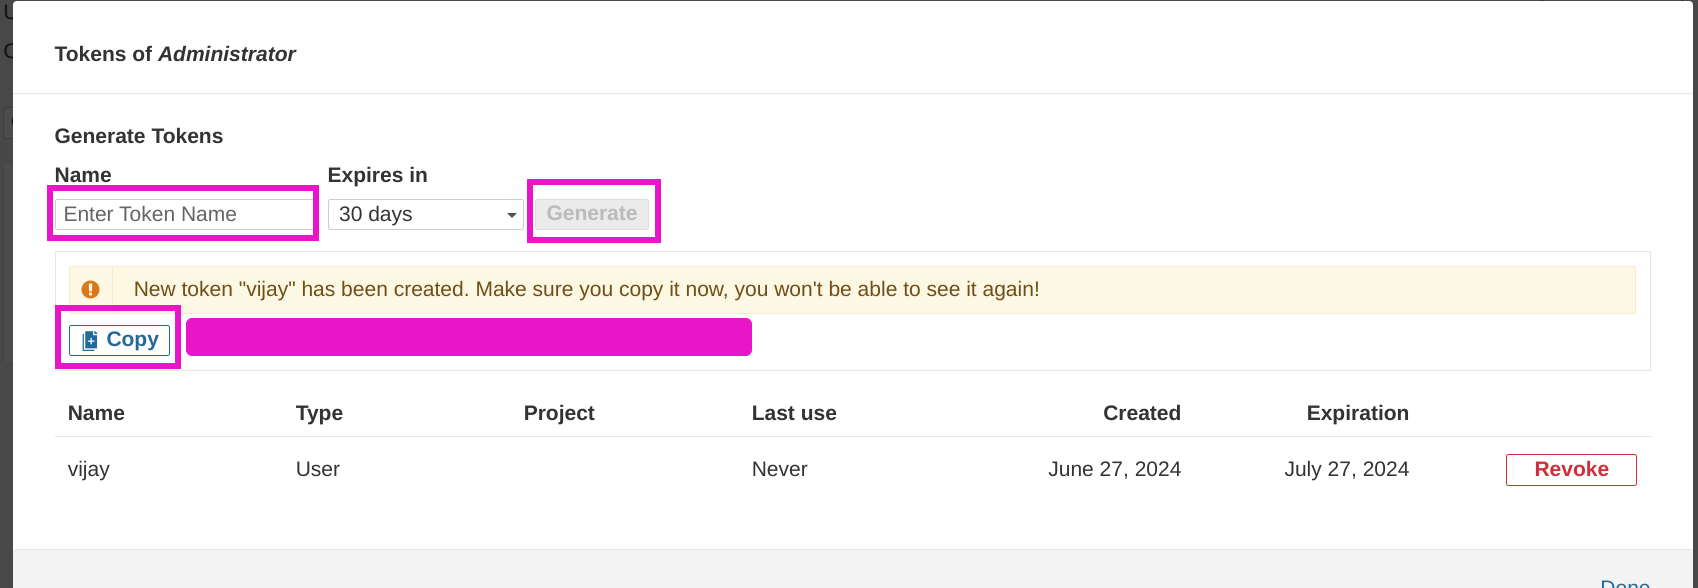
Copy access token and save it.
Return to the Jenkins credentials page and add the SonarQube credentials by using the secret text. Here, paste the token and save it.
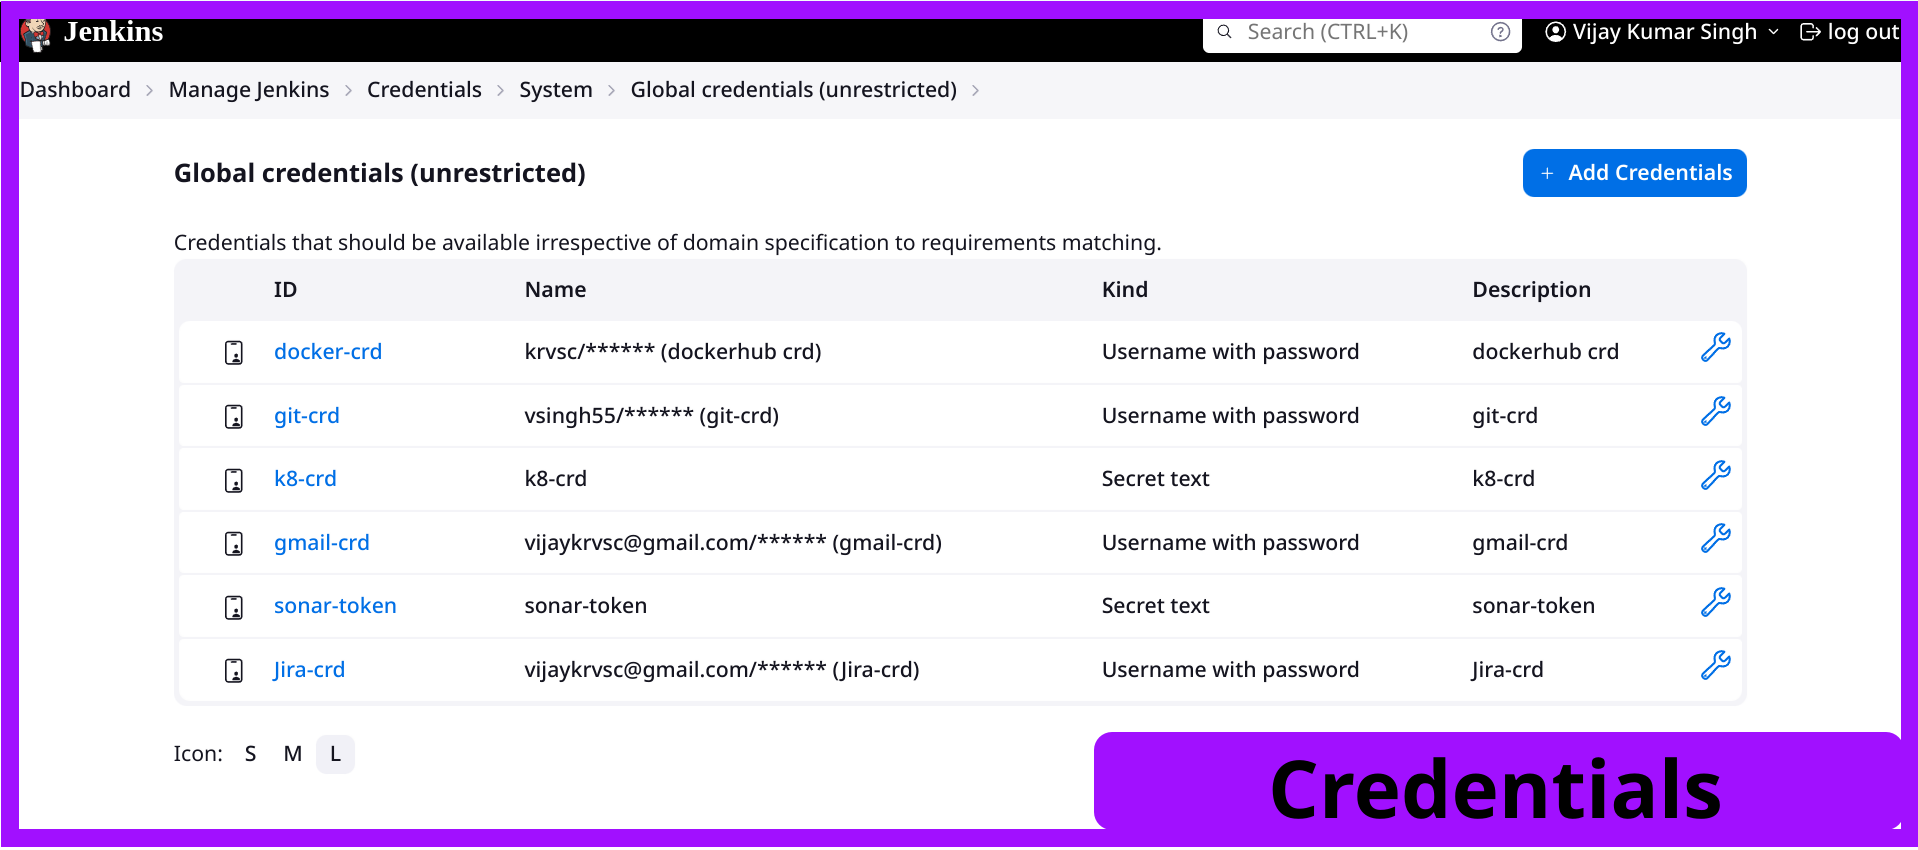
You have now completed the process of storing credentials all at once. It should resemble the image shown.
Configure Global Tools
Let's proceed to the final phase of configuration and set up the plugins. We still need to address tools and system configurations.
Configure Global Tools: Go to
Manage Jenkins>Global Tool Configuration.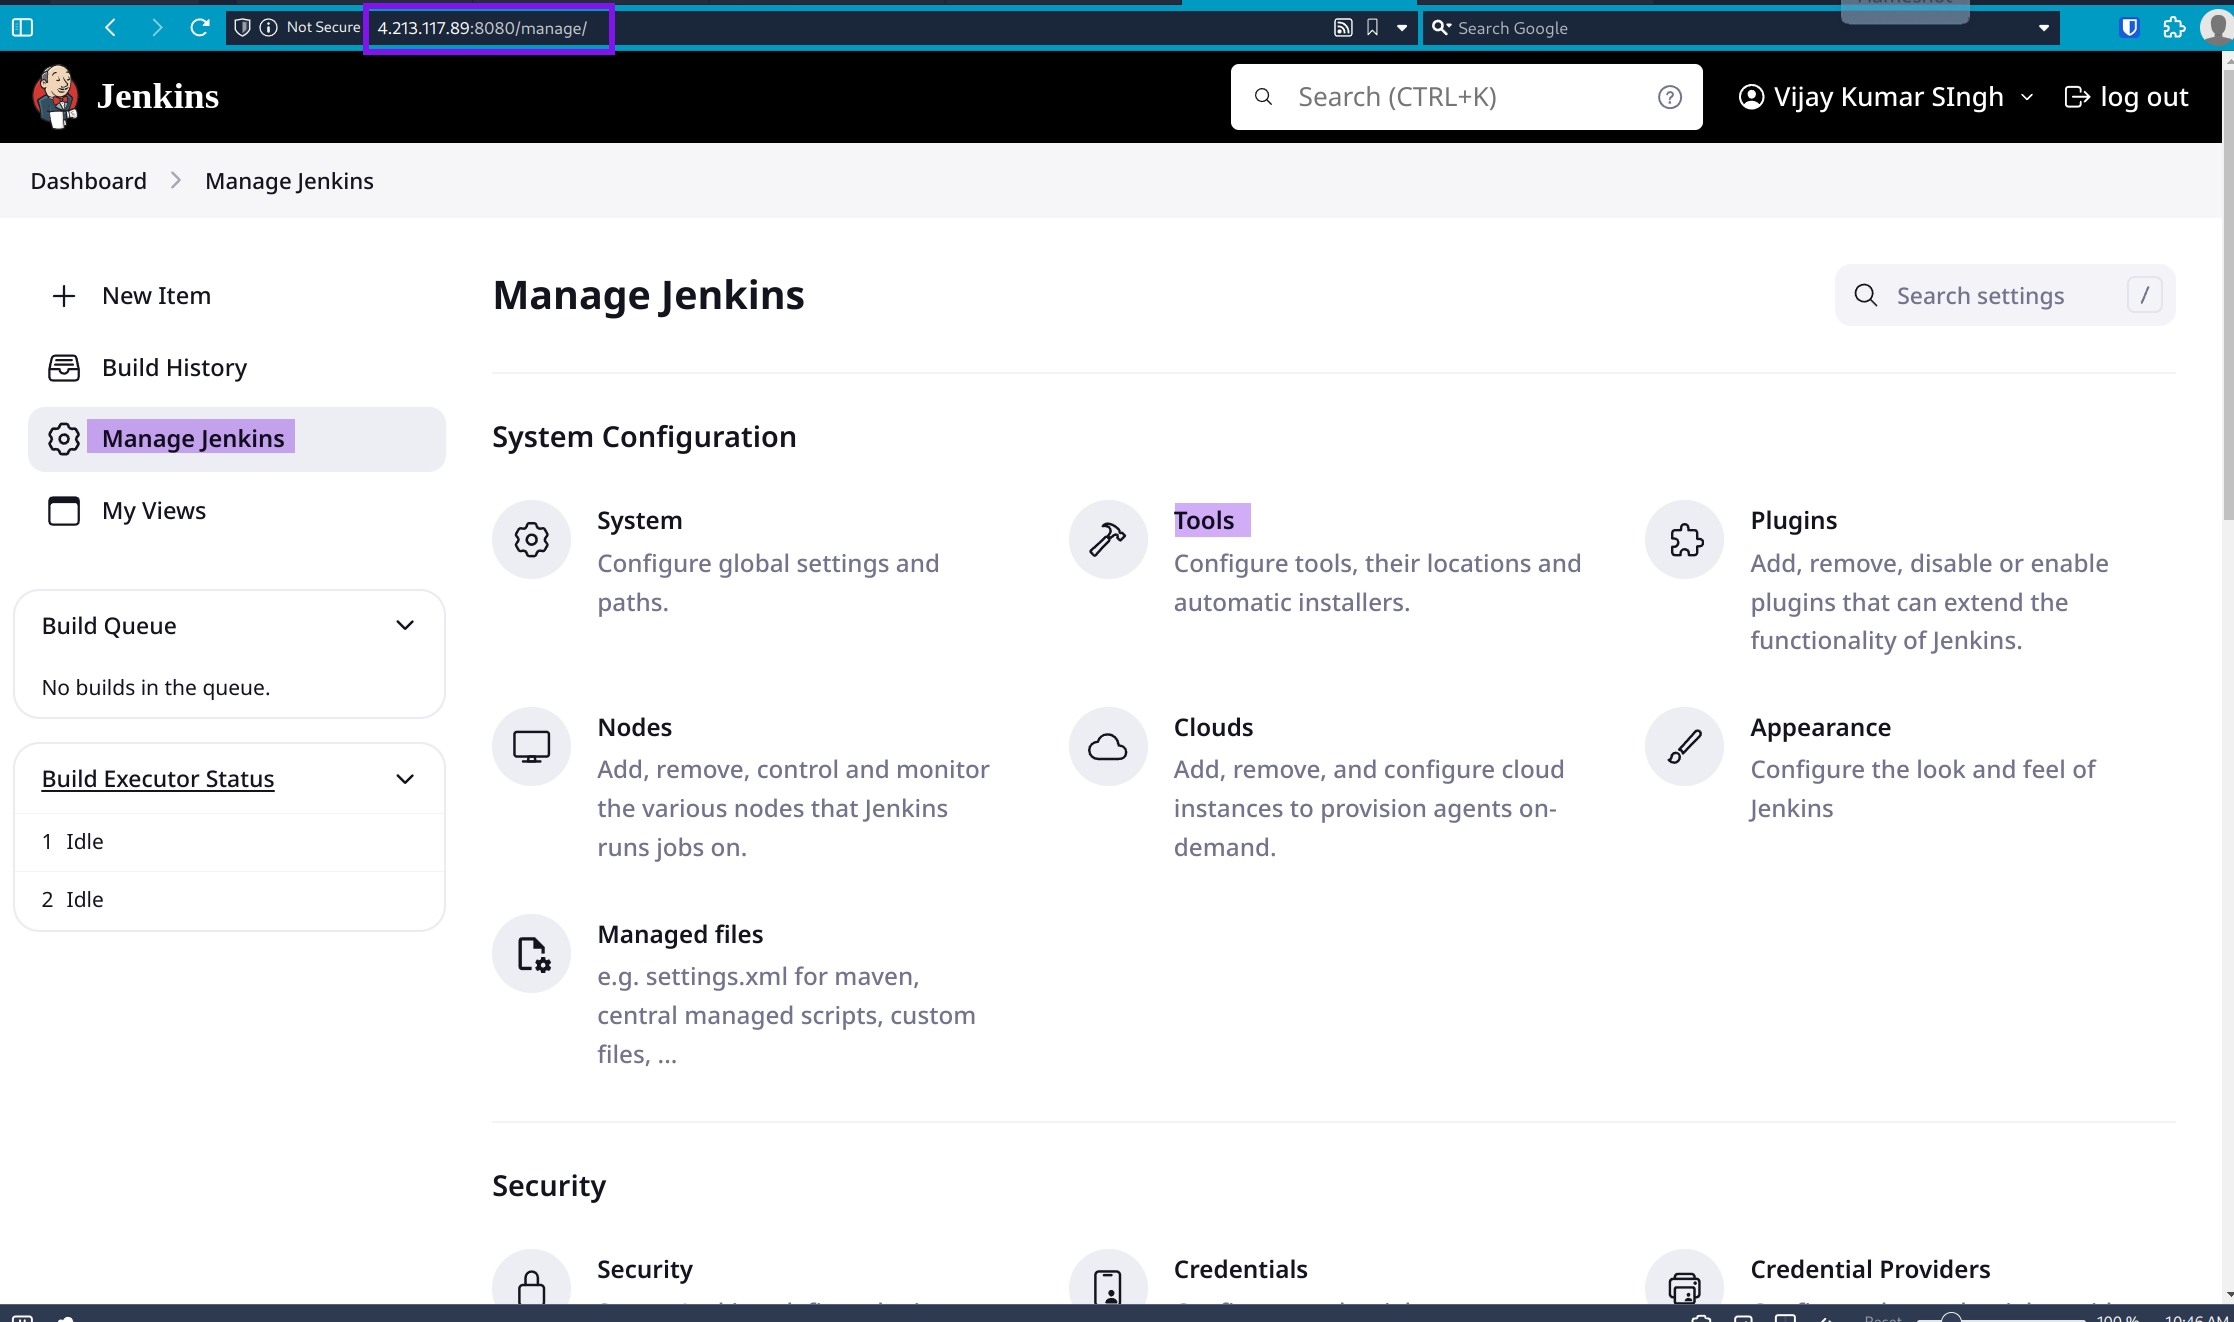
Maven Configuration:
Scroll down to
Maven installations.Click
Add Maven.Enter a name (e.g.,
Maven 3.8.1).Optionally, you can install automatically by checking the box and choosing the version.
Click
Save.
JDK Configuration:
Scroll down to
JDK installations.Click
Add JDK.Enter a name (e.g.,
JDK 17).Optionally, you can install automatically by checking the box and providing the JDK download URL.
Click
Save.
Git Configuration:
Scroll down to
Git installations.Click
Add Git.Enter a name (e.g.,
Default).Optionally, you can install automatically by checking the box and providing the Git executable path.
Click
Save.
SonarQube Scanner Configuration:
Scroll down to
SonarQube Scannerinstallations.Click
Add SonarQube Scanner.Enter a name (e.g.,
SonarQube Scanner 4.6).Optionally, you can install automatically by checking the box and providing the SonarQube Scanner version and installation method.
Click
Save.Systems Configuration
System Configuration for Plugins: Go to
Manage Jenkins>System.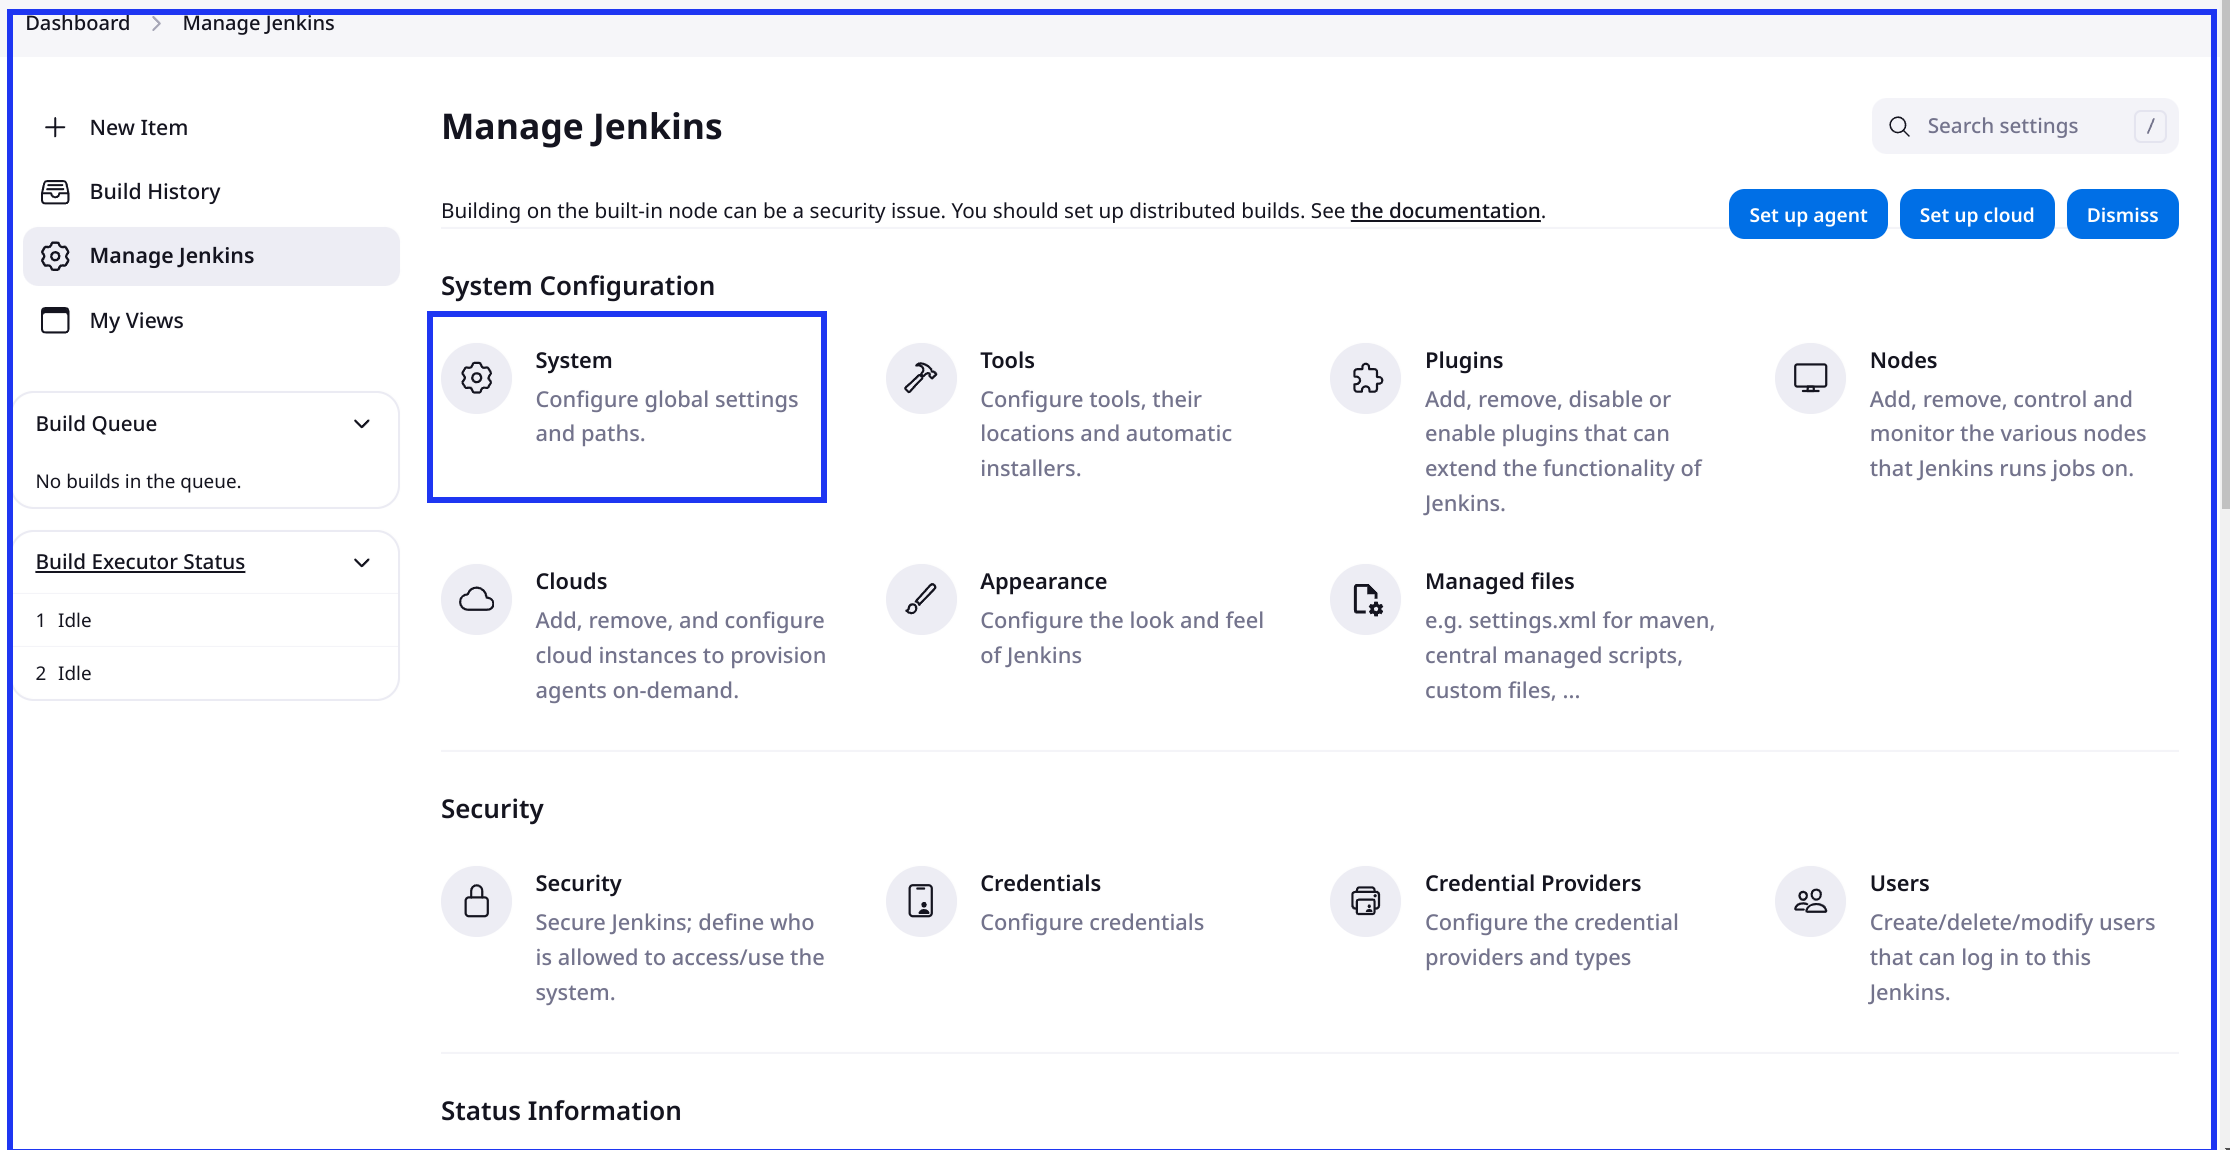
Jira Plugin:
Scroll down to the
Jirasection.Click
Add Jira Server.Enter the Jira Server URL and choose the credentials you created earlier.
Click
Test Connectionto ensure it is correctly configured.Click
Save.
SonarQube Plugin:
Go to
Manage Jenkins>Configure System.Scroll down to the
SonarQube serverssection.Click
Add SonarQube.Enter a name and the SonarQube server URL.
Choose the credentials you created earlier.
Click
Save.
Docker Plugin:
Go to
Manage Jenkins>Configure System.Scroll down to the
Dockersection.Click
Add Docker Server.Enter a name and the Docker host URL.
Choose the credentials you created earlier.
Click
Save.
Kubernetes Plugin:
Go to
Manage Jenkins>Configure System.Scroll down to the
Kubernetessection.Click
Add Kubernetes Cloud.Enter a name and Kubernetes URL.
Choose the credentials you created earlier.
Click
Save.
By following these steps, you will ensure that your Jenkins environment is fully configured with the necessary plugins and integrations. This setup will enhance your CI/CD pipeline capabilities and streamline your development and deployment processes.
Go ahead and start writing the Jenkins pipeline. Congratulations, you have completed the most tedious process of Jenkins CI/CD.
Conclusion
Thank you for following along with this comprehensive guide to setting up a robust CI/CD pipeline using Jenkins and a variety of essential tools and plugins. We hope this blog has provided you with clear, step-by-step instructions that you can refer to for your future projects.
If you found this guide helpful, please like and follow for more in-depth tutorials and tips. Don’t forget to bookmark or save this blog so you can easily reference it as you work on further Jenkins CI/CD projects.
References:
For more detailed information on each tool and plugin, please refer to the official documentation linked below.
Subscribe to my newsletter
Read articles from Vijay Kumar Singh directly inside your inbox. Subscribe to the newsletter, and don't miss out.
Written by

Vijay Kumar Singh
Vijay Kumar Singh
I'm Vijay Kumar Singh, a Linux, DevOps, Cloud enthusiast learner and contributor in shell scripting, Python, networking, Kubernetes, Terraform, Ansible, Jenkins, and cloud (Azure, GCP, AWS) and basics of IT world. 💻✨ Constantly exploring innovative IT technologies, sharing insights, and learning from the incredible Hashnode community. 🌟 On a mission to build robust solutions and make a positive impact in the tech world. 🚀 Let's connect and grow together! #PowerToCloud