Bootstrap a Full Stack Modern dapp using the Scaffold-ETH CLI and Subgraph Extension
 Siddhant Kulkarni
What is Scaffold-ETH 🏗?
Scaffold-ETH is an open-source, up-to-date toolkit for building decentralized applications (dapps) on the Ethereum blockchain.
It's designed to make it easier for developers to create and deploy smart contracts and build user interfaces that interact with those contracts.
⚙️ Built using NextJS, RainbowKit, Hardhat, Wagmi, Viem, and Typescript.
What is The Graph?
The Graph is a decentralized protocol for indexing and querying blockchain data.
The Graph simplifies querying complex blockchain data.
Read more about The Graph in the following Twitter thread:
Want to dive deeper into the documentation? Read more.
Why use create-eth?
npx create-eth@latest CLI to create decentralized applications (dapps) using Scaffold-ETH 2.
This is an alternative method of installing Scaffold-ETH.
Instead of directly cloning Scaffold-ETH 2, you can use create-eth to create your own custom instance, where you can choose among several configurations and extensions.
Extending your dapp with the subgraph extension
The subgraph extension is the first extension to launch with the Scaffold-ETH's CLI.
It provides a complete example of a modern dapp architecture using Scaffold-ETH and The Graph.
The subgraph extension allows users to create subgraphs for the smart contracts developed in the Scaffold-ETH 2 dapp.
npx create-eth@latest -e subgraph is used to create an instance of the Scaffold-ETH 2 subgraph package.
Benefits of using the subgraph extension
Using the subgraph extension simplifies the Scaffold-ETH development experience by providing a development environment where you can build and test a subgraph in your dapp, including an example subgraph that will work out of the box with the example contract that is shipped with Scaffold-ETH
During the setup it creates an instance of Scaffold-ETH 2 and gives the user options to choose various configurations such as Hardhat, Foundry, etc while also providing an additional repo with all of the subgraph files and configuration.
Here are a few components:
Hardhat or Foundry (user's choice) for running local networks, deploying and testing smart contracts.
Wagmi for React Hooks to start working with Ethereum.
Viem as low-level interface that provides primitives to interact with Ethereum. The alternative to ethers.js and web3.js.
NextJS for building a frontend, using many useful pre-made hooks.
RainbowKit for adding wallet connection.
DaisyUI for pre-built Tailwind CSS components.
How to bootstrap a dapp using the create-eth subgraph extension
Enough with the theoretical part, let's dive into the tutorial on how to bootstrap a Scaffold-ETH 2 dapp using the subgraph extension!!!
Prerequisites
Before we begin, you will need these following prerequisites:
Step 1: Installation
To install the Scaffold-ETH 2 Subgraph extension while running create-eth , run the following command in your terminal:
npx create-eth@latest -e subgraph
💬 Hint: If you choose Foundry as solidity framework in the CLI, you'll also need Foundryup installed in your machine. Checkout: getfoundry.sh
After running this command, you'll need to enter a name for your project followed by a choice of solidity frameworks like hardhat and foundry.
For the sake of this tutorial, let's stick to hardhat.
This command will install all dependencies using yarn, format all the files and also initialize the Git repository.
Please note, this process may take some time. Please be patient! :)
Done? Great!
Step 2: Setting up a local Ethereum network
Next step would be to set up a local Ethereum network using Hardhat (or Foundry) depending on what you chose during installation.
The network runs on your local machine and can be used for testing and development.
To do that, run this command with the terminal pointing towards the directory that was just initialized by the above command:
yarn chain
Success should look like this:
You can customize the network configuration in:
packages/hardhat/hardhat.config.tsif you have Hardhat as the solidity framework.packages/foundry/foundry.tomlif you have Foundry as the solidity framework.
Step 3: Deploying test contracts
Open up a second terminal for deploying a test contract.
To deploy test contracts to your local network, run:
yarn deploy
This command will run a basic contract, you can customize the contract in:
Hardhat =>
packages/hardhat/contractsFoundry =>
packages/foundry/contracts
This is a simple contract that the users can use to Set Greetings that are reflected on the dapp.
A successful deployment should look like this:
The yarn deploy command uses a deploy script to deploy the contract to the network. You can customize it. Is located in:
Hardhat =>
packages/hardhat/deployFoundry =>
packages/foundry/script
Step 4: Starting your NextJS app
On a third terminal, run the following command:
yarn start
Your terminal should look like this:

After this, you can visit your app on http://localhost:3000.
Your app will have three navigation tabs:
Home: Basic information about the app i.e. Contract Address, instructions on how to edit your page, etc.
Debug Contracts: This page is interesting as it contains a UI that lets you interact with the contract deployed.
Subgraph: A page that will have all the subgraph data deployed to the frontend.
If you didn't notice it already, there is also a faucet for us to get funds to test our contract. AND EVEN A BLOCK EXPLORER!🤯
Step 5: Testing our contract
Let's test our contract by sending in a transaction.
Navigate to the Debug Contracts page. There you will find a function setGreeting().
Enter a greeting and send in a payable value and hit Send💸.
Once the transaction is successful, you'll see the Greeting, Premium, and TotalCounter change values.
Congrats! You have successfully set up your Scaffold-ETH application!
Now, let's get into The Graph😎
Step 6: Setting up The Graph
Before getting into the setup, let's take a look at what subgraphs are:
A subgraph is a custom API built on blockchain data.
Subgraphs are queried using the GraphQL query language and are deployed to a Graph Node using the Graph CLI.
Once deployed and published to The Graph's decentralized network, Indexers process subgraphs and make them available to be queried by subgraph consumers.
You can find more about subgraphs in the docs here.
Now, let's set up our subgraph.
First, you'll need to run:
yarn clean-node
This command cleans out any past data.
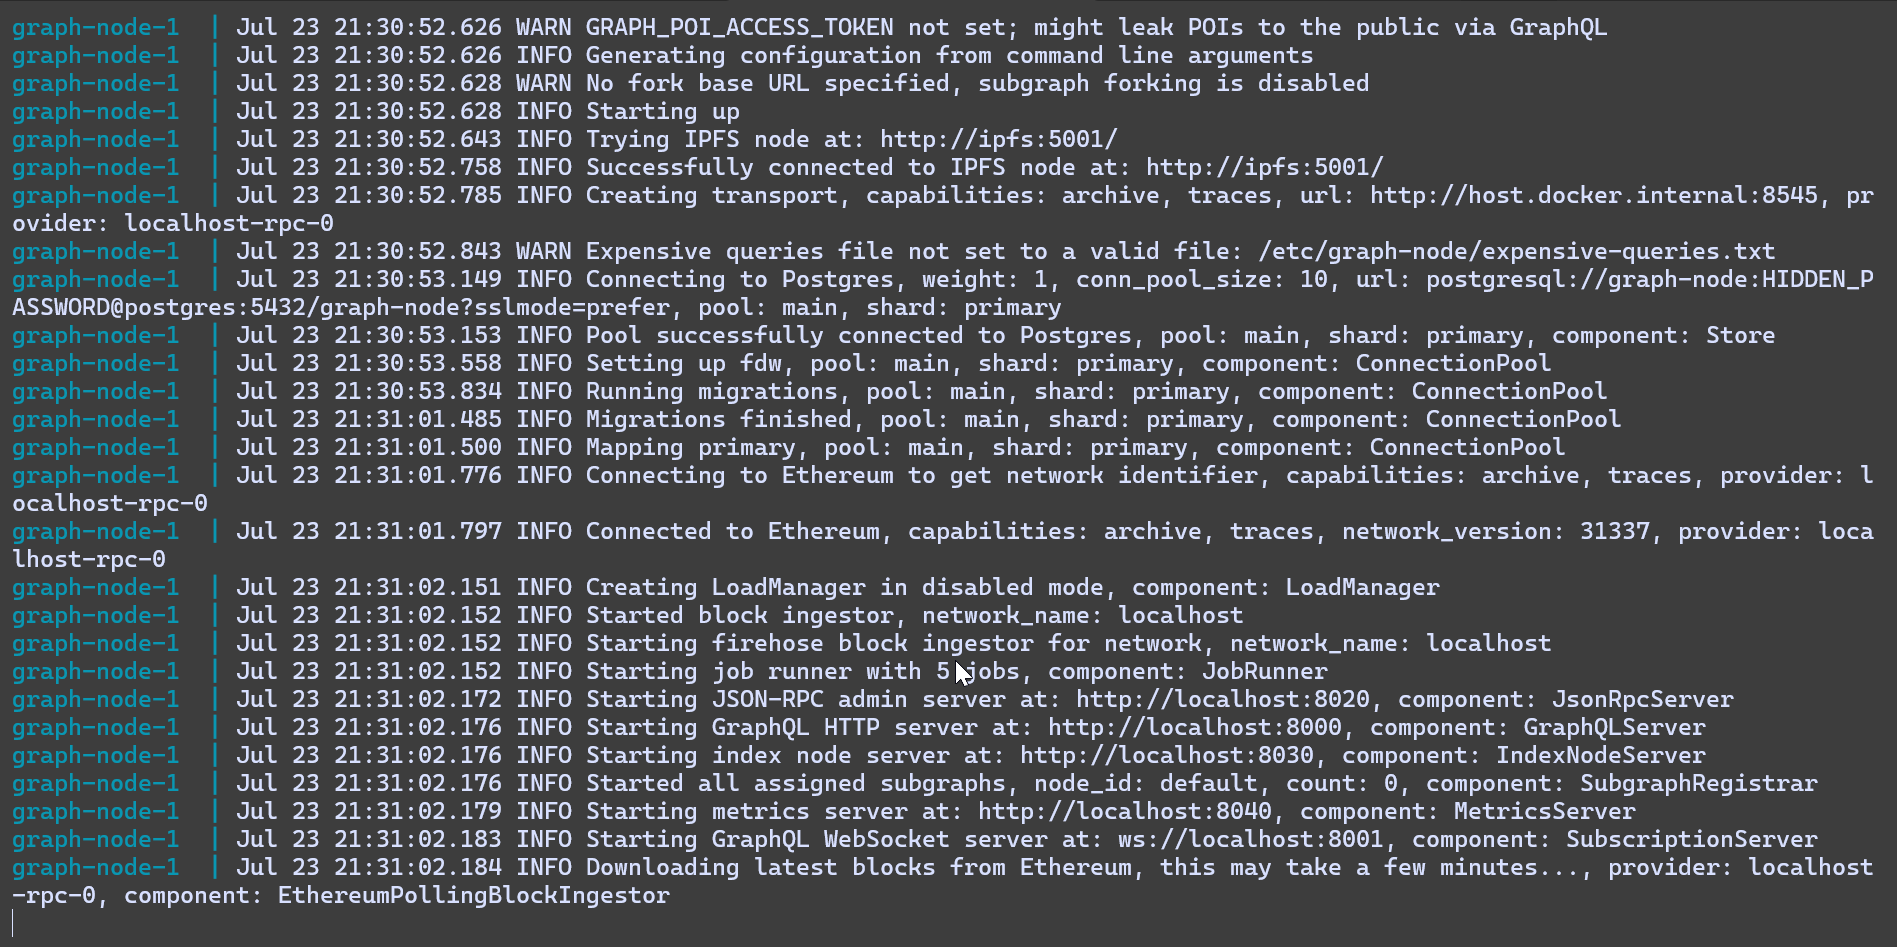
Now, in a fourth terminal, run:
yarn run-node
This command runs a local Graph node on your system.
This command spins up all the containers for The Graph using docker-compose.
On success, your terminal should look like this:

Step 7: Creating a subgraph
Now, let's create a subgraph for the contract that we deployed.
In a new terminal, run the following command:
yarn local-create
This command will create a local subgraph.
You'll get this output in your terminal:
Created subgraph: scaffold-eth/your-contract
Next, let's ship our subgraph!
Step 8: Deploy our subgraph
To deploy our subgraph, run:
yarn local-ship
For subgraph version, you can enter any version for eg. v0.0.1
What does this command do?
Well, it:
Copies the contracts ABI from the
hardhat/deploymentsfolderGenerates the
networks.jsonfileGenerates AssemblyScript types from the subgraph schema and the contract ABIs
Compiles and checks the mapping functions
Deploys our subgraph
After your subgraph gets deployed, you'll get the following output in the terminal:
Build completed: QmYQTPVqyxDty3WcZRPUhtjDiGpdQUGayWH9GLgRpKR82k

Deployed to http://localhost:8000/subgraphs/name/scaffold-eth/your-contract/graphql

Subgraph endpoints:
Queries (HTTP):     http://localhost:8000/subgraphs/name/scaffold-eth/your-contract
You'll get Deployment ID and your subgraph endpoint.
Head over to http://localhost:8000/subgraphs/name/scaffold-eth/your-contract and test your subgraph.
For an example query, use:
query MyQuery {
  greetings(first: 5, orderBy: createdAt, orderDirection: desc) {
    id
    greeting
    premium
    sender {
      id
      greetingCount
    }
  }
}
If you have already interacted with your contract, you will get an output similar to this:
{
  "data": {
    "greetings": [
      {
        "id": "0x4db647f8e7e7cf42bccfa2b1b091061a354f2dc1fc58a545f594d0080288d0ea-0",
        "greeting": "Hello World!",
        "premium": true,
        "sender": {
          "id": "0x1f36c98dcc4a92b2d7b96a7378f6bcfe2c4abf9b",
          "greetingCount": "1"
        }
      }
    ]
  }
}
Now, if you head over to the Subgraph page of your app, you will see that your subgraph data can be displayed on the frontend, like this:
Do you see it?👀
If yes, then congratulations! You have successfully deployed a Scaffold-ETH application using The Graph!😎
What next?
Now that your basic application is ready, you can customize it however you want.
If you want to change the smart contract, head over to:
packages/hardhat/contractsIf you want to change the deployment network, you can:
Change the
defaultNetworkinpackages/hardhat/hardhat.config.tsto your selected networkAnd change the
targetNetworksinpackages/nextjs/scaffold.config.tsto the same network.
That's not even all that you can do! If you want an in-depth tutorial, go over this step-by-step tutorial on how to customize your dapp, here.
Thank you for sticking till the end!💜
You can connect with me here:
Subscribe to my newsletter
Read articles from Siddhant Kulkarni directly inside your inbox. Subscribe to the newsletter, and don't miss out.
Written by

Siddhant Kulkarni
Siddhant Kulkarni
Advocate at The Graph | Editor at Geo Browser | Aspiring Blockchain Developer