Multi-Tier Web Application Stack Setup Locally
 Rahul Williams
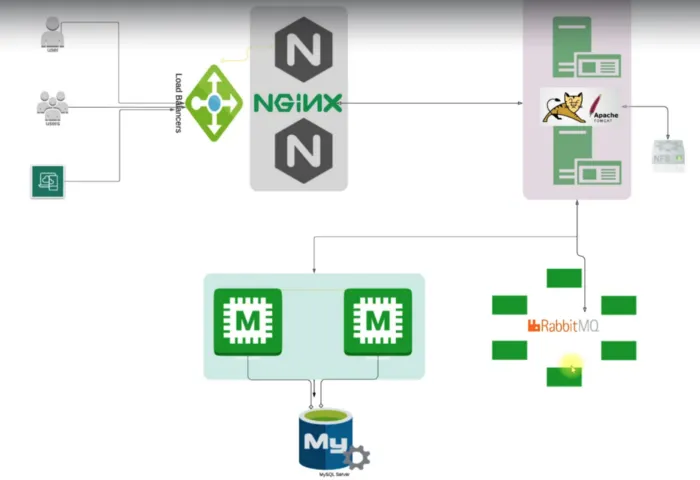
Project Source: https://github.com/rwmotivation/vprofile-project
GitHub Repo: vprofile-project
Prerequisite
To complete this project you should have your lab set up with the appropriate tools.
Git Bash or any Code editor of choice
Oracle VirtualBox
Install Vagrant and Vagrant Plugins.
Firstly We Set-up our VMs
Clone the project repository to your local environment (using gitbash)
git clone git@github.com:Adutoby/vprofile-project.git
cd to the directory that has the Vagrantfile and run the below command to start the VM via Vagrant.
Vagrant up

You might need to install the Vagrant plugins host-manger, run the below command if you encounter errors while your VMs are coming up, and run the Vagrant up command again
vagrant plugin install vagrant-hostmanager
vagrant up
It is important to note that bringing up the VMs will take some time depending on your internet speed. If the setup process stops, run the vagrant up command again until all 5 VMs are up and running.
INFO: All the VM's hostname and /etc/hosts file entries will be automatically updated
Check your Oracle Virtual-box Manager UI to see the VM’s setup and state running.
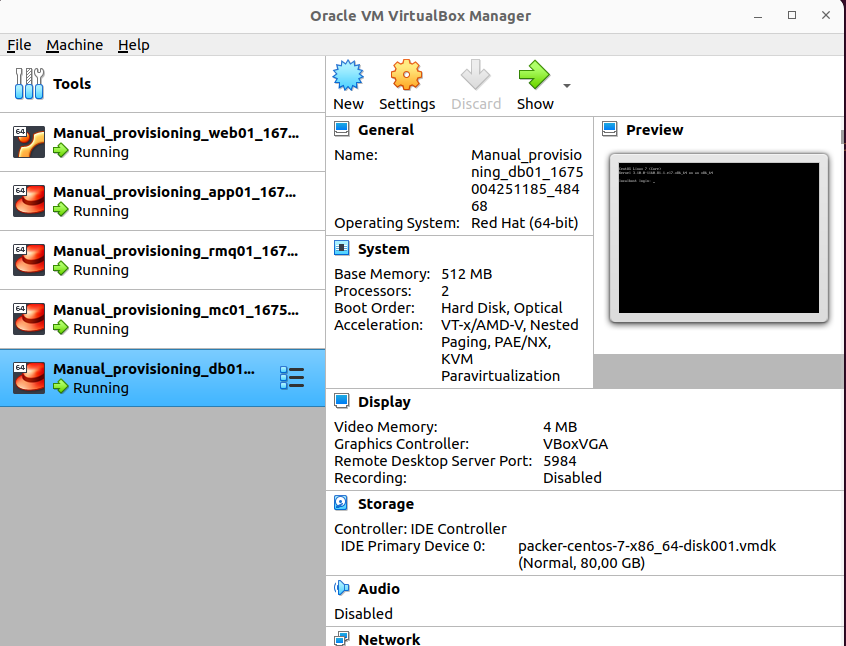
With all the VMs now set, let's validate via SSH into the VMs starting with the web server named web01. Run command.
vagrant ssh web01
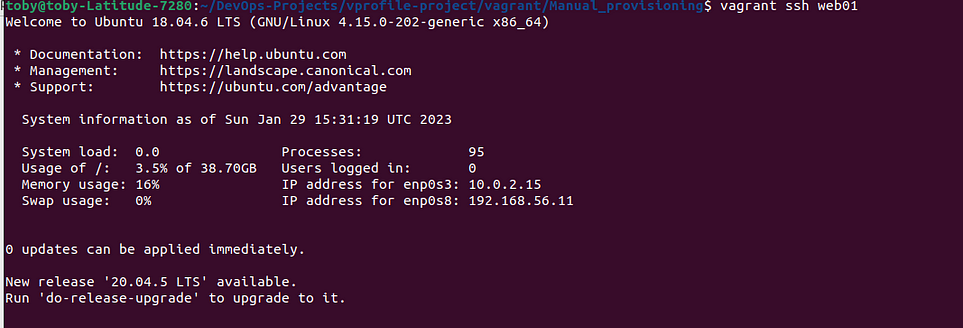
We are now inside the web server. Next, let us Check the host to validate that all were automatically updated by running the cat command to view the content in the /etc/host file
cat /etc/hosts
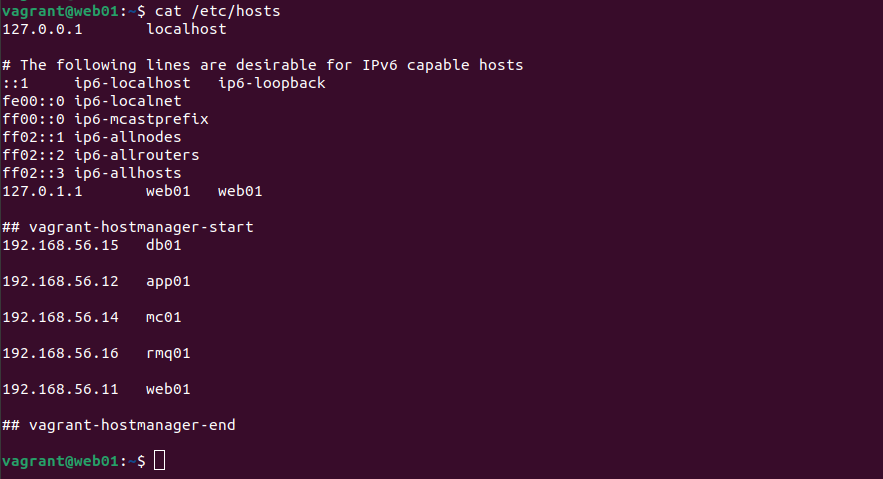
Great, now ping the app server to confirm connectivity and communication
ping app01

Connectivity was successful, log out of the web01 server connect to the app01 server, and check connectivity to the database VM db01, the Memcache VM mc01 and the rabbitMQ VM respectively rmq01 since the application server will be communicating directly with all 3 servers (VMs)
logout
vagrant ssh app01

app01 connects to db01 successfully i.e we have connectivity between the application server and the database server

same for the app server and Memcache server mc01 and finally checking connectivity between app01 and queuing agent RabbitMQ server rmq01 was also successful.

Provisioning the VMs
The next stage will be to provision the servers manually and there are 6 different services that I will be provisioning in project architecture.
Services
1. Nginx: Web Service
2. Tomcat: Application Server
3. RabbitMQ; Broker/Queuing Agent
4. Memcache; DB Caching
5. ElasticSearch; Indexing/Search service
6. MySQL; SQL Database
Project Architecture
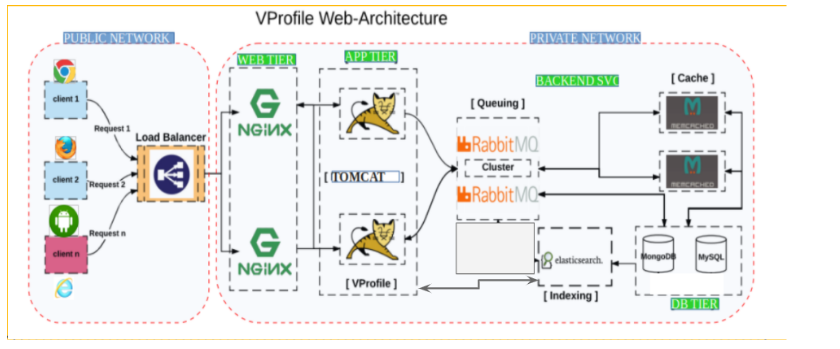
The Setup for the service will be done in the below order starting from setting up the Database service down to the Web service accordingly.
1. MySQL (Database SVC)
2. Memcache (DB Caching SVC)
3. RabbitMQ (Broker/Queue SVC)
4. Tomcat (Application SVC)
5. Nginx (Web SVC)
Provisioning Database SVC — MySQL setup
ssh into the db01
vagrant ssh db01
Switch to root user and update all packages to the latest patches when logged into the VM. Also, set the repository by installing EPEL Extra Packages for Enterprise Linux)
sudo -i
yum update -y
yum install epel-release -y
Set up the db password using DATABASE_PASS environment variable and add it to /etc/profile file by running;
DATABASE_PASS='admin123'
To save the variable permanently, add the variable to/etc/profile file and update it using a text editor of choice. I used Vim so I installed Vim using the yum install vim command first and then the below scripts
vim /etc/profile
source /etc/profile
Next is to install Maria DB and git Package
yum install git mariadb-server -y
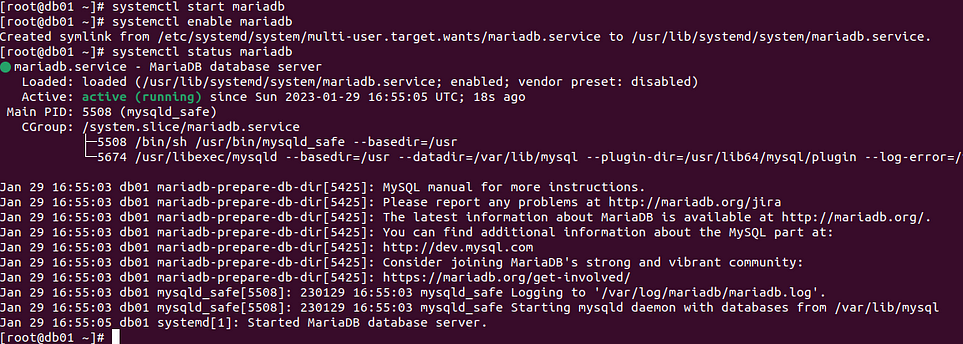
Once Mariadb is installed, start and enable Mariadb service. Also, ensure to check the status of the MariaDB service to make sure it’s active (running).
systemctl start mariadb
systemctl enable mariadb
systemctl status mariadb
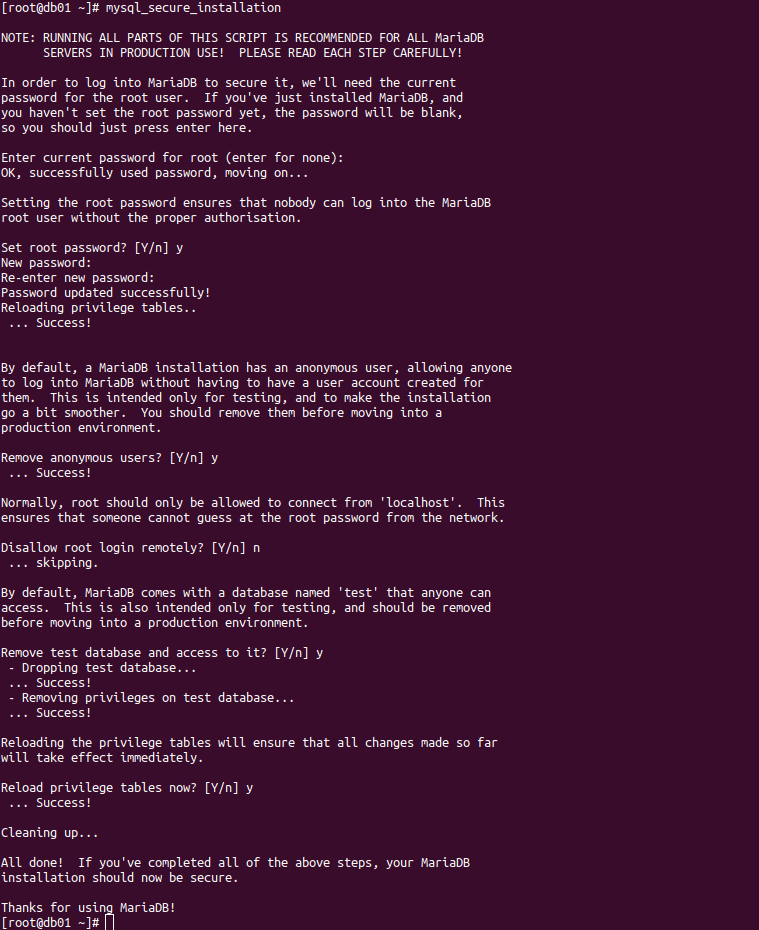
RUN MySQL secure installation script.
mysql_secure_installation
For the DB root password, I used admin123
Validate connectivity to db with the command below: at the password prompt enter admin123 . If the connection is successful exit from DB.
mysql -u root -p
exit

I proceeded to clone the source code to the DB VM, change the directory to src/main/resources/ to get the `SQL queries.
git clone https://github.com/devopshydclub/vprofile-project.git
cd vprofile-project/src/main/resources/

Create a database account, Configure the DB, and initialize
mysql -u root -p"$DATABASE_PASS" -e "create database accounts"
mysql -u root -p"$DATABASE_PASS" -e "grant all privileges on accounts.* TO 'admin'@'app01' identified by 'admin123' "
cd ../../..
mysql -u root -p"$DATABASE_PASS" accounts < src/main/resources/db_backup.sql
mysql -u root -p"$DATABASE_PASS" -e "FLUSH PRIVILEGES"

Login to the database and verify
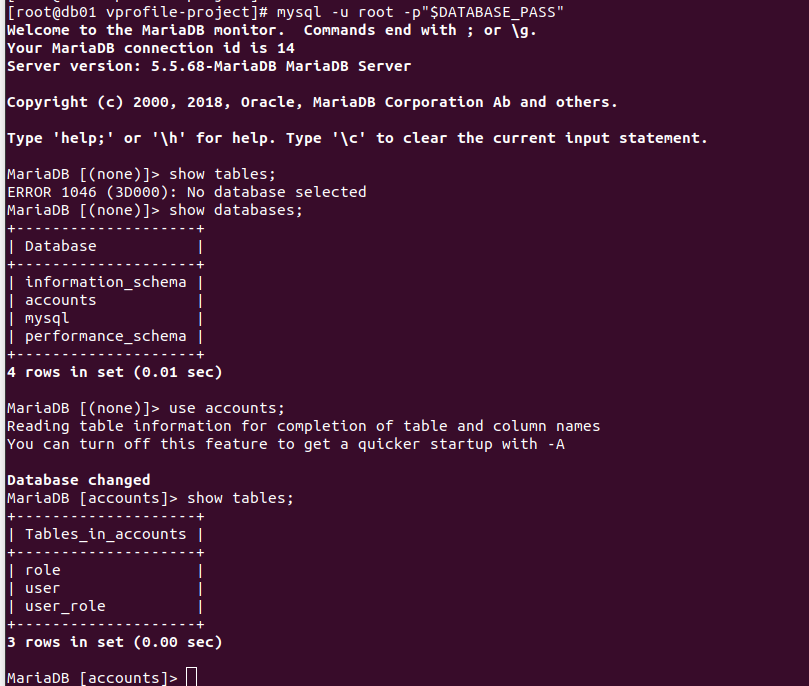
Restart the MariaDB server and logout, db is provisioned and ready
systemctl restart mariadb
exit
Provisioning (DB Caching SVC) Memcache setup
following the flow of service provisioning highlighted above we will log in to the Memcached server, (mc01) and switch to the root user with the below commands
vagrant ssh mc01
sudo -i
Just as MySQL provisioning, update OS with latest patches and download epel repository.
yum update -y
yum install epel-release -y
Install the memcached package.
yum install memcached -y
Start/enable the Memcached service and check the status of the service.
systemctl start memcached
systemctl enable memcached
systemctl status memcached

To enable memcached to listen on TCP port 11211 and UDP port 11111 run the below command.
memcached -p 11211 -U 11111 -u memcached -d
To Validate if the port is running, run the command
ss -tunlp | grep 11211

The Caching server is provisioned and reads exits from the serv and continues to the next flow setup.
Provisioning RabbitMQ
RabbitMQ is used as the queuing agent in the stack for an application. To begin the setup we login into the Rabbit MQ server (rmq01) and switch to the root user.
vagrant ssh rmq01
sudo -i
Updating OS with latest patches and installing epel repository.
yum update -y
yum install epel-release -y
To install RabbitMQ, some dependencies should be installed first such as wget and erlang-solutions. Run the below command to set those up.
yum install wget -y
cd /tmp/
wget http://packages.erlang-solutions.com/erlang-solutions-2.0-1.noarch.rpm
sudo rpm -Uvh erlang-solutions-2.0-1.noarch.rpm
sudo yum -y install erlang socat
Next, Install the RabbitMQ server with the command below
curl -s https://packagecloud.io/install/repositories/rabbitmq/rabbitmq-server/script.rpm.sh | sudo bash
sudo yum install rabbitmq-server -y
Now start/enable the RabbitMQ service and check the status of the service.
systemctl start rabbitmq-server
systemctl enable rabbitmq-server
systemctl status rabbitmq-server
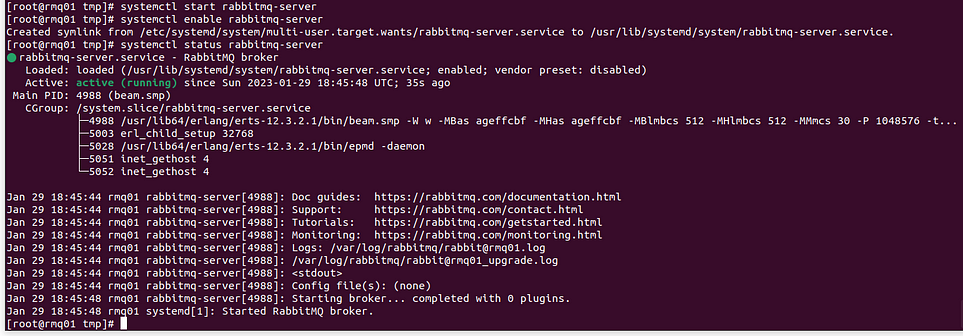
Set up a config change to Create a test user with password test, and Create a user_tag for the test user as administrator.
Restart the rabbitmq service after config change completion
cd
echo "[{rabbit, [{loopback_users, []}]}]." > /etc/rabbitmq/rabbitmq.config
rabbitmqctl add_user test test
rabbitmqctl set_user_tags test administrator
systemctl restart rabbitmq-server
Validate service is active/running after restart
systemctl status rabbitmq-server
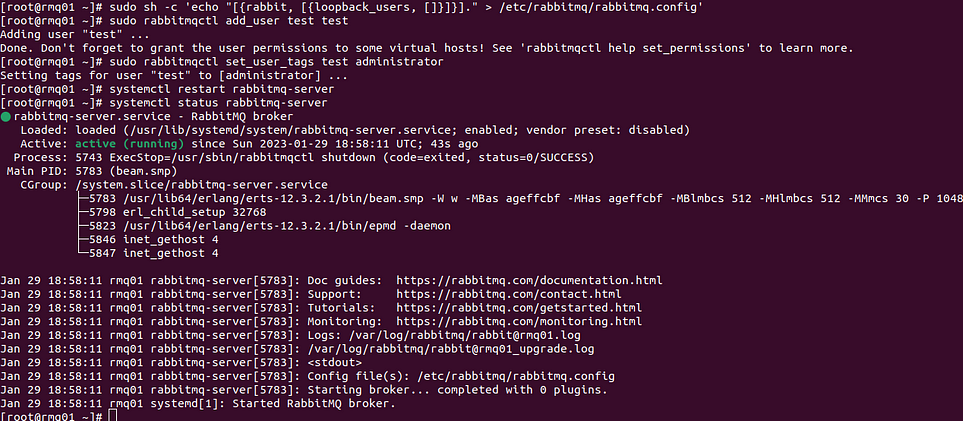
Great!, exit the rmq01 server to the next service.
Tomcat Setup (Application SVC)
With Vagrant, log into app01 the server, and switch to the root user.
vagrant ssh app01
sudo -i
As per best practice, Update the OS with the latest patches and download the Epel repository.
yum update -y
yum install epel-release -y
Install dependencies for the Tomcat server. (git, wget, maven, java-1.8.0-openjdk)
yum install java-1.8.0-openjdk -y
yum install git maven wget -y
(change directory) cd to /tmp/ directory, and download Tomcat.
cd /tmp
wget https://archive.apache.org/dist/tomcat/tomcat-8/v8.5.37/bin/apache-tomcat-8.5.37.tar.
tar xzvf apache-tomcat-8.5.37.tar.gz
Add the tomcat user and copy data to the tomcat home directory.
Check the new user tomcat with the id tomcat command.
useradd --home-dir /usr/local/tomcat8 --shell /sbin/nologin tomcat
Copy your data to /usr/local/tomcat8 the directory which is the home directory for Tomcat users.
cp -r /tmp/apache-tomcat-8.5.37/* /usr/local/tomcat8/
Observe that the root user has ownership of all files under /usr/local/tomcat8/ the direction ry, and change it to tomcat the user.
ls -l /usr/local/tomcat8/
chown -R tomcat.tomcat /usr/local/tomcat8
ls -l /usr/local/tomcat8/
Setup systems for Tomcat
Create a file with the below content. Once created, Use systemctl start tomcat to start tomcat and systemctl stop tomcat to stop tomcat service.
[Unit]
Description=Tomcat
After=network.target
[Service]
User=tomcat
WorkingDirectory=/usr/local/tomcat8
Environment=JRE_HOME=/usr/lib/jvm/jre
Environment=JAVA_HOME=/usr/lib/jvm/jre
Environment=CATALINA_HOME=/usr/local/tomcat8
Environment=CATALINE_BASE=/usr/local/tomcat8
ExecStart=/usr/local/tomcat8/bin/catalina.sh run
ExecStop=/usr/local/tomcat8/bin/shutdown.sh
SyslogIdentifier=tomcat-%i
[Install]
WantedBy=multi-user.target
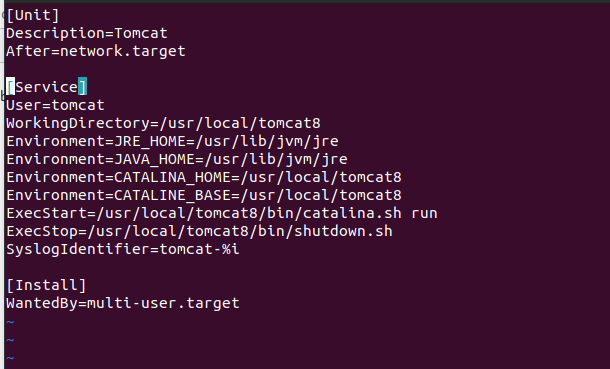
For any changes made to the file under /etc/systemd/system/ directory, we need to run the below command to be effective and Enable the tomcat service.
The service name tomcat has to be the same as given /etc/systemd/system/tomcat.service.
systemctl daemon-reload
systemctl enable tomcat
systemctl start tomcat
systemctl status tomcat
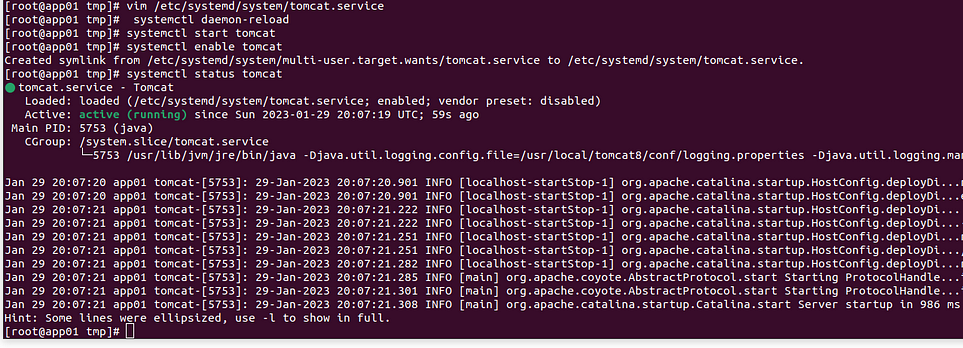
Code Build & Deploy to Tomcat(app01) Server
Clone the source code into the /tmp directory, then cd into the project-project directory.
git clone https://github.com/devopshydclub/vprofile-project.git
cd vprofile-project/
To build the artifact with maven, we need to Update the configuration file that connects the backend services i.e.., db, memcaches, and the queuing agent rabbitMQ service.
This is done by editing the application.properties file in the /src/main/resources/application.properties file using a text editor of your choice. I sued Vim.
vim src/main/resources/application.properties
In application.properties file:
Ensure the settings are correct. Check DB configuration: we named the DB server db01 , and we have admin a user with a password admin123 set up as credentials.
For the memcached service, the hostname is mc01 and we validated it is listening on TCP port 11211.
For rabbitMQ, the hostname is rmq01 and we have created a user test with pwd test.
#JDBC Configutation for Database Connection
jdbc.driverClassName=com.mysql.jdbc.Driver
jdbc.url=jdbc:mysql://db01:3306/accounts?useUnicode=true&characterEncoding=UTF-8&zeroDateTimeBehavior=convertToNull
jdbc.username=admin
jdbc.password=admin123

#Memcached Configuration For Active and StandBy Host
#For Active Host
memcached.active.host=mc01
memcached.active.port=11211
#For StandBy Host
memcached.standBy.host=127.0.0.2
memcached.standBy.port=11211

#RabbitMq Configuration
rabbitmq.address=rmq01
rabbitmq.port=5672
rabbitmq.username=test
rabbitmq.password=test

#Elasticesearch Configuration
elasticsearch.host =192.168.1.85
elasticsearch.port =9300
elasticsearch.cluster=vprofile
elasticsearch.node=vprofilenode
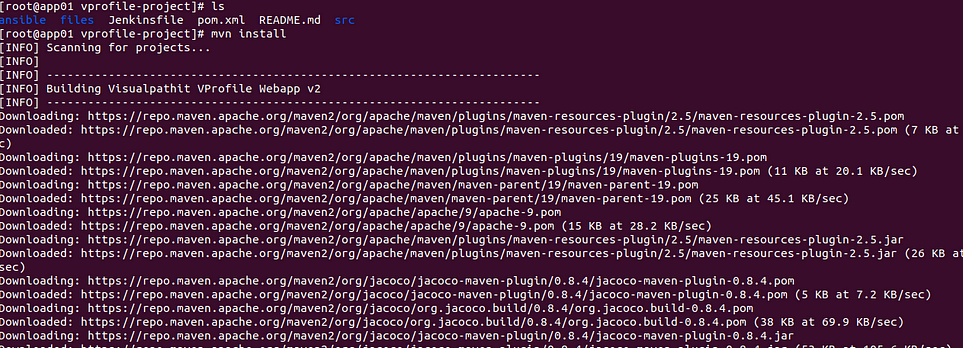
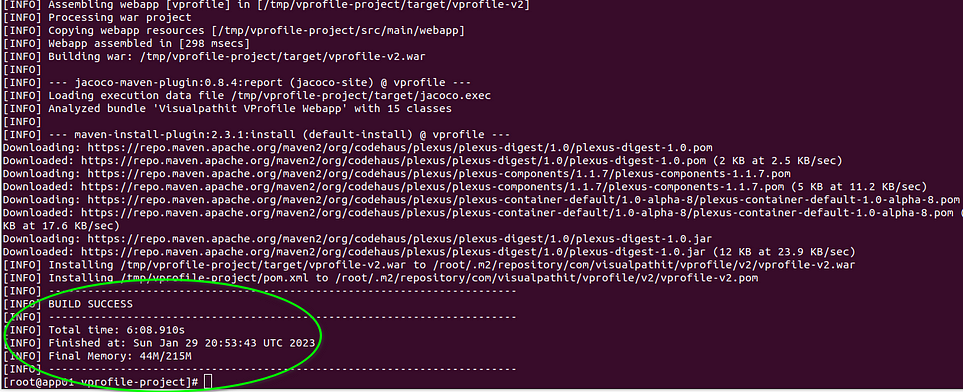
Next, we build our code with maven using the mvn install command to create our artifact. Run the below command inside the repository (vprofile-project). An Artifact will be created /tmp/vprofile-project/target/vprofile-v2.war
cd target/
ls
cd to target and list to see the artifact, remove the default app from the Tomcat server, and deploy the newly built artifact profile-v2.var to the Tomcat server
Ensure to stop the server first before removing the default from the /usr/local/tomcat8/webapps/ROOT directory. Give about 120 seconds allowing the server to stop properly. use these command
systemctl stop tomcat
systemctl status tomcat
rm -rf /usr/local/tomcat8/webapps/ROOT

Our artifact is the profile-project/target directory, copy the artifact to /usr/local/tomcat8/webapps/ the directory and ROOT.war then start the Tomcat server. Once started, it will extract our artifact ROOT.war under ROOT the directory.
cd ..
cp target/vprofile-v2.war /usr/local/tomcat8/webapps/ROOT.war
systemctl start tomcat
ls /usr/local/tomcat8/webapps/
Give the application some time to come up say around 200secs, while this happens we can proceed to set up the nginx server.
Setup Nginx SVC
We used Ubuntu for the Nginx server, while all other servers are CentOs. As usually as per best practice, update the OS with the latest patches running the below command this time using the apt package manager:
sudo apt update && sudo apt upgrade
Switch to root user and install nginx.
sudo -i
apt install nginx -y
Next, we create an nginx configuration file under the directory /etc/nginx/sites-available/. This allows nginx to act as a load balancer with the below content:
vim /etc/nginx/sites-available/vproapp
upstream vproapp {
server app01:8080;
}
server {
listen 80;
location / {
proxy_pass http://vproapp;
}
}
Remove default nginx config file:
rm -rf /etc/nginx/sites-enabled/default
Create a symbolic link for our configuration file using the default config location detailed below to enable our site and restart the Nginx server.
ln -s /etc/nginx/sites-available/vproapp /etc/nginx/sites-enabled/vproapp
systemctl restart nginx
Validate Application(stacks) from the Browser.
From inside of the web01 server, run the ifconfig command to display its IP address. The IP address of our web01 : 192.168.56.11

Now open a browser and enter the web app IP address to validate that nginx is running 192.168.56.11. you should see the login page
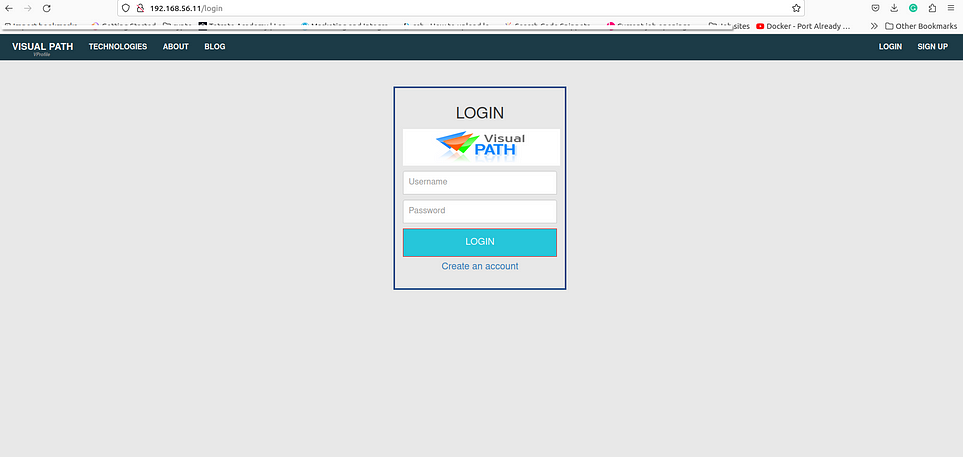
Next, validate the db connection using the credentials admin_vp For both username and password. Connect successfully!! Show that the app is running from the Tomcat server through the web server.
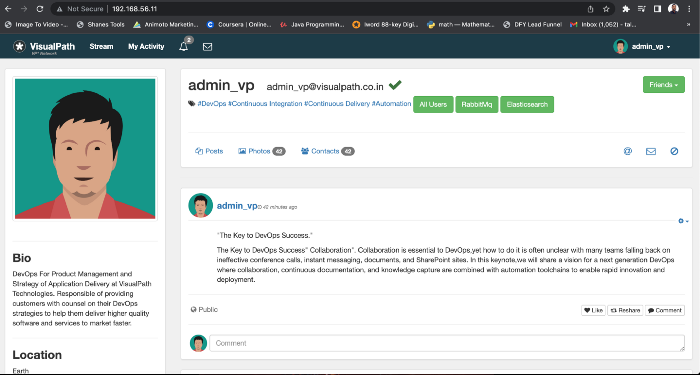
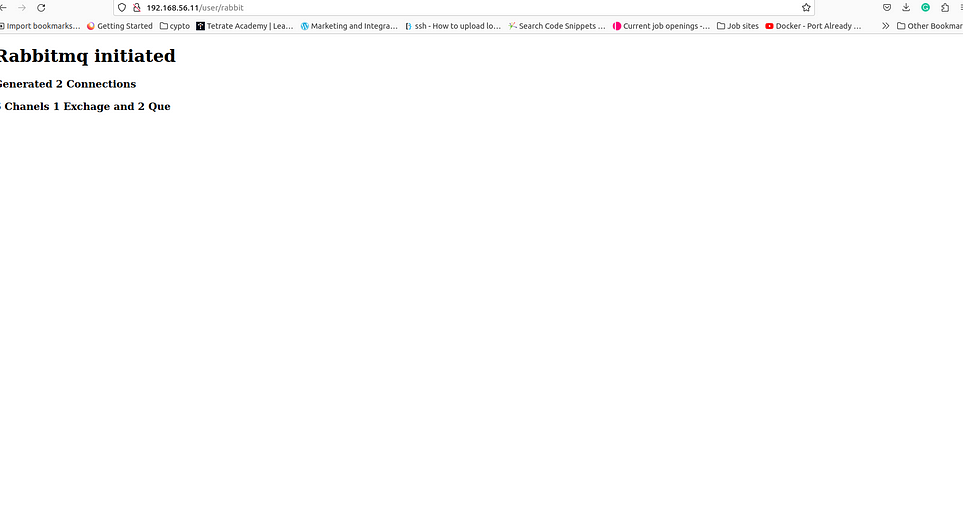
To validate the RabbitMQ connection, click RabbitMQ on the page and it should return below on display.
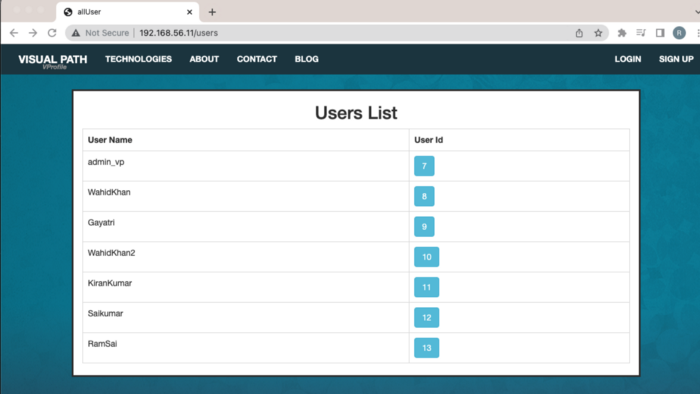
To validate the Memcache connection, click on the All user button on the front page to load all users and then click on any user.
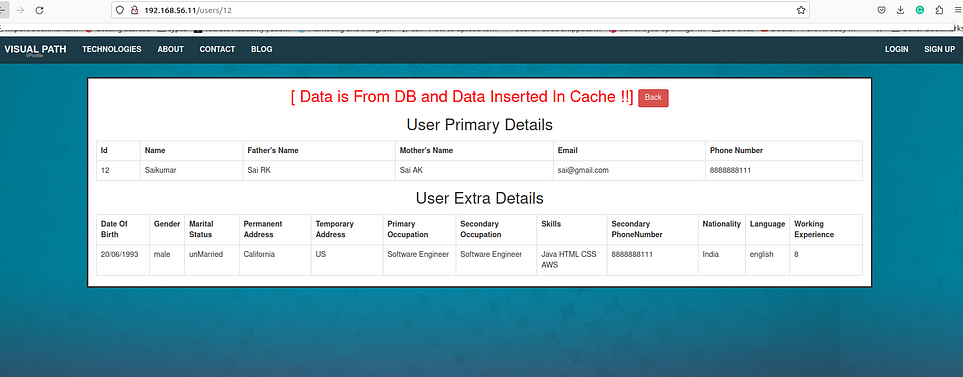
Validate data is coming from the Database when the user first time requests it.
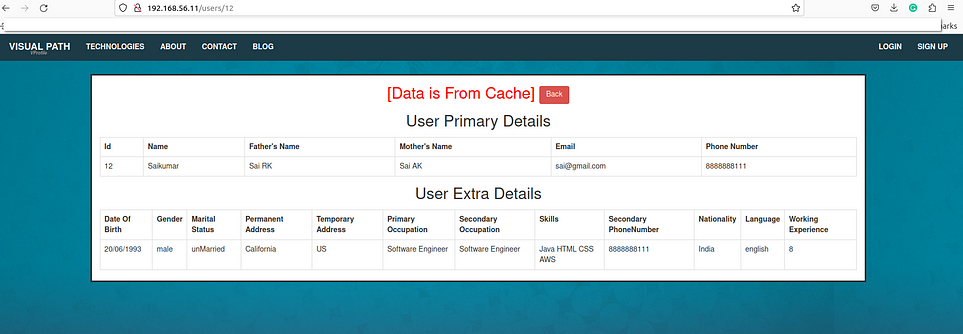
Validate data is coming from Memcached when the user second time requests it.
Great Job making it this far, we have successfully set tools for our stack, and cloned the source code, via vaga t, we brought up our VMs and validated them, we successfully set up all our services Mysql, Memcached, Rabbit MQ, Tomcat Nginx, and built and deployed them and finally we have validated to see all work perfectly.
The exercise might seem time-consuming but it helps to understand the granularity of how to provision the aforementioned and their interaction, communication flow and they are interconnected. My next project will show how to automate this entire process using a script.
Cleanup
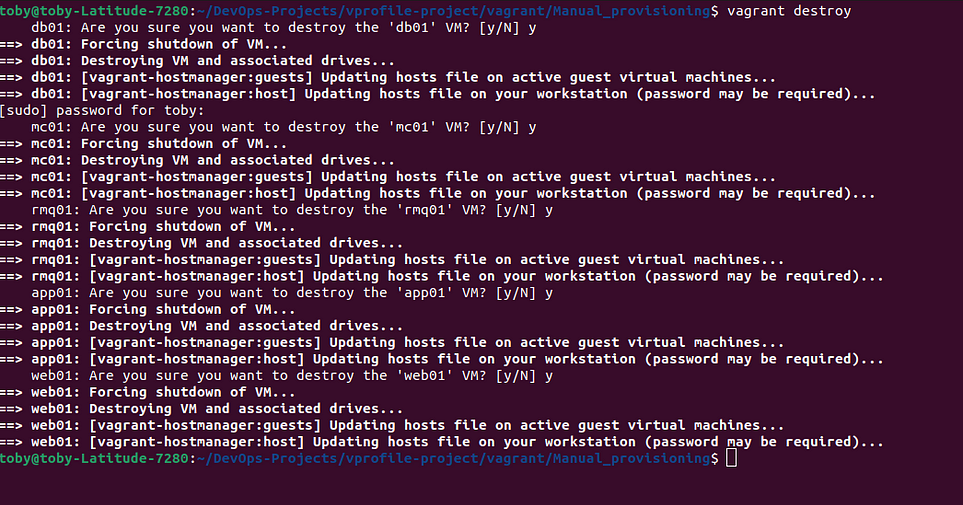
Navigate to the project directory in the manual provisioning directory where the vagrant file is contained, and run the command Vagrant destroy to bring down all virtual machines. The exercise might seem time-consuming but it helps to understand the granularity of how to provision the aforementioned and their interaction, communication flow and they are interconnected. My next project will show how to automate this entire process using a script.
vagrant destroy
Thank you for reading, your comment and reaction on how to better improve the stack will be appreciated, and look out for the next project automating the process. I can reached on LinkedIn HERE.
Subscribe to my newsletter
Read articles from Rahul Williams directly inside your inbox. Subscribe to the newsletter, and don't miss out.
Written by

Rahul Williams
Rahul Williams
"With 20+ years in IT 🚀, I'm a DevOps Engineer, shaping success with a Master's in CS 🎓, Green Belt Six Sigma, and PMP certifications 🏆. Proficient & Certified in AWS, GitLab, Pulumi, Docker, Kubernetes, Python, and more! 🛠️ Passionate about automating software delivery, I've led successful GitHub to GitLab migrations, crafted custom CloudWatch dashboards with Pulumi, and implemented robust CI/CD pipelines. 🚀 Security-savvy with Tenable, adept at optimizing database performance, and troubleshooting production systems. 🛡️ I thrive in collaboration, mentorship, and keeping pace with the latest DevOps trends. Let's achieve your business goals together! 💼🌐 #DevOps #ITExpert #ProjectLeadership"