Day 21/22 of 40 Days of K8s: Manage TLS Certificates, Authentication and Authorization In Kubernetes
 Gopi Vivek Manne
Table of contents
- ❇ How SSL/TLS works in general
- ❇ How does Server Create Certificate?
- ❇ Types of Certificates
- ❇ Public Certificate vs Private Key
- ❇ Kubernetes Certificate Use Case
- ❇ API Server Authentication and Authorization:
- ❇ Example
- Creating and Approving CSR for New User:
- ❇ Verification of client certificate issued by api-server CA or not
In the previous day, we learnt how SSL/TLS encryption works and how traffic flows from client to server and how to establish secure connection. Now, we will understand TLS with respect to k8s.
❇ How SSL/TLS works in general
Client initiates a secure connection to the server.
Server responds with its public certificate (issued by a Certificate Authority).
Client verifies the server's certificate against the CA's root certificate.
Client and server establish a session(symmetric) key for encrypting and decrypting data to enable Secure communication is maintained throughout the session.
❇ How does Server Create Certificate?
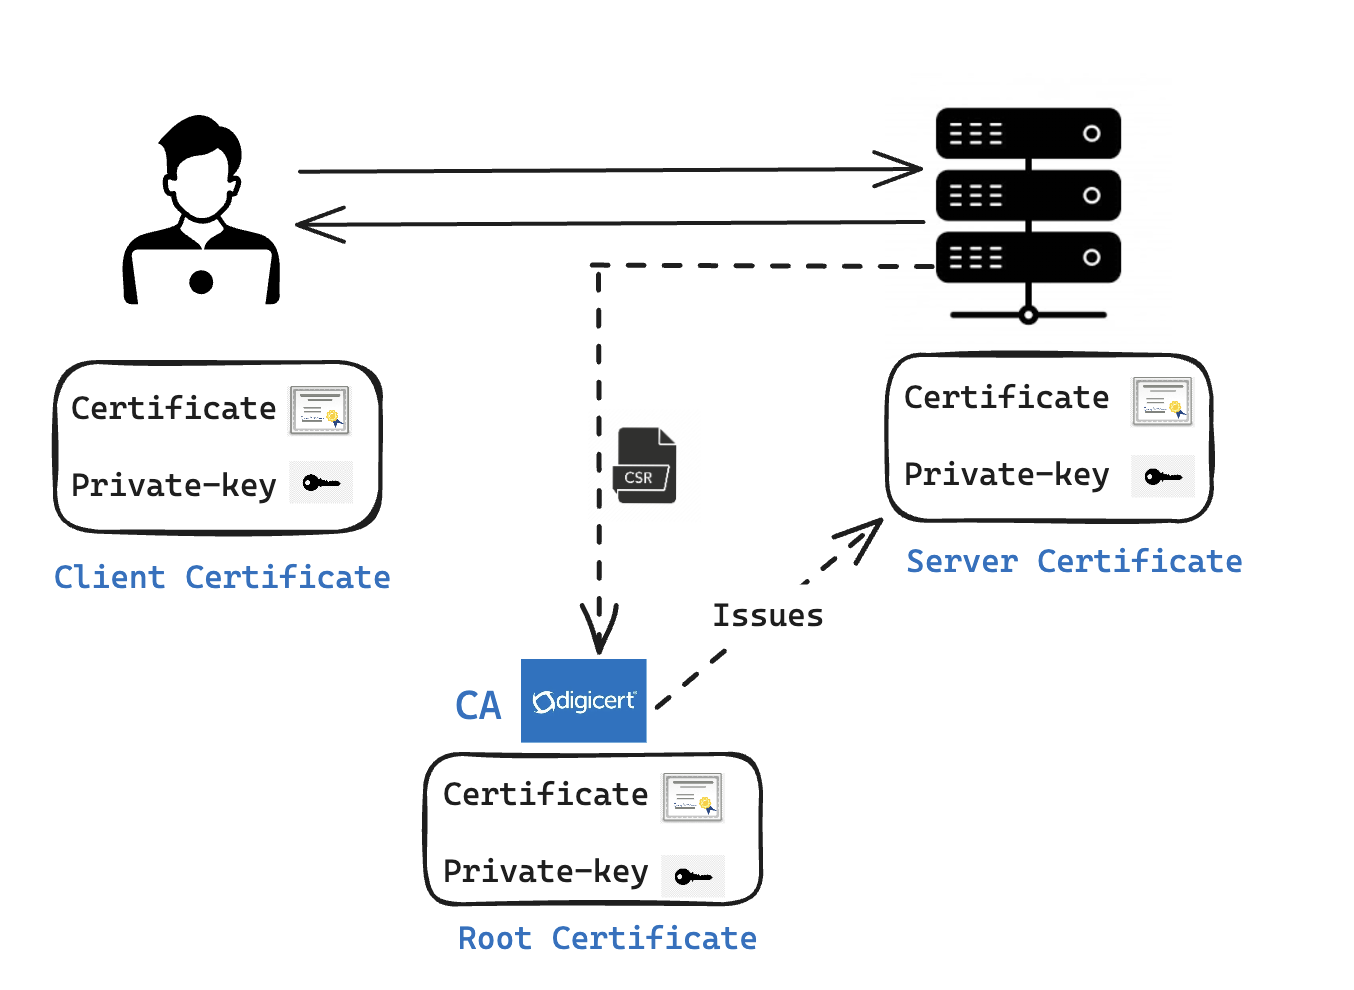
Server submits a Certificate Signing Request (CSR) to a Certificate Authority (CA)
CA validates the CSR and verifies domain ownership/authenticity of server.
CA issues a public certificate and private key pair to the server.
While Private key is retained by server, Public certificate is added to client browsers for future verification.
Once verified the public certificate it establishes the secure communication and response back from server.
CA issues public cert and private key to server using its own pubic cert and private key pair called root-certificate.
❇ Types of Certificates
Client Certificate: In some secure communications, particularly in mutual TLS (mTLS), the client generates its own certificate to prove its identity to the server.
Root Certificate: Used by clients and servers to validate other certificates, issued by a CA.
Server Certificate: Used for encrypting/decrypting data, includes public certificate and private key for enabling secure communication between client and server.
❇ Public Certificate vs Private Key
We have so many certificates like for Client,Server, Root. To identify the difference between Public certificate and Private key
Private Key: Anything with "key" in the name or extension.
Public Certificate: All other remaining certificate files.
❇ Kubernetes Certificate Use Case
Let's consider we have a Cluster with 1 master node and 3 worker node. We should enable Secure communication between Client to api-server and api-server to worker nodes(kubelet), and api-server to master components(scheduler,CM,ETCD)
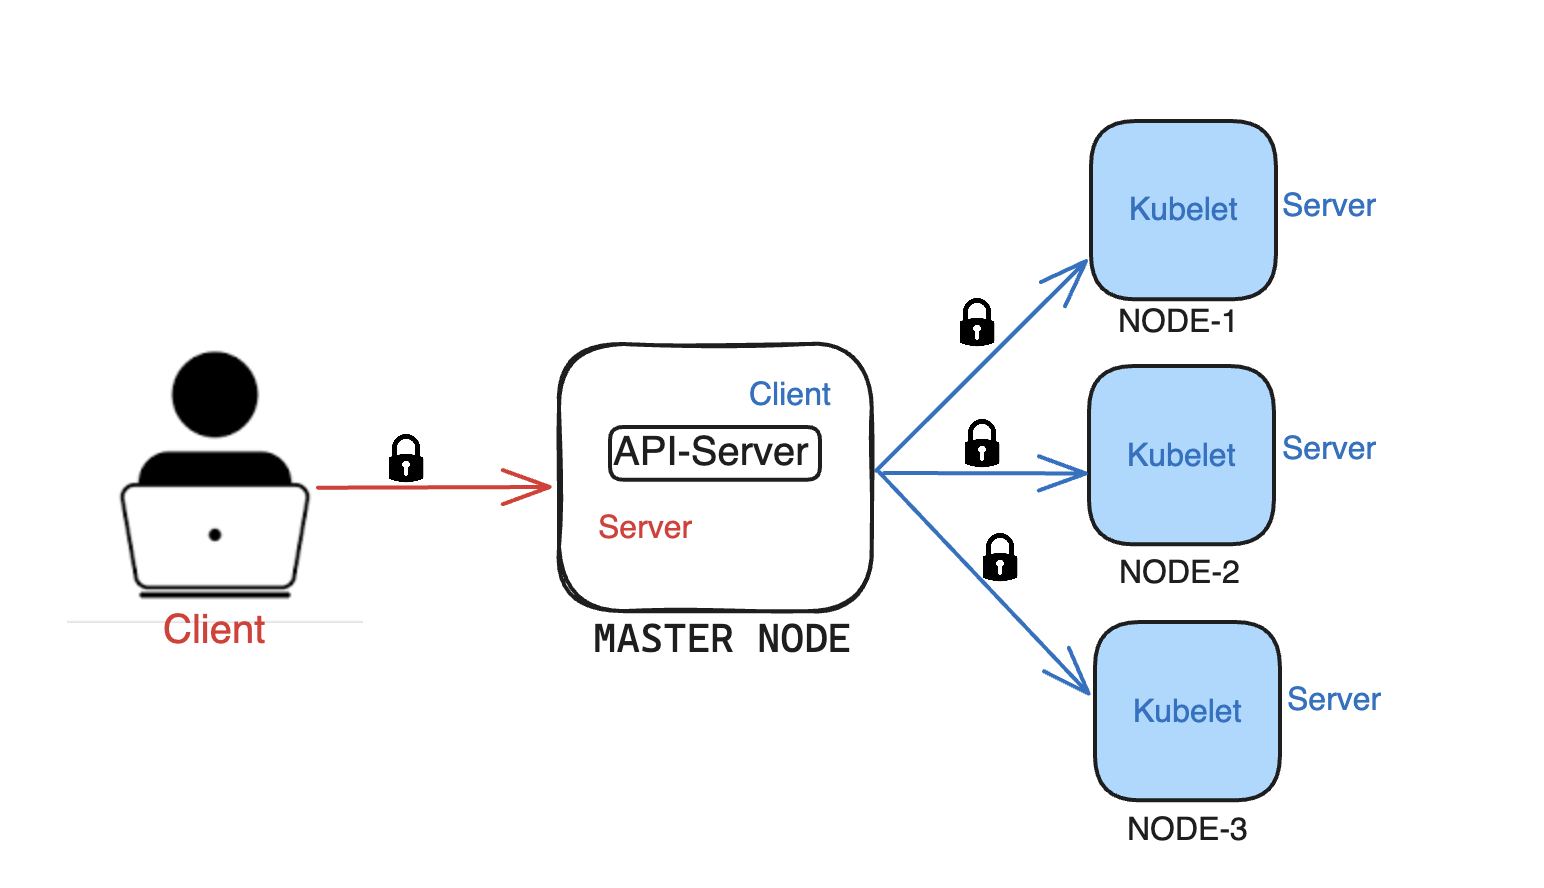
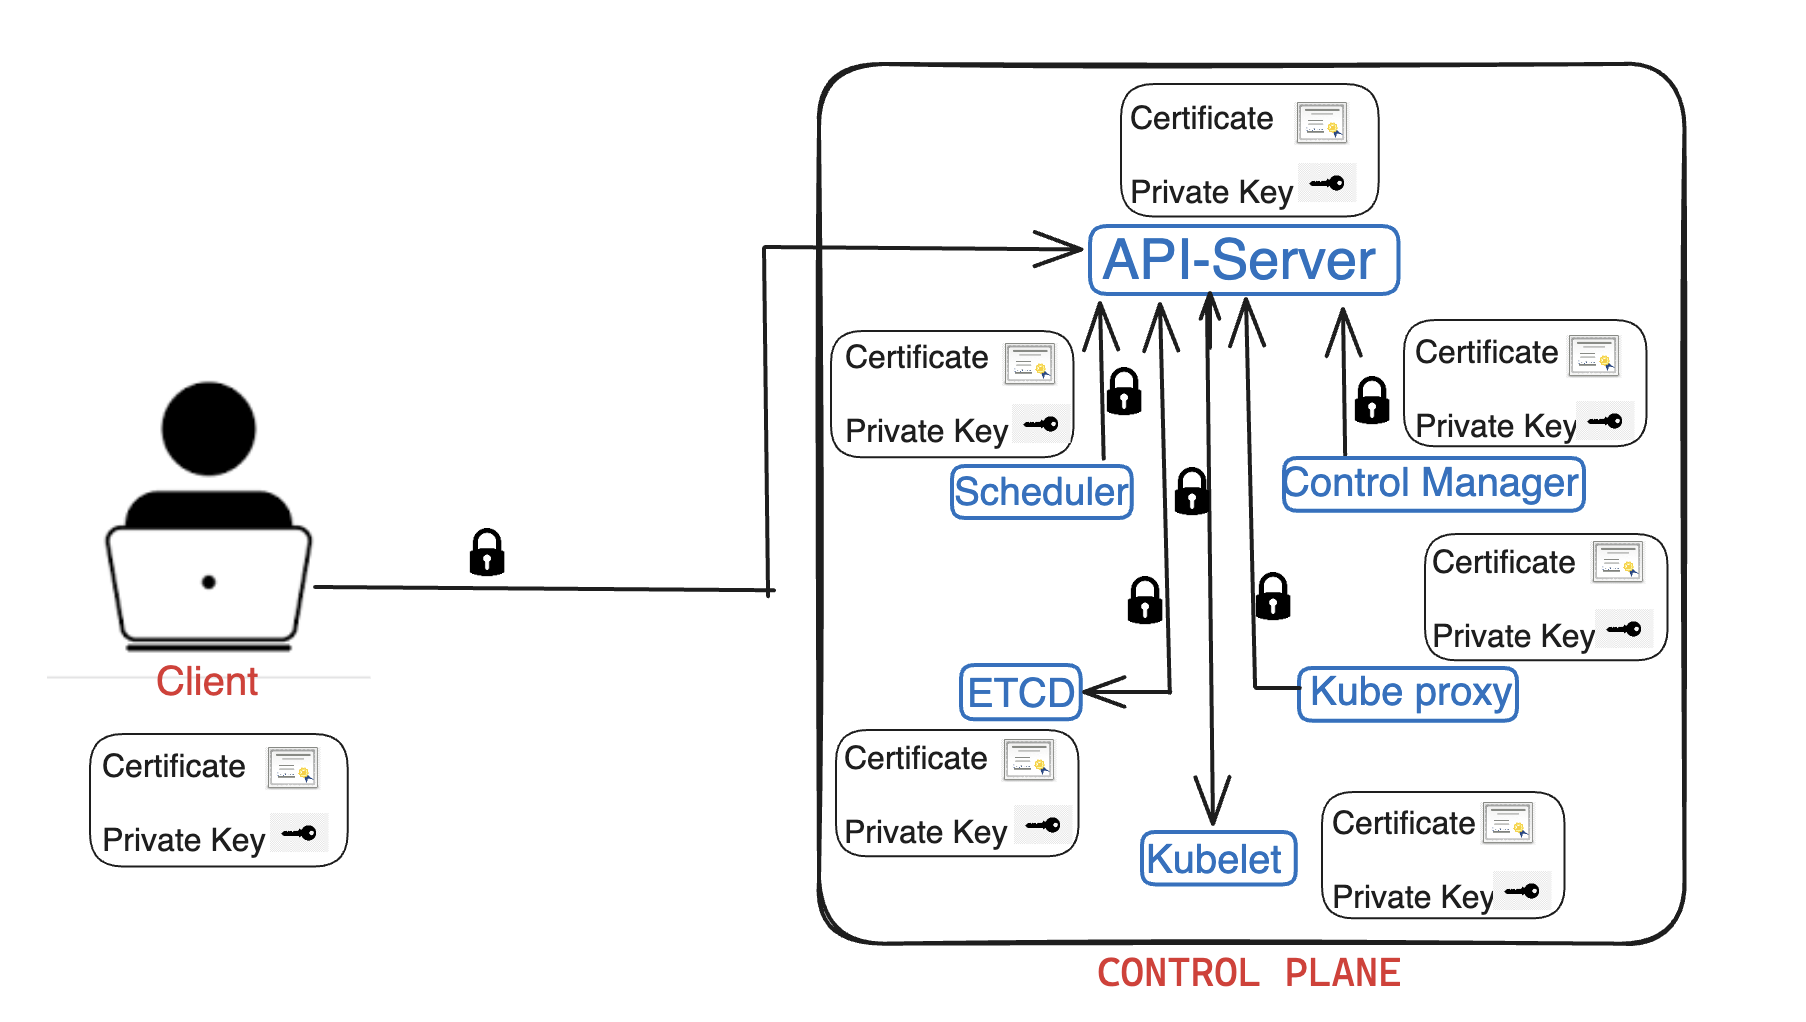
NOTE: When api-server interacts with ETCD,Kubelet , then api-server becomes client for both ETCD,kubelet. We can either use same key-pair(Pub cert,Private key) of API-Server for authentication or use dedicated key-pairs altogether.
❇ API Server Authentication and Authorization:
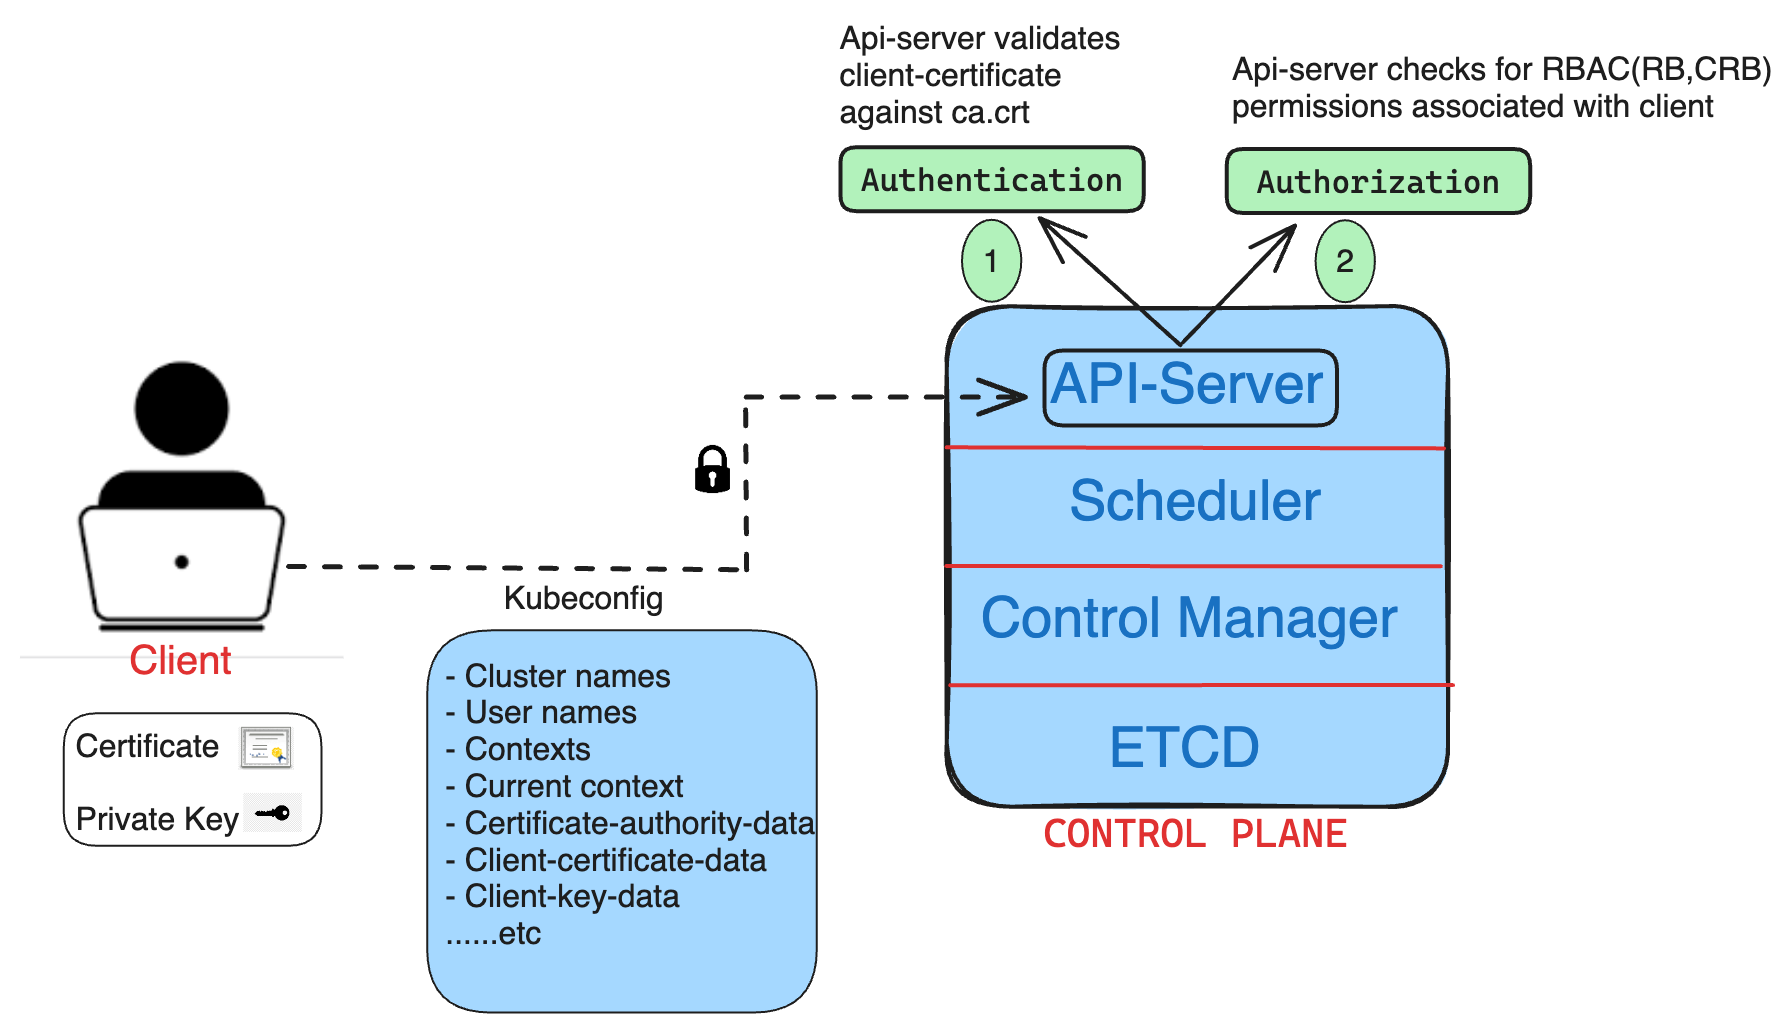
Since API server acts as a cluster gateway it checks for both authentication and authorization of any client request.
Authentication: The request from the client happens using
kubeconfigfile , API-server will look for client certificate and validates it against with api-server CA certificate(ca.crt) stored in/etc/kubernetes/pkiwhere all client and server certificates/keys are stored. Once it checks if the client certificate is valid that means it was issued by the api-server CA in the first place. Then allows authentication.Authorization: Once the client is authenticated, the API server then checks the client’s roles and permissions defined in RoleBinding and ClusterRoleBinding to determine what actions the client is authorized to perform.
Authorization Modes
ABAC(Attribute based authorization control) : We associate a set of permissions to the user and Policies are defined in policy files This policy file is referenced in the Kubernetes API server configuration, then we restart the api server everytime when there is a new user to add or new permission added to existing user. This is manual and tedious activity.
RBAC(Role Based Access Control): We Create a Role and add permissions , assign the Role to user or groups , no restarts of api-server needed , user or group assume the role using RB,CRB(RoleBinding and ClusterRoleBinding). It is the standard way of authorization.
NODE: Node based authorization
If api-server interact with kubelet, how would kubelet know that api-server has access to do that or not.
Web hook: We can configure a webhook to offload access management to a third-party service.
When a request is made to the API server, it is forwarded to the webhook service like OPA, processes the request and either grant or deny access according to its policies.Let's check where authorization mode is set in the kube-apiserver. As we know by default in k8s, all static pods manifests stored in
/etc/kubernetes/manifestsin control plane node.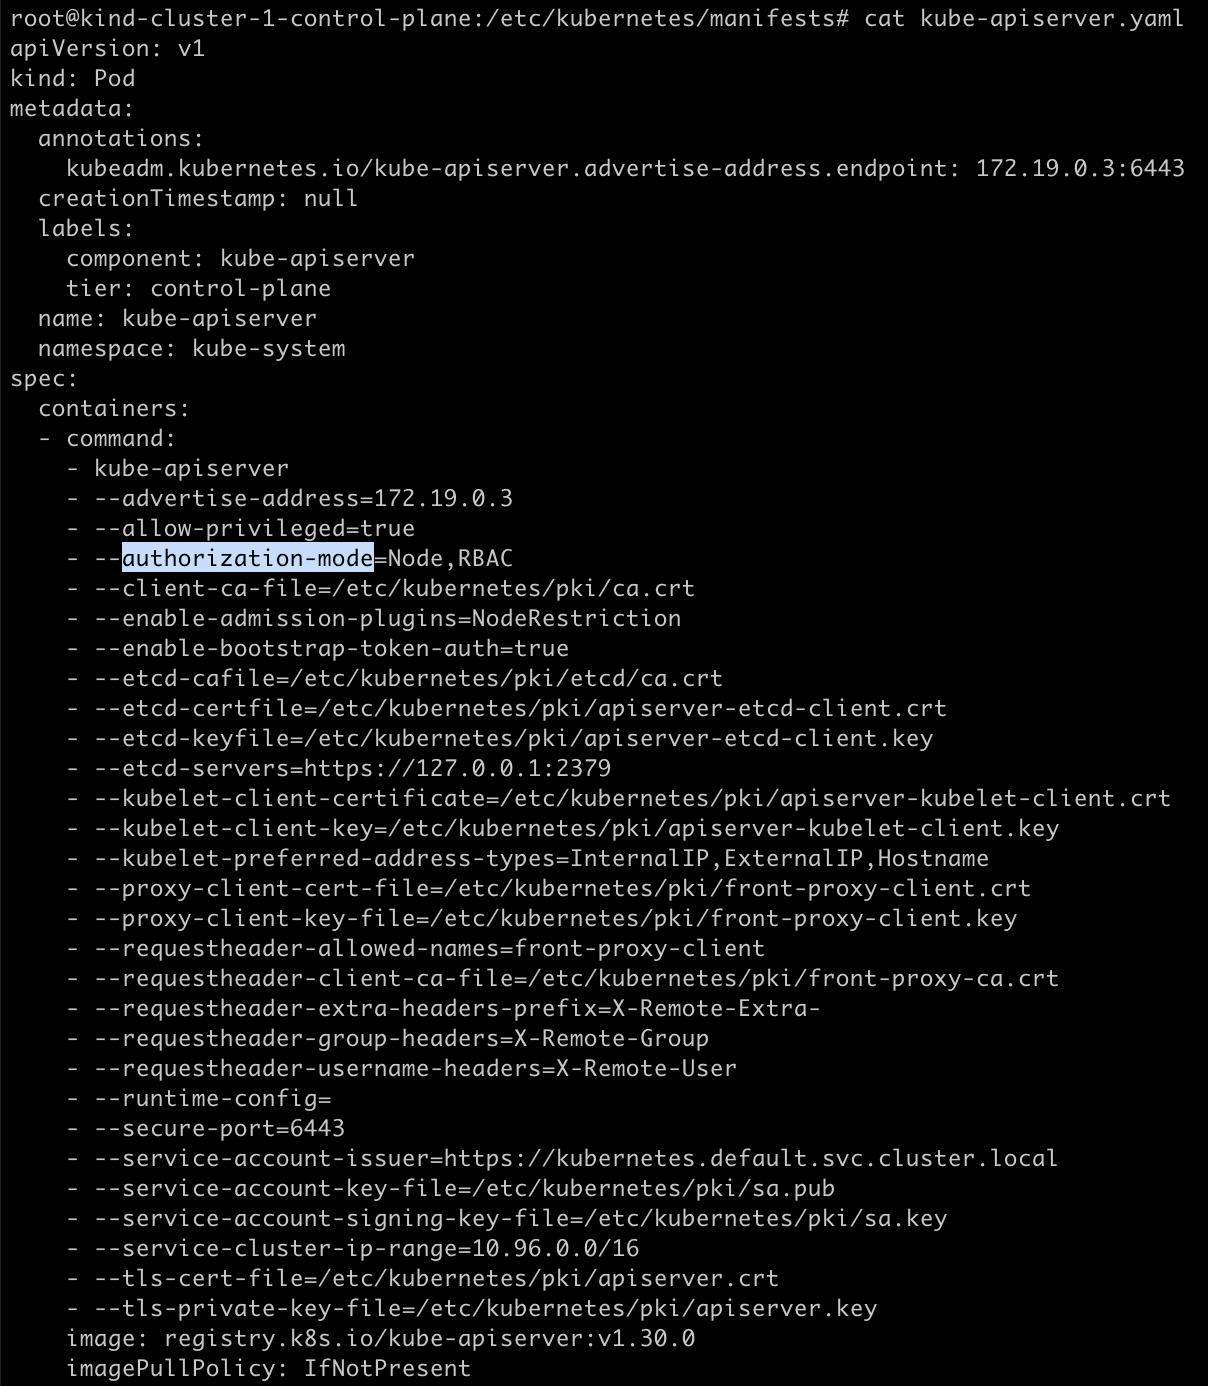
This is a part of kube-apiserver.yaml file and we can see that authorization mode was set to Node,RBAC.
❇ Example
Creating and Approving CSR for New User:
Generate a PKI private key and CSR and name it as
vivi.keyandvivi.csr# Generate a private key openssl genrsa -out vivi.key 2048 # Generate a CSR openssl req -new -key vivi.key -out vivi.csr -subj "/O=my-org/CN=vivi"
Create a CertificateSigningRequest(CSR) for vivi and set the expiration date to 1 week
Make sure to replace the encoded CSR in the request field of the yaml. To retrieve the data from previously creates CSR file and encode use the command
cat vivi.csr| base64 | tr -d "\n"apiVersion: certificates.k8s.io/v1 kind: CertificateSigningRequest metadata: name: vivi-csr spec: request: LS0tLS1CRUdJTiBDRVJUSUZJQ0FURSBSRVFVRVNULS0tLS0KTUlJQ1pUQ0NBVTBDQVFBd0lERVBNQTBHQTFVRUNnd0diWGt0YjNKbk1RMHdDd1lEVlFRRERBUjJhWFpwTUlJQgpJakFOQmdrcWhraUc5dzBCQVFFRkFBT0NBUThBTUlJQkNnS0NBUUVBMU5naWFNZlRxNHJBRTdBa3BDWUg4c0ZaCjBTN3hLbTNRR3hJVDV0RkJuVXc4cTk5Q3lwSlpnTW9HMWw4aUFlZnI1VjBNWTdyVGllUGIvQnBrVURkUm16bVIKUklnM015a0xDc2dQQ2R0L2pnaGdlaVhPa1RCMFJRNVJWazY1WUR2TTlBckNhbEIzcE1oK29EaVlZWnAwT042RQovdDRUbm8yakx0VmNoa2FJY1hPOGNjWHk4YUZlTjluSnlwQk9Wa0RRYlRVaVlKUkFHUnBvMmFMNlpSVFZsR2RnCngwV2ZLTVNJMUlnSVhwOXlqSUpWNXJMRk5NT1FuNnJKcTFYNlFDSGNhYktEenpSamhvSWZ4cDk5eS9nNms1ZHUKWWZPVVR3aUM0bzVMd3RWSkUxRitUSmVQSWFCUTdmVkEyWjBIRXZvTGVmZmZPZDBrUzltdVRUeFJ3K3loNlFJRApBUUFCb0FBd0RRWUpLb1pJaHZjTkFRRUxCUUFEZ2dFQkFIaHNOeG8vSENKbHNDdmkrYTdvUXRFN1NqV2F4UmUzCmsyUStBQlBRVWJKQ0RPS0JmVys2Q2ZpUktRczNIT2FsV2wxN3ExbnNtYlR0UzVhcUQzSFlmNTNjSzhiYk5uSEUKQkxxck9ZWURKaTJjcGJXOXM5aVZoMWg0emVZWnordU05TEdWSU1uOHptNXEwU1U2cmtBMi9LaFZFQk9HelpQWApsV0diMHorS2hkcEpoWU5YUnRGL2cvNEZqYWowVHVRUEtyekk2TXRTZUpKaUMzMW52RTFXU2M5RVVRa1g4b2VzCnRZSkloS0ZTSFlmTDRoSXllZ2RSMlBkQ1ozRUhzQ3JmQ3ZvTTY5SG1weHlNYkNmMk5GYlJBWkkzUGFBN0Nya2cKY1JBTnhPUTdsRHpvTitjZHRDSHFJSDFxdlcrTDFnWGlBZHBIeVh0RVNDaGpCdGdUYmJQZ3IwND0KLS0tLS1FTkQgQ0VSVElGSUNBVEUgUkVRVUVTVC0tLS0tCg== signerName: kubernetes.io/kube-apiserver-client expirationSeconds: 604800 usages: - client auth
As you can see, it's still in pending state. The API server uses its
ca.key(CA's private key to sign the certificate and issues public certificate to the client.Let's approve this we being an admin and having enough privileges to approve the CSR.
NOTE: We being an admin, must have Role attached to us which grants privileges to approve or deny CSR.

Now, it's in approved state, means client certificate has been issued.
Retrieve the certificate from the CSR and export the issued certificate from the CertificateSigningRequest to
vivi.crtafter decoding itkubectl get csr vivi-csr -o jsonpath='{.status.certificate}' | base64 -d > vivi.crt
Let's add
vivi.crtandvivi.keytokubeconfigfor userviviBy default, k8s picks up ~/.kube/config as kubeconfig file unless we explicitly specify kubeconfig file from different place.
 users:
 - name: vivi
   user:
     client-certificate: /Users/vivekmanne/Downloads/CKA-2024/Day22/vivi.crt
     client-key: /Users/vivekmanne/Downloads/CKA-2024/Day22/vivi.key
Create a New Context and Associate the User
Create a new context in
kubeconfigfor theviviuser:kubectl config set-context kind-kind-cluster-vivi \ --cluster=kind-kind-cluster-1 \ --user=vivi \ --namespace=default
Switch to the New Context
kubectl config use-context kind-kind-cluster-vivi
Here we created another context for our existing kind cluster.
Note: In k8s, For each cluster we can create multiple contexts where each context can be associated with only one user. You can create different contexts for different users and keep switching between contexts.
Try making request to api-server using simple command
kubectl get nodes
I was not able to get or list any resources like nodes or pods from the cluster as we just created the certificate which lets us to login to the cluster, that is Authentication.
We still need to create a role with necessary permissions and role binding to attach that role to the user to access resources.
This topic on RBAC(RoleBinding, ClusterRoleBinding) will be learnt in the upcoming days of this series.
❇ Verification of client certificate issued by api-server CA or not
✅ Client side verification
Use the command to check who issued the client certificate
openssl x509 -in vivi.crt -text -noout | grep -i Issuer
This shows the client certificate was issued by api-server CA with tag CN=Kubernetes.
✅ Server Side Verification
Let's get into the master node where api-server is running, in our case we use kind cluster , so we exec into the control plane container.
 docker exec -it kind-cluster-1-control-plane bash
 cd /etc/kubernetes/pki #This is default location where all client and server certs/keys reside
As you can see all the client and server certificates and keys are resided in /etc/kubernetes/pki directory of control plane node.
The issuer of the client certificate should match with subject of the CA certificate
openssl x509 -in /etc/kubernetes/pki/ca.crt -noout -subject
As you can observe, the client certificate named
vivi.crtstored locally was issued byca.crtof the api-server by comparing the issuer of the client certificate to the subject of the CA certificate.
In this instalment, we explored how TLS certificates are created and issued to users, and we covered how authentication works in Kubernetes. In the next part of this series, we will look into the authorization aspect of RBAC.
#Kubernetes #TLS #Authentication #Authorization #40DaysofKubernetes #CKASeries
Subscribe to my newsletter
Read articles from Gopi Vivek Manne directly inside your inbox. Subscribe to the newsletter, and don't miss out.
Written by

Gopi Vivek Manne
Gopi Vivek Manne
I'm Gopi Vivek Manne, a passionate DevOps Cloud Engineer with a strong focus on AWS cloud migrations. I have expertise in a range of technologies, including AWS, Linux, Jenkins, Bitbucket, GitHub Actions, Terraform, Docker, Kubernetes, Ansible, SonarQube, JUnit, AppScan, Prometheus, Grafana, Zabbix, and container orchestration. I'm constantly learning and exploring new ways to optimize and automate workflows, and I enjoy sharing my experiences and knowledge with others in the tech community. Follow me for insights, tips, and best practices on all things DevOps and cloud engineering!