Build Interactive In-App Polls With SwiftUI
 Amos Gyamfi
Follow the steps outlined in this guide to build the functionality required to allow users to create, display, vote, and provide feedback in your iOS apps using polls.
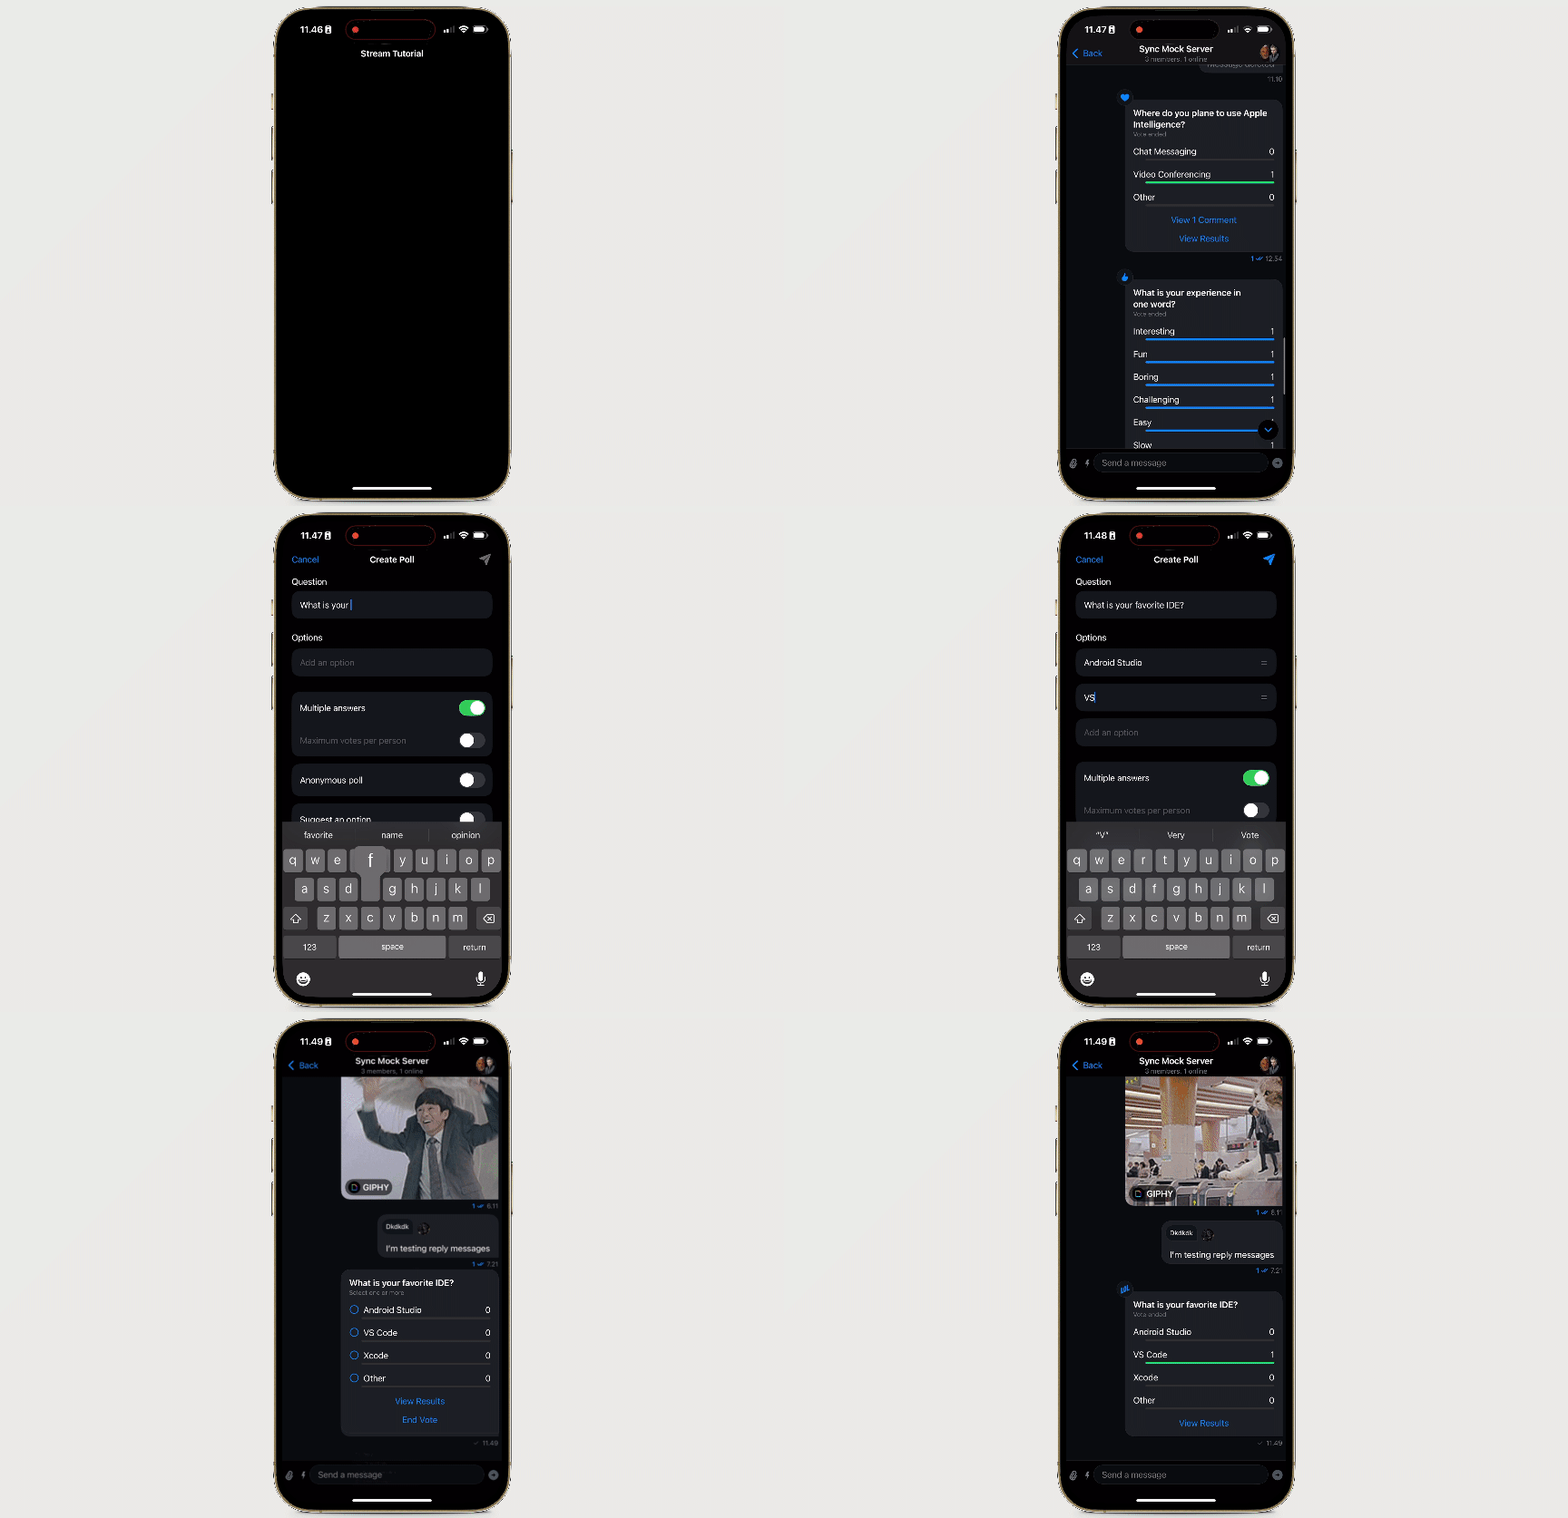
Interactive polling in Slido, WhatsApp, Messenger, and Telegram make communicating via in-app chat or video conferencing more engaging by providing an interactive way to get participants’ opinions and make everyone in a virtual event, remote education, online gaming, or team collaboration setting feel more connected.
Get Started
The polling support we implement in this tutorial will be something other than a stand-alone app. It is a new built-in feature of the SwiftUI SDK and is available in its 4.57.0 version. We will install the chat SDK shortly, configure it, and enable the ready-to-use polling feature.
If you plan to integrate polls for an actual app rather than the demo app in this tutorial, you should turn on polls on your Stream Dashboard to be available in your app. Create a free chat trial account and follow our Getting Started Guide to use your dashboard credentials to generate a token to follow this tutorial. You may also use the hard-coded user credentials we introduce later in this article to recreate it.
Grab the Sample Source Code
We made the demo app's source code available for download on GitHubiOS-SwiftUI -> PollsSwiftUI. The app's polls functionality is enabled by default. Get the app, run it with Xcode, and start creating, commenting, and voting on polls.
Step 1: Enable the Polls Support
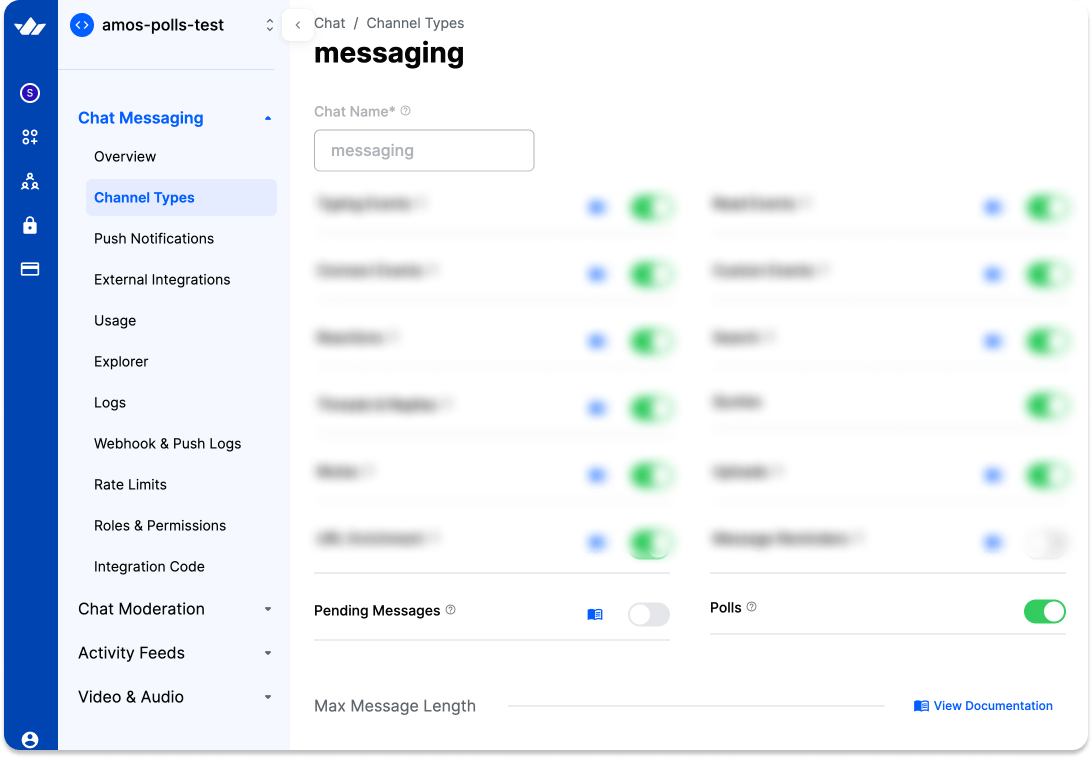
Before users can use your Stream Chat-powered app to create and send polls to others, the feature should be enabled on your administration dashboard. Log in to your dashboard, create a new app, and navigate to the Chat Messaging category. Allow polls by selecting Channel Types -> messaging and toggling the corresponding button.
Step 2: Start With a New Stream Chat SwiftUI App
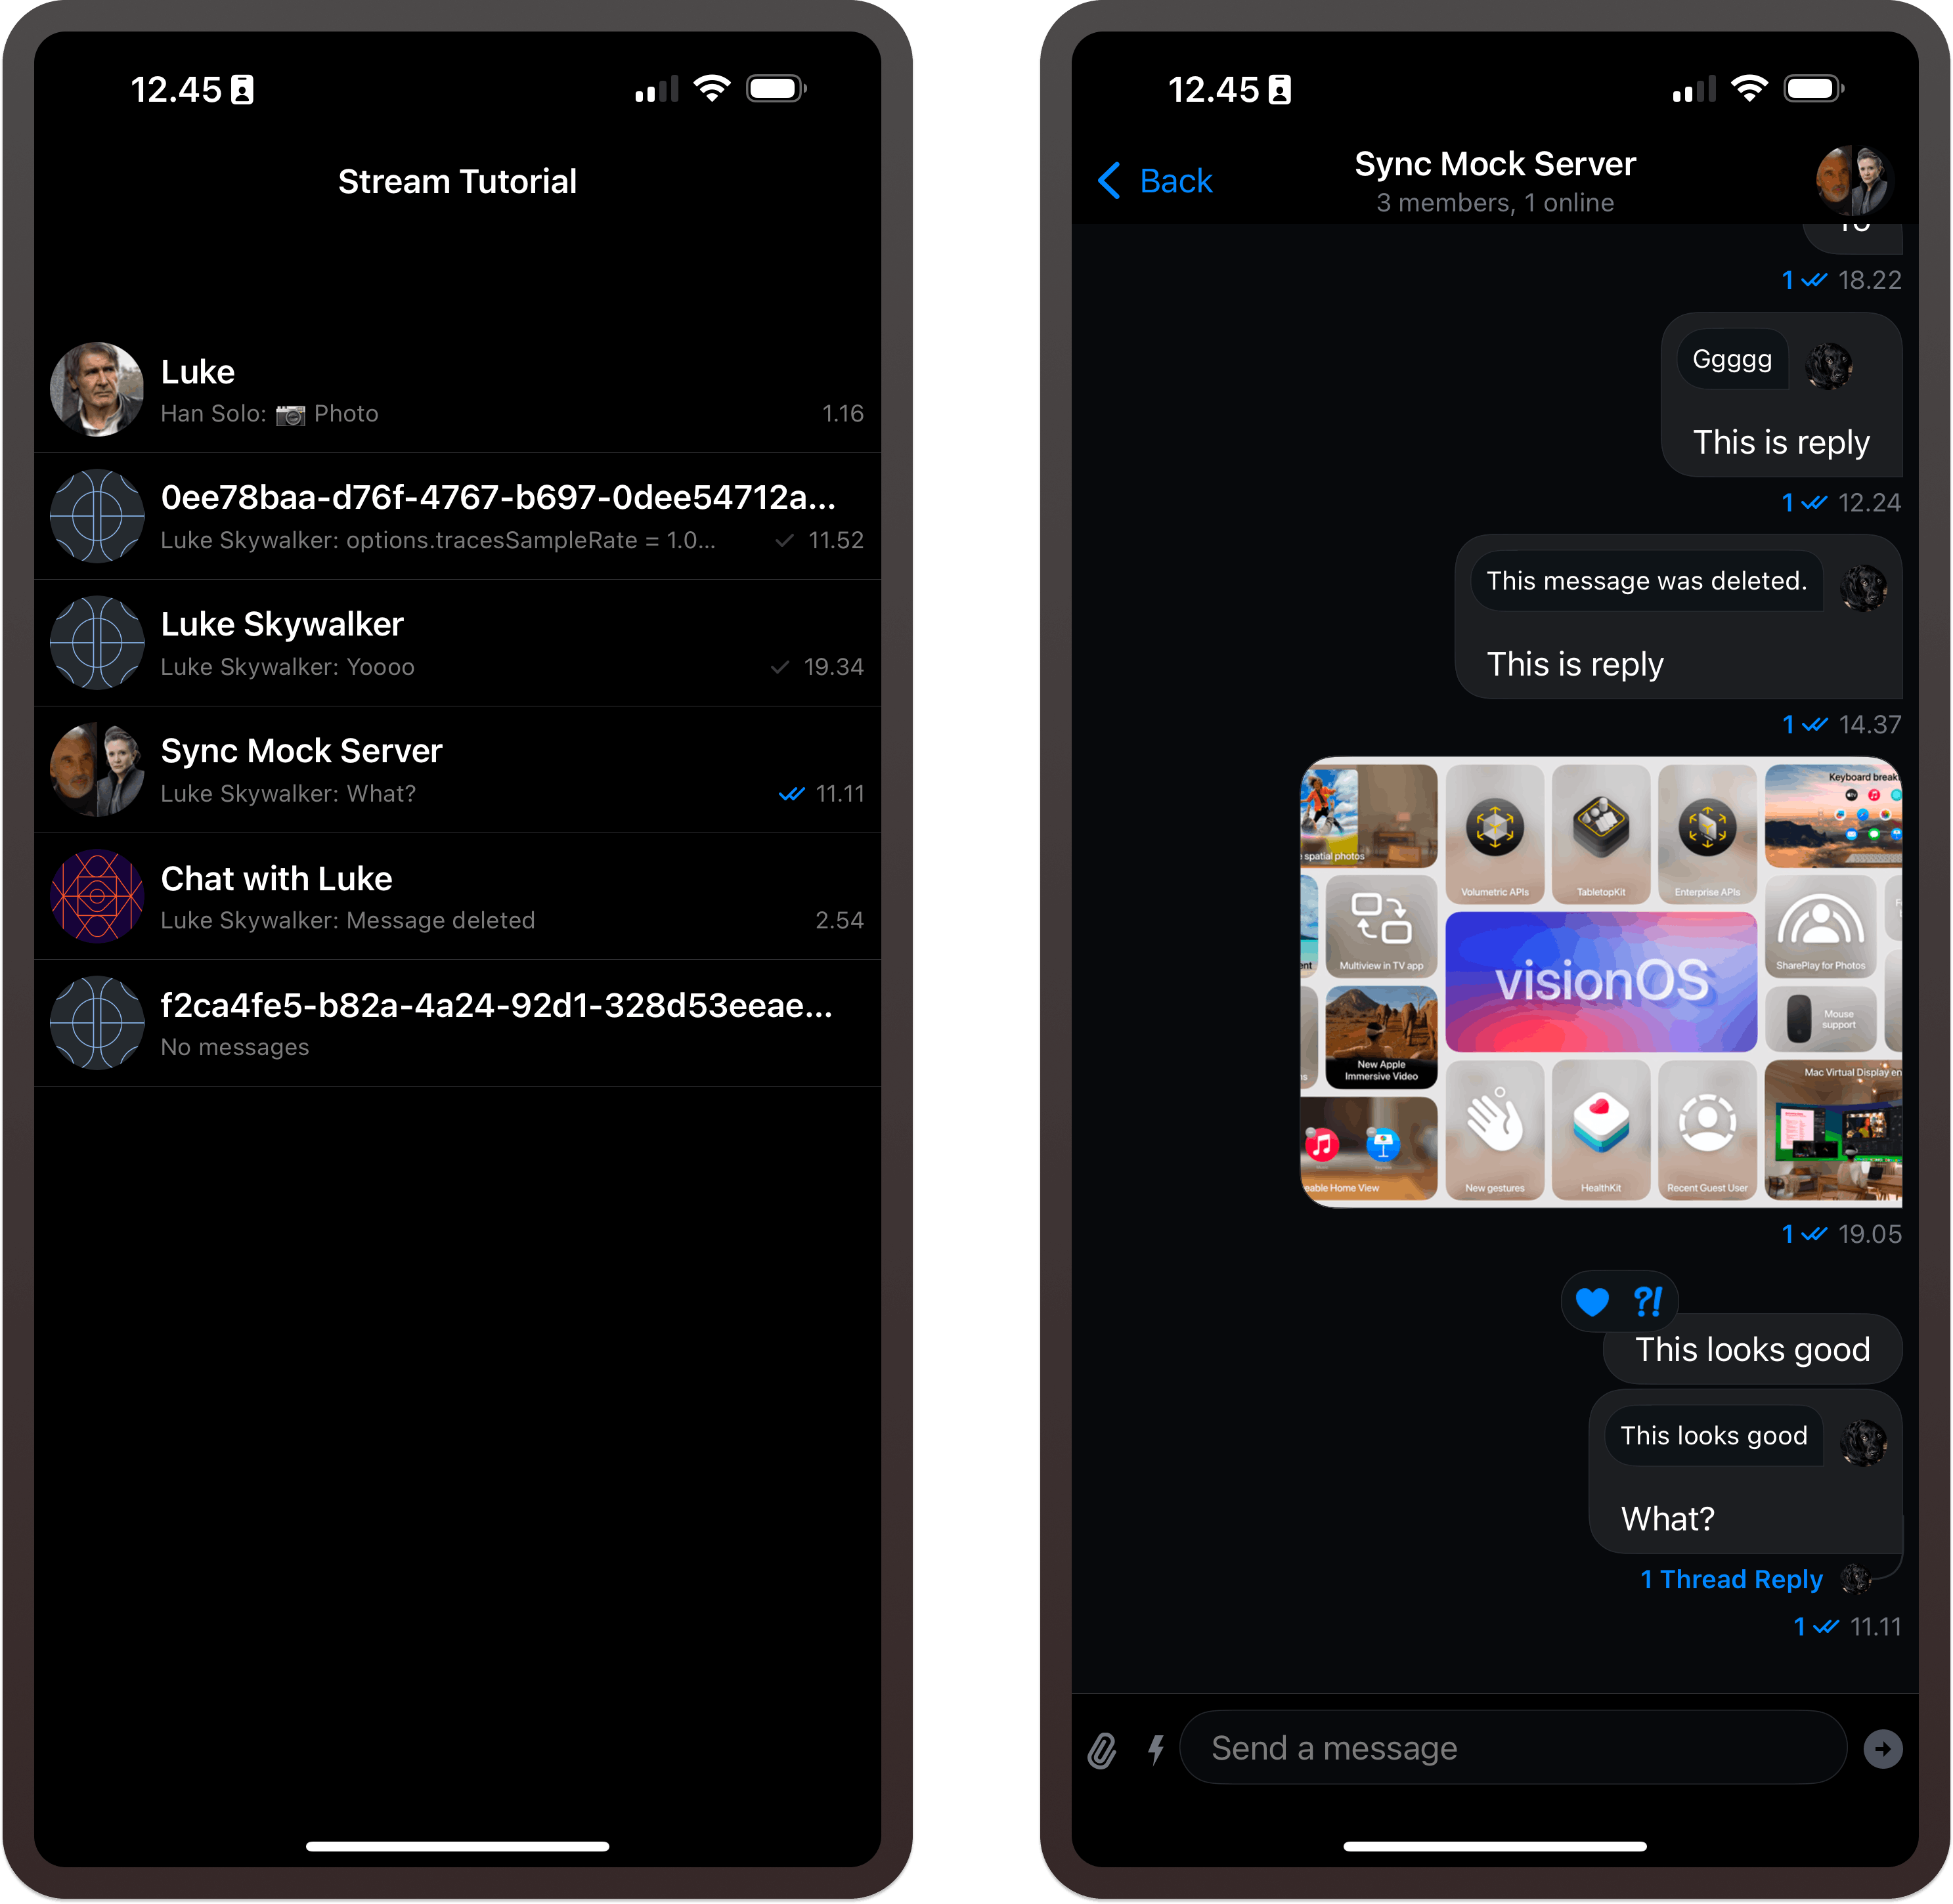
Create a new SwiftUI project in Xcode 15 or a later version and set the following privacies by selecting the project's root folder and navigating to the Info tab.
Privacy - Camera Usage Description
Privacy - Photo Library Usage Description
Install and Configure the Chat SDK
In the Xcode toolbar, select File -> Add Package Dependencies…. Then, copy and paste https://github.com/getstream/stream-chat-swiftui in the search bar to fetch the SDK from GitHub and complete the few steps to install it.
Configure the SwiftUI Chat SDK
In this section, we should set up the Chat SDK to present a list of channels when the app runs. This configuration should be made at the app’s entry point. Open the app entry file and replace the content with the following. Our app's root file is PollsSwiftUIApp.swift since the product name is PollsSwiftUI.
//  PollsSwiftUIApp.swift
//  PollsSwiftUI
//
//  How To Integrate Polls Into a SwiftUI App

import SwiftUI
import StreamChat
import StreamChatSwiftUI

@main
struct SwiftUIChatDemoApp: App {

    var chatClient: ChatClient = {
        //For the tutorial we use a hard coded api key and application group identifier
        var config = ChatClientConfig(apiKey: .init("8br4watad788"))
        config.isLocalStorageEnabled = true
        config.applicationGroupIdentifier = "group.io.getstream.iOS.ChatDemoAppSwiftUI"

        // The resulting config is passed into a new `ChatClient` instance.
        let client = ChatClient(config: config)
        return client
    }()

    @State var streamChat: StreamChat?

    init() {

        streamChat = StreamChat(chatClient: chatClient)

        connectUser()
    }

    var body: some Scene {
        WindowGroup {
            CustomChannelList()
        }
    }

    private func connectUser() {
        // This is a hardcoded token valid on Stream's tutorial environment.
        let token = try! Token(rawValue: "eyJhbGciOiJIUzI1NiIsInR5cCI6IkpXVCJ9.eyJ1c2VyX2lkIjoibHVrZV9za3l3YWxrZXIifQ.kFSLHRB5X62t0Zlc7nwczWUfsQMwfkpylC6jCUZ6Mc0")

        // Call `connectUser` on our SDK to get started.
        chatClient.connectUser(
            userInfo: .init(
                id: "luke_skywalker",
                name: "Luke Skywalker",
                imageURL: URL(string: "https://picsum.photos/id/237/200/300")!
            ),
            token: token
        ) { error in
            if let error = error {
                // Some very basic error handling only logging the error.
                log.error("connecting the user failed \(error)")
                return
            }
        }
    }
}
In the sample code above, we set up the Chat SDK by connecting a valid user to the SDK's backend with a hard-coded apikey and token. The hard-coded credentials here are just for running the app to see the demo. In your production implementation, you should replace the apikey with the one in your dashboard and use it with your app id to generate a token.
Present a List of Channels
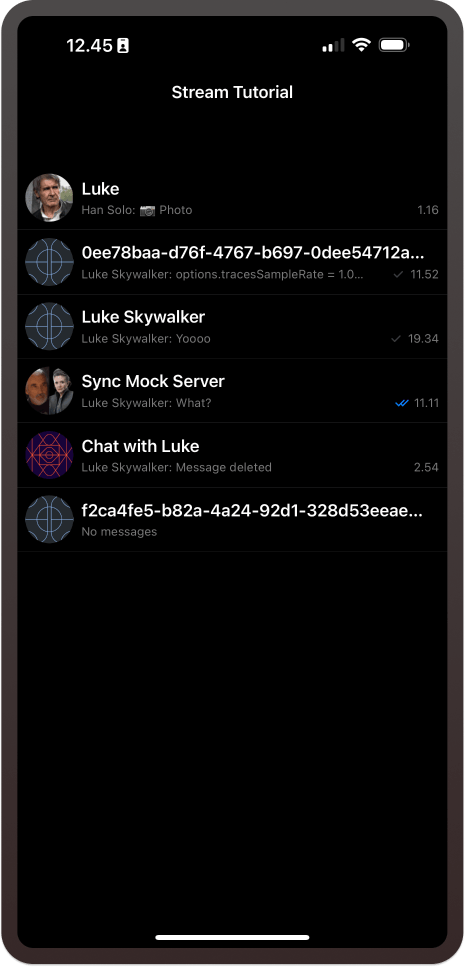
Let's display the list of chat channels you see in the image above by creating a new file CustomChannelList.swift and using this sample code to substitute its content.
import SwiftUI
import StreamChat
import StreamChatSwiftUI

struct CustomChannelList: View {

    @StateObject private var viewModel: ChatChannelListViewModel
    @StateObject private var channelHeaderLoader = ChannelHeaderLoader()

    public init(
        channelListController: ChatChannelListController? = nil
    ) {
        let channelListVM = ViewModelsFactory.makeChannelListViewModel(
            channelListController: channelListController,
            selectedChannelId: nil
        )
        _viewModel = StateObject(
            wrappedValue: channelListVM
        )
    }

    var body: some View {
        NavigationView {
            ChannelList(
                factory: DefaultViewFactory.shared,
                channels: viewModel.channels,
                selectedChannel: $viewModel.selectedChannel,
                swipedChannelId: $viewModel.swipedChannelId,
                onItemTap: { channel in
                    viewModel.selectedChannel = channel.channelSelectionInfo
                },
                onItemAppear: { index in
                    viewModel.checkForChannels(index: index)
                },
                channelDestination: DefaultViewFactory.shared.makeChannelDestination()
            )
            .toolbar {
                DefaultChatChannelListHeader(title: "Stream Tutorial")
            }
        }
    }
}
Refer to our documentation for more information about the chat channel list. For a step-by-step guide on setting up the chat SDK and displaying the channel list, check out the iOSChat App tutorial.
Step 3: How to Use Built-In Messaging Polls
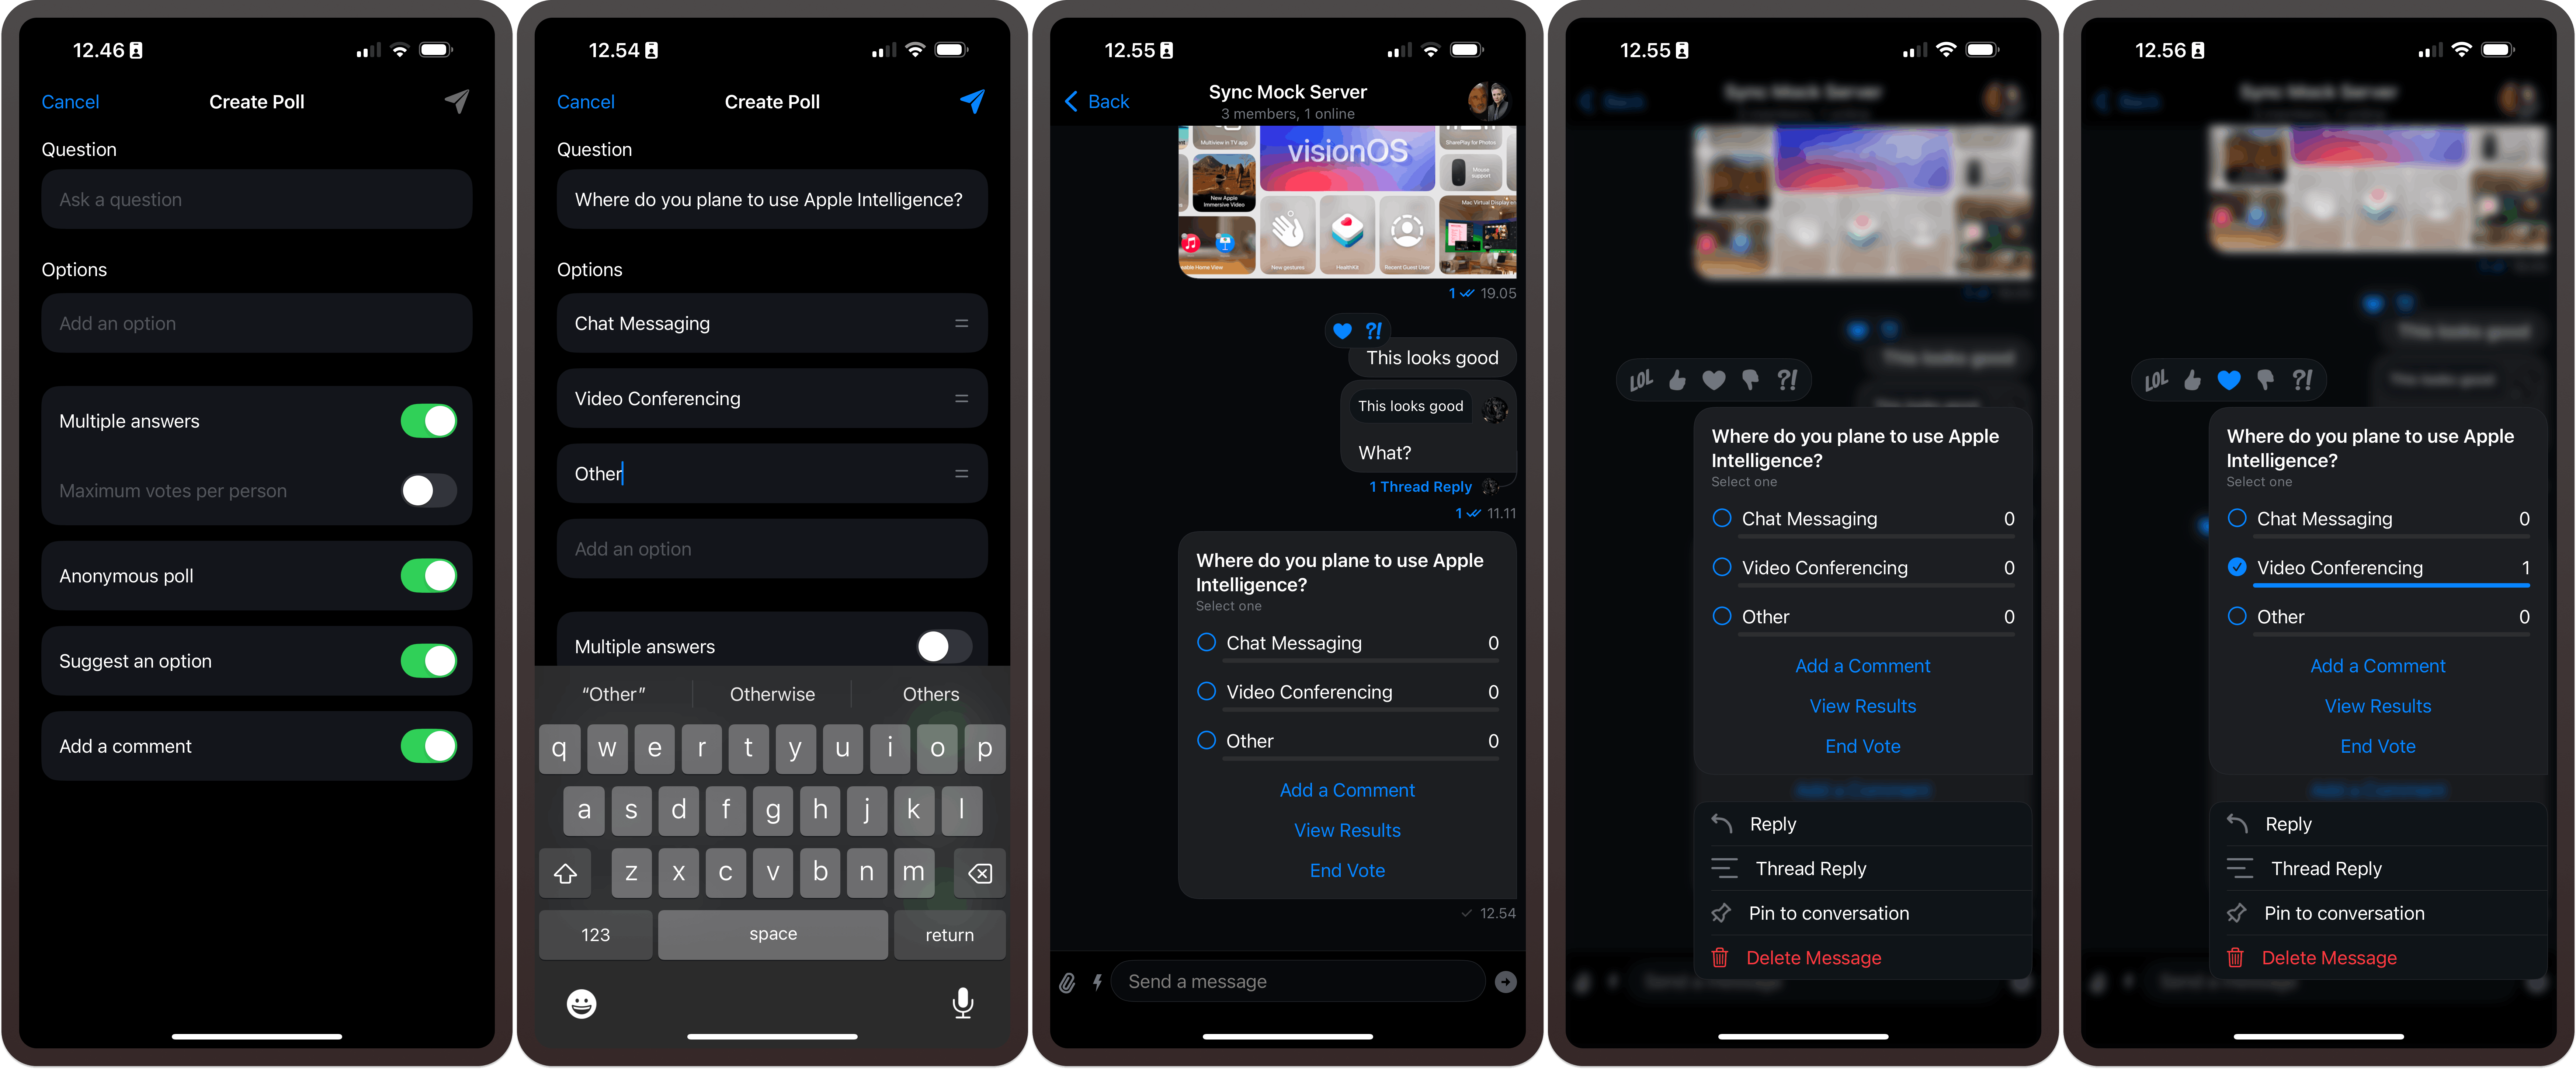
When you perform the previous two steps to enable the polls support in your dashboard and install and configure the chat SDK in a new SwiftUI app, the polling feature will be ready in the chat messaging app. Like in WhatsApp, polls are available via media attachment in the SDK. Let's create our first poll in the following section.
Create a Poll
Building your own app? Get early access to our Livestream or Video Calling API and launch in days!
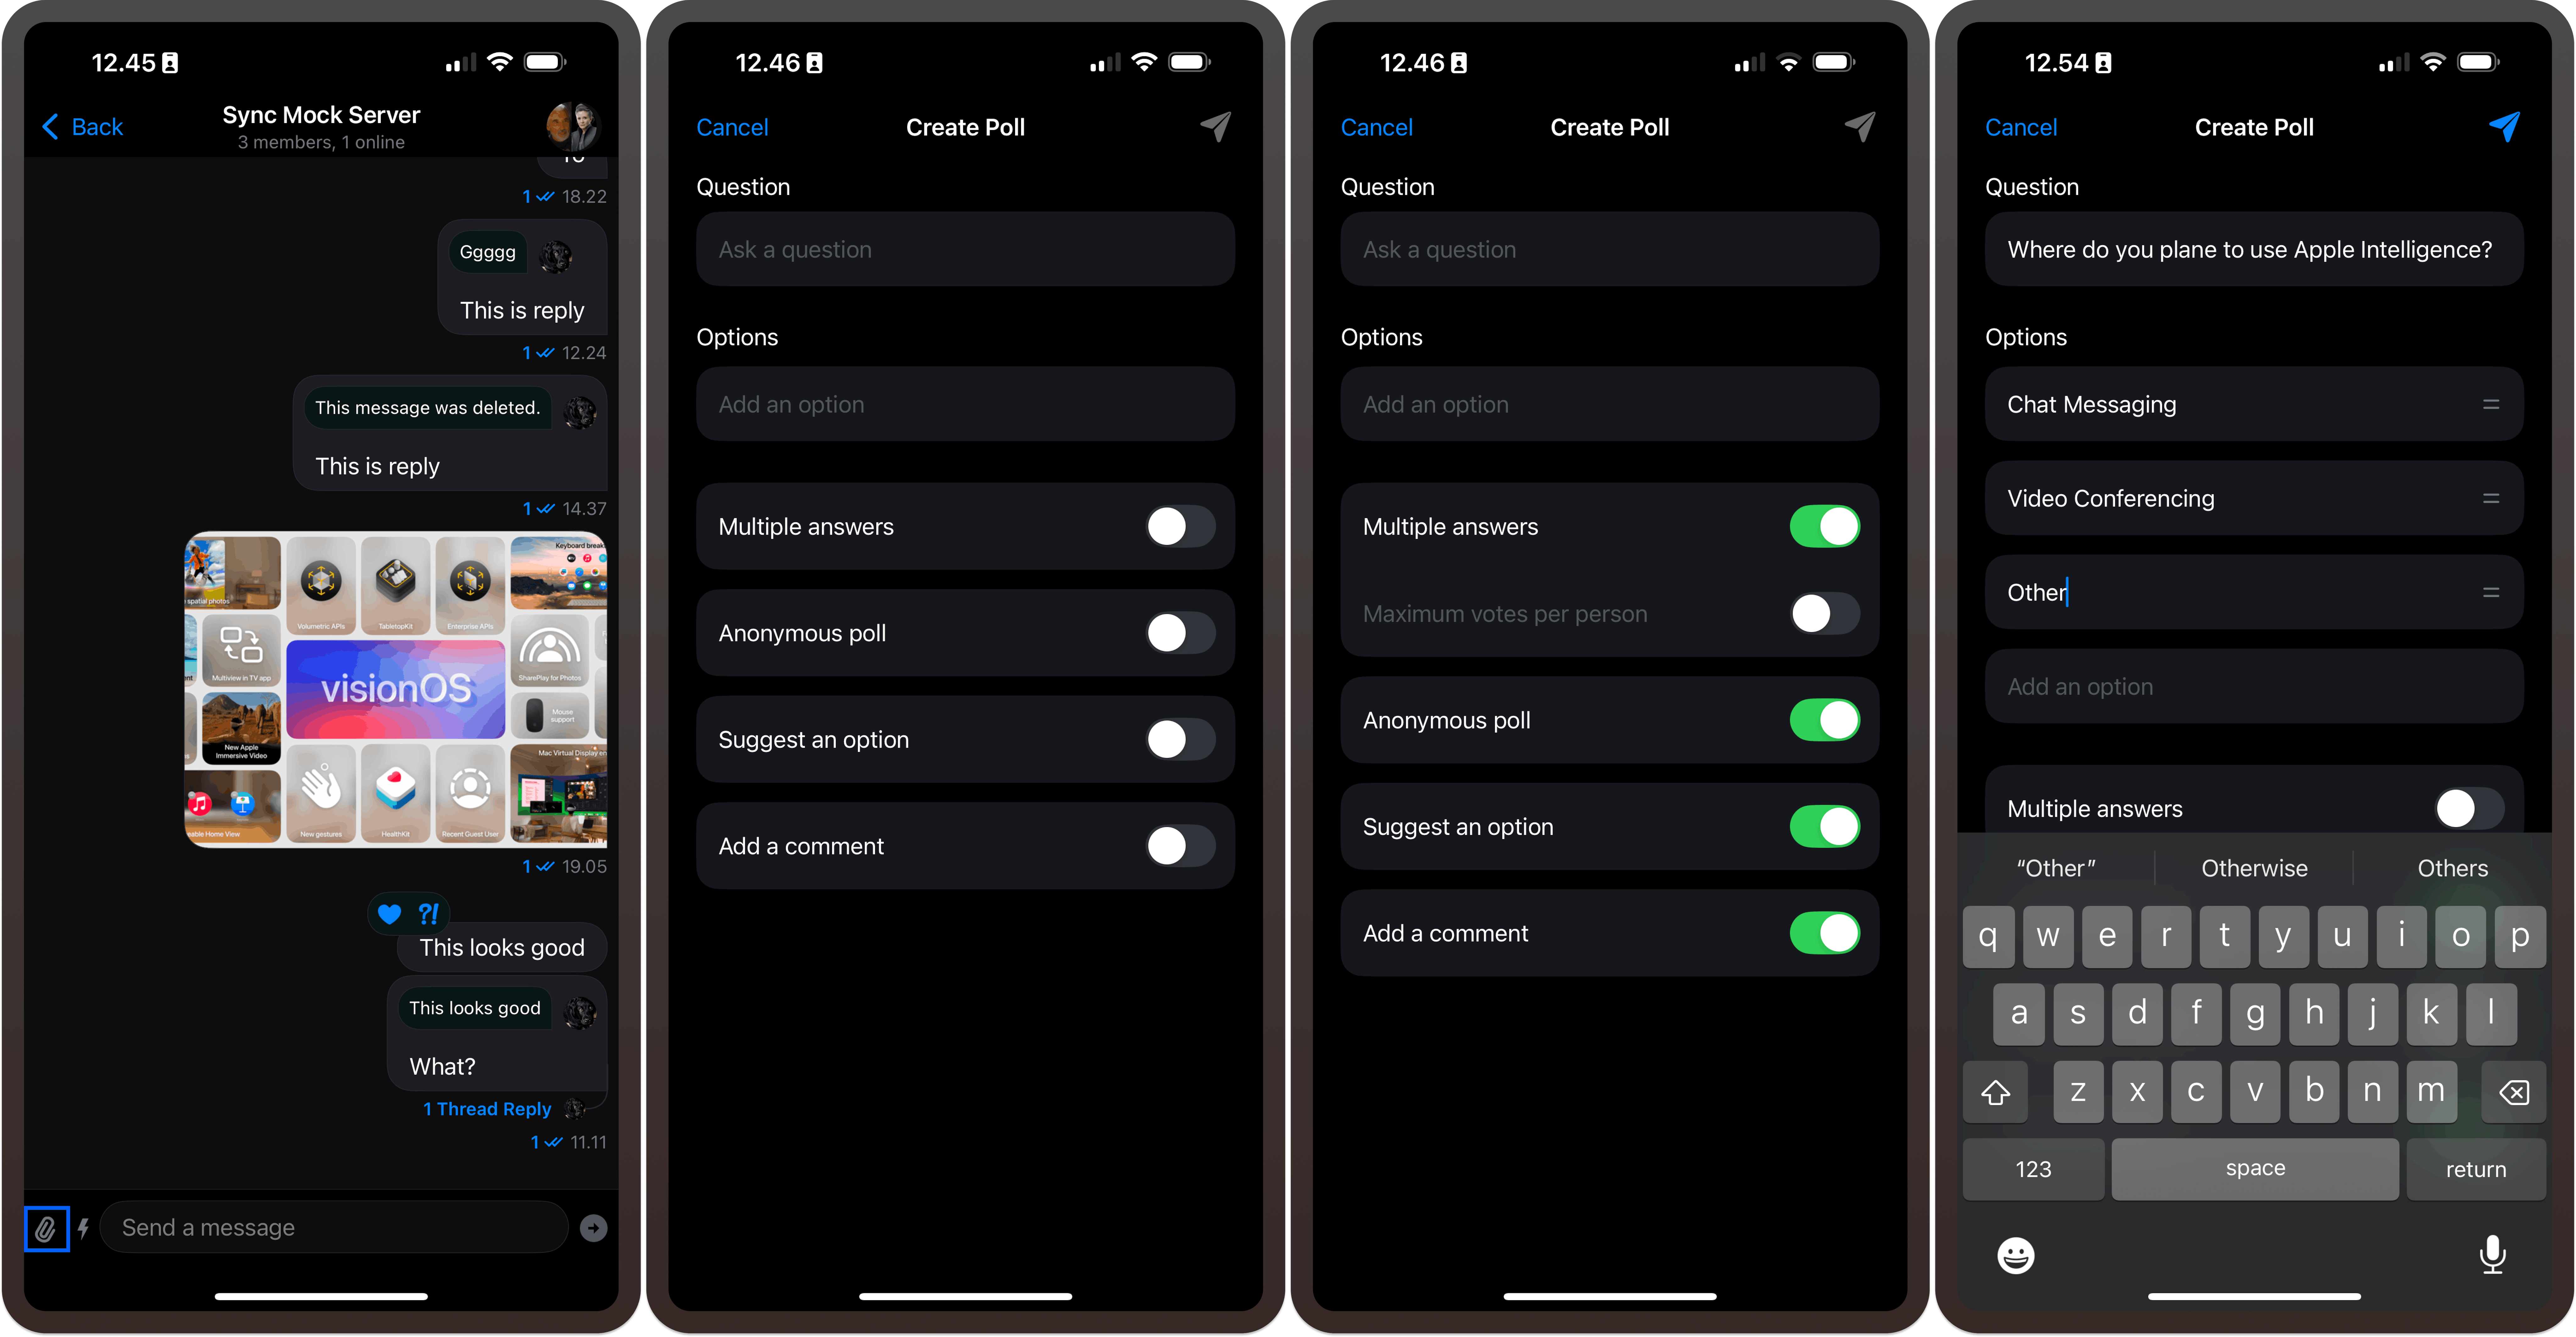
To initiate a new poll for people to vote, tap the paper clip 📎 button at the left side of the message composer and select the poll 📊 icon as illustrated below. Then, enter your question and options and configure the poll with the toggles.
Vote on a Poll
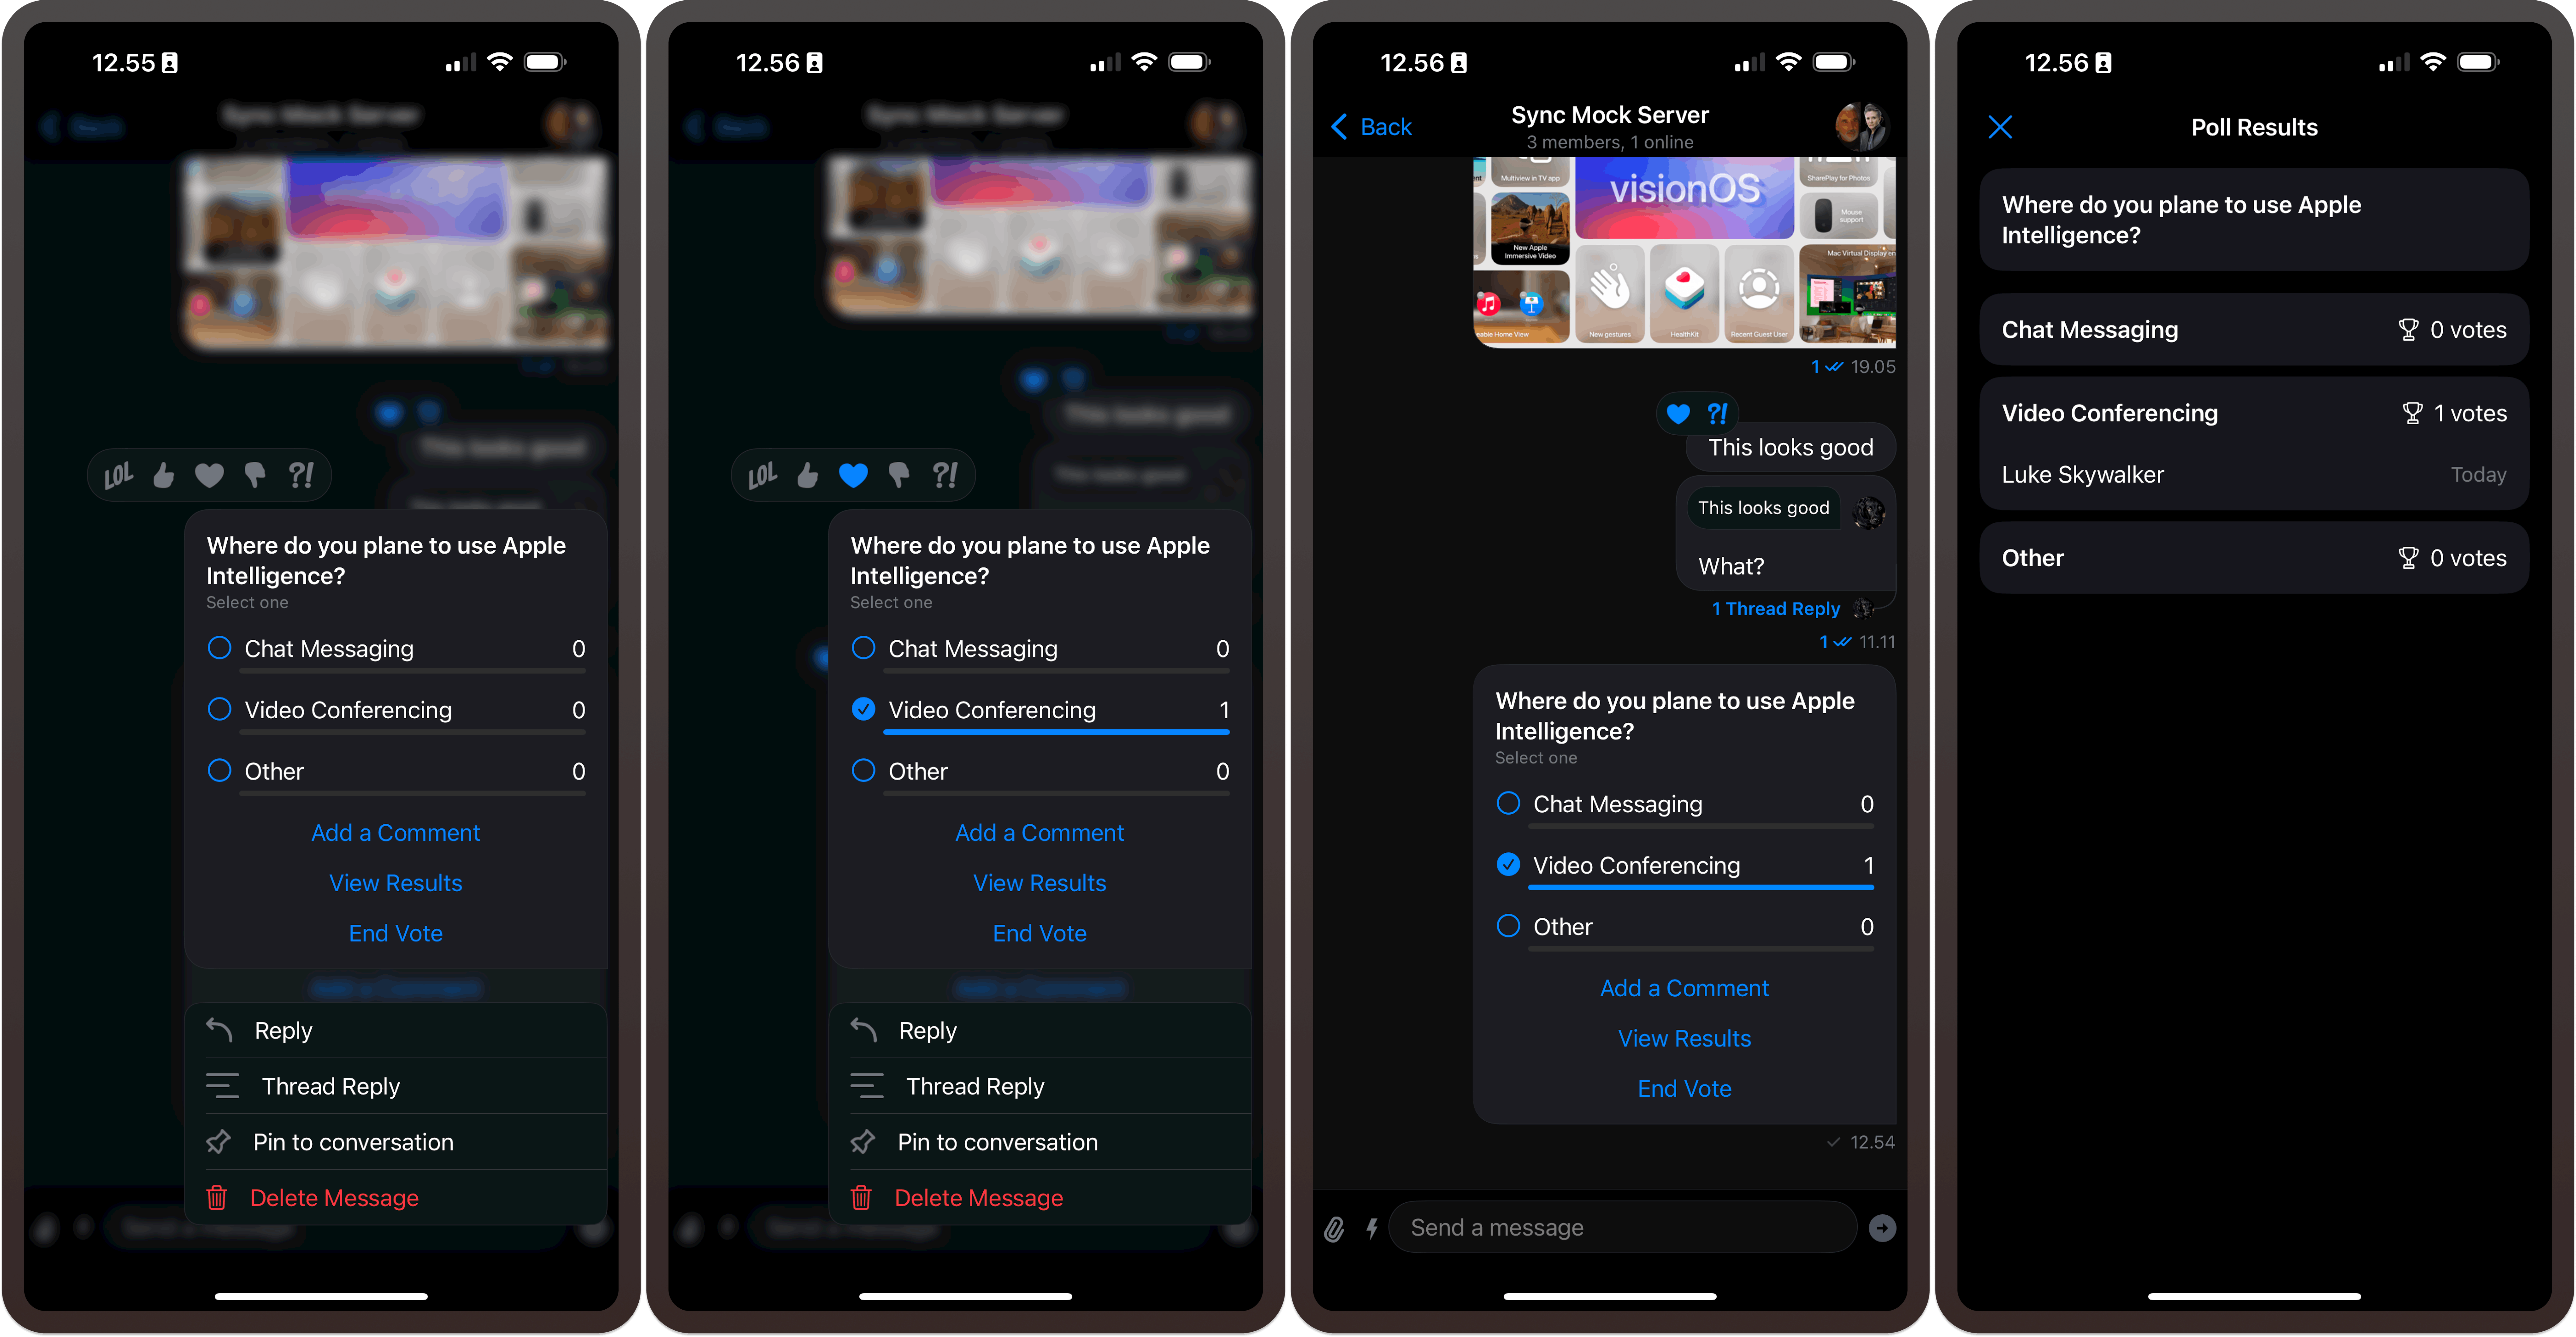
Users create and send polls to others that appear like outgoing messages. Polls can be reacted to, voted on, and configured to present a specific functionality. Tap and hold a poll to express feelings with emojis. Users can also tap the corresponding radio button 🔘 for each option in a poll to vote. The results of a poll are then shown on a detailed page.
Step 4: Customize the Poll’s Functionality and Presentation
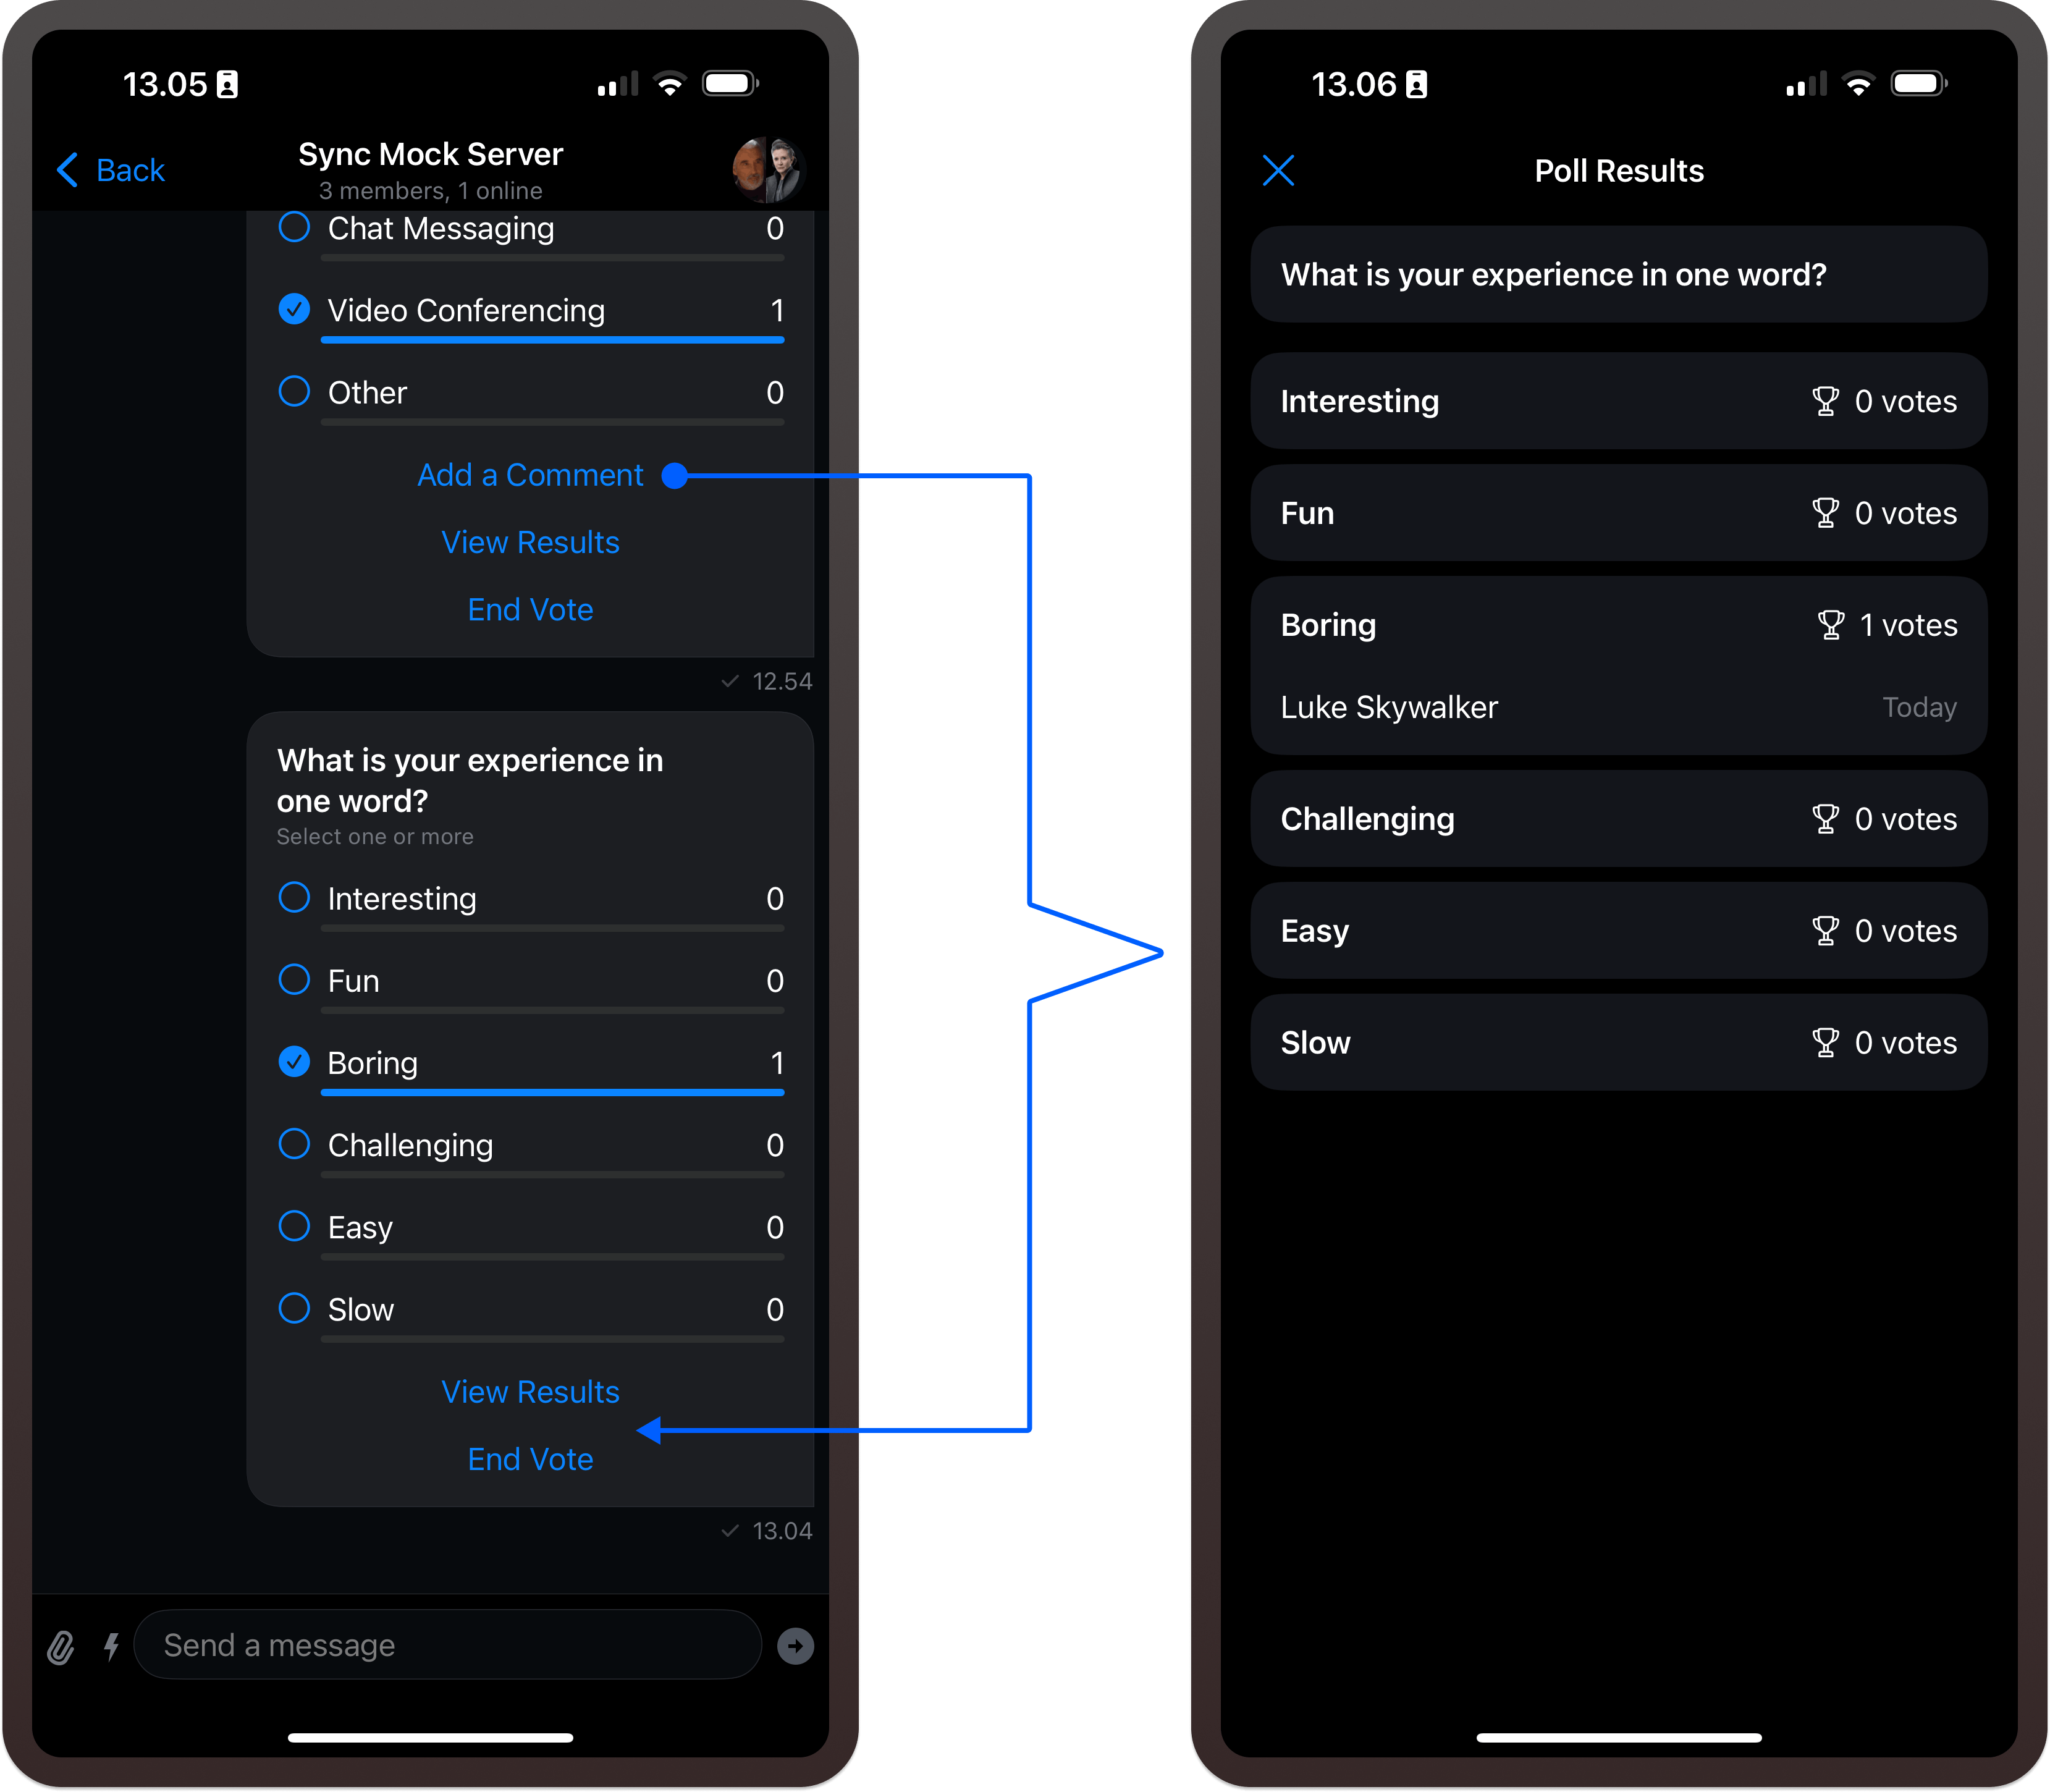
You can tailor a poll's core features and visual appearance to provide unique functions, looks, and feels for online video meetings and group chats.
This section will modify the built-in poll structure to remove the Add a Comment field, allowing responders to send feedback. Head to the Polls Docs to go beyond simple customization of removing a comment field. Thanks 👏 to the flexibility of the SwiftUI Chat SDK. You can easily customize the experience to create multiple-choice, quiz-style, ranking, and survey-like polls.
Remove Poll Options
The SDK provides a PollsConfig object for configuring the default options available during a poll's creation. This object is useful in determining which poll options should be enabled for users. For instance, we can add an initialization with the code snippet below to the PollsSwiftUIApp.swift file we implemented in one of the earlier sections to:
Disable anonymous polls.
Disallow users to suggest poll options.
Hide the comments field.
    init() {
        //streamChat = StreamChat(chatClient: chatClient)
        // Custom configuration to hide comments and allow multiple votes
        let pollsConfig = PollsConfig(
            multipleAnswers: PollsEntryConfig(configurable: true, defaultValue: true),
            anonymousPoll: .init(configurable: false, defaultValue: false),
            suggestAnOption: .init(configurable: false, defaultValue: false),
            addComments: PollsEntryConfig(configurable: false, defaultValue: false),
            maxVotesPerPerson: .default
        )

        let utils = Utils(
            pollsConfig: pollsConfig
        )
        //streamChat = StreamChat(chatClient: chatClient)
        streamChat = StreamChat(chatClient: chatClient, utils: utils)

        connectUser()
    }
Let’s update the PollsSwiftUI.swift file with the code snippet above. The sample code below represents the modified file.
//  PollsSwiftUIApp.swift
//  PollsSwiftUI
//
//  How To Integrate Polls Into a SwiftUI App

import SwiftUI
import StreamChat
import StreamChatSwiftUI

@main
struct SwiftUIChatDemoApp: App {

    var chatClient: ChatClient = {
        //For the tutorial we use a hard coded api key and application group identifier
        var config = ChatClientConfig(apiKey: .init("8br4watad788"))
        config.isLocalStorageEnabled = true
        config.applicationGroupIdentifier = "group.io.getstream.iOS.ChatDemoAppSwiftUI"

        // The resulting config is passed into a new `ChatClient` instance.
        let client = ChatClient(config: config)
        return client
    }()

    @State var streamChat: StreamChat?

    init() {
        // Custom configuration to hide comments and allow multiple votes
        let pollsConfig = PollsConfig(
            multipleAnswers: PollsEntryConfig(configurable: true, defaultValue: true),
            anonymousPoll: .init(configurable: false, defaultValue: false),
            suggestAnOption: .init(configurable: false, defaultValue: false),
            addComments: PollsEntryConfig(configurable: false, defaultValue: false),
            maxVotesPerPerson: .default
        )

        let utils = Utils(
            pollsConfig: pollsConfig
        )
        //streamChat = StreamChat(chatClient: chatClient)
        streamChat = StreamChat(chatClient: chatClient, utils: utils)

        connectUser()
    }

    var body: some Scene {
        WindowGroup {
            CustomChannelList()
        }
    }

    private func connectUser() {
        // This is a hardcoded token valid on Stream's tutorial environment.
        let token = try! Token(rawValue: "eyJhbGciOiJIUzI1NiIsInR5cCI6IkpXVCJ9.eyJ1c2VyX2lkIjoibHVrZV9za3l3YWxrZXIifQ.kFSLHRB5X62t0Zlc7nwczWUfsQMwfkpylC6jCUZ6Mc0")

        // Call `connectUser` on our SDK to get started.
        chatClient.connectUser(
            userInfo: .init(
                id: "luke_skywalker",
                name: "Luke Skywalker",
                imageURL: URL(string: "https://picsum.photos/id/237/200/300")!
            ),
            token: token
        ) { error in
            if let error = error {
                // Some very basic error handling only logging the error.
                log.error("connecting the user failed \(error)")
                return
            }
        }
    }
}
Previously, the init() function had this streamChat = StreamChat(chatClient: chatClient) initialization. In the sample code above, we define a Swift utility property and pass it to the streamChat initialization.
let utils = Utils(
            pollsConfig: pollsConfig
        )
            streamChat = StreamChat(chatClient: chatClient, utils: utils)
Swap the Poll's UI
If you want the poll's UI to have a completely different look and feel, you can implement a custom-made UI using the SDK's ViewFactory protocol method makeComposerPollView. The ViewFactory provides slots for replacing built-in UIs with one's own implementation.
func makeComposerPollView(
        channelController: ChatChannelController,
        messageController: ChatMessageController?
) -> some View {
    CustomComposerPollView(channelController: channelController, messageController: messageController)
}
After creating your custom poll view, it should be registered in the ViewFactory. Add a new file, CustomPollsFactory.swift, and replace its content with the following.
//  PollsUIFactory.swift
//  PollsSwiftUI

import Foundation
import SwiftUI
import StreamChat
import StreamChatSwiftUI

class CustomPollsFactory: ViewFactory {

    @Injected(\.chatClient) public var chatClient

    private init() {}

    public static let shared = CustomPollsFactory()

    func makeComposerPollView(
            channelController: ChatChannelController,
            messageController: ChatMessageController?
    ) -> some View {
        CustomComposerPollView(channelController: channelController, messageController: messageController)
    }

}
Checkout Customizing Components to learn more about the ViewFactory protocol.
Step 5: Test the Customized Poll
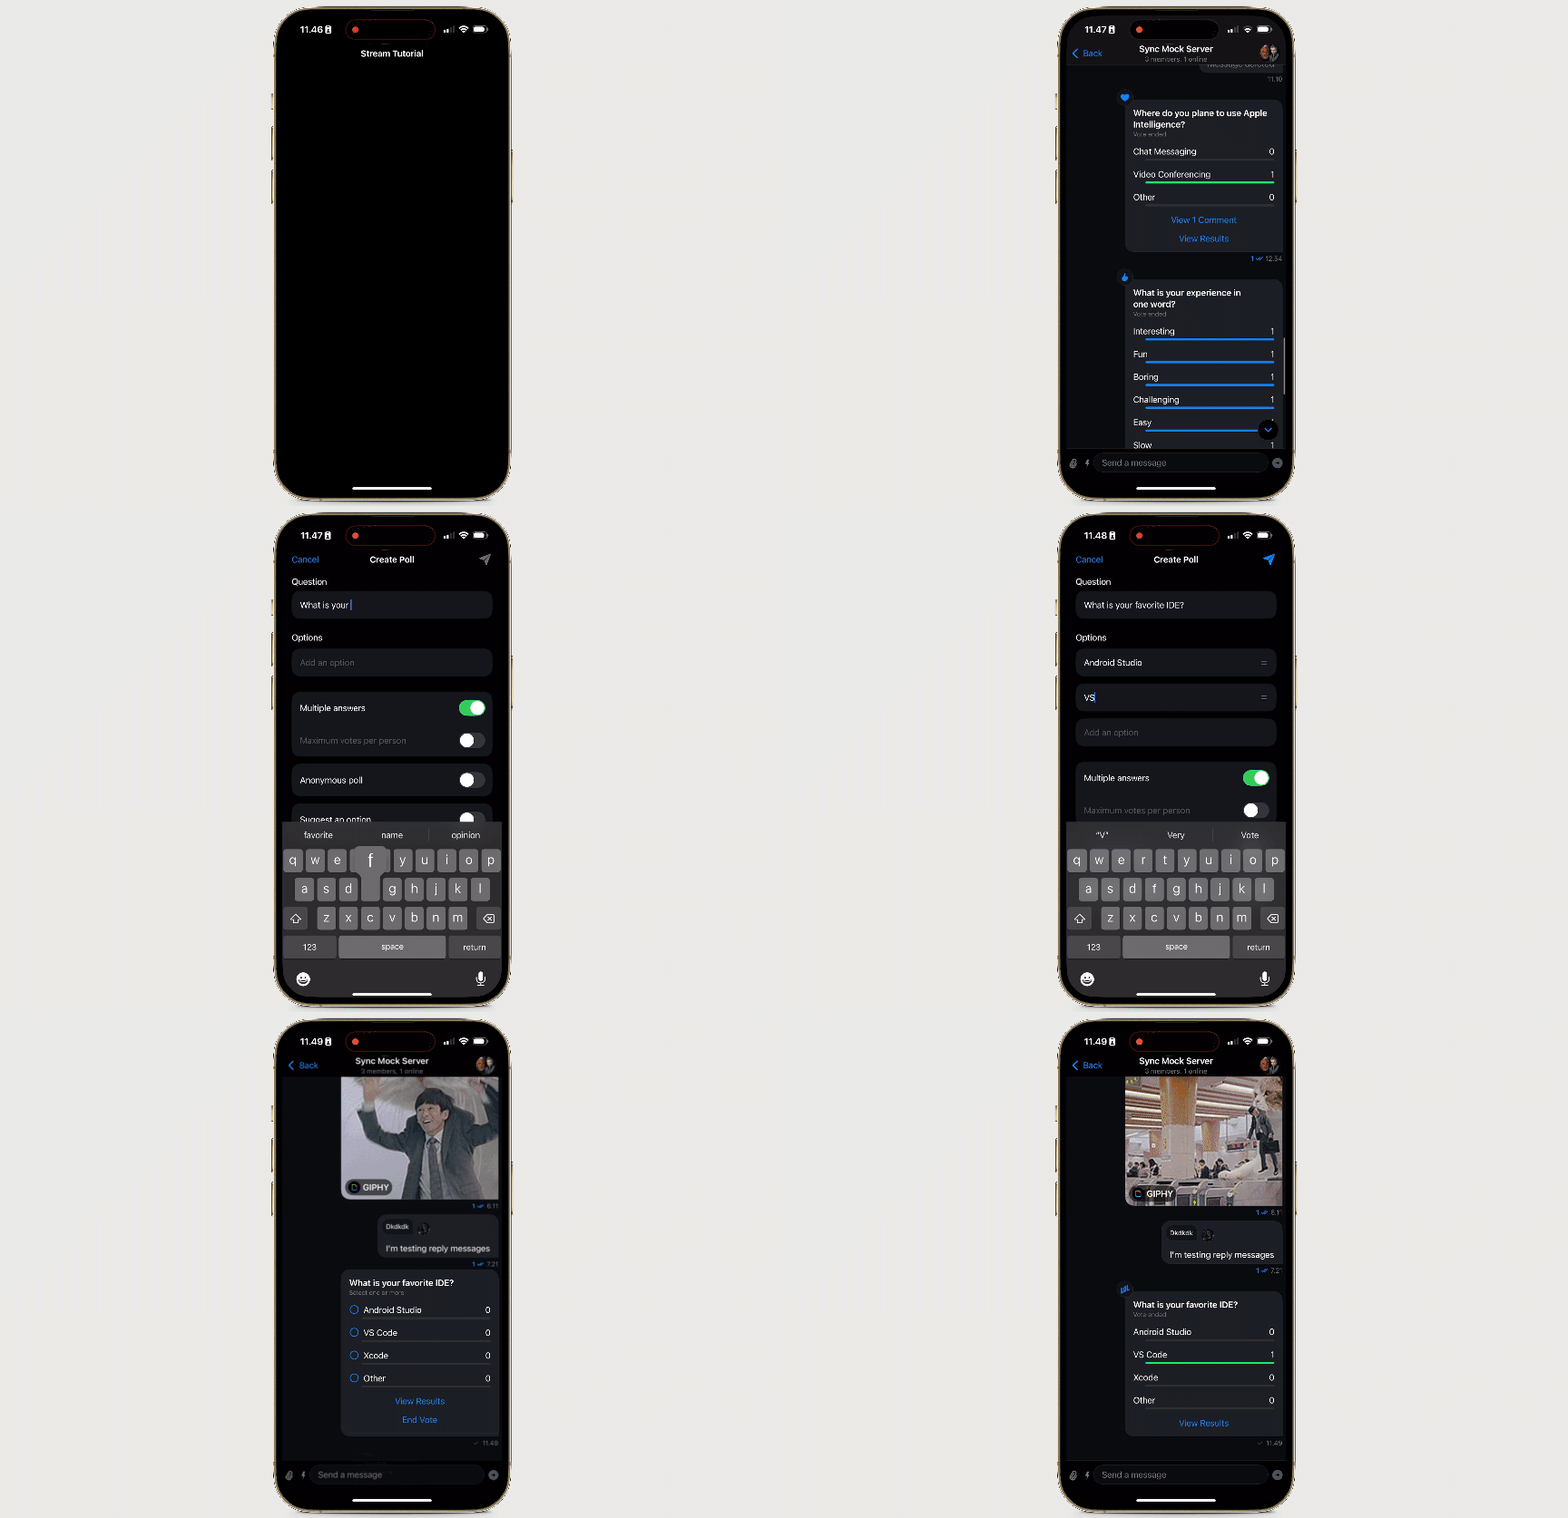
With the implementation of the previous customization, you can now run the app and create a new poll from the attachment view, as described in one of the sections above. However, the Add a Comment field is no longer visible. That is easy, huh? You now have a chat messaging app with fully working polling support to gather real-time responses and insights from people.
SwiftUI Poll Recap
In this tutorial, you learned how to integrate polls into a SwiftUI app for any use case and to capture real-time in-app feedback from participants. You discovered polls' configuration options, basic customization, how to create polls, and view them in chat messaging. You can dive into advanced customization possibilities for a poll's functionality and how it is presented to participants in our documentation.
The chat messaging part of the tutorial has a step-by-step guide to get up and running with the iOS SDK. Visit the SwiftUI Chat tutorial to learn more.
Subscribe to my newsletter
Read articles from Amos Gyamfi directly inside your inbox. Subscribe to the newsletter, and don't miss out.
Written by
