All you need to know about Flutter BLoC
 hedi
hedi
If you’re reading this article, you’re probably familiar with Flutter. You might have built a personal project or a client project. You might have also heard about the different opinions on Flutter state management. We’re not here to say X is better than Y. We are here to explain the BLoC state management solution. I believe that any Flutter developer should understand most of the approaches to building a Flutter app, because you might start a project from scratch or you might work on an existing project. Of course, when that happens, you won’t say to your client, “I can’t work on a BLoC project.” We’re software developers; we know how to learn fast, the correct way. So, let’s not waste any time.
What do we mean by state management?
State management is just the way you decide to manage your different app states. No application would have a single state; you’re not here to build a static app that will show the same UI to the user all the time. Your app will have different states. Let’s take a login page, for example:
Initial State: The user just navigated to your login page, buttons are not yet clicked, and inputs are empty.
Loading State: The user typed an email & password and then clicked on the button. Your buttons are now loading so the user doesn’t click on them twice and send the same request multiple times to the server.
Error State: If something goes wrong, such as an invalid login.
Success State: If everything is OK, you’ll show a Toast to your user and redirect them to the next page.
A widget in Flutter has two types:
Stateless: The widget will remain static for the whole lifecycle of the app.
Stateful: The widget has an attached state, which might change depending on user interaction or other triggers.
By default, Flutter has a way to manage state through stateful widgets. You change data inside your state, call setState, and Flutter will take care of the rest: mark the state as dirty, call the build method, and the app re-renders with the new data and thus the new UI.
While this might work for simple cases, your code will quickly become coupled, your state will manage different responsibilities, and it will become hard to scale, add new features, or fix bugs. Not just that, you’ll need to declare all of your state inside the State object. For the login page example, you’ll need to declare:
isLoading(true | false)errorMessage(String)passwordController(TextEditingController)emailController(TextEditingController)
You’ll need to manage the combination of these states carefully. For example:
errorMessageshould be set when an error occurs but then should be cleared if the user starts typing.You should set
isLoadingto true before each operation and false after each operation (not just when the operation succeeds, but also when there is an error).
The more states you have, the more complex it will become to manage. You’ll need to start building state machines, which isn’t worth the effort as the community has already introduced well-designed solutions to these problems.
BLoC stands for Business Logic
Business logic or domain logic is that part of the program which encodes the real-world business rules that determine how data can be created, stored, and changed. It prescribes how business objects interact with one another, and enforces the routes and the methods by which business objects are accessed and updated.
Every app you build will satisfy certain business requirements, which often involve different interactions with the data we pull/push from/to a database (either through a server or locally). We then convert this data into a custom UI that the end user can easily understand, read, or update. To separate concerns, it is highly recommended to separate logic from UI.
This separation not only makes the application more maintainable and scalable, with fewer chances for bugs, but it also makes our business logic reusable and untouched when we want to use it in a different app or if we decide one day to change a few components. This might be the case when we have a mobile and web app using the same cross-platform framework, for example.
BLoC (Business Logic Component) is one of the best solutions to achieve this. With its simple API and mental model, we can build a simple yet powerful codebase.
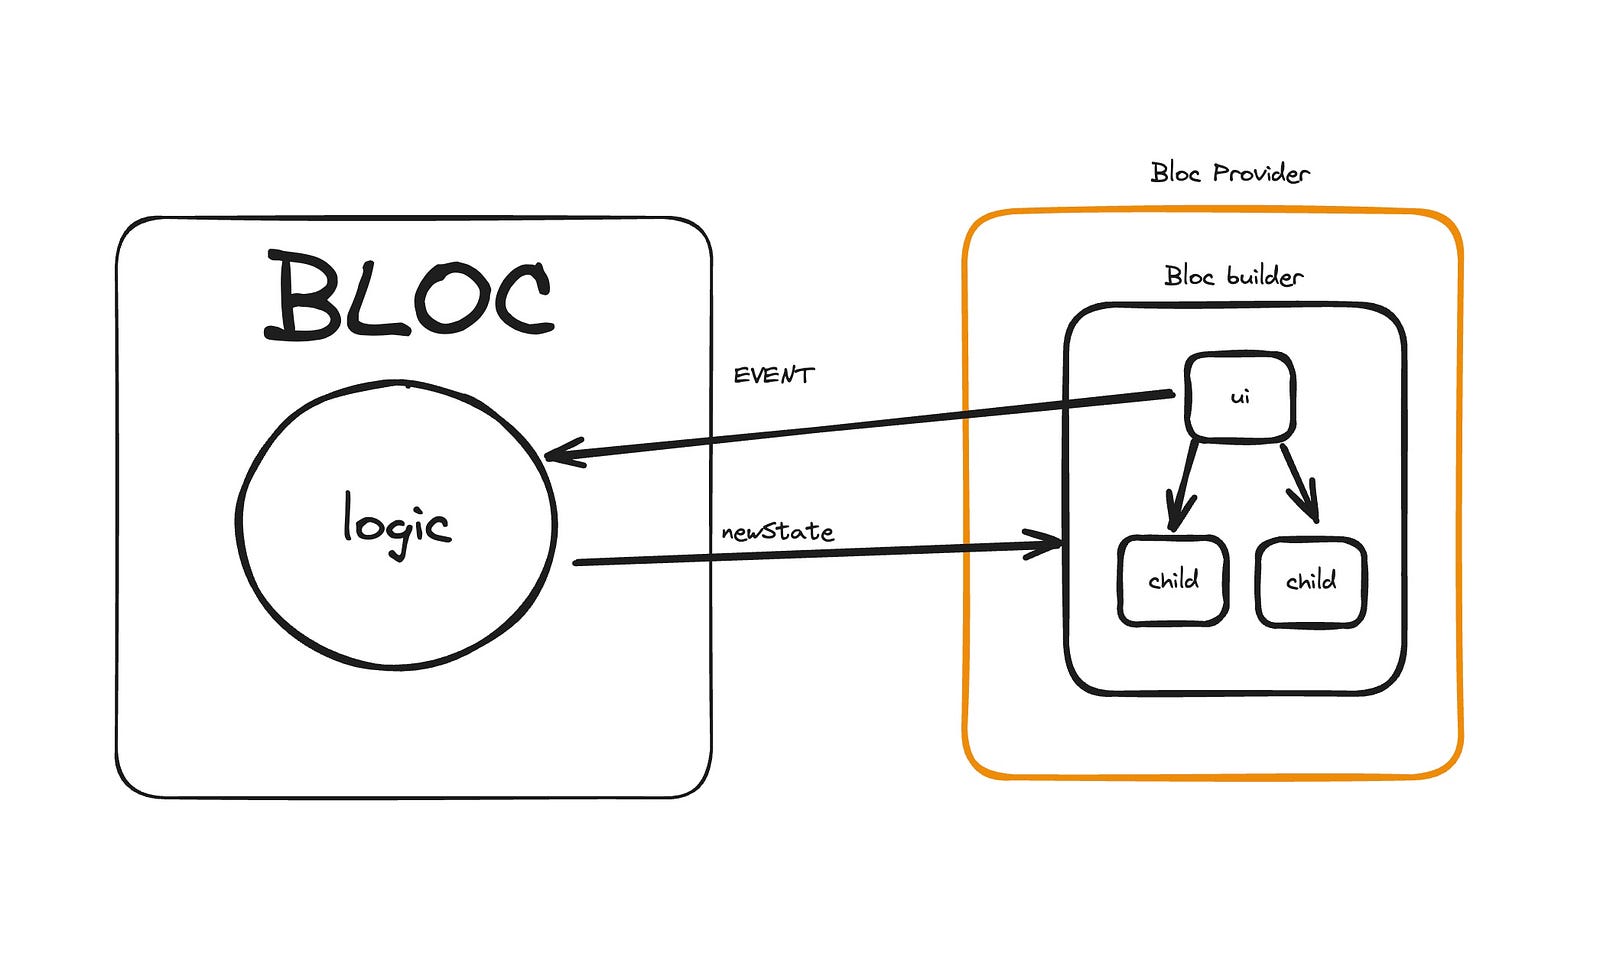
This diagram has three main parts:

The BLoC itself: It receives events, performs some logic, and emits a new state.
Bloc Provider: It provides the BLoC instance to all its children. It uses Provider under the hood, which utilizes
InheritedWidget.Bloc Builder: It has a builder function and listens for the nearest provided BLoC. When it receives a new state, it re-runs the build method.
// 1 — The BLoC itself
import 'package:flutter_bloc/flutter_bloc.dart';

enum LoginEvent { submitCredentials, logout }
enum LoginState { initial, loading, success, failure }

class LoginBloc extends Bloc<LoginEvent, LoginState> {
  LoginBloc() : super(LoginState.initial) {
    on<LoginEvent>((event, emit) async {
      switch (event) {
        case LoginEvent.submitCredentials:
          emit(LoginState.loading);
          // Perform login logic here
          // For example purposes, we'll just emit success after a delay
          await Future.delayed(Duration(seconds: 2));
          emit(LoginState.success);
          break;
        case LoginEvent.logout:
          emit(LoginState.initial);
          break;
      }
    });
  }
}

// 2 — Bloc Provider
import 'package:flutter/material.dart';
import 'package:flutter_bloc/flutter_bloc.dart';

class MyApp extends StatelessWidget {
  @override
  Widget build(BuildContext context) {
    return BlocProvider(
      create: (context) => LoginBloc(),
      child: MaterialApp(
        home: LoginPage(),
      ),
    );
  }
}

// 3 — Bloc Builder
class LoginPage extends StatelessWidget {
  @override
  Widget build(BuildContext context) {
    return Scaffold(
      body: BlocBuilder<LoginBloc, LoginState>(
        builder: (context, state) {
          switch (state) {
            case LoginState.initial:
              return LoginForm();
            case LoginState.loading:
              return CircularProgressIndicator();
            case LoginState.success:
              return Text('Login Successful!');
            case LoginState.failure:
              return Text('Login Failed. Please try again.');
          }
        },
      ),
    );
  }
}
Bear with me, we’ll dive into details later. For now, all you need to keep in mind is that we’ll have a BLoC class (or Cubit — more on that later). We need to provide a BLoC instance through BlocProvider, and wrap the UI that should update when BLoC emits a new state under a BlocBuilder. BlocBuilder will listen to state emissions and update the UI accordingly.
What about Cubit?
import 'package:bloc/bloc.dart';

/// {@template cubit}
/// A [Cubit] is similar to [Bloc] but has no notion of events
/// and relies on methods to [emit] new states.
///
/// Every [Cubit] requires an initial state which will be the
/// state of the [Cubit] before [emit] has been called.
///
/// The current state of a [Cubit] can be accessed via the [state] getter.
///
/// ```dart
/// class CounterCubit extends Cubit<int> {
///   CounterCubit() : super(0);
///
///   void increment() => emit(state + 1);
/// }
///
/// /// {@endtemplate} abstract class Cubit extends BlocBase { /// {@macro cubit} Cubit(State initialState) : super(initialState); }
Cubit is a simpler version of BLoC. Instead of the notion of events, we just declare methods inside a Cubit and call them directly, rather than sending (or adding) events.

```dart
/// {@template bloc}
/// Takes a `Stream` of `Events` as input
/// and transforms them into a `Stream` of `States` as output.
/// {@endtemplate}
abstract class Bloc<Event, State> extends BlocBase<State>
    implements BlocEventSink<Event> {
  /// {@macro bloc}
  Bloc(State initialState) : super(initialState);

.....

}
As you can see, Both Cubit & Bloc both extend BlocBase.
With Bloc, you need to add Events instead of calling methods.
// Cubit example
import 'package:flutter_bloc/flutter_bloc.dart';

class LoginCubit extends Cubit<String> {
  LoginCubit() : super('initial');

  void login(String username, String password) {
    emit('loading');
    // Simulating login process
    Future.delayed(Duration(seconds: 2), () {
      if (username == 'user' && password == 'pass') {
        emit('success');
      } else {
        emit('failure');
      }
    });
  }
}

// Bloc example
import 'package:flutter_bloc/flutter_bloc.dart';

abstract class LoginEvent {}
class LoginSubmitted extends LoginEvent {
  final String username;
  final String password;
  LoginSubmitted(this.username, this.password);
}

class LoginBloc extends Bloc<LoginEvent, String> {
  LoginBloc() : super('initial') {
    on<LoginSubmitted>((event, emit) async {
      emit('loading');
      await Future.delayed(Duration(seconds: 2));
      if (event.username == 'user' && event.password == 'pass') {
        emit('success');
      } else {
        emit('failure');
      }
    });
  }
}
This snippet shows the main difference between Cubit & Bloc.
// Using LoginCubit
class LoginPageWithCubit extends StatelessWidget {
  @override
  Widget build(BuildContext context) {
    return BlocProvider(
      create: (context) => LoginCubit(),
      child: BlocBuilder<LoginCubit, String>(
        builder: (context, state) {
          return Column(
            children: [
              Text('State: $state'),
              ElevatedButton(
                onPressed: () {
                  context.read<LoginCubit>().login('user', 'pass');
                },
                child: Text('Login'),
              ),
            ],
          );
        },
      ),
    );
  }
}

// Using LoginBloc
class LoginPageWithBloc extends StatelessWidget {
  @override
  Widget build(BuildContext context) {
    return BlocProvider(
      create: (context) => LoginBloc(),
      child: BlocBuilder<LoginBloc, String>(
        builder: (context, state) {
          return Column(
            children: [
              Text('State: $state'),
              ElevatedButton(
                onPressed: () {
                  context.read<LoginBloc>().add(LoginSubmitted('user', 'pass'));
                },
                child: Text('Login'),
              ),
            ],
          );
        },
      ),
    );
  }
}
Cubit is definitely simpler and was introduced in later versions to make BLoC even simpler and easier to use. So, you should always use Cubit unless there is a strong reason to use the events model of BLoC. I rarely find a good reason that outweighs the boilerplate, added complexity, and extra code of BLoC.
This is how you would use both: with Cubit, you read the Cubit and directly call the login method. With BLoC, you add an event using the add method.
// Using LoginCubit
class LoginPageWithCubit extends StatelessWidget {
  @override
  Widget build(BuildContext context) {
    // We use BlocProvider to provide Cubit || Bloc.
    return BlocProvider(
      create: (context) => LoginCubit(),
      child: LoginViewCubit(),
    );
  }
}

class LoginViewCubit extends StatelessWidget {
  @override
  Widget build(BuildContext context) {
    return BlocBuilder<LoginCubit, String>(
      builder: (context, state) {
        return Column(
          children: [
            Text('State: $state'),
            ElevatedButton(
              onPressed: () {
                // This is how you read a cubit provded above
                context.read<LoginCubit>().login('user', 'pass');
              },
              child: Text('Login'),
            ),
          ],
        );
      },
    );
  }
}

// Using LoginBloc
class LoginPageWithBloc extends StatelessWidget {
  @override
  Widget build(BuildContext context) {
    return BlocProvider(
      create: (context) => LoginBloc(),
      child: LoginViewBloc(),
    );
  }
}

class LoginViewBloc extends StatelessWidget {
  @override
  Widget build(BuildContext context) {
    return BlocBuilder<LoginBloc, String>(
      builder: (context, state) {
        return Column(
          children: [
            Text('State: $state'),
            ElevatedButton(
              onPressed: () {
                // This is how you read a Bloc provided above.
                context.read<LoginBloc>().add(LoginSubmitted('user', 'pass'));
              },
              child: Text('Login'),
            ),
          ],
        );
      },
    );
  }
}
What’s next?
What we have covered so far should be very easy to understand and master. What makes BLoC a bit inconvenient for some is what we’ll cover in the next paragraphs: BlocListener, BlocBuilder, and BlocConsumer.
All of these widgets are stateful widgets. They first start by looking for the nearest provided BLoC instance above in the tree. If they find nothing, an exception will be thrown. Once they find a BLoC provided above, they start listening for state changes, when a state changes each widget of these will have a different behavior.
1- BlocListener:
BlocListener<CounterCubit, int>(
  listener: (context, state) {
    if (state == 5) {
      ScaffoldMessenger.of(context).showSnackBar(
        SnackBar(content: Text('Counter reached 5!')),
      );
    }
  },
  child: Text('Count: ${context.watch<CounterCubit>().state}'),
)
BlocListener has a listener method with two parameters (context and new state). This method will only be called when a new state is emitted. The new state should not equal the last emitted state for this method to be triggered.
This is where you should put any logic besides rendering UI, such as showing a Snackbar, a modal sheet, or navigating. If you try to do this inside a builder, an exception will be thrown because you were trying to perform an action that shouldn’t be inside the build method. That’s why BlocListener was built — to handle any kind of operation when a state is emitted other than UI rendering.
2- BlocBuilder:
class CounterPage extends StatefulWidget {
  @override
  _CounterPageState createState() => _CounterPageState();
}

class _CounterPageState extends State<CounterPage> {
  int localState = 0;

  @override
  Widget build(BuildContext context) {
    print('Build method called');
    return Column(
      children: [
        BlocBuilder<CounterCubit, int>(
          builder: (context, state) {
            print('BlocBuilder rebuilding');
            return Text('Cubit state: $state');
          },
        ),
        Text('Local state: $localState'),
        ElevatedButton(
          onPressed: () => setState(() => localState++),
          child: Text('Increment local state'),
        ),
        ElevatedButton(
          onPressed: () => context.read<CounterCubit>().increment(),
          child: Text('Increment cubit state'),
        ),
      ],
    );
  }
}
Now let’s take a look at this simple CounterPage. We have the same CounterCubit and a local state variable which will be updated using setState.
BlocBuilder will have the same behavior as BlocListener in that it listens for state changes. If newState != oldState, the builder method will be triggered. So, what's the difference?
Flutter can call your build method many times during the lifecycle of a stateful widget. For example:
When a parent widget rebuilds.
When we call
setState, as we're doing in this example.When we use
MediaQuery.of(context)and size/orientation or any other property changes.
If any of these actions occur, the BlocBuilder will also re-call its builder method despite the fact that no new state is emitted from the BLoC. BlocListener’s listener method won’t be triggered in this case. And that’s the main difference between BlocBuilder and BlocListener.
So to recap:
BlocListener is used when UI changes are independent of the state, and we need to trigger some actions like navigation or showing a Snackbar when
newState!=oldStateis emitted.BlocBuilder is used when we need to change the UI based on the state. The builder method might be triggered as a result of many actions other than a new state emission.
3 — BlocConsumer:
BlocConsumer has two methods: listener and builder. The listener method behaves the same way as the listener method of BlocListener, while the builder method behaves the same way as the builder method from BlocBuilder.
You would use a BlocConsumer when you need to update the UI based on the new state and trigger some actions like navigation or showing snackbars or bottom sheets.
class CounterPage extends StatelessWidget {
  @override
  Widget build(BuildContext context) {
    return Scaffold(
      appBar: AppBar(title: Text('Counter')),
      body: Center(
        child: BlocConsumer<CounterCubit, int>(
          listener: (context, state) {
            if (state == 5) {
              ScaffoldMessenger.of(context).showSnackBar(
                SnackBar(content: Text('Counter reached 5!')),
              );
            }
          },
          builder: (context, state) {
            return Text('Count: $state', style: TextStyle(fontSize: 24));
          },
        ),
      ),
      floatingActionButton: FloatingActionButton(
        child: Icon(Icons.add),
        onPressed: () => context.read<CounterCubit>().increment(),
      ),
    );
  }
}
How to read a Bloc?
To get access to your BLoC instance, you should first add a Provider above in the tree. Then you can read it using context.read<T>(context) or BlocProvider.of<T>(context)
However, you should be careful with BlocProvider , this code for example will throw an exception. Bloc is not provided...
class LoginViewBloc extends StatelessWidget {
  @override
  Widget build(BuildContext context) {
    return BlocProvider<LoginBloc>(
      create:(context)=>LoginBloc(),
      child:BlocBuilder<LoginBloc, String>(
      builder: (context, state) {
        return Column(
          children: [
            Text('State: $state'),
            ElevatedButton(
              onPressed: () {
                // This is how you read a Bloc provided above.
                context.read<LoginBloc>().add(LoginSubmitted('user', 'pass'));
              },
              child: Text('Login'),
            ),
          ],
        );
      },
     )
    );
  }
}
This is a common issue in Flutter when working with BlocProvider and BlocBuilder. The problem occurs because the context available in the build method of a widget is not yet aware of the BlocProvider that’s being created in that same build method.
To solve this we can either create a parent widget to provide our Bloc,
class ParentWidget extends StatelessWidget {
  @override
  Widget build(BuildContext context) {
    return BlocProvider(
      create: (context) => YourBloc(),
      child: ChildWidget(),
    );
  }
}

class ChildWidget extends StatelessWidget {
  @override
  Widget build(BuildContext context) {
    return BlocBuilder<YourBloc, YourState>(
      builder: (context, state) {
        // Your widget tree
      },
    );
  }
}
Or we can use Builder widget which creates a new build context that’s a child of the BlocProvider.
@override
Widget build(BuildContext context) {
  return BlocProvider(
    create: (context) => YourBloc(),
    child: Builder(
      builder: (BuildContext context) {
        // Now you can access the bloc within this Builder
        return BlocBuilder<YourBloc, YourState>(
          builder: (context, state) {
            // Your widget tree
            return YourWidget();
          },
        );
      },
    ),
  );
}
NB: We can also use context.watch<T>(context) to listen for state changes. This will call the build method whenever w new state is emitted.
@override
Widget build(BuildContext context) {
  final state = context.watch<YourBloc>(context);
  return state is Loading ? Loading() : YourWidget();
}
Another common issue new developers face with Bloc is when they navigate to a new screen. They still receive the Bloc not provided exception.. even if they do provide a Bloc above in the tree.
import 'package:flutter/material.dart';
import 'package:flutter_bloc/flutter_bloc.dart';

class CounterCubit extends Cubit<int> {
  CounterCubit() : super(0);
  void increment() => emit(state + 1);
}

void main() => runApp(MyApp());

class MyApp extends StatelessWidget {
  @override
  Widget build(BuildContext context) {
    return BlocProvider(
      create: (_) => CounterCubit(),
      child: MaterialApp(home: HomeScreen()),
    );
  }
}

class HomeScreen extends StatelessWidget {
  @override
  Widget build(BuildContext context) {
    return Scaffold(
      appBar: AppBar(title: Text('Home')),
      body: Center(
        child: ElevatedButton(
          child: Text('Go to Counter'),
          onPressed: () => Navigator.push(
            context,
            MaterialPageRoute(builder: (_) => CounterScreen()),
          ),
        ),
      ),
    );
  }
}

class CounterScreen extends StatelessWidget {
  @override
  Widget build(BuildContext context) {
    return Scaffold(
      appBar: AppBar(title: Text('Counter')),
      body: Center(
        child: BlocBuilder<CounterCubit, int>(
          builder: (context, count) => Text('Count: $count'),
        ),
      ),
      floatingActionButton: FloatingActionButton(
        onPressed: () => context.read<CounterCubit>().increment(),
        child: Icon(Icons.add),
      ),
    );
  }
}
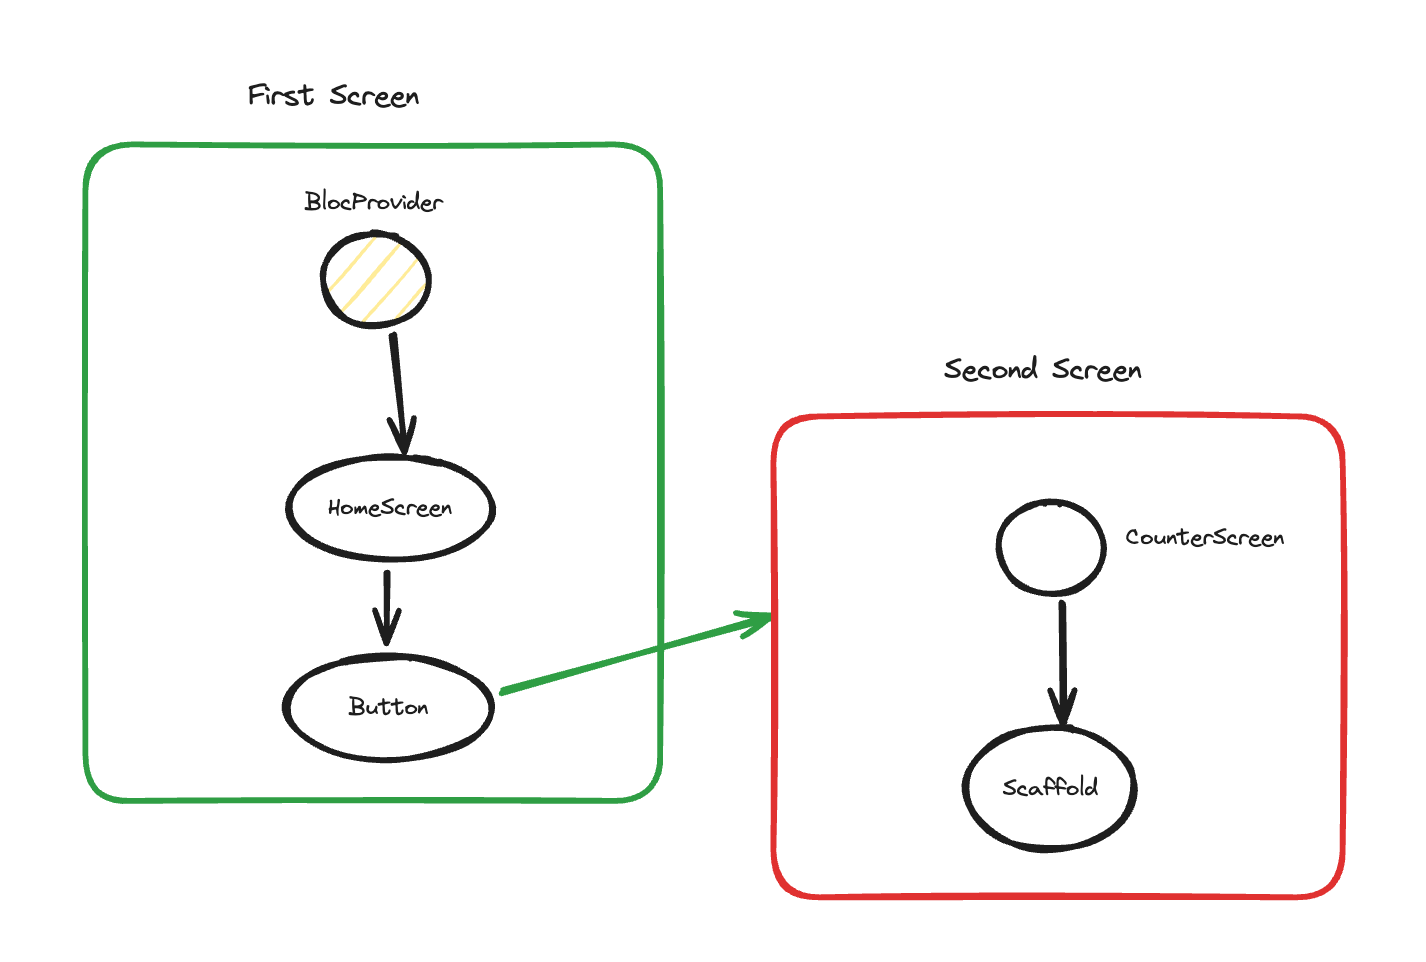
In this example we’re providing our CounterCubit above HomeScreen . When we click on Go to Counter button inside HomeScreen we’re navigating to new screen called CounterScreen . If we try to access the bloc here, or use BlocBuilder / BlocListener / BlocConsumer / context.read or context.watch Bloc will throw an exception. To demonstrate this, let’s take a look at this example.

When we navigate to CounterScreen , flutter will create a new route on top of FirstScreen route and the won’t be able to access the Bloc using context in this case.
To fix this we should provide our Bloc to second screen using BlocProvider.value under MaterialPageRoute. This will make our Bloc accessible within the new Route.
class HomeScreen extends StatelessWidget {
  @override
  Widget build(BuildContext context) {
    return Scaffold(
      appBar: AppBar(title: Text('Home')),
      body: Center(
        child: ElevatedButton(
          child: Text('Go to Counter'),
          onPressed: () {
            Navigator.of(context).push(
              MaterialPageRoute(
                builder: (_) => BlocProvider.value(
                  value: context.read<CounterCubit>(),
                  child: CounterScreen(),
                ),
              ),
            );
          },
        ),
      ),
    );
  }
}
You might ask, why use BlocProvider.value instead of BlocProvider.create?
When we use BlocProvider.create, the Bloc will be closed when the widget is disposed and won't be available for use anymore. So, if we use BlocProvider.create to wrap the next screen, when we pop back to the previous screen, the Bloc will be closed, and HomeScreen will now use a closed bloc, leading to runtime exceptions.
That’s why we use BlocProvider.value, which will provide the same instance of our CounterCubit down the tree to CounterScreen. When we pop the second screen, the Bloc won't be closed, and we can still use it in HomeScreen.
So to Recap:
BlocProvider.value: Accepts an existing instance of a bloc and propagates it down the tree to make it accessible through
context.read. When the widget wrapped withBlocProvider.valueis disposed, the BLoC instance won't be closed.BlocProvider.create: Accepts a create function to create a new instance of the BLoC. When the widget wrapped with
BlocProvider.createis disposed, the Bloc will be closed and can't be used anymore.
Global BLoC
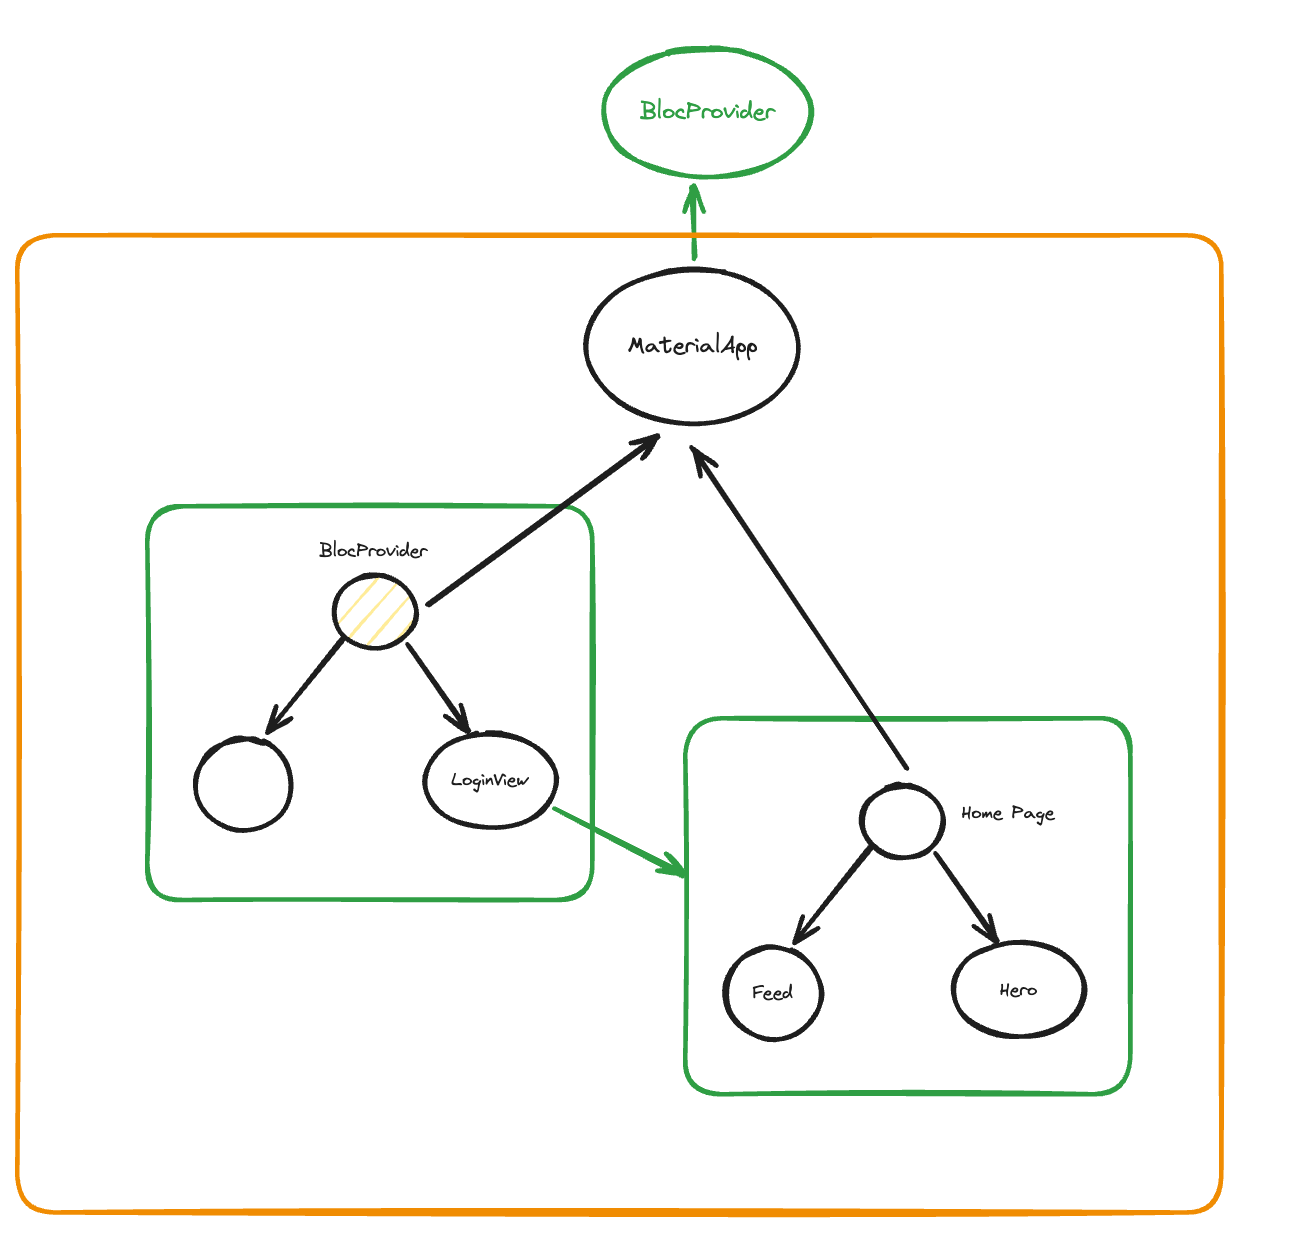
You might need your BLoC to be accessible from any widget in the widget tree. For example, an AuthorizationCubit should remain consistent. If a user logs in or out, you should be able to get notified from any widget to ensure you don't show confidential data or allow unauthorized users to see or update data.
It’s also very common for ConnectivityCubit or NotificationCubit. To make a BLoC instance global and shared across the app using context.read, you should provide it above your root widget, which is usually MaterialApp or CupertinoApp.
class MyApp extends StatelessWidget {
  @override
  Widget build(BuildContext context) {
    return BlocProvider(
      create: (context) => AuthorizationCubit(),
      child: MaterialApp(
        title: 'Auth Example',
        theme: ThemeData(primarySwatch: Colors.blue),
        home: HomeScreen(),
      ),
    );
  }
}
This way, you don’t need to wrap every screen with BlocProvider.value when you navigate. Wrapping your MaterialApp with BlocProvider will make it easier to make your Bloc instance global and accessible throughout the app.

States equality
We’ve been mentioning over and over that the builder or listener method will be triggered when newState != oldState. But how does BLoC compare these two states?
By default, BLoC will use the != operator. If our state is a primitive type or a record for example this won't be an issue. For example, 1 is always != from 2 or 3, and "string" is always != from "different string”. Similarly, (name:"hedi", age:25) is considered equal to (name:"hedi", age:25).
However, Person(name:"hedi", age:25) is not the same as Person(name:"hedi", age:25), and ["hedi"] is not the same as ["hedi"]. Class instances and lists, for example, are compared by reference, so BLoC will always consider newState != oldState even if they look the same to you.
This is an issue when we use complex state objects instead of primitive types or records. For example, …
import 'package:flutter_bloc/flutter_bloc.dart';

class User {
  final String name;
  final int age;

  User(this.name, this.age);

  @override
  String toString() => 'User(name: $name, age: $age)';
}

class UserState {
  final User user;

  UserState(this.user);


}

class UserCubit extends Cubit<UserState> {
  UserCubit() : super(UserState(User('John', 30)));

  void updateUser() {
    final currentUser = state.user;
    emit(UserState(User(currentUser.name, currentUser.age)));

    // Simulating an API call
    Future.delayed(Duration(seconds: 1), () {
      emit(UserState(User(currentUser.name, currentUser.age)));
    });
  }
}
In this case, whether we’re using BlocListener or BlocBuilder, the UserState will be considered different from the new UserState. Each time we instantiate a UserState, it will be completely different even if we use the same properties.
The first way to fix this is by overriding the buildWhen or listenWhen methods provided in BlocBuilder (buildWhen), BlocListener (listenWhen), or BlocConsumer (both buildWhen and listenWhen).
BlocConsumer<UserCubit, UserState>(
  listenWhen: (previous, current) {
    // Listen when the user's name or age changes
    return previous.user.name != current.user.name || previous.user.age != current.user.age;
  },
  listener: (context, state) {
    // Show a snackbar when the user's details change
    ScaffoldMessenger.of(context).showSnackBar(
      SnackBar(content: Text('User updated: ${state.user}')),
    );
  },
  buildWhen: (previous, current) {
    // Rebuild when the user's details change
    return previous.user.name != current.user.name || previous.user.age != current.user.age;
  },
  builder: (context, state) {
    return Column(
      children: [
        Text('Name: ${state.user.name}'),
        Text('Age: ${state.user.age}'),
      ],
    );
  },
)
listenWhen (or buildWhen) has two parameters: the previous state and the current state. You should return a boolean from it; if it's true, Bloc will rebuild or re-call the listener; otherwise, it won't.
This will work, but it’s not scalable nor easy to read and maintain. The best way to handle this is to override the == operator and hashCode, which Dart uses to compare two objects. We don't need to write the boilerplate for this; instead, we should use the equatable package.
import 'package:equatable/equatable.dart';

class User extends Equatable {
  final String name;
  final int age;

  User(this.name, this.age);

  @override
  List<Object?> get props => [name, age];

  @override
  String toString() => 'User(name: $name, age: $age)';
}

class UserState extends Equatable {
  final User user;

  UserState(this.user);

  @override
  List<Object?> get props => [user];

  @override
  String toString() => 'UserState(user: $user)';
}

class UserCubit extends Cubit<UserState> {
  UserCubit() : super(UserState(User('John', 30)));

  void updateUser() {
    final currentUser = state.user;
    emit(UserState(User(currentUser.name, currentUser.age)));

    // Simulating an API call
    Future.delayed(Duration(seconds: 1), () {
      emit(UserState(User(currentUser.name, currentUser.age)));
    });
  }
}
We just need to extend the Equatable class and add the attributes that should be part of the comparison inside the props array. When BLoC tries to compare the states, it will now compare these attributes instead of using the default comparison, which can lead to unexpected behaviors.
Conclusion
I think we’ve said it all 🫡. I’m a fan of BLoC state management, so I wanted to share its intricacies and make people excited to use it in their next project.
Try to read this article more than once, build a project, and ask questions. Trial and error will make this topic easy for you to grasp and implement in your future projects.
Do not hesitate to ask any questions through comments or reach out to me directly on my LinkedIn account.
The last peace of the puzzle..
In the next article, we will tackle unit testing for BLoC, inshallah. This will help you become a full-fledged BLoC developer who can build awesome apps with simple yet predictable, readable, and maintainable Flutter code.
Peace
Subscribe to my newsletter
Read articles from hedi directly inside your inbox. Subscribe to the newsletter, and don't miss out.
Written by

hedi
hedi
I'm a web/mobile developer enthusiast! I'm a JavaScript lover and a flutter fun! I talk about #typescript #flutter and #webdevelopment in general.