Generating a Docker Image for a Spring Boot Application 🤯
 Sudarshan Doiphode
Introduction
Docker has revolutionized the way developers build, ship, and run applications. By encapsulating applications and their dependencies into containers, Docker ensures that software runs consistently across different environments. This guide will help you understand why Docker is essential and provide a step-by-step process to generate a Docker image for a Spring Boot application.
Why Use Docker?
Consistency Across Environments: Docker ensures that your application runs the same way regardless of where it's deployed, eliminating "it works on my machine" issues.
Scalability: Containers can be easily scaled up or down to handle varying loads, making it ideal for microservices and cloud-native applications.
Isolation: Docker containers run in isolation, ensuring that one application’s environment doesn’t interfere with another’s.
Portability: Docker images can be shared and deployed on any system that supports Docker, providing great flexibility and ease of deployment.
Efficient Resource Usage: Containers are lightweight and use fewer resources compared to traditional virtual machines.
1. Prerequisites
Docker Installed: Make sure Docker is installed on your system. You can download it from the official Docker Website.
Spring Boot Application: Have a Spring Boot application ready. If you don't have one, you can create a simple one using Spring Initializr or by cloning a sample project from my GitHub.
2. Create a Dockerfile
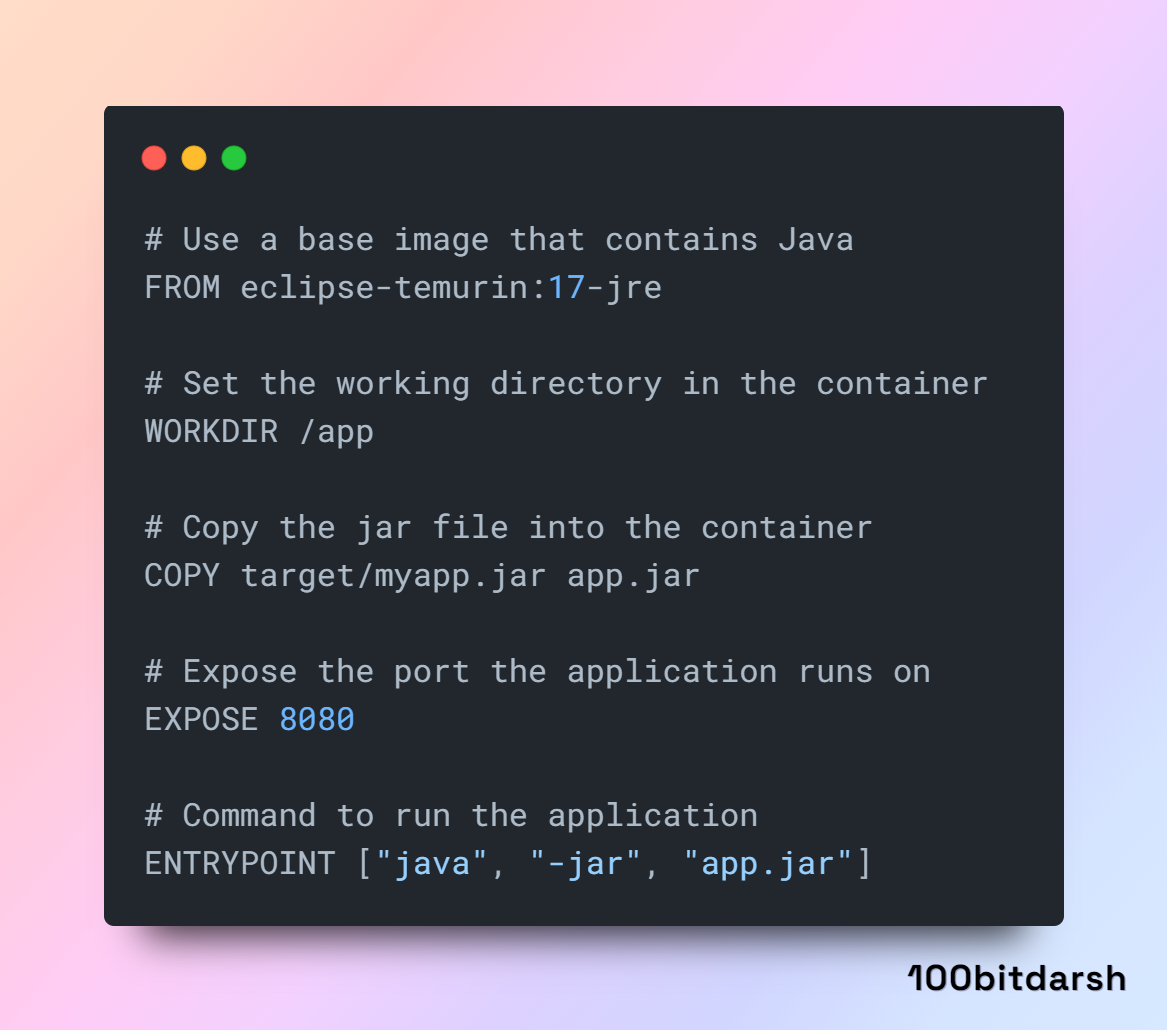
A Dockerfile is a text file that contains all the instructions to build a Docker image. Here’s a basic Dockerfile for a Spring Boot application:

Explanation:
FROM eclipse-temurin:17-jre: This specifies the base image to use, which includes the Java runtime environment.WORKDIR /app: Sets the working directory inside the container. This is optional.COPY target/myapp.jar app.jar: Copies the JAR file from the target directory to the container.EXPOSE 8080: Exposes port 8080 for communication.ENTRYPOINT ["java", "-jar", "app.jar"]: Defines the command to run the application.
3. Build the Spring Boot Application
Before building the Docker image, you need to package your Spring Boot application as a JAR file. Run the following command in your project directory:

or if you are using Gradle:

This will create a JAR file in the target directory (for Maven) or build/libs directory (for Gradle).
4. Build the Docker Image
Navigate to the directory containing your Dockerfile and run the following command to build the Docker image:

Here, my-spring-boot-app is the name you are giving to your Docker image. The . denotes the current directory as the build context.
5. Run the Docker Container
After building the Docker image, you can run it using the following command:

This maps port 8080 on your local machine to port 8080 in the Docker container.
6. Access the Application
Open your web browser and navigate to http://localhost:8080 to see your Spring Boot application running inside the Docker container.
Conclusion
You’ve successfully created and run a Docker image for your Spring Boot application. This setup allows you to deploy your application consistently across different environments. If you have any more questions feel free to ask!
Subscribe to my newsletter
Read articles from Sudarshan Doiphode directly inside your inbox. Subscribe to the newsletter, and don't miss out.
Written by

Sudarshan Doiphode
Sudarshan Doiphode
👋 Hey there! I'm Sudarshan, a tech enthusiast with a focus on: • 🚀 Spring Boot • 🌼 Spring • 🔒 Spring Security • 🌱 Hibernate • ☕ Java 8 & Java • 🚀 Apache Kafka • 🛢️ Apache Maven • 🐳 Docker • 🔗 Git • 🏗️ Design Patterns • And more tech adventures! Follow for insights and join the journey. 🌟👨💻 #TechEnthusiast