NGINX in Action: A Case Study on Enhancing In-House Web Performance
 Akshat Sharma
🤔 Context:
So recently I had project where our team had to build a Flask-React Application that would be used by other micro service developers to run automated test and perform analytics on same.
Once we were done with application we were give a VM to Deploy and run that App on.
Question Came , what to use?
🌏 What Options do we have ?
➫ Backend (Flask) Application Servers
| Application Server | Description | Pros | Cons |
| Gunicorn | Python WSGI HTTP server for UNIX | Easy to use with Flask, highly configurable, good performance | Limited to UNIX-like operating systems |
| uWSGI | Application server for deploying Python web applications | Very configurable, supports multiple languages, robust performance | Complex configuration, steep learning curve |
| Nginx with uWSGI | Nginx as a reverse proxy with uWSGI application server | High performance, efficient static file serving, load balancing | Complex setup, requires configuration for both Nginx and uWSGI |
| Apache HTTP Server with mod_wsgi | Apache module for hosting WSGI applications | Mature and stable, integrates well with other Apache features | More complex setup, higher resource usage compared to Nginx |
| Daphne | HTTP, HTTP2, and WebSocket protocol server for ASGI and ASGI-HTTP | Supports WebSockets and HTTP2, integrates well with Django Channels | Not as mature as uWSGI or Gunicorn, more suitable for ASGI apps |
| Nginx with Gunicorn | Nginx as a reverse proxy with Gunicorn application server | Good performance, easy to set up, load balancing | Requires configuration for both Nginx and Gunicorn |
➬ Frontend (React) Application Servers
| Application Server | Description | Pros | Cons |
| Nginx | High-performance web server and reverse proxy server | Efficient static file serving, high performance, load balancing | Requires configuration |
| Apache HTTP Server | Versatile and widely used web server | Mature and stable, supports various modules | Higher resource usage compared to Nginx |
| Vercel | Platform for static sites and serverless functions | Easy deployment, built-in CDN, optimized for React | Limited to static sites and serverless functions |
| Netlify | Platform for web applications and static websites | Easy deployment, built-in CDN, continuous deployment | Limited backend capabilities, primarily for static sites |
| Firebase Hosting | Hosting for static and dynamic content with a global CDN | Easy to use, integrates well with other Firebase services | Limited to static content and serverless functions |
| GitHub Pages | Free hosting for static websites directly from a GitHub repository | Simple to set up, free for public repositories | Limited to static content, no backend support |
🖥️ Let's see How your Websites servers you with data.
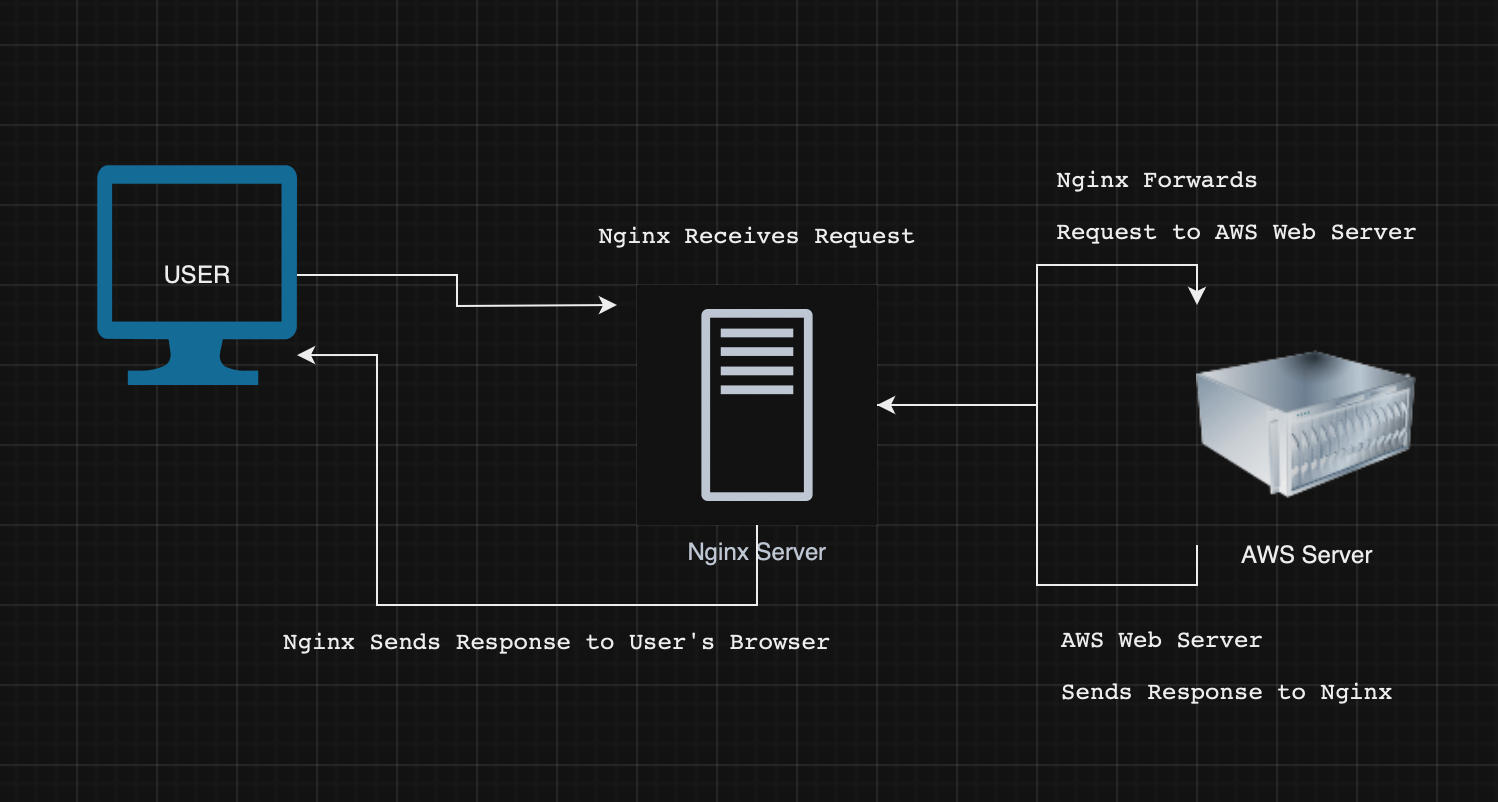
User Opens Browser:
- The user launches their preferred web browser.
User Enters URL:
- The user types
www.amazon.cominto the browser's address bar and presses Enter.DNS Lookup:
- The browser requests the IP address for
www.amazon.comfrom the DNS server.Browser Connects to Nginx:
- The browser establishes a connection to Nginx, which is the reverse proxy server for Amazon, using the IP address obtained from the DNS server.
Nginx Receives Request:
- Nginx receives the HTTP GET request from the user's browser for the Amazon homepage.
Nginx Forwards Request to AWS Web Server:
- Nginx forwards the request to the appropriate web server hosted on AWS (Amazon Web Services), which handles the actual content and processing logic.
AWS Web Server Processes Request:
- The AWS web server receives the request, processes it, which may involve querying databases, accessing backend services, and preparing the necessary HTML, CSS, and JavaScript files.
AWS Web Server Sends Response to Nginx:
- The AWS web server sends the processed response back to Nginx. This response includes the HTML content for the homepage, along with any associated assets like images, CSS files, and JavaScript files.
Nginx Sends Response to User's Browser:
- Nginx receives the response from the AWS web server and forwards it back to the user's browser.
Browser Renders Page:
- The browser receives the response from Nginx and starts rendering the homepage. It interprets the HTML, applies the CSS for styling, and executes JavaScript for dynamic content and functionality.
User Views Homepage:
- The user sees Amazon's homepage displayed in their browser. They can now interact with the website by searching for products, clicking on links, and navigating through different sections.
This is a very basic example. In reality, many additional components and processes are involved, such as load balancers, caching mechanisms, security layers, and more.
👾 How NGINX would help here ?
Load Balancing: As the user base increases, a single server may struggle to handle all requests simultaneously, potentially causing a bottleneck. To mitigate this issue, multiple servers can be deployed. However, the critical question arises: how does each request determine which server to target? This is where NGINX plays a crucial role. Users interact solely with NGINX, which is responsible for balancing the load across the various servers by distributing incoming requests effectively.
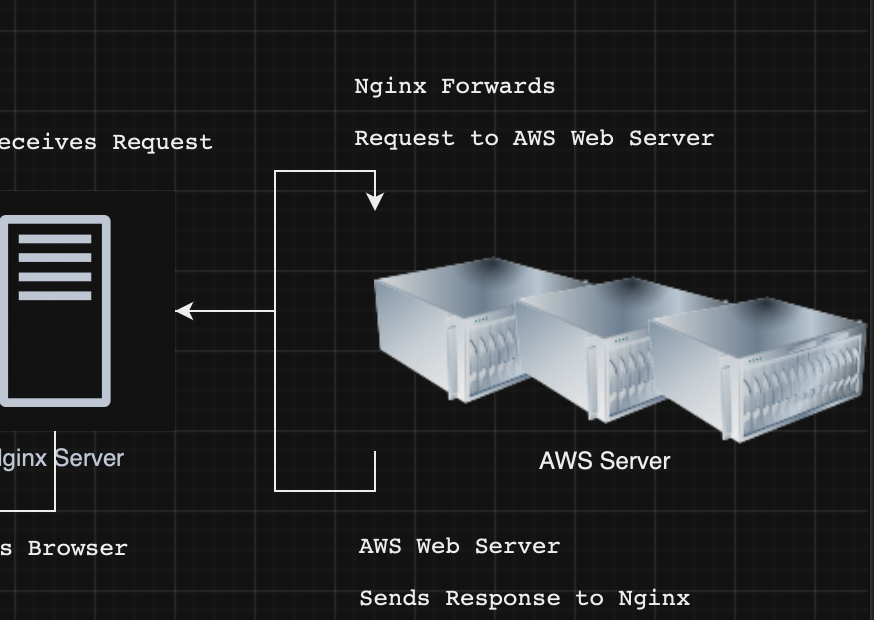
Encryption: Whenever you visit a website, you might notice that the URL starts with either HTTP or HTTPS. If it's HTTPS, it means that the data exchanged between the server and your browser is encrypted. On the user side, this data is decrypted. In scenarios with multiple servers, encryption needs to occur on each server. However, NGINX can handle this by managing the encryption process itself, ensuring that the data is encrypted and decrypted at the NGINX level.
There are several reasons to use NGINX and a reverse proxy, but here are the key considerations our team had in mind:
🏃♂️Let's get started...
💿 Installation
The installation steps vary depending on your operating system. For Ubuntu/Debian, follow these steps:
Update the package index:
sudo apt updateInstall Nginx:
sudo apt install nginxStart Nginx:
sudo systemctl start nginxEnable Nginx to start on boot:
sudo systemctl enable nginxCheck Nginx status:
sudo systemctl status nginx
🔎 Verification
Once you have installed NGINX, you need to navigate to the directory where the configuration files are located. On a Mac, the NGINX files are typically found in
/opt/homebrew/etc/nginx.To do this:
Open a terminal.
Navigate to the NGINX configuration directory:
cd /opt/homebrew/etc/nginx
You can then open the configuration files using your preferred text editor. For example:
To open the directory in VS Code, use:
code .To edit files using
vim, use:vim nginx.conf
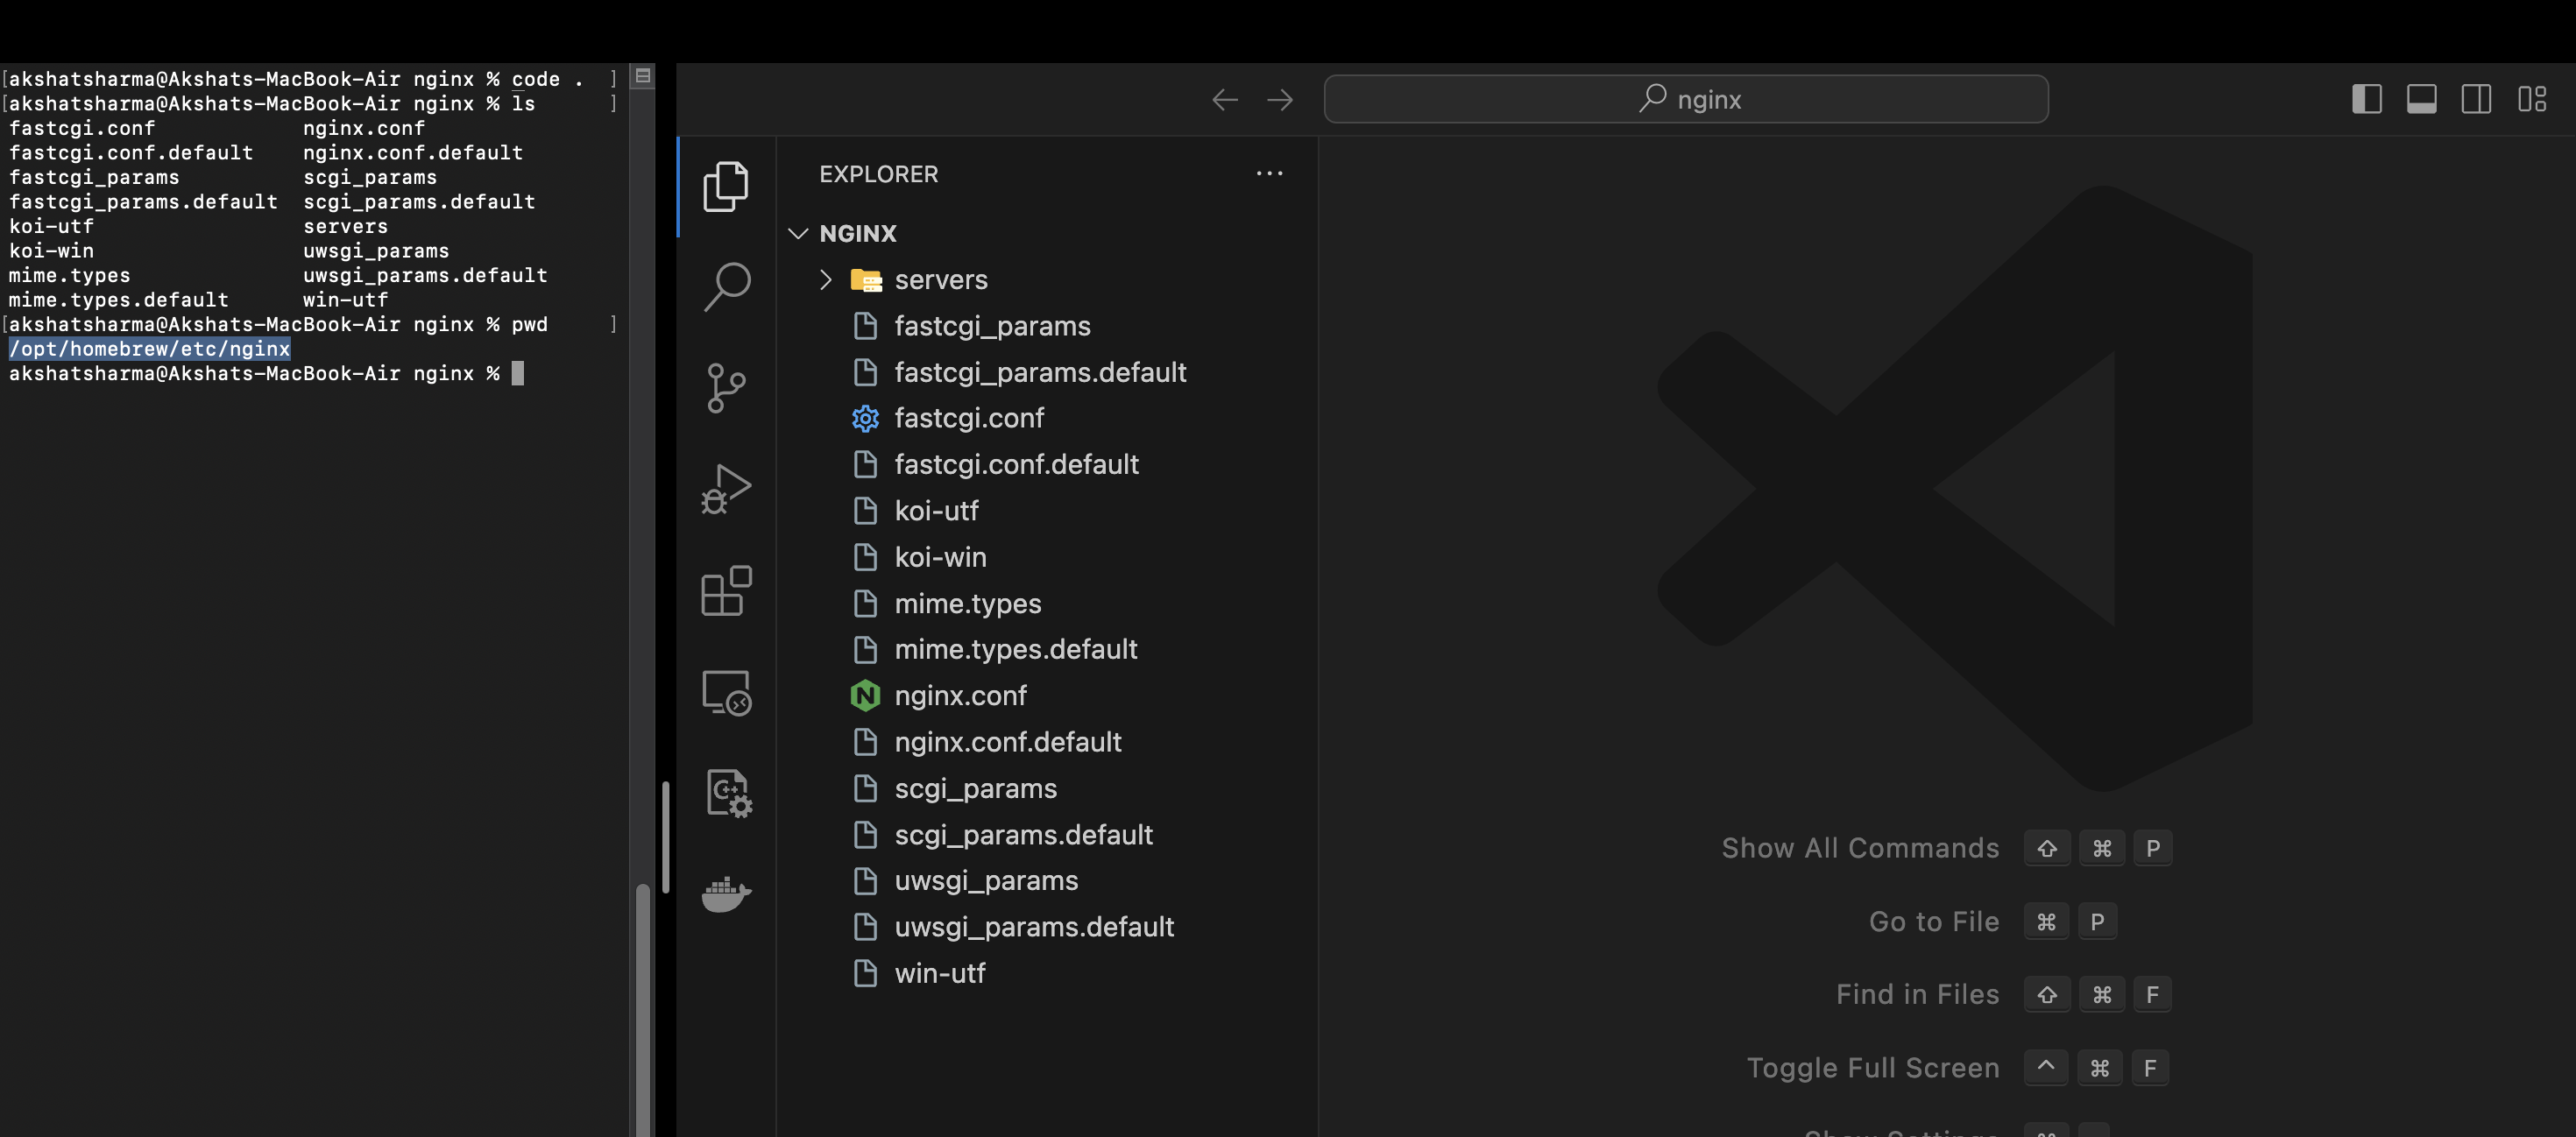
We will specifically be working on the
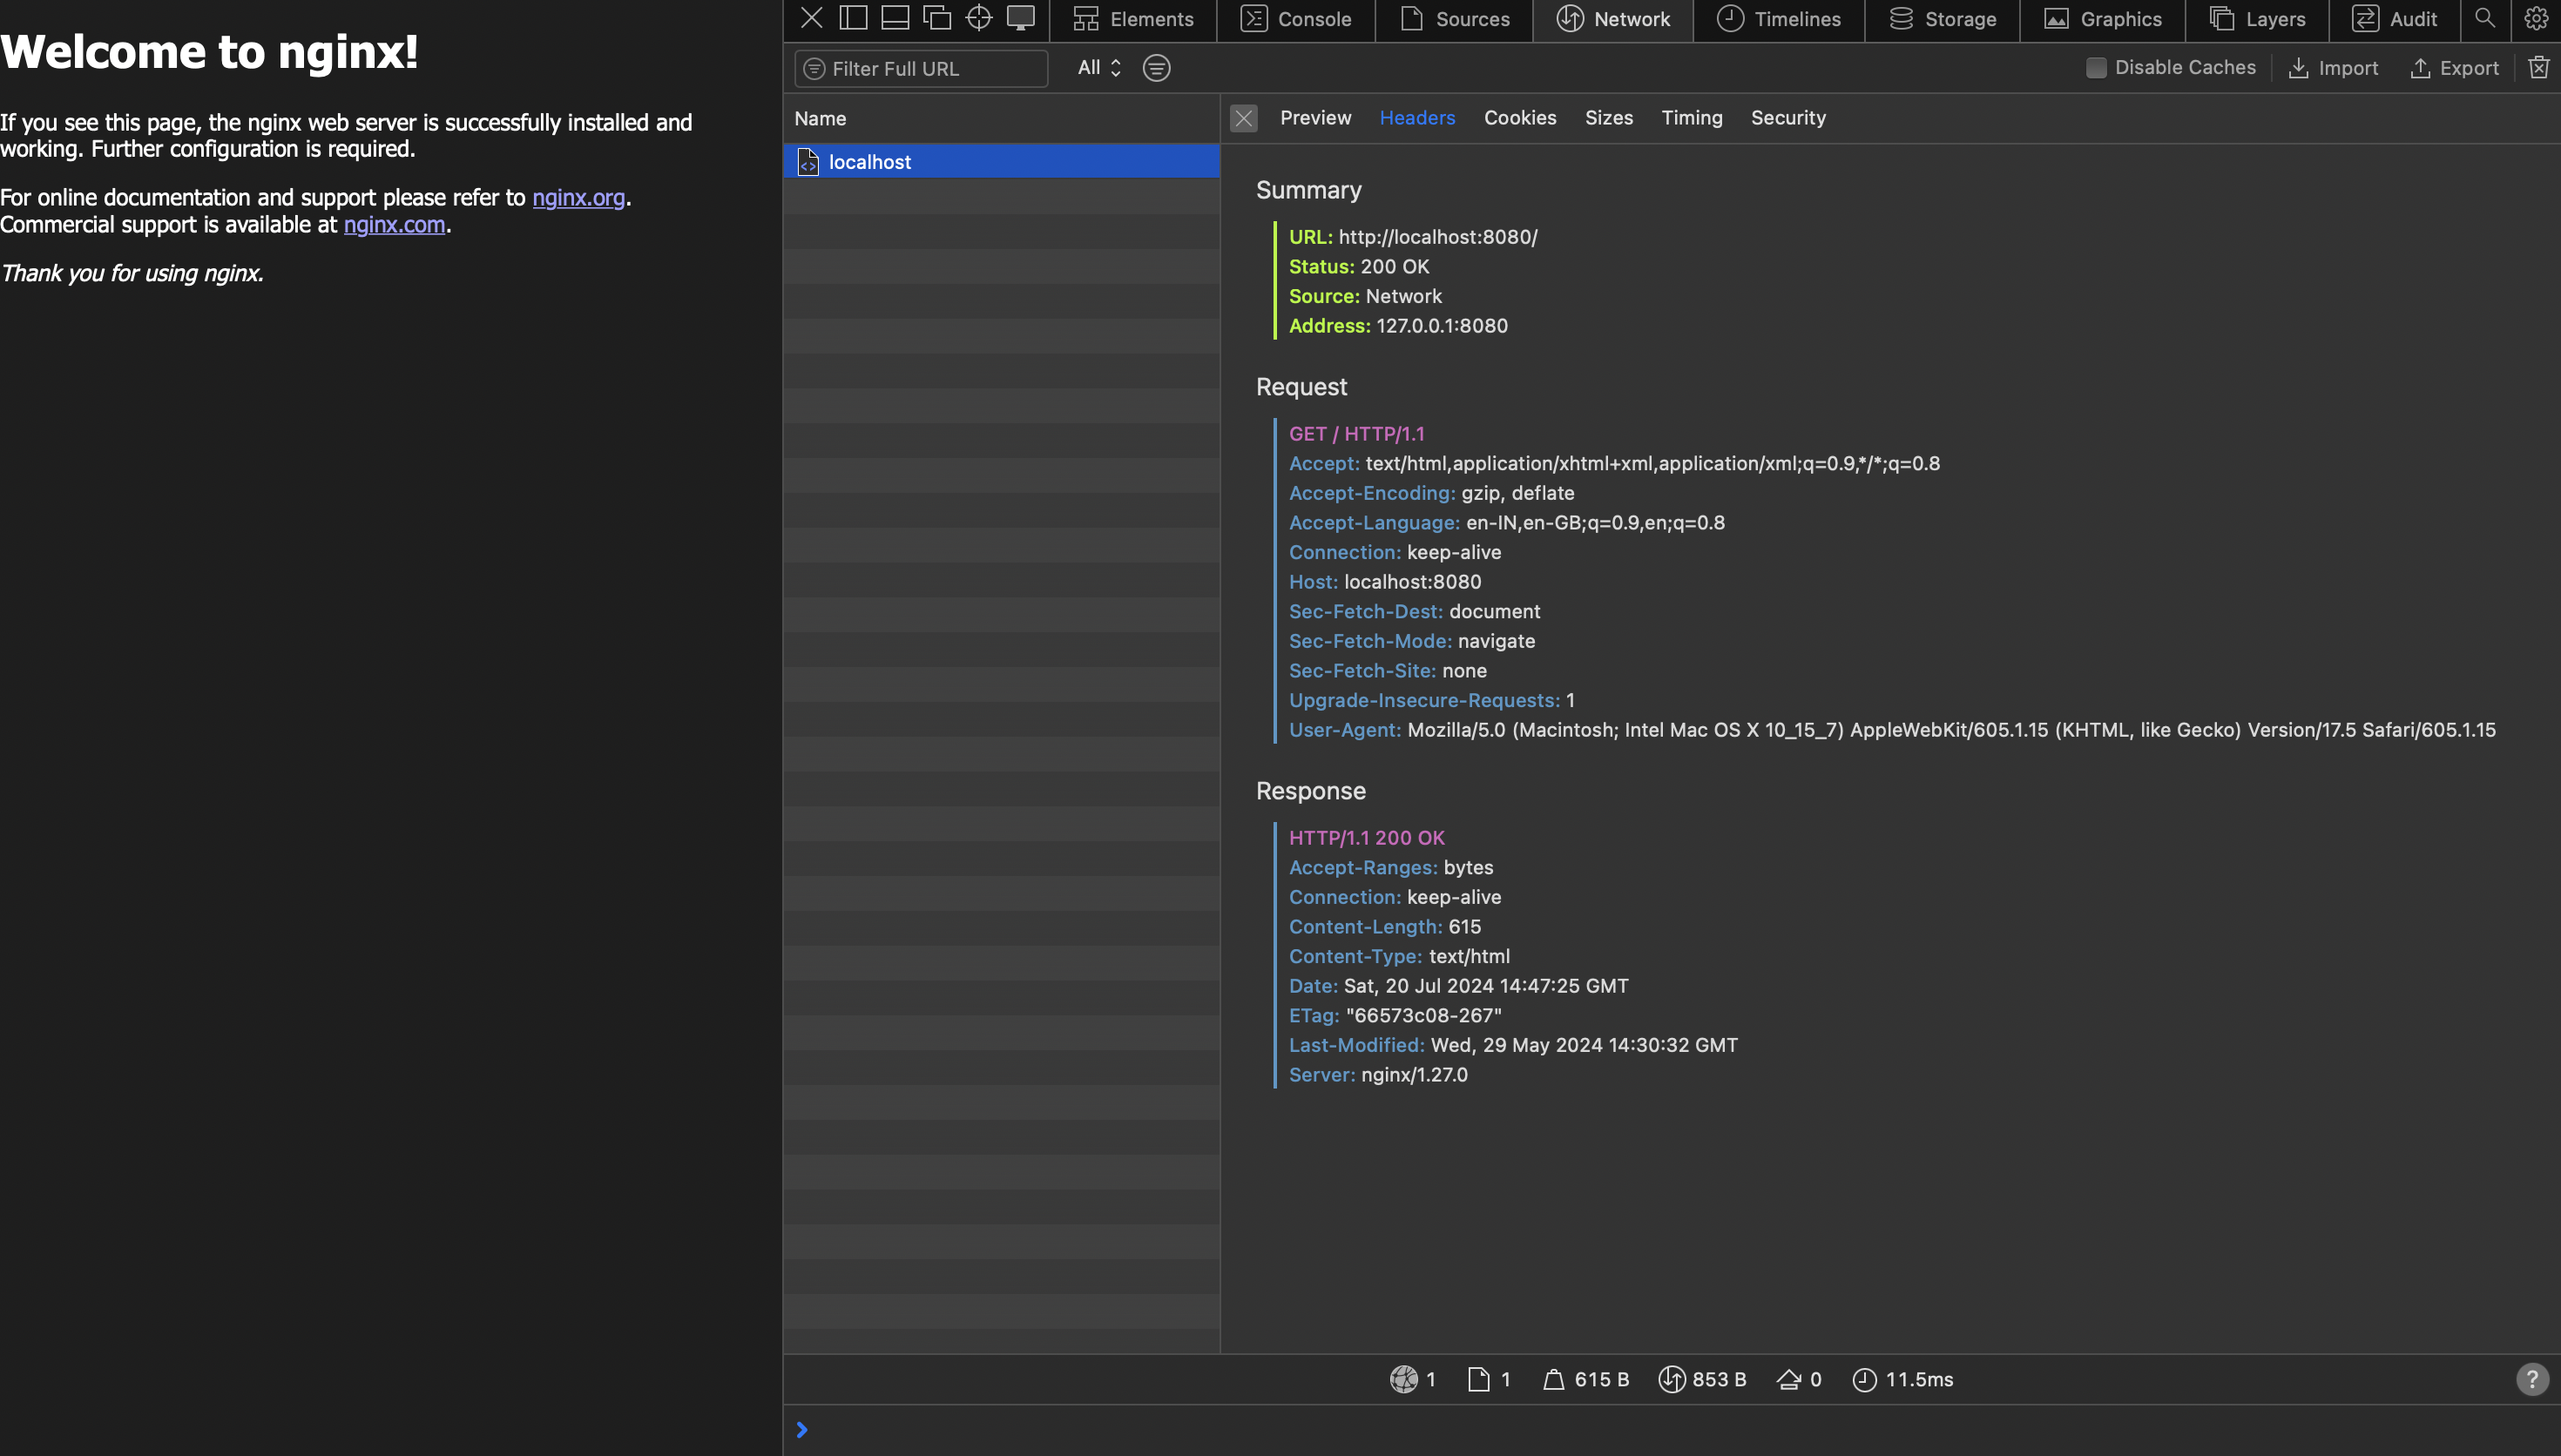
nginx.conffile for configuring NGINX. However, for now, let's just start NGINX by running the following command:nginxIf there are no errors, you can check the NGINX server by opening your browser and navigating to
http://localhost:8080. You should see a default NGINX welcome page.To verify further, you can inspect the page in your browser:
Open the developer tools (usually by right-clicking on the page and selecting "Inspect" or pressing
F12).Go to the "Network" tab.
Refresh the page.
You should see the server details in the network tab.
📚 Understanding
In configuration files like nginx.conf, individual settings are commonly referred to as directives. Directives are instructions or settings that control the behavior of the server. They are typically written as key-value pairs, where the key is the directive name and the value is the directive's setting or parameter.
Here's a breakdown of what these terms mean:
Directive: An instruction that tells the server how to behave or configure a specific aspect of its functionality.
Key: The name of the directive.
Value: The parameter or setting for the directive.
For example, in the directive worker_processes 1; :
worker_processesis the key (the name of the directive).1is the value (the setting for this directive).
In NGINX configuration files, directives can also be grouped into blocks. Blocks are enclosed in curly braces {} and can contain multiple directives. For example:
http {
    include       mime.types;
    default_type  application/octet-stream;

    server {
        listen       8080;
        server_name  localhost;

        location / {
            root   html;
            index  index.html index.htm;
        }
    }
}
In this example:
httpis a block that contains several directives.serveris another block within thehttpblock.location /is yet another block within theserverblock.
Each block can contain multiple directives, and these directives configure different aspects of the server's behaviour.
📝 Practice with an example.
I need you to delete the entire configuration in the nginx config file.
After that, create a new project directory and place an
index.htmlfile inside it. For example, in the screenshot below, you can see thenginx.conffile opened in VS Code on the left side, with its contents deleted. On the right side, I've created a sample directory containing theindex.htmlfile.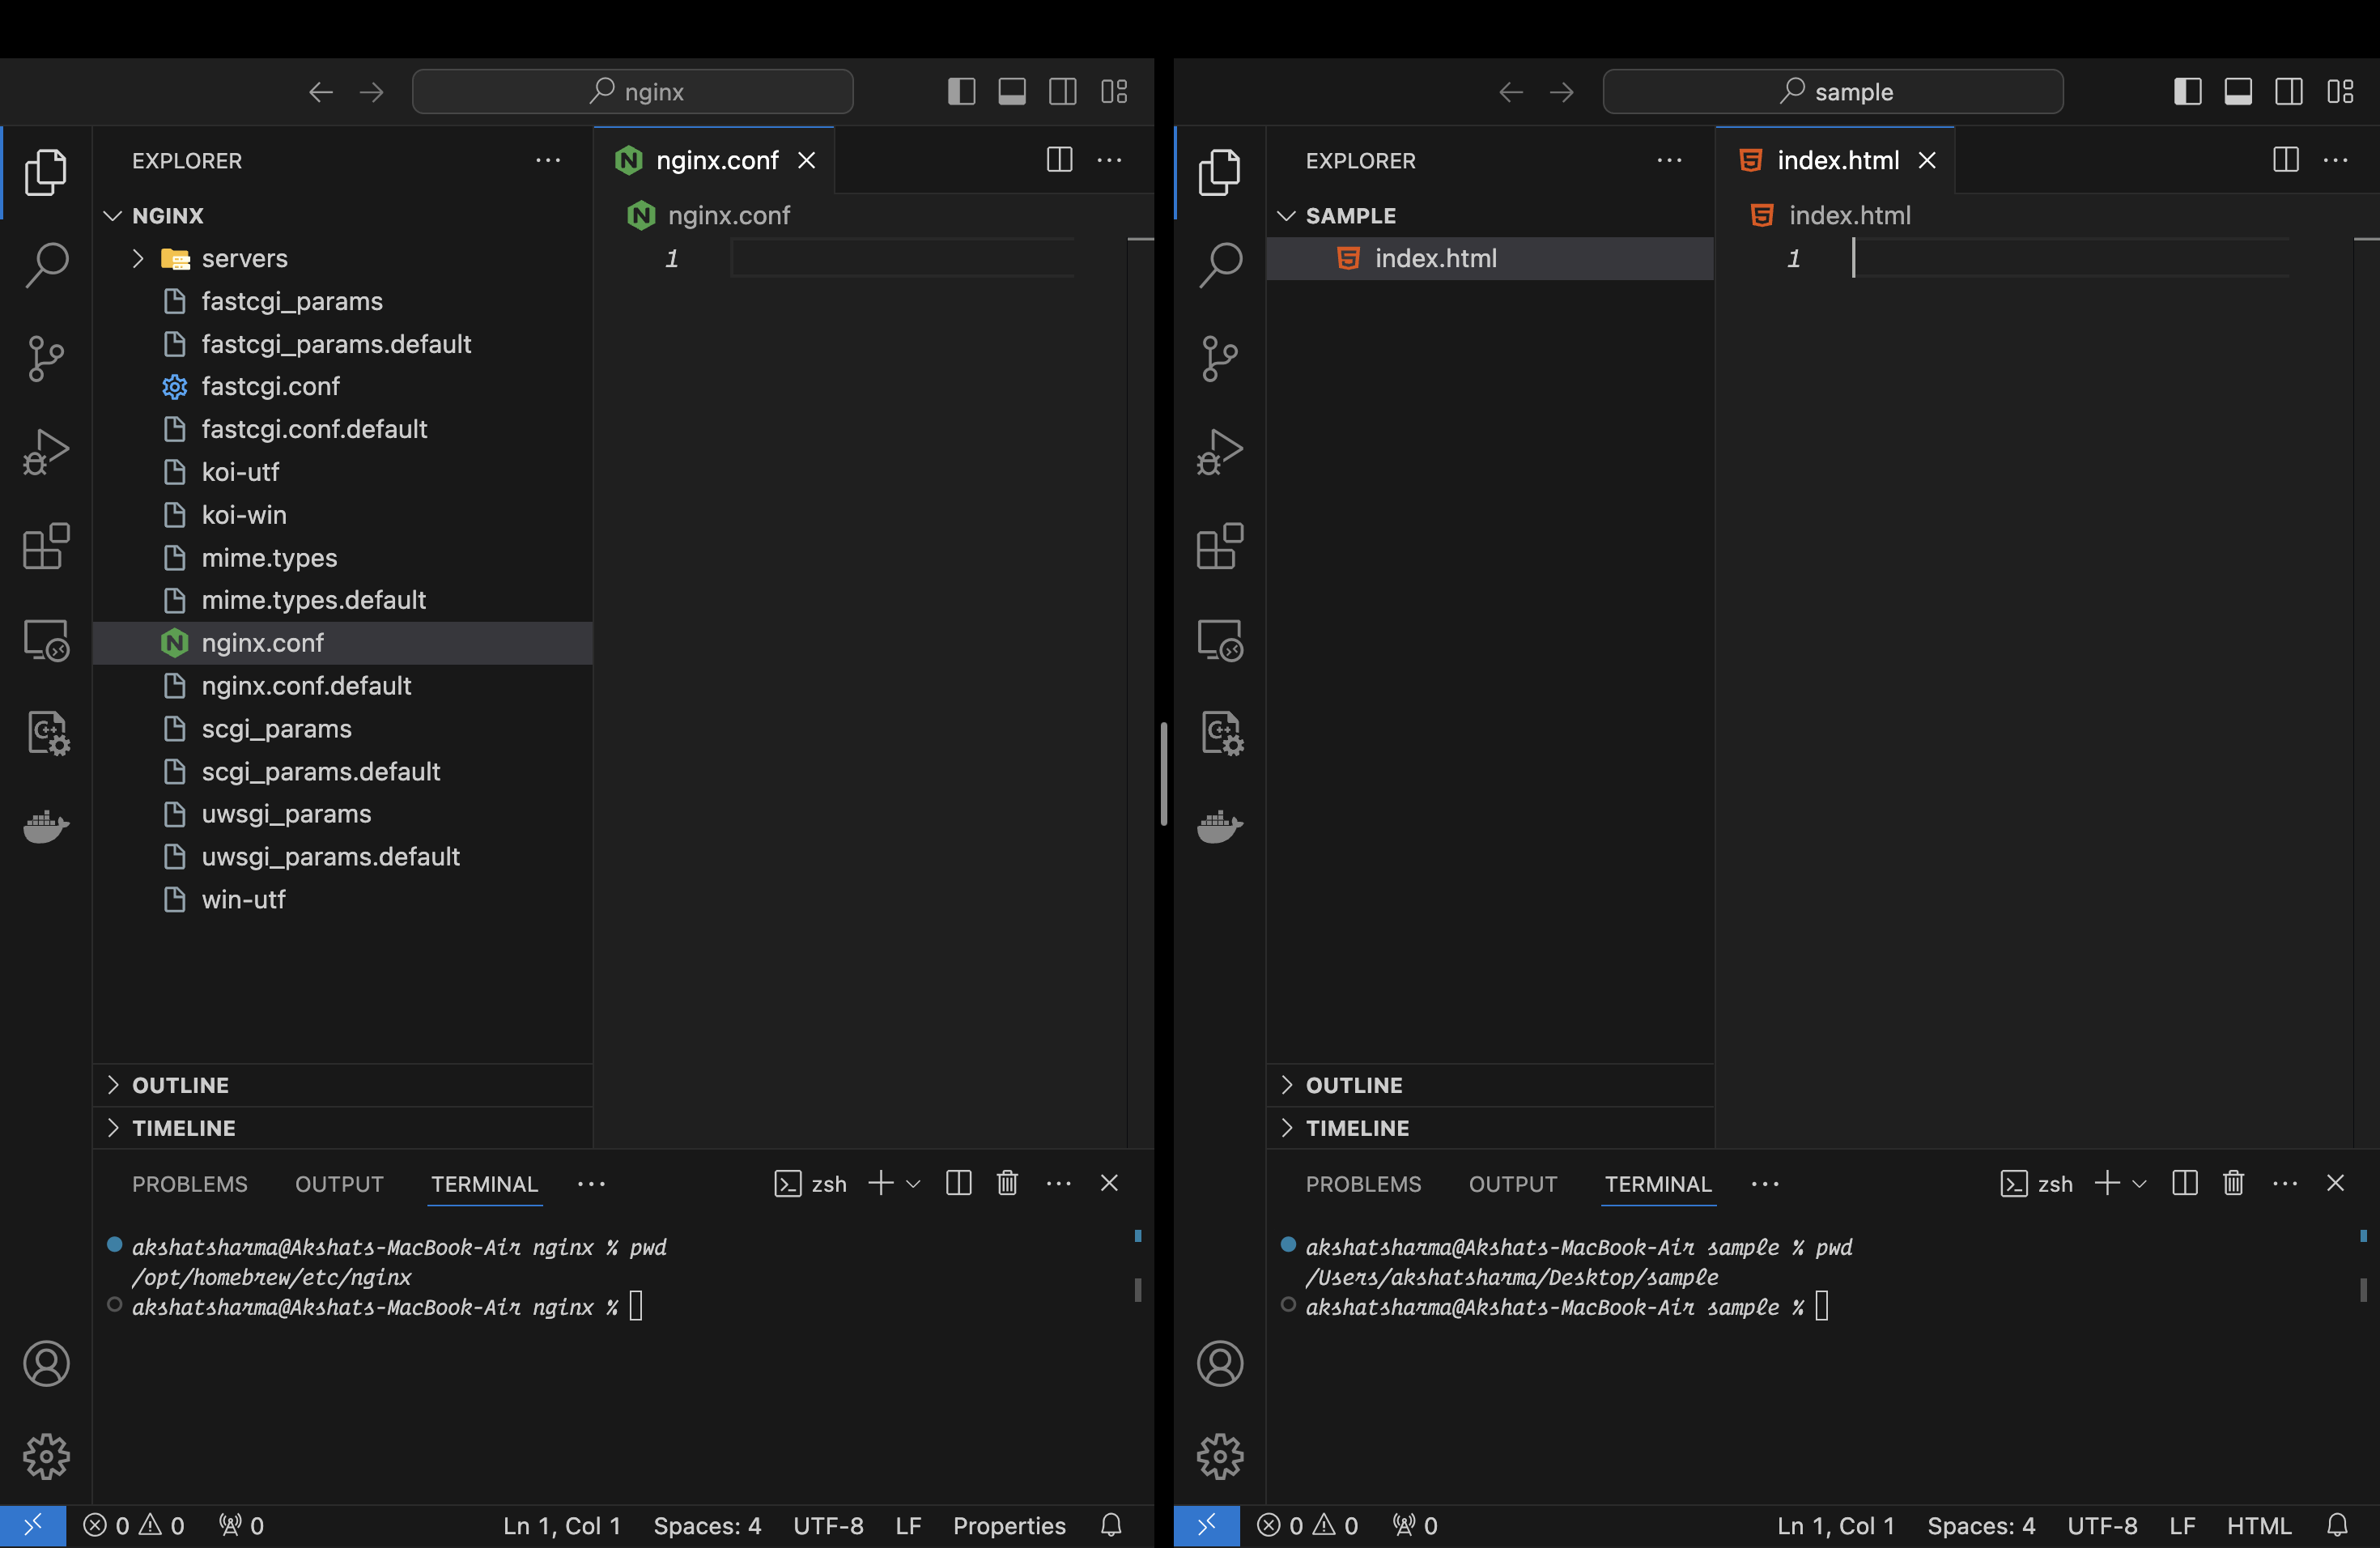
Now, we will serve a static HTML page using Nginx. Create a simple HTML page, or you can copy the code provided below.
<!DOCTYPE html> <html lang="en"> <head> <meta charset="UTF-8"> <meta name="viewport" content="width=device-width, initial-scale=1.0"> <title>Simple Website</title> <style> body { font-family: Arial, sans-serif; margin: 0; padding: 0; background-color: #f4f4f4; } header { background-color: #333; color: white; padding: 1em; text-align: center; } main { padding: 1em; } footer { background-color: #333; color: white; padding: 1em; text-align: center; position: fixed; bottom: 0; width: 100%; } </style> </head> <body> <header> <h1>Welcome to My Website</h1> </header> <main> <h2>About Me</h2> <p>Hi there! I'm learning NGINX.</p> <h2>My Interests</h2> <ul> <li>Coding</li> <li>Blogging</li> <li>Music</li> <li>Skateboarding</li> </ul> </main> <footer> © 2024 My Simple Website </footer> </body> </html>Once done, let's write some blocks and directives to serve the
index.htmlfile.http { server { listen 8080; root /Users/akshatsharma/Desktop/sample; } } events {}Now let's see in detail.
httpBlockThe
httpblock is used to define configurations related to handling HTTP traffic. This is where you set up your server(s) and specify how requests should be processed.http { server { listen 8080; root /Users/akshatsharma/Desktop/sample; } }serverBlockThe
serverblock defines the configuration for a specific virtual server. In my case, I have a single server block within thehttpblock.listen 8080;Purpose: This directive tells NGINX to listen on port 8080 for incoming HTTP connections.
Importance: The
listendirective is crucial because it specifies the port number on which the server will accept requests. Port 8080 is a common alternative to the default HTTP port 80, often used for development and testing purposes.
root /Users/akshatsharma/Desktop/sample;
Purpose: This directive sets the root directory from which files will be served for requests that match this server block.
Importance: The
rootdirective is important because it tells NGINX where to find the files to serve. In this case, it points to the/Users/akshatsharma/Desktop/sampledirectory. This means that if someone accesses my server on port 8080, NGINX will serve files from this directory.
eventsBlockThe
eventsblock is used to configure how NGINX handles connections at a lower level, such as setting the number of worker connections.events {}Purpose: Although I haven't specified any directives within the
eventsblock, it is required to be present in the configuration file. Typically, we would configure settings likeworker_connectionshere, which defines the maximum number of simultaneous connections that each worker process can handle.Importance: Even though it's empty, the
eventsblock is necessary for NGINX to function properly. It serves as a placeholder for potential future configurations related to event handling.
Once Done , you will have to reload the nginx using the command
nginx % nginx -s reloadand then refresh the browser. You should be seeing the contents from theindex.htmlpage as below.
👻 Mime Types
Before we move on to understanding MIME types in Nginx, please remove the CSS components from the HTML file and place them in a styles.css file. Then link this CSS file in your HTML.
Your index.html should look like this:
<!DOCTYPE html>
<html lang="en">
<head>
<meta charset="UTF-8">
<meta name="viewport" content="width=device-width, initial-scale=1.0">
<title>Simple Website</title>
<link rel="stylesheet" href="styles.css">
</head>
<body>
<header>
<h1>Welcome to My Simple Website</h1>
</header>
<main>
<h2>About Me</h2>
<p>Hi there! I'm learning Nginx.</p>
<h2>My Interests</h2>
<ul>
<li>Coding</li>
<li>Blogging</li>
<li>Music</li>
<li>Skateboarding</li>
</ul>
</main>
<footer>
© 2024 My Simple Website
</footer>
</body>
</html>
and the styles.css should be.
body {
    font-family: Arial, sans-serif;
    margin: 0;
    padding: 0;
    background-color: #f4f4f4;
}

header {
    background-color: #333;
    color: white;
    padding: 1em;
    text-align: center;
}

main {
    padding: 1em;
}

footer {
    background-color: #333;
    color: white;
    padding: 1em;
    text-align: center;
    position: fixed;
    bottom: 0;
    width: 100%;
}
Once Done , Reload the NGINX using the command nginx -s reload and refresh the browser.

You will notice that the CSS components are missing. All the colors and designs are gone, leaving just plain text. If you inspect and refresh the screen, you should see that styles.css is actually being served.
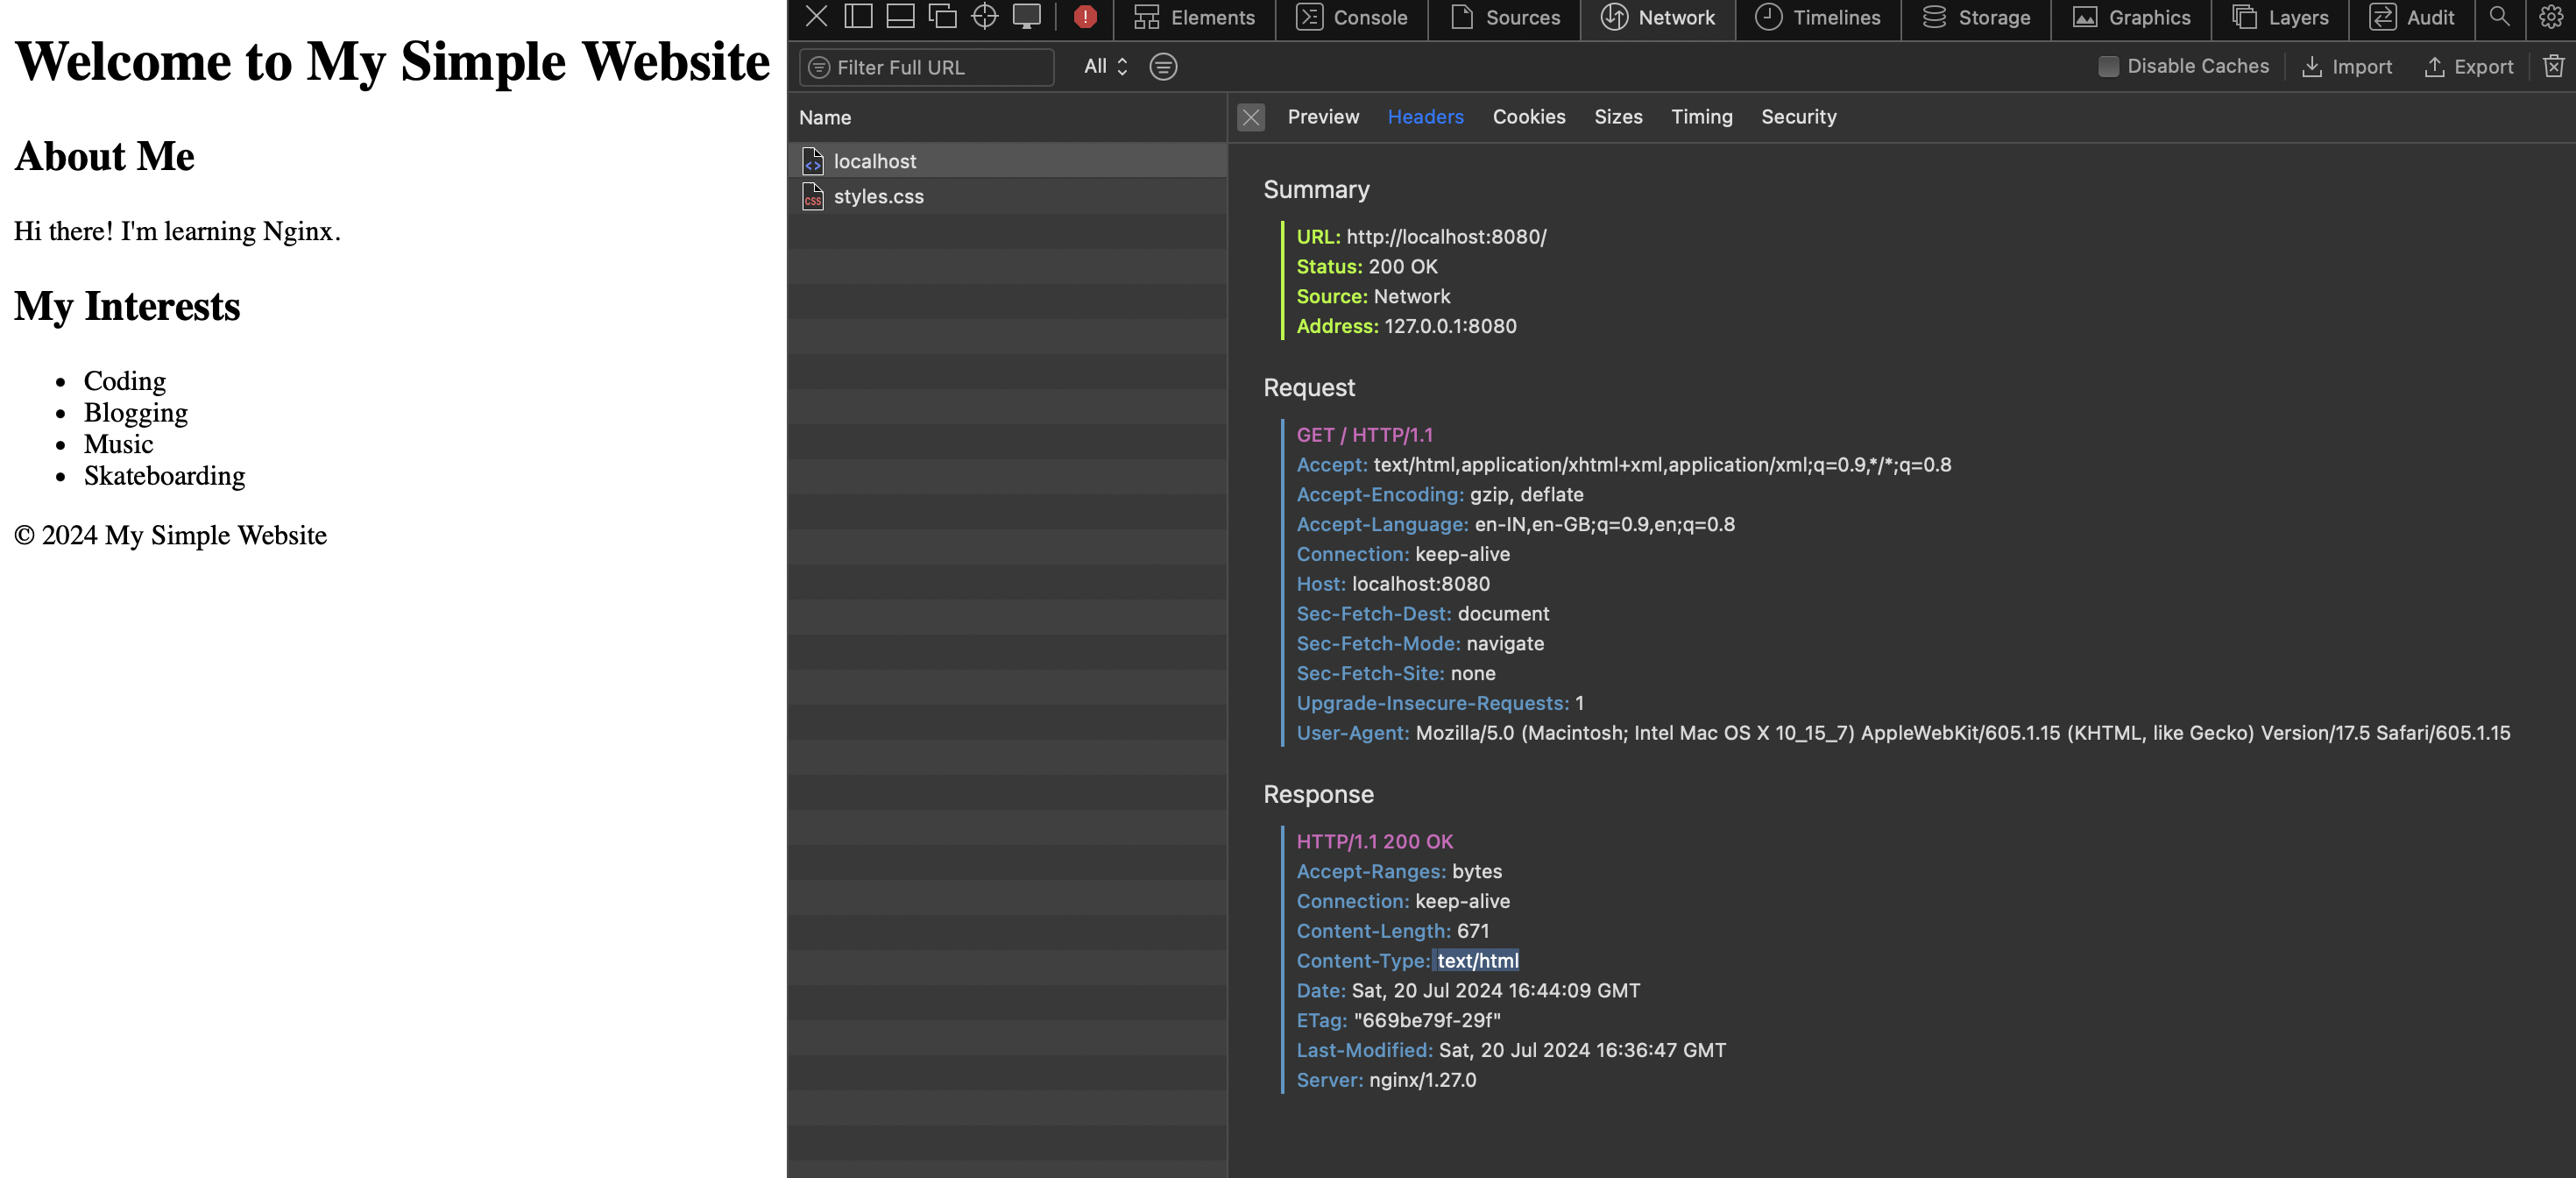
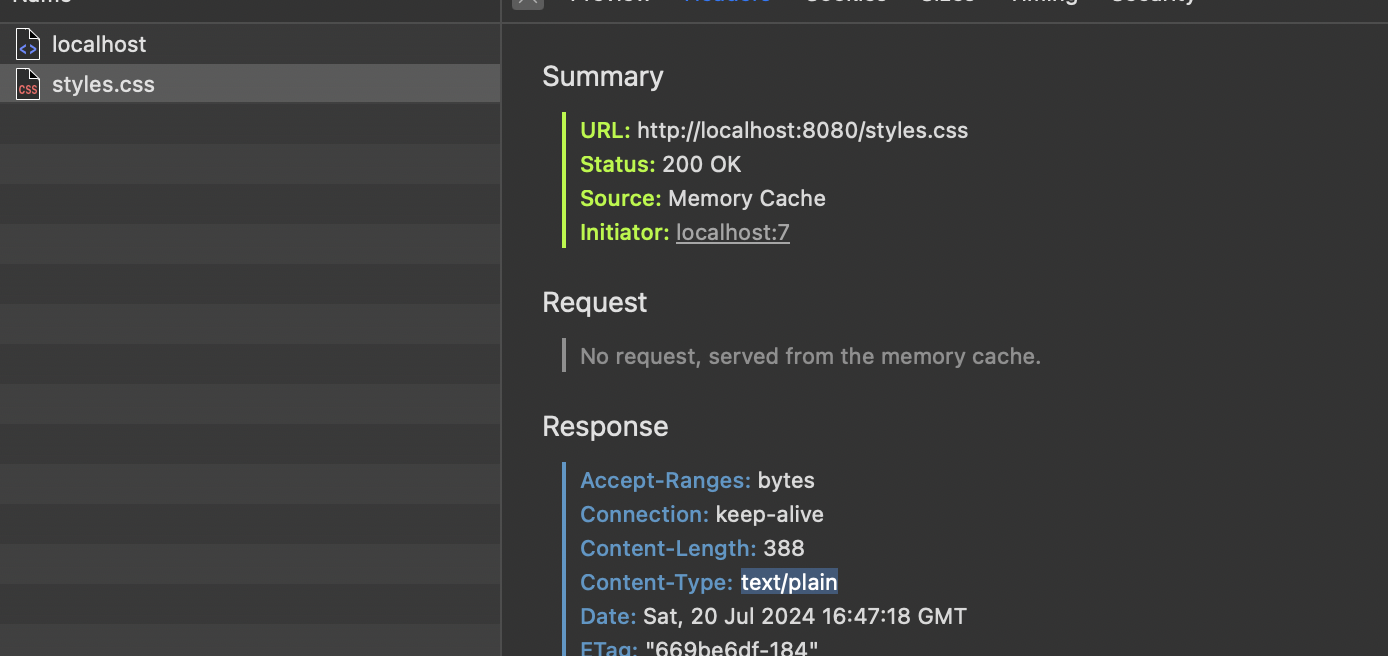
The Reason for CSS not being loaded is the content type for css, which is text/plain.
🧱 HOW TO FIX THIS ?
We can simply go to the config file of nginx and mention the types there which would represent for what type of file what is the extension. So now the config file should look like this.
include mime.types; because the nginx comes with some default mime types.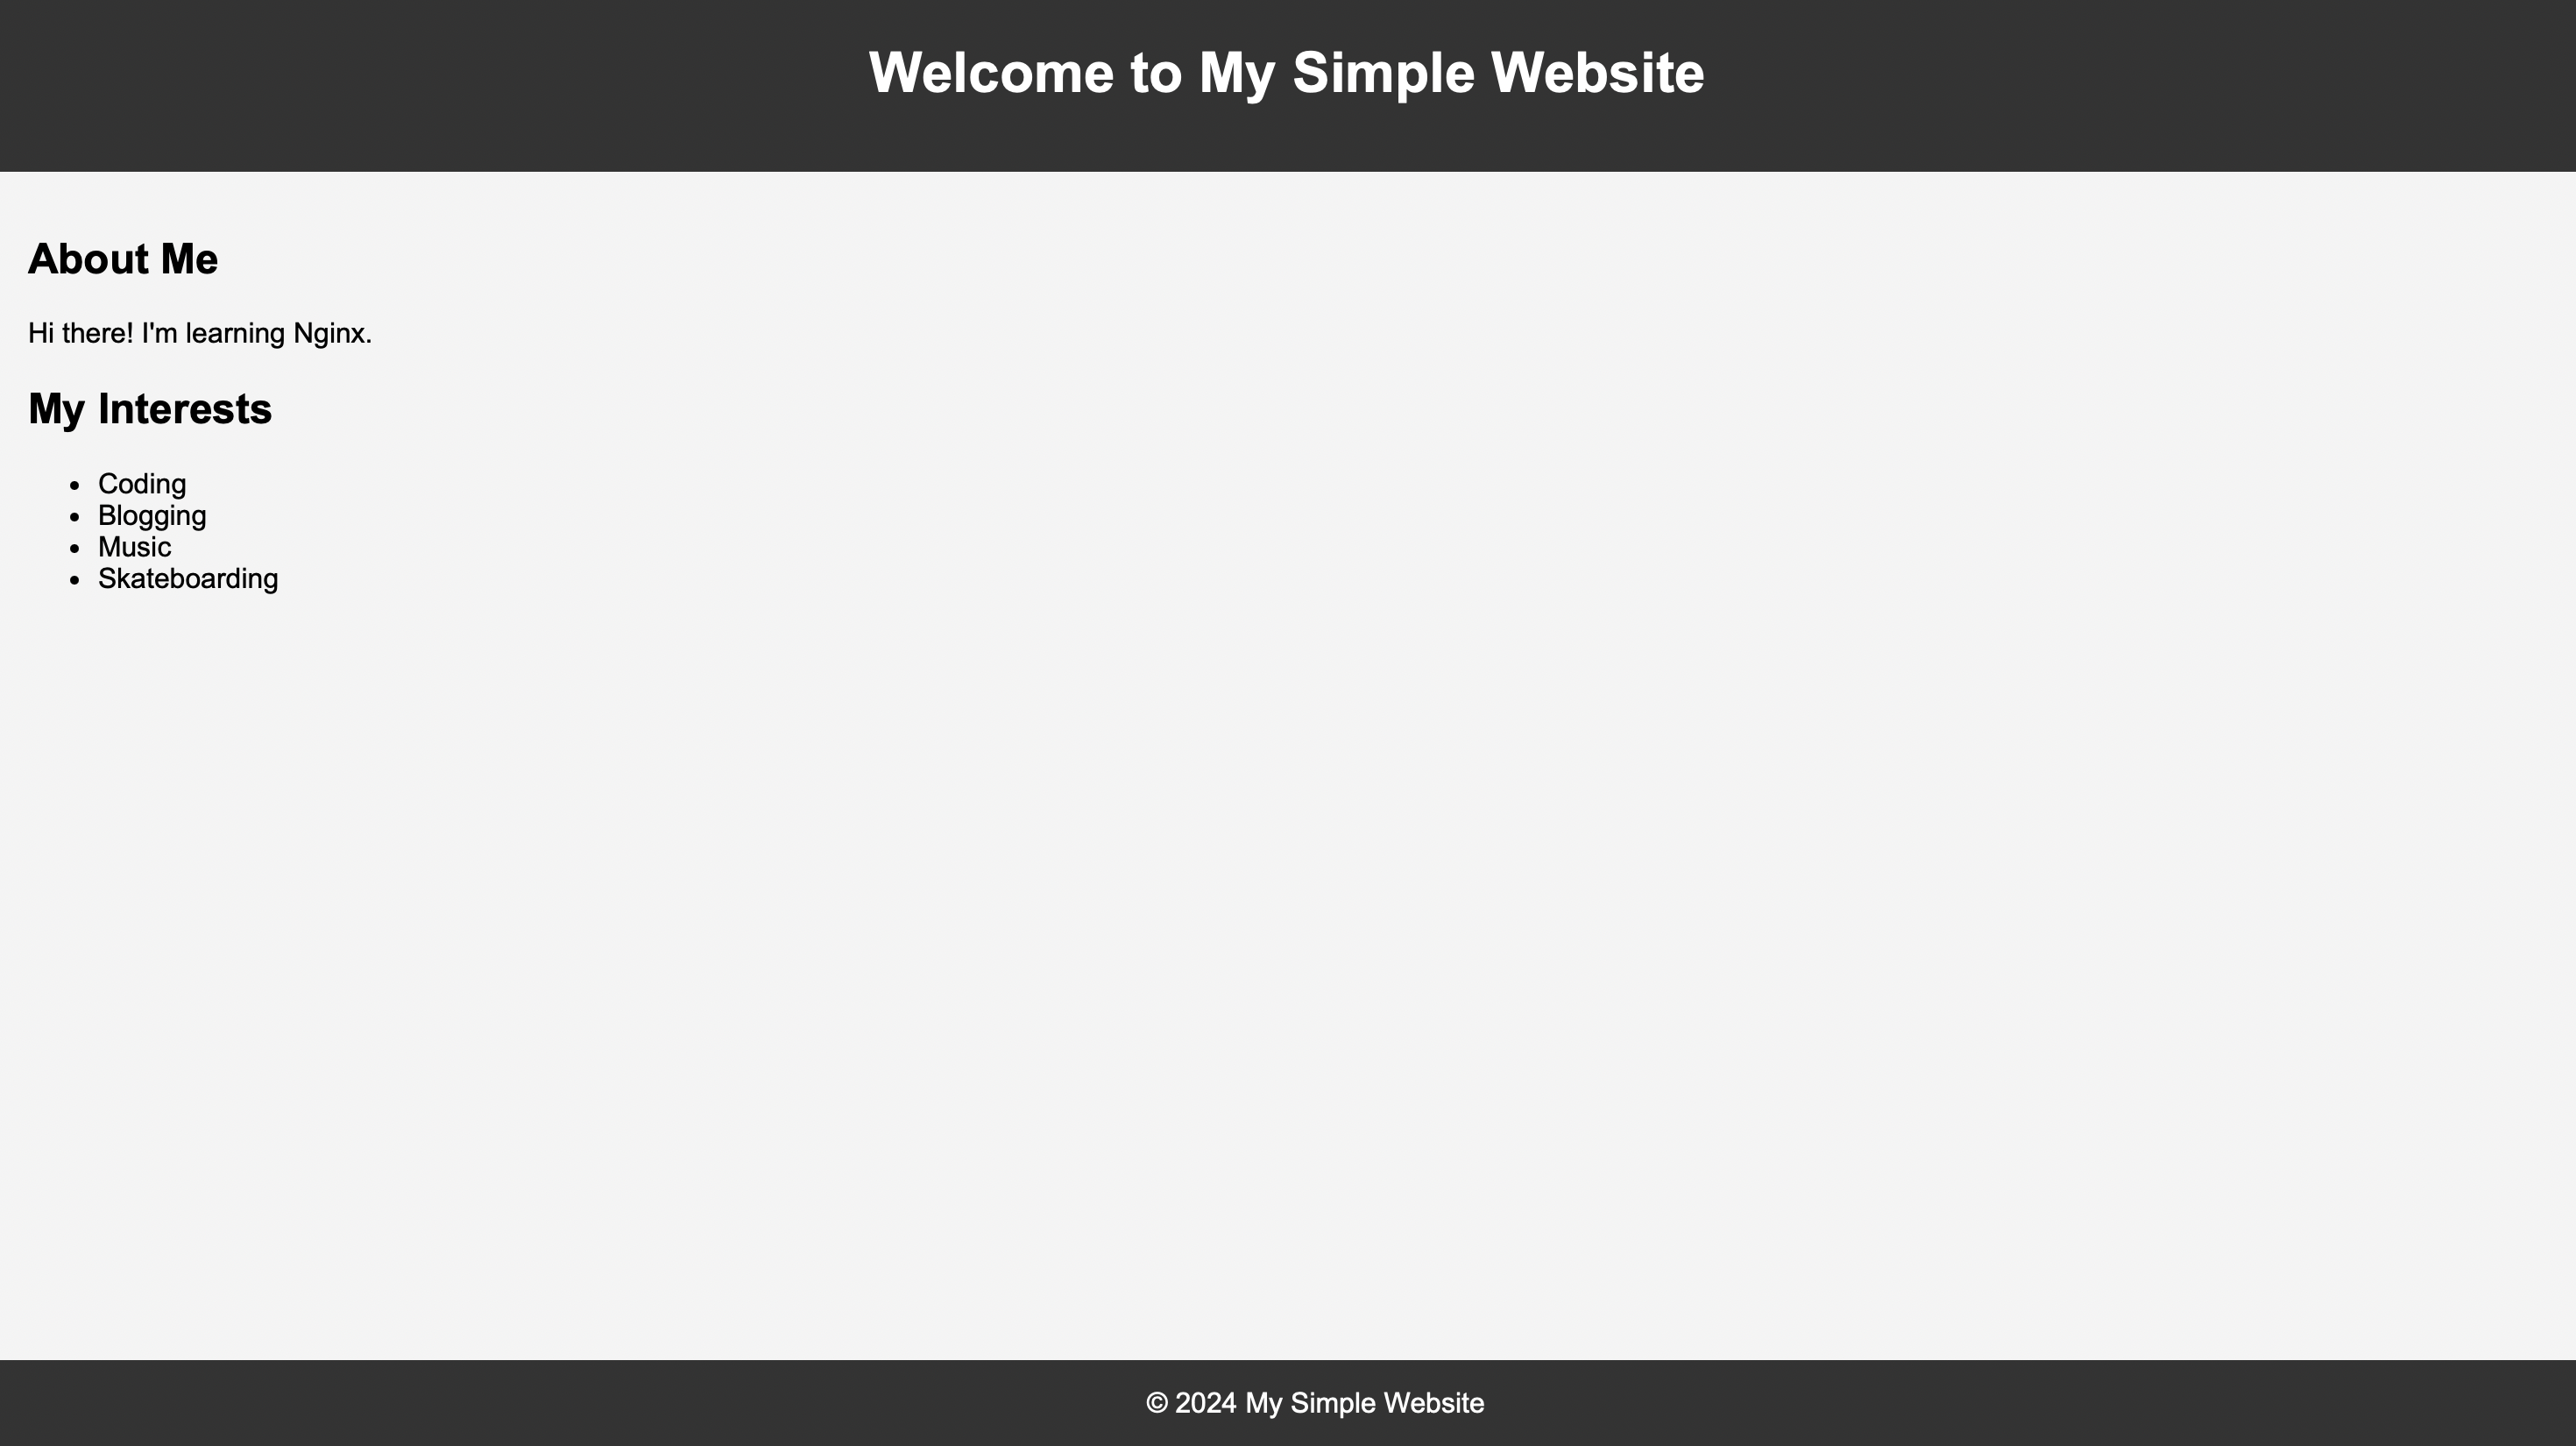
MIME types (Multipurpose Internet Mail Extensions) are a way of specifying the type of content being served by a web server. In NGINX, MIME types help the server understand how to handle and display different types of files. They tell the browser or client how to interpret the content of a file.
👉 What are MIME Types?
A MIME type is a standardized way of describing the nature and format of a file. It consists of a primary type and a sub-type, separated by a slash. For example:
text/html: This indicates an HTML file.image/jpeg: This indicates a JPEG image.application/json: This indicates a JSON file.
👉 How NGINX Uses MIME Types
In NGINX, MIME types are used to set the Content-Type header in HTTP responses. This header tells the client what type of data is being sent. For example, if NGINX serves a file with the MIME type text/html, the browser knows to display it as an HTML page.
👉 Configuring MIME Types in NGINX
NGINX uses a file named mime.types to define mappings between file extensions and their corresponding MIME types. This file is usually included in the main configuration file (nginx.conf) with a directive like include mime.types;.
Here’s a simplified example of what the mime.types file might look like:
types {
    text/html                             html htm;
    text/css                              css;
    text/javascript                       js;
    image/jpeg                            jpeg jpg;
    image/png                             png;
    application/json                      json;
    application/octet-stream              bin exe;
}
👉 Explanation
types { ... }block: Defines MIME types and the file extensions that correspond to them.text/html html htm;: Tells NGINX that files with.htmland.htmextensions should be served with the MIME typetext/html.text/css css;: Files with the.cssextension should be served with the MIME typetext/css.image/jpeg jpeg jpg;: Files with.jpegand.jpgextensions should be served with the MIME typeimage/jpeg.
👉 Why MIME Types are Important
Proper Handling: Ensures that files are handled correctly by the client. For example, a browser will render HTML files correctly only if they are served with the
text/htmlMIME type.Security: Helps prevent security issues by ensuring that files are treated as their proper types. For instance, serving a file with the wrong MIME type might result in it being executed or rendered incorrectly.
User Experience: Provides the correct content type to users, improving their experience. For example, ensuring images are displayed properly by serving them with the correct
image/*MIME type.
📍 Location Blocks
Let's say now you want to showcase all you coding projects and you created a separate HTML page for same. So I created a coding directory inside the Main Project Directory and inside the coding directory we have the index.html and css (which is same as the first page).
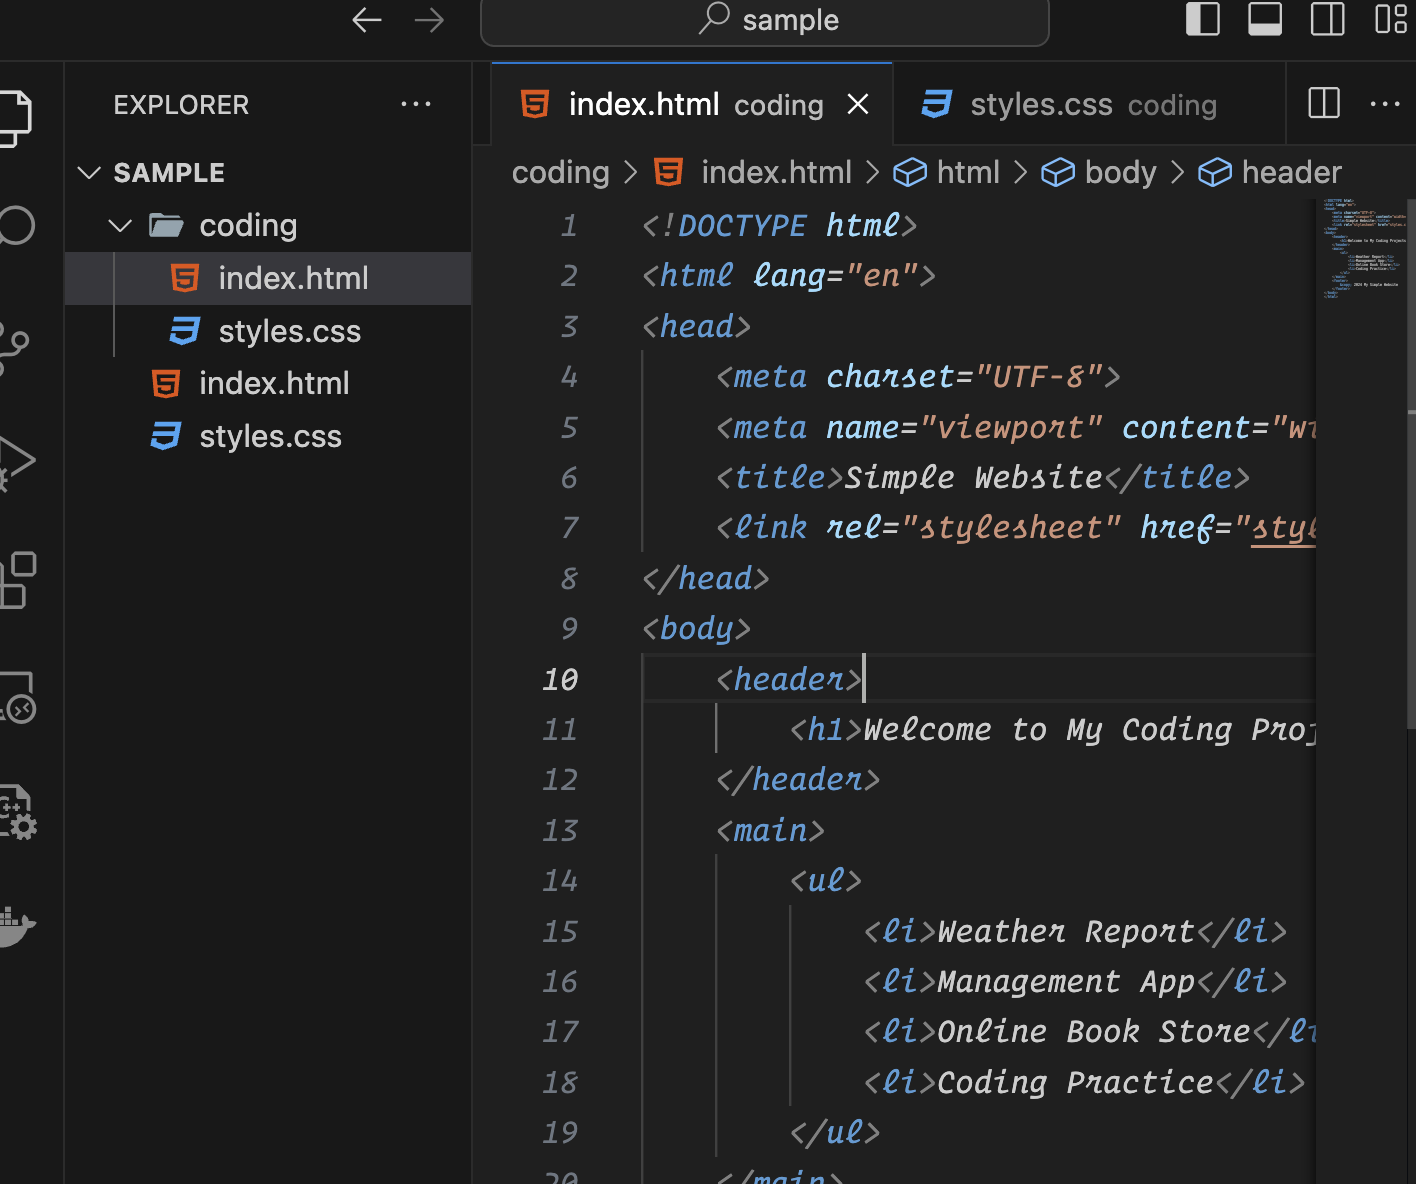
<!DOCTYPE html>
<html lang="en">
<head>
<meta charset="UTF-8">
<meta name="viewport" content="width=device-width, initial-scale=1.0">
<title>Simple Website</title>
<link rel="stylesheet" href="styles.css">
</head>
<body>
<header>
<h1>Welcome to My Coding Projects</h1>
</header>
<main>
<ul>
<li>Weather Report</li>
<li>Management App</li>
<li>Online Book Store</li>
<li>Coding Practice</li>
</ul>
</main>
<footer>
© 2024 My Simple Website
</footer>
</body>
</html>
Now the question is how to make sure if the user reaches for http://localhost:8080/coding/ the HTML page that we created above is showcased. Now this is something that Nginx can handle automatically , but if you want to specifically add the path we need to use Location Block.
Location blocks in NGINX are used to define how NGINX should process requests for specific URIs (Uniform Resource Identifiers) or paths. They are one of the most powerful features in NGINX configuration, allowing you to set different rules and behaviors based on the URL being accessed.
👉 What is a Location Block?
A location block is defined with the location directive, followed by a pattern that matches a URI. Inside the block, you can specify directives to handle requests that match the pattern.
👉 Basic Syntax
location [modifier] pattern {
    # directives
}
modifier: Optional. Determines how the pattern is interpreted.
pattern: The URI pattern to match.
directives: Instructions on how to handle the matched requests.
👉 Common Modifiers
No modifier: Performs a prefix match (default behavior).
location /images/ { # handles URIs starting with /images/ }=(exact match): Matches the exact URI.location = / { # handles the exact URI "/" }~(case-sensitive regular expression): Matches URIs using a case-sensitive regex.location ~ \.php$ { # handles URIs ending with .php }~*(case-insensitive regular expression): Matches URIs using a case-insensitive regex.location ~* \.(jpg|jpeg|png|gif|ico)$ { # handles URIs ending with .jpg, .jpeg, .png, .gif, or .ico (case-insensitive) }^~(prefix match with higher priority): Matches the beginning of the URI and stops searching if this block matches.location ^~ /static/ { # handles URIs starting with /static/ and stops further matching }
👉 Default Behaviour without Location Block
If no
locationblock is specified, NGINX uses the default settings of theserverblock to handle requests. This means it will:
Use the
rootdirective to determine the base directory for serving files.Look for the
index.htmlfile in the requested directory.So, if you add a new directory with an
index.htmlfile inside the root directory, NGINX will serve thatindex.htmlfile when a request is made to the corresponding directory URL.
HOW WE CAN ADD LOCATION in the current NGINX Configuration?
Simply we can add the location block inside the server block. Let's make some changes.
Assuming we also want to showcase our Project inside the Blogging section since we have blogs for the same projects , which means that if someone reaches for http://localhost:8080/coding/ or http://localhost:8080/blogging/ they should see the same stuff.
For example you can update the nginx config and add the location block like below.
http    {

    include mime.types;
    server  {
        listen  8080;
        root /Users/akshatsharma/Desktop/sample;

        location /coding {
            root /Users/akshatsharma/Desktop/sample;
        }
        location /blogging {
            alias /Users/akshatsharma/Desktop/sample/coding;
        }
    }
}

events   {}
location /coding { ... }
location /coding {
    root /Users/akshatsharma/Desktop/sample;
}
Purpose: This location block handles requests that start with
/coding.Behavior:
When a request is made to a URI that starts with
/coding, NGINX will look for files in the directory specified by therootdirective.The
rootdirective in this context is set to/Users/akshatsharma/Desktop/sample.This means that for a request to
/coding/example.txt, NGINX will look for the file at/Users/akshatsharma/Desktop/sample/coding/example.txt.
How it works:
The
rootdirective here sets the base directory for this location block.The full path to the file is constructed by combining the
rootdirectory with the URI after/coding.
For example, if you request http://localhost:8080/coding/file.txt, NGINX will serve the file from /Users/akshatsharma/Desktop/sample/coding/file.txt.
location /blogging { ... }
location /blogging {
    alias /Users/akshatsharma/Desktop/sample/coding;
}
Purpose: This location block handles requests that start with
/blogging.Behavior:
When a request is made to a URI that starts with
/blogging, NGINX will serve files from the directory specified by thealiasdirective.The
aliasdirective in this context is set to/Users/akshatsharma/Desktop/sample/coding.This means that for a request to
/blogging/example.txt, NGINX will look for the file at/Users/akshatsharma/Desktop/sample/coding/example.txt.
How it works:
The
aliasdirective is similar torootbut serves files from the specified directory directly without appending the URI path.The URI
/blogging/file.txtwill map directly to/Users/akshatsharma/Desktop/sample/coding/file.txt.
👉 Key Differences Between root and alias
Root Directive:
The
rootdirective appends the location pattern to the root directory path.Example: If
location /codinghasroot /Users/akshatsharma/Desktop/sample, the path to files will be/Users/akshatsharma/Desktop/sample/coding.
Alias Directive:
The
aliasdirective replaces the location pattern with the specified path.Example: If
location /blogginghasalias /Users/akshatsharma/Desktop/sample/coding, the path to files will be/Users/akshatsharma/Desktop/sample/coding, without appending the URI pattern.
After reload the NGINX , the result for both http://localhost:8080/coding/ or http://localhost:8080/blogging/should look like below.

Now ?
What Happen if I create a music directory inside the root directory along side the coding directory, and instead of having a index.html, I created a music.html.
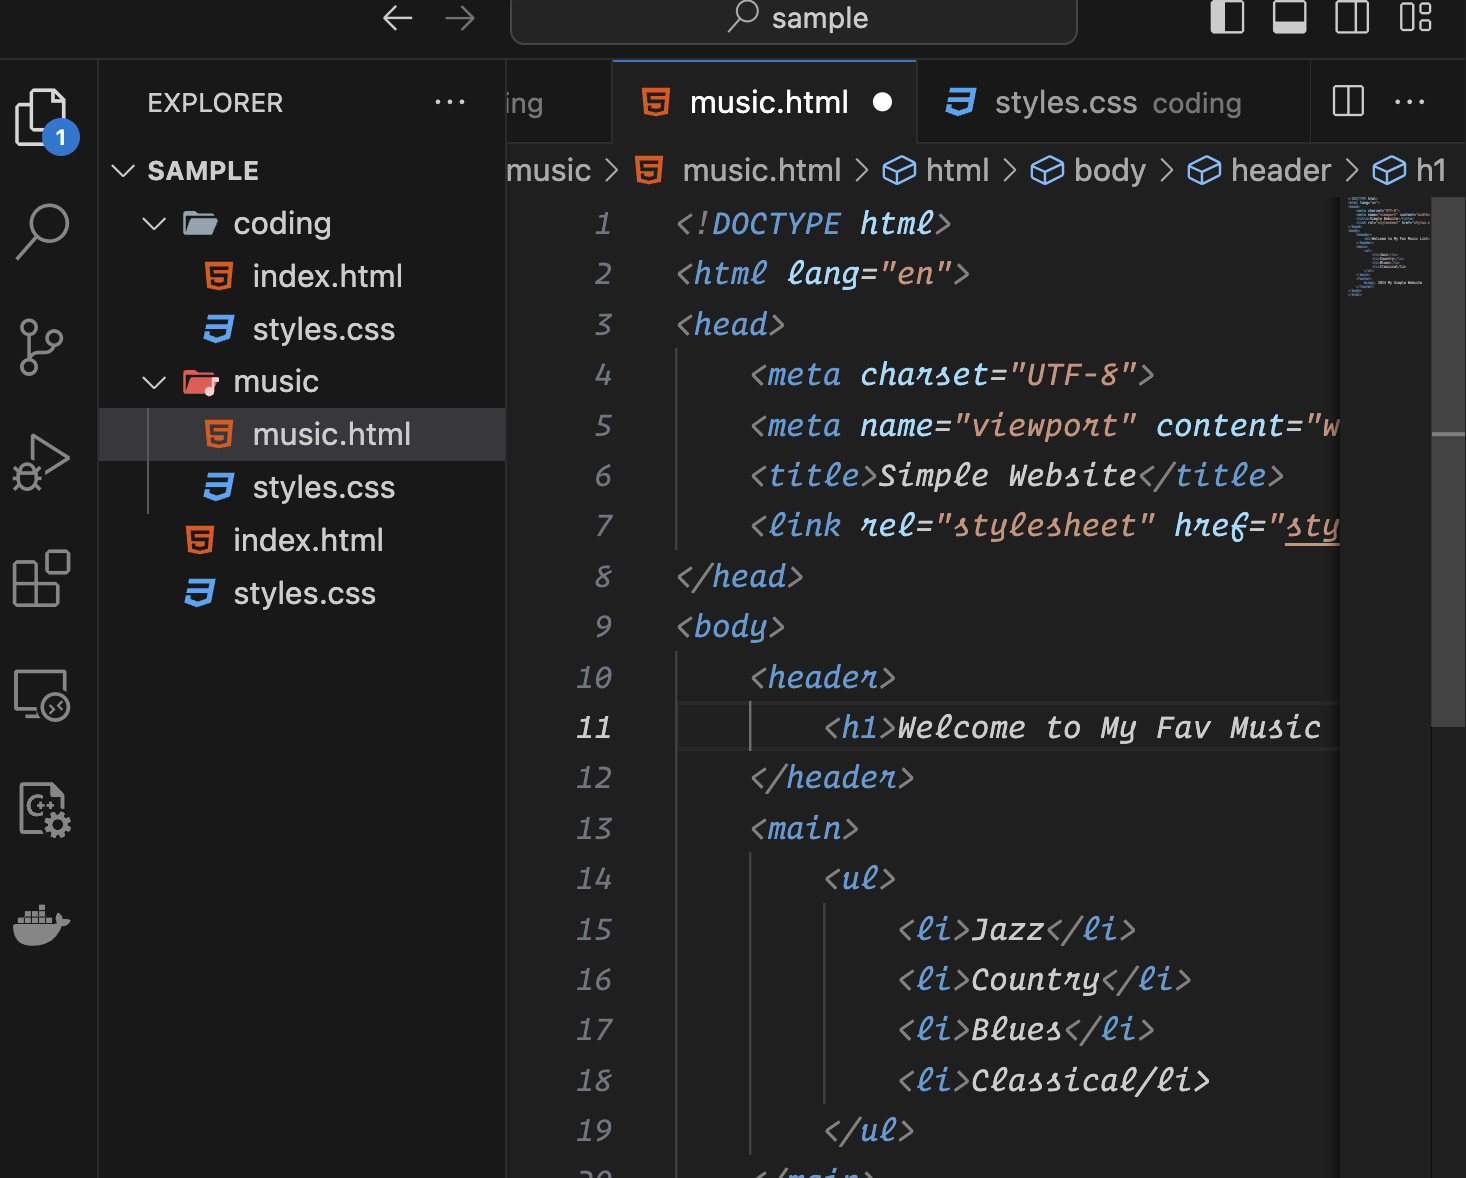
now here we don't want to serve the index.html which is the default name that the nginx picks up , instead this time we want to server music.html. For this we can simply use the directive try_files.
http    {

    include mime.types;
    server  {
        listen  8080;
        root /Users/akshatsharma/Desktop/sample;

        location /coding {
            root /Users/akshatsharma/Desktop/sample;
        }
        location /blogging {
            alias /Users/akshatsharma/Desktop/sample/coding;
        }

        location /music {
            root /Users/akshatsharma/Desktop/sample;
            try_files   /music/music.html /index.html =404;
        }
    }
}

events   {}
Explanation of the location /music Block
nginxCopy codelocation /music {
    root /Users/akshatsharma/Desktop/sample;
    try_files /music/music.html /index.html =404;
}
1.root /Users/akshatsharma/Desktop/sample;
Purpose: Sets the base directory for serving files within this location block.
Behavior:
For requests matching
/music, NGINX will look for files in the directory/Users/akshatsharma/Desktop/sample/musicbecause therootdirective specifies the base directory, and/musicis appended to it.For example, if a request is made to
http://localhost:8080/music/track.mp3, NGINX will look for the file at/Users/akshatsharma/Desktop/sample/music/track.mp3.
2.try_files /music/music.html /index.html =404;
Purpose: This directive attempts to serve different files based on the URI, in the specified order.
Behavior:
/music/music.html: First, NGINX will try to serve the file/Users/akshatsharma/Desktop/sample/music/music.html. This is a relative path based on therootdirectory combined with the URI path./index.html: If the first file is not found, NGINX will then try to serve/Users/akshatsharma/Desktop/sample/index.htmlinstead.=404: If neither of the above files exists, NGINX will return a 404 Not Found error.

👉 How It Works
Request Matching: When a request is made to a URI starting with
/music, this location block is used to handle it.File Lookup:
For a request to
http://localhost:8080/music/somefile.mp3, NGINX will look for the file at/Users/akshatsharma/Desktop/sample/music/somefile.mp3.If the file is not found, NGINX will try to serve
/Users/akshatsharma/Desktop/sample/music/music.html.If
music.htmlis also not found, it will try to serve/Users/akshatsharma/Desktop/sample/index.html.If neither file is found, NGINX will return a 404 error.
👉 Key Points
rootDirective: Sets the base directory for serving files. In this case, it is/Users/akshatsharma/Desktop/sample, and/musicis appended to it.try_filesDirective: Attempts to serve a list of files in the specified order. It provides a fallback mechanism for handling requests if the primary file is not available.
🫵🏼 Redirects and Rewrites
Let's say we want that if someone reaches out for http://localhost:8080/hobbies , they should be redirected to http://localhost:8080/music that we created above. This is easy , we just need to add a new location block.
http    {

    include mime.types;
    server  {
        listen  8080;
        root /Users/akshatsharma/Desktop/sample;

        location /coding {
            root /Users/akshatsharma/Desktop/sample;
        }
        location /blogging {
            alias /Users/akshatsharma/Desktop/sample/coding;
        }

        location /music {
            root /Users/akshatsharma/Desktop/sample;
            try_files   /music/music.html /index.html =404;
        }
        location /hobbies {
            return 307 /music;
        }
    }
}

events   {}
👉 Explanation of the location /hobbies Block
location /hobbies {
    return 307 /music;
}
1.return 307 /music;
Purpose: This directive is used to send an HTTP redirect response to the client.
Behavior:
307: This is the HTTP status code for a "Temporary Redirect." It indicates that the requested resource has been temporarily moved to a different URI. The client should repeat the request to the new URI, and the method (GET, POST, etc.) should be preserved./music: This is the target URI to which the client will be redirected. In this case, any request to/hobbieswill be redirected to/music.
👉 How It Works
Request Matching: When a request is made to a URI starting with
/hobbies, NGINX uses this location block to handle it.Redirect Behavior:
For example, if a user requests
http://localhost:8080/hobbies, NGINX will respond with an HTTP 307 status code and redirect the client tohttp://localhost:8080/music.The client will then make a new request to the
/musicURI.
👉 Key Points
returnDirective: This directive is used to send a specified HTTP response code and an optional text or URL. In this case, it's used to perform a redirect.307 Temporary Redirect: Indicates that the resource requested has been temporarily moved to a different location (/musicin this case). The client should use the new location for this request.
You may notice that , even if you try going to
http://localhost:8080/hobbies, it changes tohttp://localhost:8080/musicnow if you want it to stay athobbiesbut still serve the contents frommusicthis can be done by changing introducing REWRITEhttp { include mime.types; server { listen 8080; root /Users/akshatsharma/Desktop/sample; location /coding { root /Users/akshatsharma/Desktop/sample; } location /blogging { alias /Users/akshatsharma/Desktop/sample/coding; } location /music { root /Users/akshatsharma/Desktop/sample; try_files /music/music.html /index.html =404; } location /hobbies { rewrite ^/hobbies/?$ /music last; } } } events {}
👉 Explanation of the rewrite Directive
location /hobbies {
    rewrite ^/hobbies/?$ /music last;
}
1.rewrite ^/hobbies/?$ /music last;
Purpose: Internally redirects the request from
/hobbiesto/musicwhile keeping the URL in the client’s browser unchanged.Components:
^/hobbies/?$: This is a regular expression pattern that matches the URI/hobbies. The?after/hobbiesmakes the trailing slash optional./music: The new URI that the request will be internally rewritten to.last: This flag tells NGINX to stop processing furtherrewritedirectives and reprocess the request with the new URI. This flag ensures that the internal redirect is performed, and NGINX will handle the request as if it were originally made to/music.
👉 Purpose of Using
$
Exact Matching: Using
$ensures that only exact matches for/hobbies(or/hobbies/) are considered. It prevents matching longer URIs that start with/hobbiesbut have additional characters or paths.Precision: It makes sure that the rewrite rule only applies when the entire URI is
/hobbiesor/hobbies/, and not when it includes additional segments like/hobbies/extra.
👉 How It Works
Request Matching: When a request is made to a URI starting with
/hobbies, NGINX uses thislocationblock to handle it.Internal Rewrite:
The
rewritedirective will internally map the request for/hobbiesto/music.The client’s browser will still show the original URL
/hobbies, but NGINX will serve the content from/music.
👉 Key Points
rewriteDirective: Used to internally map or modify the request URI. It does not change the URL seen by the client.lastFlag: Ensures that the rewrite is processed and the request is handled as if it was originally made to the new URI.
⚖️ LOAD BALANCER
When we started this blog , we initially discussed that Nginx is useful while load balancing.
Load Balancing: As the user base increases, a single server may struggle to handle all requests simultaneously, potentially causing a bottleneck. To mitigate this issue, multiple servers can be deployed. However, the critical question arises: how does each request determine which server to target? This is where NGINX plays a crucial role. Users interact solely with NGINX, which is responsible for balancing the load across the various servers by distributing incoming requests effectively.
For Understanding this we would be using 2 things.
Flask for backend
Docker for spinning up multiple instances of our application on multiple ports.
⨕ Round Robin ?
Round Robin is a load balancing method used in NGINX to distribute incoming requests evenly across a set of backend servers. This ensures that each server in the pool gets an equal number of requests over time, helping to balance the load and avoid overloading a single server.
👉 How Round Robin Works
Request Distribution: NGINX maintains a list of backend servers and routes each incoming request to the next server in the list in a cyclic manner.
Cyclic Order: After sending a request to the last server in the list, NGINX returns to the first server and continues the cycle.
Even Load: Over time, this method ensures that each server receives roughly the same number of requests, which helps to distribute the load evenly.
👉 Example Configuration
Here’s an example of how you might configure round robin load balancing in NGINX:
http {
    upstream myapp {
        server backend1.example.com;
        server backend2.example.com;
        server backend3.example.com;
    }

    server {
        listen 80;

        location / {
            proxy_pass http://myapp;
        }
    }
}
👉 Explanation of the Configuration
upstream myapp { ... }:Defines a group of backend servers. In this case,
backend1.example.com,backend2.example.com, andbackend3.example.comare part of themyappgroup.By default, NGINX will use round robin to distribute requests across these servers.
proxy_passhttp://myapp;:In the
serverblock, theproxy_passdirective sends incoming requests to themyappupstream group.NGINX automatically distributes these requests using the round robin method.
👉 Benefits of Round Robin
Simplicity: Round robin is simple to configure and understand. It does not require complex algorithms or additional settings.
Even Distribution: It ensures that requests are evenly distributed among all available servers, helping to prevent any single server from becoming a bottleneck.
👉 Limitations
No Awareness of Server Load: Round robin does not take into account the current load or performance of each server. It simply cycles through the list of servers.
Server Health: If a server becomes unavailable, round robin will still attempt to send requests to it unless additional health checks or failover mechanisms are configured.
🧪 How to Test This Setup
To set up and test a load balancer with Nginx, we'll need three things:
Nginx Installed
Backend: For this example, I'll use Flask.
Docker: This allows us to create multiple instances of the same application, which we can then distribute using round-robin load balancing.
👉 Setting Up a Simple Backend
First, create a simple main.py file in the same directory as your index.html. It's important to note that if we don't specify the directory for our HTML templates, Flask will default to looking for them in a directory named templates.
from flask import Flask, render_template
import os

curr_dir = os.getcwd()

app = Flask(__name__, template_folder=curr_dir)  # Specify your custom template folder

@app.route('/')
def home():
    return render_template('index.html')

if __name__ == '__main__':
    app.run(host='0.0.0.0', port=5000, debug=True)
will also create a simple requirements.txt file that would have the python packages that are required for backend , right now it would just have
Flask==2.0.2
Werkzeug==2.0.3
👉 Creating a Docker file for creating a Docker image.
# Use an official Python runtime as a parent image
FROM python:3.9

# Set the working directory in the container
WORKDIR /sample

# Copy the current directory contents into the container at /app
COPY . /sample

# Install any needed packages specified in requirements.txt
RUN pip install --no-cache-dir -r requirements.txt

# Make port 5000 available to the world outside this container
EXPOSE 5000

# Define environment variable
ENV FLASK_ENV=development

# Run the application
CMD ["python", "main.py"]
Docker file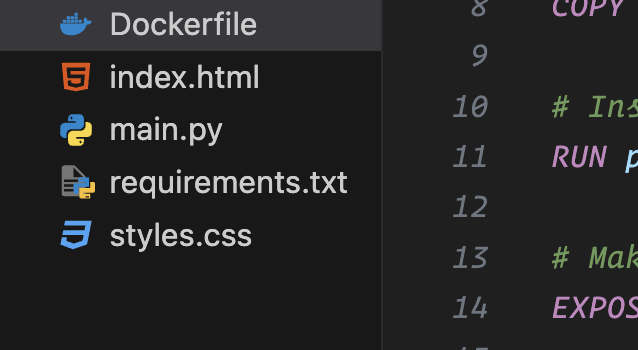
👉 Creating A Docker Build.
To create a Docker image of your current application, run the command docker build . -t roundrobin. This command builds the Docker image and tags it with the name "roundrobin," as specified.
Once the build is complete, you can verify the image's creation by running the docker images command.

If you have the utility tool , you can verify the same above in the tool under images.
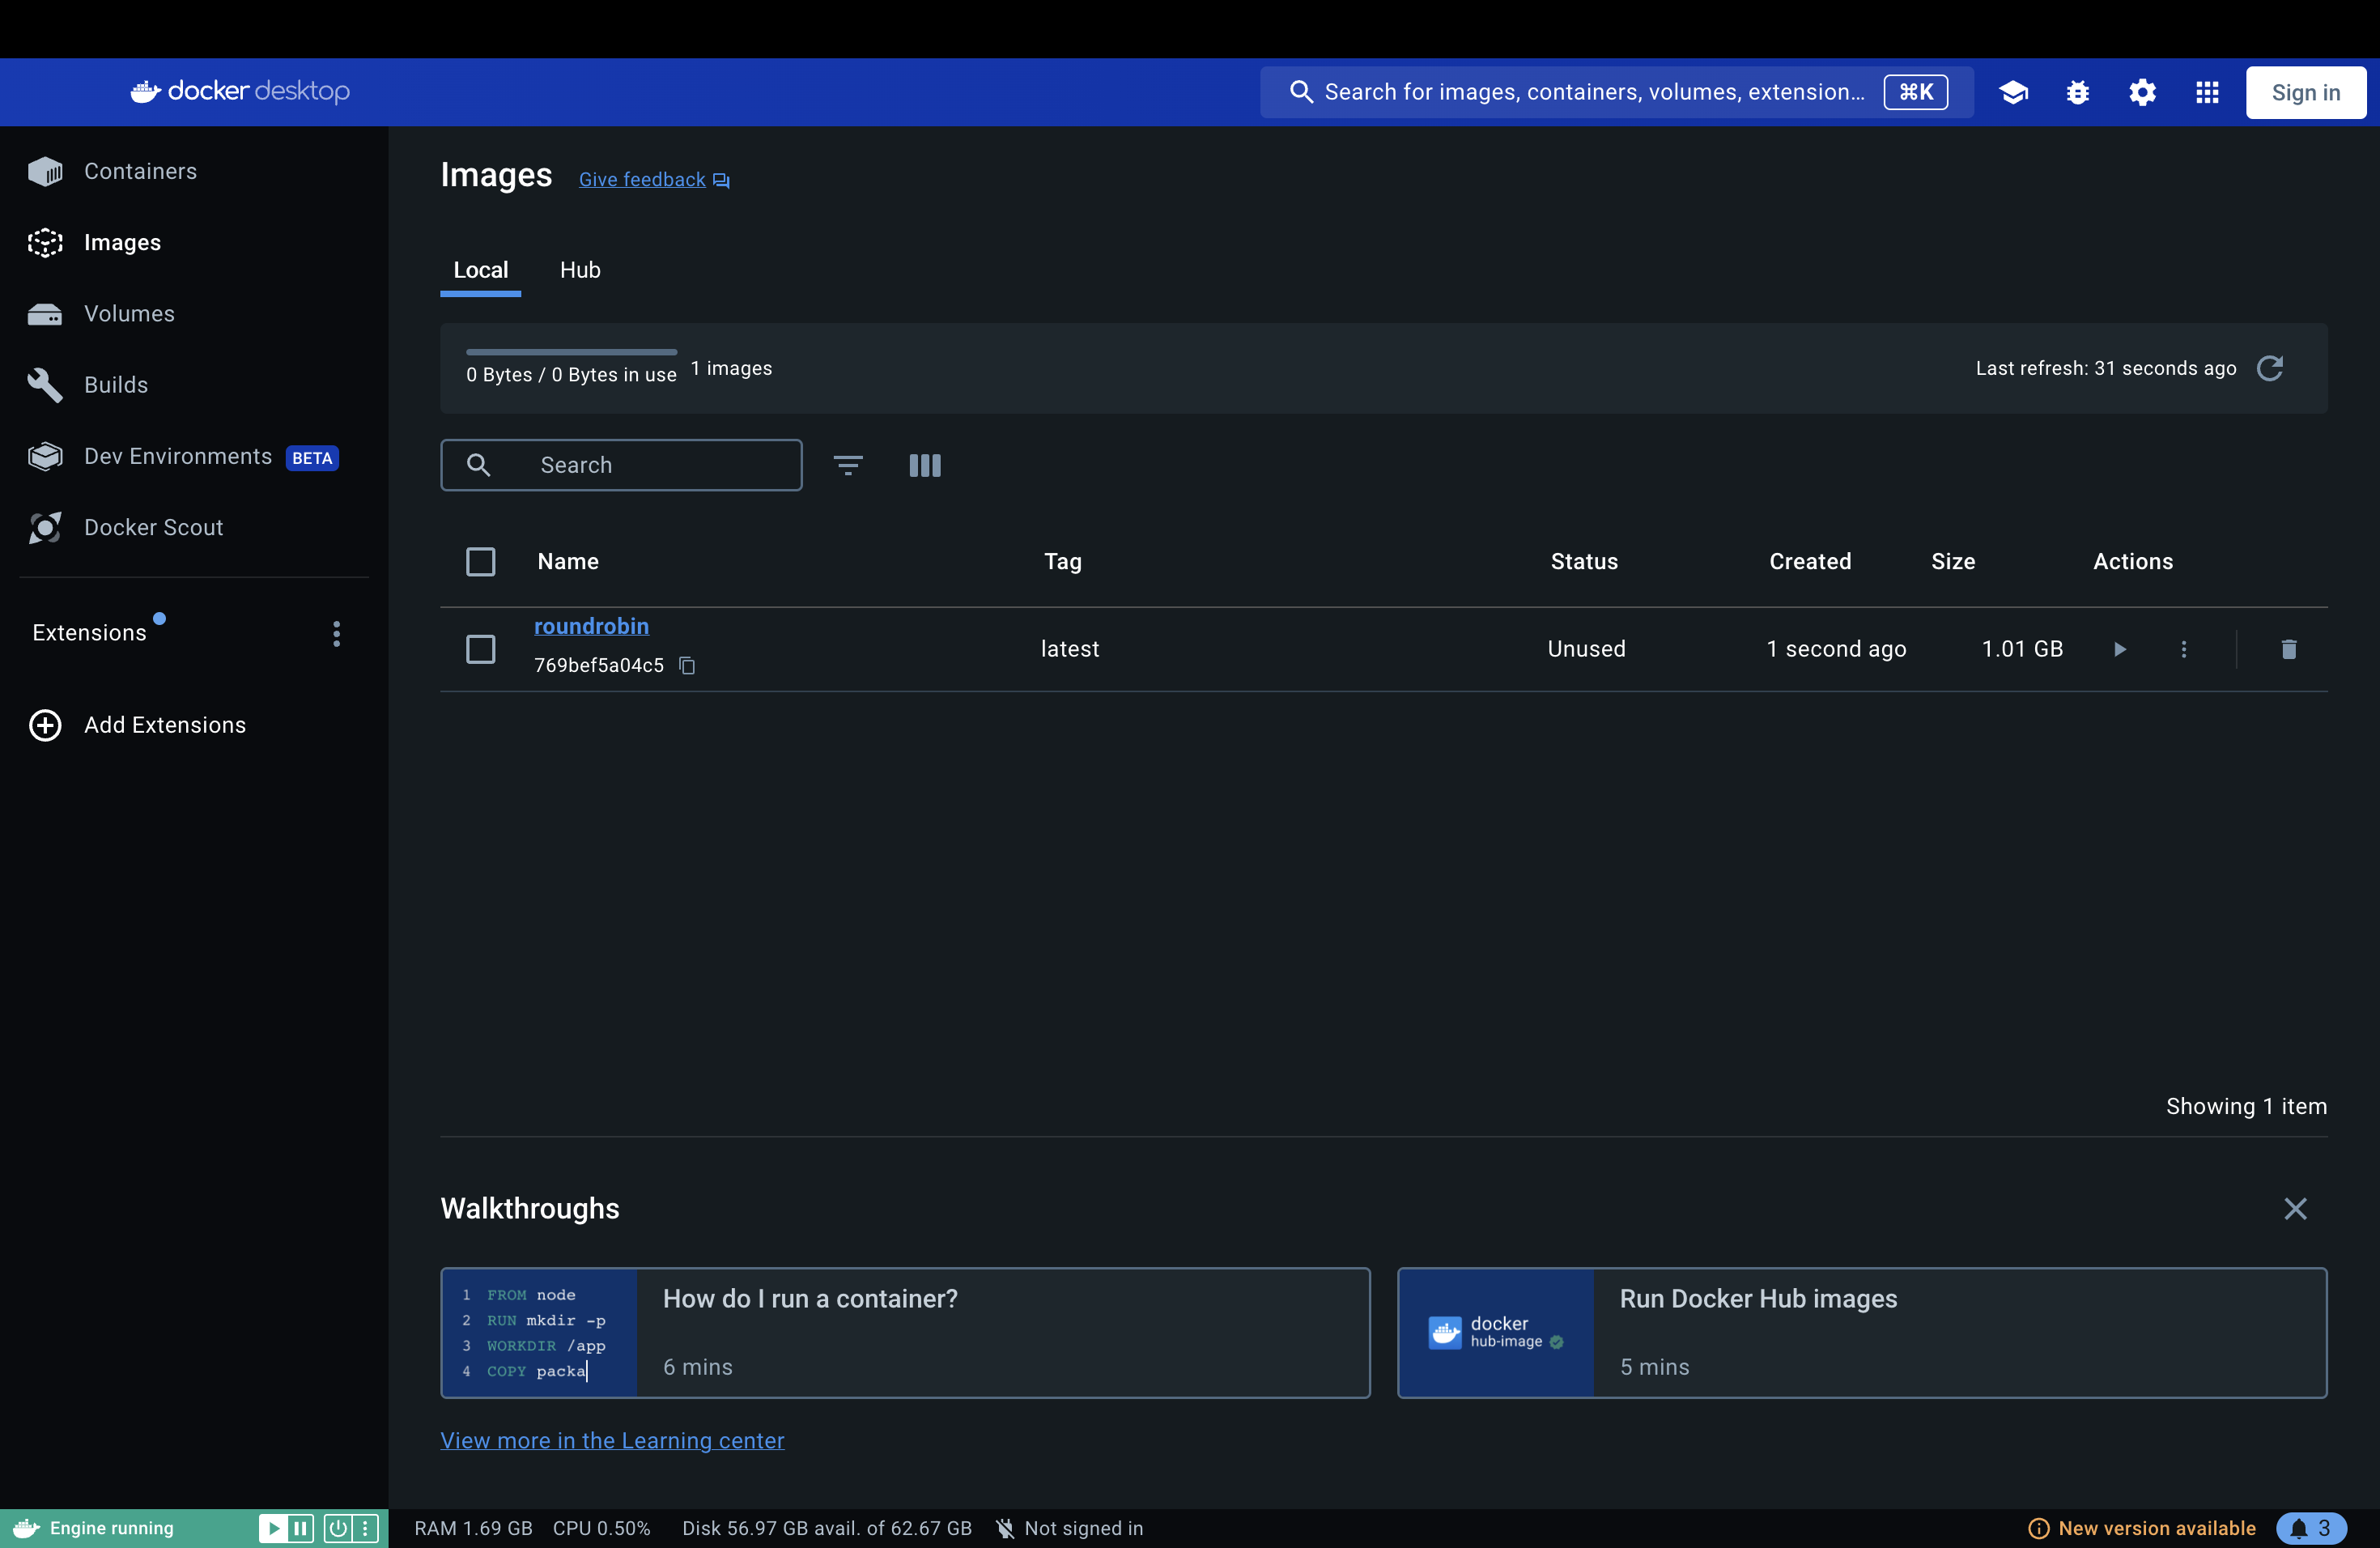
Once you are done with creating a docker image , you can spun 4 containers and forward the docker port to your local port using the following commands.
docker run -p 5001:5000 -d roundrobin
docker run -p 5002:5000 -d roundrobin
docker run -p 5003:5000 -d roundrobin
docker run -p 5004:5000 -d roundrobin
👉 Command Breakdown
docker run: This command starts a new container from a specified Docker image.
-p <external-port>:<internal-port>: This option maps a port on your host machine (the<external-port>) to a port inside the Docker container (the<internal-port>). This allows you to access the container's service from outside the container through the specified external port.
5001:5000: Maps port 5001 on the host to port 5000 inside the container.
5002:5000: Maps port 5002 on the host to port 5000 inside the container.
5003:5000: Maps port 5003 on the host to port 5000 inside the container.
5004:5000: Maps port 5004 on the host to port 5000 inside the container.
-d: Runs the container in detached mode, which means the container runs in the background and does not block your terminal.
roundrobin: This is the name of the Docker image from which the container is created.
Once docker containers are you you can verify using the command docker ps
CONTAINER ID   IMAGE        COMMAND            CREATED          STATUS          PORTS                    NAMES
971d331e33ad   roundrobin   "python main.py"   6 seconds ago    Up 5 seconds    0.0.0.0:5004->5000/tcp   adoring_raman
0a58d8cd7594   roundrobin   "python main.py"   12 seconds ago   Up 11 seconds   0.0.0.0:5003->5000/tcp   frosty_chaplygin
2b15be3852c3   roundrobin   "python main.py"   17 seconds ago   Up 16 seconds   0.0.0.0:5002->5000/tcp   fervent_keldysh
f5edbc901877   roundrobin   "python main.py"   2 minutes ago    Up 2 minutes    0.0.0.0:5001->5000/tcp   eager_mccarthy
even in the browser you can check for http://localhost:5001 , http://localhost:5002, http://localhost:5003 , http://localhost:5004. These should be running the instance of same application on different ports.
👉 Making NGINX Changes for Round robin.
http    {

    include mime.types;
    upstream backend {
        # Define backend servers
        server localhost:5001;
        server localhost:5002;
        server localhost:5003;
        server localhost:5004;
    }

    server {
        listen 8080;  # The port Nginx will listen on

        location / {
            proxy_pass http://backend;  # Pass requests to the upstream group
        }
    }
}

events   {}
http Block
This block defines the HTTP server configuration.
include mime.types;- This line tells Nginx to include a file called
mime.types, which contains mappings of file extensions to MIME types. This helps Nginx serve files with the correct content type.
- This line tells Nginx to include a file called
upstream backend { ... }The
upstreamblock defines a group of backend servers that Nginx can distribute requests to. In this case, it's namedbackend.Inside this block, you list the servers that make up the
backendgroup. Eachserverdirective specifies a backend server, and here, it's configured to use four servers running onlocalhostwith ports 5001 to 5004.
server Block
This block defines a virtual server that Nginx will run.
listen 8080;- This line tells Nginx to listen for incoming HTTP requests on port 8080.
location / { ... }The
locationblock specifies how requests to a particular path should be handled. In this case, it’s handling all requests (since/matches everything).proxy_passhttp://backend;- This directive forwards incoming requests to the upstream
backendgroup. Nginx will distribute the requests among the servers defined in thebackendblock.
- This directive forwards incoming requests to the upstream
events Block
The events block is used to configure settings related to Nginx’s event handling, such as the number of worker connections. It’s empty in your configuration, which means it will use default settings.
YESSS You did it buddy!
In this article, we've explored the essential aspects of Nginx, from its role as a high-performance web server and reverse proxy to its powerful load-balancing capabilities. By configuring Nginx to manage incoming traffic and distribute it among backend servers, you can enhance the efficiency and reliability of your web applications.
The flexibility and speed of Nginx make it a valuable tool for a wide range of use cases, including serving static content, handling complex proxy setups, and balancing loads across multiple servers. As you become more familiar with Nginx, you'll discover even more ways to leverage its features to optimize your web infrastructure.
Thank you for reading!
I’m glad you made it to the end of this article. I hope you found the insights valuable. If you did, please consider leaving a like. Your support motivates me to continue writing and sharing more content in the future.
Connect with me on Linkedin
Start your own blogs
Subscribe to my newsletter
Read articles from Akshat Sharma directly inside your inbox. Subscribe to the newsletter, and don't miss out.
Written by

Akshat Sharma
Akshat Sharma
I am a Human who trys to learn new stuff every day.