Integrating bpmn-js with Angular : step-by-step guide
 Hatem Siala
In today's dynamic business landscape, we're hearing more and more about workflows. That’s where Business Process Model and Notation (BPMN) diagrams come in. For example, a BPMN diagram can represent the steps involved in processing an insurance claim, from the initial submission to the final approval.
One popular tool for editing BPMN diagrams is Camunda Modeler, which provides an interface for designing and managing business processes. However, for those who prefer a more integrated approach within their applications, we will explore how to use bpmn-js with Angular to achieve similar functionality.
To bring BPMN to web applications, developers can use bpmn-js, a JavaScript library designed for embedding BPMN diagrams into web interfaces. bpmn-js offers powerful features for creating, editing, and viewing BPMN diagrams.
In this guide, we will explore how to integrate the bpmn-js Modeler into an Angular project. By following this tutorial, you will learn how to set up a new Angular application, install bpmn-js, and implement a component that allows users to interact with BPMN diagrams directly within your Angular app.
Prerequisites
Basic knowledge of Angular and TypeScript
Node.js and npm installed
Angular CLI installed
Setting Up the Angular Project
To get started, we need to set up a new Angular project. Ensure you have Angular CLI installed. If you have Angular installed you can check your version by running the following command:
ng version
For this guide, we'll be using Angular version 18.1.2. Now, let's create a new Angular project with the following command:
ng new bpmn-js-angular --no-standalone
cd bpmn-js-angular
The --no-standalone flag is used to create a traditional Angular project structure. In Angular 14, standalone components were introduced, allowing components to be defined without a module. This approach simplifies component creation but requires a different setup. By using --no-standalone, we ensure that our project includes app.module.ts and follows the conventional Angular project structure. We stick to the traditional setup to maintain familiarity and ease of integration with third-party libraries like bpmn-js.
During the project setup, you'll be prompted to choose a stylesheet format:
? Which stylesheet format would you like to use? (Use arrow keys)
> CSS             [ https://developer.mozilla.org/docs/Web/CSS                     ]
  Sass (SCSS)     [ https://sass-lang.com/documentation/syntax#scss                ]
  Sass (Indented) [ https://sass-lang.com/documentation/syntax#the-indented-syntax ]
  Less            [ http://lesscss.org                                             ]
We will select css for this tutorial. The other options offer additional features.
You'll also be asked whether you want to enable Server-Side Rendering (SSR) and Static Site Generation (SSG/Prerendering):
Do you want to enable Server-Side Rendering (SSR) and Static Site Generation (SSG/Prerendering)? (y/N)
By choosing not to enable SSR and SSG, we keep the setup simpler and focus on the integration of bpmn-js with Angular.
Installing bpmn-js
Install bpmn-js and its dependencies using npm :
npm install bpmn-js
Integrating bpmn-js in Angular
Now, we can proceed with integrating bpmn-js. For this tutorial, we will use the bpmn-js modeler, which allows us to create and edit BPMN diagrams directly within our Angular application. Note that bpmn-js also offers other components, such as the viewer, which is used for displaying diagrams without editing capabilities.
We will create a new Angular component named "bpmn-modeler" to host our BPMN modeler. You can use this command :
ng generate component bpmn-modeler
This command creates the necessary files for our new component such as bpmn-modeler.component.ts, bpmn-modeler.component.html, and bpmn-modeler.component.css.
Implementing bpmn-modeler.component.ts :
After creating the new component we will define the logic for initializing and managing the bpmn-js modeler. We need few imports to handle that :
"Modeler" from
bpmn-js/lib/Modeler: The bpmn-js modeler class."Component", "ViewChild", and ElementRef from
@angular/core: Used to define the component and access DOM elements."from" and "Observable" from
rxjs: Used to handle asynchronous operations.
rxjs (Reactive Extensions for JavaScript) is a library for reactive programming using observables that makes it easier to compose asynchronous or callback-based code.
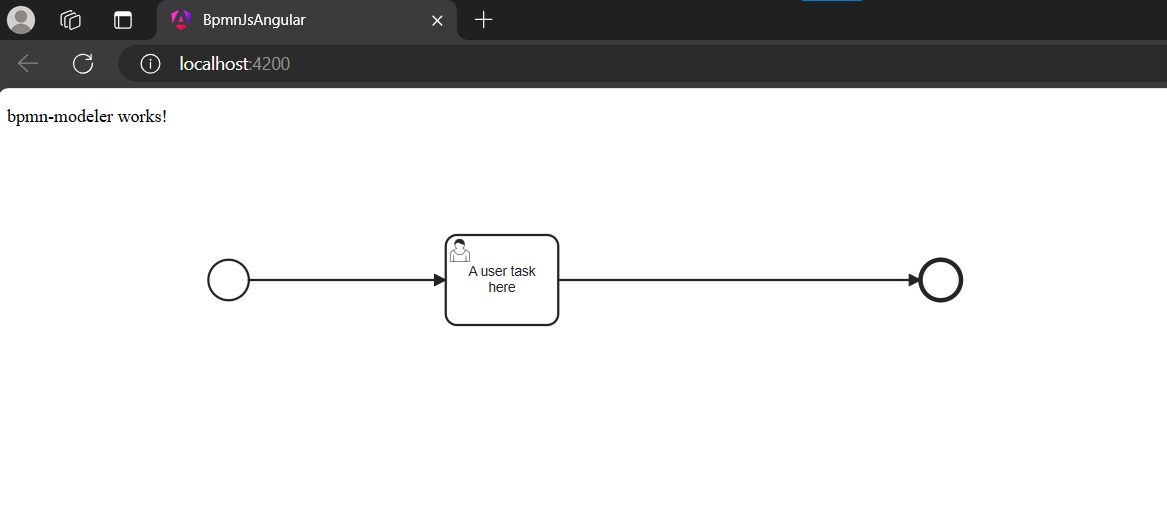
Prepering static diagram to start. Our diagram look like this :

we need BPMN diagram from an XML string. Of course you can put your own xml to start.
The equivalent XML format for the previous diagram and that will be used later in our code is :
 <?xml version="1.0" encoding="UTF-8"?>
     <bpmn:definitions xmlns:bpmn="http://www.omg.org/spec/BPMN/20100524/MODEL" xmlns:bpmndi="http://www.omg.org/spec/BPMN/20100524/DI" xmlns:dc="http://www.omg.org/spec/DD/20100524/DC" xmlns:camunda="http://camunda.org/schema/1.0/bpmn" xmlns:di="http://www.omg.org/spec/DD/20100524/DI" xmlns:modeler="http://camunda.org/schema/modeler/1.0" id="Definitions_02r90y2" targetNamespace="http://bpmn.io/schema/bpmn" exporter="Camunda Modeler" exporterVersion="5.24.0" modeler:executionPlatform="Camunda Platform" modeler:executionPlatformVersion="7.21.0">
       <bpmn:process id="Process_1s5zn7v" isExecutable="true" camunda:historyTimeToLive="10">
         <bpmn:startEvent id="StartEvent_1">
           <bpmn:outgoing>Flow_1e64c8b</bpmn:outgoing>
         </bpmn:startEvent>
         <bpmn:endEvent id="Event_0rzkx5b">
           <bpmn:incoming>Flow_1b80get</bpmn:incoming>
         </bpmn:endEvent>
         <bpmn:sequenceFlow id="Flow_1e64c8b" sourceRef="StartEvent_1" targetRef="Activity_1jlibrg" />
         <bpmn:sequenceFlow id="Flow_1b80get" sourceRef="Activity_1jlibrg" targetRef="Event_0rzkx5b" />
         <bpmn:userTask id="Activity_1jlibrg" name="A user task here">
           <bpmn:incoming>Flow_1e64c8b</bpmn:incoming>
           <bpmn:outgoing>Flow_1b80get</bpmn:outgoing>
         </bpmn:userTask>
       </bpmn:process>
       <bpmndi:BPMNDiagram id="BPMNDiagram_1">
         <bpmndi:BPMNPlane id="BPMNPlane_1" bpmnElement="Process_1s5zn7v">
           <bpmndi:BPMNShape id="_BPMNShape_StartEvent_2" bpmnElement="StartEvent_1">
             <dc:Bounds x="179" y="102" width="36" height="36" />
           </bpmndi:BPMNShape>
           <bpmndi:BPMNShape id="Event_0rzkx5b_di" bpmnElement="Event_0rzkx5b">
             <dc:Bounds x="812" y="102" width="36" height="36" />
           </bpmndi:BPMNShape>
           <bpmndi:BPMNShape id="Activity_0h5dmju_di" bpmnElement="Activity_1jlibrg">
             <dc:Bounds x="390" y="80" width="100" height="80" />
             <bpmndi:BPMNLabel />
           </bpmndi:BPMNShape>
           <bpmndi:BPMNEdge id="Flow_1e64c8b_di" bpmnElement="Flow_1e64c8b">
             <di:waypoint x="215" y="120" />
             <di:waypoint x="390" y="120" />
           </bpmndi:BPMNEdge>
           <bpmndi:BPMNEdge id="Flow_1b80get_di" bpmnElement="Flow_1b80get">
             <di:waypoint x="490" y="120" />
             <di:waypoint x="812" y="120" />
           </bpmndi:BPMNEdge>
         </bpmndi:BPMNPlane>
       </bpmndi:BPMNDiagram>
     </bpmn:definitions>
Finally your bpmn-modeler.component.ts sould look like this :
import { Component,ViewChild, ElementRef } from '@angular/core';
import Modeler from 'bpmn-js/lib/Modeler';
import {from, Observable} from 'rxjs';

@Component({
  selector: 'app-bpmn-modeler',
  templateUrl: './bpmn-modeler.component.html',
  styleUrl: './bpmn-modeler.component.css'
})

export class BpmnModelerComponent {

  private bpmnJS: Modeler;

  @ViewChild('bpmnModelerRef', { static: true }) private bpmnModelerRef: ElementRef | undefined;

  private xml: string = `<?xml version="1.0" encoding="UTF-8"?>
    <bpmn:definitions xmlns:bpmn="http://www.omg.org/spec/BPMN/20100524/MODEL" xmlns:bpmndi="http://www.omg.org/spec/BPMN/20100524/DI" xmlns:dc="http://www.omg.org/spec/DD/20100524/DC" xmlns:camunda="http://camunda.org/schema/1.0/bpmn" xmlns:di="http://www.omg.org/spec/DD/20100524/DI" xmlns:modeler="http://camunda.org/schema/modeler/1.0" id="Definitions_02r90y2" targetNamespace="http://bpmn.io/schema/bpmn" exporter="Camunda Modeler" exporterVersion="5.24.0" modeler:executionPlatform="Camunda Platform" modeler:executionPlatformVersion="7.21.0">
      <bpmn:process id="Process_1s5zn7v" isExecutable="true" camunda:historyTimeToLive="10">
        <bpmn:startEvent id="StartEvent_1">
          <bpmn:outgoing>Flow_1e64c8b</bpmn:outgoing>
        </bpmn:startEvent>
        <bpmn:endEvent id="Event_0rzkx5b">
          <bpmn:incoming>Flow_1b80get</bpmn:incoming>
        </bpmn:endEvent>
        <bpmn:sequenceFlow id="Flow_1e64c8b" sourceRef="StartEvent_1" targetRef="Activity_1jlibrg" />
        <bpmn:sequenceFlow id="Flow_1b80get" sourceRef="Activity_1jlibrg" targetRef="Event_0rzkx5b" />
        <bpmn:userTask id="Activity_1jlibrg" name="A user task here">
          <bpmn:incoming>Flow_1e64c8b</bpmn:incoming>
          <bpmn:outgoing>Flow_1b80get</bpmn:outgoing>
        </bpmn:userTask>
      </bpmn:process>
      <bpmndi:BPMNDiagram id="BPMNDiagram_1">
        <bpmndi:BPMNPlane id="BPMNPlane_1" bpmnElement="Process_1s5zn7v">
          <bpmndi:BPMNShape id="_BPMNShape_StartEvent_2" bpmnElement="StartEvent_1">
            <dc:Bounds x="179" y="102" width="36" height="36" />
          </bpmndi:BPMNShape>
          <bpmndi:BPMNShape id="Event_0rzkx5b_di" bpmnElement="Event_0rzkx5b">
            <dc:Bounds x="812" y="102" width="36" height="36" />
          </bpmndi:BPMNShape>
          <bpmndi:BPMNShape id="Activity_0h5dmju_di" bpmnElement="Activity_1jlibrg">
            <dc:Bounds x="390" y="80" width="100" height="80" />
            <bpmndi:BPMNLabel />
          </bpmndi:BPMNShape>
          <bpmndi:BPMNEdge id="Flow_1e64c8b_di" bpmnElement="Flow_1e64c8b">
            <di:waypoint x="215" y="120" />
            <di:waypoint x="390" y="120" />
          </bpmndi:BPMNEdge>
          <bpmndi:BPMNEdge id="Flow_1b80get_di" bpmnElement="Flow_1b80get">
            <di:waypoint x="490" y="120" />
            <di:waypoint x="812" y="120" />
          </bpmndi:BPMNEdge>
        </bpmndi:BPMNPlane>
      </bpmndi:BPMNDiagram>
    </bpmn:definitions>
    `;

  constructor() {
    this.bpmnJS = new Modeler({
      container: this.bpmnModelerRef?.nativeElement,
    })
  }

  ngAfterContentInit(): void {
    this.bpmnJS.attachTo(this.bpmnModelerRef!.nativeElement);
    this.importDiagram(this.xml);

  }

  ngOnDestroy(): void {
    this.bpmnJS.destroy();
  }

  private importDiagram(xml: string): Observable<{warnings: Array<any>}> {
    return from(this.bpmnJS.importXML(xml) as Promise<{warnings: Array<any>}>);
  }

}
Next, we'll add the HTML template for the bpmn-modeler component in the bpmn-modeler.component.html :
<p>bpmn-modeler works!</p>
<div class="container">
    <div #bpmnModelerRef class="bpmnModeler-container"></div>
</div>
And add some basic styles for the modeler container in the bpmn-modeler.component.css file:
.bpmnModeler-container {
    width: 80%;
    height: 800px;
    flex-grow: 4;
}
.properties-container{
    width: 20%;
}
.container{
    display: flex;
    flex-direction: row;
    flex-wrap: nowrap;
    justify-content: space-between;
    width: 80%;
    height: 80%;
}
Finally, to display the bpmn-modeler component in our application, clear the content of app.component.html and add the following line:
<app-bpmn-modeler></app-bpmn-modeler>
This ensures that the bpmn-modeler component is rendered when the application runs.
Run the Angular application to see the bpmn-js modeler in action by using this command :
ng serve
Open your browser and navigate to http://localhost:4200You should see something like this :

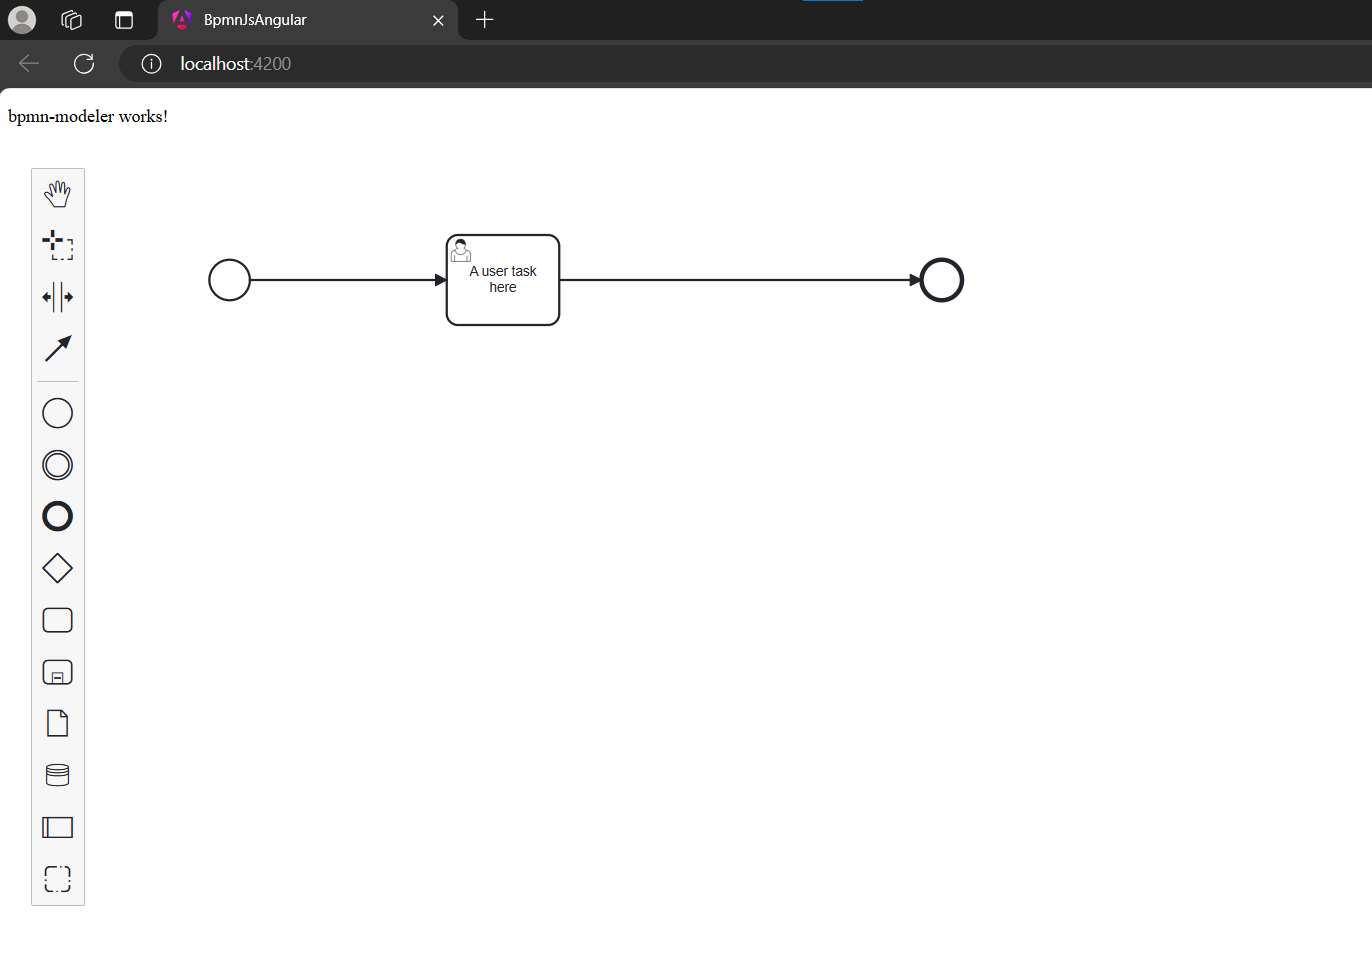
Now maybe you are wondering why we are not seing the panel and the tools to edit the diagram while it is a modeler and not a viewer ! Well don't worry we are going to solve this ! You need to run this command
npm install diagram-js
diagram-js is a toolbox for displaying and modifying diagrams on the web.
Go to angular.json and look for "architect", then "build" and edit the "styles in the "options". You need to add some lines so it looks like this:
"architect": {
  "build": {
    "options": {
      "styles": [
        "src/styles.css",
        "node_modules/bpmn-js/dist/assets/bpmn-font/css/bpmn.css",
        "node_modules/bpmn-js/dist/assets/diagram-js.css",
        ],
      }
    }
  }
Finally your application should look like that :

And Congratulations ! your modeler is now ready !
Conclusion
In this tutorial, we've successfully integrated bpmn-js into an Angular project. You can now start building and visualizing BPMN diagrams within your Angular applications. If you have any questions or feedback, feel free to leave a comment below. Happy coding !
Subscribe to my newsletter
Read articles from Hatem Siala directly inside your inbox. Subscribe to the newsletter, and don't miss out.
Written by
