Taints and Tolerations
 Gopinath V
Taint: A label applied to a node that indicates that no pods should be scheduled on it unless they have a corresponding toleration.
Toleration: A label applied to a pod that allows it to be scheduled on a node with a matching taint.
The Role of Taint Effects
The effect part of a taint determines how the taint impacts pod scheduling:
NoSchedule: Prevents new pods from being scheduled on the node, but existing pods are unaffected.
PreferNoSchedule: Indicates a preference to not schedule new pods on the node, but the scheduler can still schedule pods if there are no other suitable nodes.
NoExecute: Prevents all pods, both existing and new, from running on the node. This effectively evicts all pods from the node.
Use Cases
Hardware Isolation:
Taint nodes with specific hardware (e.g.,
gpu=true) to restrict pod scheduling.Create pods with tolerations for specific hardware to run on those nodes.
Node Maintenance:
Taint a node with
NoScheduleto prevent new pods from being scheduled while performing maintenance.Remove the taint when maintenance is complete.
Workload Isolation:
Create taints to isolate specific workloads on dedicated nodes.
Use tolerations to ensure that only the intended pods can run on those nodes.
lets see how to taint the node
kubectl taint node nameofthenode gpu=true:NoSchedule
lets see how to remove taint in the node
kubectl taint node nameofthenode gpu=true:NoSchedule-
to remove taint in the node it is very simple we need place - in the very end of the command

this is how we add taint to the node
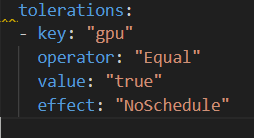
so we need to give tolerations for the pod with accordance the node

this is the toleration detail for the pod
Now we move to the concept of selector
how to add labels to the node
lets see the command for that
kubectl label node nodename gpu=false

so the pod will select the node with the selector gpu=false
Subscribe to my newsletter
Read articles from Gopinath V directly inside your inbox. Subscribe to the newsletter, and don't miss out.
Written by
