The Ultimate Istio Guide
 Gopal Gautam
What is Istio?
Istio is an open-source service mesh that provides a way to control how microservices share data with one another. It offers a platform-agnostic way to secure, connect, and observe microservices. Istio manages communication between services by deploying a proxy (Envoy) as a sidecar to each service instance, intercepting all network communication between microservices.
Key Features of Istio
Traffic Management:
Routing: Control traffic routing between services. This includes features like request routing, retries, timeouts, and fault injection.
Load Balancing: Distribute traffic across multiple instances of a service to optimize resource usage and improve performance.
Security:
Mutual TLS (mTLS): Encrypts traffic between services, ensuring secure communication.
Authentication and Authorization: Enforces policies for service-to-service and end-user authentication and authorization.
Observability:
Metrics: Collects detailed metrics for monitoring service performance.
Logging: Provides detailed logs for analyzing service interactions.
Tracing: Supports distributed tracing to track the flow of requests through the service mesh.
Policy Enforcement:
- Apply policies to control access and usage, including rate limiting, quotas, and more.
Istio architecture and components
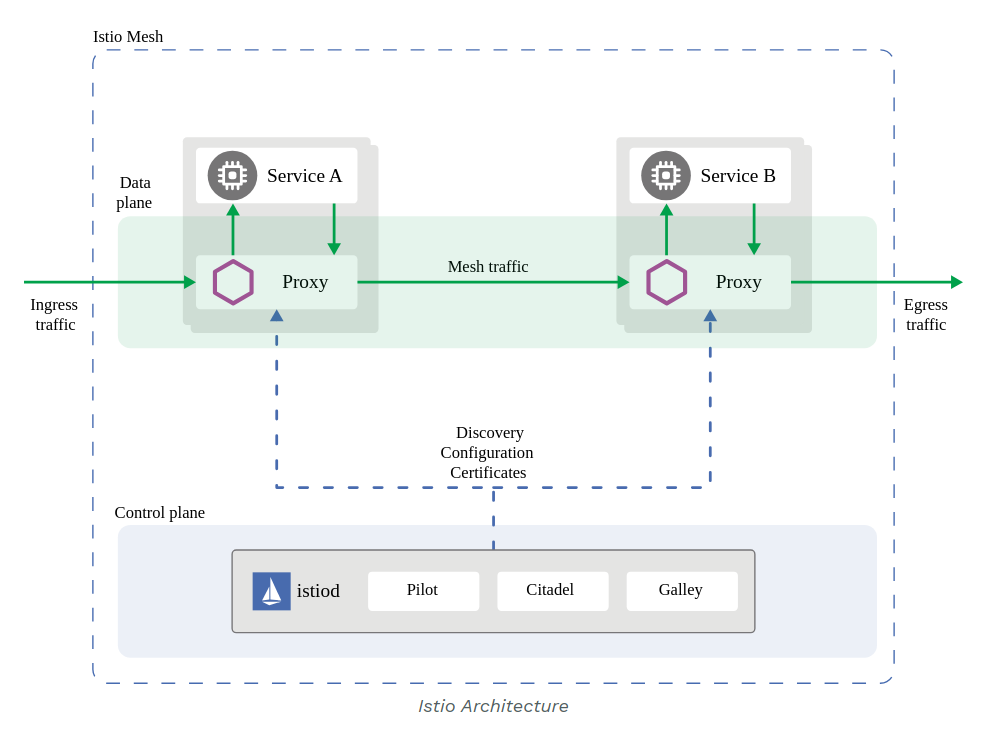
In Istio, the architecture is divided into two main planes: the control plane and the data plane. Each plane has distinct responsibilities that contribute to the overall functionality and management of the service mesh.
Control Plane
The control plane is responsible for managing and configuring the proxies to route traffic. It provides the necessary configuration to the data plane to enforce policies and collect telemetry data. The key components of the control plane include:
Before v1.5 of Istio, the Control Plane had many components such as Pilot, Galley, Citadel, Mixer, etc.
After v1.5 → all these components got combined into one → Istiod → This made it easier for operators to manage and configure Istio
Istiod:
Pilot: Manages and distributes configuration to the Envoy proxies, including routing rules, service discovery, and load balancing settings.
Galley: (Previously part of Istio) Responsible for validating and distributing configuration data, ensuring that configurations are correct and applied consistently.
Citadel: Manages security policies, including service identity and certificate management for mutual TLS.
Mixer: (Deprecated, but its functions are integrated into Istiod) Responsible for policy enforcement and telemetry collection.
Istio Ingress and Egress Gateways:
- These are specialized Envoy proxies that handle traffic entering and exiting the mesh. They provide a controlled entry and exit point for all traffic.
Data Plane
The data plane is responsible for handling the actual network traffic between services. It consists of a set of intelligent proxies (Envoy proxies) deployed as sidecars to each microservice. The main tasks of the data plane include:
Envoy Sidecar Proxy:
Traffic Routing:
- The Envoy proxies intercept all incoming and outgoing traffic to and from the microservices. They route requests to the appropriate service instances based on the configuration provided by the control plane.
Traffic Management:
- Envoy proxies manage traffic flow, including load balancing, retries, timeouts, and fault injection. They ensure that traffic is routed efficiently and according to the defined policies.
Security:
- Envoy sidecars enforce security policies such as mutual TLS (mTLS) to encrypt traffic between services and authenticate service identities.
Telemetry:
- Envoy proxies collect telemetry data, such as metrics, logs, and traces, for every request and response. This data is sent to the control plane for aggregation and analysis.

Installation
First install istioctl command utility in your system:
curl -L https://istio.io/downloadIstio | sh -
Move to the Istio package directory. For example, if the package is istio-1.22.3:
cd istio-1.22.3
Once command is installed then export the path:
export PATH=$PWD/bin:$PATH
Now istioctl command utility is configured in your shell now run following command to install istio-operator.
istioctl operator init
Above command will install istio-operator in istio-operator namespace and by default it will watch istio-system namespace, but you can use any other namespace also as per your requirement.
Optional -
istioctl operator init --watchedNamespaces=istio-namespace1,istio-namespace2
Install:
istioctl install
Add a namespace label to instruct Istio to automatically inject Envoy sidecar proxies when you deploy your application later:
kubectl label namespace default istio-injection=enabled
The PeerAuthentication configuration in Istio enforces strict mutual TLS (mTLS) for all services within a specified namespace. By setting the mode to STRICT, it ensures that all service-to-service communication is encrypted and authenticated, enhancing security by preventing unauthorized access and data tampering.
apiVersion: security.istio.io/v1beta1
kind: PeerAuthentication
metadata:
  name: mtls-mode
  namespace: default
spec:
  mtls:
    mode: STRICT
Deploy the sample application
Deploy theTodo sample application:
 apiVersion: apps/v1
 kind: Deployment
 metadata:
   name: todolist-v1
   labels:
     app: todolist
     version: v1
 spec:
   replicas: 1
   selector:
     matchLabels:
       app: todolist
       version: v1
   template:
     metadata:
       labels:
         app: todolist
         version: v1
     spec:
       containers:
       - name: todolist
         image: gopalgtm001/node-todo:v1
         ports:
         - containerPort: 8000
apiVersion: v1 kind: Service metadata: name: todolist labels: app: todolist spec: selector: app: todolist ports: - protocol: TCP port: 8000 targetPort: 8000The application will start. As each pod becomes ready, the Istio sidecar will be deployed along with it.
kubectl get servicesand
kubectl get pods
Open the application to outside traffic
The Bookinfo application is deployed but not accessible from the outside. To make it accessible, you need to create an Istio Ingress Gateway, which maps a path to a route at the edge of your mesh.
Associate this application with the Istio gateway:
 apiVersion: networking.istio.io/v1alpha3
 kind: Gateway
 metadata:
   name: todolist-gateway
 spec:
   selector:
     istio: ingressgateway # use istio default controller
   servers:
   - port:
       number: 80
       name: http
       protocol: HTTP
     hosts:
     - "*"

 ---
 apiVersion: networking.istio.io/v1alpha3
 kind: VirtualService
 metadata:
   name: todolist
 spec:
   hosts:
   - "*"
   gateways:
   - todolist-gateway
   http:
   - route:
     - destination:
         host: todolist
         port:
          number: 8000
Ensure that there are no issues with the configuration:
istioctl analyzeaccess the application:
kubectl get svc -n istio-system
Canary Deployment
Canary Deployment is a strategy used to release a new version of a service gradually to a small subset of users before rolling it out to the entire user base. This approach allows developers to test and validate the new version in a production environment with minimal risk, ensuring that it performs as expected and does not introduce any critical issues.
Configure VirtualService and DestinationRule:
Define the traffic routing rules to split traffic between the two versions. Initially, you can send a small percentage of traffic to the canary version (
v2) and the rest to the stable version (v1).Deployment for version2:
  apiVersion: apps/v1
  kind: Deployment
  metadata:
    name: todolist-v2
    labels:
      app: todolist
      version: v2
  spec:
    replicas: 1
    selector:
      matchLabels:
        app: todolist
        version: v2
    template:
      metadata:
        labels:
          app: todolist
          version: v2
      spec:
        containers:
        - name: todolist
          image: gopalgtm001/node-todo:v2
          ports:
          - containerPort: 8000
Istio DestinationRule:
  apiVersion: networking.istio.io/v1alpha3
  kind: DestinationRule
  metadata:
    name: todolist
  spec:
    host: todolist
    subsets:
    - name: v1
      labels:
        version: v1
    - name: v2
      labels:
        version: v2
Istio VirtualService for Canary Deployment:
  apiVersion: networking.istio.io/v1alpha3
  kind: VirtualService
  metadata:
    name: todolist
  spec:
    hosts:
    - "*"
    http:
    - route:
      - destination:
          host: todolist
          subset: v1
        weight: 90
      - destination:
          host: todolist
          subset: v2
        weight: 10
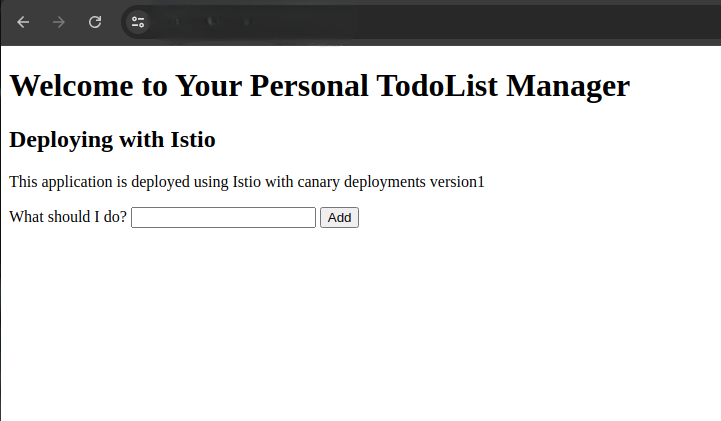
These YAML files set up a canary deployment where 90% of the traffic goes to
version1and 10% toversion2. Adjust the weights as necessary for your deployment strategy.
Set up SSL for Istio
Step 1: Install Cert-Manager
The default static configuration can be installed as follows:
kubectl apply -f https://github.com/cert-manager/cert-manager/releases/download/v1.15.1/cert-manager.yaml
Verify Cert-Manager Installation: Make sure the Cert-Manager pods are running.
kubectl get pods --namespace cert-manager
Step 2: Create a ClusterIssuer
Create a ClusterIssuer resource that Cert-Manager will use to request SSL certificates.
apiVersion: cert-manager.io/v1
kind: ClusterIssuer
metadata:
  name: letsencrypt-prod
spec:
  acme:
    server: https://acme-v02.api.letsencrypt.org/directory
    email: yakuphanbilgic3@gmail.com
    privateKeySecretRef:
      name: letsencrypt-prod
    solvers:
      - http01:
          ingress:
            class: istio
Step 3: Create a Certificate Resource
Create a Certificate resource to obtain the SSL certificate for your domain.
apiVersion: cert-manager.io/v1
kind: Certificate
metadata:
  name: todolist-cert
  namespace: istio-system
spec:
  secretName: todolist-tls
  issuerRef:
    name: letsencrypt-prod
    kind: ClusterIssuer
  commonName: example.domain.com
  dnsNames:
  - example.domain.com
Step 4: Configure Istio Gateway for TLS
Update the Istio Gateway to use the newly obtained SSL certificate.
apiVersion: networking.istio.io/v1alpha3
kind: Gateway
metadata:
  name: todolist-gateway
  namespace: default
spec:
  selector:
    istio: ingressgateway  # Use Istio's default ingress controller
  servers:
  - port:
      number: 443
      name: https
      protocol: HTTPS
    tls:
      mode: SIMPLE
      credentialName: istio-test-cert  # Secret created by Cert-Manager
    hosts:
    - example.domain.com

Conclusion
In this guide, we deployed a TodoList application with two versions using Istio for canary deployments. We configured a Kubernetes Service and Istio Gateway to manage traffic. Additionally, we set up SSL using Cert-Manager and Let's Encrypt to ensure secure communication. This setup provides a robust, secure, and scalable solution for managing application versions and traffic routing with Istio.
Subscribe to my newsletter
Read articles from Gopal Gautam directly inside your inbox. Subscribe to the newsletter, and don't miss out.
Written by

Gopal Gautam
Gopal Gautam
Hii I am a backend/DevOps engineer.I have a experience with development and automation.I mostly work with Python, django, Cloud based technologies.