Mastering Time Travel in Snowflake: Tips and Techniques
 John Ryan
First Published: 29th July 2024
This article will explain what you need to know about time travel in Snowflake. In addition to explaining what it is and how it works, we'll also discuss some of the best practices. This will include:
What is Snowflake Time Travel, and how it works
How Snowflake Time Travel impacts update statements
How is Time Travel related to snowflake data retention
What is Time Travel in Snowflake?
Time Travel is a powerful Snowflake feature that enables users to query and restore historical data that has been overwritten, deleted, or even dropped. Unlike on many database platforms, Snowflake Time Travel is automatically available by default on every table.
The primary purpose includes:
To allow users to write time travel queries against historical data that's been accidentally deleted or updated
To recover entire Databases, Schemas, or individual tables that have been dropped
Time Travel Example
Execute the following SQL
create table my_table (column_1   varchar);
insert into my_table values ('Test');
drop table my_table;
You can quickly recover the lost data by executing:
undrop table my_table;
The example above demonstrates that Time Travel is automatically available and can easily be used to recover from accidental data loss. However, it has some hidden implications, which we'll see below.
How Does Time Travel Work?
It is worth it to understand how the unique Snowflake Architecture works on three largely independent levels. The diagram below illustrates how Snowflake loads and stores data.
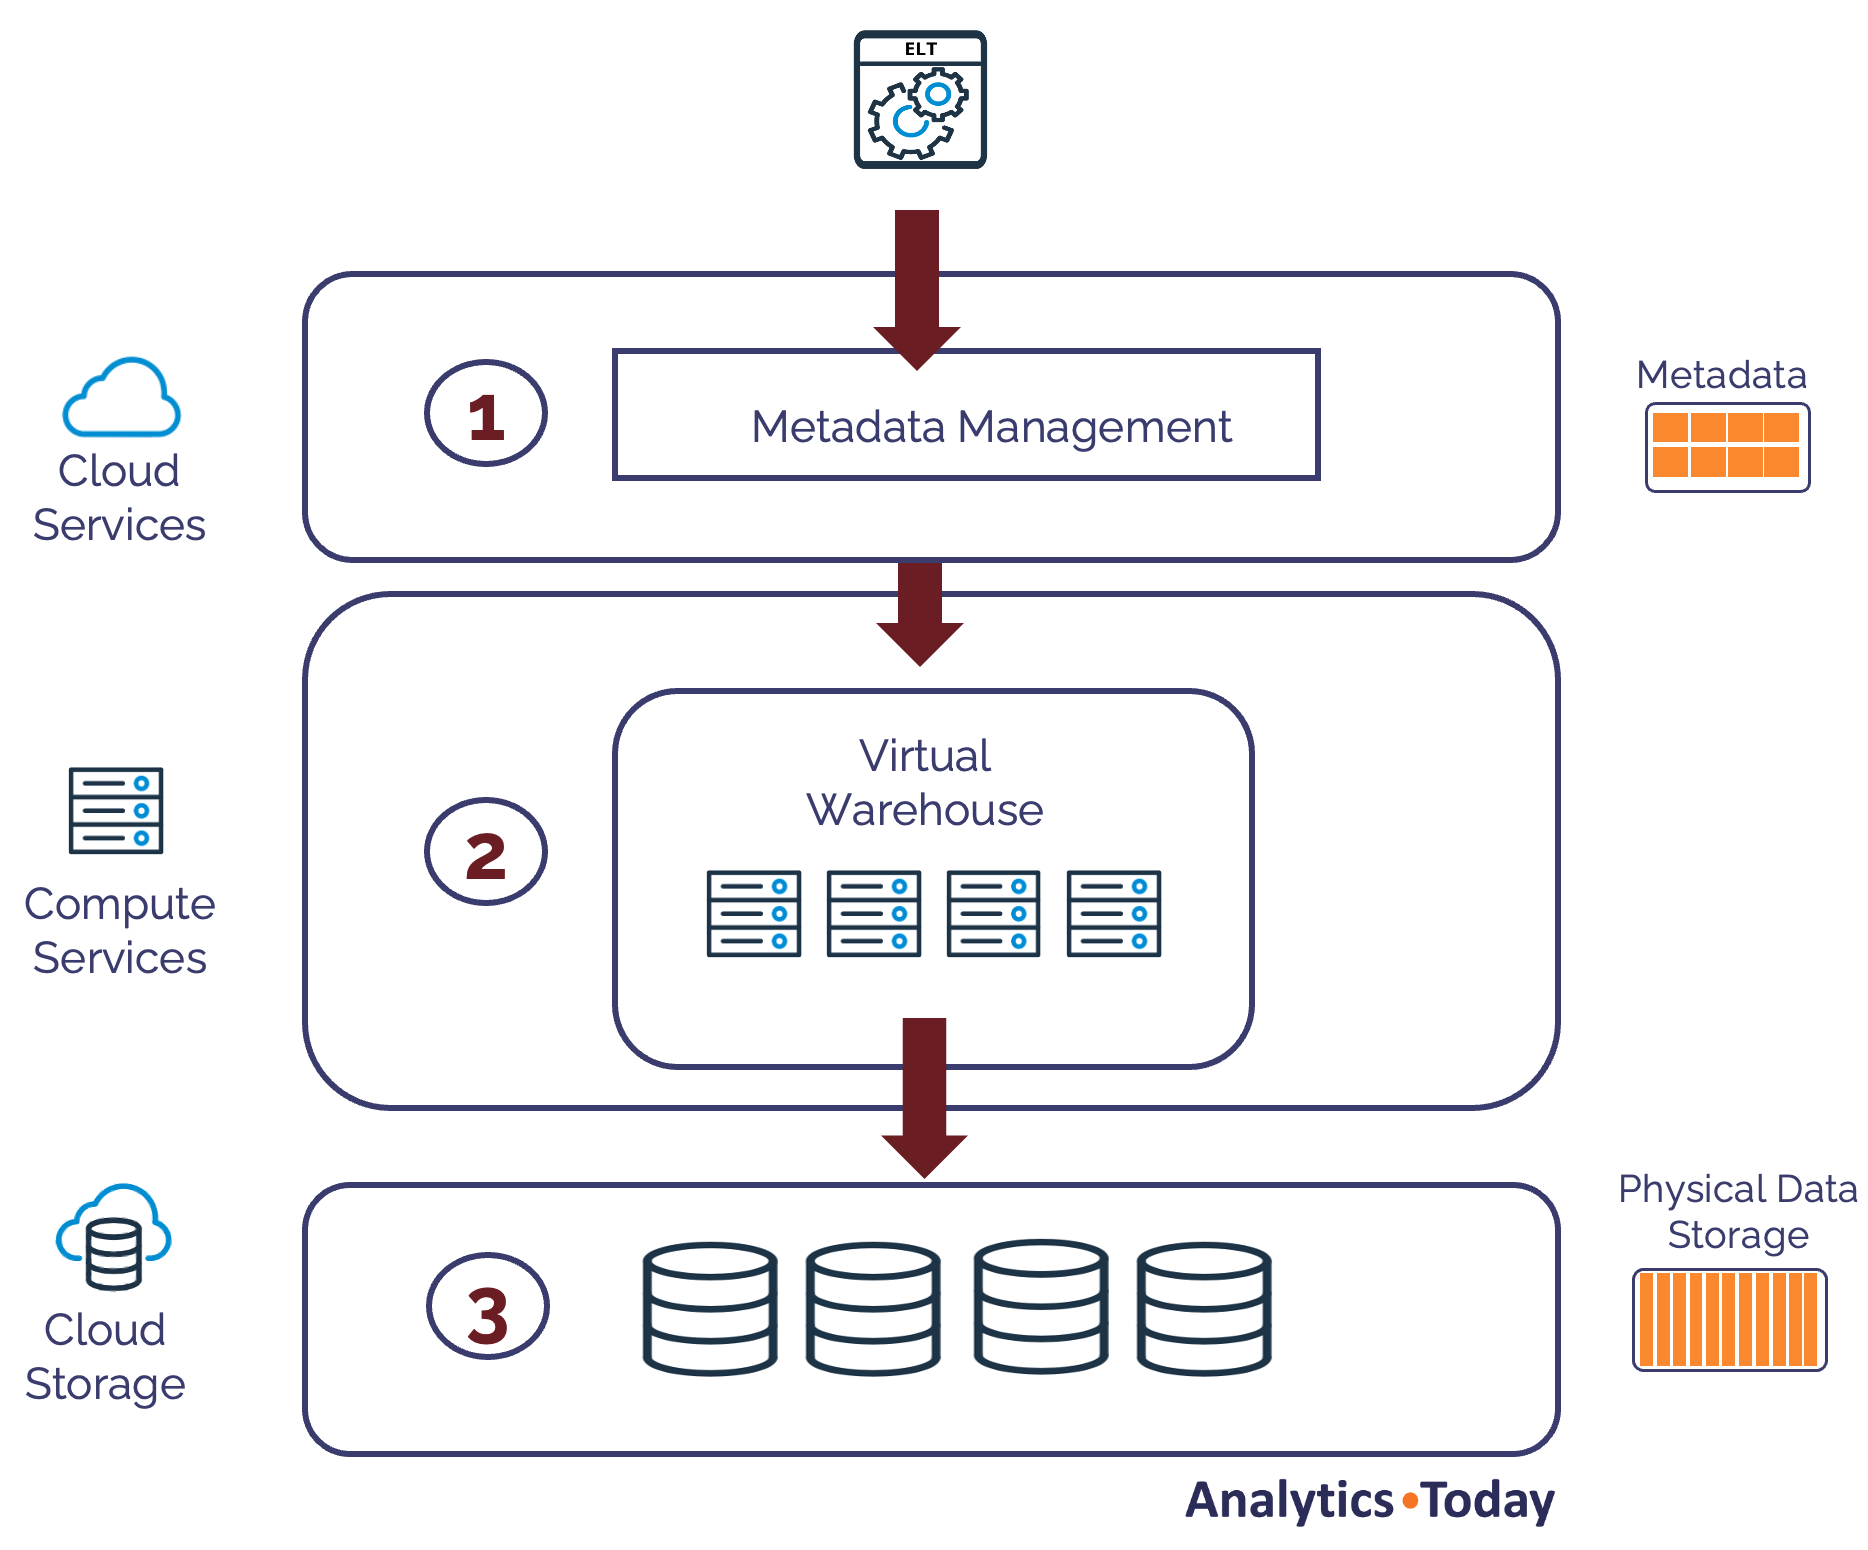
As the diagram above shows, data is first parsed in phase 1 using the Cloud Services layer, automatically capturing metadata statistics. The cost-based query optimizer later uses these to tune query performance.
In phase 2, the Virtual Warehouse organizes the data into 16MB micro-partitions. These are compressed, and the results are stored in phase 3, in Cloud Storage (on a hard disk).
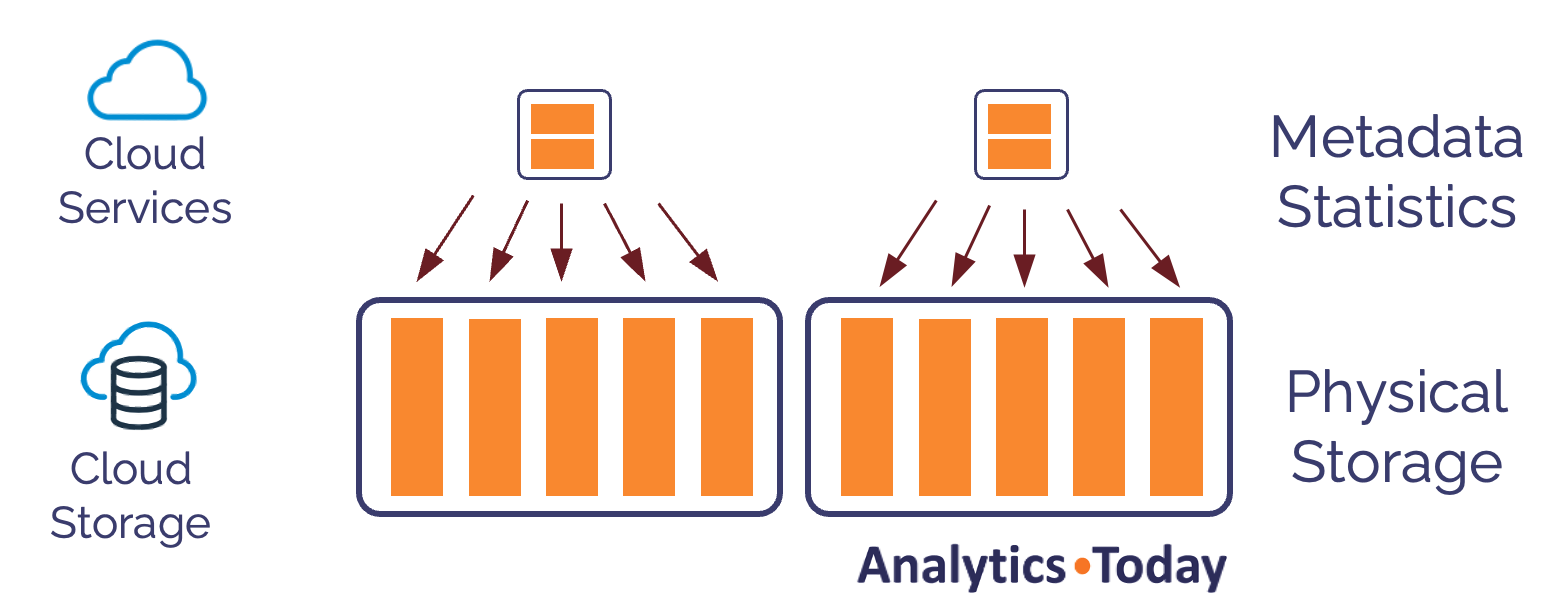
The critical insight is that data is held at two levels:
Cloud Services: This holds the metadata statistics for each micro-partition. This is usually tiny - perhaps a few kilobytes or megabytes at most. The metadata includes pointers to the physical data.
Cloud Storage: This holds the physical data, which, although highly compressed, can amount to terabytes or even petabytes.
The diagram below illustrates how Snowflake physically stores data in separate data stores with pointers from metadata to physical storage.
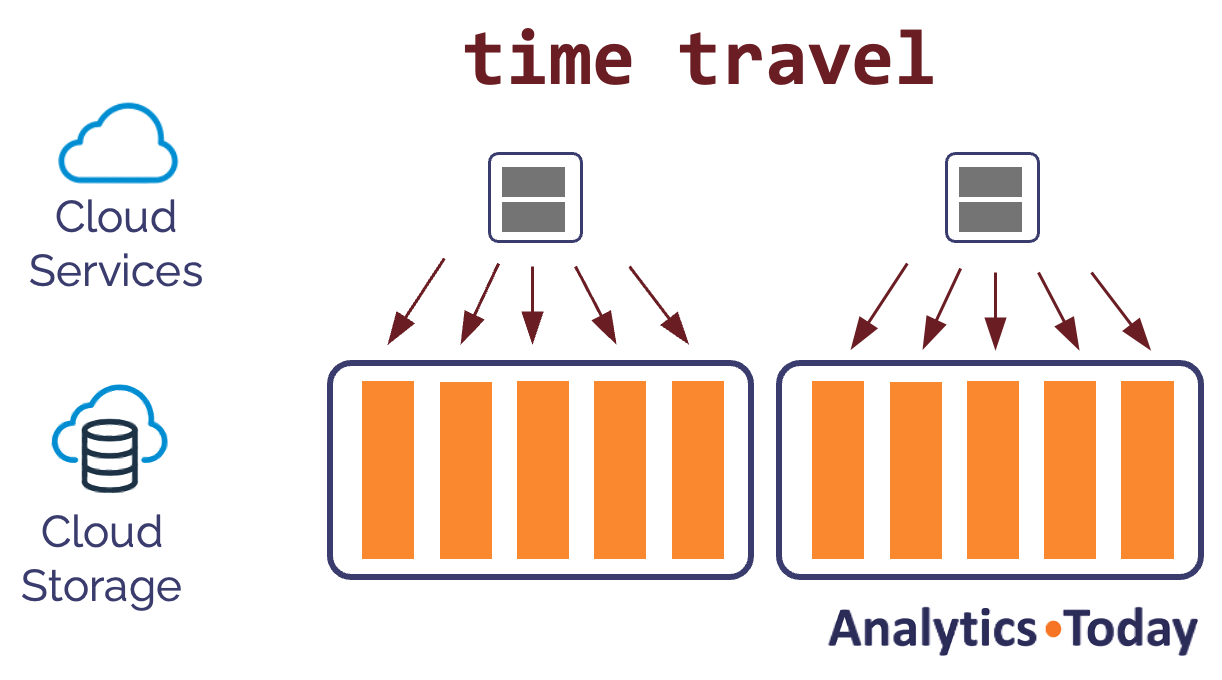
If we were to execute the following SQL statement, we'd expect it to overwrite the data and mark it as dropped.
drop table sales;
However, the diagram below shows how only the metadata is updated, which means you can drop huge multi-terabyte tables almost instantly.
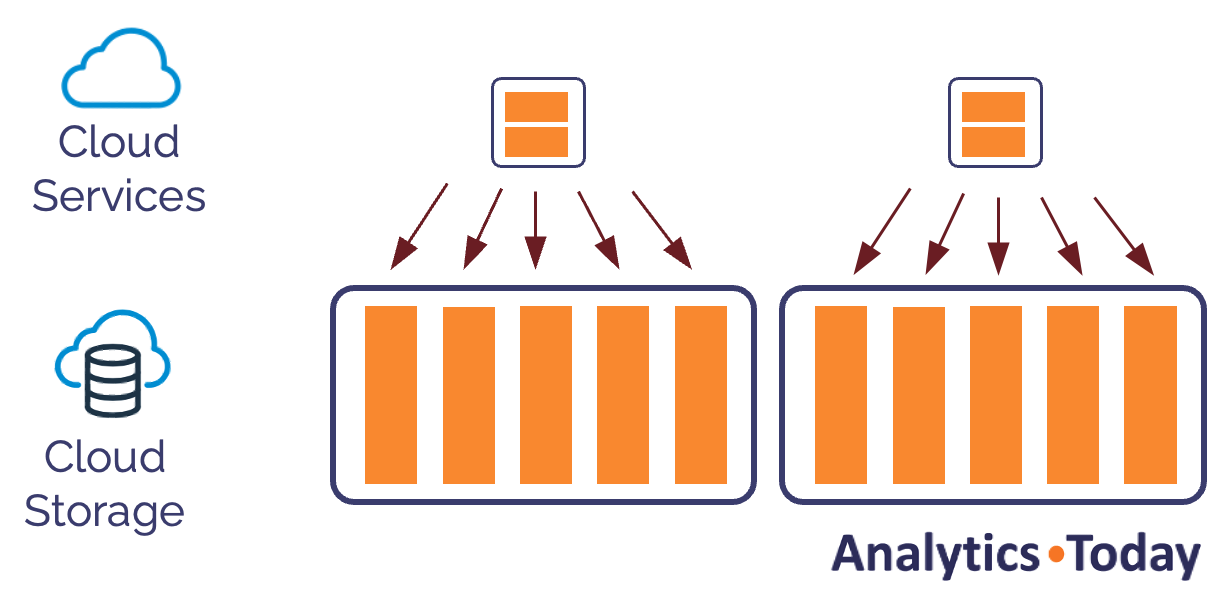
Equally, using the Snowflake undrop command, we can instantly restore the table to its previous state.
undrop table sales;
The diagram below shows how the undrop command instantly restores the metadata. Like the drop command, this completes within milliseconds, only affecting the Snowflake metadata.
Equally, you can undrop an individual table, a schema, or an entire database. For example:
undrop table sales;
undrop schema sales_data;
undrop database edw;
How Does Snowflake handle Updates?
Snowflake uses data versioning to track changed data. For example, the following query updates a small subset of data in the first micro partition.
update sales
set price = 4.25
where id = 30062049;
This is illustrated in the diagram below, which shows how Snowflake executes the update. The steps include:
Mark the original micro partition (v1) as held for Time Travel
Create a new version (v2) that contains the updated row.
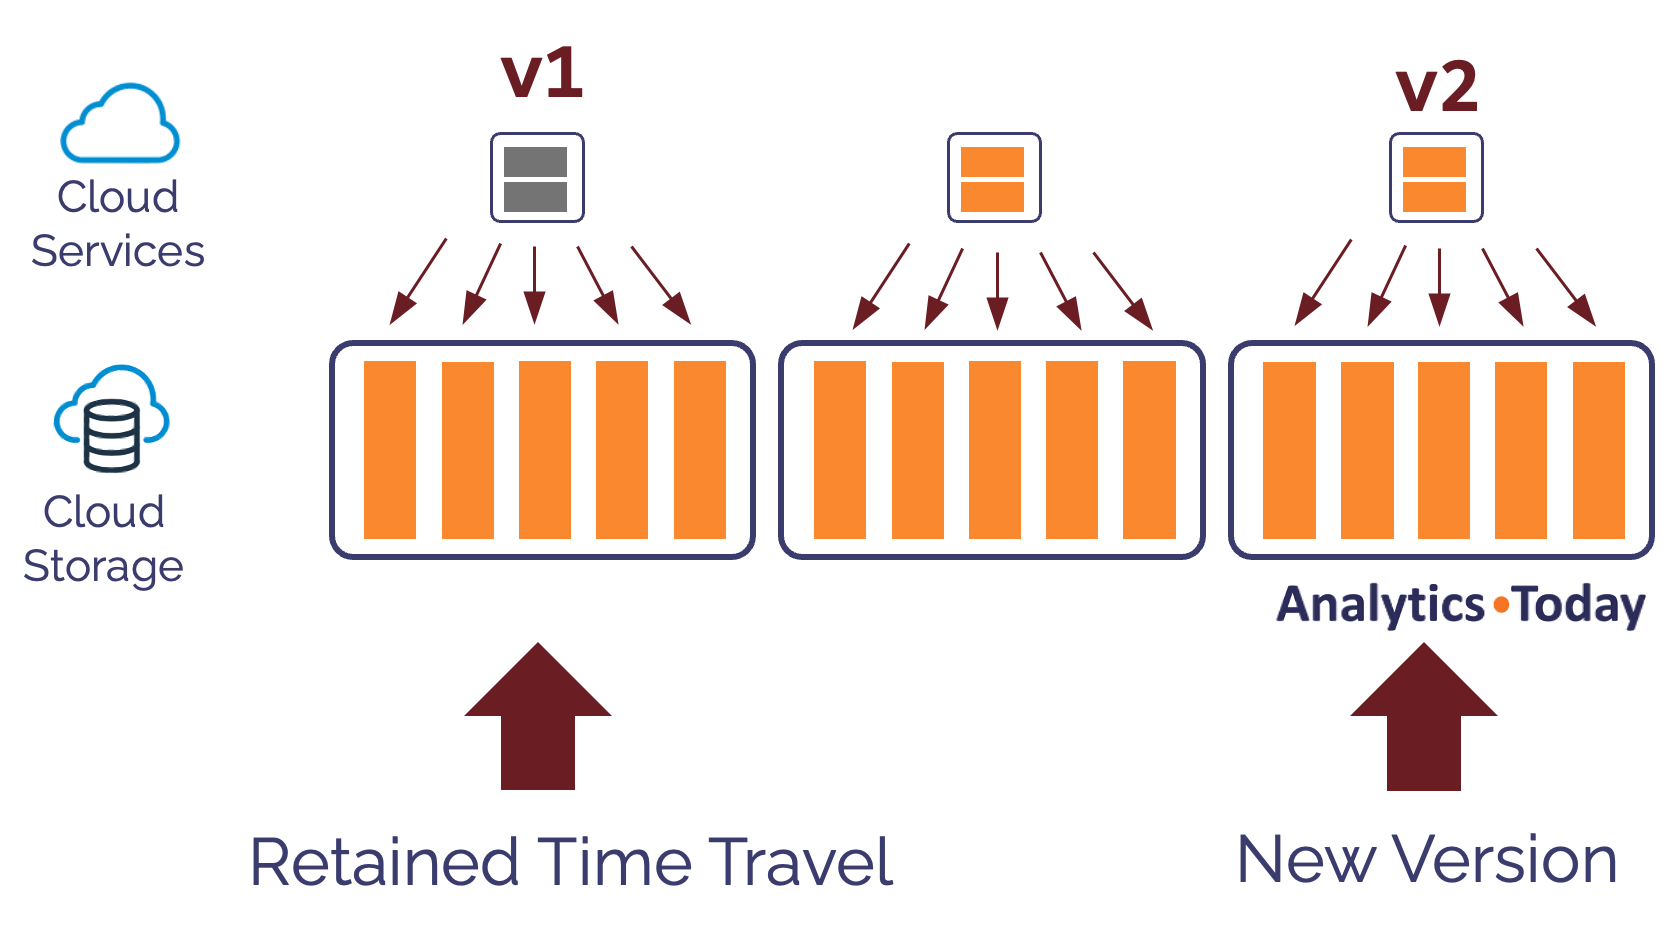
This method means Snowflake can support queries against historical records modified up to 90 days in the past.
Snowflake Time Travel Queries
As indicated above, Snowflake provides three methods to query historical data, even when that data has been modified. These include:
Query results as of a given timestamp.
Returns results from several seconds ago.
Return results before a given
STATEMENTwas executed.
For example, return results up to 60 seconds ago:
select *
from sales
at (offset => -60);
Return results at a given timestamp:
select *
from sales
at (timestamp = to_timestamp_ltz('2024-05-22 20:00:00.000'));
To return results before a SQL statement was executed:
select *
from sales
before (statement => '01b59ecc-0001-9c71-001c-998700b00b76';
Using Time Travel and Clones to Restore Data
In addition to querying the data in the past (which can be used to extract entries and update existing rows), it's possible to produce an instant snapshot copy at a point in time using the Snowflake CLONE statement.
For example, to restore a single table as it was 60 seconds ago, use:
create table sales_backup
clone sales
at (offset => -60);
To restore an entire schema and all the tables (for example, to take a backup on Monday at a point in time on Friday), use:
create schema sales_schema_backup
clone sales_schema
at (timestamp = to_timestamp_ltz('2024-05-22 20:00:00.000'));
Equally, creating a copy of an entire database, including all the schemas, tables, and underlying objects, is possible. This could be used, for example, to create a copy of a database for testing purposes:
create database edw_testing
clone edw
before (statement => '01b59ecc-0001-9c71-001c-998700b00b76';
Using the Snowflake Swap Command
Having restored the sales table to sales_backup you may then want to swap the contents of each table, which you'd typically do using a two-step rename command. However, you can instantly swap the contents of two tables as follows:
alter table sales
   swap with sales_backup;
Be aware, however, that the Snowflake clone command takes a snapshot copy of the table at a point in time without any version history. This means having swapped the sales and sales_backup clone, the new version of the sales table won't have any version history.
Identifying Dropped Tables
To list the tables available, you'd typically use the show tables command. However, if you use the show tables history command, you can list details for all tables, including dropped tables, provided they are still in Time Travel. For example:
show tables history;

select "database_name", "schema_name", "name", "rows", "bytes", "dropped_on"
from table(result_scan(last_query_id()))
where "dropped_on" is not null;
The above query uses the last_query_id() function to re-query the output of the show tables history command. In this case, it lists the two tables which have been dropped.

Time Travel: Snowflake Data Retention
Time Travel records the changed micro-partitions to support data recovery, and the data retention adds to the monthly storage bill. It's therefore essential to set limits, and this is done using the Snowflake parameter, DATA_RETENTION_TIME_IN_DAYS.
By default, every Snowflake table includes data retention of one day. However, this can be adjusted using:
alter table sales
  set data_retention_time_in_days = 7;
The above command will retain seven days of changes, instantly supporting the ability to recover from mistakes up to seven days ago. However, it's best practice to allow your Snowflake System Administrator to set this and maintain consistent values across the database.
Conclusion
In this article, we explained the basics of Snowflake Time Travel and the Snowflake parameter DATA_RETENTION_TIME_IN_DAYS. We discussed how Snowflake automatically retains the history of every change at the micro-partition level and how this can be used to query historical results and recover from data loss at the Table, Schema, and Database levels.
Finally, we saw how to set the data retention for a given table. In the following article, we'll discuss the best practices for data recovery, including Time Travel, Fail-Safe, and data retention.
If you found this article helpful, please share it on social media
.
Subscribe to my newsletter
Read articles from John Ryan directly inside your inbox. Subscribe to the newsletter, and don't miss out.
Written by

John Ryan
John Ryan
After 30 years of experience building multi-terabyte data warehouse systems, I spent five years at Snowflake as a Senior Solution Architect, helping customers across Europe and the Middle East deliver lightning-fast insights from their data. In 2023, he joined Altimate.AI, which uses generative artificial intelligence to provide Snowflake performance and cost optimization insights and maximize customer return on investment. Certifications include Snowflake Data Superhero, Snowflake Subject Matter Expert, SnowPro Core, and SnowPro Advanced Architect.

