Integrate Google Sheets as database with ExpressJS
 Fajar Chaniago
Google Sheets is a powerful tool often used for data storage and manipulation. While traditionally used for simple spreadsheet tasks, it can also serve as a database for web applications. This article will guide you through integrating Google Sheets as a database with an ExpressJS application.
Why Use Google Sheets as a Database?
Google Sheets offers several advantages:
Ease of Use: Its familiar interface makes it easy for non-developers to view and edit data.
Collaboration: Multiple users can work on the same sheet simultaneously.
Cost-Effective: For small to medium-sized applications, it can be a free alternative to traditional databases.
Prerequisites
Before we start, ensure you have the following:
Node.js and npm: Install from Node.js official website.
Google Cloud Account: To access Google Sheets API.
Google Sheet: Create spreadsheet
Step by Step
Step1 : Create Service Account
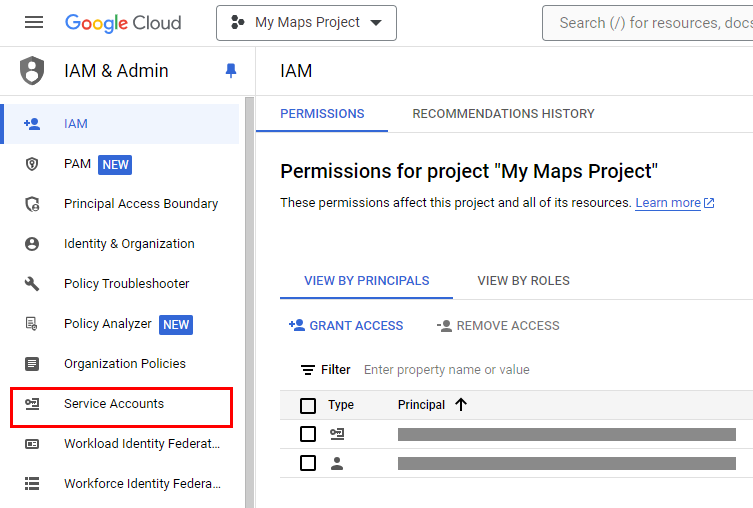
If you have already registered for Google Cloud account, go to Google Cloud IAM and admin. Klik Service accounts in the red box shown below, under the left side bar.
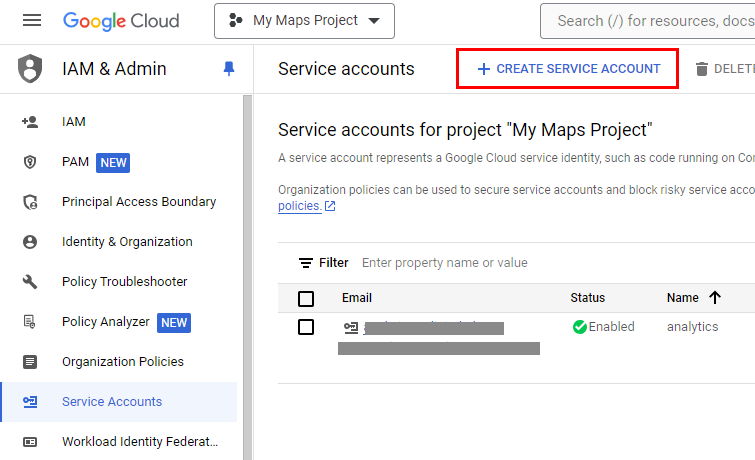
then, click on CREATE SERVICE ACCOUNT
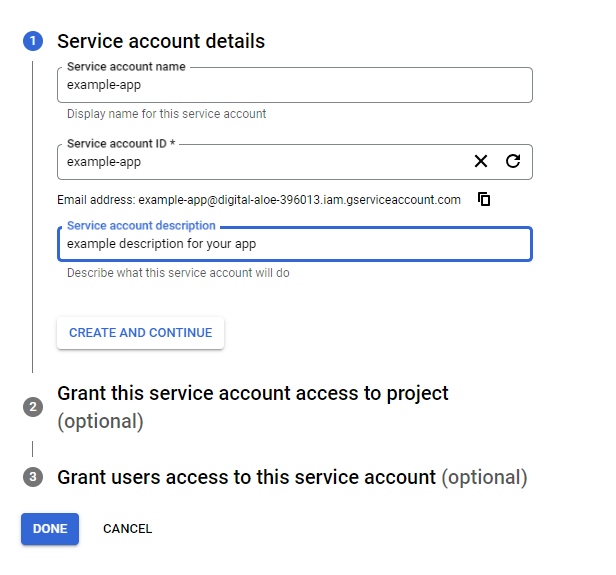
fill in the form provided
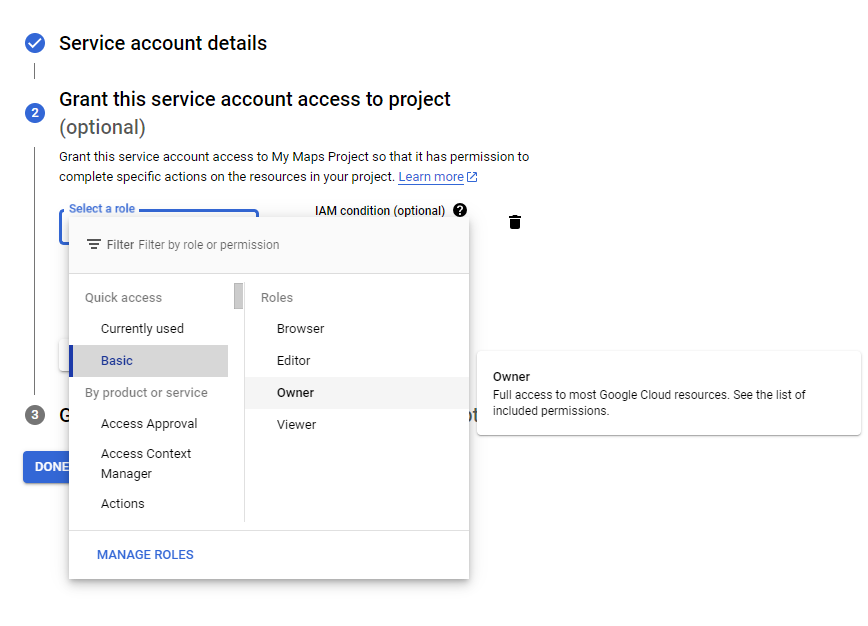
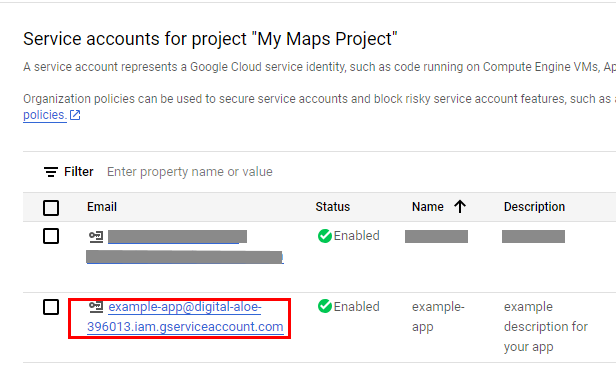
Once created, go to the service account detail as below.
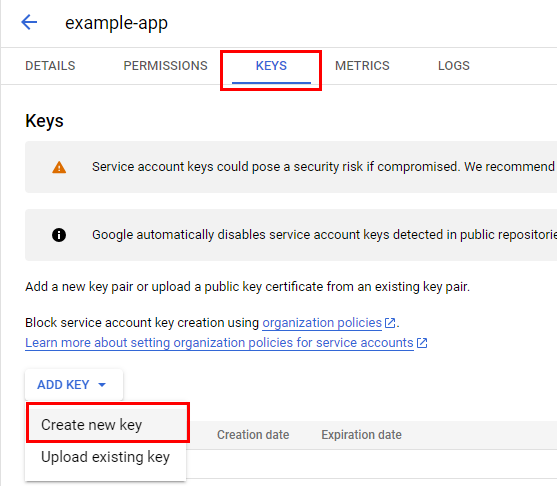
you must generate a key that, after being named, will be immediately downloaded in a JSON format into your computer's storage in order to connect the API from programs
Step2 : Set Up the Spreadsheet
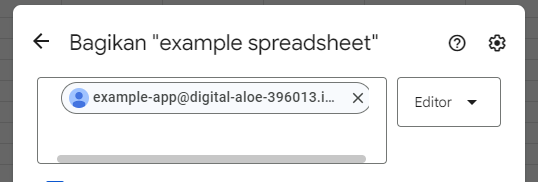
create a new spreedsheet, share the spreedsheet with the google account service that you have created earlier

Step3 : Create ExpressJS Project
Set Up the Project: Begin by creating a new directory for your project and initializing it with npm:
mkdir crud-spreadsheet
cd crud-spreadsheet
npm init -y
This will create a new directory called crud-spreadsheet and a package.json file, which will keep track of your project's dependencies and scripts.
Install Dependencies: You will need to install Express, Google APIs, and Body-Parser:
npm install express googleapis body-parser
Express: A minimal and flexible Node.js web application framework that provides a robust set of features for web and mobile applications.
Googleapis: A library that provides access to various Google APIs, including Google Sheets.
Body-Parser: A middleware to parse incoming request bodies in a middleware before your handlers, available under the
req.bodyproperty.
Project Structure: Your project structure should look like this:
crud-spreadsheet/
├── node_modules/
├── service-account.json
├── package.json
└── index.js
node_modules/: Directory where npm installs the packages.service-account.json: The JSON key file you downloaded from Google Cloud Console for your service account.package.json: File created bynpm initthat lists your dependencies and project details.index.js: The main file where you will write your Express application code.
Implement CRUD Operations: In index.js, implement the CRUD operations as follows:
const express = require('express');
const { google } = require('googleapis');
const bodyParser = require('body-parser');
const fs = require('fs');
const path = require('path');

const app = express();
const port = 4000;

// Middleware
app.use(bodyParser.json());

// Load service account credentials
const SERVICE_ACCOUNT_FILE = path.join(__dirname, 'service-account.json');
const credentials = JSON.parse(fs.readFileSync(SERVICE_ACCOUNT_FILE));

// Create an authorized client
const auth = new google.auth.GoogleAuth({
  credentials,
  scopes: ['https://www.googleapis.com/auth/spreadsheets']
});
const sheets = google.sheets({ version: 'v4', auth });

// Spreadsheet ID
const spreadsheetId = 'YOUR_SPREADSHEET_ID'; // Replace with your spreadsheet ID

// CREATE
app.post('/mahasiswa', async (req, res) => {
  const { name, nim, ipk } = req.body;

  if (!name || !nim || !ipk) {
    return res.status(400).send('All fields are required');
  }

  try {
    await sheets.spreadsheets.values.append({
      spreadsheetId,
      range: 'Sheet1!A1', // Replace with the appropriate range
      valueInputOption: 'USER_ENTERED',
      resource: {
        values: [[name, nim, ipk]],
      },
    });
    res.status(200).send('Data saved successfully');
  } catch (err) {
    console.error('Error inserting data:', err);
    res.status(500).send('Error saving data');
  }
});

// READ
app.get('/mahasiswa', async (req, res) => {
  try {
    const response = await sheets.spreadsheets.values.get({
      spreadsheetId,
      range: 'Sheet1!A2:C', // Replace with the appropriate range
    });

    const rows = response.data.values;
    if (rows.length) {
      res.status(200).send(rows);
    } else {
      res.status(404).send('No data found');
    }
  } catch (err) {
    console.error('Error reading data:', err);
    res.status(500).send('Error reading data');
  }
});

// UPDATE
app.put('/mahasiswa/:row', async (req, res) => {
  const { row } = req.params;
  const { name, nim, ipk } = req.body;

  if (!name || !nim || !ipk) {
    return res.status(400).send('All fields are required');
  }

  try {
    await sheets.spreadsheets.values.update({
      spreadsheetId,
      range: `Sheet1!A${row}:C${row}`, // Replace with the appropriate range
      valueInputOption: 'USER_ENTERED',
      resource: {
        values: [[name, nim, ipk]],
      },
    });
    res.status(200).send('Data updated successfully');
  } catch (err) {
    console.error('Error updating data:', err);
    res.status(500).send('Error updating data');
  }
});

// DELETE
app.delete('/mahasiswa/:row', async (req, res) => {
  const { row } = req.params;

  try {
    await sheets.spreadsheets.values.update({
      spreadsheetId,
      range: `Sheet1!A${row}:C${row}`, // Replace with the appropriate range
      valueInputOption: 'USER_ENTERED',
      resource: {
        values: [['', '', '']], // Clear the data
      },
    });
    res.status(200).send('Data deleted successfully');
  } catch (err) {
    console.error('Error deleting data:', err);
    res.status(500).send('Error deleting data');
  }
});

app.listen(port, () => {
  console.log(`Server running at http://localhost:${port}`);
});
Explanation:
Express Setup:
const express = require('express');andconst app = express();set up an Express application.app.use(bodyParser.json());adds middleware to parse JSON request bodies.
Google Sheets API Setup:
The service account credentials are loaded from the JSON file.
An authorized client is created using
google.auth.GoogleAuth.The Sheets API is initialized with the authorized client.
CRUD Operations:
CREATE: A POST request to
/mahasiswaappends a new row with the provided data.READ: A GET request to
/mahasiswaretrieves all rows starting from the second row.UPDATE: A PUT request to
/mahasiswa/:rowupdates a specific row with the provided data.DELETE: A DELETE request to
/mahasiswa/:rowclears the data in a specific row.
Another important thing you should remember for connection is the id of the google sheet you want to handle. You can find the id from the url of the google sheet and It looks like:
https://docs.google.com/spreadsheets/d/[your-sheet-id]/edit#gid=0
Step4 : Run Your Application
Now that we have our application code ready, we need to start our server and test the endpoints to ensure everything is working correctly. This step involves running the Node.js server, sending requests to the server, and verifying that the Google Sheets operations are performed as expected.
Start the Server: Open a terminal in the root directory of your project and run the following command to start the server:
node index.js
CREATE: Use Postman or another tool to send a POST request to /mahasiswa with a JSON body:
{
  "name": "John Doe",
  "nim": 123456,
  "ipk": 3.5
}
READ: Send a GET request to /mahasiswa.
UPDATE: Send a PUT request to /mahasiswa/:row with a JSON body to update a specific row:
{
  "name": "Jane Doe",
  "nim": 654321,
  "ipk": 3.8
}
Replace :row with the row number you want to update.
DELETE: Send a DELETE request to /mahasiswa/:row to delete a specific row.
Conclusion
Integrating Google Sheets with ExpressJS to perform CRUD operations is a powerful way to leverage the simplicity and accessibility of Google Sheets as a database. This method is particularly useful for small projects or for quickly prototyping applications where setting up a full database might be unnecessary. By following the steps outlined in this guide, you can easily set up a CRUD application and start managing your data with ease.
Subscribe to my newsletter
Read articles from Fajar Chaniago directly inside your inbox. Subscribe to the newsletter, and don't miss out.
Written by

Fajar Chaniago
Fajar Chaniago
suka bicarain tentang teknologi, security, tips & trick coding. subscribe untuk mendapatkan informasi menarik lainnya