Nx Angular Code Generators
 Lorenzo Zarantonello
Straight from the documentation, "Similar to the Angular CLI, Nx comes with code generation abilities. What the Angular CLI calls 'Schematics,' Nx calls 'Generators.'"
Shortly: Angular Schematics = Nx Generators
So, basically, Nx generators help you create code and scaffolding like components, libraries, etc.
The command npx nx list @nx/angular offers a list of Nx Generators capabilities. The full list includes more generators and some executors/builders related to webpack and module federation.

Partial list of Nx Generators capabilities
You can also find similar features by installing the Nx Console extension for your code editor. the Nx console supports VSCode, and IntelliJ, and ships an LSP for Vim.

It doesn’t matter if you are working specifically on an Nx angular standalone application or a monorepo, I highly recommend you install it. It will simplify your job and it will come useful later in the section “Step 1 — Create Component In Library”.
Generating Angular Components
You can generate an Angular component with
npx nx g @nx/angular:component hello-world
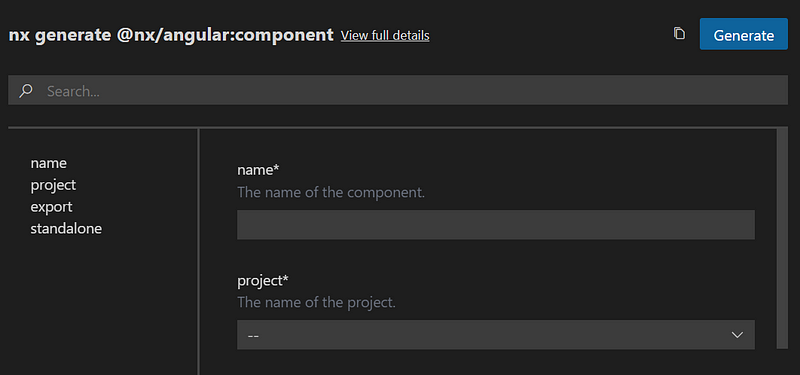
or using the Nx Console Extension:

Generate Angular component with Nx Console Extension
This is exactly like Angular CLI where you would use ng g c hello-world to create a HelloWorldComponent inside the app directory.
The only difference is that the selector will start with nxapp- instead of app-. Other than that, you can import the component in the template as usual.
// app.component.html

<nxapp-hello-world></nxapp-hello-world>
Testing Components
If you import HelloWorldComponent in AppComponent remember to update AppComponent unit test to make it aware of the new component used in its template.
Update app.component.spec.ts as follows:
// app.component.spec.ts

...
import { HelloWorldComponent } from './hello-world/hello-world.component';

describe('AppComponent', () => {
  beforeEach(async () => {
    await TestBed.configureTestingModule({
      imports: [RouterTestingModule],
      declarations: [AppComponent, NxWelcomeComponent, HelloWorldComponent],
    }).compileComponents();
  });
  ...

  it('should render title', () => { }
  it(`should have as title 'nxapp'`, () => {}
}
Then you can run:
npx nx test
to run all unit tests. Or, if you prefer running a single unit test:
$ npx nx test nxapp --test-file=src/app/app.component.spec.ts
where you have to specify the project name and the name of the test file you want to run.
This is a simple case but to keep the app structured we should follow Nx practices when creating new components and features.
As a rule of thumb, a well-architected Nx app has a library folder, also called libs or features or modules, where features reside. Even though we are working specifically on an Nx angular standalone application, the same principles hold for Nx React or monorepo.
Generating Angular Libraries
You can generate an Nx Angular library using the following syntax
npx nx g @nx/angular:library library-name
It is important to understand that in the Nx world, a library is something like a feature or a module. In this post, I will use the term library and lib interchangeably, however, you might see a module or feature folder in other codebases.
For the sake of structure, we will create a libs folder that contains all libraries (features/modules) we need.
Thinking of a company that engages with both business and private customers, we may want to structure libraries accordingly.
First, we create two libraries for business relationships (clients and suppliers), then we’ll create one more library for private customers (clients).
npx nx g @nx/angular:library clients --directory=libs/business
npx nx g @nx/angular:library suppliers --directory=libs/business
npx nx g @nx/angular:library clients --directory=libs/private
Nx will automatically place the libraries inside the libs folder. Since this is an Nx Angular Standalone Application, the src folder at the root level is the Angular standalone application.
All libraries can be used by the Angular app, therefore, we place the libs folder as a peer of src. We get to the following architecture:
e2e/
libs/
  business/
    clients/
    suppliers/
  private/
    clients/
src/
project.json
tsconfig.spec.json
tsconfig.app.json
tsconfig.json
nx.json
package.json
...
In so doing we get to independent local libraries that can be tested and built independently.
This principle applies to Nx angular standalone applications as well as Nx React or monorepo.
Testing Libraries
For instance, you can run
npx nx test nxapp --test-file=libs/business/clients
to test only the Clients library.
As usual, if you re-run the command without changing anything Nx will use the cached results to give you a faster response.
Keeping Libraries Independent
As mentioned above, keeping libraries independent from each other is a good practice. When some code should be used in multiple libraries, you should create a shared library folder containing the shared code.
npx nx g @nx/angular:library shared
The code above generated a shared library folder inside the libs folder.
The current architecture becomes:
e2e/
libs/
  business/
    clients/
    suppliers/
  private/
    clients/
  shared/
src/
project.json
tsconfig.spec.json
tsconfig.app.json
tsconfig.json
nx.json
package.json
...
Now, since we created independent libraries and we are not using them in AppComponent, they can be visualized as distinct nodes in the workspace.
Nx Graph
Nx comes with a good visualization tool out of the shelf: graph.
Nx creates a graph of all the dependencies between projects in your workspace using two sources of information:
package.json
Typescript import statements
By running
npx nx graph
we get to the following view:

Nx dependency graph
So far, the only dependency is the e2e test suite which depends on the app.
While the e2e test suite depends on the app (nxapp), the app doesn’t depend on the tests.
Moreover, as reported by Victor Savkin (Nx co-founder), The building of the app and the running of the e2e tests don’t have to happen at the same or on the same machine. One machine can build the application and another one can run the tests.
Subscribe to my newsletter
Read articles from Lorenzo Zarantonello directly inside your inbox. Subscribe to the newsletter, and don't miss out.
Written by
