Boosting Sighted Accessibility: Building a Python GitHub Action
 Sadra Yahyapour
It's been a couple of months since I created PyActon, an open-source tool that allows you to create GitHub Actions using Python. With this tool, you can install and use any Python package or library within your CI/CD pipelines.
The implementation described in this article is live hosted on GitHub.
You can use it with GitHub's official action/cache action to cache your action's dependencies. This is helpful when working with environments that have many or large dependencies that take time to load. This way, you can quickly get TensorFlow running inside your pipelines! We're not going to use it today though as our action is quite light and fast in terms of response.
In this article, we'll create a new action using PyAction that triggers when an issue is opened or reopened. It will read the issue data, use Sighted to analyze the text in the issue form, and finally, display the result as a comment based on the analysis.
Installation
Let's install both pyaction and sighted. They both require you to have pip and Python >= 3.8 installed.
pip install "pyaction[cli" sighted
To get started, we use the init command in pyaction to provide a base template for our action.
pyaction init
🎤 Action name
   Sighted Action
🎤 Action's slug
   sighted-action
🎤 Short description
   Turning your issue content into bionic text
🎤 Author's name
   Sadra Yahyapour
🎤 Include workflow testing pipeline
   Yes
Change the current directory to the action's path.
cd sighted-action/
Development
We need to interact with the repository issues meaning we need to have access to the issue ID. Our action doesn't have any user-related inputs. Let's start with the action.yml file. I need to add one input and one output.
inputs:
  ...
  issue_number:
    description: The id of the issue
    required: true

outputs:
  bionic_text:
    description: The converted bionic text
Leave the rest of the file as it is. Add the moment, we're using sighted==0.0.4. Add it to the requirements.txt file.
...
sighted==0.0.4
Create .github/ISSUE_TEMPLATE/sighted_text.yml file. It contains the structure of the issue template.
name: Sighted Text
description: Using Sighted to convert your input into Markdown bionic text
title: "Sighted: Bionic Text"
body:
  - type: textarea
    attributes:
      label: Text
      description: Write or paste your text here
    validations:
      required: true
  - type: dropdown
    id: color
    attributes:
      label: Color
      description: Set the color for fixations
      options:
        - Gray
        - Light Gray
        - Dark Gray
        - Red
        - Yellow
        - Green
      default: 1
  - type: dropdown
    id: fixation
    attributes:
      label: Fixation
      description: Set the fixation
      options:
        - 1
        - 2
        - 3
        - 4
        - 5
      default: 1
  - type: dropdown
    id: saccade
    attributes:
      label: Saccade
      description: Set the saccade
      options:
        - 1
        - 2
        - 3
        - 4
        - 5
      default: 0
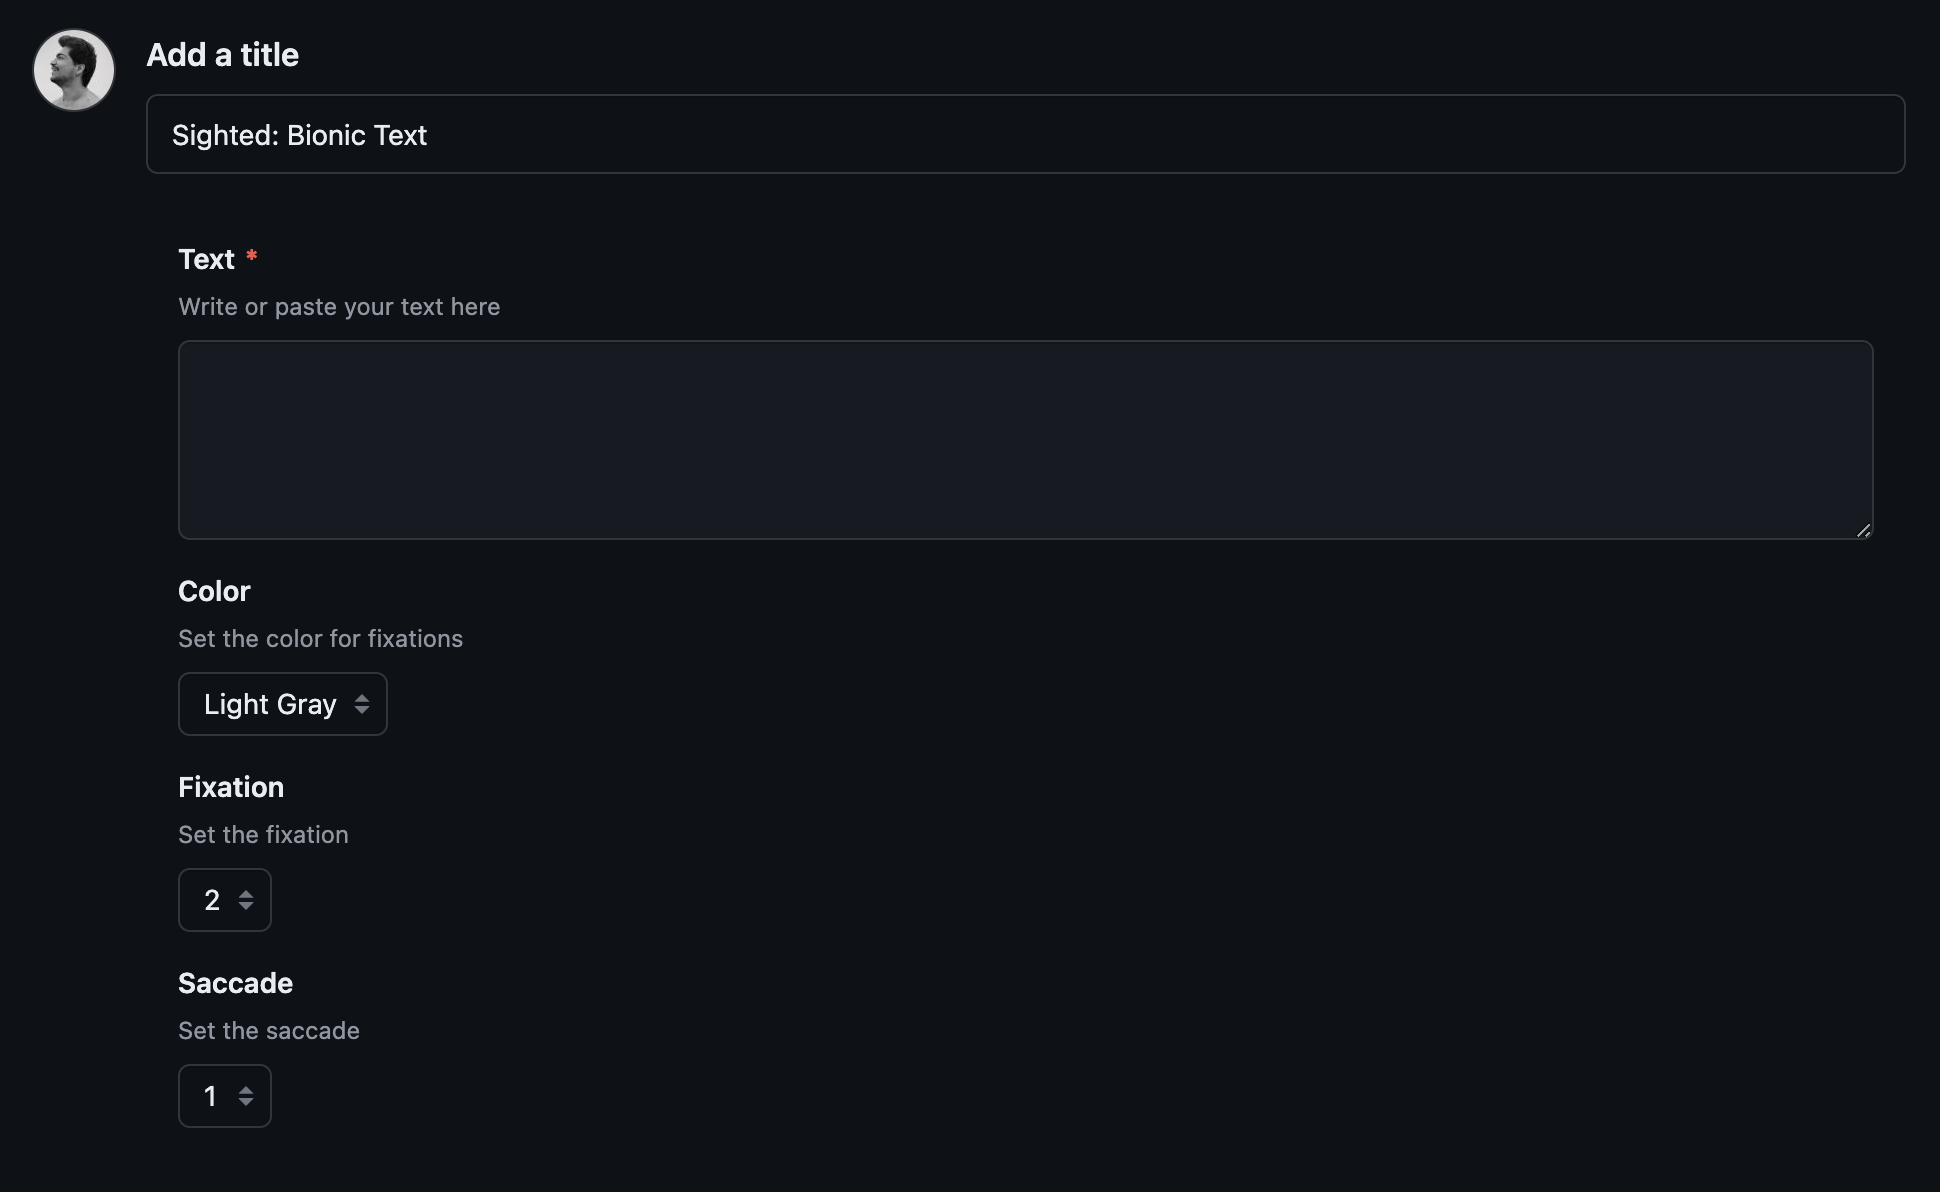
Issue template allows you to design a form and force users to fill the form if they want to open any issue on your repository. The above template would create something like this in the issues tab.

We're almost there. All we need to do is to implement the actual action and make it usable by completing the .github/workflows/test.yml pipeline.
Open the main.py file and import the following sighted components.
from string import Template               # new

from pyaction import PyAction
from pyaction.auth import Auth            # new
from pyaction.issues import IssueForm     # new
from sighted import Literal               # new
from sighted.language import PoS          # new
Notice we're importing pyaction.auth.Auth and pyaction.issues.IssueForm. We need the IssueForm class to pass it an Auth object and interact with the issues.
We're going to use LaTeX to colorize text in GitHub's markdown platform. You probably know, there is no way you could colorize a text in your markdown unless you use LaTeX. That's not a common way, but for the sake of experiments, that's fine.
For that matter, we need this const variable defined.
...
COLORS = {
    "Gray": "{gray}",
    "Light Gray": "{lightgray}",
    "Dark Gray": "{lightgray}",
    "Red": "{red}",
    "Yellow": "{yellow}",
    "Green": "{green}",
}
Let's focus on the main function. Consider this one.
...
workflow = PyAction()

@workflow.action()
def my_action(github_token: str, repository: str, issue_number: int) -> None:
    auth = Auth(token=github_token)

    repo = auth.github.get_repo(repository)
    user_input = IssueForm(repo=repo, number=issue_number).render()

    language = Literal(
        text=user_input["Text"],
        fixation=int(user_input["Fixation"]),
        saccade=int(user_input["Saccade"]),
        ignore_pos=[PoS.PUNCT],
    )

    color = COLORS[user_input["Color"]]
    prefix, postfix = f"$`\color{color}", "`$"

    transformed_text = language.transform(
        template=Template(f" $`$fix`$${prefix}$unfix{postfix}")
    )

    workflow.write({"bionic_text": "".join(list(transformed_text))})
It first reads the issue. Serializes that and takes Text, Fixation, Saccade, and Color. Then it creates prefix and postfix based on the color. Finally, the whole bionic transformed content will be returned under the variable name of bionic_text.
Open the .github/workflows/test.yml. Paste the following workflow steps.
name: Testing

on:
  issues:
    types: [opened, reopened]

jobs:
  Test:
    runs-on: ubuntu-latest
    name: Testing the action
    steps:
      - name: Checkout
        uses: actions/checkout@v2

      - name: Create processing comment
        uses: peter-evans/create-or-update-comment@v4
        id: comment
        with:
          issue-number: ${{ github.event.issue.number }}
          body: Processing..

      - name: Running the action
        uses: ./
        id: sighted
        with:
          issue_number: ${{ github.event.issue.number }}

      - name: Update comment
        uses: peter-evans/create-or-update-comment@v4
        with:
          comment-id: ${{ steps.comment.outputs.comment-id }}
          body: ${{ steps.sighted.outputs.bionic_text }}
          reactions: rocket
          edit-mode: replace
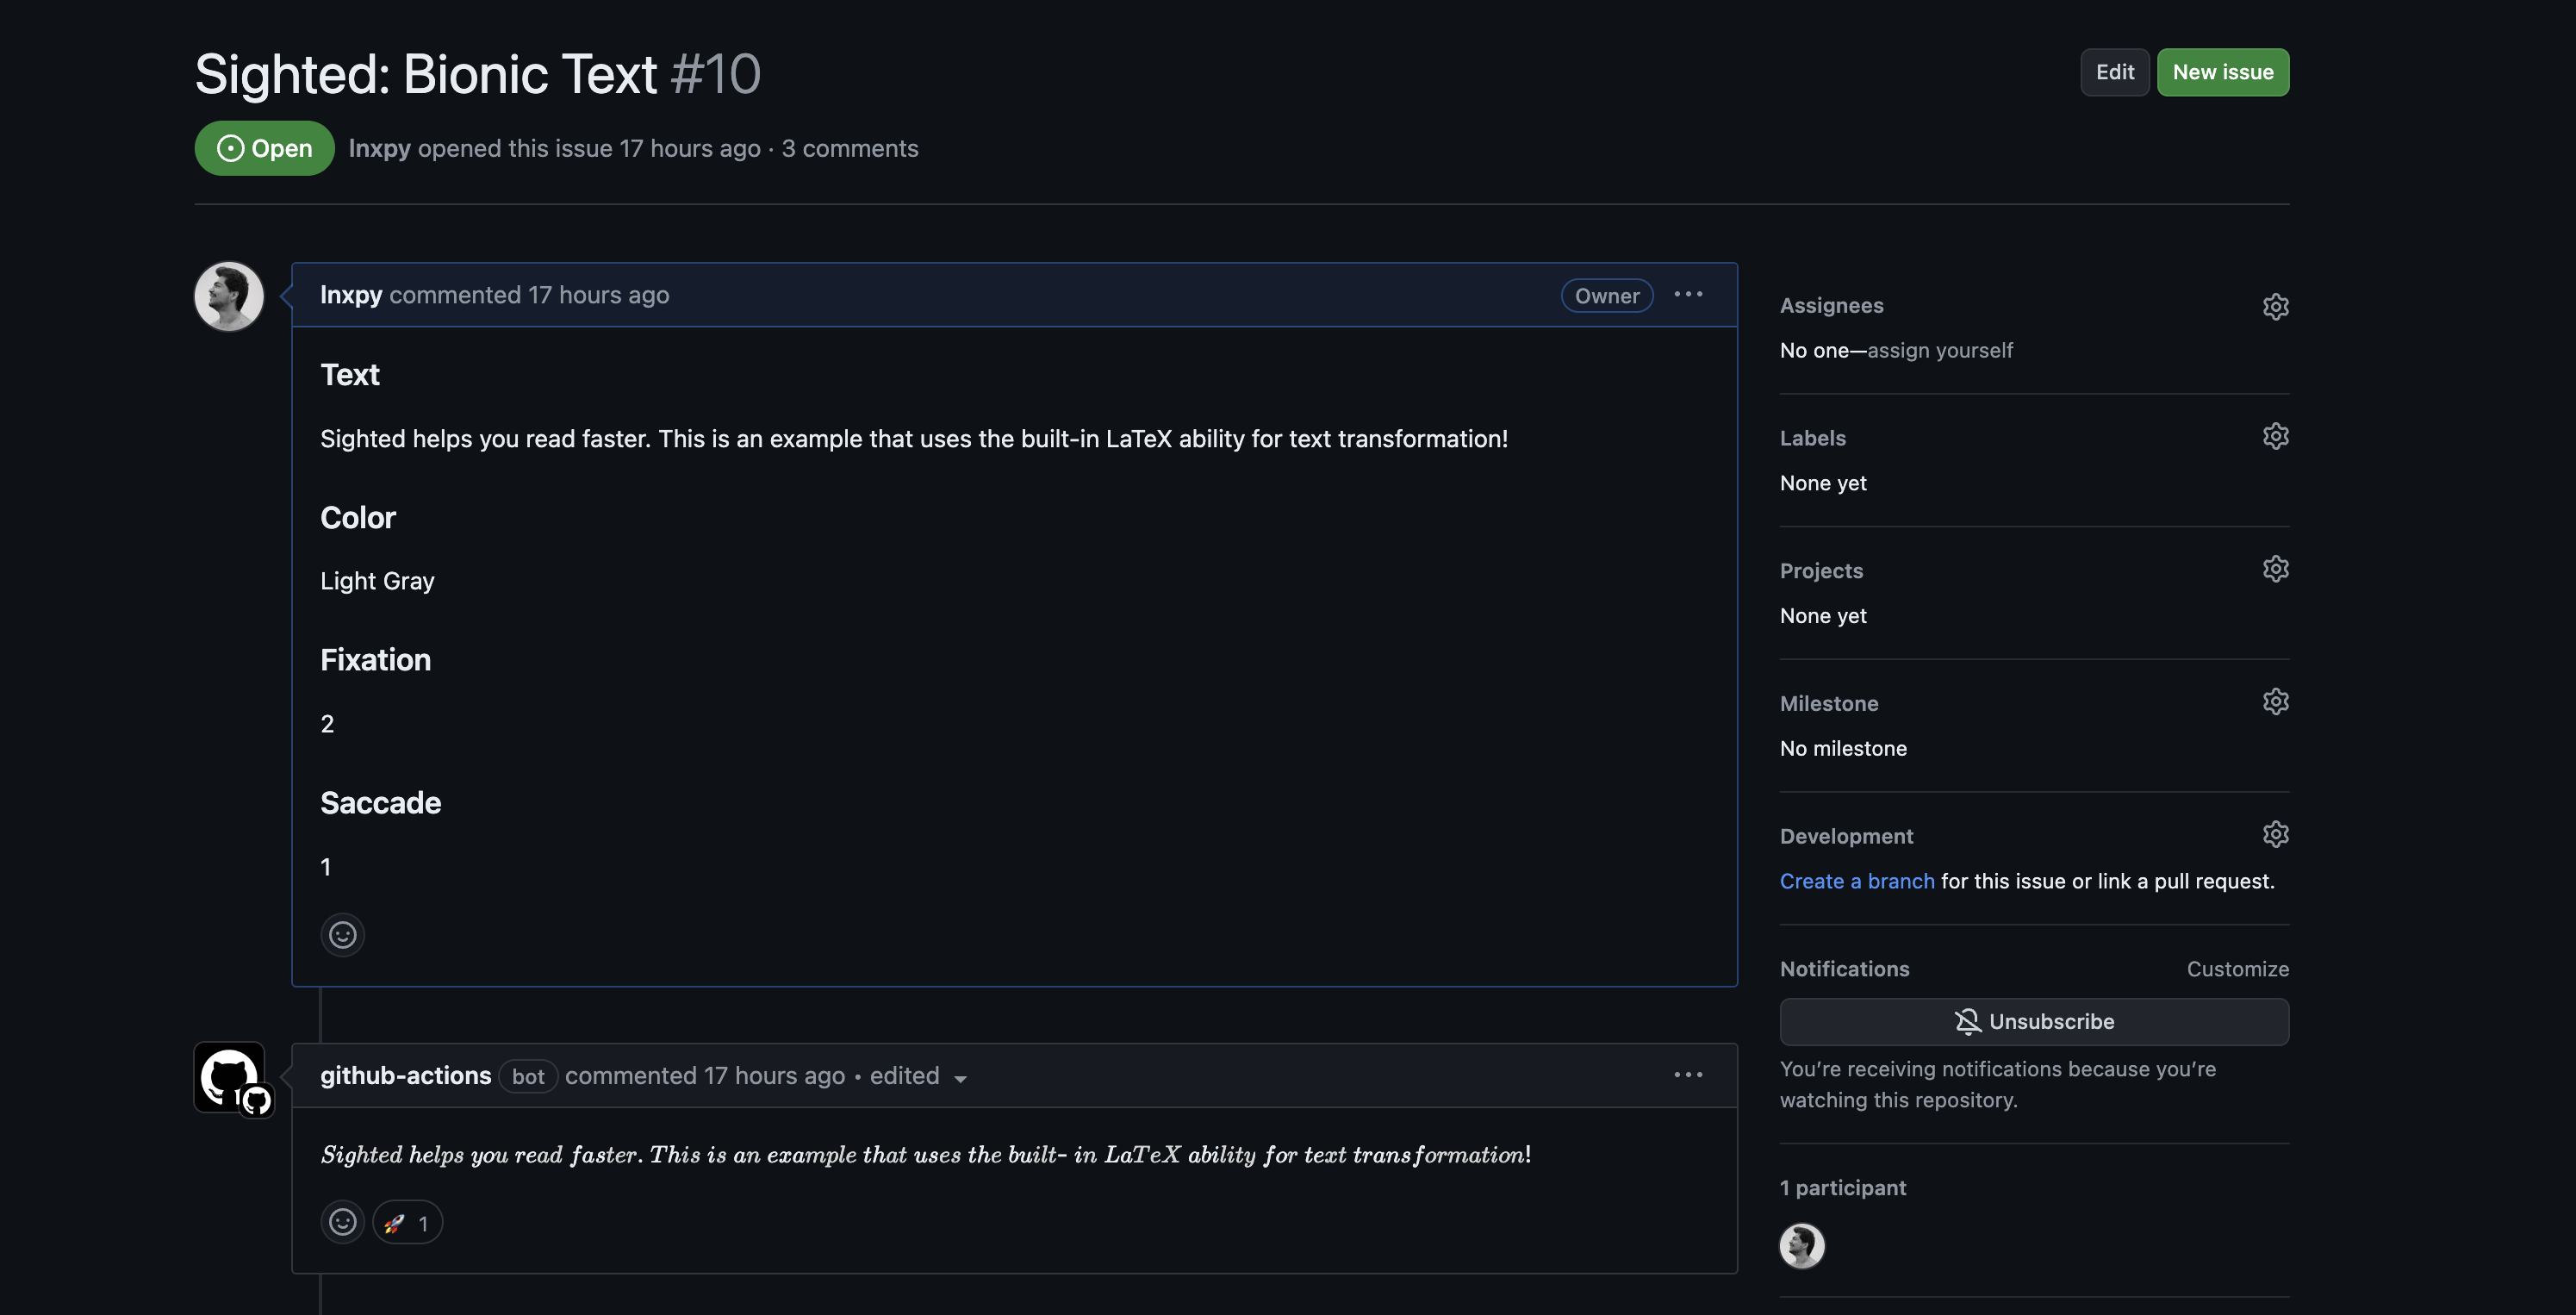
It gets triggered whenever an issue gets opened or reopened. Creates a comment in the issue form. Runs the action. Updates the comment that it just created. Here is the result.

Hopefully, you enjoyed this practice!
Conclusion
In this article, we created a GitHub Action using PyAction that triggers when an issue is opened or reopened, reads the issue data, uses Sighted to analyze and transform the text into bionic text, and displays the result in a comment. We walked through the installation, setup, and development process, including defining inputs and outputs, creating an issue template, implementing the main functionality with Python imports, and setting up a GitHub workflow to automate the process.
Subscribe to my newsletter
Read articles from Sadra Yahyapour directly inside your inbox. Subscribe to the newsletter, and don't miss out.
Written by

Sadra Yahyapour
Sadra Yahyapour
A passionate software developer who enjoys sharing his thoughts with others and learning from them vise versa!