AWS Cloud Resume API Challenge
 Linet Kendi
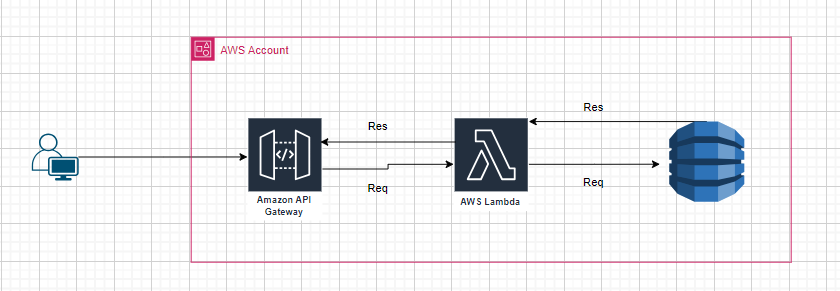
Architecture of the Mini-application
Step 1: Create a DynamoDB Table
Go to the AWS Management Console.
Navigate to DynamoDB and create a new table.
Table name:
ResumesPrimary key:
id(String)
Step 2: Add Resume Data to DynamoDB
Create a Python script to add your resume data to the DynamoDB table. Here’s an example script:
Python
import boto3
import json

# Initialize a session using Amazon DynamoDB
dynamodb = boto3.resource('dynamodb', region_name='us-east-1')

# Select your DynamoDB table
table = dynamodb.Table('Resumes')

# Sample resume data
resume_data = {
    'id': '1',
    'name': 'Linet Kendi',
    'email': 'linet.kkendi@gmail.com',
    'phone': '123-456-7890',
    'education': 'B.Sc. in Computer Science',
    'experience': [
        {
            'company': 'Dell Technologies',
            'role': 'Technical Engineer',
            'years': '2023-Present'
        },
        {
            'company': 'Computech',
            'role': 'Junior System Engineer',
            'years': '2021-2023'
        }
    ],
    'skills': ['Python', 'AWS', 'DynamoDB', 'Lambda']
}

# Add the resume data to the table
table.put_item(
    TableName='Resumes',
    Item=resume_data
)

print("Data inserted successfully")
You should be able to see the item in your Table like attached screenshot

Step 3: Create an AWS Lambda Function
Go to the AWS Management Console.
Navigate to Lambda and create a new function.
Function name:
GetResumeRuntime: Python 3.x
Role: Create a new role with basic Lambda permissions
Add the following code to your Lambda function:
import json
import boto3
from boto3.dynamodb.conditions import Key

def lambda_handler(event, context):
    # Initialize a session using Amazon DynamoDB
    dynamodb = boto3.resource('dynamodb')

    # Select your DynamoDB table
    table = dynamodb.Table('Resumes')

    # Fetch the resume with ID = 1
    response = table.query(
        KeyConditionExpression=Key('id').eq("1")
    )

    # Check if the item exists
    if 'Items' in response and len(response['Items']) > 0:
        resume = response['Items'][0]
        return {
            'statusCode': 200,
            'body': json.dumps(resume)
        }
    else:
        return {
            'statusCode': 404,
            'body': json.dumps({'error': 'Resume not found'})
        }
Step 4: Setup API Gateway Using the GUI
https://gatete.hashnode.dev/build-an-end-to-end-http-api-with-aws-api-gateway - review more on creating API gateway.
curl -v https://a334k0vzma.execute-api.us-east-1.amazonaws.com/dev/resume
Test out the API endpoint and alas it works - The function returns the resume details from Dynamo tables. see screenshot below

Step 4: Setup GitHub Actions
GitHub Actions: Automatically package and deploy your Lambda function on every push to the repository.
Use the below Link for Guidance
My GitHub Deployment file is as below.
name: deploy to lambda
on: [push]
jobs:

  deploy_source:
    name: deploy lambda from source
    runs-on: ubuntu-latest
    steps:
      - name: checkout source code
        uses: actions/checkout@v3
      - name: default deploy
        uses: appleboy/lambda-action@v0.2.0
        with:
          aws_access_key_id: ${{ secrets.AWS_ACCESS_KEY_ID }}
          aws_secret_access_key: ${{ secrets.AWS_SECRET_ACCESS_KEY }}
          aws_region: us-east-1
          function_name: GetResume
          source: lambda_function.py
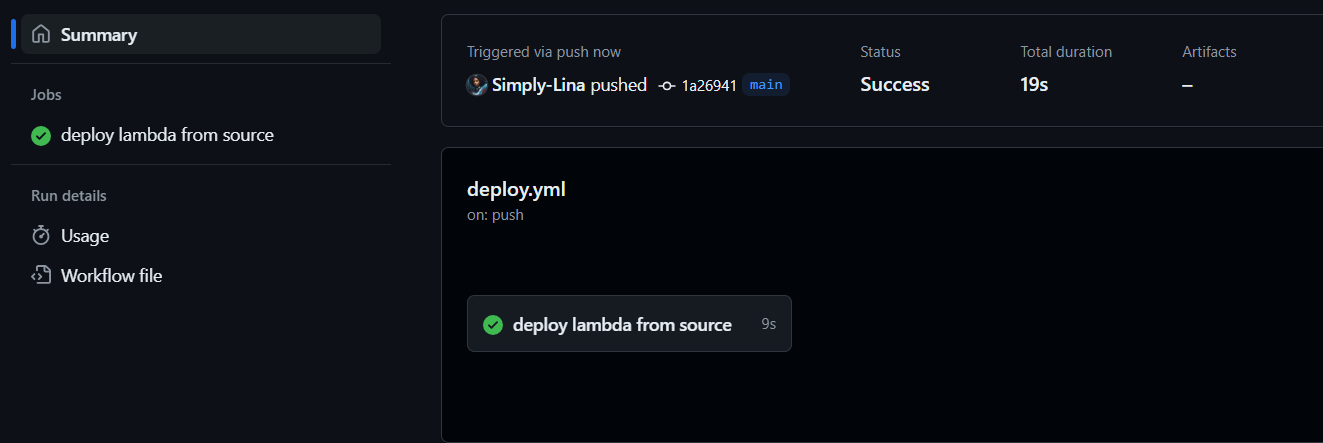
Hurray Done - successfully deployed. see attached Screenshot
Extras Bonus Point
Use Terraform as IAC - to Deploy the above Infrastructure
Step 5: Configure Terraform deployment files
Install Terraform: Make sure Terraform is installed on your machine. You can download it from the official website.
Create a new directory
terraform-moduleRefer to this write up on how to setup very organized terraform files and Here is a blog link
Apply the Terraform configuration: Run the following commands to deploy the infrastructure.
 terraform init
 terraform plan
 terraform validate
 terraform apply -auto-approve

The above screenshot is the output you should be Able to see if all goes well. I spent some couple of hours😭😭 here before everything worked.
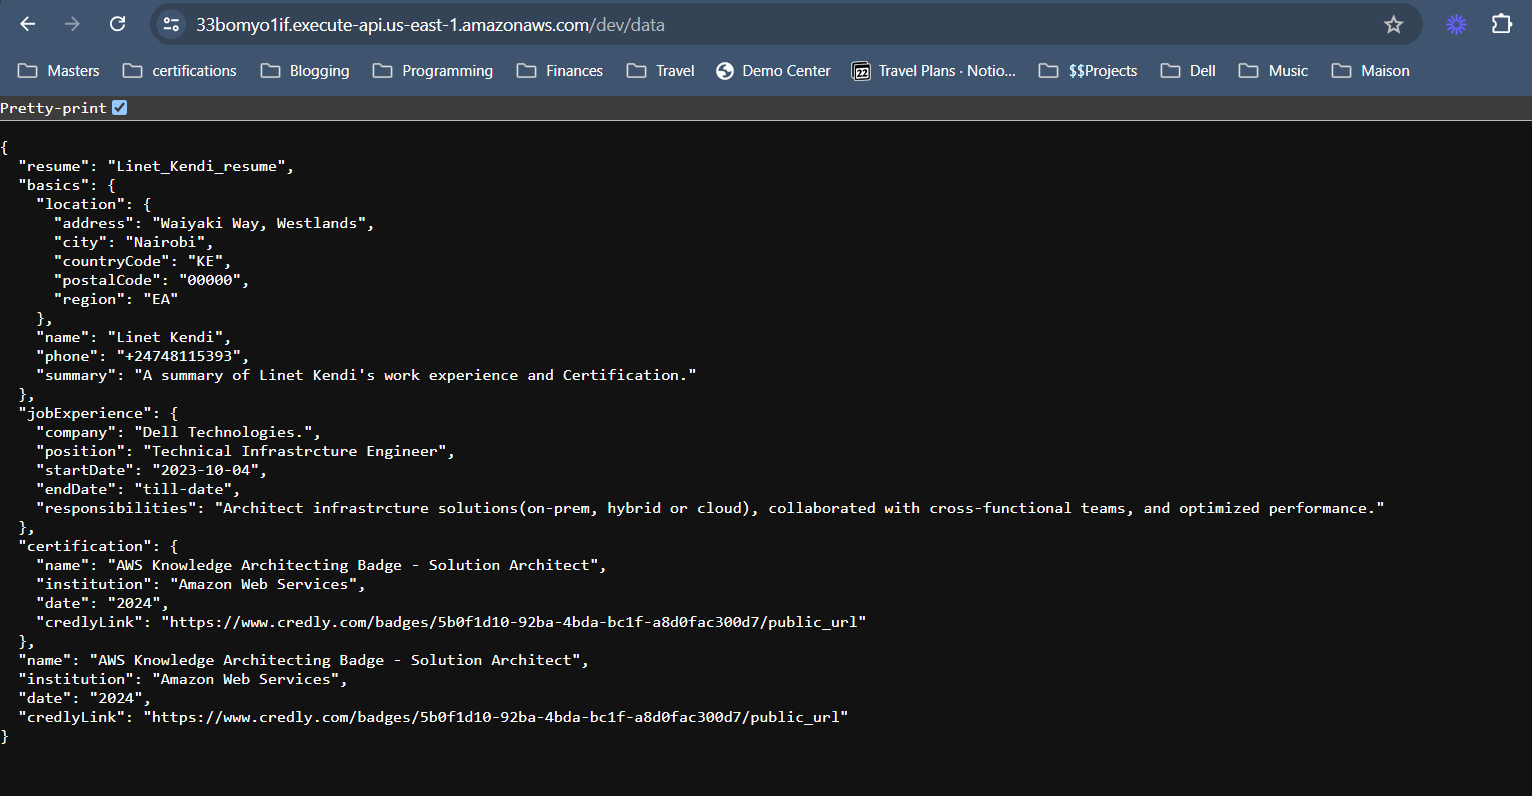
To test out our code - Run the Below query
curl -v https://33bomyo1if.execute-api.us-east-1.amazonaws.com/dev/data
See below Screenshot for the results
Step 6: Update the GitHub Workflow files to include Terraform Initialization process
name: Resume Challenge

on:

  push:
    branches:
      - main
    paths-ignore:
      - 'README.md'
env:
 AWS_ACCESS_KEY_ID: ${{secrets.AWS_ACCESS_KEY_ID}}
 AWS_SECRET_ACCESS_KEY: ${{secrets.AWS_SECRET_ACCESS_KEY}}
 AWS_REGION: ${{vars.AWS_REGION}}
jobs:
  deploy:
    name: "TF_Resume_Challenge"
    runs-on: ubuntu-latest

    steps:
      - name: Checkout Code
        uses: actions/checkout@v2


      - name: Set up Python
        uses: actions/setup-python@v2


      - name: Install dependencies
        run: |
          python -m pip install --upgrade pip
          pip install boto3

      - name: Set up Terraform
        uses: hashicorp/setup-terraform@v1


      - name: Terraform Init
        run: terraform init

      - name: Terraform Plan
        run: terraform plan -no-color
        continue-on-error: true

      - name: Terraform Apply
        run: terraform apply -auto-approve
The difference of this GitHub Action file with the previous is that:
1st one: Deploy to Lambda -This workflow is triggered on any push and deploys a Lambda function from the source code using the appleboy/lambda-action. - this deploy.yml has been renamed to renamed-deploy.yml
2nd one: Resume Challenge - This workflow is triggered on a push to the main branch, except for changes to README.md. It sets up the environment variables for AWS and runs a series of steps to deploy using Terraform. - current deploy.yml
Step 7: Push to GitHub
Initialize a Git repository:
 git init
 git remote add origin <your-repo-url>
 git add .
 git commit -m "Initial commit"
 git push -u origin main
Set up GitHub Secrets: In your GitHub repository, go to Settings > Secrets and add
AWS_ACCESS_KEY_IDandAWS_SECRET_ACCESS_KEY.
The workload on GitHub Action fails since there is already existing resources.
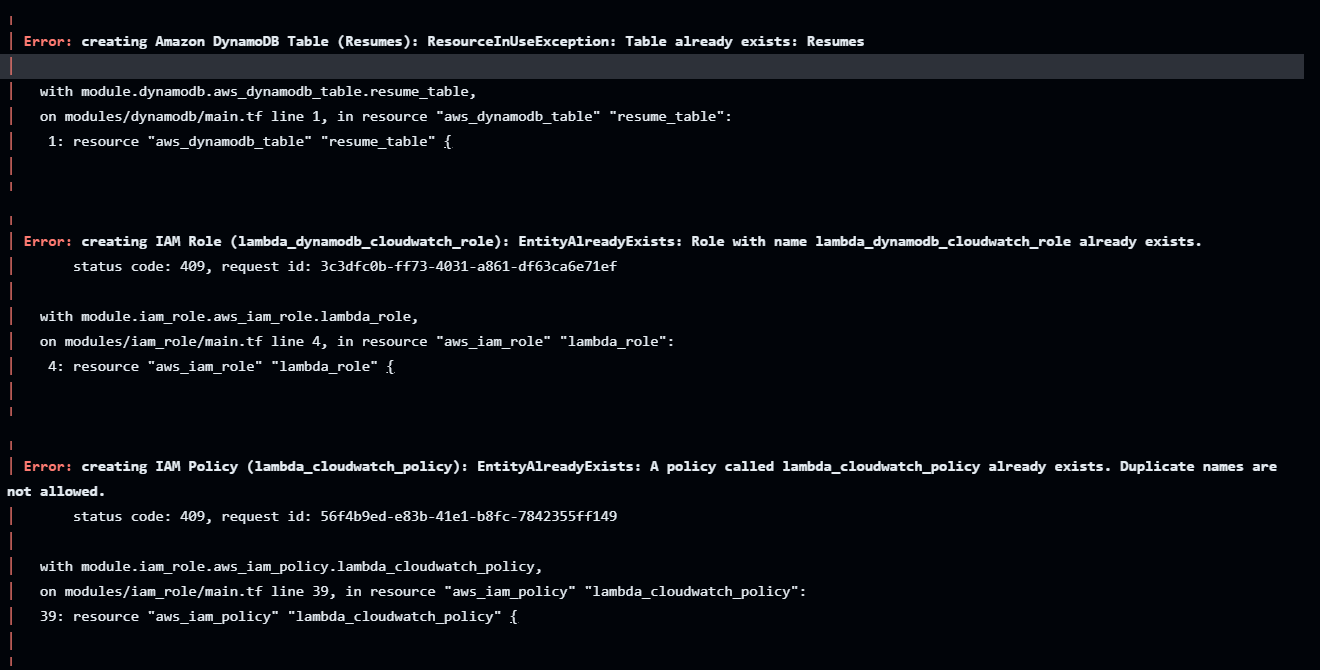
To fix the above - run terraform destroy --auto-approve to clean out the resources

Then do a new push to the branch. git push -u origin main to trigger a fresh build. and this is Build up successfully 🎉🎉🎉
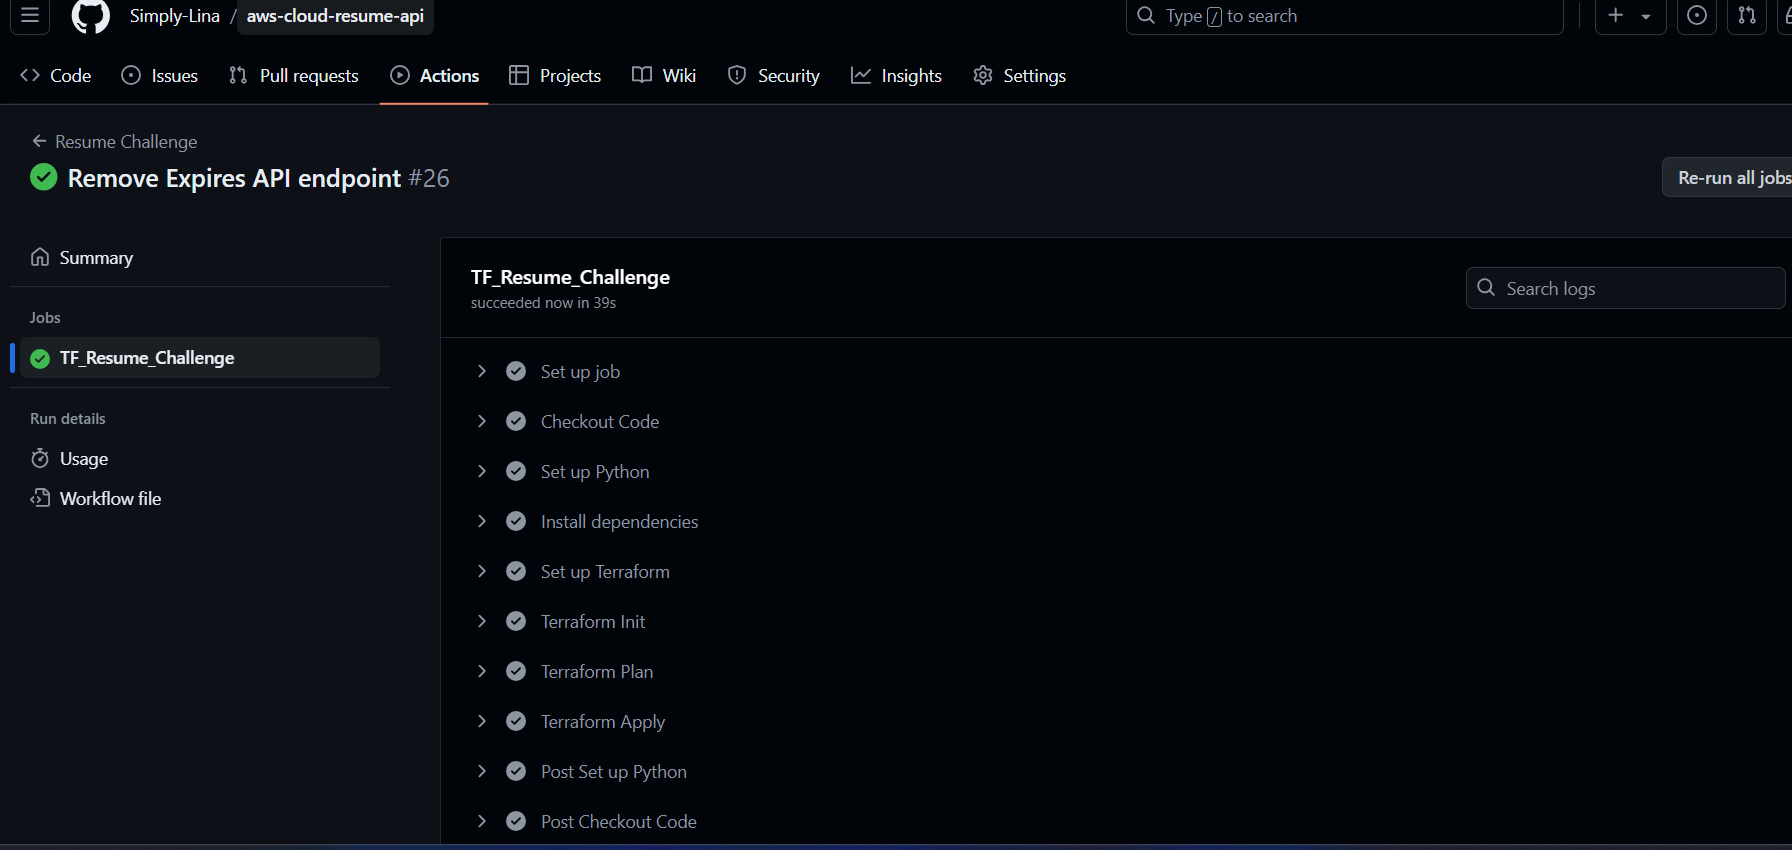
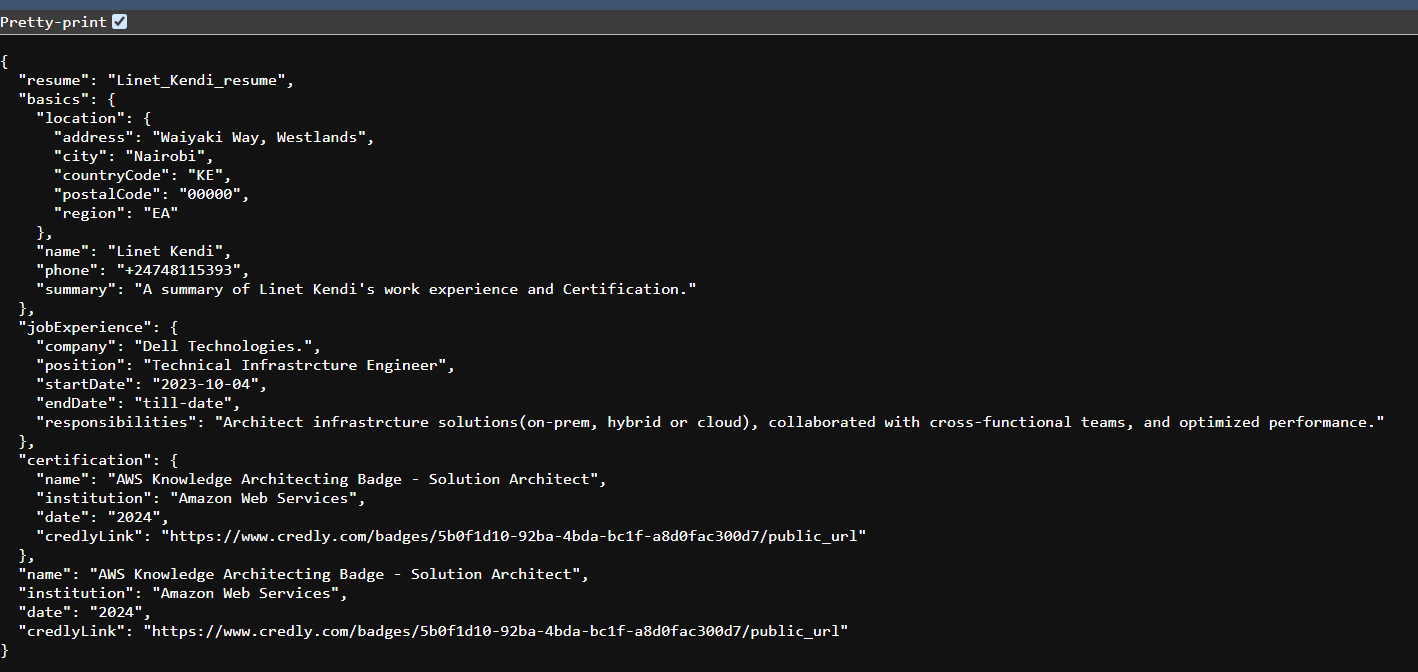
Verify the endpoint is working as expected by either
`curl -v
https://xgf77429x1.execute-api.us-east-1.amazonaws.com/dev/data`Run the link on your browser
https://xgf77429x1.execute-api.us-east-1.amazonaws.com/dev/data
See screenshot response of the api endpoint
Challenges Faced
For the GitHub Actions, this link helped to understand the appleboy third party package to facilitate integration of GitHub Actions and Lambda Deploy
Since I was working from Cloud9 - I realized I had to set up the Credentials manually on the terminal for the IAM role to be created. Link that came to the rescue
Conclusion
This project Covers Setting up serverless Architecture ( AWS Lambda and API Gateway) using Terraform.
To Clean up the resources run To clean up locally, run
terraform destroy --auto-approve
Appreciation Shoutout To
@Rishab Kumar for creating the Cloud RESUME API AWS challenge
@Ifeanyi Otuonye for Co-hosting the Challenge
@Samuel7050 for the great write up on Terraform files to build the architecture. I will be embracing your practice on having clean decentralized terraform write up files.
#StayCurious&KeepLearning
Update on 04/09/2024
I won the challenge 🎉🥳🎊🎁 and got a Certification Voucher.
Destroying the infrastructure is becoming a challenge as I forgot to persist the terraform state files on S3 😟, Now I have to do it manually. I will be sharing an update soon on how to include the terraform S3 persist code.
Subscribe to my newsletter
Read articles from Linet Kendi directly inside your inbox. Subscribe to the newsletter, and don't miss out.
Written by

Linet Kendi
Linet Kendi
Cloud and Cyber Security enthusiast. I love collaborating on tech projects. Outside tech, I love hiking and swimming.