Scaling 2048: How I Deployed a Classic Game on AWS EKS
 Subodh Bagde
Deploying the 2048 Game on AWS Using Elastic Kubernetes Service (EKS)
In this blog, I’ll walk you through the process of deploying a simple game, the 2048 game, on AWS using Elastic Kubernetes Service (EKS). This deployment not only showcases the practical application of Kubernetes but also highlights the scalability and management benefits of using AWS services.

Prerequisites
kubectl — A command line tool for working with Kubernetes clusters. For more information, see Installing or updating kubectl. (Refer Documentation)
eksctl — A command line tool for working with EKS clusters that automates many individual tasks. For more information, see Installing or updating. (Refer Documentation)
AWS CLI — A command line tool for working with AWS services, including Amazon EKS. For more information, see Installing, updating, and uninstalling the AWS CLI in the AWS Command Line Interface User Guide. After installing the AWS CLI, we recommend that you also configure it. (Refer Documentation)
Helm — Helm helps you manage Kubernetes applications — Helm Charts help you define, install, and upgrade even the most complex Kubernetes application. Charts are easy to create, version, share, and publish — so start using Helm and stop the copy-and-paste. (Refer Documentation)
Deployment Walkthrough
- Create cluster on EKS. It will take 10–15 minutes for creation of cluster depending upon your Internet speed.
eksctl create cluster --name demo-cluster --region us-east-1 --fargate

Cluster is created
2. Update Kubeconfig on your EKS cluster.
aws eks update-kubeconfig --name demo-cluster --region us-east-1
3. Now create the EKS Fargate profile.
eksctl create fargateprofile \
    --cluster demo-cluster \
    --region us-east-1 \
    --name alb-sample-app \
    --namespace game-2048
You can see that a new Fargate profile has been created “alb-sample-app”.

4. Now using kubectl deploy the deployment, service and Ingress file for the 2048-game.
kubectl apply -f https://raw.githubusercontent.com/kubernetes-sigs/aws-load-balancer-controller/v2.5.4/docs/examples/2048/2048_full.yaml
After doing this you can check whether the pods, service and Ingress are created or not.
kubectl get pods -n game-2048
kubectl get svc -n game-2048
kubectl get ingress -n game-2048

5. Next you have to create and configure an IAM OIDC provider for your demo-cluster.
eksctl utils associate-iam-oidc-provider --cluster $cluster_name --approve
6. Setup ALB controller add on.
Firstly, download the IAM policy.
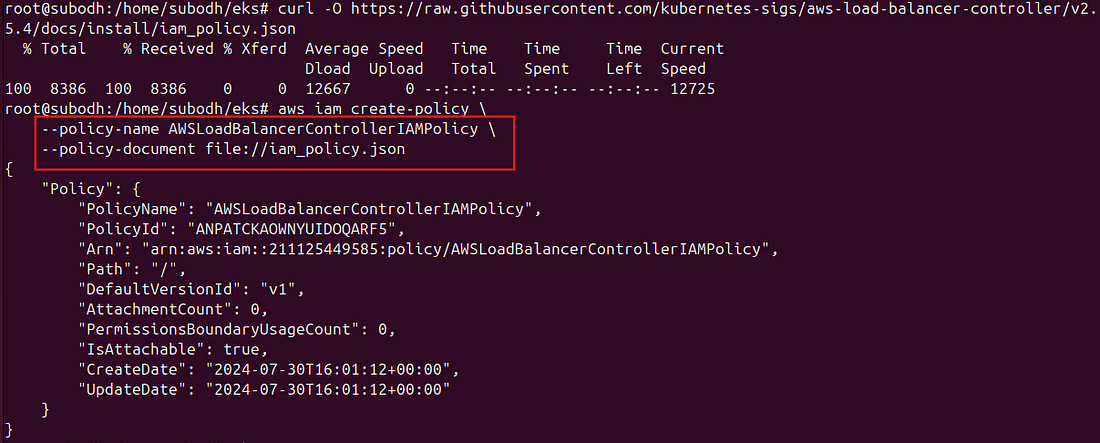
curl -O https://raw.githubusercontent.com/kubernetes-sigs/aws-load-balancer-controller/v2.5.4/docs/install/iam_policy.json
Now we will create IAM policy.
aws iam create-policy \
    --policy-name AWSLoadBalancerControllerIAMPolicy \
    --policy-document file://iam_policy.json

Create IAM Role.
eksctl create iamserviceaccount \
  --cluster=<your-cluster-name> \
  --namespace=kube-system \
  --name=aws-load-balancer-controller \
  --role-name AmazonEKSLoadBalancerControllerRole \
  --attach-policy-arn=arn:aws:iam::<your-aws-account-id>:policy/AWSLoadBalancerControllerIAMPolicy \
  --approve

7. Deploy ALB controller.
Add the helm repo.
helm repo add eks https://aws.github.io/eks-charts
Update the repo.
helm repo update eks

Install
helm install aws-load-balancer-controller eks/aws-load-balancer-controller -n kube-system \
  --set clusterName=<your-cluster-name> \
  --set serviceAccount.create=false \
  --set serviceAccount.name=aws-load-balancer-controller \
  --set region=<region> \
  --set vpcId=<your-vpc-id>

Verify that the deployments are running.
kubectl get deployment -n kube-system aws-load-balancer-controller
Wait for 2–3 minutes till the ALB controllers are ready. Also check that whether the ingress has address assigned to it or not.
kubectl get ingress -n game-2048


Now that your 2048 game is deployed on the EKS copy the address and paste it on your browser to check whether it is running or note. Make sure to add http:// before the address.
Conclusion
This setup not only provides scalability but also showcases how easily you can manage and deploy applications on AWS. Feel free to experiment with scaling the deployment, configuring autoscaling, and integrating other AWS services to enhance the game’s functionality.
I hope this helps! Let me know if you need any further details or modifications. Happy blogging!
Subscribe to my newsletter
Read articles from Subodh Bagde directly inside your inbox. Subscribe to the newsletter, and don't miss out.
Written by

Subodh Bagde
Subodh Bagde
Hello! I'm Subodh, I'm passionate about technology and security, focusing on cloud security ☁️🔒, AWS 🚀, and artificial intelligence 🤖.