Linux: A Comprehensive Overview
 Anas
Anas
Hello! I'm Anas , a DevOps and Cloud enthusiast with a passion for building scalable, efficient, and secure infrastructure. With a strong focus on automation, containerization, and orchestration, In this blog I'll be diving into the Linux in detail.
Topics of this Blog:
Introduction
working with shell
Linux core concepts
package management
Security and File Permissions
Networking
Storage
Service management with SYSTEMD
Introduction:
A brief history of Linux and its evolution:
Early Days
1960s: Unix is created by Ken Thompson and Dennis Ritchie
1980s: Richard Stallman launches the GNU Project to create a free and open-source operating system
Birth of Linux
1991: Linus Torvalds creates the Linux kernel, inspired by the GNU Project
1991: Linux version 0.01 is released
1992: Linux version 1.0 is released, marking a significant milestone
Rise of the Community
Early 1990s: Linux gains popularity, and the community grows
1996: Linux version 2.0 is released, introducing significant improvements
Commercial Interest
- Late 1990s: Commercial interest in Linux surges, with companies like Red Hat and SuSE emerging
Modern Era
2011: Linux version 3.0 is released, marking a significant milestone
Today: Linux is one of the most popular operating systems, powering devices from smartphones to supercomputers
Key Milestones
1991: Linux project announced
1992: Linux 1.0 released
1996: Linux 2.0 released
2011: Linux 3.0 released
2015: Linux 4.0 released
2020: Linux 5.0 released
Benefits of Linux
Free
Open Source
Reliable
Low-level resource support
Secure
Privacy
Customization
Better community support
Working with shell :
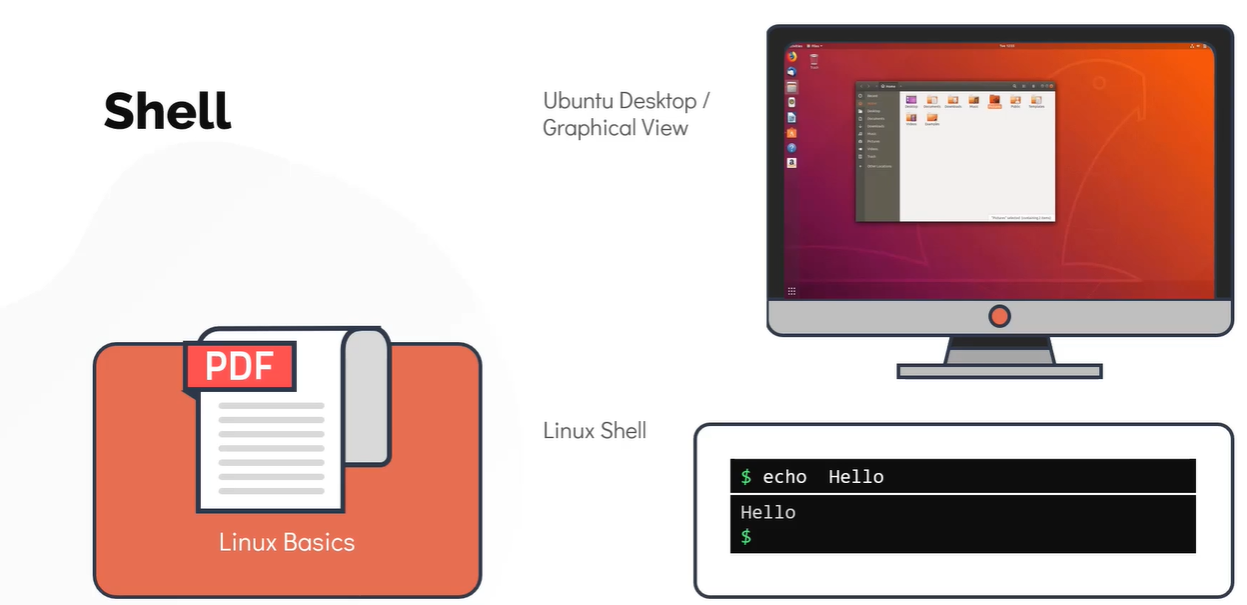
This command line interface (CLI) will enable you to effectively work on linux laptop/server/virtual machine.
While the graphical version may see more appealing to the users but can be limited in case of functionality. These is where the Linux command line commonly known as
Linux Shellshines.What is a shell?
Linux shell is a program that allows text based interaction between the user and the operating system, this interaction is carried out by typing commands into the interface and receving the response in the same way.
The Linux shell is a powerful tool with which you can navigate between different locations within the system, however when you login to the shell the very first directory you were take into is your home directory.
Command Prompt
You can configure the command prompt to show whatever you want, such as the
hostname,dateortime.It is currently configured to show the current working directory. The
~symbol here represents the home directory
Command and Arguments
To interact with the linux system using the shell, a user has to type in commands
When a command is run it executes a program to achieve a specific task.
For example: Theechocommand is used to print a line of text on the screen.
$ echo
An argument acts as an input to command
For example: To print ahellomessage typeecho hellocommand.
$ echo hello
Command Types
Command types in linux can be generally categorized in two types
Internal or Built-in Commands
Internal commands are part of the shell itself. It come bundled with it, there are in total about 30 such commands
For example: echo, cd, pwd e.t.c.
External Commands
External commands on the other hand are binary programs or scripts which are usually located in distinct files in the system. They either come with pre-install with the distribution package manager or can be created or installed by the user
For Example: mv, date, uptime, cp e.t.c.
To determine a command is internal or external, use type command
o print the present working directory. Run pwd command
$ pwd
To see the contents of the directory. Run ls command
$ ls
To make (or) create a directory. Run mkdir command
$ mkdir Asia
To make (or) create multiple directories. Run mkdir command followed by <directory_name1> <directory_name2> .. <directory_nameN>
$ mkdir Europe Africa America
To change a directory from the current directory. Run cd <directory_name>
$ cd Asia
To recursively created directories. Run mkdir -p <directory_name1>/<sub_directory_of_name1>
$ mkdir -p India/Mumbai
To go back to one directory up. Run cd ..
$ cd ..
To go back directly to a home directory of the current user from any location in the system. Run cd
$ cd
To copy a file to a directory. Run cp <filename> <destination_directorypath> command
$ cp Asia/India/Mumbai/City.txt Africa/Egypt/Cairo
To delete a file from a directory. Run rm /path/<filename> command
$ rm Europe/UK/London/Tottenham.txt
To copy a directory recursively. Run cp -r <sourcepath> <destinationPath> command
$ cp -r Europe/UK Europe/UnitedKingdom
To print the content of a file. Run cat /path/to/<filename> command
$ cat Asia/India/Mumbai/City.txt
To create an empty file. Run touch /path/to/filename command
$ touch /home/michael/Asia/China/Country.txt
To see the content of a file in a scrollable manner. Run more /path/to/filename command <-- not recommended for large files
$ more new_file.txt
To see the content of a file and navigate throught the file. Run less /path/to/filename command
$ less new_file.txt
To get the long list of files and directories. Run ls -l command
$ ls -l
To list all files including the hidden. Run ls -la command
$ ls -a
To list all the files in the order they were modified. Run ls -lt command
$ ls -lt
To list all the files form oldest to newest. Run ls -ltr command
$ ls -ltr
whatis , this command will displays a one line description of a command does.
Syntax: whatis <command>
$ whatis date
Most of the commands internal or external come bundled with man pages which provides information about the command in detail (with examples, usecases and with command options)
Syntax: man <command>
$ man date
Several commands will provide -h or --help to provide users with the options and usecases available in a command:
$ date -h
$ date --help
Different types of Shells
There are different types of shells in linux, some of the popular ones are below
Bourne Shell (sh)
C Shell (csh or tsh)
Korn Shell (ksh)
Z Shell (zsh)
Bourne again shell (Bash)
To check the shell being used. Use the command echo $SHELL
$ echo $SHELL
To change the default shell. Use the command chsh, you will be prompted for the password and following that input the name of the new shell. You have to login into new terminal session to see this change though.
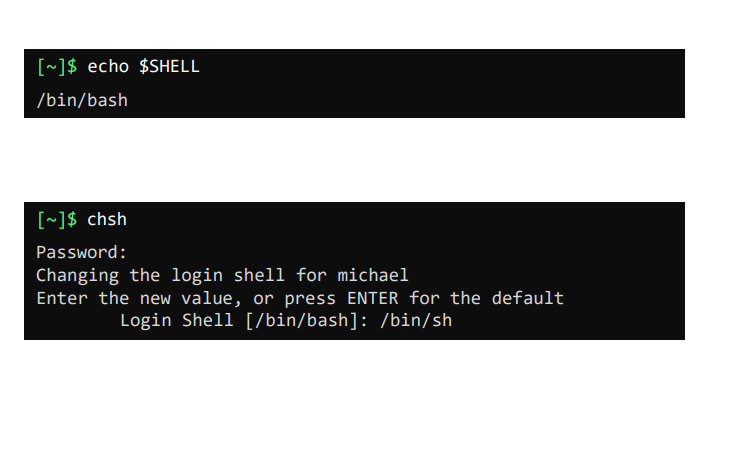
$ chsh
Bash Shell Features
Bash supports command auto-completion. What this means is bash means to auto-complete commands for you if you type part of it and press the
tabkeyIn Bash we can set custom aliases for the actual commands
 $ date
 $ alias dt=date
 $ dt
Use the
historycommand to list the previous run commands that you ran earlier$ history
Viewing file sizes
The du command, which stands for disk usage is a popular command to inspect the size of the file.
duwith-skshows the size of a file or directory inKilobytes$ du -sk test.imgduwith-shshows the size of a file or directory inhuman readable format$ du -sh test.imgwe can also use
long list,ls -lhto print the size of the file.$ ls -lh test.img
Remote Copying tool
A remote copying tool is a software program that allows you to copy files or data from one computer to another computer over a network or the internet. It enables you to transfer files between remote computers securely and efficiently.
Following are some types of copying tools:
SCP(Secure copy) : Command in the Linux system is used to copy file(s) between servers securely. The SCP command or secure copy allows the secure transferring of files between the local host and the remote host or between two remote hosts.
scp <filename> <username>@<IP>:<destination>scp soultroy root@192.168.0.2:/rootRSYNc : rsync or remote synchronization is a software utility for Unix-Like systems that efficiently sync files and directories between two hosts or machines. It is famous for its delta-transfer algorithm, in which it copies only the differences between the source files present in the local host and the existing files in the destination or the remote host.
rsync -av <filename> <username>@<IP>:<destination>rsync av- soultroy root@192.168.100.2:/rootSFTP : SFTP (Safe File Transfer Protocol) is part of the SSH protocol designed to securely transfer files between remote systems. It allows users to view, manage, and change file and directory permissions on remote systems.
Command:
sftp <username>@<IP>sftp soultroy@192.168.0.2
Compression
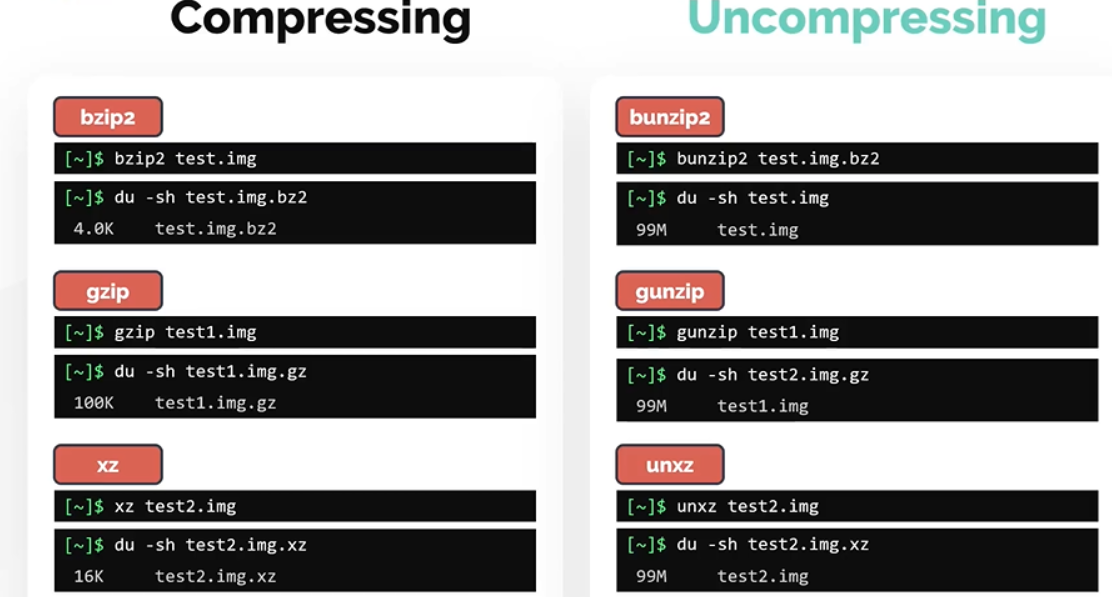
Compression is the technique used to reduce the size consumed by a file or a dataset.
- To reduce the size of a file or directory in the linux file system, there are commands specificly used for compression.
1 . gzip
#Syntax : (Compress)
gzip <filename>
#Syntax : (Decompress)
gunzip <filename>.gz
2 . xz
#Syntax: (Compress)
xz <filename>
#Syntax: (Decompress)
unxz <filename>.xz
3 . bzip2
#Syntax: (Compress)
bzip2 <filename>
#Syntax: (Decompress)
bzip2 <filename>.bz2
Archiving Files
Let us know take a look at widely used utility called tar
taris used to group multiple files and directories into a single file. Hence it is specially used for archiving data.tar is an abrevation for
tape archive.Files created with tar are often called
tarballs.
To archive a file or directory. Use tar command followed by -c to create an archive and the -f is used to specify the name of the tar file to be created. These is followed by files or directories to be archive.
$ tar -cf test.tar file1 file2 file3
$ ls -ltr test.tar
 output:
-rw-r--r-- 1 user user 10240 Jan 12 14:30 test.tar
The tar command followed by -tf option followed by the tar filename is used to see the contents of the tarball.
$ tar -tf test.tar

output:
file1
file2
file3
The tar command followed by -xf option followed by the tar filename is used to extract the contents from the tarball.
$ tar -xf test.tar

ooutput
$ ls -ltr
-rw-r--r-- 1 user user 10240 Jan 12 14:30 file1
-rw-r--r-- 1 user user 10240 Jan 12 14:30 file2
-rw-r--r-- 1 user user 10240 Jan 12 14:30 file3
The tar command followed by -zcf option is used to compress the tarball to reduce its size.
$ tar -zcf test.tar
output:
$ ls -ltr test.tar.gz
-rw-r--r-- 1 user user 2048 Jan 12 14:30 test.tar.gz
Searching for files and Patterns
how to locate a file or directory in the filesystem.
locate
find
grep
locate
Lets say you want to find the files with the name City.txt. Easiest way to do this is to make use of locate command.
Run locate command followed by the filename you are searching as an argument. This should return all paths matching the pattern.
$ locate City.txt
output: /home/user/Documents/City.txt
find
Another way to do this is make use of the find command. Use the find command followed by the directory under which you want to search. To search file by a name use the -name option followed by the name of the file.
$ find /home/michael -name City.txt
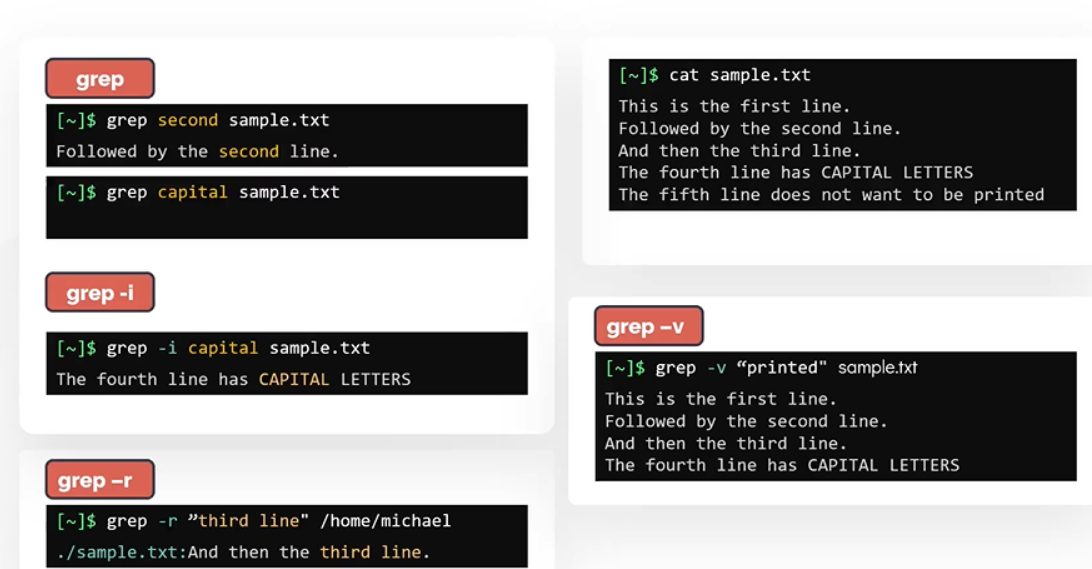
Grep
The grep command is a powerful utility in Linux that allows you to search for patterns in one or more files. The name grep is derived from the phrase "global regular expression print.
IO Redirection
Standard Input (STDIN)
- STDIN is the standard input stream which accepts text as an input.
Standard Output (STDOUT)
- Text output is delivered as STDOUT or the standard out stream
To redirect STDOUT to a file instead of printing it on the screen.
$ echo $SHELL > shell.txt
To append STDOUT to an exisiting file
$ echo $SHELL >> shell.txt
REDIRECT STDERR
Error messages of the command are sent through the standard ERROR stream (STDERR)
To redirect just the ERROR message we need to use 2 followed by forward arrow > symbol and then the name of the filename in which the errors are written.
$ cat missing_file 2> error.txt
To append the STDERR to the exisiting file
$ cat missing_file 2>> error.txt
If you want to execute and not print ERROR messages on the screen even if it generates a standard ERROR. You can redirect to /dev/null
$ cat missing_file 2> /dev/null
Command Line Pipes
Command Line Pipes allow the linking of multiple commands.
In simple terms, pipes allows the first commands standard output to be used as the standard input for the second command.
The pipes are defined using vertical bar symbol (|).
$ grep Hello sample.txt | less
Text Editor
There are several options available, we will be focusing on the VI Editor.
Most popular text editor in linux is the
VIEditor.The VI EDITOR is available in all most all of the linux distribution out of the box.
The command to open the vi editor is
vifollowed by the filename that you want to create or append.$ vi /home/michael/sample.txtThe VI EDITOR has three operation modes.
Command Mode
When the vi editor opens a file, it always goes to the
COMMAND MODEfirst.In this mode, the editor only understands the commands
Insert Mode
To switch from command mode to
INSERT MODEtype lower caseiThis mode allows you to write text into the file.
Once you are done with editing the file, to go back to command mode hit the
ESCbutton.While going into insert mode from command mode you may use other options such as
I,o,O,a, orA
Last Line Mode
Pressing the
:key will take you to theLAST LINE MODEIn this mode you can choose to save changes to the file, discard changes, or save and edit.
From the last line mode hit the
ESCkey to go back to the command mode.
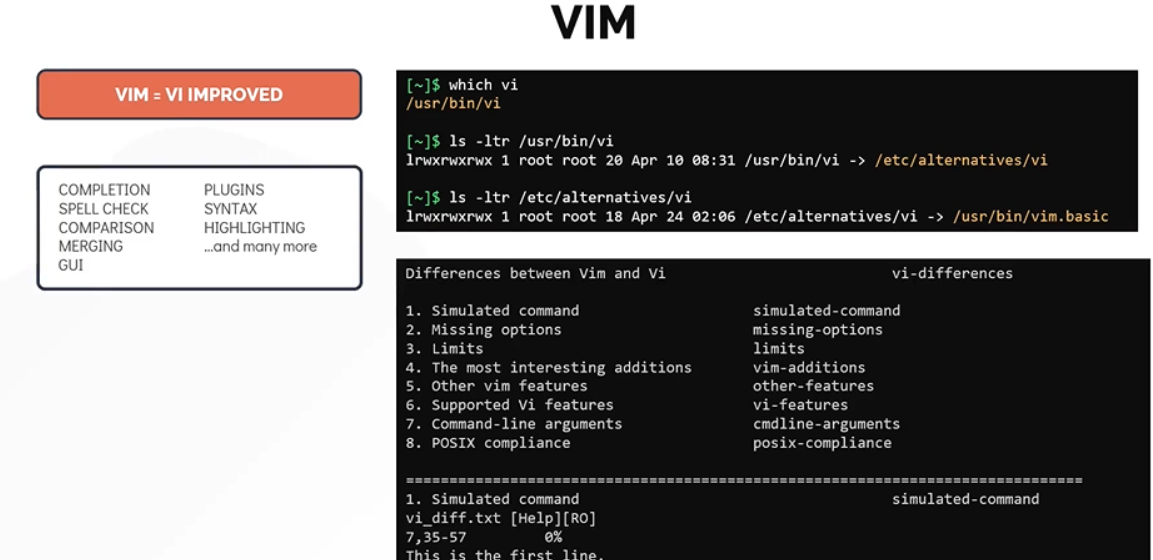
There is another popular editor called VIM which is an improved version of VI with added features but very similar in appereance to VI.
In the most distros today, the VI is the symblic to the VIM editor
Linux core concepts
Linux Kernel
If you have worked with any operating system, you have run into the term kernel.
The Linux kernel is monolithic, this means that the kernel carrries out CPU scheduling, memory management and several operations by itselfs.
The Linux Kernel is also modular, which means it can extends its capabilities through the use of dynamically loaded kernel modules
In simple words, kernel established a connection between hardware and software that's why we called kernel is heart of linux operating system
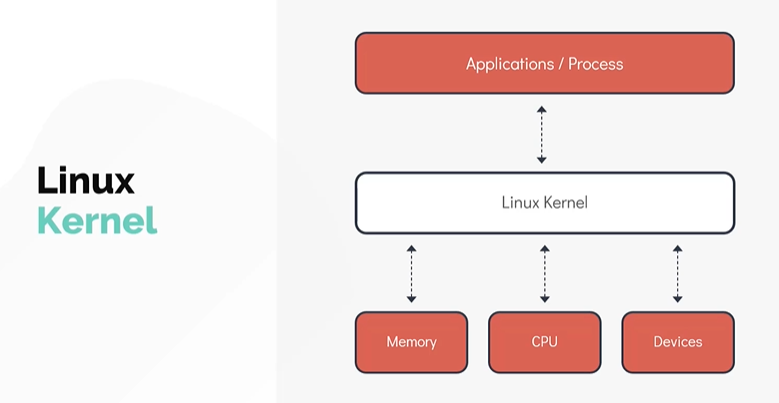
To understand a kernel in simple terms, let us use an analogy of a College Library. Here the librarian is equal to Linux Kernel.
The Kernel is responsible for 4 major tasks
Memory Management
Process Management
Device management / Device Drivers
Handling System calls / System calls and Security
Linux Kernel Versions
let us know identify the ways to identify linux kernel versions
Use uname command to get the information about the kernel (by itself it doesn't provide much information except that the system uses the Linux Kernel.
$ uname
Use the uname -r or uname comamnd and option to print the kernel version
$ uname -r
$ uname -a
Working with Hardware
we will look at how linux works with the hardware resources available to the system.
To see ways to list and get detailed information about these devices from the command line.
To list all PCI (Peripheral Component Interconnect) devices that are configured in the system. Examples of PCI devices are Ethernet Cards, RAID Controllers, Video Cards and wireless Adaptors that directly attached to PCI slots in the motherboard of the computer
$ lspci
To list information about Block Devices
$ lsblk
To display detail information about the CPU such as CPU architecture, cpu op-modes (32 bit, 64 bit) etc.
$ lscpu
To list available memory in the system.
$ lsmem --summary
Another alternate command to see the information about the memory. This command will list total used and free memory.
$ free -m
To extract detail information about the entire hardware information of the machine
$ lshw
To run commands with root privileges. Not every user can run all the commands in the linux system some commands need to be run as the root or the super-user. Use sudo followed by ( input the sudo password ).
$ sudo lshw
Linux Boot Sequence
boot process in a simplied manner by dividing it into four broader steps.
The boot process can be broken down into four stages
BIOS POST
Boot Loader (GRUB2)
Kernel Initialization
INIT Process
How to initiate a linux boot process?
This can be achieved in one of the two ways.
The first method is to start a linux device which is in a halted or stopped state
Second method is to reboot or reset a running system
BIOS POST
The first stage, called
BIOS POSThas very little to do with linux itself.POSTStands forPower On Self Test.In this stage, BIOS runs a POST test, to ensure the hardware components that are attached to the device are functioning correctly, if POST fails the computer may not be operable and the system will not be proceed to next stage of the boot process
Boot Loader
The next stage after BIOS POST is
Boot Loaderafter successful of POST test.BIOS loads and executes the boot code from the boot device, which is located in the first sector of the hard disk. In Linux this is located in the
/bootfile system.The boot loader will provide the user with the boot screen, Once the selection is made at the boot screen, boot loader loads the kernel into the memory supplies it with some parameters and hands over the control to kernel
example of the boot loader is
GRUB2(GRand Unified Bootloader Version 2).
Kernel Initialization : After the selected kernel is selected and loads into the memory, it usually decompress and then loads kernel into the memory.
At this stage, kernel carries out tasks such as initializing hardware and memory management tasks among other things.
Once it is completely operational , kernel looks for
INIT Processto run.INIT Process:
In most of the current day linux distribution, the
INITfunction then calls thesystemddaemon.The
systemdis responsible for bringing the linux host to usable state.systemdis responsible for mounting the file systems, starting and managing system services.systemdis the universal standard these days, but not too long ago another initialization process calledsystem V (five) initwas used. It is also called **Sys5Once of the key advantages of using
systemdoversystem V(five) initis that it reduces the system startup time by parallelizing the startup of services.
To check the init system used run ls -l /sbin/init, if it is systemd then you will see a pointer to /lib/systemd/systemd
$ ls -l /sbin/init
Run Levels
Systemd Targets (Run Levels)
We can setup the server to boot either into graphical mode or non-graphical mode. Linux can run in multiple modes and these modes are set by something called runlevel
The operation mode which provide a graphical interface is called
runlevel 5The operation mode which provide a non-graphical mode is called
runlevel 3
In systemd, runlevels are called as targets.
The RunLevel 5 is called as the
graphical targetThe Runlevel 3 is called as the
multiuser target
To see the default target, run the command systemctl get-default. This command looks at the file located at /etc/systemd/system/default.target
$ systemctl get-default
To change the default target, we can make use of systemctl set-target <desired target name goes here as an argument>
$ systemctl set-default multi-user.target
File Types in Linux
Everything is a file in Linux.
Every object in linux can be considered to be a type of file, even a directory for example is a special type of file.
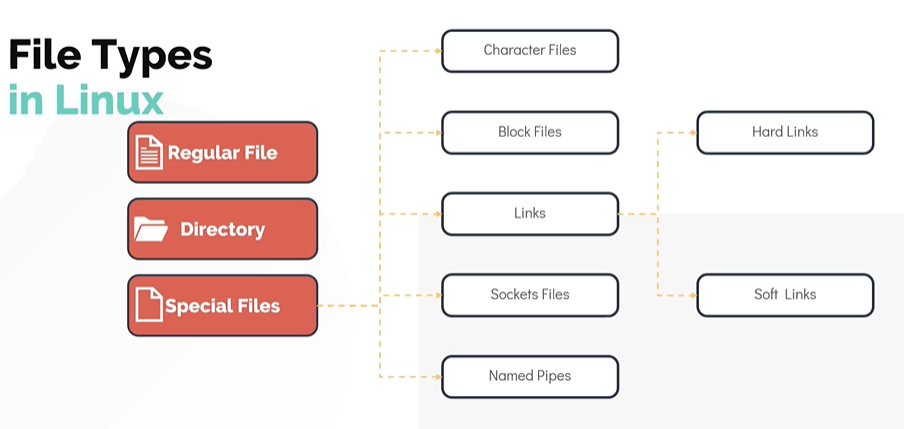
how to identify different file types in Linux.
One way to identify a file type is by making use of the file command.
$ file /home/michael
$ flle bash-script.sh
$ file insync1000.sock
$ file /home/michael/bash-script
Another way to identify a file type is by making use of the ls -ld command
ls -ld /home/michael
ls -l basg-script.sh
Package Management
What is a package?
- A package in its simplest defination is a compressed archieve that contains all the files that are required by a particular software to run.
For Debain/Ubuntu, it is apt/dpkg and for CentOs/Redhat, it is RPM
What is the difference between CentOS, RHEL and Ubuntu*?
Distributions such as RHEL, Fedora and CentOS. are based on RPM. Hence they are known as RPM based distribution. The Debian family including Ubuntu, Debian and Linux Mint e.t.c. make use of Debian based package managers such as the DPKG.
package manger:
A package manager is a software in a linux system that provides the consistent and automated process in installing, upgrading, configuring and removing packages from the operating system.
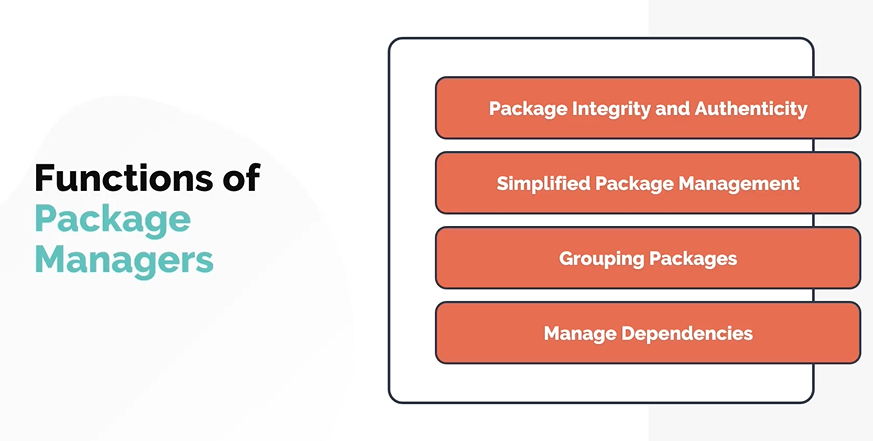
Types of Package Managers
A Linux distribution supports different types of package managers, some of the common ones are below
RPM and YUM Package Managers
This package manager is used in RHEL as well as other linux distributions but these are the most common ones. The File extensions for packages manage by RPM is .RPM
RPM has five basic modes of operations. Each of these modes can be run using rpm command followed by a specific command options.
Despite of this, RPM doesn't resolve dependencies on its own. This is why we make use of a higher level of package manager called YUM.
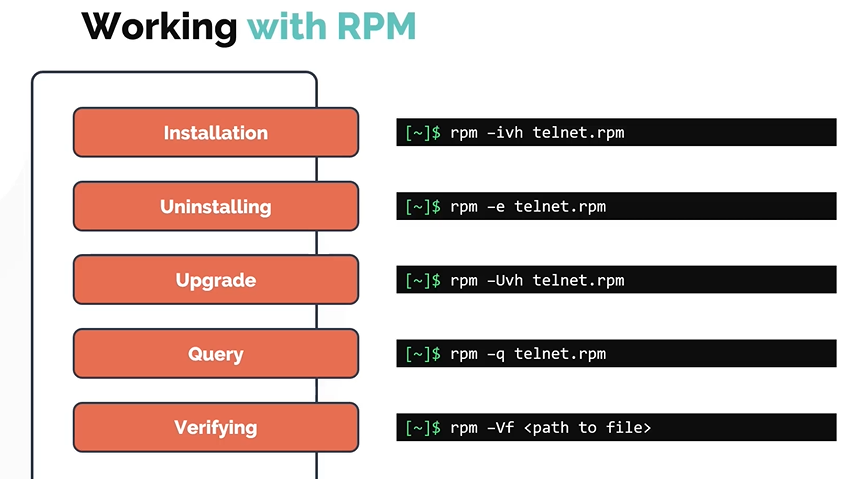
YUM (Yellowdog Updater Modifier)
YUM is a free and opensource package manager.
Works on RPM based Linux systems
Acts as a high level package manager but under the hood it still depeneds on
RPMto manage packages on the linux systems.Unlike RPM, YUM handles package dependencies very well (Automatic Dependency Resolution).
It is able to install any dependencies packages to get the base package install on the linux system.
Common Commands
To list all the repos added to your system. Run yum repolist
$ yum repolist
To check which package should be installed for specific command to work. Use yum provides command followed by name.
$ yum provides scp
To Install a package
$ yum install httpd
To Install a package to automatically answer "yes" to any question prompt during the operation. Use -y flag with the yum install command.
if the package is not installed in the system yum checks the configured repositories under
/etc/yum.repos.d/for the availability of the requested package.$ yum install httpd -yTo remove a package
$ yum remove httpdTo update a package
$ yum update telnetTo update all packages in the system, use the
yum updatecommand without any arguments.$ yum updateDPKG and APT Package Managers
DPKG Utility
DPKG stands for Debian Package Manager
It is a low level package manage
functions same as rpm (Installing ,Uninstalling,Upgrade,List, Status, Verfiying)
APT and APT-GET
Similar to RPM, DPKG doesnt resolve the dependencies when it comes to package management.
- Install may fail due to dependencies issues. This is the reason why we use higher level debian package managers such as
APTandAPT-GET.
- Install may fail due to dependencies issues. This is the reason why we use higher level debian package managers such as
APTorAPT-GETalthough sounds similar, but they do not depend on each other.APTstands for advanced package managers, it is more user friendly and overall better tool compared toAPT-GET.$sudo apt install gimp $sudo apt-get install gimp
some common commands
To refresh a repository. Run apt update command.
$ sudo apt update
To install available upgrades of all packages currently installed on the system from the sources configured.
$ sudo apt upgrade
Another way to update the repository is to use apt edit-sources command. This opens up the /etc/apt/sources.list file in the text editor of your choice.
$ sudo apt edit-sources
To install the package
$ sudo apt install telnet
To remove the package
$ sudo apt remove telnet
To search or look for a package in the repository.
$ sudo apt search telnet
To list all the available packages
$ sudo apt list |grep telnet
Difference between APT vs APT-GET
APT is a more user friendly tool when compared to APT-GET
In all the latest debian based distros APT is already installed by default.
Security and File Permissions
LINUX ACCOUNTS
User Accounts
User's informations are stored under
/etc/passwdfile.[~]$ cat /etc/passwdInformation about groups is stored into
/etc/groupfile.[~]$ cat /etc/group
Each user has a username and a unique ID assigned to them known as user ID or UID.
The user also has a GID, the group id they are part of,
idcommand can be use to check these details. for eg:[~]$ id michael uid=1001(michael) gid=1001(michael)groups=1001(michael),1003(developers)More details about the user account can be found eg. default shell, home directory using.
  [~]$ grep -i michael /etc/passwd
  michael:x:1001:1001::/home/michael:/bin/sh
To see the list of users currently logged use who command.
  [~]$ who
  bob pts/2 Apr 28 06:48 (172.16.238.187)
Switching users
To switch to any user use
sucommand.[~]$ su – Password: root ~#To run a specific command you can use
su -c "whoami"(This is not recommended way)[michael@ubuntu-server ~]$ su -c "whoami" Password: rootTo run a command as a root user
sudocommand is recommended.[michael@ubuntu-server ~]$ sudo apt-get install nginx [sudo] password for michael:
USER MANAGEMENT
User Add
To create a new local user
bobin the system useuseraddcommand.[~]$ useradd bobTo get more details about
bobaccount like, home director, uid, and shell use/etc/passwd[~]$ grep -i bob /etc/passwd bob:x:1002:1002::/home/bob:/bin/sh
o check the uid or username of the user logged in user whoami command.
    [~]$ whoami
    bob
All user's password are store under
/etc/shadow[~]$ grep -i bob /etc/shadow bob:!:18341:0:99999:7:::To change the password of current user use
passwdor for any specific user usepasswd <username>[~]$ passwd bob Changing password for user bob. New UNIX password: Retype new UNIX password: passwd: all authentication tokens updated successfully.
Managing Users
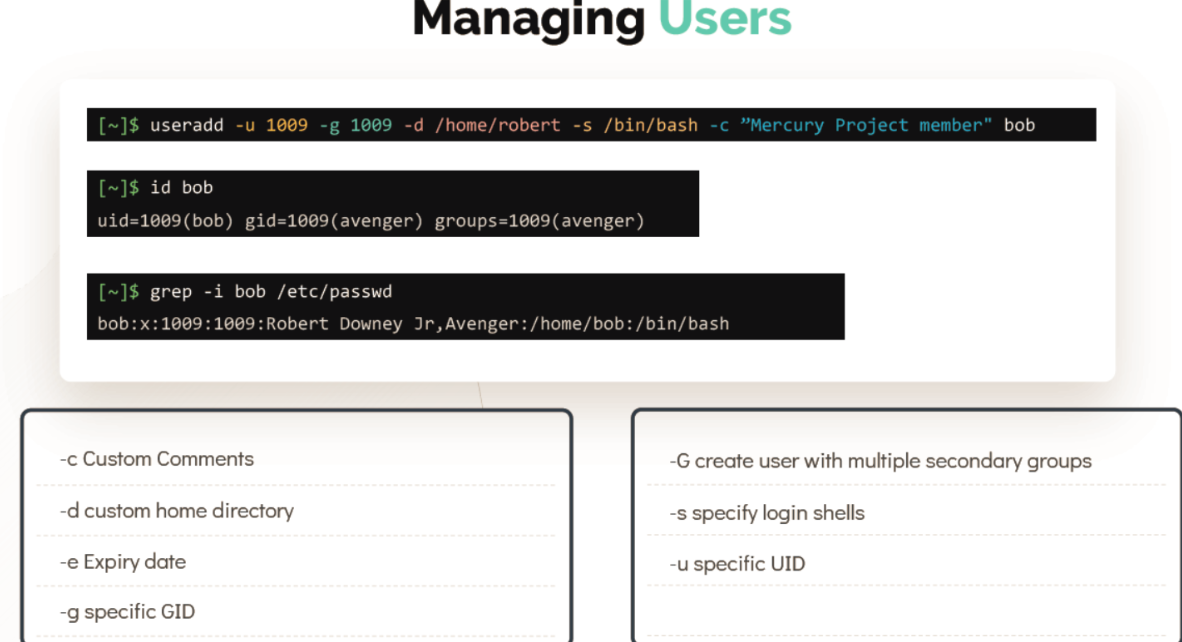
To delete a user use
userdelcommand[~]$ userdel bobTo add a group use
groupaddcommand[~]$ groupadd –g 1011 developerTo delete a group user
groupdelcommand[~]$ groupdel developerPassword are stored under
/etc/shadow[~]$ grep -i ^bob /etc/shadow bob:$6$0h0utOtO$5JcuRxR7y72LLQk4Kdog7u09LsNFS0yZPkIC8pV9tgD0wXCHutY cWF/7.eJ3TfGfG0lj4JF63PyuPwKC18tJS.:18188:0:99999:7::: USERNAME:PASSWORD:LASTCHANGE:MINAGE:MAXAGE:WARN:INACTIVE:EXPDATELINUX FILE PERMISSIONS
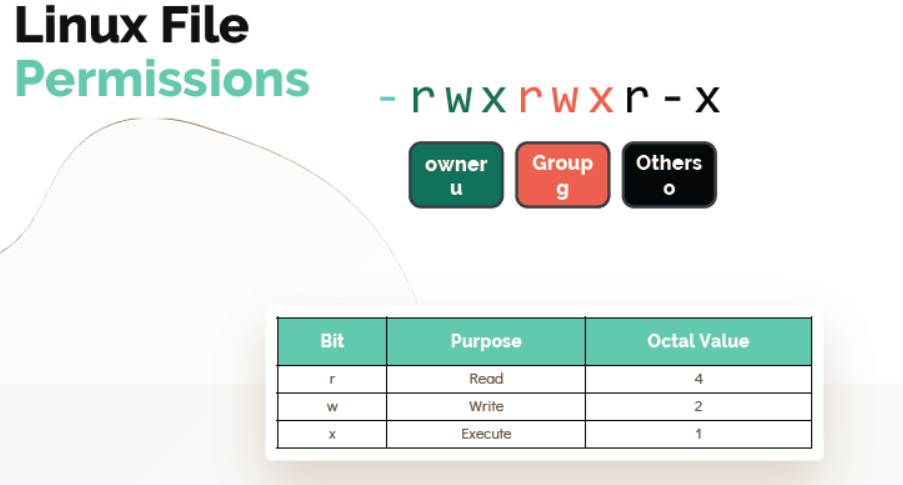
Modifying file permissions
Use
chmodcommand to modify the file permissions.Provide full access to owners
[~]$ chmod u+rwx test-fileProvide Read access to Owners, groups and others, Remove execute access
[~]$ chmod ugo+r-x test-fileRemove all access for others
[~]$ chmod o-rwx test-fileFull access for Owner, add read , remove execute for group and no access for others
[~]$ chmod u+rwx,g+r-x,o-rwx test-fileProvide full access to Owners, group and others
[~]$ chmod 777 test-fileProvide Read and execute access to Owners,groups and others
[~]$ chmod 777 test-fileRead and Write access for Owner and Group, No access for others.
[~]$ chmod 660 test-fileFull access for Owner, read and execute for group and no access for others.
[~]$ chmod 750 test-file
Change Ownership
Changes owner to bob and group to developer
[~]$ chown bob developer test-fileChanges just the owner of the file to bob. Group unchanged.
[~]$ chown bob andoid.apk
SSH and SCP
SSH is used to login to the remote computer.
SCP is used to copy of files/directories within the file system also can copy data to remote computer.
To login to the remote server use
sshcommand with hostname or IP address.ssh <hostname OR IP Address>Password-Less Authentication
Password-less authentication can be setup via key-pair authentication in order to login to the remote server with password.
Public and Private key are stored at below location.
Public Key: /home/bob/.ssh/id_rsa.pubPrivate Key: /home/bob/.ssh/id_rsaTo generate a keypair on the
Clientrun this commandbob@caleston-lp10 ~]$ ssh-keygen –t rsaTo copy the Public key from the client to the remote server
bob@caleston-lp10 ~]$ ssh-copy-id bob@devapp01Now
Bobcan login to remote server without password[bob@caleston-lp10 ~]$ ssh devapp01Public Key is copied to the remote server at :
[bob@caleston-lp10 ~]$ cat /home/bob/.ssh/authorized_keys
SCP
To copy a compresses file to a remote server
bob@caleston-lp10 ~]$ scp /home/bob/caleston-code.tar.gz devapp01:/home/bobTo copy a directory to a remote server
[bob@caleston-lp10 ~]$ scp –pr /home/bob/media/ devapp01:/home/bobCronjob in Linux
crontabis a list of commands that are scheduled to run at specific times or intervals. It's a time-based job scheduler in LinuxLinux Crontab Format
Crontab Examples
Run a script daily at 2:30 AM
30 2 * * * /path/to/daily_script.shThe script
daily_script.shwill run every day at 2:30 AM.
Networking
DNS: Domain Name System
-it translate domain name into IP
Ping
PingCommand is use to check the remote machine is reachable or not.[~]$ ping 192.168.1.11 Reply from 192.168.1.11: bytes=32 time=4ms TTL=117 Reply from 192.168.1.11: bytes=32 time=4ms TTL=117To
Pingthe remote host with a name instead ofIP Addressmake an entry in/etc/hostsfile[~]$ cat >> /etc/hosts 192.168.1.11 db[~]$ ping db PING db (192.168.1.11) 56(84) bytes of data. 64 bytes from db (192.168.1.11): icmp_seq=1 ttl=64 time=0.052 ms 64 bytes from db (192.168.1.11): icmp_seq=2 ttl=64 time=0.079 msYou can configure as many hosts you want in the
/etc/hostsfile.[~]$ cat >> /etc/hosts 192.168.1.10 web 192.168.1.11 db 192.168.1.12 nfs 192.168.1.20 webEvery host has a DNS resolution file
/etc/resolv.conf[~]$ cat /etc/resolv.conf nameserver 192.168.1.100The
/etc/nsswitch.conffile is used to configure which services are to be used to determine information such as hostnames, password files, and group files.There is a specific search order according to which it is performed. This order is set in this configuration file.[~]$ cat /etc/nsswitch.conf … hosts: files dns …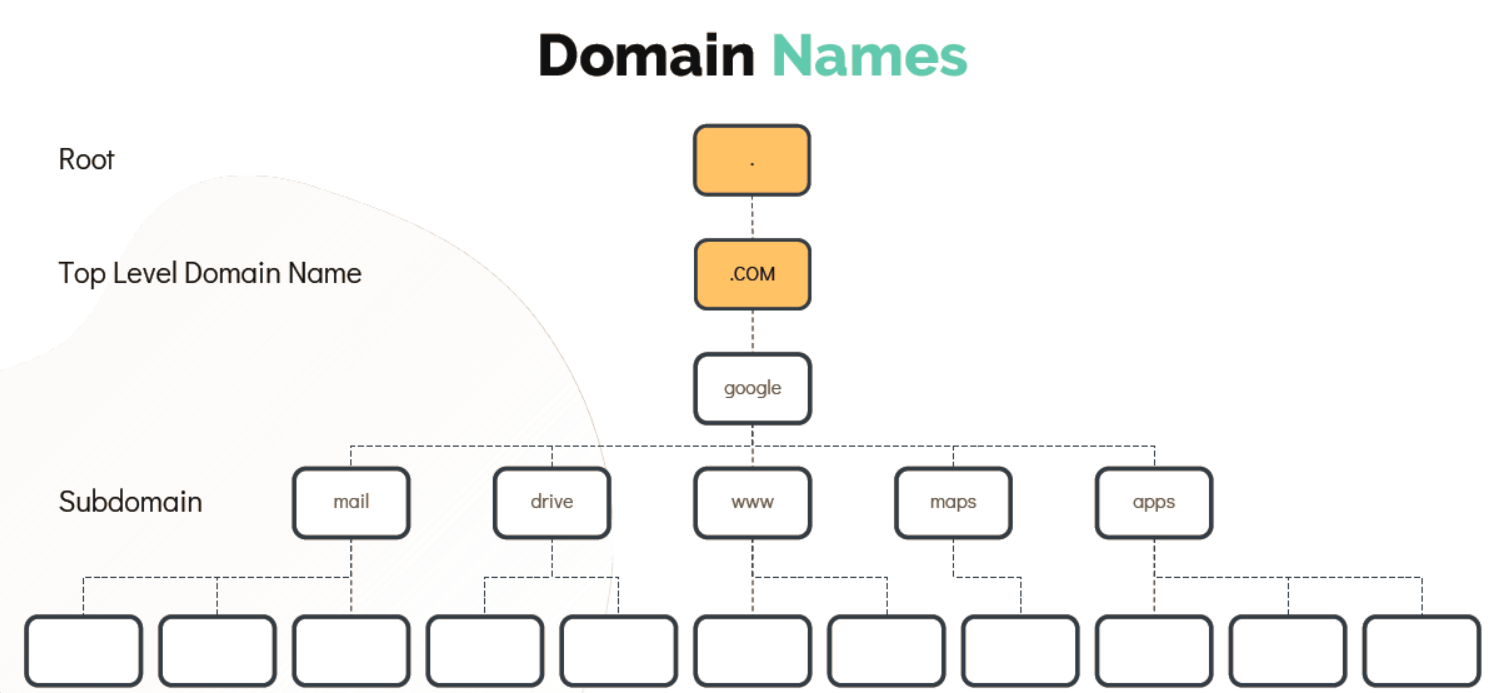
- To test the DNS resolution you can use
nslookupcommand, this will query a hostname from a DNS Server.
- To test the DNS resolution you can use
    [~]$ nslookup www.google.com
    Server: 8.8.8.8
    Address: 8.8.8.8#53
    Non-authoritative answer:
    Name: www.google.com
    Address: 172.217.0.132
- Another useful tool to query a hostname from a DNS server is
digwhich return more detailed information as shown.
    [~]$ dig www.google.com
    ; <<>> DiG 9.10.3-P4-Ubuntu <<>> www.google.com
    ;; global options: +cmd
    ;; Got answer:
    ;; ->>HEADER<<- opcode: QUERY, status: NOERROR, id: 28065
Switching & Routing
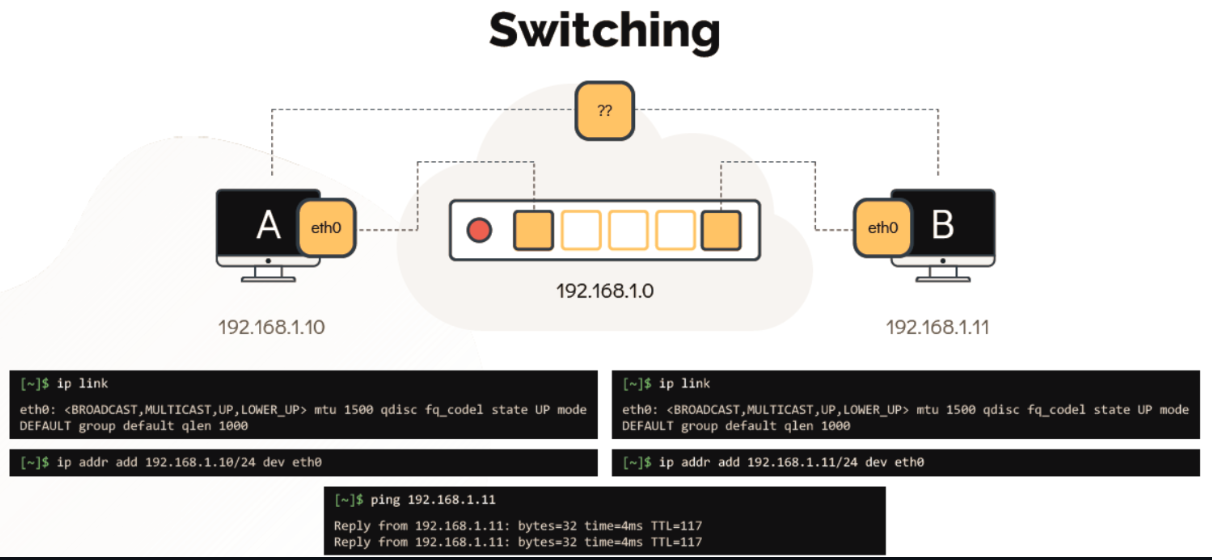
Switching
Switching helps to connect the interface within same network.
To see the interfaces on the hosts use
ip linkcommand
[~]$ ip link
- To connect to the switch we use
ip addr addcommand
- To connect to the switch we use
[~]$ ip addr add 192.168.1.10/24 dev eth0
Routing
Router helps to connect to two seprate networks together.
- To see the existing routing table configuration run the
routecommand.
- To see the existing routing table configuration run the
            [~]$ route
            Kernel IP routing table
            Destination Gateway Genmask Flags Metric Ref Use Iface
- To configure a gateway on system B to reach the system on other network run
[~]$ ip route add 192.168.2.0/24 via 192.168.1.1
            [~]$ route

            Kernel IP routing table
            Destination Gateway Genmask Flags Metric Ref Use Iface
            192.168.2.0 192.168.1.1 255.255.255.0 UG 0 0 0 eth0
- To see the ip addresses assign to interfaces use
[~]$ ip addr
STORAGE
DISK'S & PARTITIONS
Disk is physical storage can divide into smaller logical parts.
List all Block devices
[~]$ lsblk[~]$ ls -l /dev/ | grep "^b"To Print,Create and Delete the parition table use
fdisk -lcommand[~]$ sudo fdisk -l /dev/sda
Partition types:
PRIMARY - Use to Boot an Operating System.
EXTENDED - Can host logical partitions but cannot be used on its own.
LOGICAL - Created within an extended partition.
Creating Partitions -
Gdiskis an improved version of thefdiskthat works with the GTP partition table.To create a partition on
sdbuse[~]$ gdisk /dev/sdb GPT fdisk (gdisk) version 1.0.1 Partition table scan: MBR: protective BSD: not present APM: not present GPT: present Found valid GPT with protective MBR; using GPT. Command (? for help): ? b back up GPT data to a file c change a partition's name d delete a partition i show detailed information on a partition l list known partition types n add a new partition o create a new empty GUID partition table (GPT) p print the partition table q quit without saving changes r recovery and transformation options (experts only) s sort partitions t change a partition's type code v verify disk w write table to disk and exit x extra functionality (experts only) ? print this menu Command (? for help): n Partition number (1-128, default 1): 1 First sector (34-41943006, default = 2048) or {+-}size{KMGTP}: 2048 Information: Moved requested sector from 34 to 2048 in order to align on 2048-sector boundaries. Use 'l' on the experts' menu to adjust alignment Last sector (2048-41943006, default = 41943006) or {+-}size{KMGTP}: 41943006 Current type is 'Linux filesystem' Hex code or GUID (L to show codes, Enter = 8300): Changed type of partition to 'Linux filesystem' Command (? for help): w Final checks complete. About to write GPT data. THIS WILL OVERWRITE EXISTING PARTITIONS!! Do you want to proceed? (Y/N): Y OK; writing new GUID partition table (GPT) to /dev/vdb. The operation has completed successfully.[~]$ sudo fdisk -l /dev/sdb Disk /dev/sdb: 20 GiB, 128035676160 bytes, 250069680 sectors Units: sectors of 1 * 512 = 512 bytes Sector size (logical/physical): 512 bytes / 512 bytes I/O size (minimum/optimal): 512 bytes / 512 bytes Disklabel type: gpt Disk identifier: 7CABF26E-9723-4406-ZEA1-C2B9B6270A23 Device Start End Sectors Size Type /dev/sdb1 2048 41943006 204800 20GB Linux filesystem
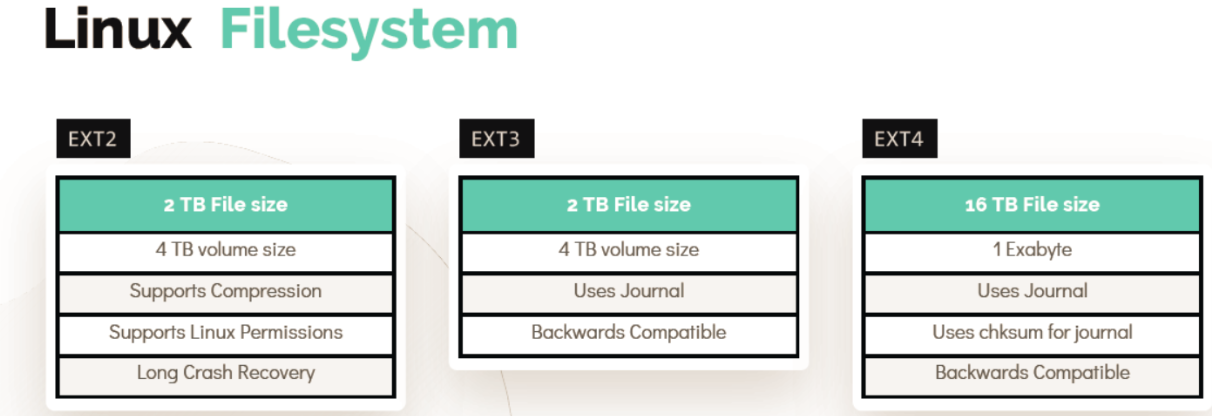
File System in Linux
Working with Ext4
To create a file system we will make use of
/dev/sdbdisk, run below command[~]$ mkfs.ext4 /dev/sdb1Now create a directory to mount the filesystem use below commands
  [~]$ mkdir /mnt/ext4;

  [~]$ mount /dev/sdb1 /mnt/ext4
To verify if the filesystem is mounted use
  [~]$ mount | grep /dev/sdb1

  [~]$ df -hP | grep /dev/sdb1
DAS NAS AND SAN
DAS - Direct Attached Storage, external storage is attached directly to the host system that requires the space.
NAS - Network Attached Storage quite similar to NFS server.
SAN - Storage Area Network, this technology uses a fiber channel for providing high-speed storage.
NFS
NFS - Does not store data in blocks. Instead, it saves data in form of files. It works on service-client model.
NFS server maintains an export configuration file at
/etc/exportsthat defines the clients which should be able to access the directories on the server./etc/exportslooks like this[~]$ /etc/exports /software/repos 10.61.35.201 10.61.35.202 10.61.35.203To exports all the mounts defined in
/etc/exportsuse[~]$ exportfs -aTo manually export a directory use below command
[~]$ exportfs -o 10.61.35.201:/software/repos
LOGICAL VOLUME MANAGER
- LVM allows grouping of multiple physical volumes, which are hard disks or partitions into a volume group.
Working with LVM
To make use of LVM, install the package
LVM.[~]$ apt-get install lvm2Use
pvcreatecommand to create a Physical Volume.[~]$ pvcreate /dev/sdb Physical volume "/dev/sdb" successfully createdUse
vgcreatecommand to create a Volume Group.[~]$ vgcreate caleston_vg /dev/sdb Volume group "caleston_vg" successfully createdUse
pvdisplaycommand to list all the PVs their names, size and the Volume group it is part of.[~]$ pvdisplay --- Physical volume --- PV Name /dev/sdb VG Name caleston_vg PV Size 20.00 GiB / not usable 3.00 MiB Allocatable yes PE Size 4.00 MiB Total PE 5119 freeUse
vgdisplayto see more details of the VG.[~]$ vgdisplay --- Volume group --- VG Name caleston_vg System ID Format lvm2 Metadata Areas 1 VG Status resizable MAX LV 0 Cur LV 0 PE Size 4.00 MiB Total PE 5119 Alloc PE / Size 0 / 0 Free PE / Size 5119 / 20.00 GiB VG UUID VzmIAn-9cEl5bA-lVtm-wHKX-KQaObRTo create the Logical Volumes, you can use
lvcreatecommand[~]$ lvcreate –L 1G –n vol1 caleston_vg Logical volume "vol1" created.To display the Logical Volumes, you can use
lvdisplaycommand[~]$ lvdisplay --- Logical volume --- LV Path /dev/caleston_vg/vol1 LV Name vol1 VG Name caleston_vg Segments 1 Allocation inherit Read ahead sectors auto - currently set to 256 Block device 252:0To list the volume, you can use
lvscommand[~]$ lvs LV VG Attr LSize Pool vol1 caleston_vg -wi-a----- 1.00gNow to create an filesystem you can use
mkfscommand[~]$ mkfs.ext4 /dev/caleston_vg/vol1To mount the filesystem use
mountcommand[~]$ mount –t ext4 /dev/caleston_vg/vol1 /mnt/vol1To Resize the logical volume
  [~]$ lvresize -L +1G -n /dev/caleston_vg/vol1
  Logical volume vol1 successfully resized.
Now to resize the file system use
resize2fscommand.[~]$ resize2fs /dev/caleston_vg/vol1 resize2fs 1.42.13 (17-May-2015) Filesystem at /dev/mapper/caleston_vg-vol1 is mounted on /mnt/vol1; on-line resizing required old_desc_blocks = 1, new_desc_blocks = 1 The filesystem on //dev/mapper/caleston_vg-vol1 is now 524288 (4k) blocks long.Now run
df -hpcommand to verify the size of the mounted filesystem[~]$ df –hP /mnt/vol1 Filesystem Size Used Avail Use% Mounted on /dev/mapper/caleston_vg-vol1 2.0G 1.6M 1.9G 1% /mnt/vol1
Service management with system-d
-All the major distributions, such as Rhel, CentOS, Fedora, Ubuntu, Debian and Archlinux, adopted systemd as their init system.
Systemd is a Linux initialization system and service manager that includes features like on-demand starting of daemons, mount and automount point maintenance etc.
- Systemd also provides a logging daemon and other tools and utilities to help with common system administration tasks.
What is a service unit?
A file with the .service suffix contains information about a process which is managed by systemd. It is composed by three main sections:
1.Unit
The
Unitsection -First of all we have theDescriptionoption. By using this option we can provide a description of the unit.Secondly, we have
Documentationoption. By using this option we can get the details of the service and documentation related to it.By using the
Afteroption, we can state that our unit should be started after the units we provide in the form of a space-separated list.[~]$ cat /etc/systemd/system/project-mercury.service [Unit] Description=Python Django for Project Mercury Documentation=http://wiki.caleston-dev.ca/mercury After=postgresql.service
2.Service
In the
Servicesection of a service unit, we can specify things as the command to be executed when the service is started, or the type of the service itself.[Service] ExecStart=/usr/bin/project-mercury.sh User=project_mercury Restart=on-failure RestartSec=10
3.Install
This
Installsection contains information about the installation of the unit[Install] WantedBy=graphical.target
How to Start the Service now ?
The system to detect the changes you have done in the file, we need to reload the daemon and start the service.
  [~]$ systemctl daemon-reload

  [~]$ systemctl start project-mercury.service
SYSTEMD Tools to Manage SYSTEMD service
SYSTEMCTL
JOURNALCTL
SYSTEMCTL
Systemctl is the main command used to manage services on a
SYSTEMDmanaged server.It can be used to manage services such as
START/STOP/RESTART/RELOADas well asENABLE/DISABLEservices during the system boot.It is also used to
LIST AND MANAGE UNITSandLIST AND UPDATE TARGETS
Systemctl Commands
To start a service use the start command, for example to start a docker service use
systemctl start docker[~]$ systemctl start dockerTo stop a service use the stop command, for example to stop a docker service use
systemctl stop docker[~]$ systemctl stop dockerTo restart a service use the restart command, for example to restart a docker service use
systemctl restart dockerthis will stop and start again.[~]$ systemctl restart dockerTo reload a service use the reload command
[~]$ systemctl reload dockerTo enable a service and make it persistent accross reboots use the enable command
[~]$ systemctl enable dockerTo disable a service at boot use the disable command
[~]$ systemctl disable dockerTo know the status of the service use
systemctl status dockercommand. This command provided the state of the service.[~]$ systemctl status dockerTo see the current runlevel use
systemctl get-default[~]$ systemctl get defaultTo change the runleve to a different target use
systemctl set-default multi-user.target[~]$ systemctl set-default multi-user.targetTo list all the units that systemd has loaded use
systemctl list-units --all, this lists all the unit which are active, inactive or anyother state.[~]$ systemctl list-units --allTo list only active units use
systemctl list-unitscommand[~]$ systemctl list-unitsTo view, and also locate a unit file use
systemctl catcommand. A comment line containing the path to the unit file is printed as the first line of output.[~]$ systemctl cat project-mercury.service
JOURNALCTL
Journalctl is a command for quering/viewing logs collected by systemd.
The systemd-journald service is responsible for systemd’s log collection, and it retrieves messages from the kernel systemd services, and other sources.
Very useful when you are troubleshooting issues with systemd services.
Using
journalctlcommands print all the log entries from oldest to the newest.[~]$ journalctlUsing
journalctl -bcommand print all the logs from the current boot.[~]$ journalctl -bUsing
journalctl -u docker.servicecommand print all the logs specific to the unit specified, for example docker in this case.[~]$ journalctl -u docker.serviceUsing
journalctl -u docker.service --sincecommand print all the logs specific to the unit specified since the given time, for example docker in this case.[~]$ journalctl -u docker.service --since "2022-01-01 13:45:00"
Wow, we've made it to the end of this epic blog post! I hope you've enjoyed this journey into the world of linux as much as I have.
Special thanks to KodeKloud for their comprehensive Linux resources and ChatGPT . Their help was invaluable in writing this blog .
Thanks for Reading!
Subscribe to my newsletter
Read articles from Anas directly inside your inbox. Subscribe to the newsletter, and don't miss out.
Written by


