How to attach the Secondary Elastic IP of EC2 Instance?
 Sachin Yalagudkar
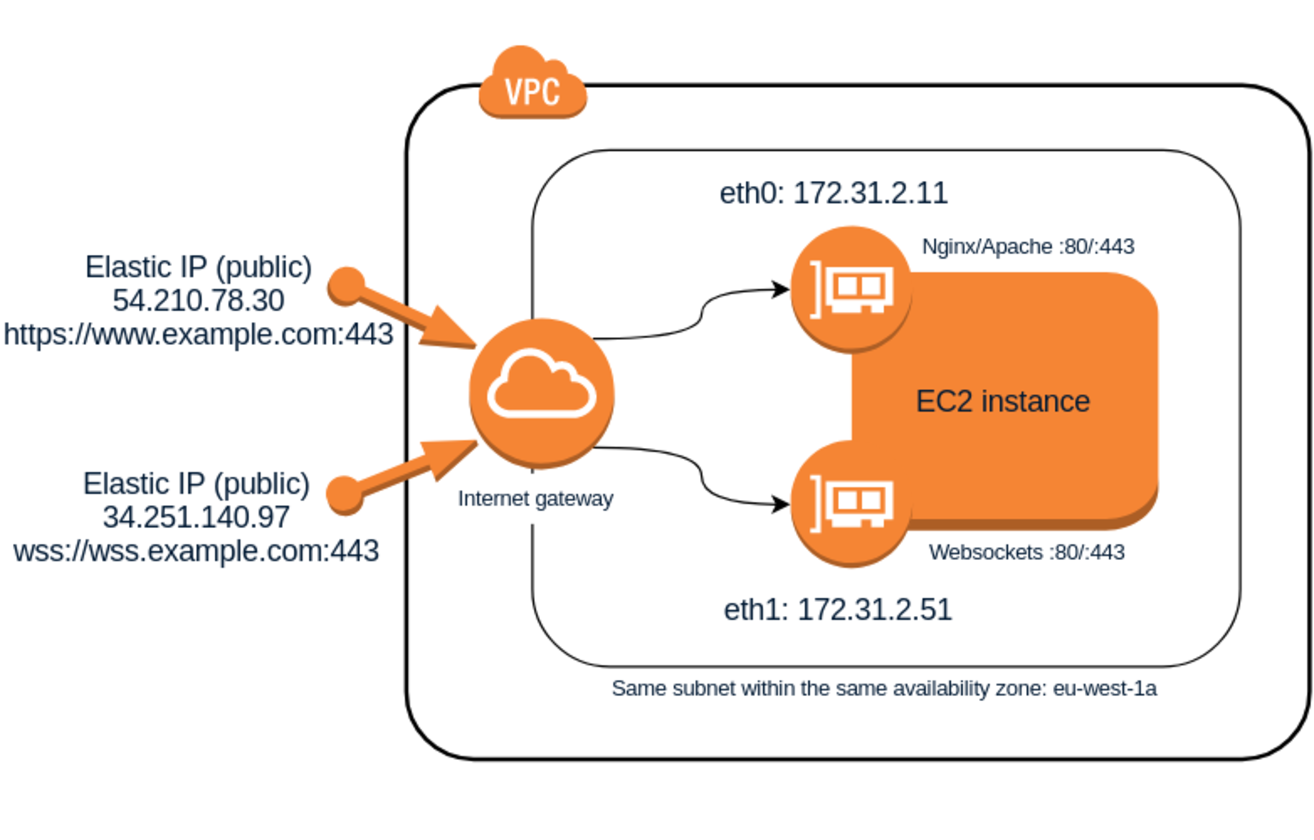
Steps: To create a Secondary Elastic IP for EC2
Create a Secondary Private IP Address:
Open the Amazon EC2 console.
In the navigation pane, choose "Instances" and select your instance.
Choose "Actions," then "Networking," and select "Manage IP Addresses."
Under "IPv4 Addresses," choose "Assign new IP address" and let AWS assign one or specify an IP address from the subnet range.
Choose "Save." and click on the "Confirm"
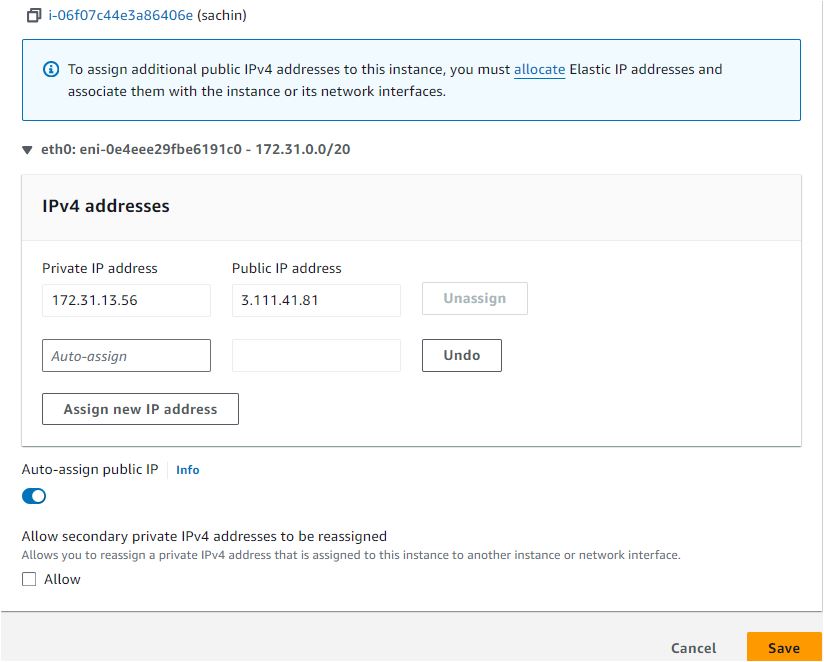
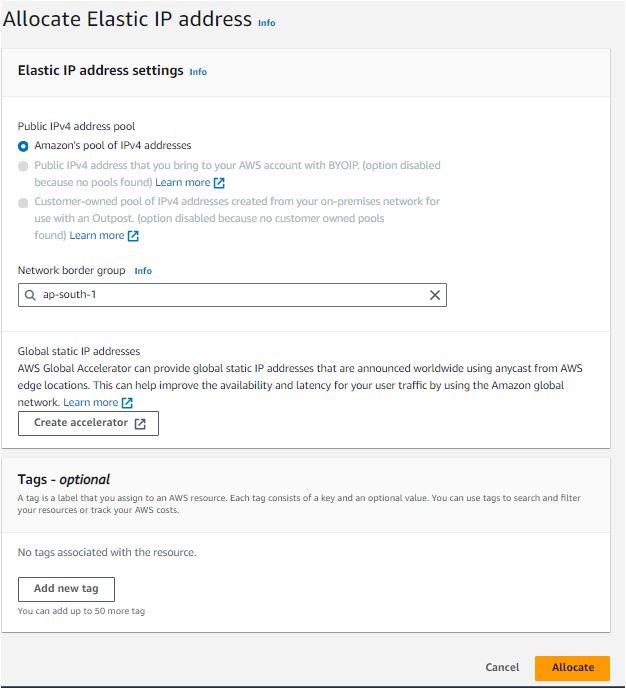
- Allocate the Elastic IP address:
Open the Amazon EC2 console.
In the navigation pane, choose "Elastic IPs."
Choose "Allocate Elastic IP address."
Select the scope for the Elastic IP address (either "VPC" or "EC2-Classic").
Choose "Allocate."
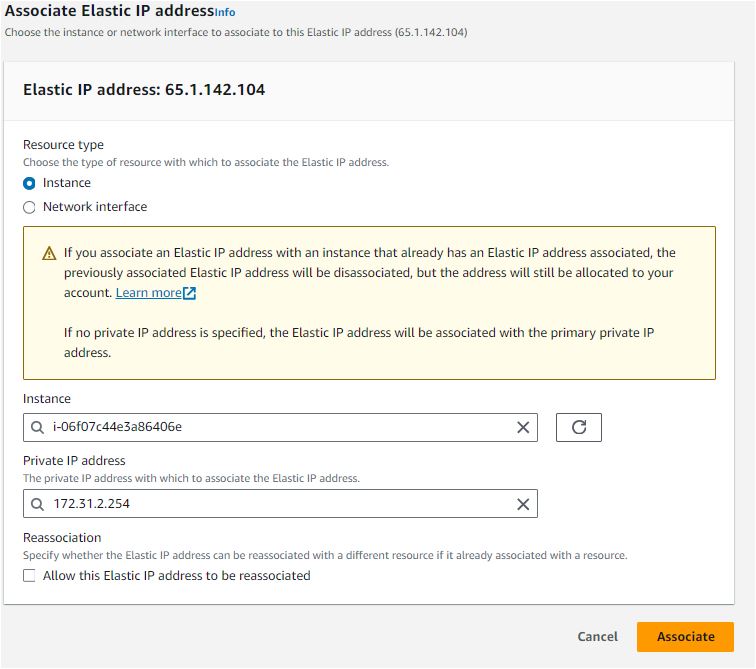
Associate the Elastic IP Address:
In the navigation pane, choose "Elastic IPs."
Select the Elastic IP address that you want to associate as a Secondary IP, then choose "Actions" and select "Associate Elastic IP address."
For "Instance," select your instance.
For "Private IP address," select the secondary private IP address you created.
Choose "Associate."
Verify the both Elastic IPs and Private IPs from Elastic Network Interface (ENI).
Open the Amazon EC2 console.
In the navigation pane, choose "Instances"
Select the Instance, choose "Networking" --> Scroll Down
Select the network interface ID associated with your instance.
In the details pane, you will see the list of private IP addresses and their associated Elastic IP addresses (if any).
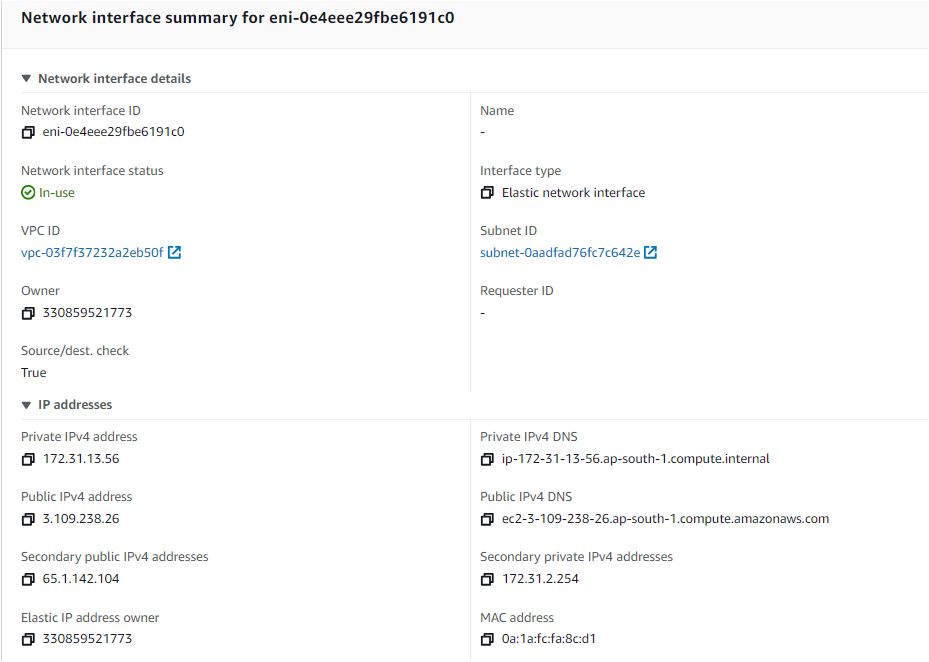
- Use the below given script to attach the IPs to Instance.
Purpose:
- Automatically assign secondary IP addresses to a specified network interface on an EC2 instance using AWS metadata service.
Script Functionality:
Retrieve a Metadata Token:
- Requests a token from the EC2 metadata service for secure access.
Fetch MAC Address:
- Obtains the MAC address of the network interface.
Retrieve Associated IP Addresses:
- Fetches the list of local IPv4 addresses associated with the MAC address.
Add IP Addresses to Interface:
- Iterates through the list of IP addresses and assigns them to the specified network interface.
Usage:
Prerequisites:
Ensure the script has execute permissions.
Verify the correct network interface name (e.g.,
enX0).
Script Execution:
- Save the script to a file, e.g.,
/usr/local/bin/add_ips.sh
- Save the script to a file, e.g.,
    #!/bin/bash

    # Function to get a new metadata token
    get_metadata_token() {
        curl -X PUT "http://169.254.169.254/latest/api/token" \
             -H "X-aws-ec2-metadata-token-ttl-seconds: 21600"
    }

    # Function to get metadata using the token
    get_metadata() {
        local token=$1
        local path=$2
        curl -H "X-aws-ec2-metadata-token: $token" \
             "http://169.254.169.254/latest/meta-data/$path"
    }

    # Request a new metadata token
    TOKEN=$(get_metadata_token)

    # Get the MAC address
    MAC_ADDR=$(get_metadata $TOKEN "mac")

    # Get the local IPs associated with the MAC address
    IP=$(get_metadata $TOKEN "network/interfaces/macs/$MAC_ADDR/local-ipv4s")

    # Convert the IPs to an array
    IFS=$'\n' read -r -d '' -a IP_ARRAY <<<"$IP"

    # Get existing IPs on the interface
    EXISTING_IPS=$(ip addr show dev enX0 | grep "inet " | awk '{print $2}' | cut -d/ -f1)

    # Add each IP address to the interface if not already present
    for ip in "${IP_ARRAY[@]}"; do
        if echo "$EXISTING_IPS" | grep -q "$ip"; then
            echo "IP $ip already assigned."
        else
            echo "Adding IP: $ip"
            ip addr add dev enX0 $ip/24
        fi
    done
Make the script executable with:
chmod +x /usr/local/bin/add_ips.shRun the script manually using:
bash /usr/local/bin/add_ips.sh

- Automate Execution:
Using Cron with reboot
Edit Crontab
- Edit the root user’s crontab:
sudo crontab -eAdd the following line to the crontab to run the script on reboot:
@reboot /usr/local/bin/add_ips.shAlternate option To ensure that your script runs automatically on reboot
Using Systemd
systemdis the recommended way to manage services on modern Linux distributions. Here's how to set up a systemd service:Create a systemd service file:
sudo nano /etc/systemd/system/add_ips.service- Paste the following configuration into this file:
        [Unit]
        Description=Add IPs on startup
        After=network.target

        [Service]
        Type=oneshot
        ExecStart=/usr/local/bin/add_ips.sh
        RemainAfterExit=true

        [Install]
        WantedBy=multi-user.target
- Save and close the editor.
Enable and Start the Service
Reload systemd to pick up the new service file:
sudo systemctl daemon-reload
sudo systemctl enable add_ips.service
sudo systemctl start add_ips.service
sudo systemctl status add_ips.service
Test:
- Stop and Start or reboot the EC2 instance and check if the private IP is exists by using the below command
ip a
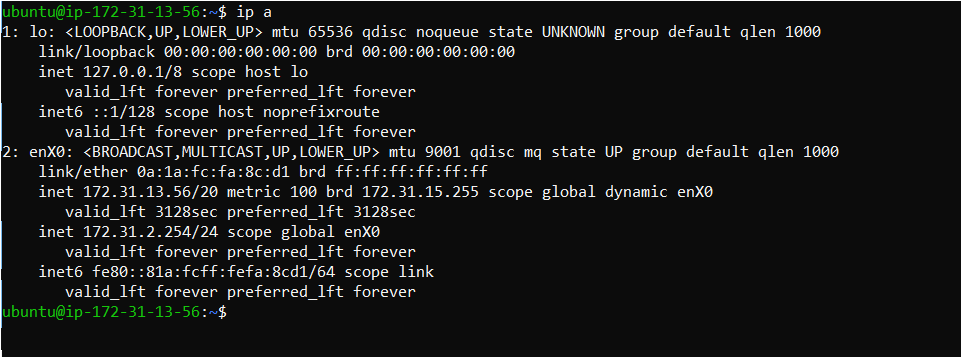
- Check If you can able to log in to the server via SSH by using the Secondary Elastic IP.
Conclusion:
- This script simplifies the process of adding multiple secondary IP addresses to a network interface on an EC2 instance, ensuring they are automatically assigned on reboot.
Subscribe to my newsletter
Read articles from Sachin Yalagudkar directly inside your inbox. Subscribe to the newsletter, and don't miss out.
Written by
