How to Transfer Files Between Containers with One Command
 Nisarg Pipaliya
Imagine you are enjoying your regular cup of coffee. Sip... ahhh!

It’s a nice morning, and you are ready for work, you open your laptop, and BAM!! have a Docker task assigned to you i.e. you are supposed to transfer a file from a folder “Source” to another folder “Destination” but the catch is, you need to follow the order i.e “Source” to “Container A”, “ContainerA” to “ContainerB” and “ContainerB” to “Destination” folder.
another condition is you should do it using a single command 🤯🤯 and no shared volume between containerA and containerB.

So now you start thinking about how to do it?
Let’s break down the problem:
Step 1: transfer file from “Source” folder to containerA
Step 2: transfer file from containerA to containerB
Step 3: transfer file from containerB to “Destination” folder
So now we can think clearly, as we have divided our work into smaller tasks #DivideAndConquer 😂( Bad Joke Alert)
For Steps 1 and 3:
We can use the concept of Bind mount i.e. leverage the functionality of the Docker Storage service to connect the host file system to the Docker container.
But before we do that, we need to keep the docker containers on the same network as we are supposed to transfer files from one container to another.
(You can also skip this network creation part, as by default containers will use a bridge network for communication)
docker network create pirateNet
Let’s choose the image for demo purposes, I am going with the tomcat image, you can choose any.
docker run -d --name containerA -p 2222:22 --network pirateNet -v /home/luffy/source:/source tomcat
Host Folder:
- /home/luffy/source
Folder on containerA:
- /source
Similarly for containerB:
docker run -d --name containerB -p 2223:22 --network pirateNet -v /home/luffy/destination:/destination tomcat
Let’s dive into the main part i.e. step 2:
This thing can be done using multiple ways, I am going to discuss two ways you can do it.
Way 1 Using SCP
We will use the “Secure Copy Protocol” scp, part of the “openssh” module.
docker exec -i containerA sh -c 'sshpass -p "root123" scp $HOME/../source/file_name.txt root@IP_OF_CONTAINER_B:$HOME/../dest
To use this command you need “openssh-server openssh-client and sshpass” modules in your docker container.
To do it:
#For ContainerA
docker exec -it containerA /bin/bash

#into the container
apt-get install openssh-server openssh-client sshpass

service ssh start
#For ContainerB
docker exec -it containerB /bin/bash

#Into containerB
apt-get install openssh-server openssh-client

service ssh start


#Now we will set id password to login to this system
echo "root|root123" | chpasswd

#Now move to /etc/ssh
cd /home/../etc/ssh

#open sshd_config file in editor
vi sshd_config

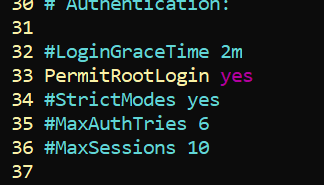
Now, edit the authentication part, and make “PermitRootLogin yes”
All set to execute the command !!
Way 2 Using Netcat
Here we will use “Netcat” for transferring files, thanks to my friend Shreya Gandhi for suggesting this approach.
Setup Netcat on both the containers:
Make containerB listen for requests and what it is listing should be written to the destination folder,
docker exec containerB sh -c 'nc -l -p port_bounded_to_container > /destination/file_name.txt'
Now stream the source file,
docker exec containerA sh -c 'nc containerB_IP_address port_bounded_to_container_B < /source/file.txt'
To know the IP address of containerB
docker inspect containerB #Search IP address of containerB from here.
For this approach to work set up Netcat:
Run the following command inside containerA and containerB:
apt-get update && apt-get upgrade
apt-get install netcat-openbsd

Well, Kudos to you 🎉 you finished this article and mastered the art of transferring files from one container to another 😁.
Follow for more such interesting content and if you find this helpful then do like and share it ✨
Keep Exploring 🔎
Subscribe to my newsletter
Read articles from Nisarg Pipaliya directly inside your inbox. Subscribe to the newsletter, and don't miss out.
Written by
