Git-Lab DevSecOps pipeline
 ajay singh
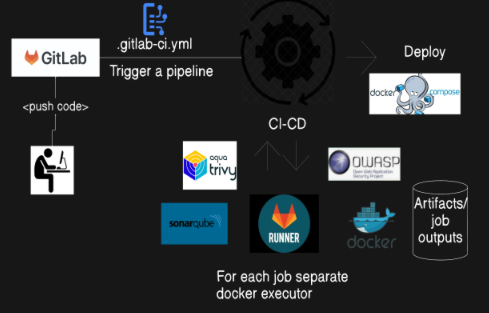
Short Note on Tools:
Git-Lab : GitLab is a web-based DevOps lifecycle tool that provides a Git repository manager providing wiki, issue-tracking, and CI/CD pipeline features, using an open-source license. GitLab offers both self-managed and SaaS (software as a service) versions.
Runner: A GitLab Runner is like a helper that automatically does the chores for your code. Imagine you have a list of tasks every time you update your code, like checking for errors, running tests, or packaging everything up. Instead of doing these tasks manually every time, you have a helper (the GitLab Runner) that does them for you. whenever you make changes to your code and save it in GitLab, the Runner steps in and handles all the repetitive tasks, making sure everything is working perfectly and ready to go. This saves you time and ensures your code is always in good shape.
Docker: Docker is like a shipping container for your software. Just like a shipping container holds everything needed for a shipment (like goods, packaging, etc.) and can be transported anywhere, a Docker container holds everything your software needs to run (like code, libraries, and settings). This way, you can be sure your software will work the same way everywhere, whether it's on your laptop, a test server, or in production.
OWASP: OWASP is the Open Web Application Security Project that helps developers understand where security issues might be and provides tools and best practices to make sure their applications are safe from hackers and other threats. OWASP is like a security-focused guide and dependency checker. helping you to understand and fix the most common security problems in your software.
Trivy : It helps you ensure that your software containers are safe and secure, reducing the risk of running into problems once your application is deployed. It’s a handy tool to keep your software safe from potential threats. It is used for image scanning.
SonarQube: SonarQube is like a general code quality inspector, checking for various issues in your code to make it better overall.
Docker-compose: Docker Compose is like a recipe book for setting up and running multi-container Docker applications.
Follow the Git-Lab CICD Pipeline Steps:
You Must have the Git-lab account and project should be there.
SonarQube Server configuration on Node or Instance:-
Install SonarQube on your cloud or On-Premises instance.
 # update the a piece of package information
 sudo apt-get update -y
 # install docker
 sudo apt install docker.io
 # check sdocker is running or not
 systemctl status docker
 # To avoid from any permission issue,Give permission to user and socket file.
 sudo usermod -aG docker $USER
 sudo chmod 666 /var/run/docker.sock
 # Install and run SonarQube on Port 9000 with the name of 'sonar'.
 docker -d -p 9000:9000 --name sonar sonarqube:latest
 # if your project is running by docker compose , install docker compose by using following command.
 sudo apt install docker-compose-v2
Java-17 or later for sonar-scanner on Sonarqube server.
 # Install Java 17 or later and check java version.
 sudo apt-get install openjdk-17-jdk
 java -version
 # export java in envirnmanet variable
 export
 # Install unzip
 sudo apt-get install unzip
 # Install Sonar Scanner
 wget https://binaries.sonarsource.com/Distribution/sonar-scanner-cli/sonar-scanner-cli-6.1.0.4477-linux-x64.zip
 unzip sonar-scanner-cli-6.1.0.4477-linux-x64.zip
 mv sonar-scanner-6.1.0.4477-linux-x64 /opt/
 vi ~/.bashrc
 export PATH=/opt/sonar-scanner-6.1.0.4477-linux-x64/bin:$PATH
 source ~/.bashrc
 # check sonar scanner version, Java 17.0.11 Eclipse or later.
 sonar-scanner --version
Integration Git-Lab and SonarQube server.
Login To Git-Lab and Generate Access Token(Add New Token) and Copy this at safe place.

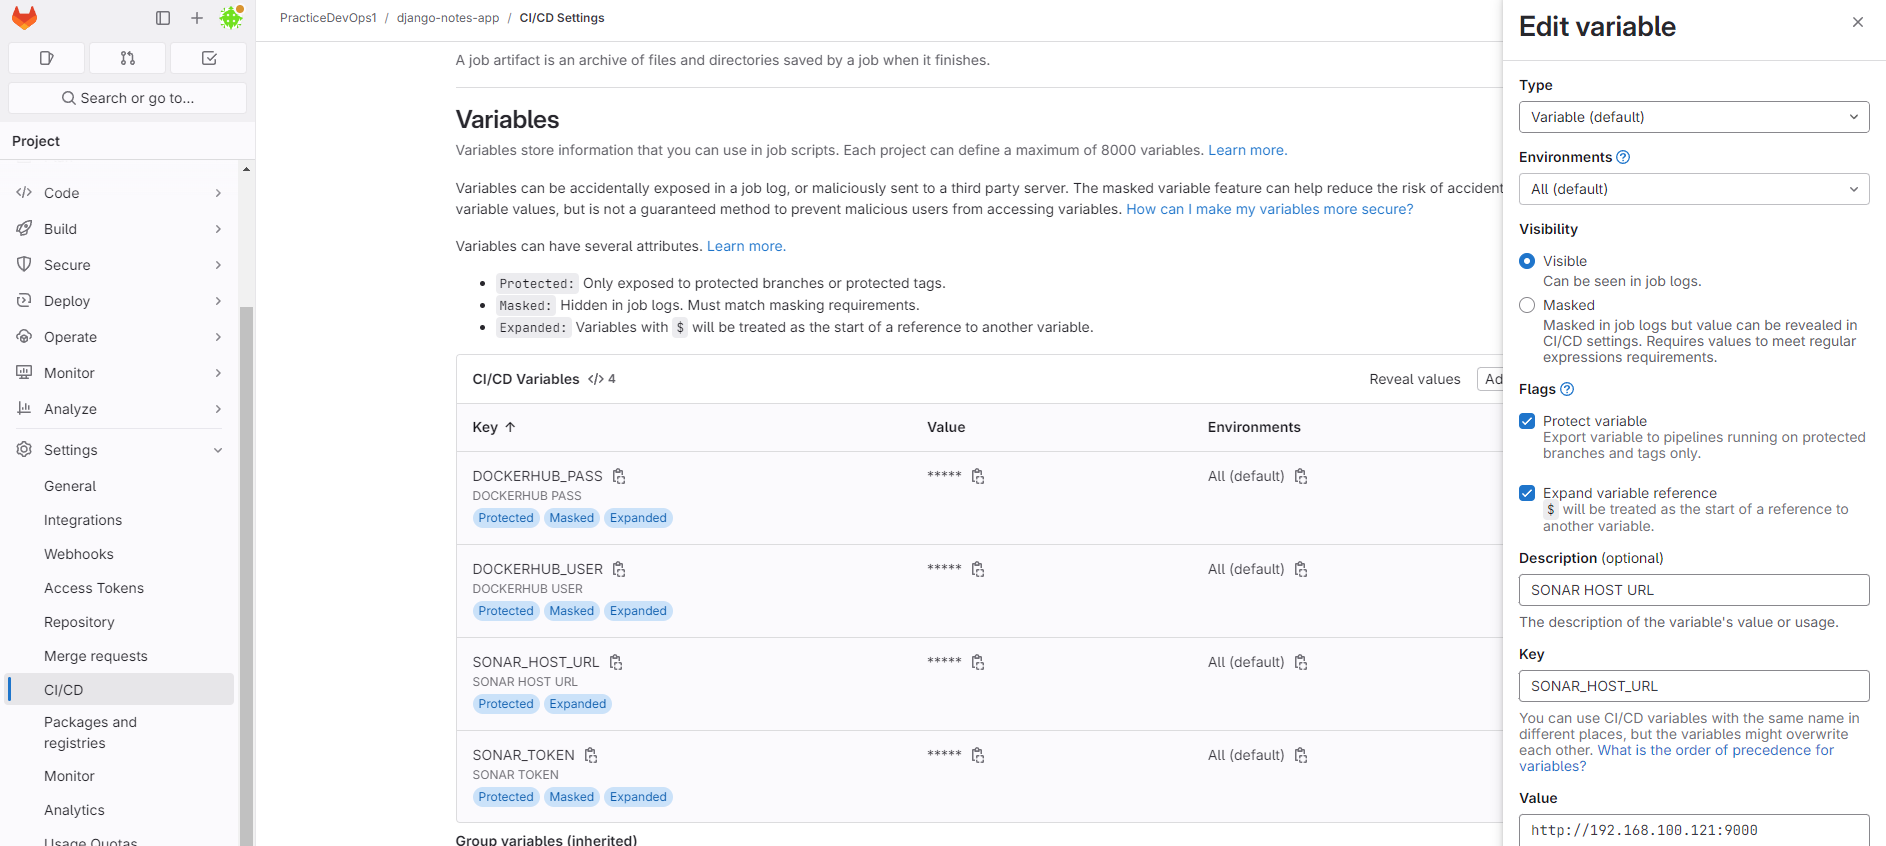
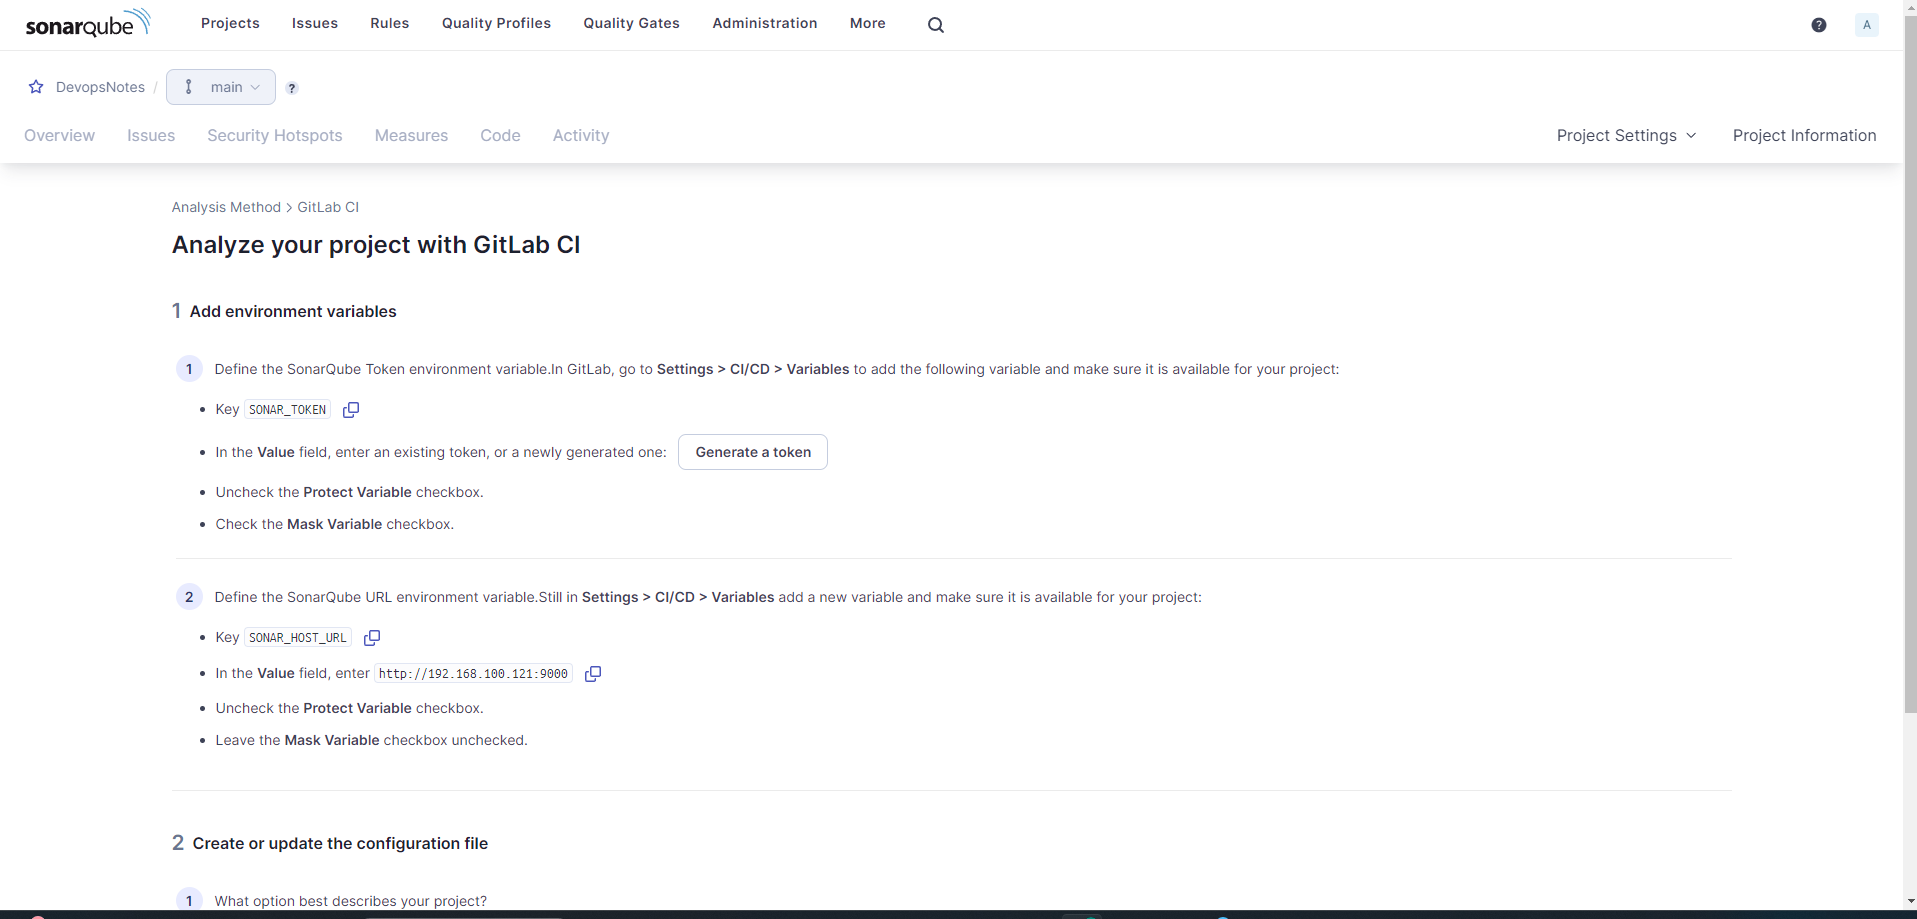
Copy (SONAR_HOST_URL,SONAR_TOKEN) from Step-6 and Configure in Git-lab.
Gitlab==>Project==>setting==>CICD==>Variables. Token must be masked.
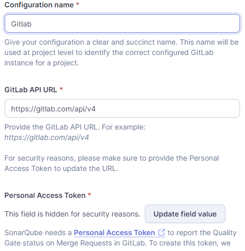
Login To SonarQube and import project, In my case i imported from Git-Lab.

I have already imported, Once you click on setup of git lab it will show you the form. There you need to fill the info.

Paste the Token from Step-1 that you have generated on Git-lab.
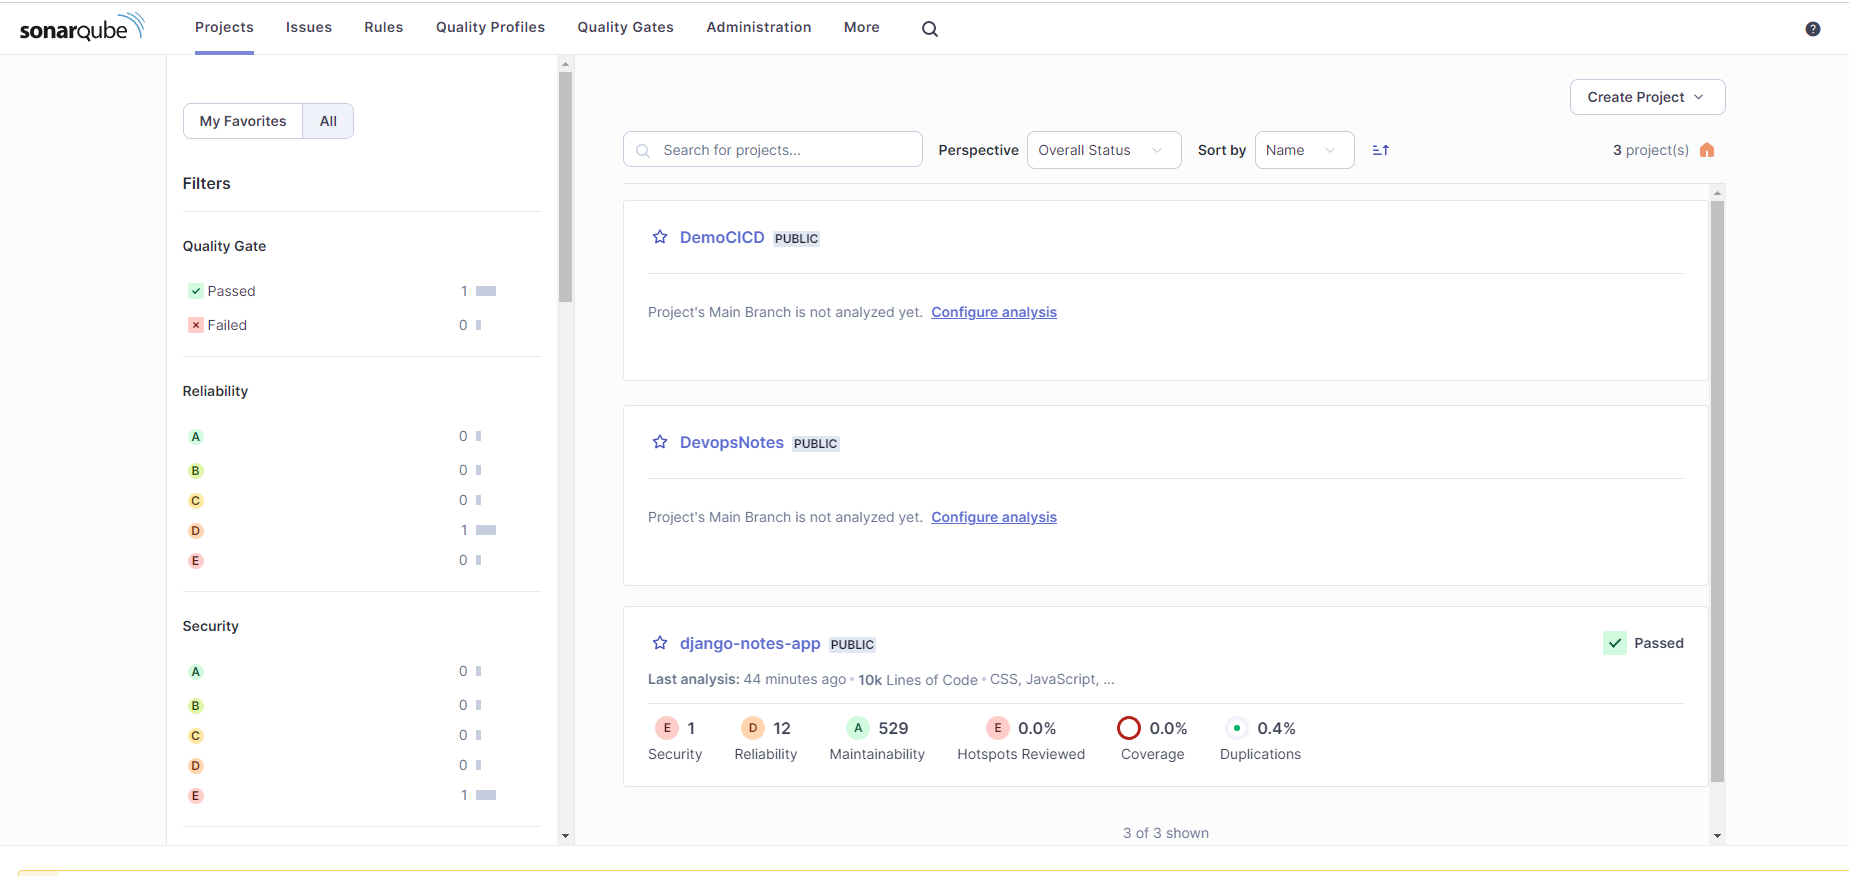
Once you done, it will show you the list of git-lab projects. you can select all or any of one or two.
Now, go to imported project and click on configure analysis.
It will redirect you the configuration page where you have to generate a token.
copy the key (SONAR_HOST_URL,SONAR_TOKEN) and their values in safe place.
Click on Project setting==>Permission
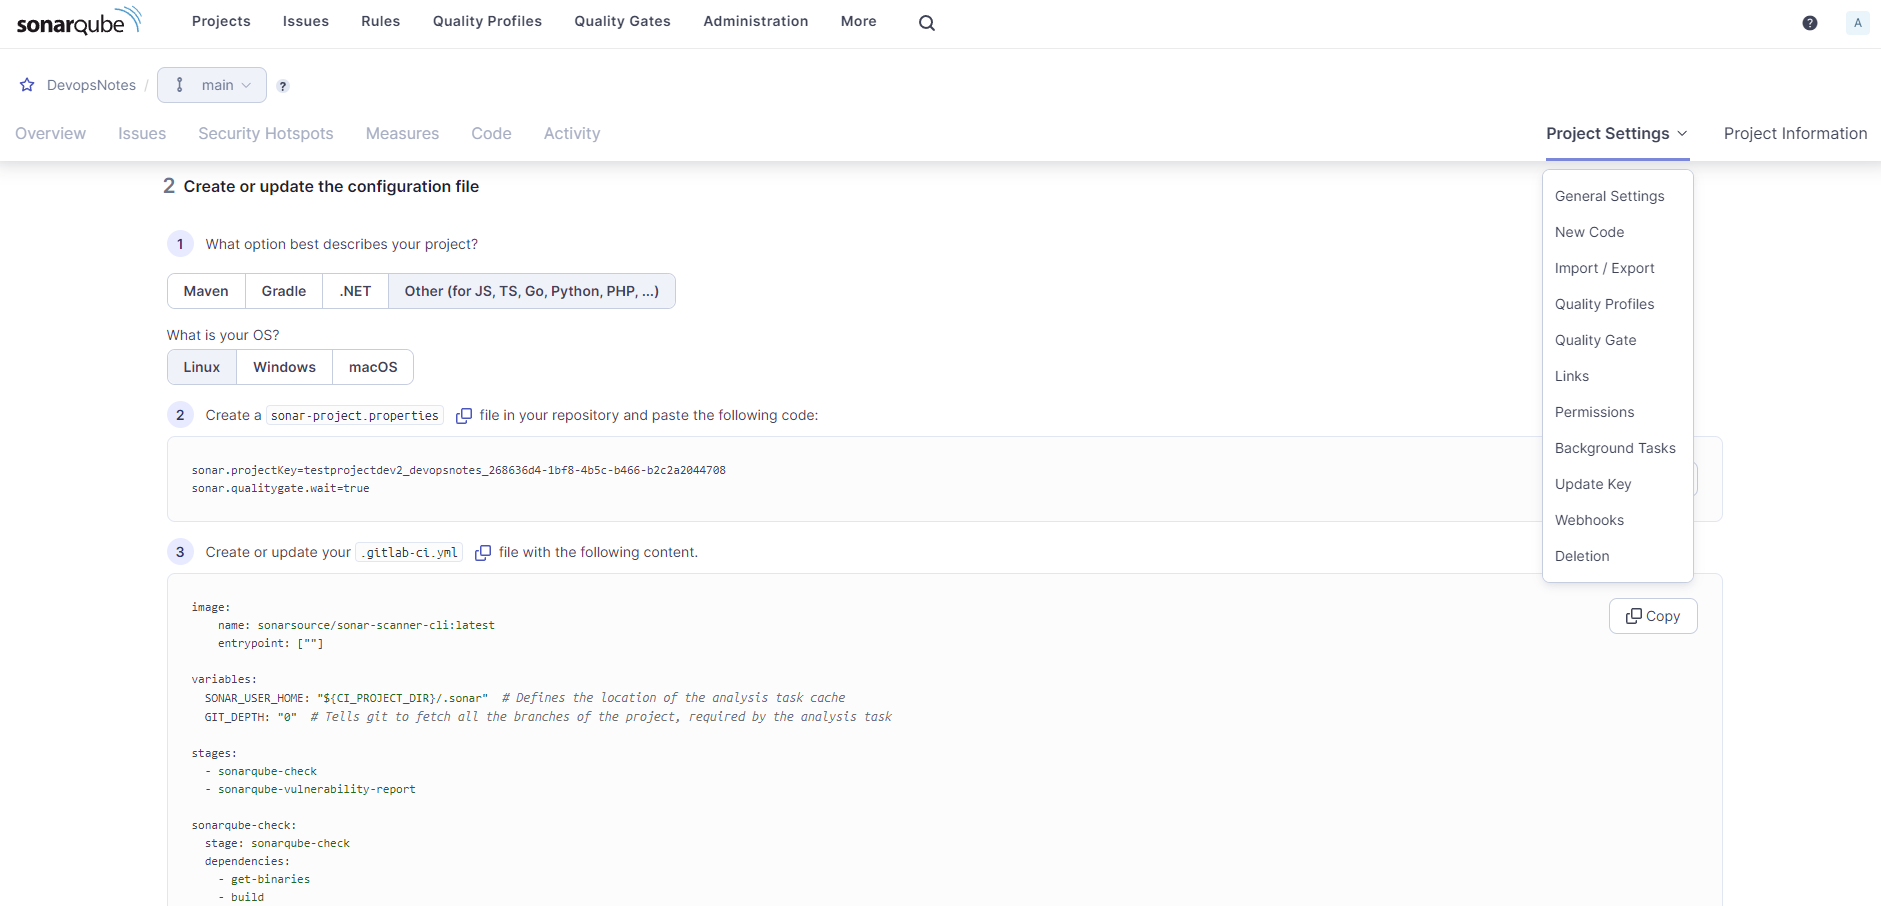
You can give Execute Analysis permission to your user when you create token that time that user has been created inside a admin .

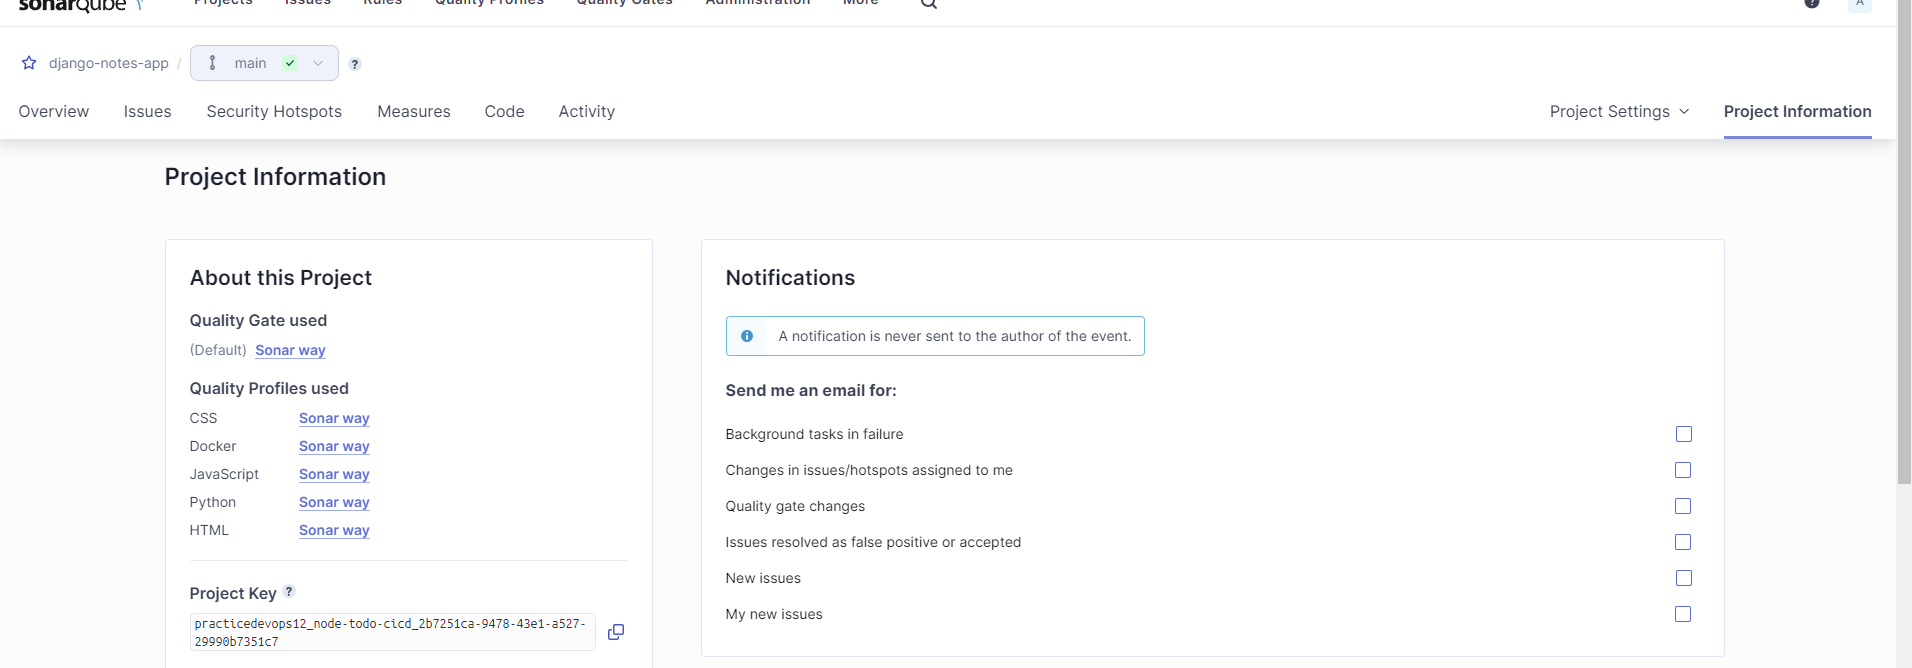
Click on 'Project information' and Copy Project key from Project information and use this in your .gitlab-ci.yml.
Create Project Runner on our instance.
Gitlab==>Project==>setting==>CICD==>Runners==>New project runner.
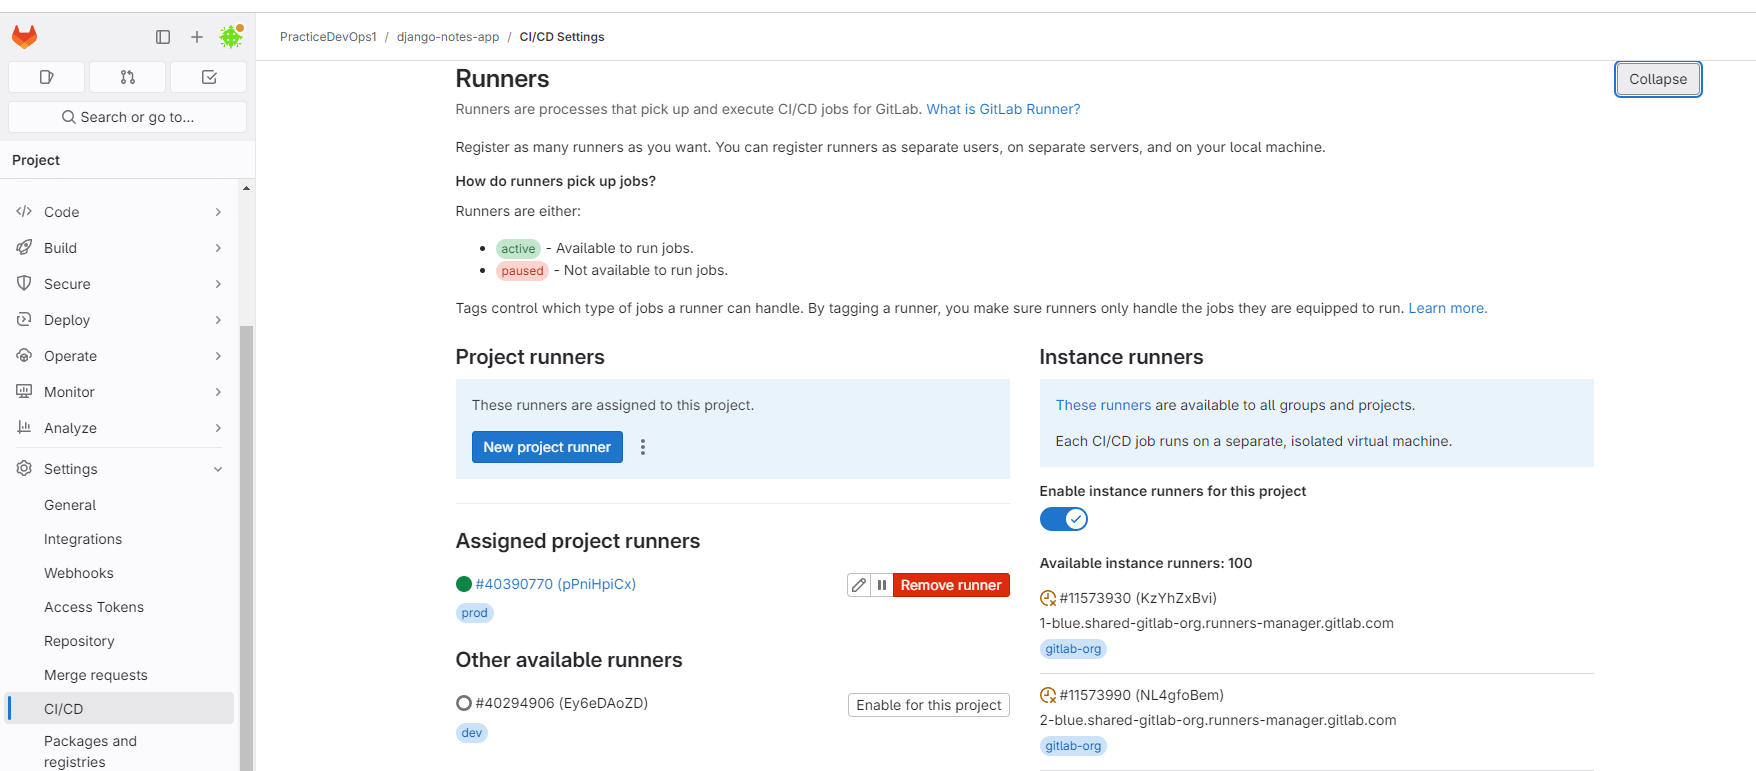
Just write a new runner name and create runner.
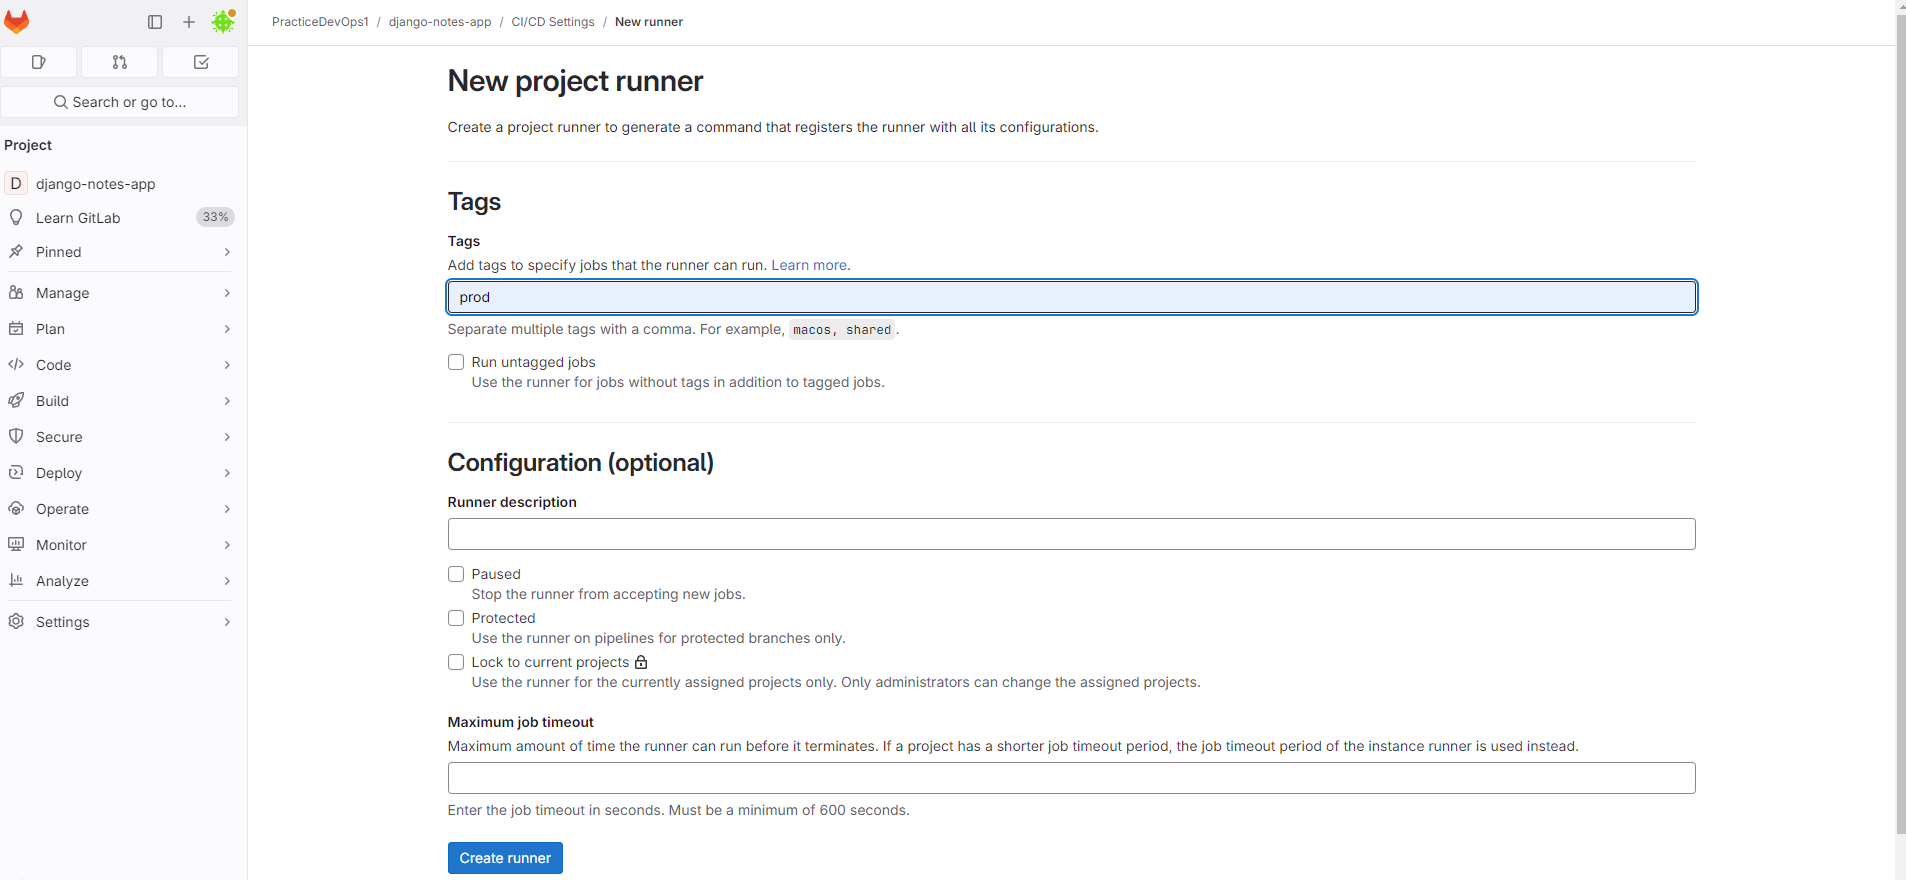
Install and register runner on your instance.
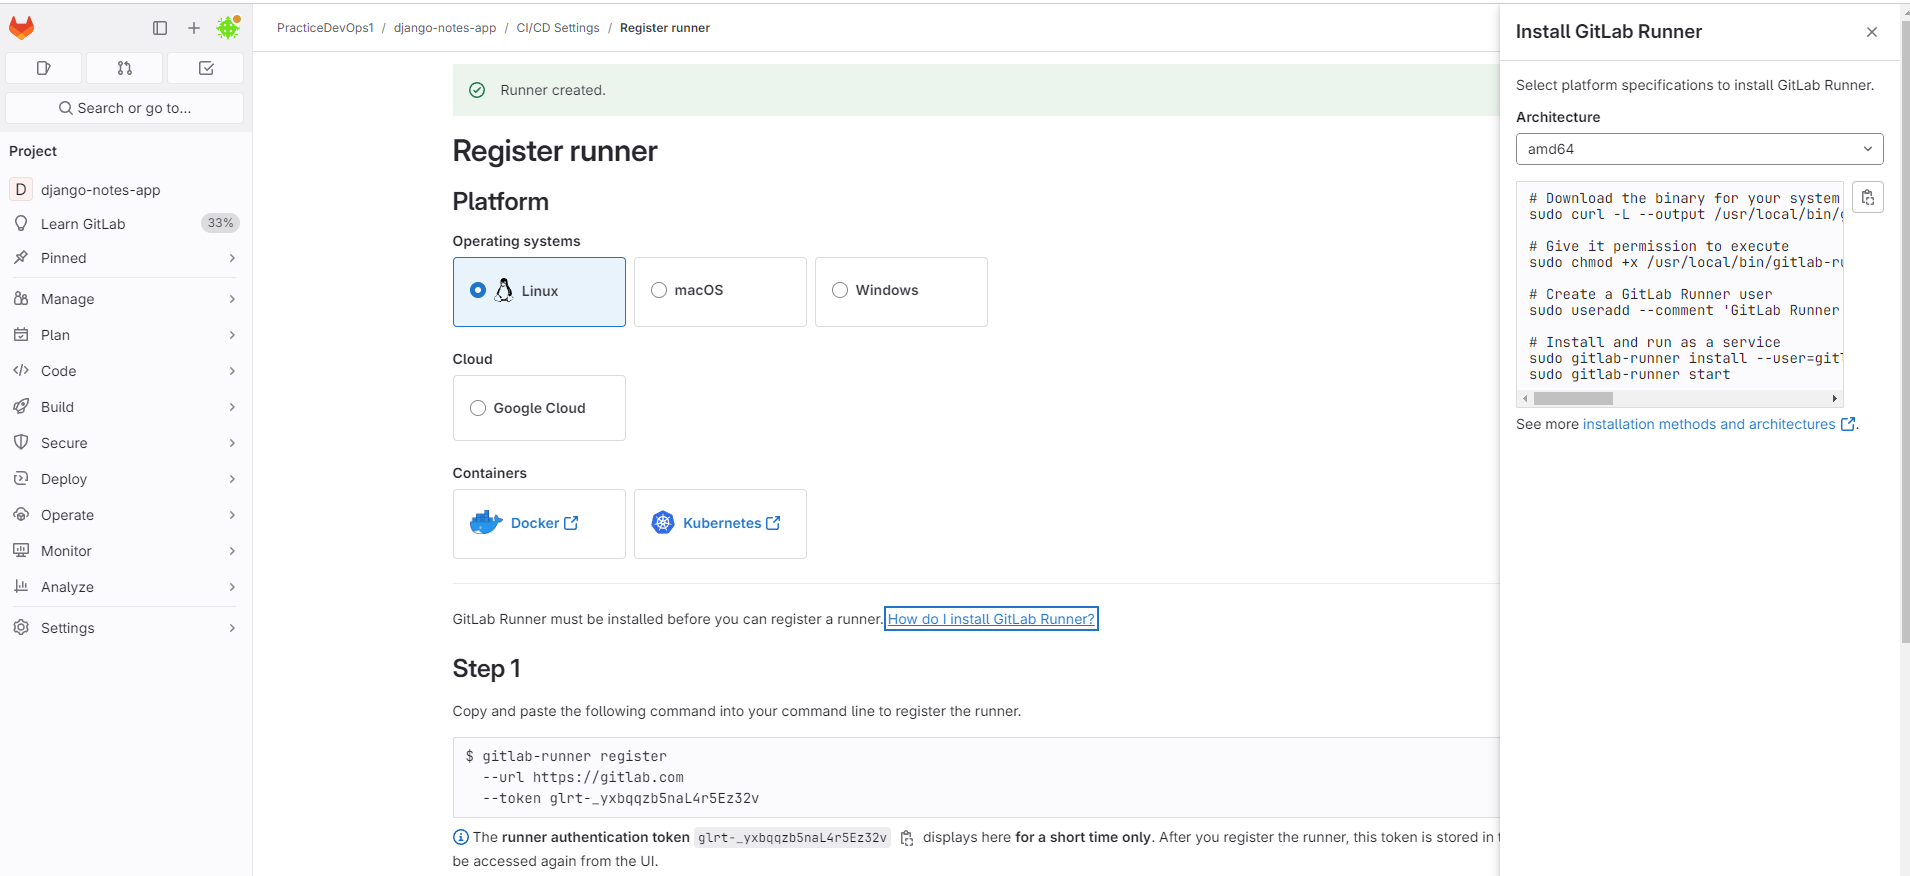
Choose platform, i am using Linux.
Click on how do i install git -lab runner.
Copy Install steps shows in left side and paste this on you instance terminal.
Now, register runner. copy register runner commands and paste in to your instance terminal.
Enter the GitLab Instance URL, Empty and Enter bcoz using default.
Enter a name of runner, any name you can use.
Enter a Executor, I am using shell.
then press enter
Run <gitlab-runner run> to check whether it's Runner is running or not. you can use <systemctl status gitlab-runner.service>
        myserver@server:~$ gitlab-runner register  --url https://gitlab.com  --token glrt-h4vdu6kTsUCPPf9MUrqF
        Runtime platform                                    arch=amd64 os=linux pid=2065 revision=9882d9c7 version=17.2.1
        WARNING: Running in user-mode.
        WARNING: The user-mode requires you to manually start builds processing:
        WARNING: $ gitlab-runner run
        WARNING: Use sudo for system-mode:
        WARNING: $ sudo gitlab-runner...

        Enter the GitLab instance URL (for example, https://gitlab.com/):
        [https://gitlab.com]:
        Verifying runner... is valid                        runner=h4vdu6kTs
        Enter a name for the runner. This is stored only in the local config.toml file:
        [terraform]: test
        Enter an executor: docker, docker-windows, docker-autoscaler, instance, custom, shell, parallels, virtualbox, ssh, docker+machine, kubernetes:
        shell
        Runner registered successfully. Feel free to start it, but if it's running already the config should be automatically reloaded!

        myserver@server:~$ systemctl status gitlab-runner.service

        # comment below line in a .bash_logout file

        myserver@server:~$ vi /home/gitlab-runner/.bash_logout

        #if [ "$SHLVL" = 1 ]; then
        #    [ -x /usr/bin/clear_console ] && /usr/bin/clear_console -q
        #fi
Now, we are ready to create a pipeline, copy and paste below code in ".gitlab-ci.yml" file and commit this file in your project.
 image: docker:latest #This line specifies the Docker image to use for the job.
 services:  #These services run in parallel with the main job container
   - docker:dind #It runs a Docker daemon inside a Docker container
 variables:
     Github_repo: "https://github.com/user/test-app.git" # enter your github repo url
 stages:
   - clone
   - build
   - dependency-check
   - sonarqube-check
   - sonarqube-vulnerability-report
   - trivy-scan
   - push
   - trivy_image_scan
   - deploy
 clone_code:
   stage: clone
   script:
     - git clone $Github_repo
   artifacts:
    paths:
     - test-app/
 build_job:
   stage: build
   script:
     - cd test-app/
     - docker build -t test-app:latest .
     - docker save test-app:latest > test-app.tar #Save the Docker image in test-app-tar
     - docker images
   artifacts: #Artifacts are files or directories that you want to save and make available after the job completes.
    paths: #This section specifies the files or directories to be saved as artifacts.
     - test-app/ #Save the django-notes-app directory.
     - test-app.tar #Save the test-app.tar file, which is the backup of your Docker image.
 dependency_check:
   stage: dependency-check
   image: owasp/dependency-check:latest
   script:
     - cd test-app/
     - dependency-check.sh --project "${CI_PROJECT_NAME}" --scan "${CI_PROJECT_DIR}" --format "HTML" --out dependency-check-report.html"
     - cat dependency-check-report.html   # Display the report content to confirm it's generated
   artifacts:
     paths:
       - test-app/
       - dependency-check-report.html
     expire_in: 1 day
 sonarqube-check:
   stage: sonarqube-check
   variables:
     SONAR_USER_HOME: "${CI_PROJECT_DIR}/.sonar"
     GIT_DEPTH: "0" #Job should fetch the entire history of the repository
   cache: #Caching is used to save certain files or directories so that they can be quickly reused in future jobs.
     policy: pull #cache will be downloaded if it exists
     key: "${CI_COMMIT_SHORT_SHA}" # the short version of the commit hash
     paths:
       - .sonar/cache #SonarQube stores its analysis cache, so reusing this cache.
   script:
     - cd test-app/
     - java --version
     - /opt/sonar-scanner-6.1.0.4477-linux-x64/bin/sonar-scanner -Dsonar.projectKey=practicedevops12_node-todo-cicd_2b7251ca-9478-43e1-a527-29990b7351c7 -Dsonar.sources=. -Dsonar.host.url=$SONAR_HOST_URL -Dsonar.login=$SONAR_TOKEN
   tags:
     - prod  # Our project runner or instance, where job will execute.
 sonarqube-vulnerability-report:
   stage: sonarqube-vulnerability-report
   variables:
     SONAR_USER_HOME: "${CI_PROJECT_DIR}/.sonar"  # Defines the location of the analysis task cache
     GIT_DEPTH: "0"  # Tells git to fetch all the branches of the project, required by the analysis task
   script:
     - cd test-app/
     - 'curl -u "${SONAR_TOKEN}:" "${SONAR_HOST_URL}/api/issues/gitlab_sast_export?projectKey=practicedevops12_node-todo-cicd_2b7251ca-9478-43e1-a527-29990b7351c7&branch=${CI_COMMIT_BRANCH}&pullRequest=${CI_MERGE_REQUEST_IID}" -o gl-sast-sonar-report.json'
   artifacts:
     paths:
       - test-app/
       - gl-sast-sonar-report.json
   tags:
     - prod
 trivy_job:
   stage: trivy-scan
   image:
     name: aquasec/trivy:latest
     entrypoint: [""] #This overrides the default entrypoint of the Docker image. By setting it to an empty string, it allows the script commands to be executed directly.
   script:
     - trivy fs . #trivy to scan the filesystem (denoted by fs) of the current directory
 push_job:
   stage: push
   script:
     - cd test-app/
     - docker load -i test-app.tar
     - docker images
     - echo "$DOCKERHUB_PASS" | docker login -u $DOCKERHUB_USER --password-stdin
     - docker image tag test-app:latest $DOCKERHUB_USER/test-app:latest
     - docker push  $DOCKERHUB_USER/test-app:latest
 scan_image:
   stage: trivy_image_scan
   image:
     name: aquasec/trivy:latest
     entrypoint: [""]
   script:
     - trivy image $DOCKERHUB_USER/test-app:latest
 deploy_job:
   stage: deploy
   script:
     - cd test-app/
     - docker load -i test-app.tar
     - docker images
     - docker compose down && docker compose up -d
   tags:
     - prod # Project deployed on my instance or Git-lab Project runner.
Final Output of Pipeline Look like this and your project will run successfully.
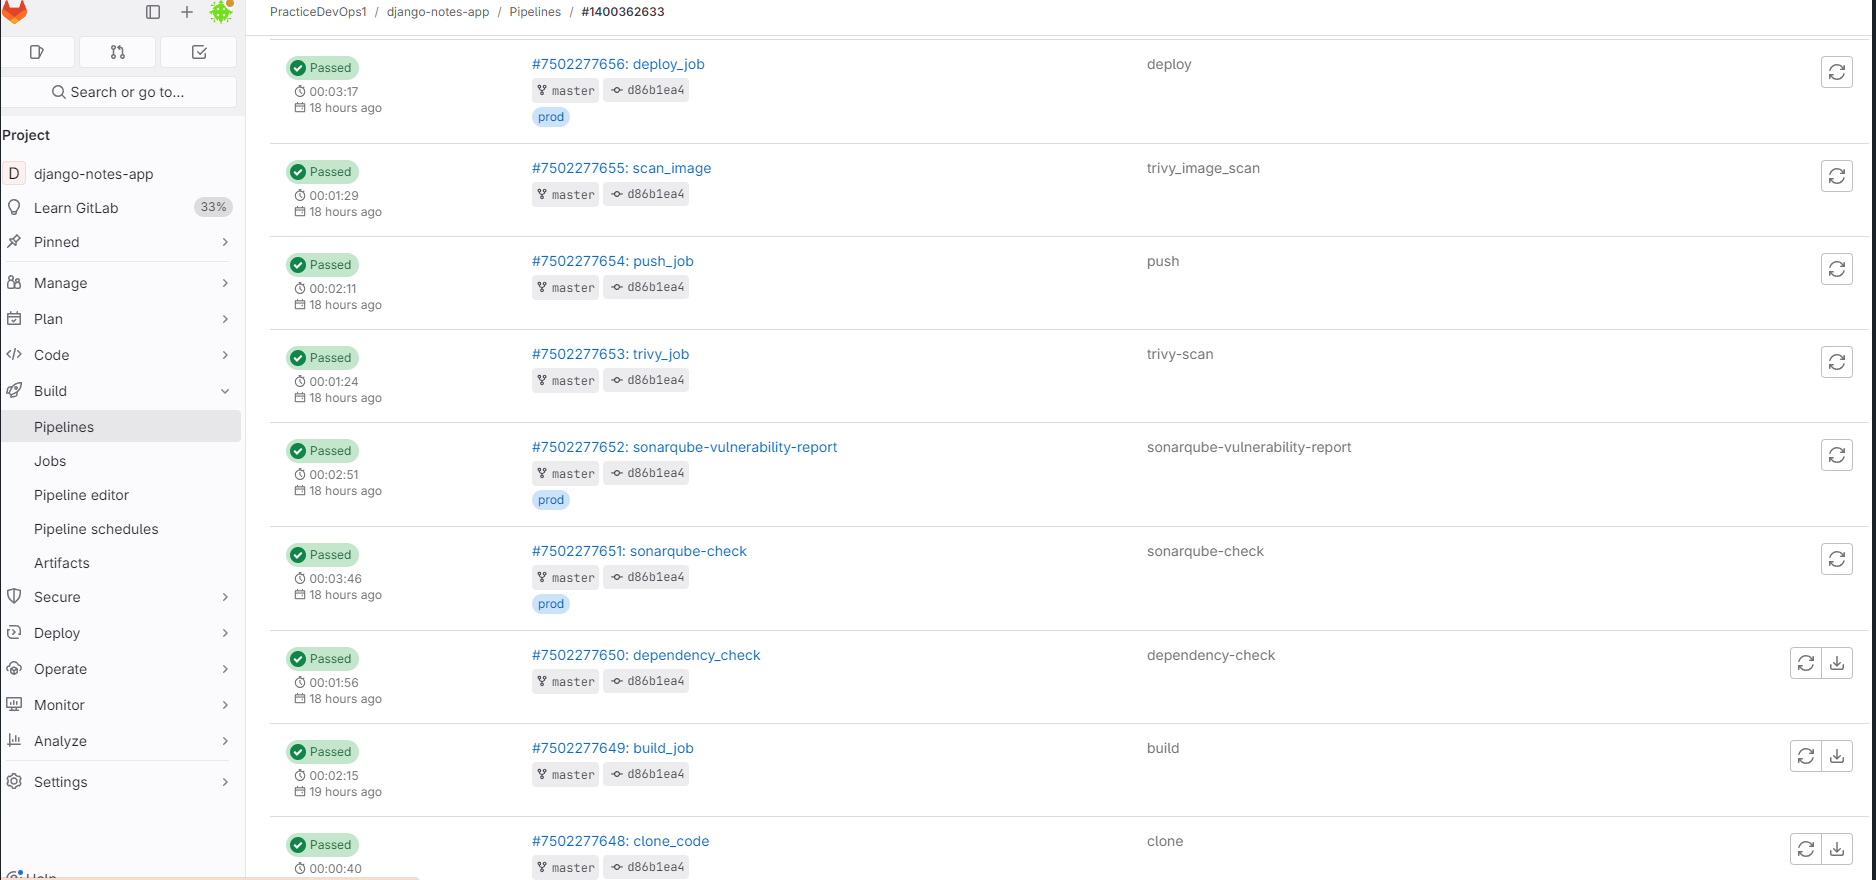
My-App running on my Virtual Machine or Project Runner.

Subscribe to my newsletter
Read articles from ajay singh directly inside your inbox. Subscribe to the newsletter, and don't miss out.
Written by

ajay singh
ajay singh
Hi Folks, Your thoughts and suggestions are invaluable to me! Feel free to leave comments on my posts. Let's connect and grow together!