How to Build High-Performance Astro Apps with Vue Components: A Step-by-Step Guide
 syncfusion
TL;DR: Learn to integrate Syncfusion Vue components into an Astro app. Astro’s SSR and MPA capabilities enhance performance and simplify web development. This guide covers prerequisites and steps to build an Astro app with Syncfusion Vue Rich Text Editor. Perfect for high-performance, maintainable web development. Read the full blog for details!
Astro, a cutting-edge web framework, simplifies the creation of high-performing websites and web applications. By seamlessly integrating Server-side Rendering (SSR) and Client-side Hydration, Astro empowers developers to craft robust, interactive digital experiences effortlessly.
It stands out for its innovative frontend architecture, which minimizes JavaScript overhead and simplifies complexity compared to other frameworks.
The Syncfusion Vue UI components library is the only suite you will ever need to build an app. It contains over 85 high-performance, lightweight, modular, and responsive UI components in a single package.
In this blog, we’ll see how to build an Astro app using the Syncfusion Vue components.
Advantages of the Astro framework
Let’s see some of the significant advantages offered by Astro framework:
Server-side rendering (SSR) support: Astro offers robust support for server-side rendering, akin to traditional server-side frameworks, without requiring developers to learn a new server-side language.
Multi-page app (MPA) capabilities: With SSR capabilities, Astro facilitates the creation of multi-page apps (MPAs), prioritizing initial loading performance, which is especially beneficial for content-heavy websites.
HTML-only templating system: Astro introduces an HTML-only templating system called Astro components, enabling components to seamlessly render into HTML during the build process or on-demand using SSR.
Zero JavaScript footprint by default: Utilizing an SSR and HTML-only templating system, Astro ensures faster website performance with a default absence of JavaScript, enhancing both speed and efficiency.
Flexible UI element creation: Astro components allow developers to create reusable UI elements or smaller snippets of HTML, contributing to a more modular and maintainable codebase.
Prerequisites
Create an Astro app
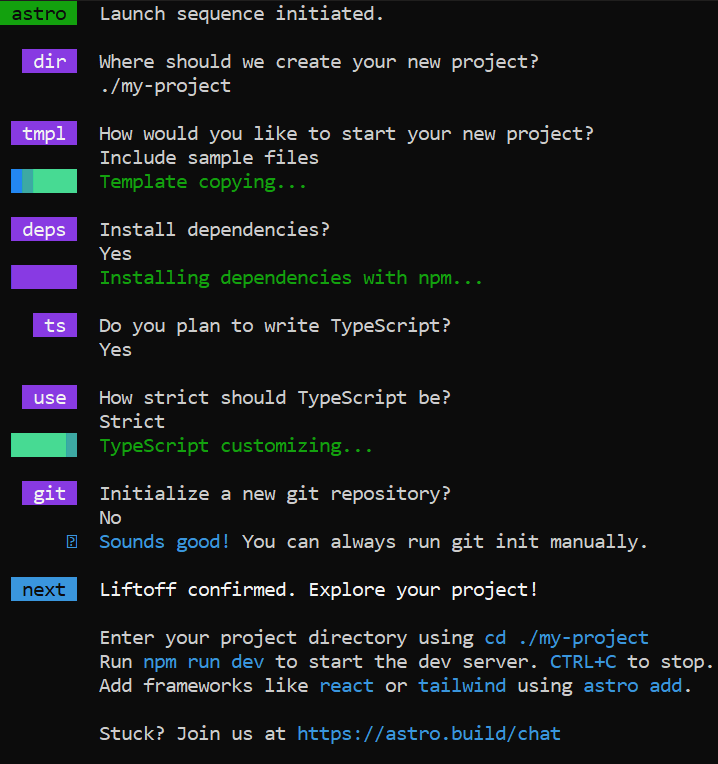
Let’s start by creating a new Astro app from scratch. Initiate the process by executing the following command.
npm create astro@latest
Upon executing this command, you will get a prompt with several queries, like in the following image.
This will allow you to configure it based on your requirements.
Incorporating Vue integrations into the Astro app
To integrate Vue components into an Astro app, which stands out among JavaScript frameworks for its compatibility with various UI frameworks like React, Vue, Preact, Svelte, Lit, or Solid, we need to incorporate Vue integrations provided by Astro. This allows for server-side rendering and client-side hydration of Vue 3 components.
Benefits of Vue integration
Performance: Vue.js: is known for its performance optimizations, including virtual DOM diffing and efficient rendering. When combined with Astro.js, Vue components can contribute to faster page loads and smoother user experiences, particularly on content-focused websites where performance is crucial.
Synchronization: Vue’s reactivity system enables efficient and automatic updates to the DOM when data changes. This makes managing the state easier and ensures the UI remains synchronized with the underlying data, enhancing the user experience.
UI integration: Vue promotes a component-based architecture, allowing developers to encapsulate UI elements into reusable and modular components. This improves code organization, readability, and maintainability, leading to more efficient development and easier scaling of projects.
Execute the following command to implement Vue integration in the Astor app.
npx astro add vue
Integrating the Syncfusion Vue components
Let’s follow these steps to integrate the Syncfusion Vue components into the Astro app. Here, we’ll demonstrate creating a forum app using the Syncfusion Vue Rich Text Editor component.
Step 1: Install Syncfusion Vue components
Syncfusion Vue components are available at NPM. Install the Syncfusion Vue Rich Text Editor package using the following command.
npm install –save @syncfusion/ej2-vue-richtexteditor @syncfusion/ej2-vue-buttons
Step 2: Add Vue Rich Text Editor component
Create a dedicated Vue file, src/components/Forum.vue, and add the Vue Rich Text Editor component to replicate a forum app.
Refer to the following code example.
<template>
  <div>
   …..
    <div class="posting">
      To add a custom icon (<b>code-mirror</b>) to the Toolbar, you have to use the
      `template` option of the `<b>toolbarSettings</b>`. To know more about adding
      custom icons, refer to the <a href="https://ej2.syncfusion.com/home/" target="_blank">custom tool</a>
      sample of RTE.
    </div>
   …..
    <ejs-richtexteditor ref="rteInstance" v-model="value" v-bind:value="value" placeholder="Write a reply"></ejs-richtexteditor>
    <div id="buttonSection">
    </div>
   …..
  </div>
</template>

<style>
  @import "@syncfusion/ej2-base/styles/material3.css";
  @import "@syncfusion/ej2-inputs/styles/material3.css";
  @import "@syncfusion/ej2-lists/styles/material3.css";
  @import "@syncfusion/ej2-popups/styles/material3.css";
  @import "@syncfusion/ej2-buttons/styles/material3.css";
  @import "@syncfusion/ej2-navigations/styles/material3.css";
  @import "@syncfusion/ej2-splitbuttons/styles/material3.css";
  @import "@syncfusion/ej2-vue-richtexteditor/styles/material3.css";
  …..
</style>

<script>
import { isNullOrUndefined as isNOU } from "@syncfusion/ej2-base";
import {
  RichTextEditorComponent,
  Link,
  Image,
  QuickToolbar,
  HtmlEditor,
  Toolbar,
} from "@syncfusion/ej2-vue-richtexteditor";
import { ButtonComponent } from "@syncfusion/ej2-vue-buttons";

export default {
  components: {
    "ejs-richtexteditor": RichTextEditorComponent,
    "ejs-button": ButtonComponent,
  },
  data() {
    return {
      isPrimary: true,
      value: "",
    };
  },
  methods: {
    // ... (Your methods)
  },
  provide: {
    richtexteditor: [Link, Image, QuickToolbar, HtmlEditor, Toolbar],
  },
};
</script>
Step 3: Integrate the Vue component with Astro pages
Import the Forum.vue component into src/pages/index.astro file and incorporate it within the layout structure. Here, the Vue component can be integrated with Astro pages; refer to the following code example.
---
import Layout from "../layouts/Layout.astro";
import Forum from "../components/Forum.vue";
---

<Layout title="Syncfusion components">
 <div>
  Syncfusion Forum
  <Forum client:only />
 </div>
</Layout>
Step 4: Run the Astro app
Now, run the Astro app using the following command.
npm run dev
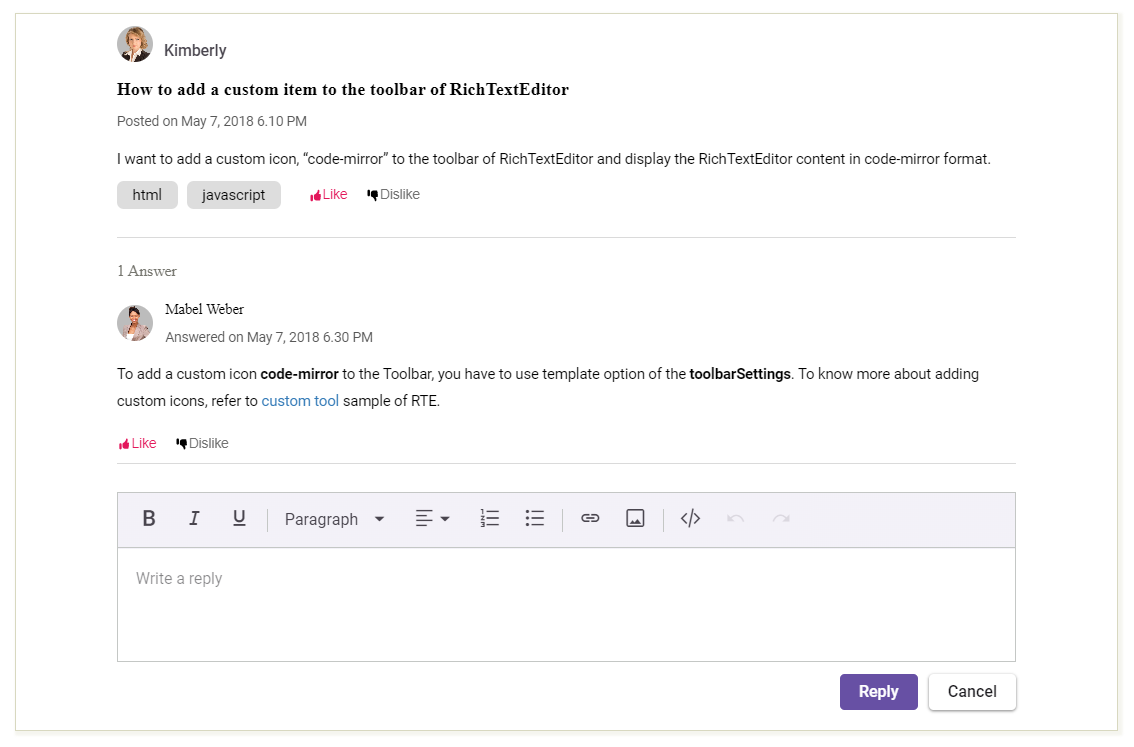
Finally, navigate to http://localhost:4321/ in your preferred browser to view the rendered Syncfusion Vue components within the Astro project.
The output will look like the following image.

Integrating Syncfusion Vue Rich Text Editor in the Astro app
Supported platforms
You can also seamlessly integrate the following Syncfusion web framework components with Astro.js, functioning like Vue components:
GitHub reference
For more details, refer to integrating Syncfusion Vue components into the Astro app GitHub demo.
Conclusion
Thanks for reading! In this blog, we’ve explored how to integrate Syncfusion Vue components into the Astro framework. Like this, you can also use other Syncfusion Vue components in Astro apps. Try it out now and leave your feedback in the comment section below!
Are you already a Syncfusion user? You can download the product setup. If you’re not a Syncfusion user, you can download a free 30-day trial.
You can also contact us through our support forum, support portal, or feedback portal. We are always happy to assist you!
Related blogs
Subscribe to my newsletter
Read articles from syncfusion directly inside your inbox. Subscribe to the newsletter, and don't miss out.
Written by

syncfusion
syncfusion
Syncfusion provides third-party UI components for React, Vue, Angular, JavaScript, Blazor, .NET MAUI, ASP.NET MVC, Core, WinForms, WPF, UWP and Xamarin.
