Create an AI Agent Builder Data Source Using Microsoft Kernel Memory, OpenAI, and Qdrant in OutSystems
 Stefan Weber
Table of contents
- What is an AI Agent Builder Data Source
- Why a Custom AI Agent Builder Data Source
- An Index Ingestion Pipeline
- AI Agent Builder Data Source
- Prerequisites
- Launch Agent Builder Custom Source Sample Application
- Configure a custom data source in AI Agent Builder
- Create an Agent with a custom data source
- Implementation Walkthrough
- Summary

In July 2024, OutSystems released an update for their AI Agent Builder solution. This update allows you to add your own custom document index, in addition to the built-in Amazon Kendra and Azure AI Search data sources. In this article, we explore not only to create your own custom data source for AI Agent Builder, but also how to build a custom index ingestion pipeline using Microsoft Kernel Memory.
But let us start with some explanations first.
What is an AI Agent Builder Data Source
A data source is simply a way to search for information. During a conversation with an Agent, the user's input is sent to the data source, which returns relevant text passages for the user's input. How these text passages are determined depends on the underlying document index used (e.g. Amazon Kendra).
In a Retrieval Augmented Generation flow, this represents the retrieval part. The text passages are then added to a prompt along with the original user input (Augment) and, combined with the entire conversation, sent to a Large Language Model to generate a response (Generation).
In summary, a data source takes a user's text input and returns one or more text passages along with some metadata.
It is important to note that indexing information into a document index is outside the scope of AI Agent Builder. If you are using AWS Kendra as an AI Agent Builder data source, you would configure one or more Kendra data sources in the AWS console. Kendra supports a wide range of data sources like S3, Web Pages, Confluence, Jira, Exchange, and many more. Kendra then handles indexing information from the configured data sources.
Why a Custom AI Agent Builder Data Source
Both Amazon Kendra and Azure AI Search are powerful document indexing services. They support a wide range of information sources, multiple languages, and can scale infinitely. They excel at finding information, and the best part is that you don't have to set up anything. Configuration is easily done in the AWS console or Azure Portal. In many cases, one of these document indexing services should be your first choice.
There are, however, situations and use cases where neither Kendra nor AI Search is suitable. The most obvious reason for a custom data source is when you can't or don't want to use either of them, for any reason. But the most pressing reason could be if the data extraction, index ingestion, and retrieval of Kendra or AI Search do not meet your needs or do not provide the expected results during an Agent conversation.
Let's look at Amazon Kendra. AI Agent Builder uses Kendra's Retrieve API endpoint to look up relevant passages for a given query text (the user's input) by performing a semantic relevance search. Kendra will return up to 100 text passages from found documents, with each passage having a maximum of 200 tokens (~150 words). These text passages are used to augment a prompt, but there is a high chance that passages extracted from a very large document lack the necessary context to generate a high-quality response. Think of a business stakeholder you interview for solution requirements who only tells you half of the requirements. You wouldn't come up with the full solution then, and the same is true for an augmented prompt with improper context.
This text passage segmentation isn't unique to Kendra; it's common in any document index used in a Retrieval Augmented Generation flow. You might wonder why we don't just add full documents to the prompt. The first reason is that Large Language Models have a maximum token limit, and adding full documents would likely exceed this limit. The second reason is that with a large context, there is a risk that Large Language Models start to hallucinate. Lastly, the larger the context, the longer it takes for the Large Language Model to generate a response.
Slicing of large documents is known as text chunking. Services like Kendra generate these chunks during search, while others chunk large documents during index ingestion.
Text chunking is a science in itself. There are many text chunking strategies, such as fixed-size chunking with or without overlaps, semantic chunking, or more advanced methods that turn large documents into a knowledge graph. Text chunking may also include preprocessing steps to make a large document "chunkable," such as text extraction and OCR, or even enriching the source text to ensure chunks have proper context.
In my opinion, there isn't a single text chunking strategy that works for all document types. This might be a good reason to build a custom index ingestion pipeline and document index. A custom pipeline could classify a source document first and, based on its type, choose the appropriate text chunking strategy.
An Index Ingestion Pipeline
A typical and basic ingestion pipeline includes the following elements:
Extraction - The document to be indexed can be simple text, Word or PDF files, and even audio or images. The first step is to extract the content from the source document. This could be text from Word and PDF files, the meaning of an image, or a transcript of an audio file.
Chunking - Larger documents are split into multiple segments of text (see above).
Embeddings - Vector embeddings are numerical representations of the individual chunks. They are generated using an embedding model and capture the meaning and relationship of words and sentences, allowing for semantic search.
Memory - Embeddings, along with the text chunks and additional metadata, are stored in a database (or service) that can manage high-dimensional vectors efficiently. There are many products to choose from, such as PostgreSQL with pgvector, Elasticsearch for example, or specialized vector databases like Qdrant or Pinecone.
More complex index ingestion pipelines may include several additional elements, like keyword extraction from source documents for additional metadata, creating, embedding and storing of summaries along the text chunks or additional preprocessing steps of the source content to ensure text chunks with proper context.
No worries, we will not create a highly complex ingestion pipeline for a document index that we can use with AI Agent Builder as a data source.
For this article, our scenario is as follows:
Our solution should allow a user to add a website URL to our document index. The ingestion pipeline then scrapes (extracts) the URL's content. Larger content is chunked into segments (fixed-size chunking with overlaps). The individual text chunks are then embedded using OpenAI's text-embedding-ada-002 model and finally stored in a Qdrant Vector Database Cluster along with some additional metadata.
It sounds like a lot of work to build, but we don't have to develop everything ourselves. You probably already know that there are many frameworks (both commercial and open-source) available for building custom index ingestion pipelines. One of the most well-known is LlamaIndex, a Python-based library for building ingestion pipelines, from simple to complex.
The downside of LlamaIndex is that you can't directly use it in OutSystems Developer Cloud External Logic functions, at least not at the moment. External Logic Functions are .NET only. This means you would need to build an external service with LlamaIndex and then integrate it into ODC.
Personally, I'm not good at Python and have never managed to get into it (says someone whose first programming language was COBOL). I can get by with the help of Google and Amazon Q, but even when it works, it always feels cobbled together.
Although Python is very popular in the GenAI field, there are also some .NET-based frameworks available. Microsoft maintains an open-source project called Kernel Memory, which is a user-friendly yet flexible .NET library for building index ingestion pipelines. It offers many features for the entire ingestion process, from extraction to storage. You can even create full RAG flows with it. However, for our use case, we use Kernel Memory only for the ingestion part.
To sum up our technology components
OpenAI for generating vector embeddings
Qdrant Vector database for storing vectors, text chunks and metadata
Microsoft Kernel Memory for orchestrating the index ingestion pipeline.
and of course OutSystems Developer Cloud.
AI Agent Builder Data Source
Having a working document index is only part of the process. The final step is connecting AI Agent Builder with your document index.
This is done by exposing a REST API that follows the AI Agent Builder custom data source contract, which defines request and response structures.
Custom data sources can then be attached to AI Agent Builder Agents. When you start a conversation, your text input is sent to the configured REST API endpoint.
During retrieval, your implementation takes the text input and generates vector embeddings using the same model that was used to embed the text chunks. It then performs a similarity search in the document index and retrieves semantically similar text segments. Finally, it returns the text segments in the defined output structure that AI Agent Builder expects. Agent Builder augments a prompt with your text segments and sends it to the configured Large Language Model, which generates a response.
Prerequisites
Finally, we've reached the end of the theory part. For the following walkthrough, I created a sample OutSystems Developer Cloud Application to manage a document index and an External Logic Function package that wraps Microsoft Kernel Memory to ingest websites and perform semantic searches. The latter is needed when adding our custom data source to the AI Agent Builder.
Download Forge Components
Download the following components from OutSystems Developer Cloud Forge
Agent Builder Custom Source Sample (Application)
AIAgentBuilderSourceSample
and you also need the AI Agent Builder application.
Register OpenAI Account
Register an account with OpenAI.
Create an API key under Dashboard - API Keys. Save the API key in a secure location, as it will only be displayed once.
Make sure that your account has enough funding.
Create a Qdrant Cluster
Head over to the Qdrant website and register an account by clicking on the Start Free button.
Create a free tier cluster and wait until the cluster is fully provisioned (Status: Healthy).
In the Clusters menu, click on the three dots action button and choose Details.
On the Cluster details screen, copy the endpoint URL.
In the Data Access Controls menu, click Create and select your cluster to generate a new API Key. Copy the key value and store it in a secure location, as it will only be displayed once.
Application Settings and Roles
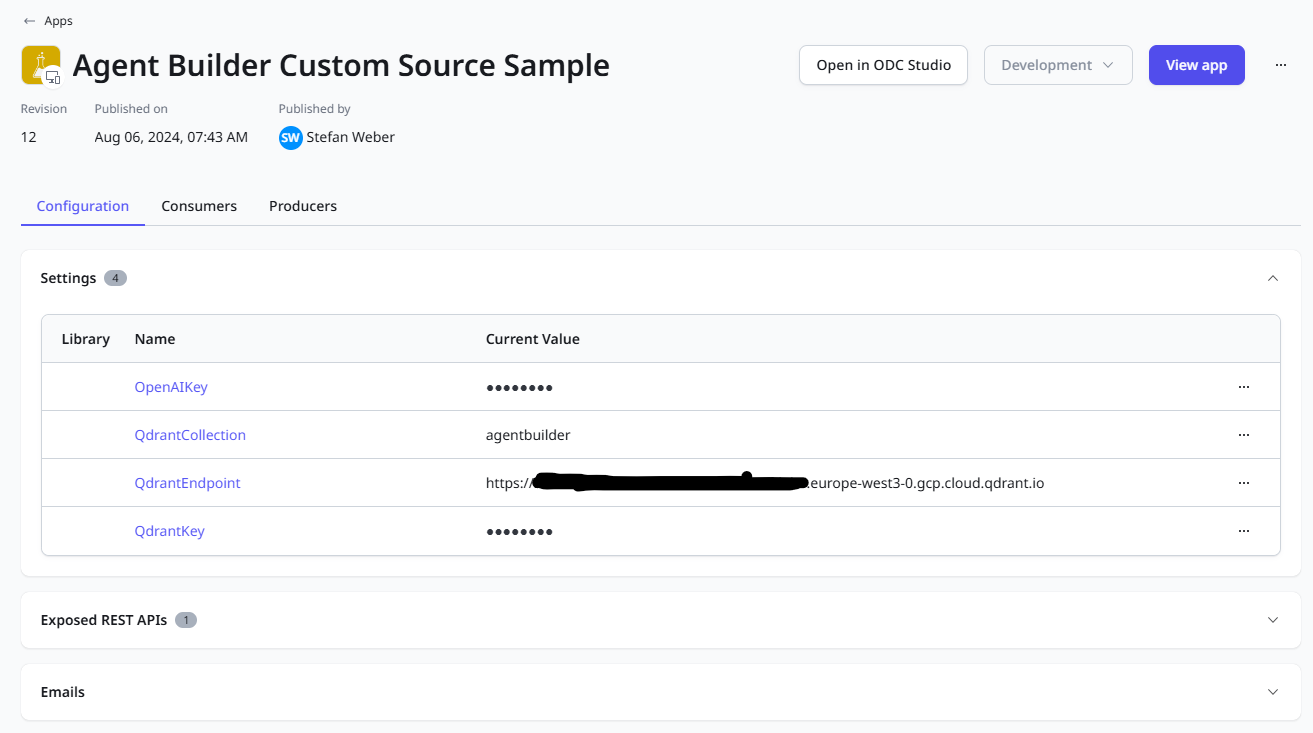
Next, we need to set the application settings and ensure that your user account has permission to access the application.
Open ODC Portal
In the Apps menu, select the Agent Builder Custom Source Sample application.
In the Configuration tab, open Settings and set the values for:
OpenAIKey - The API key you created in the OpenAI Dashboard.
QdrantCollection - Identifies the collection (like a database) for the vectors.
QdrantEndpoint - The endpoint URL you copied from the cluster details screen.
QdrantKey - The Qdrant API key you generated in the Data Access Controls menu.
In the Users menu select your own user account and add the IndexManager end-user role from the Agent Builder Custom Source Sample application.
Launch Agent Builder Custom Source Sample Application
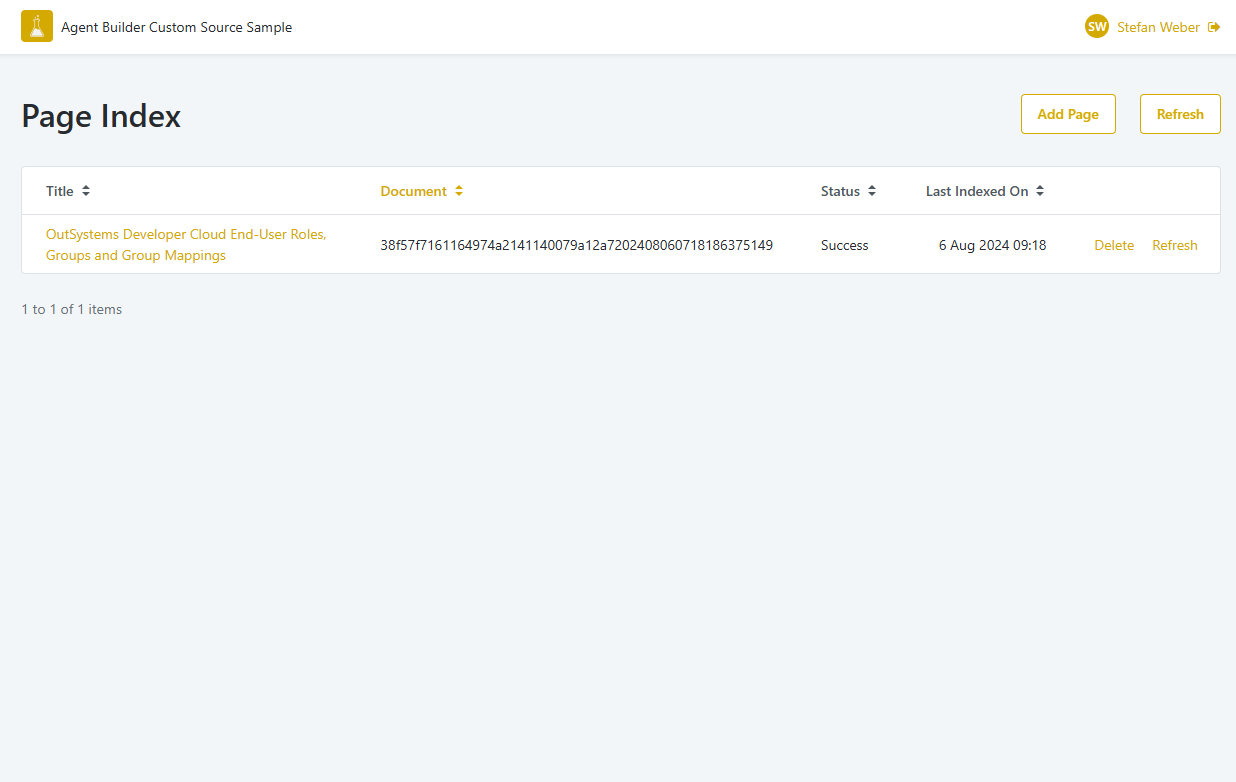
Launch the application and add some webpages. Hit the Refresh button to check the ingestion status. In case of an error check your application settings.
For demonstration purposes you can add the following webpage
Title: OutSystems Developer Cloud End-User Roles, Groups and Group Mappings
Configure a custom data source in AI Agent Builder
Open the AI Agent Builder application and select the Configurations menu.
Click on Add data source and choose Custom connection.
Enter details for the custom connection
Name: Display name of your custom data source, e.g. My Webpage Index
Id: Keep the autogenerated id or enter your own
Endpoint: This is the URI of the exposed REST API in the Agent Builder Custom Source Sample application. We get to that later.
Enter the following value for Endpoint
https://<Your development stage FDQN>/AgentBuilderCustomSourceSample/rest/AgentBuilderSource/DataSource
Then save the configuration.
Create an Agent with a custom data source
Next, switch to My Agents in the menu and click on Create agent.
Select an AI model. You can use the trial models like Claude 3 Haiku (Trial).
Turn on Use data source and select the custom data source you created earlier.
You can try out the agent right away. If you imported the sample above, try asking: What are application end-user roles?
You should get an answer taken from the original blog post.
Implementation Walkthrough
With a working application we can now explore the implementation details.
Open the Agent Builder Custom Source Sample application in ODC Studio.
Adding a Page
When you submit the Add Page form in the frontend it calls the Index_AddPage Server action, which does the following
Creates a new entry in the Page entity
Raises an OnPageIndex event with the Page Identifier as payload.
Page Indexation
The OnPageIndex event is directly handled in the application through the Index_HandlePageIndexation server action. This server action not only indexes new pages but also manages index refreshes.
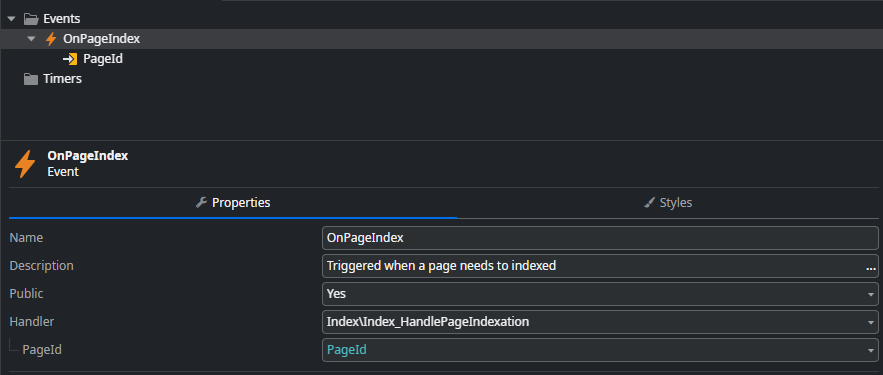
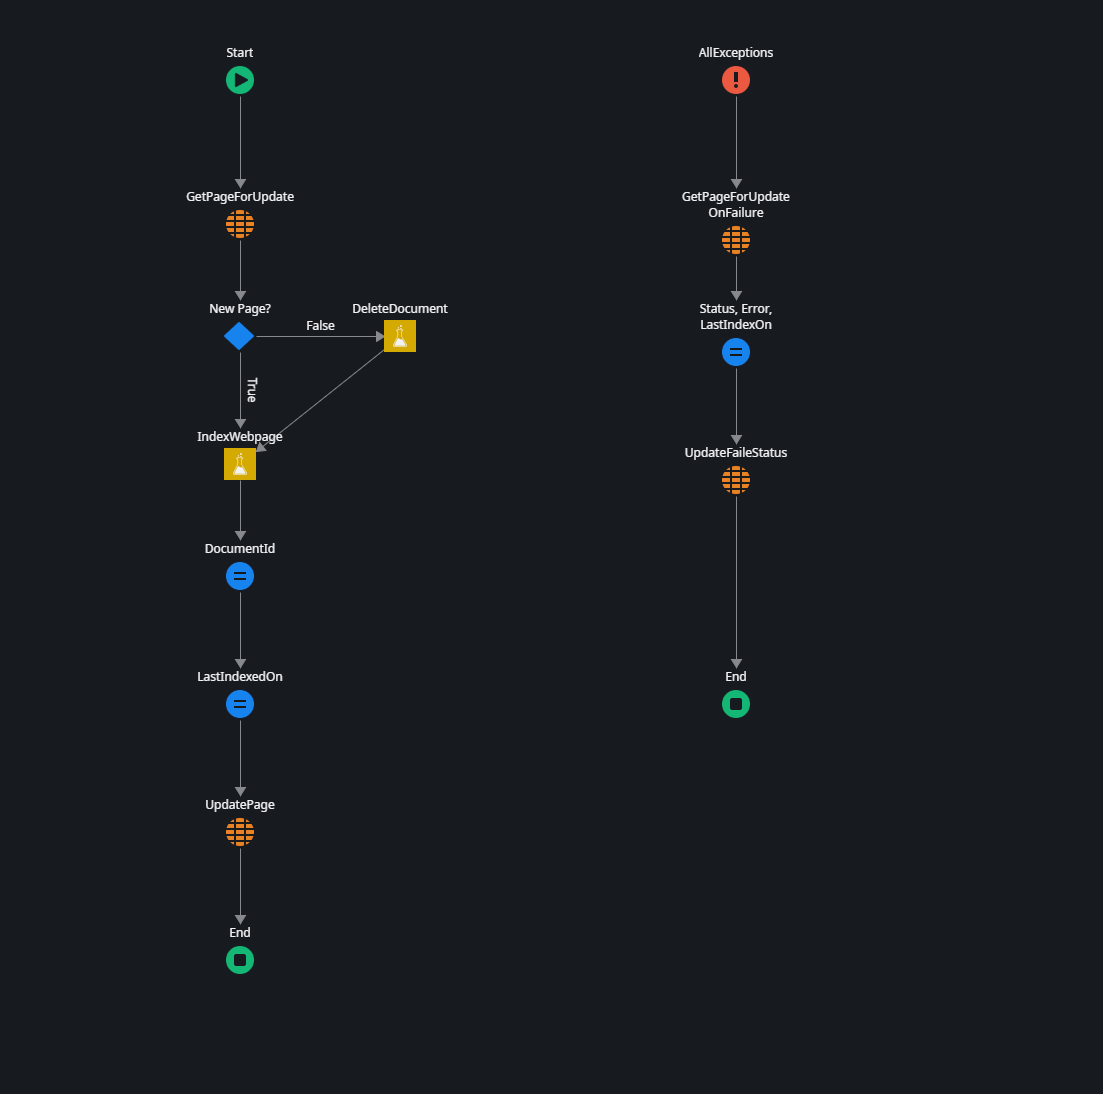
The server action performs the following steps:
Retrieves the Page record.
Checks if it is a new Page or an existing Page that needs to be refreshed by seeing if the DocumentId (generated by Kernel Memory) has a value.
Deletes the Page from the index store using the DeleteDocument function from the AIAgentBuilderSourceSample external logic component if it is already indexed.
Executes the index ingestion using the IndexWebPage function from the AIAgentBuilderSourceSample external logic component.
Sets a Success status if executed successfully and a Failure status if an exception occurs during processing.
The IndexWebPage external logic source code is pretty simple
public string IndexWebpage(string url, string title, string openaiKey, string qdrantEndpoint, string qdrantKey, string qdrantCollection)
{
    var memory = new KernelMemoryBuilder()
        .WithOpenAIDefaults(apiKey: openaiKey)
        .WithQdrantMemoryDb(endpoint: qdrantEndpoint, apiKey: qdrantKey)
        .Build<MemoryServerless>();

    var documentId = AsyncUtil.RunSync(() => memory.ImportWebPageAsync(url: url, index: qdrantCollection, tags: new () {{ "title", title }}));

    return documentId;
}
Kernel Memory is set up with just a few lines of code, especially if you use the default implementations.
Kernel Memory handles scraping the website, breaking the content into chunks, creating embeddings using the OpenAI embeddings model, and writing to a Qdrant collection.
Exposed REST API for Agent Builder Data Source
The final implementation we will look at — though the others are also important — is the exposed REST API endpoint that connects the AI Agent Builder to our document index.
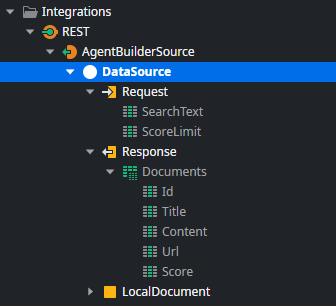
Open the DataSource API endpoint in ODC Studio.
This endpoint implements the AI Agent Builder contract for custom data sources partially. Check the documentation for full details on request and response parameters.
The implementation does the following
- It executes the Search external logic function from AIAgentBuilderSourceSample with the user's input text and score threshold.
Again the Kernel Memory implementation is pretty straight forward
public Structures.SearchResult Search(string text, Structures.SearchOptions searchOptions, string openaiKey, string qdrantEndpoint, string qdrantKey,
        string qdrantCollection)
    {
        var memory = new KernelMemoryBuilder()
            .WithOpenAIDefaults(apiKey: openaiKey)
            .WithQdrantMemoryDb(endpoint: qdrantEndpoint, apiKey: qdrantKey)
            .Build<MemoryServerless>();

        var results = AsyncUtil.RunSync(() => memory.SearchAsync(query: text, limit: searchOptions.limit,
            minRelevance: searchOptions.relevance, index: qdrantCollection));

        return _automapper.Map<Structures.SearchResult>(results);

    }
However, Kernel Memory returns a different result structure than what AI Agent Builder accepts, so the action performs a flattening transformation to generate the target response.
Kernel Memory returns documents, and each document can have multiple partitions. Each partition contains text chunks of the document that are semantically similar to the user's input. AI Agent Builder, however, expects a flattened result. That is why the endpoint goes through the documents and combines every partition into a single content field.
Summary
Thank you for reading another one of my lengthy articles. In this article, we explored how to build a custom index ingestion pipeline for a document index that can be used as a custom data source for AI Agent Builder.
Microsoft Kernel Memory is a perfect fit for OutSystems Developer Cloud GenAI solutions, as it can be integrated into external logic functions without needing to build an external service. Kernel Memory offers many features out-of-the-box and is highly extensible, allowing you to create a tailored index ingestion pipeline that meets your requirements and expectations.
I hope you enjoyed the article and found my explanations clear. If not, please let me know by adding a comment.
Subscribe to my newsletter
Read articles from Stefan Weber directly inside your inbox. Subscribe to the newsletter, and don't miss out.
Written by

Stefan Weber
Stefan Weber
Throughout my diverse career, I've accumulated a wealth of experience in various capacities, both technically and personally. The constant desire to create innovative software solutions led me to the world of Low-Code and the OutSystems platform. I remain captivated by how closely OutSystems aligns with traditional software development, offering a seamless experience devoid of limitations. While my managerial responsibilities primarily revolve around leading and inspiring my teams, my passion for solution development with OutSystems remains unwavering. My personal focus extends to integrating our solutions with leading technologies such as Amazon Web Services, Microsoft 365, Azure, and more. In 2023, I earned recognition as an OutSystems Most Valuable Professional, one of only 80 worldwide, and concurrently became an AWS Community Builder.