Learn HTML and CSS in Spanish – Course for Beginners
 Estefania Cassingena Navone
Hi! If you speak Spanish and you want you learn HTML and CSS, you're in the right place.
In this article, you will find a brief introduction to the basics of HTML and CSS. Then you will find a free 5-hour course on HTML and CSS on our Spanish YouTube channel where you can learn the content in more depth with practical examples.
This article will use English to summarize everything you'll learn through this course. If you know Spanish-speaking friends, you can share this Spanish version of this article.
Let's begin! ✨
🔹 HTML and CSS: Description and Purpose
Let's see what HTML and CSS are and what they are used for:
- HTML (HyperText Markup Language) is essential for web development because we use it to define the structure of a webpage, the content that will be displayed on the browser.
- CSS (Cascading Style Sheets) is a language based on rules that we use to define and assign styles to the elements of our webpage.
HTML works with CSS to create the webpages that we use every day on our browsers. Some webpages also use JavaScript.
💡 Tip: HTML files have an **.html** extension and CSS files have a **.css** extension.
Think about this for a moment. The website that you are looking at right now is made of HTML and CSS. Awesome, right?
Now let's talk a little bit about Chrome Developer Tools.
🔸 Chrome Developer Tools
You can see the HTML and CSS code of any webpage on Google Chrome just by right clicking on the page and selecting "Inspect".
This will open Chrome Developer Tools, where you will see two main sections:
- The top section shows the HTML code of the webpage. This part is surrounded by an orange rectangle in the following image.
- The bottom section shows the CSS styles that are being applied to the element that is currently selected in the HTML section. This part is surrounded by a green rectangle in the following image.
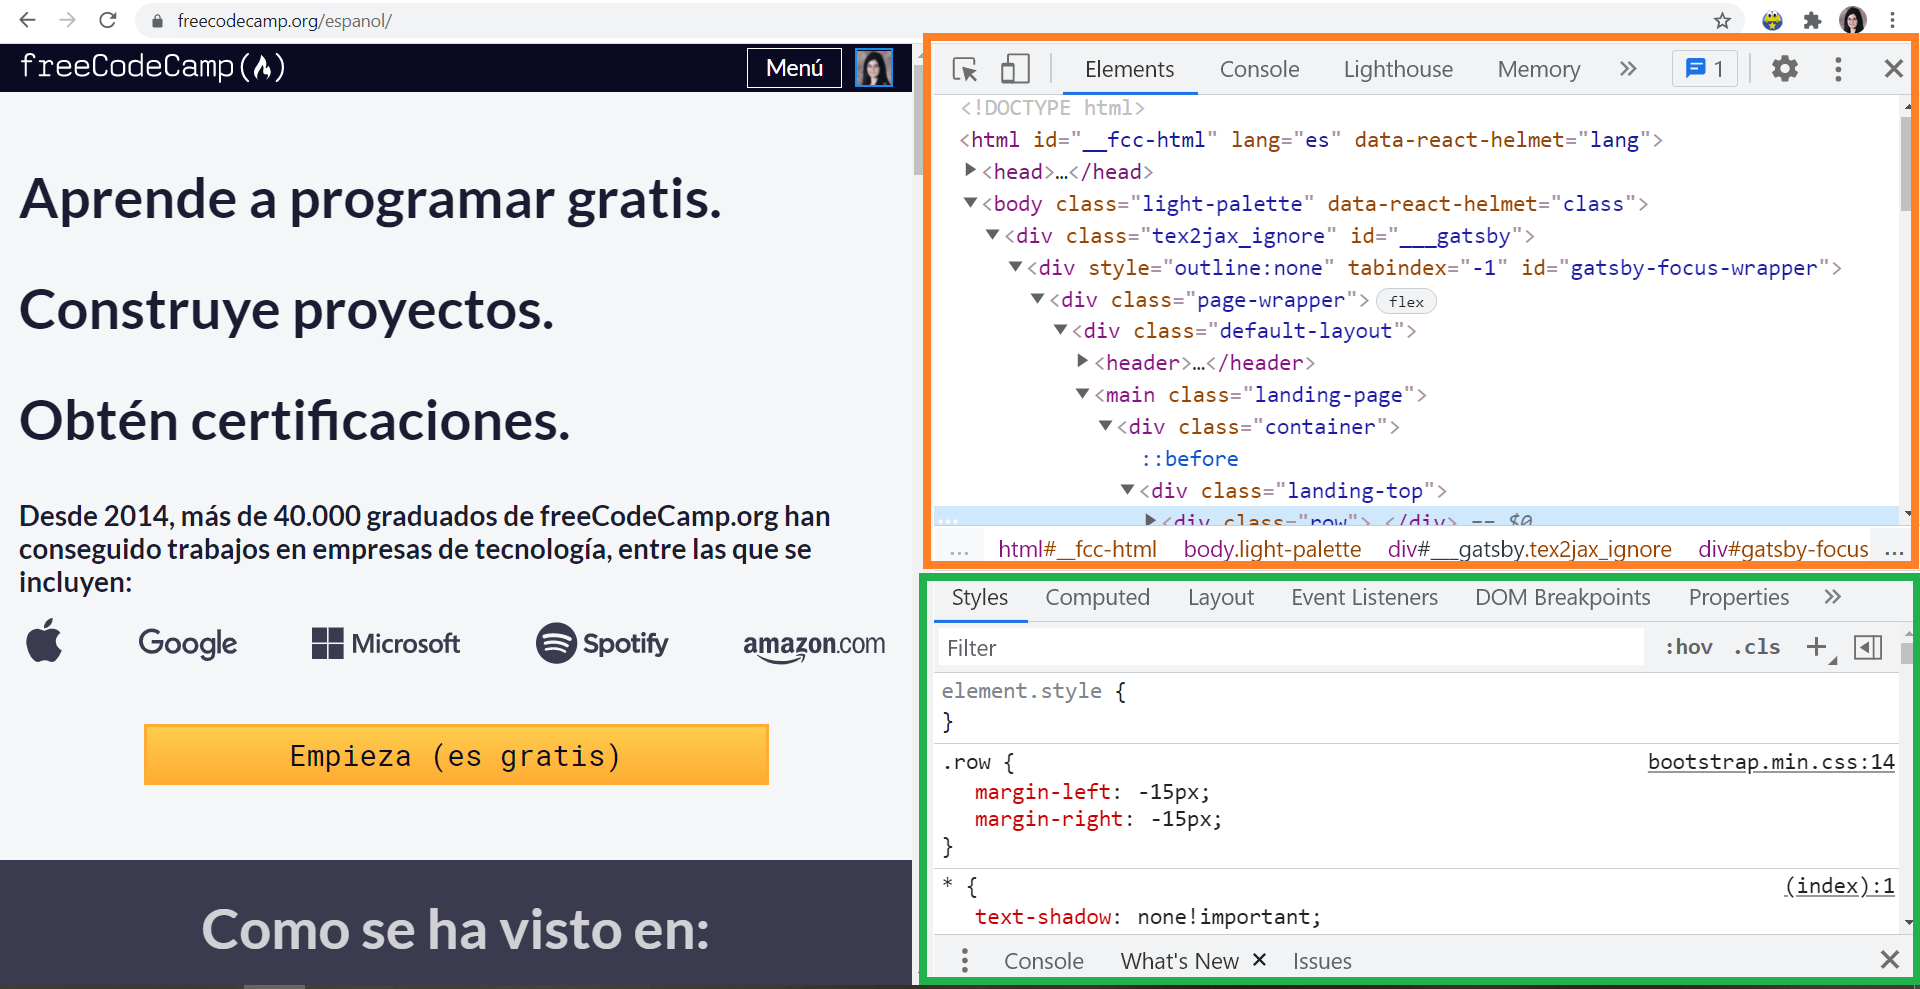 Chrome Developer Tools
🔹 Introduction to HTML
Now let's start diving into the fundamentals of HTML. Here we have an example of a very simple webpage:
<!DOCTYPE html>
<html lang="en">
  <head>
    <title>freeCodeCamp</title>
  </head>
  <body>
    <h1>freeCodeCamp</h1>
    <p>I'm learning HTML and CSS.</p>
  </body>
</html>
💡 Tip: In HTML, indentation (the space that you can see before the lines) is not mandatory because it doesn't have an impact on the final result. Even so, it is highly recommended because it helps us to write HTML files that are easy to read, maintain, and understand. We typically use 2 spaces per level of indentation in HTML.
Let's see the main components of HTML.
HTML Elements
An HTML file is made up of HTML elements. These elements are the individual components that we use to create the structure of the webpage.
This is an example of an element:
<h1>freeCodeCamp</h1>
💡 Tip: Certain elements can act as containers for other elements to help us create more complex structures. You should indent these nested elements to reflect the structure of the website, like in our previous example.
HTML Tags
Each element has an associated tag. We can create an element by including its tag in our HTML file.
These are examples of the most commonly used tags:
**<html>**– All the content of the website should be contained within these tags.**<head>**– This element contains the title of the webpage that you can see on the tab of your browser and it contains the metadata of the webpage.**<body>**– This element contains all the visible elements of the webpage. The structure of the webpage has to be within these tags.<h1>,<h2>,<h3>,<h4>,<h5>,<h6>–These elements create headlines in order of importance from 1 to 6.**<p>**– A paragraph.**<a>**– A link to another website, webpage, or to internal sections of the current webpage.**<strong>**– This tag lets us emphasize important text. It's displayed as bold text.**<em>**– This tag lets us emphasize important text. It's displayed as italic text.**<form>**– This element represents a form.**<hr>**– A horizontal rule that can be used to separate paragraphs or sections of the webpage.**<input>**– An element that lets us create the components of a form. It can be a text input field or become a radio button or a checkbox.**<footer>**– A footer.
💡 Tip: the first element on our webpage should be **<!DOCTYPE html>**. It tells the browser that the file is an HTML file and what version of HTML to use.
Most of the HTML elements need an opening tag and a closing tag. We write the content of the element within the tags.
In the previous example, we created an element of type **<h1>**:
<h1>freeCodeCamp</h1>
This element has an opening tag and a closing tag to surround its content.
- The opening tag is
**<h1>**. - The closing tag is
**</h1>**.
You can see this in the following diagram:

💡 Tip: the difference between the opening tag and the closing tag is that the closing tag has a forward slash (**/**) before the type of element.
However, some elements do not need a closing tag because they don't act as containers. An example of this type of element is the **<img>** element (image):
**<img src="freeCodeCamp.jpg">**
HTML Attributes
HTML elements can have attributes. These attributes let us define additional information about the element. They include **class**, **id**, **style**, **lang**, **src**, and **href**.
Here we have an example of an HTML element with the **class** attribute:
<h1 class="main-title">freeCodeCamp</h1>
As you can see in this example:
- The attributes must be written in the opening tag, before the closing angle bracket
**>**. - The attributes and their values are separated by an equal sign. To the left, we write the name of the attribute and to the right we write its value. In this example, the value is
**main-title**. - The value of the attribute must be surrounded by quotation marks.
💡 Tip: each type of element has a specific set of attributes that we can assign to them and each attribute has a set of possible values. You can check these in the web documentation MDN Web Docs.
HTML Language
You can specify the language of the webpage and the language of any element in the HTML structure with the **lang** attribute and the code of the language:
<html lang="en">
In this example, we are specifying that the language of the webpage is English.
HTML Links
In HTML, you can create links to other webpages and links to internal sections of the current webpage with the **<a>** (anchor) element and the **href** attribute.
For example, this element would take you to freeCodeCamp's website in Spanish:
<a href="https://www.freecodecamp.org/espanol/">freeCodeCamp</a>
- With the
**href**attribute, we specify where the link will take the user. - The text that we write between the
**<a></a>**tags is the text that users will see. In this case, the text is**freeCodeCamp**.
We can also take users to another page of the same website by selecting an HTML file as the destination:
<a href="about.html">About Me</a>
If we assign the **id** attribute to an HTML element, we can also create a link to take the user to that element on the same page. We just need to write a hashtag followed by the name of the **id** as the value of the attribute **href**:
<a href="#main-title">freeCodeCamp</a>
In this example, the link would take the user to the element with the **id** main-title.
HTML Comments
We can also write comments in HTML. Comments are very helpful to add notes that we and other developers can read when we open the file. They help us to explain and understand the structure of the webpage:
<!-- Add a link to freeCodeCamp -->
💡 Tip: Comments are not part of the final result. They can only be read when you open the HTML file and they are helpful for developers who work with the file.
HTML Lists
In HTML you can create ordered lists and unordered lists with the **<ol>** and the **<ul>** tags, respectively.
Here we have an example of each type of list:
- Ordered List
<ol>
  <li>Blue</li>
  <li>Green</li>
  <li>Black</li>
</ol>

- Unordered List
<ul>
  <li>Blue</li>
  <li>Green</li>
  <li>Black</li>
</ul>

💡 Tip: the difference between both types of lists is that the elements of ordered lists are numbered while the elements of unordered lists are not.
HTML Images
To create an image in HTML, we use the **<img>** tag. This element does not need a closing tag, only an opening tag.
For example:
<img src="https://bit.ly/fcc-relaxing-cat">
- We specify the location of the image with the
**src**attribute in the**<img>**tag.
You should also assigned the **alt** attribute to all the images of your webpage to have an alternative text in case the image is not downloaded correctly or in case the user needs to use a screen reader.
For example:
<img src="https://bit.ly/fcc-relaxing-cat" alt="A cute orange cat.">
Great! Now you know the basics of HTML.
Let's start with CSS.
🔸 Introduction to CSS
Once we have the HTML structure of our webpage, we can start applying styles to the HTML elements with CSS.
CSS is a language based on rules. These rules let us specify how the elements will be presented on the webpage based on CSS selectors, properties, and values.
How to Apply Styles to your HTML Elements
There are three options to apply CSS styles to your HTML elements:
In-line Styles:
You can specify a style directly in the opening tag of the element that you want to customize. You just need to assign the style attribute.
For example:
<h1 style="color: blue">freeCodeCamp</h1>
In this example, the value of the style attribute is the color property and its corresponding value (**blue**). They are surrounded by quotation marks.
💡 Tip: the property and its value must be separated by a colon and a space.
Element
Subscribe to my newsletter
Read articles from Estefania Cassingena Navone directly inside your inbox. Subscribe to the newsletter, and don't miss out.
Written by
Estefania Cassingena Navone
Estefania Cassingena Navone
I'm a software developer and technical writer. I love teaching and learning the intricacies of the amazing world of programming.