A Practical Guide of DevSecOps with Jenkins CI/CD for Node-todo-CICD-App Development - Integrates seamlessly..
 Shesh Dhar
In this article, we will be creating a CI/CD pipeline for Node-todo-CICD-App Development. Using DevSecOps methodology with tools like code clone with Git, Pipeline with Jenkins, Docker, Docker Compose, SonarQube, OWASP and Trivy, The project will be deployed with the help of Jenkins.
Prerequisites:-
GitHub and DockerHub Accounts.
Knowledge of Linux Operating system.
AWS account For EC2 Instance or Any Linux Infra.
Knowledge of CI/CD server Jenkins and it's associated tools like SonarQube, OWASP, Trivy any Docker tools.
Steps 1: Setting up the Jenkins server.
First we will install Java which is vital for Jenkins server. You may refer Jenkins Installation Guide.
Find below mentioned command to install the Java.
sudo apt update
sudo apt install fontconfig openjdk-17-jre
java -version
openjdk version "17.0.8" 2023-07-18 OpenJDK Runtime Environment (build 17.0.8+7-Debian-1deb12u1) OpenJDK 64-Bit Server VM (build 17.0.8+7-Debian-1deb12u1, mixed mode, sharing)
Now we will install the Jenkins. Please choose only Long Term Support release and run below mentioned command.
sudo wget -O /usr/share/keyrings/jenkins-keyring.aschttps://pkg.jenkins.io/debian-stable/jenkins.io-2023.key
echo "deb [signed-by=/usr/share/keyrings/jenkins-keyring.asc]"https://pkg.jenkins.io/debian-stable binary/ | sudo tee etc/apt/sources.list.d/jenkins.list > /dev/null
sudo apt-get update
sudo apt-get install jenkins
After running above command Jenkins will be installed.
And now you can check the Jenkins service by
systemctl status jenkins

Steps 2: Now here we have to install the Docker and docker compose on this system to run the docker and docker-compose.
sudo apt-get update
sudo apt-get upgrade
sudo apt install docker.io
sudo usermod -aG docker $USER
Now need to reboot the machine once.
sudo apt-get install docker-compose
Steps 3: Jenkins Server configurations.
Now open the Jenkins server with your System IP address with Port no. 8080.
And you will get the below mentioned screen.
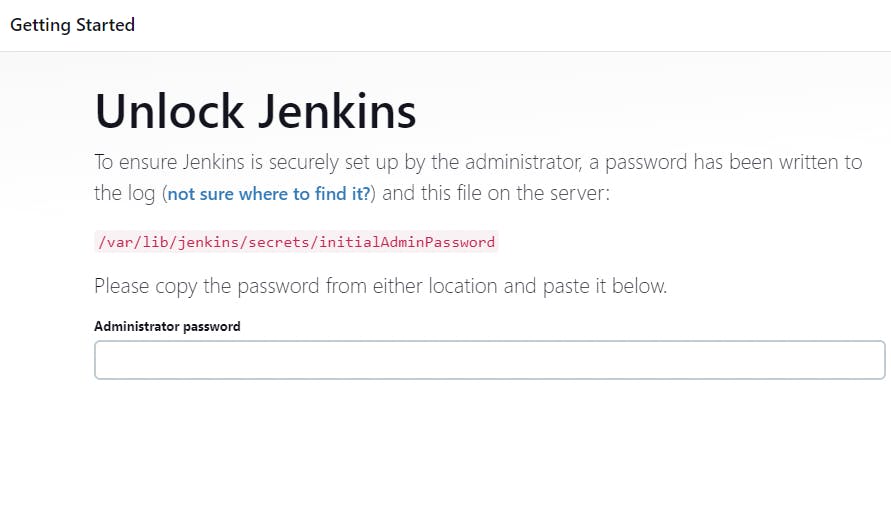
Now you need to unlock the Jenkins Administrator password.
Just go to the System where you have installed the Jenkins and type
sudo cat /var/lib/jenkins/secrets/initialAdminPassword
And you will get the password, and login with user name admin with the above password and reset the password.
After first successfully login you need to install the Suggested plugins.
Step 4: Plugins Installation:
Go to Manage Jenkins, click on Plugins and install all the plugins listed below, we will require for other tools integration:
SonarQube Scanner
Sonar Quality Gates
OWASP Dependency-Check
Docker
Steps 5: Now Install the SonarQube server with the help of Docker.
docker run -itd --name sonarqube-server -p 9000:9000 sonarqube:lts-community
You can access the Sonarqube server with the help of Your system IP with port No. 9000.
SonarQube is open source platform designed to continuously inspect the quality of source code.

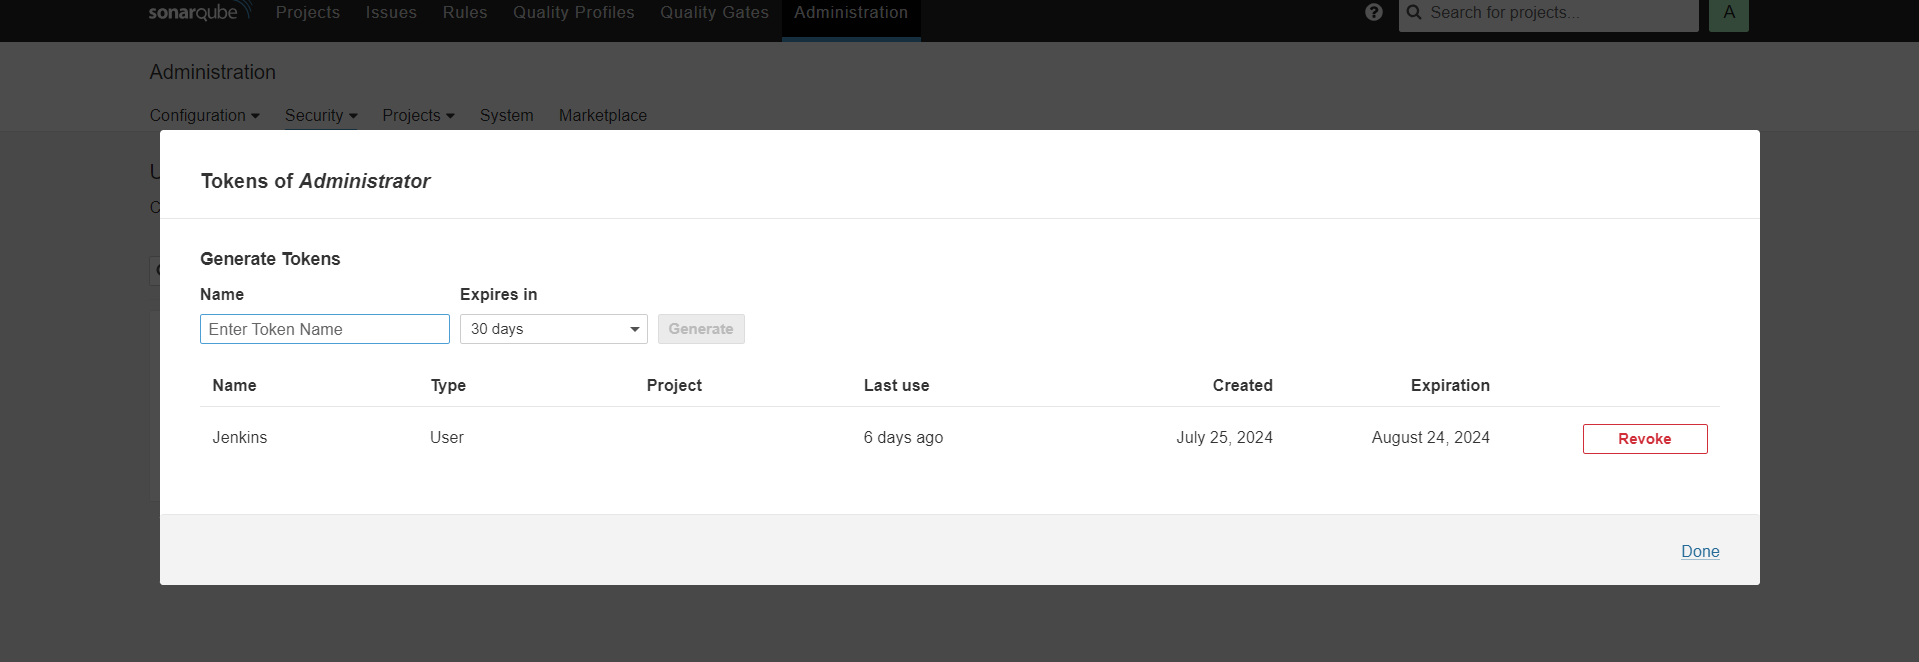
Steps 6: Token Creation in SonarQube server.
Go to SonarQube server>>Administration>>Security>>Users>>Add Token
Here Token name Jenkins and keep safe the created taken for future use.
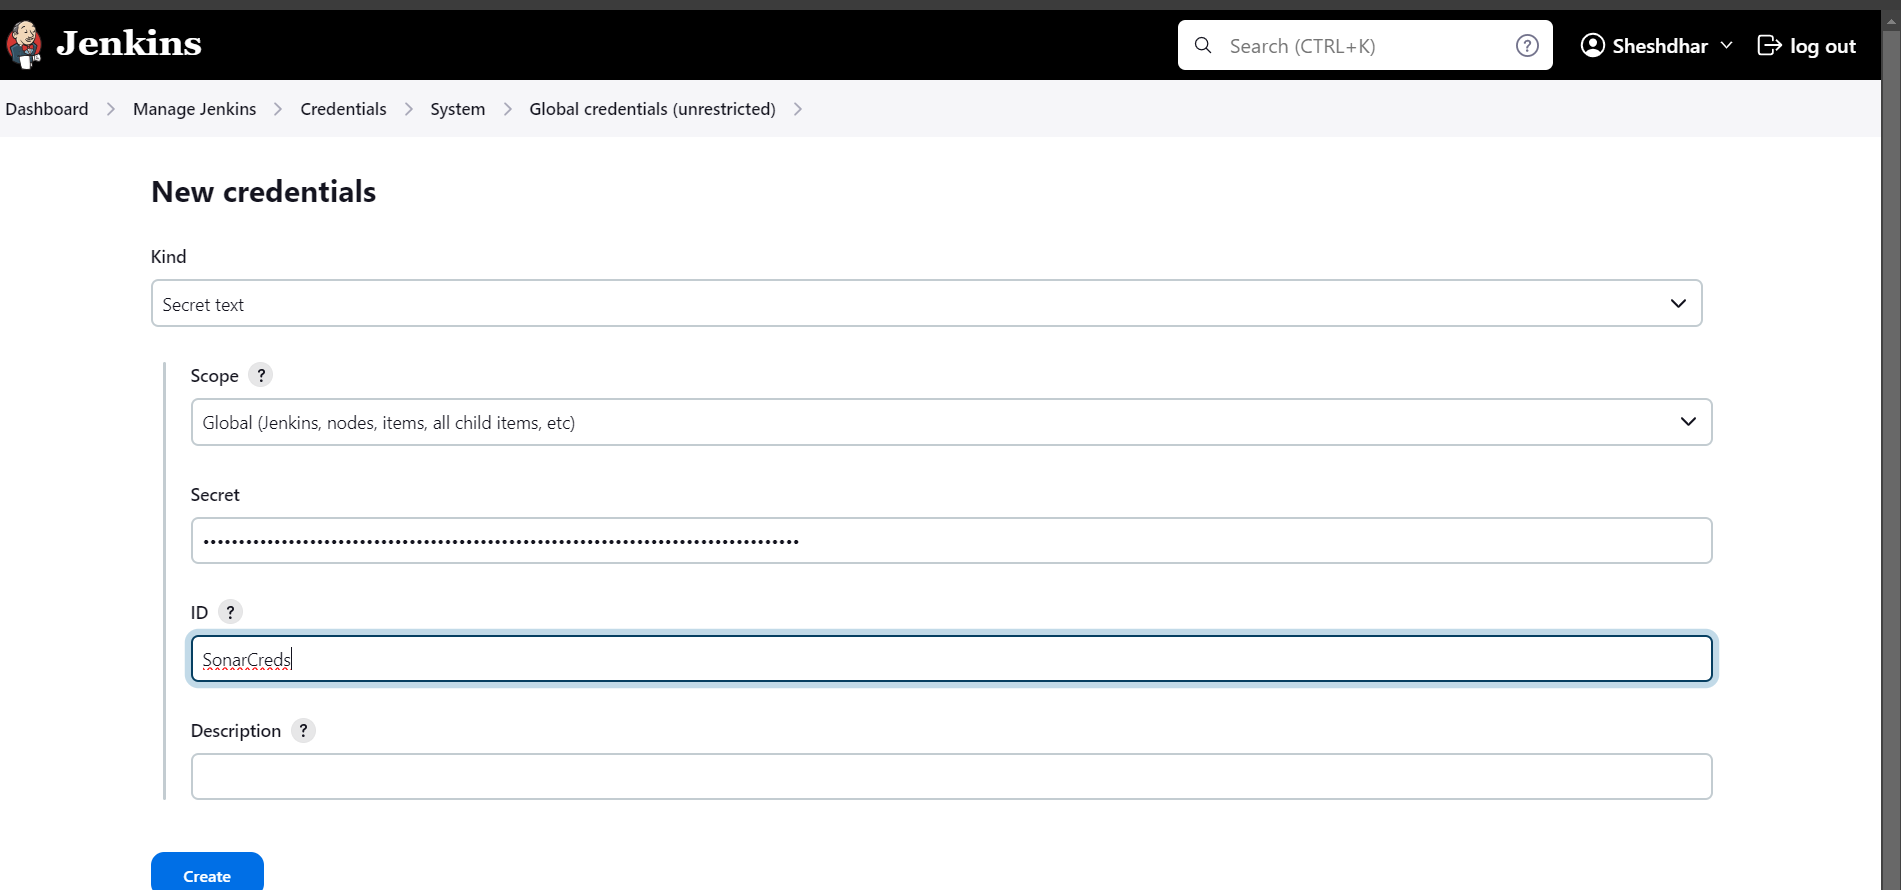
Steps 7: SonarQube token addition in Jenkins.
Now go to Jenkins and click on Manage Jenkins>>Credentials>>domain>>add credentials/secret(token generated in Sonarqube) and name the Credentials ID here SonarCreds and create.
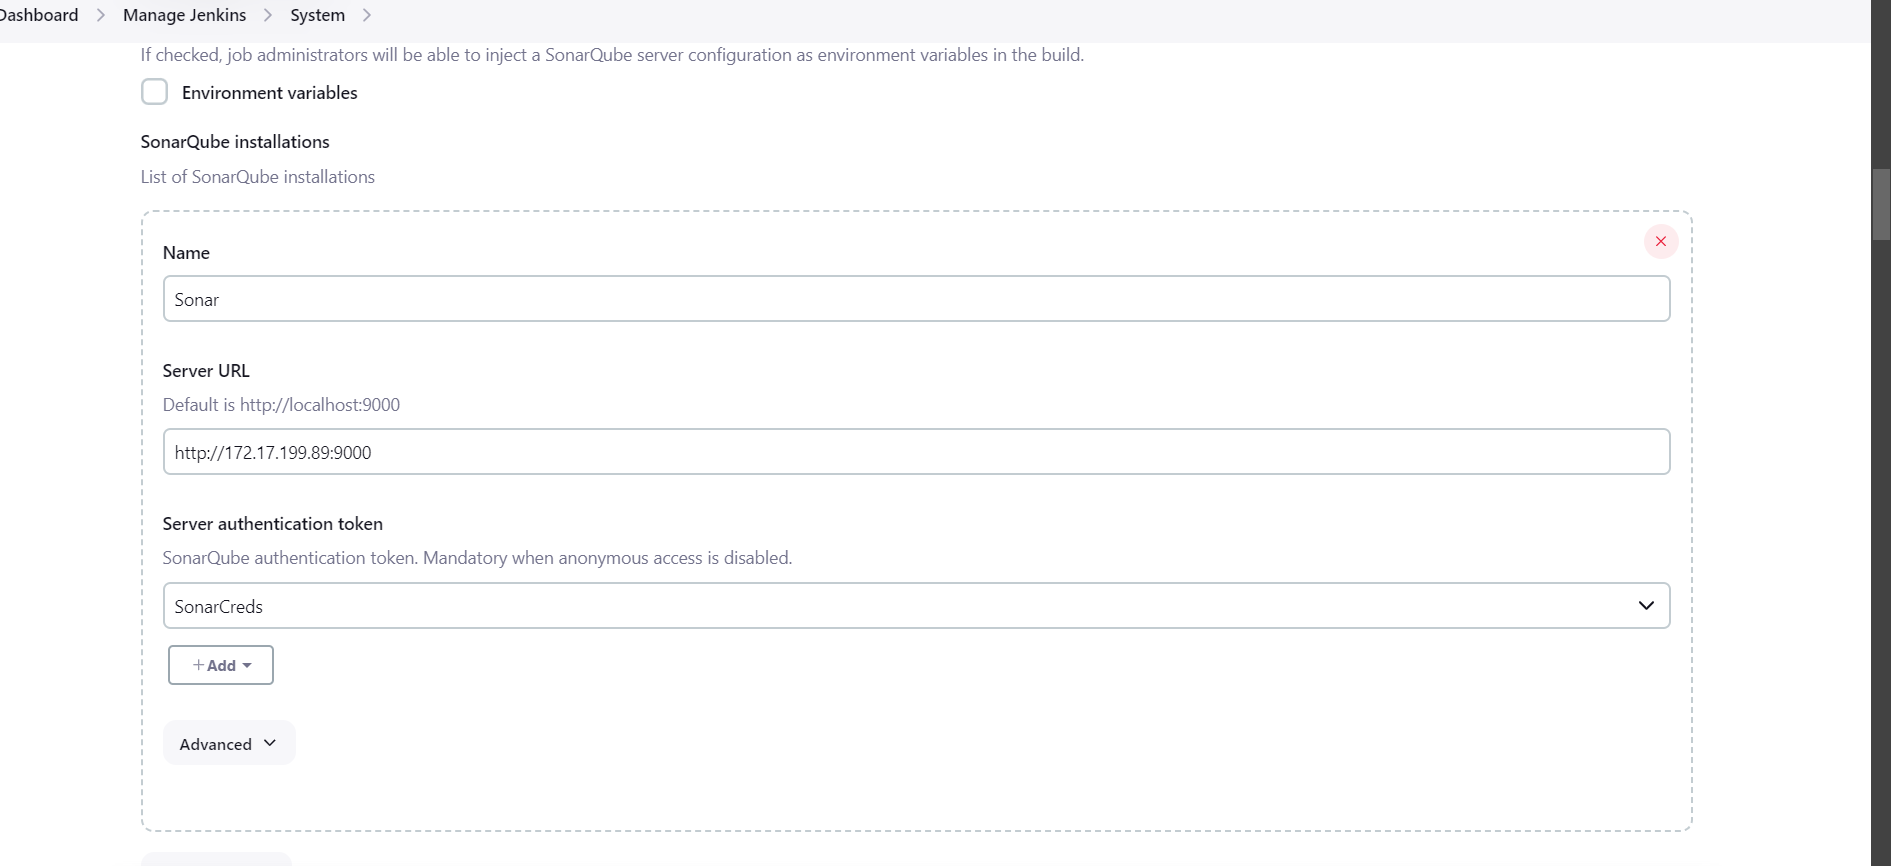
Steps 8: SonarQube server integration with Jenkins.
Now integrate SonarQube Server with Jenkins server, go to Manage Jenkins , then System and look for SonarQube Servers and add SonarQube server details.
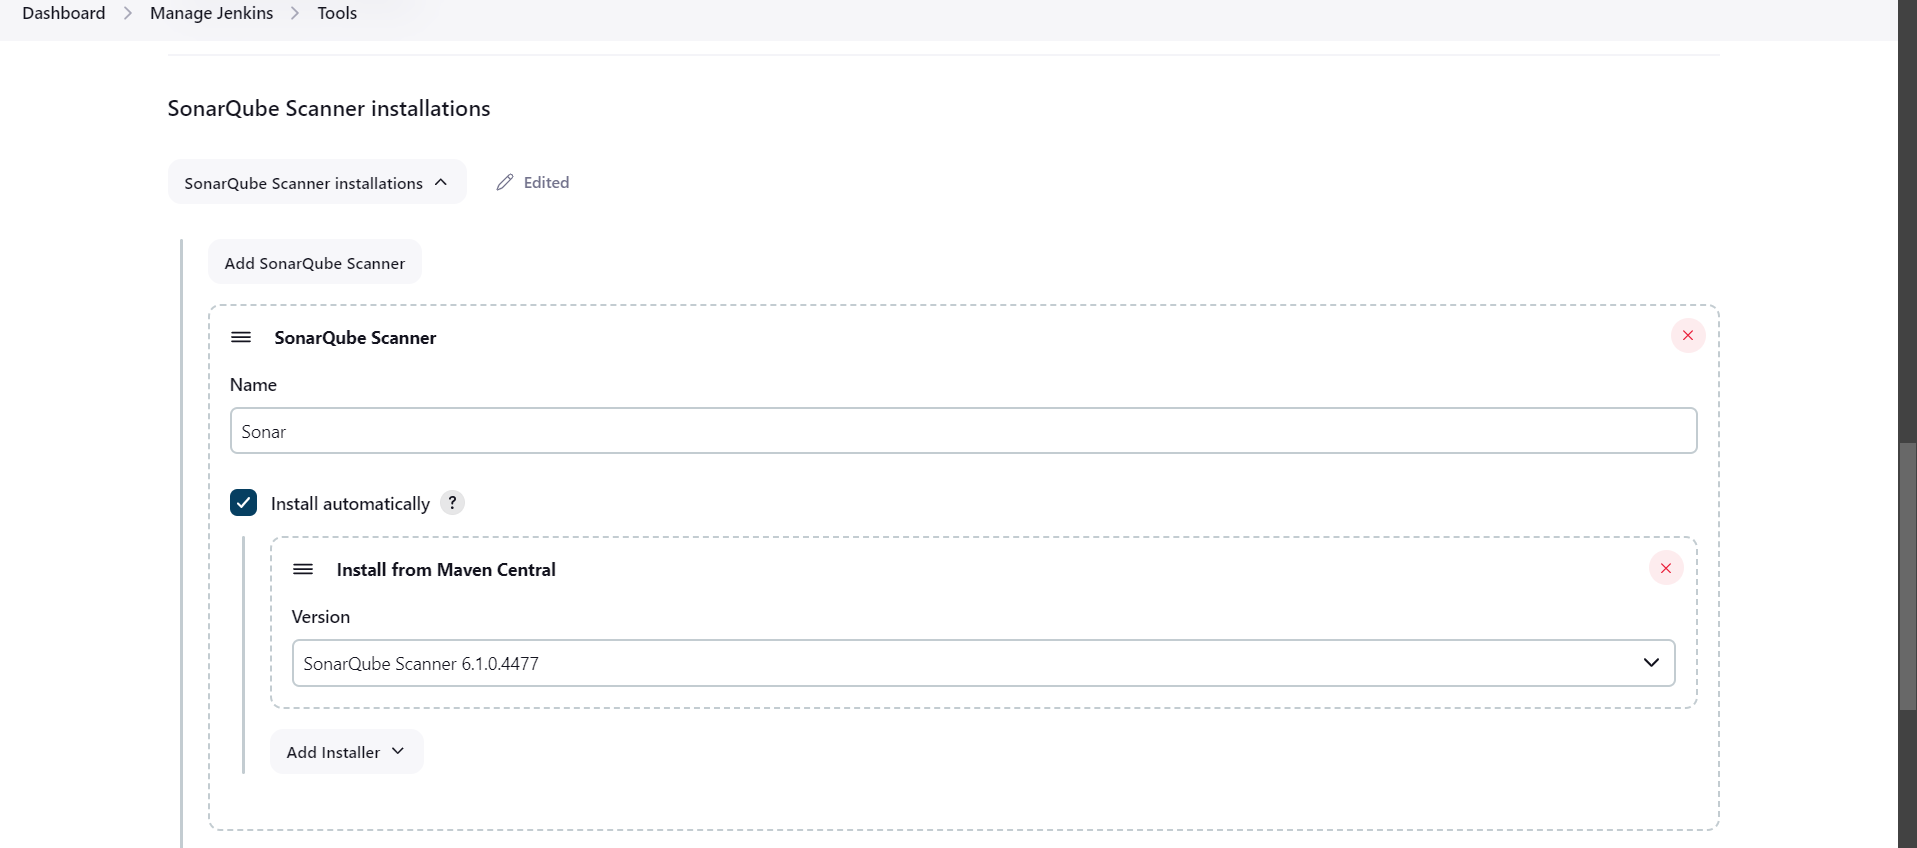
Steps 9: Now we will install SonarQube scanner..
Goto Jenkins>>Manage Jenkins>>tools>>Sonarqube scanner installation and add Sonarqube scanner...
Steps 10: Integration of OWASP with Jenkins-:
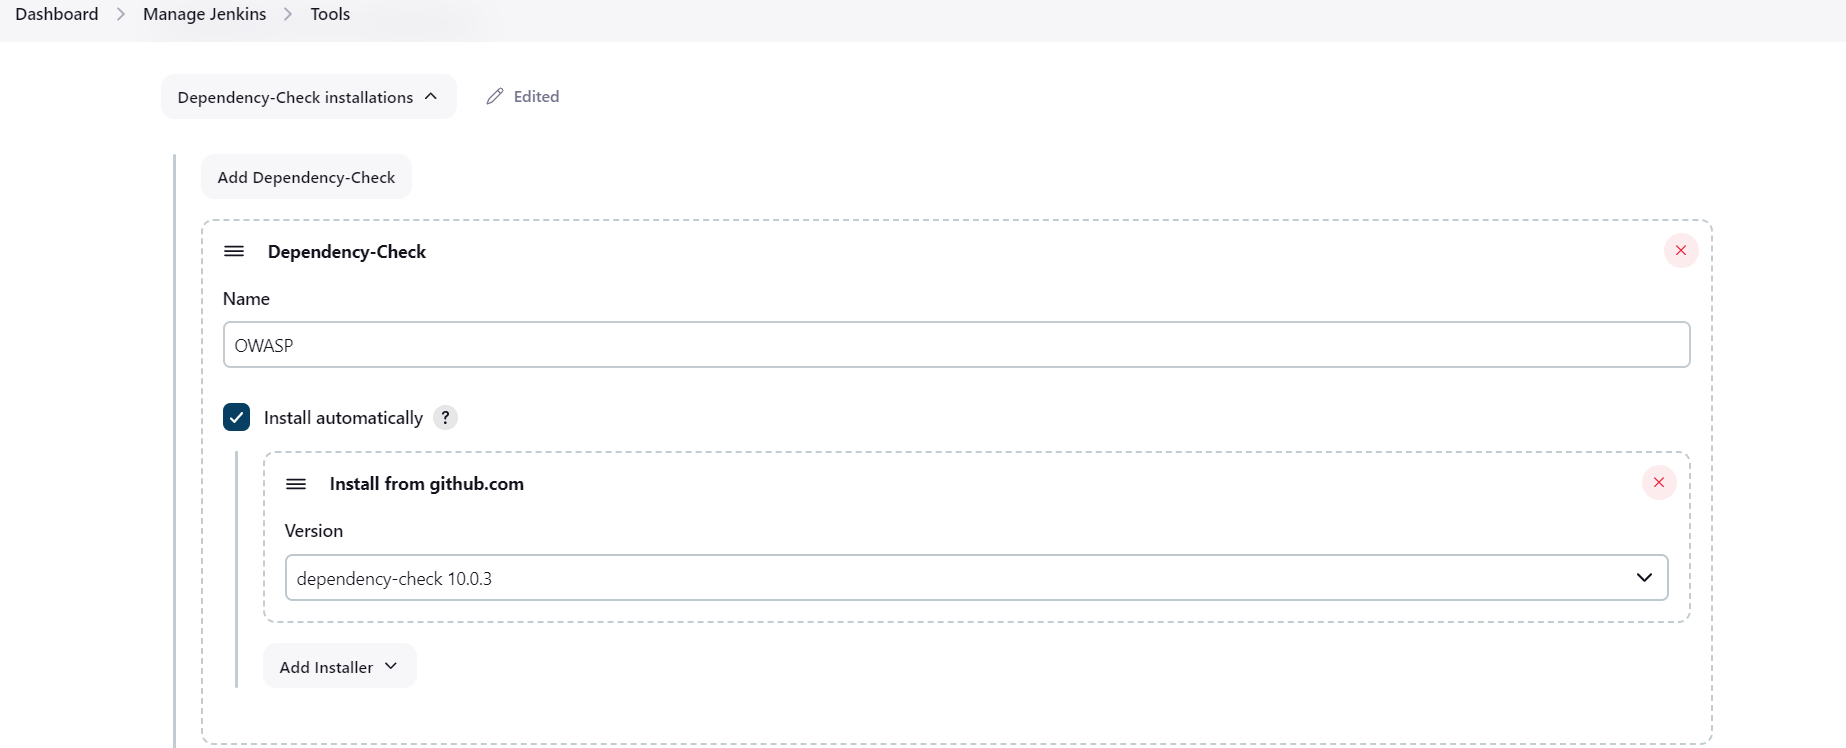
OWASP is Open Worldwide Application Security Project which helps to improve security of software, that help to developers and organizations to protect their applications from security threats.
go to Manage Jenkins , then tools , look for Dependency-Check installations and add Dependency-Check.
Steps 11: Trivy:-
Trivy is a comprehensive and versatile security scanner for container images, file system, Git repository, virtual machine images.
Steps to install Trivy....
sudo apt-get install wget apt-transport-https gnupg lsb-release
wget -qO - https://aquasecurity.github.io/trivy-repo/deb/public.key | gpg --dearmor | sudo tee /usr/share/keyrings/trivy.gpg > /dev/null
echo "deb [signed-by=/usr/share/keyrings/trivy.gpg] https://aquasecurity.github.io/trivy-repo/deb $(lsb_release -sc) main" | sudo tee -a /etc/apt/sources.list.d/trivy.list
sudo apt-get update
sudo apt-get install trivy
Steps 12: Dockerhub Credentials binding with Jenkins server to access the dockerhub credentials in pipeline script.
Go to Jenkins and click on Manage Jenkins>>Credentials>>domain>>add credentials like user name and password of Dockerhub to push the images on docker hub and the Credentials ID name is Dockerhubcreds and create.
Steps 13: Now we will be configuring email notification for success and failed Jobs with Project details.
First go to Jenkins and install Email Extension Plugin from Plugins section.
Then go to Manage Jenkins>>System>>Extended E-mail Notification and fill the details as per mentioned below.
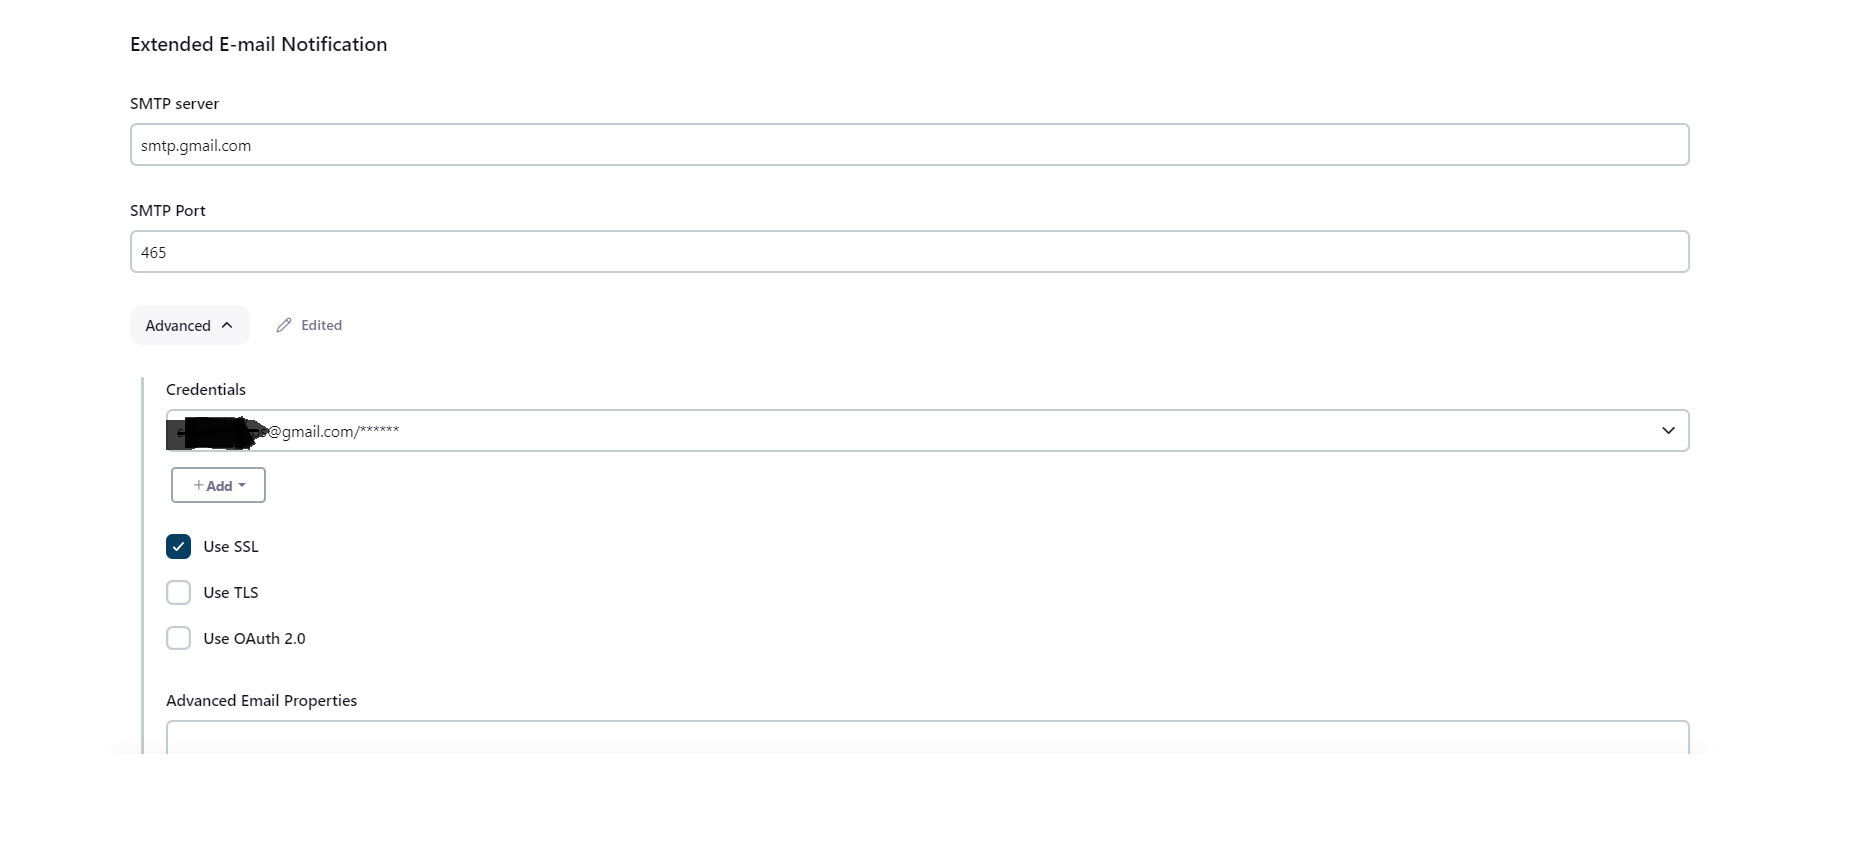
Note:- When you are using any mailbox for sending the emails, you have to configure SMTP server as per your mailbox domain to authenticate for sending the emails, then you have to generate the App password for that mailbox and then add this App password in Jenkins Credentials sections and use above.
Steps 14: Now create the Job for pipeline configuration.
Go to Jenkins>>New Item>>Pipeline>>Provide the description about your project.
And Select Github project and enter the Github repository.
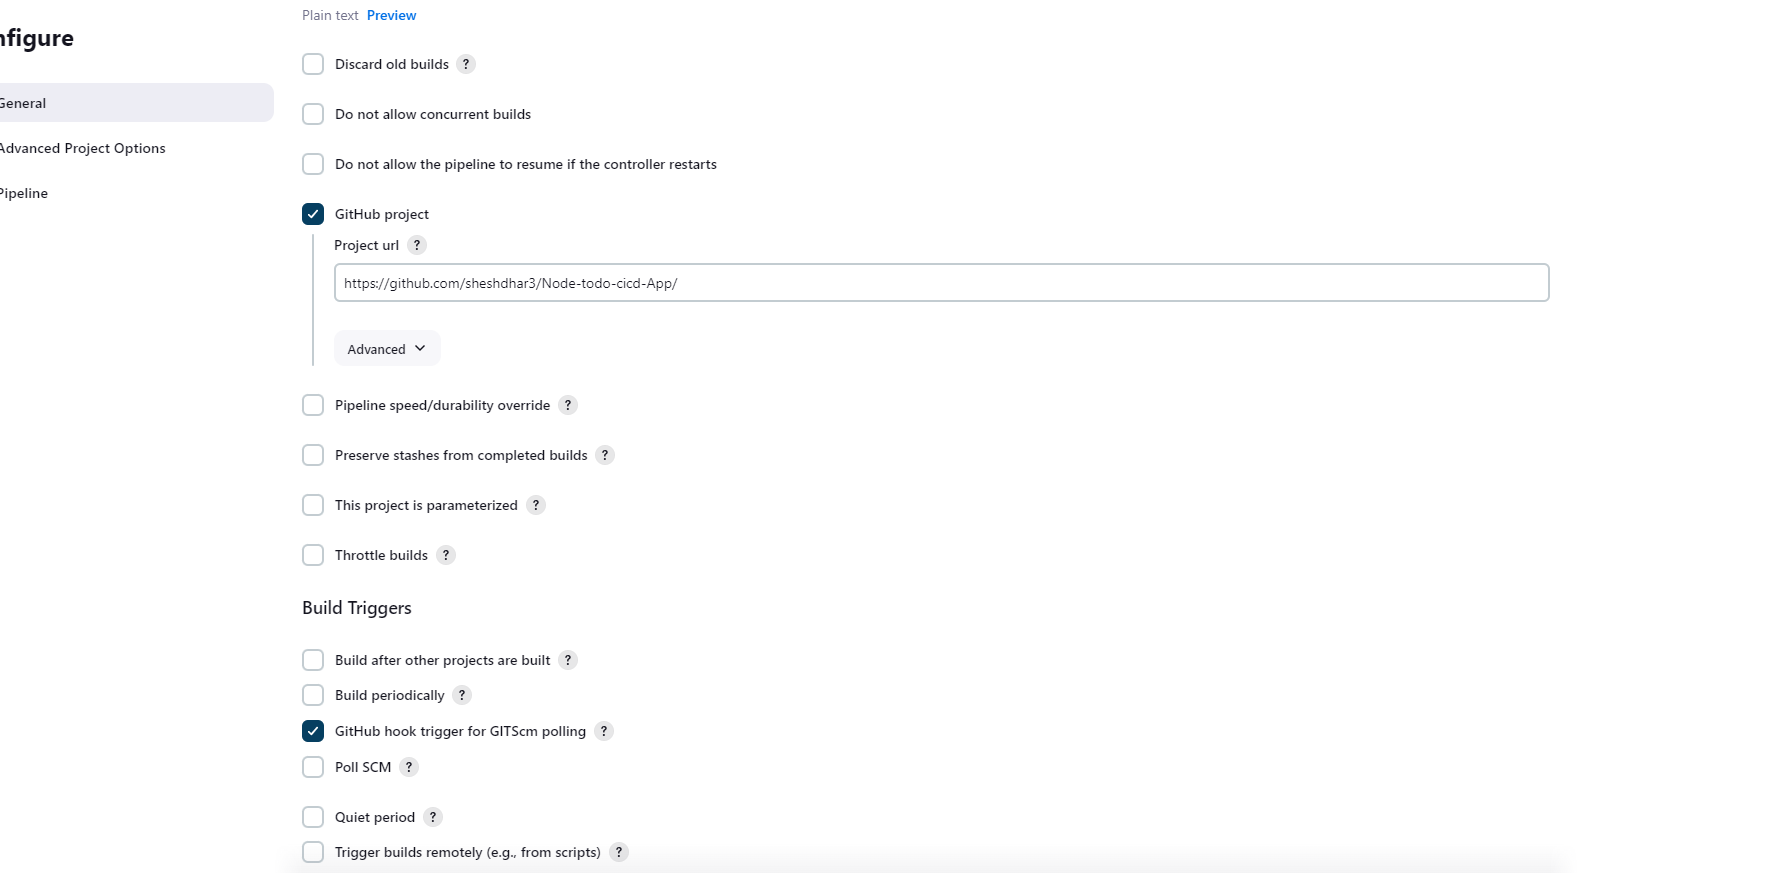
In Pipeline Section Select pipeline script and write the script..
pipeline {
agent any
environment{
SONAR_HOME = tool "Sonar"
}
stages {
stage ("Code clone") {
steps{
git url: "https://github.com/sheshdhar3/Node-todo-cicd-App.git" , branch: "master"
echo "Code Cloned successfully"
}
}
stage ("SonarQube Analysis"){
steps{
withSonarQubeEnv("Sonar"){
sh "$SONAR_HOME/bin/sonar-scanner -Dsonar.projectName=PQRNodeApp-CICD -Dsonar.projectKey=PQRNodeApp-CICD"
}
}
}
stage ("SonarQube Quality Gate checks"){
steps{
timeout(time: 1, unit: "MINUTES") {
waitForQualityGate abortPipeline: false
}
}
}
stage ("OWASP"){
steps{
dependencyCheck additionalArguments: '--scan ./', odcInstallation: 'OWASP'
dependencyCheckPublisher pattern: '**/dependency-check-report.xml'
echo "OWASP check completed"
}
}
stage ("Build and Test Stage"){
steps{
sh 'docker build -t node-todo-cicd:final .'
echo "Code build successfully"
}
}
stage ("Trivy scan"){
steps{
sh "trivy image node-todo-cicd:final"
}
}
stage ("Push to private docker hub repository"){
steps{
withCredentials([usernamePassword(credentialsId:"Dockerhubcreds",passwordVariable:"dockerPassword",usernameVariable:"dockerUser")]){
sh "docker login -u ${env.dockerUser} -p ${env.dockerPassword}"
sh "docker tag node-todo-cicd:final ${env.dockerUser}/node-todo-cicd:final"
sh "docker push ${env.dockerUser}/node-todo-cicd:final"
echo "Image pushed on dockerhub repository"
}
}
}
stage ("Deploy stage"){
steps{
sh "docker-compose down && docker-compose up -d"
echo "Apps Deployed Successfully"
}
}
}
post {
always {
script {
emailext(
subject: "${env.JOB_NAME} - Build #${env.BUILD_NUMBER} - ${currentBuild.currentResult}",
body: """${env.JOB_NAME} - Build #${env.BUILD_NUMBER} - ${currentBuild.currentResult} \n
Check console output at ${env.BUILD_URL} to view the results.""",
recipientProviders: [[$class: 'CulpritsRecipientProvider'], [$class: 'DevelopersRecipientProvider']],
to: 'youremailid@gmail.com'
)
}
}
}
}
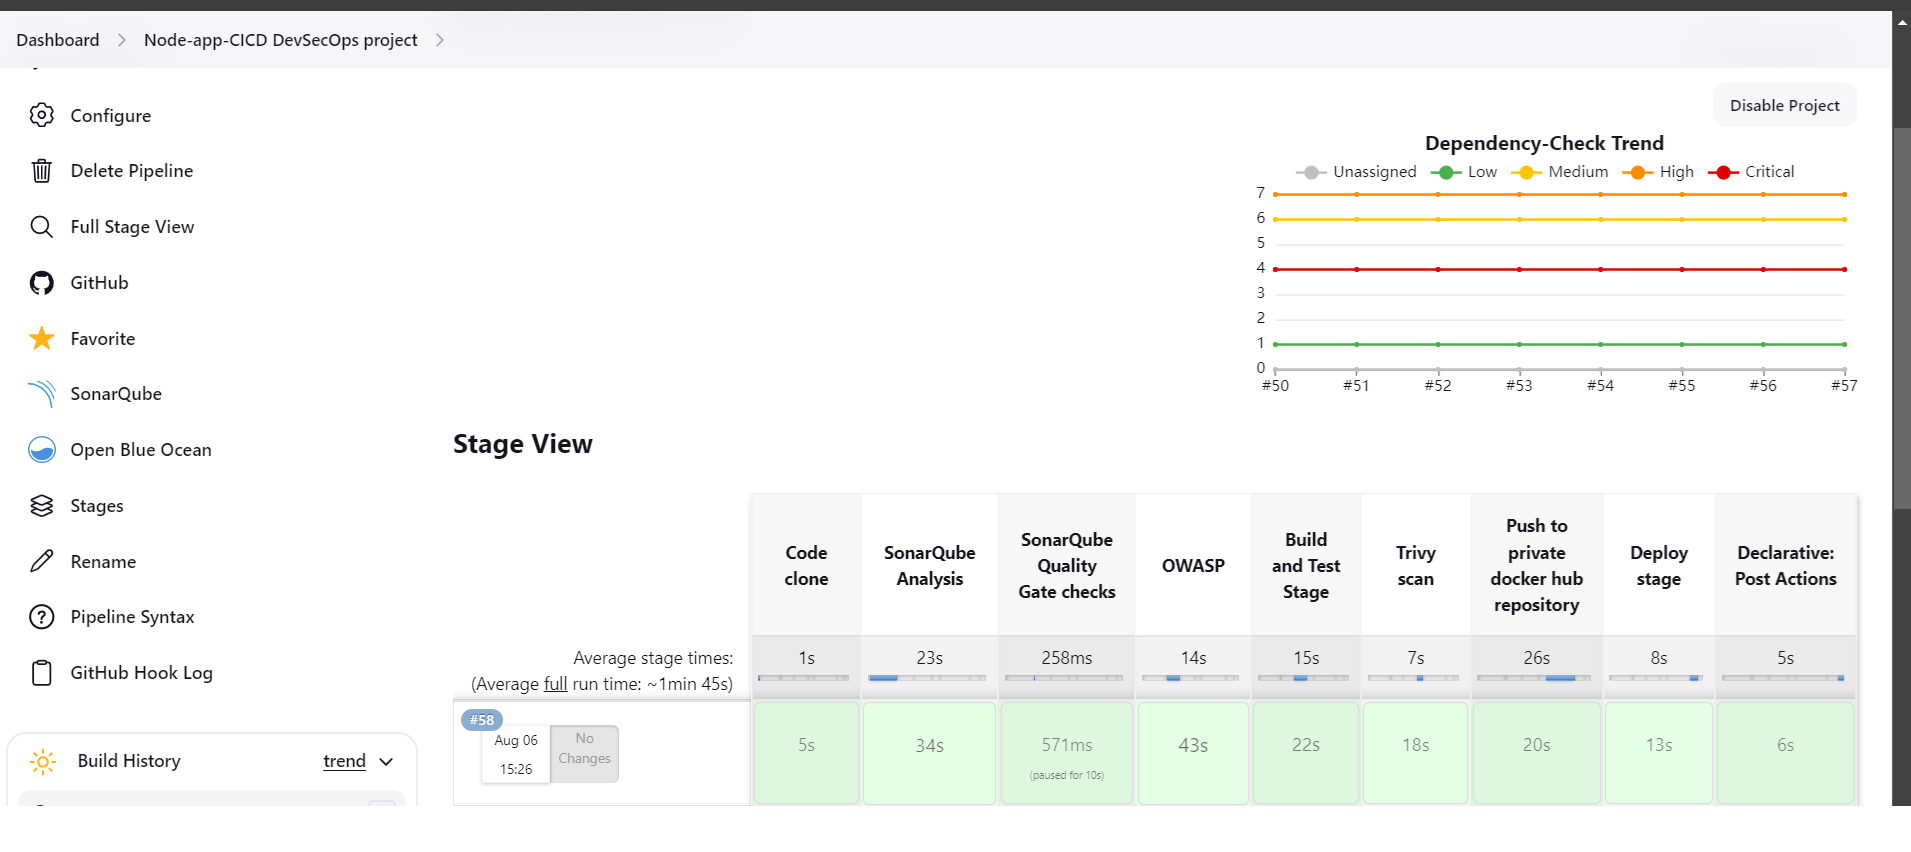
Steps 15: And now last run the pipeline and after sometime your code is deployed using DevSecOps.
Email Notification

"/"
Subscribe to my newsletter
Read articles from Shesh Dhar directly inside your inbox. Subscribe to the newsletter, and don't miss out.
Written by
