All About Setting up, Building & Installing AWS C++ SDK from Source on Personal Device
 Aditya Panchal
Table of contents
- A. Setting up AWS IAM Identity Center (IDC) & AWS Organizations
- B. Establishing how the SDK will authenticate with AWS using IDC
- C. Downloading AWS C++ SDK Source & building binaries on Local Device
- Download / Clone AWS C++ SDK Source on your device
- Create a new directory to store the build files in and navigate to that folder.
- Generate the Build files using cmake once you are in newly created build files directory.
- Build the SDK Binaries using the build files generated.
- Install the built Binaries
- Add bin path as System Environment variable
- D. Hello S3 C++ Application
This is a tutorial type article which will mostly be a step-by-step listing of instructions on how to set, build & install AWS C++ SDK from its Source Code on Local Device.
Article is divided in 4 Parts
A. Setting up AWS IAM Identity Center (IDC) & AWS Organizations
B. Establishing how the SDK authenticates with AWS using IDC
C. Downloading AWS C++ SDK Source & building binaries on Local Device
D. Hello S3 C++ Application
Before we begin, this article is intended for Windows OS with below programs serving as prerequisites to be installed on local device.
Windows OS
Visual Studio 2015 or later
Git for Windows (Git - Downloading Package (git-scm.com)
Cmake (Latest release - Download CMake)
A. Setting up AWS IAM Identity Center (IDC) & AWS Organizations
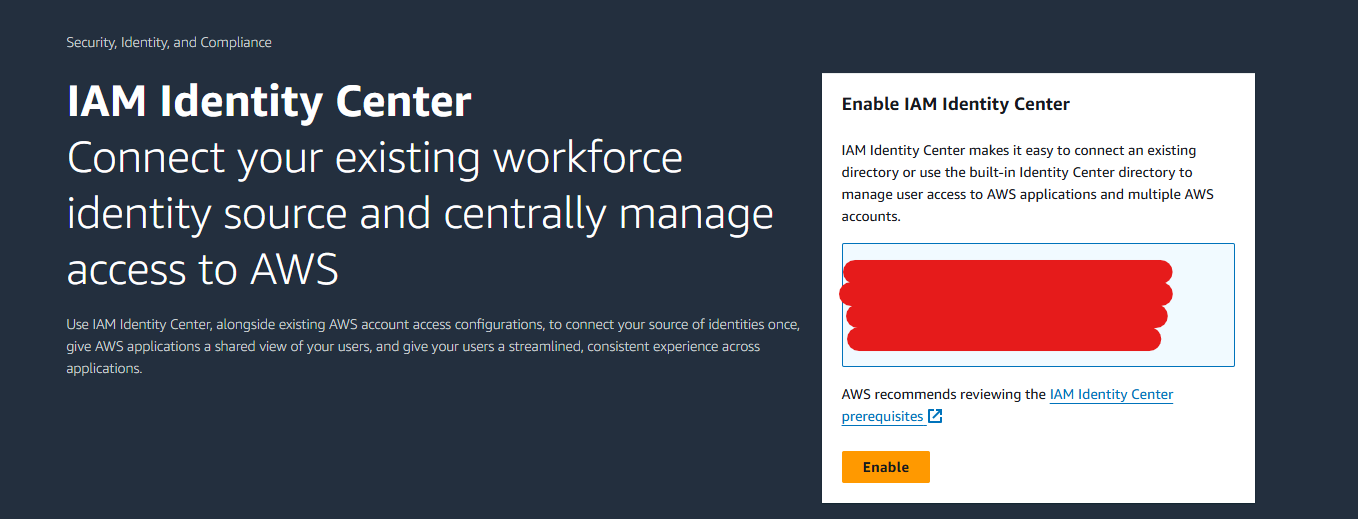
Enable IAM Identity Center & create an IAM Identity instance.
Enabling AWS IAM Identity Center - AWS IAM Identity Center (amazon.com)
Enabling / Activating IDC should be done by your AWS Root Account
Get started with common tasks in IAM Identity Center - AWS IAM Identity Center (amazon.com)
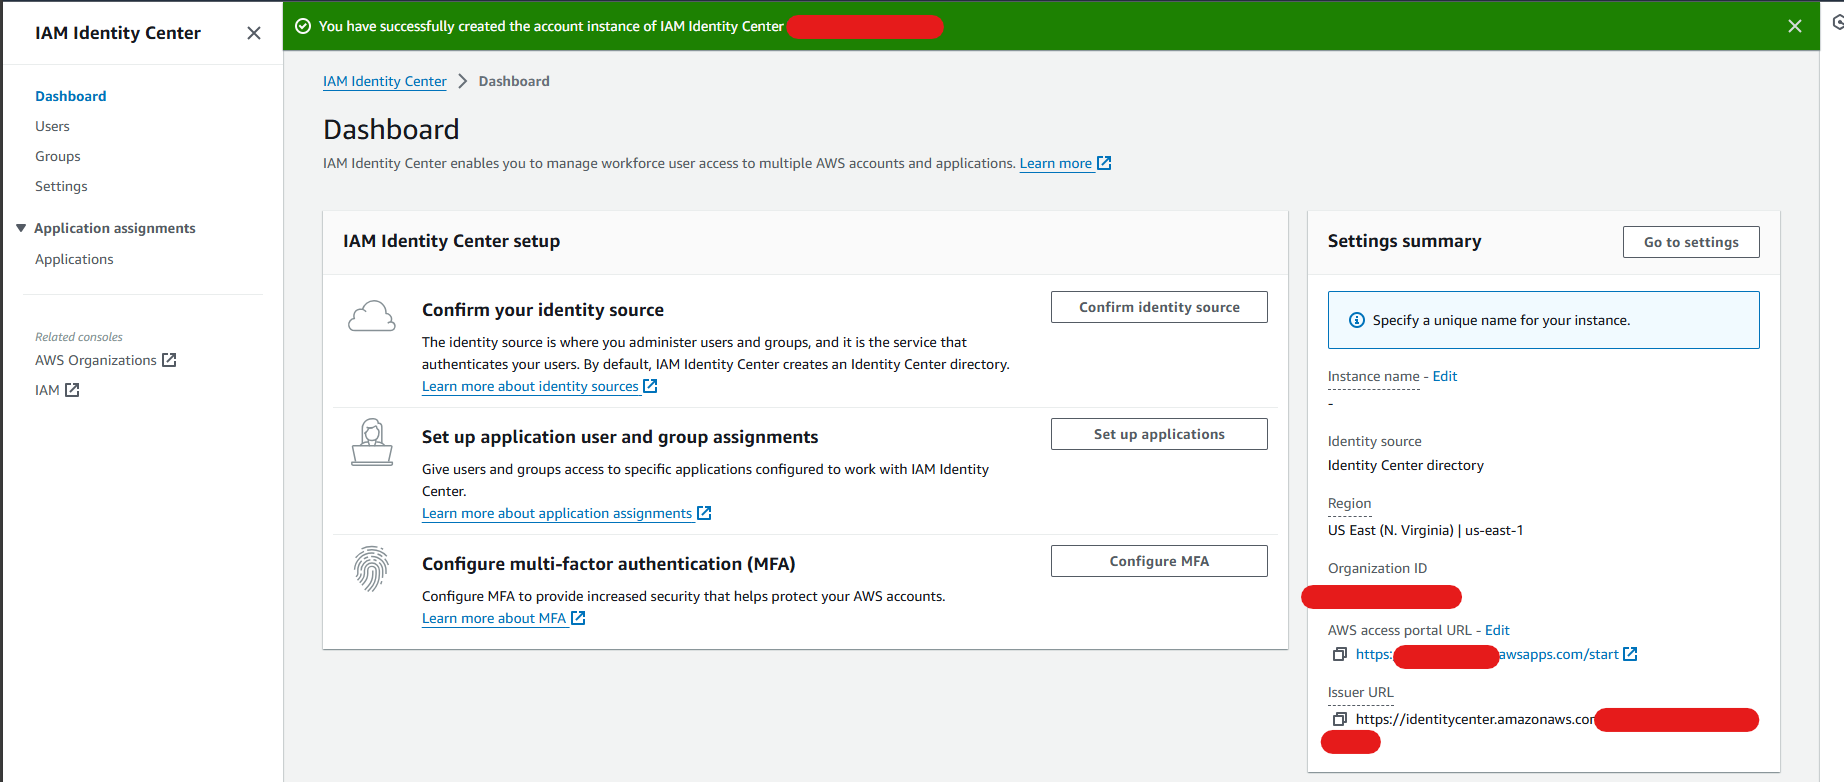
Once enabled, you'll see your created IDC Instance as below
Along with IDC, it will also automatically create an AWS Organization instance if it was not created before.
A Management Account under your Root account in AWS Organizations will also get created along the way. An organization has only one management account along with zero or more member accounts.

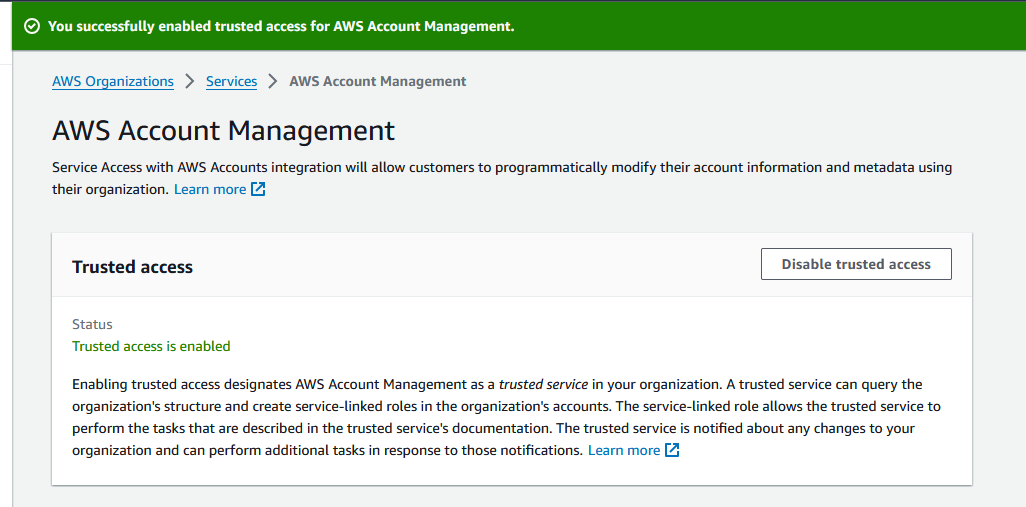
You also may or may be not be required to enable the AWS Account Management Service in AWS Organizations
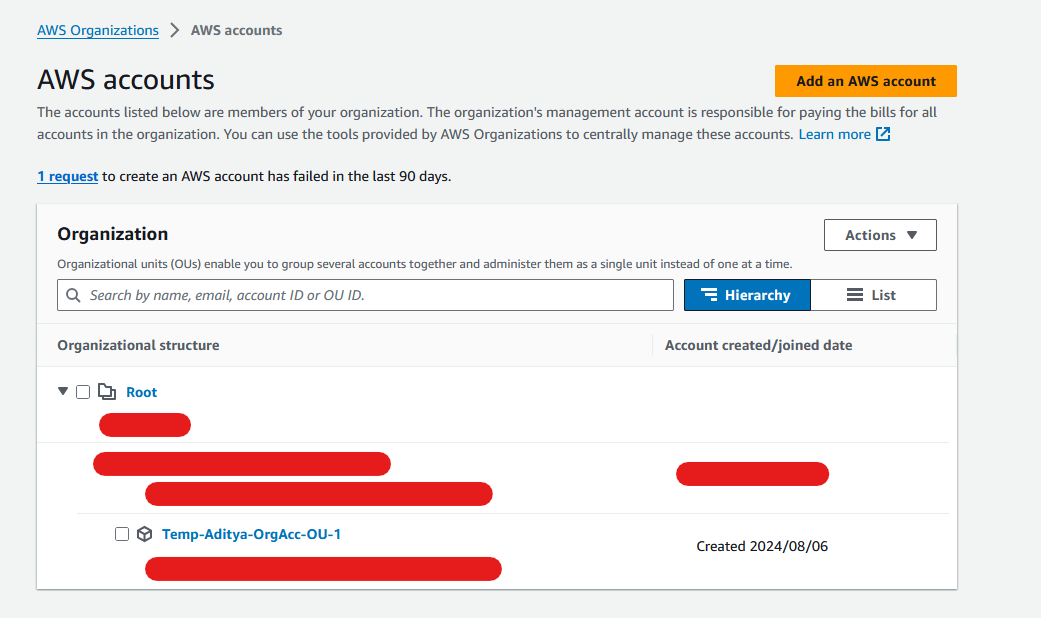
Final view in AWS Organizations looks like below, your Root AWS Account is equivalent to your Management Account in AWS Organizations
B. Establishing how the SDK will authenticate with AWS using IDC
Install AWS CLI as per the Operating System on your personal device
Install or update to the latest version of the AWS CLI - AWS Command Line Interface (amazon.com)
Run command : aws --version to check if installed correctly

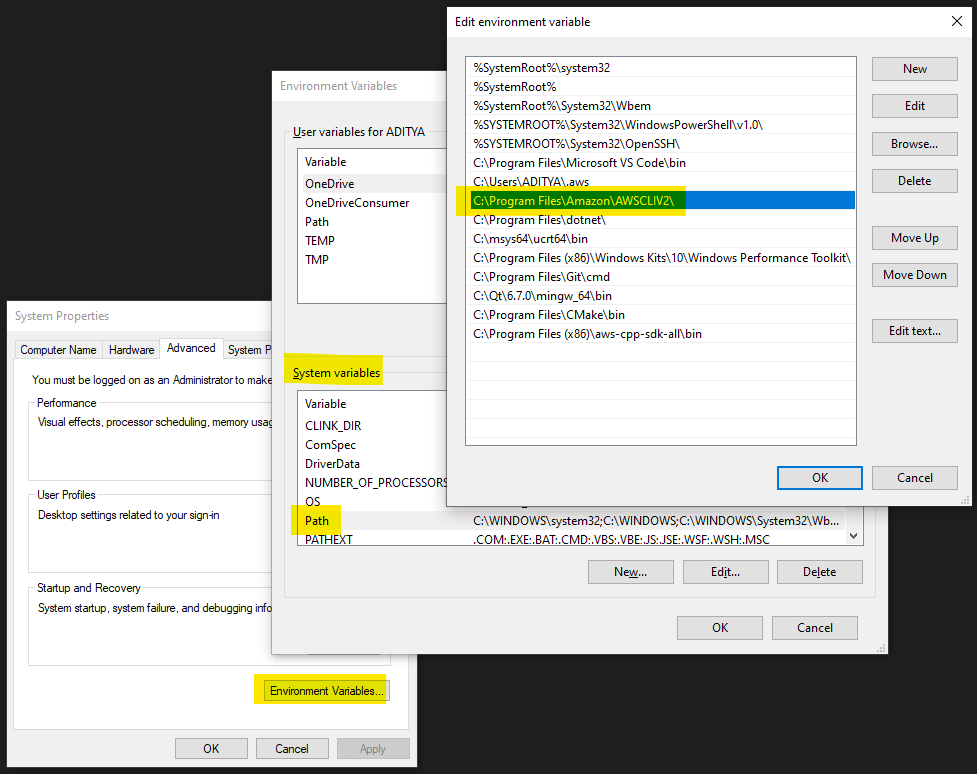
If AWS CLI does not show up in some other Command Prompt, go to System Properties, Edit Environment Variables & verify if Path variable in System variables has AWSCLIV2 path added to it, to make it visible move it up as much as possible as per below.
Configure AWS CLI with AWS IAM Identity Center
The next step would be to make API calls via the AWS CLI installed on your local device to view, provision or modify cloud resources from your AWS Account. To achieve this, you would need programmatic access to interact with AWS outside of the AWS Management Console.
There are multiple ways of Authentication Type by which one can get the programmatic access. In this article we will limit to see Authentication Type using AWS IAM Identity Center (IDC) for short-term credentials only.
To get the short-term credentials for programmatic access from IDC, we need to go back to IDC & create a User, Group & Permission Set, as a good security practice with least-privilege permissions to our AWS Account.
2A. Create a User in IDC

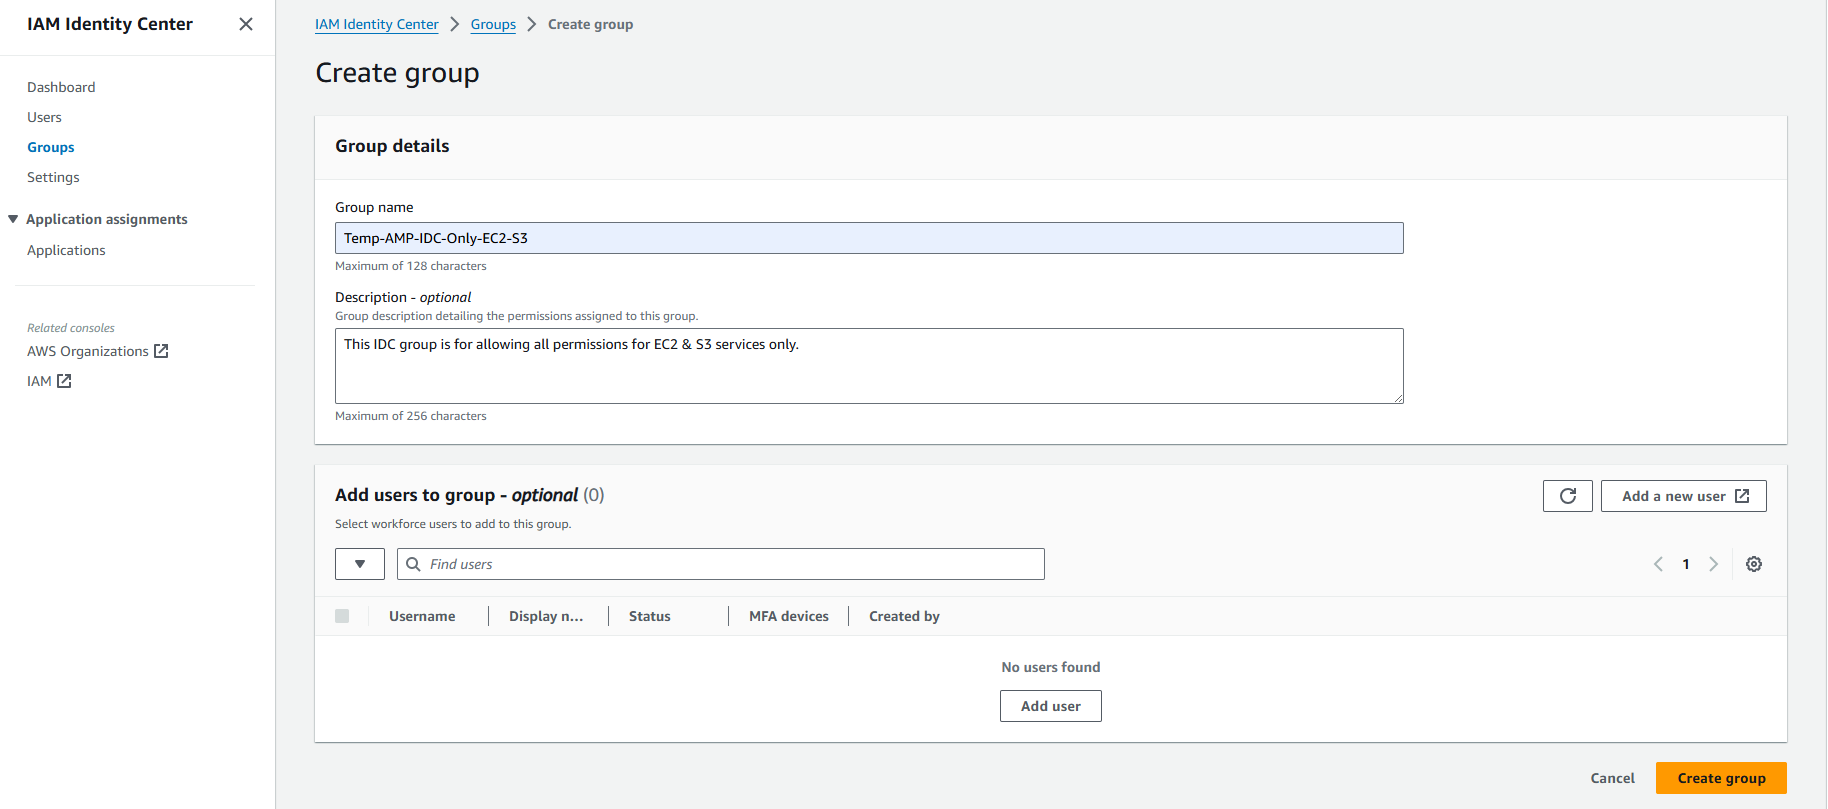
2B. Along the way, console will ask you to create a Group in IDC as per below snap. Add the User under the created Group.
The final view looks as per below snap

2C. Use created user to login into Account's AWS Access Portal
Once User is created, verified & added in the Group, the user will need to login into AWS Access Portal using the URL which is visible in IDC Dashboard or in Settings with password shared on email or with one-time generated password. The AWS access portal is a central place where Users created in IDC can view and access their assigned AWS accounts and cloud applications with assigned least-privilege permissions.

2D. Create a Permission Set in IDC from Root Management Account
A Permission Set is a collection of policies that define the level of access, permissions and roles that users and groups have to an AWS account. The ability to create and manage Permission Sets in AWS IAM Identity Center is tied to the Root Management Account of the organization. So you'll always have to manage Permission Sets from your main AWS account. This is because permission sets need to be available across all accounts within the organization, and the management account is responsible for handling this centralized configuration. Non-management accounts under your Organization do not have the capability to create or manage these permission sets, as this functionality is restricted to maintain security and consistency across all Accounts under an Organization. Since Permission Sets are not available for non-management accounts, it is recommended that all Users and Groups in IDC be maintained under the Root Management AWS Account.
While the management account creates and manages permission sets, these sets can then be assigned to different accounts within the organization. Users can then use these different permission sets to access different resources across multiple accounts as defined by the permissions.
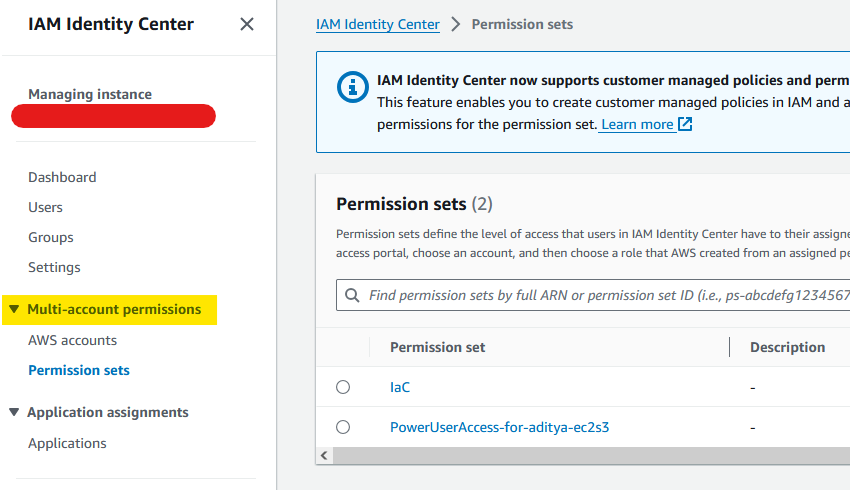
When you login from your Root Management Account, you'll automatically see the 'Multi-account permissions' option in IDC. For non-management accounts under an Organization this option will not be visible in IDC.
Create a permission set - AWS IAM Identity Center (amazon.com)
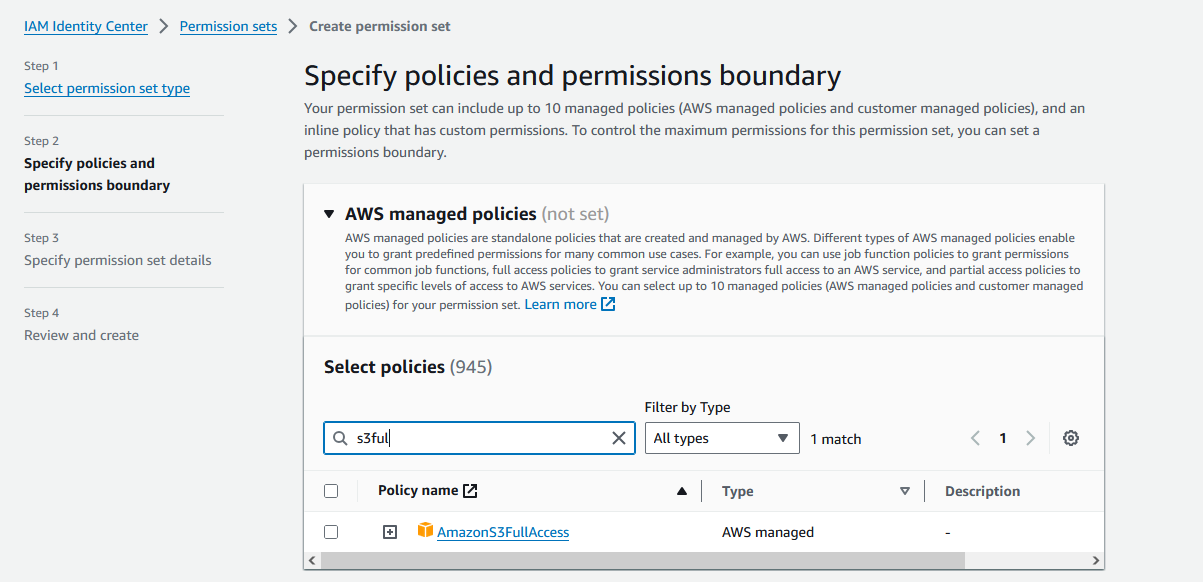
Since we need the programmatic access to test the authentication of CLI to AWS resources, we'll limit our use to AWS Managed Policies of PowerUserAccess, AmazonS3FullAccess & AmazonEC2FullAccess, to get access to EC2 & S3 Service
While creating permission set, you define the Permission Set Session Duration, it is the length of time a user can be logged on before the console logs them out of their session. When the specified duration elapses, AWS signs the user out of the session. This achieved the objective of short-term access via IDC

Once Permission Set is created, final view in IDC looks like below snap
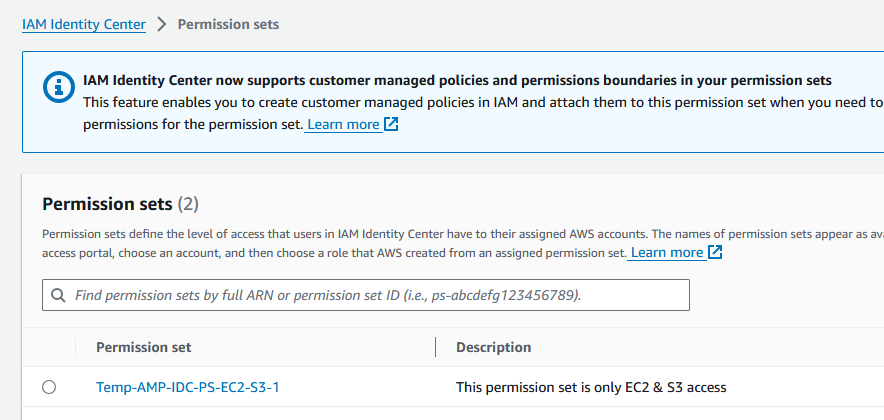
2E. Assign the Permission Set & Group in IDC to an Account under your Organization from the Multi-account permissions option.
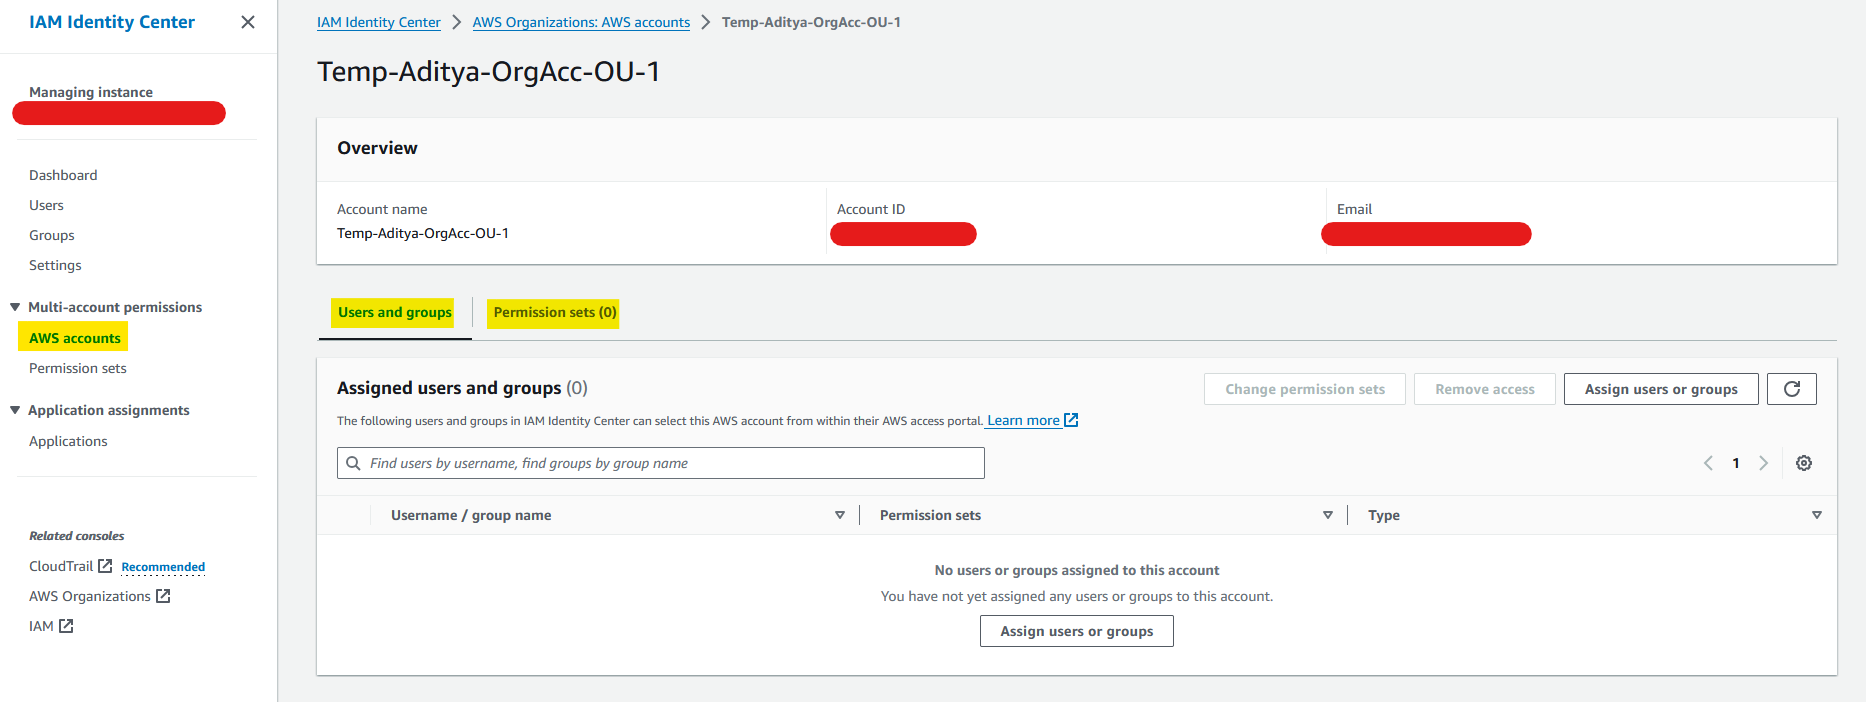
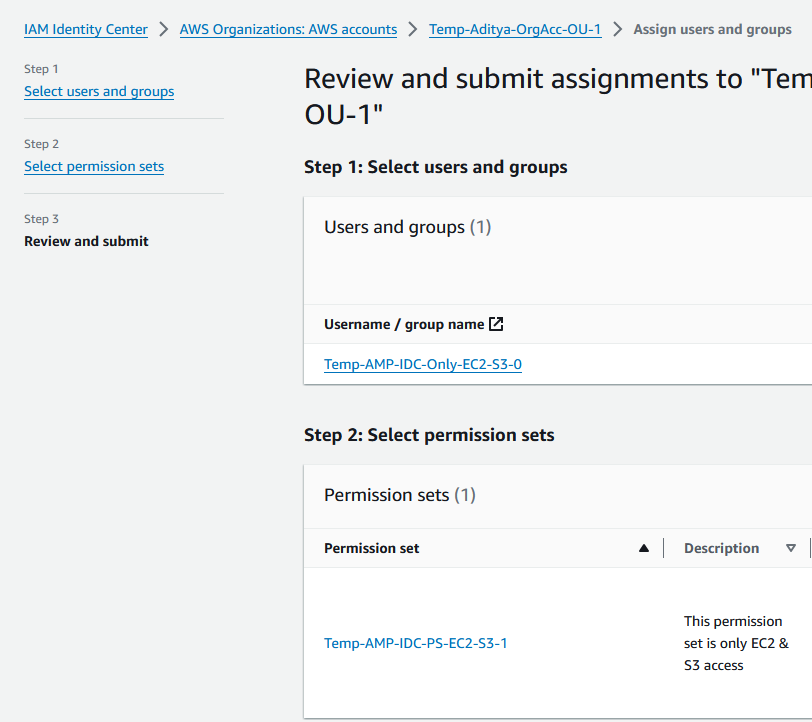
Final view looks like

2F. In above step 2C we created a User in IDC & logged into AWS Access Portal. Now re-login into the Portal & see if the User is able to see the Account & assigned Permission Set as below.
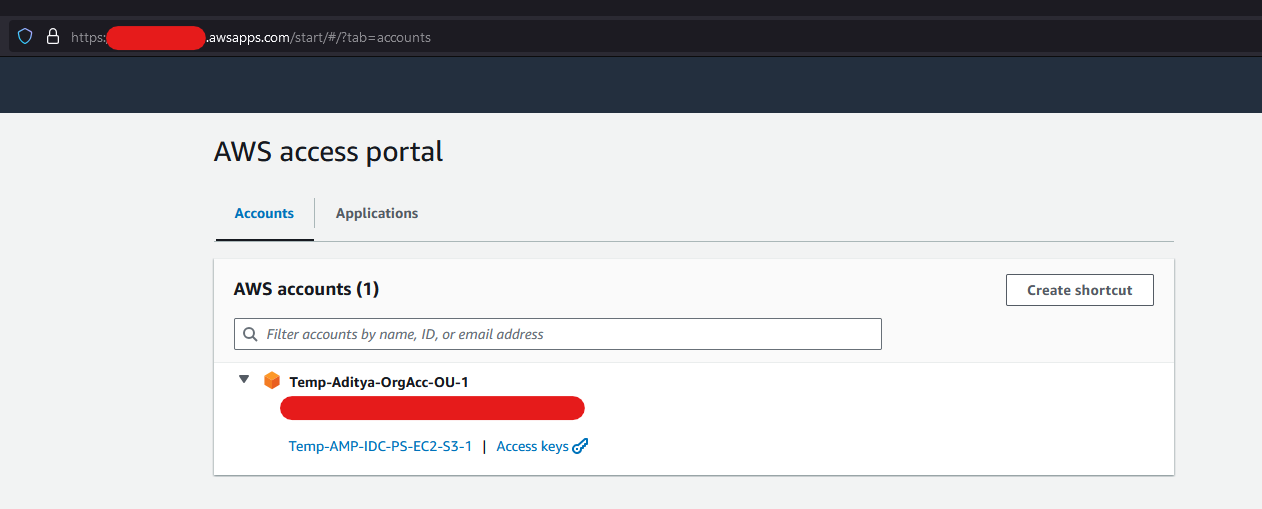
Configure the AWS CLI with IAM Identity Center authentication - AWS CommandLine Interface (amazon.com)
Using Access Keys & Session Token to finally call AWS Services via AWS CLI from Local Device
From your AWS Access Portal, you'll see option to get Access Keys for your user profile for the assigned Permission Set under that AWS Account.
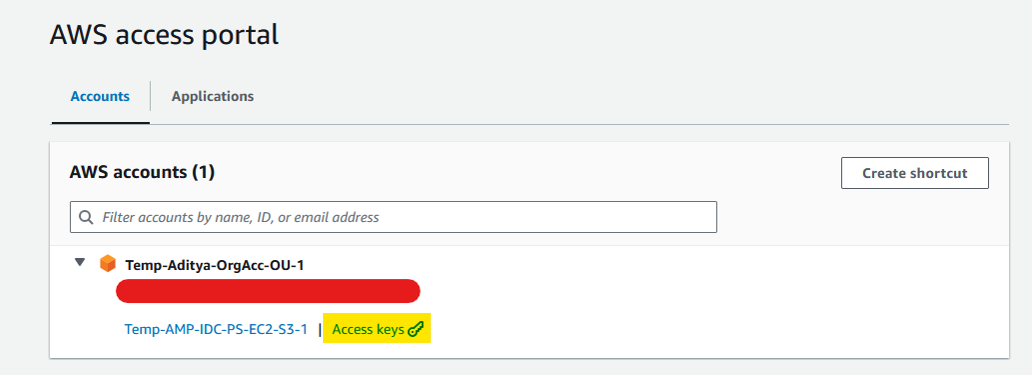
Once opened there are multiple options to use these short-term credentials, these will expire once the session duration you choose for this permission set is over.
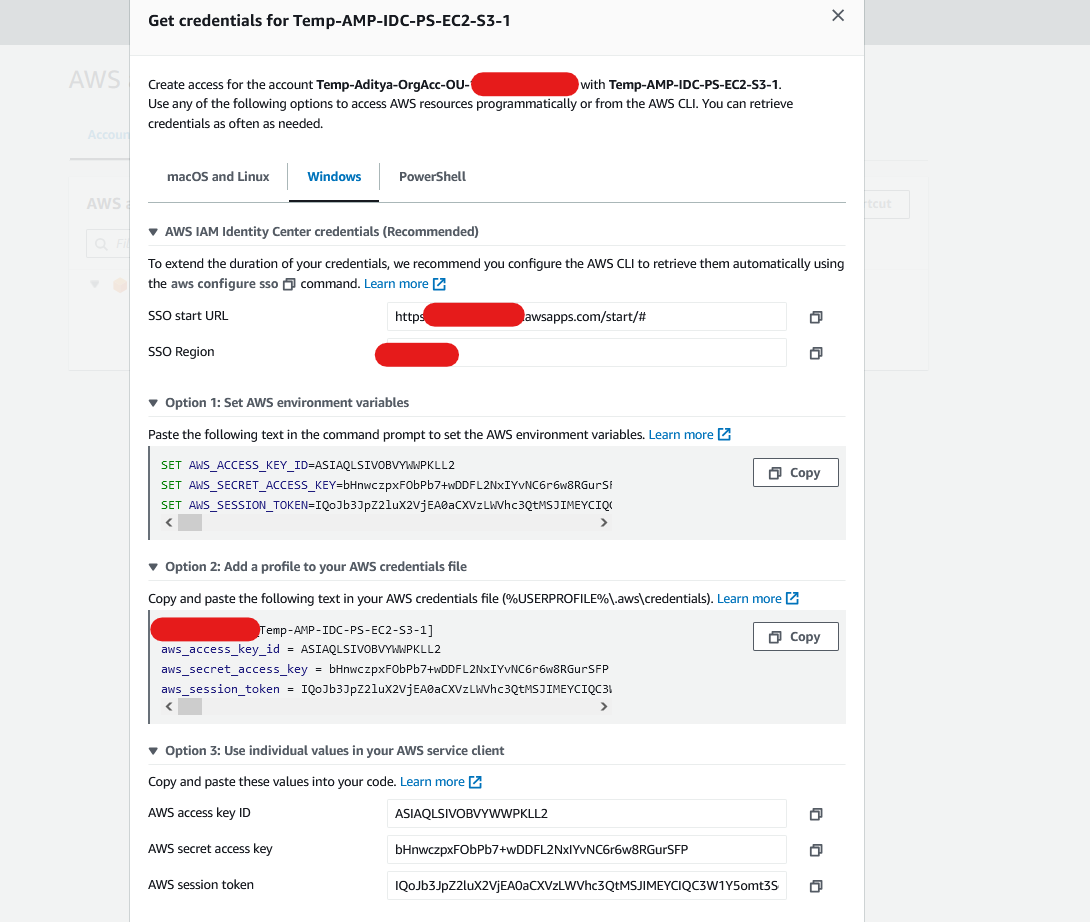
All options listed above have their purpose, we will use the fastest available out of all these to progress. Option 1: Set AWS environment variables (Operating System selected is Windows)
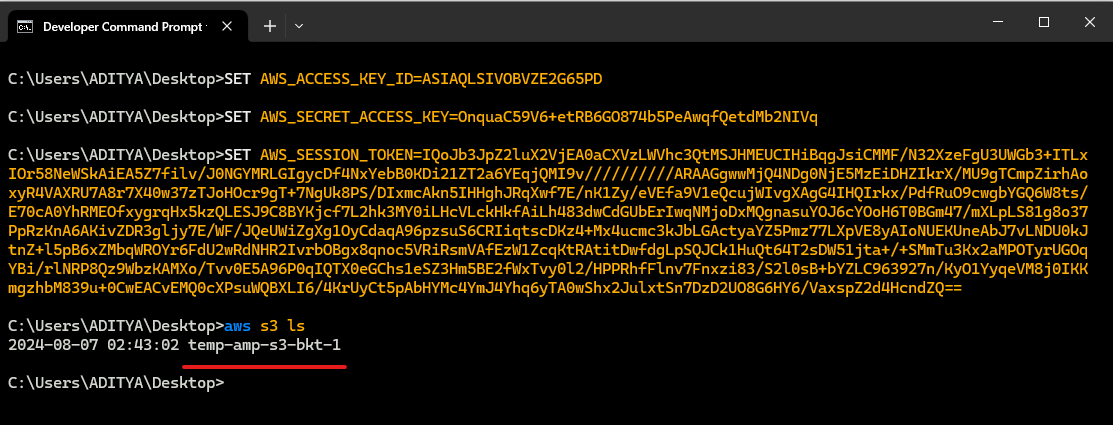
Copy those & paste them in your Command Prompt. Once pasted those will set as your environment variables for your device, which you can verify with 'set' command.
Once set, quickly create a S3 bucket from your AWS Account Console. You can access Console from AWS Access Portal itself for your User by clicking at below highlighted button.
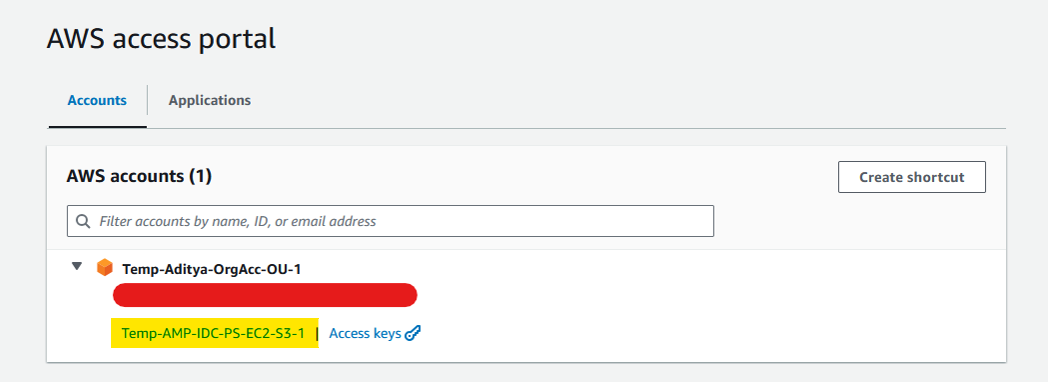
Create a bucket & add a dummy file as below snap.

Now that Access Key for the session are set as environments variables & we have a S3 bucket to query. Use below CLI command to query it.
Command: aws s3 ls
Lets try to copy (download) an object from S3 bucket to our some local directory via below CLI Command.
Command: aws s3 cp "S3Uri" "LocalPath"

Using IAM Identity Center we have now established how our local device user & SDK that we will install in next step will be authenticating with the AWS resources from our account with least-privilege permissions.
Configure the AWS CLI - AWS Command Line Interface (amazon.com)
C. Downloading AWS C++ SDK Source & building binaries on Local Device
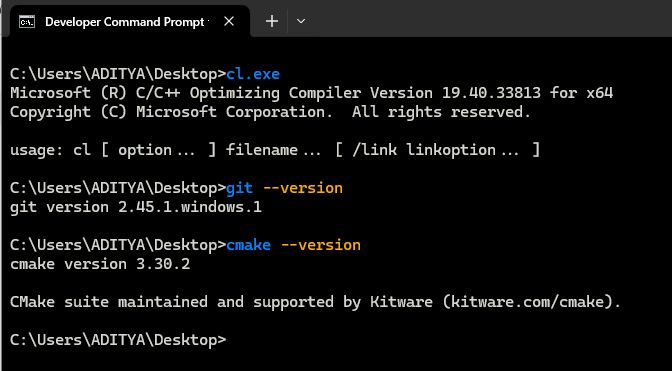
This step is easier, here you'll download AWS C++ SDK Source from its hosted repository using Git on our local device & build the binaries using Cmake
Assuming all prerequisites are correctly installed & are in system's executable path.
Download / Clone AWS C++ SDK Source on your device
aws/aws-sdk-cpp: AWS SDK for C++ (github.com)
Clone with Git: HTTPS Method in your preferred directory. Navigate to your preferred folder & use below command.
Git Command: git clone --recurse-submodules https://github.com/aws/aws-sdk-cpp
The view looks something like below

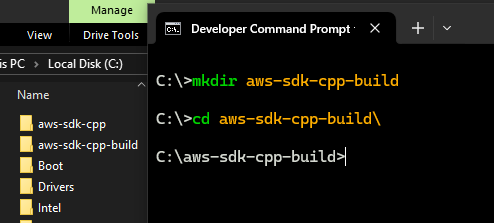
Create a new directory to store the build files in and navigate to that folder.
It is recommended you store the generated build files outside of the SDK source directory.
Something as per below snap.
Generate the Build files using cmake once you are in newly created build files directory.
For Windows, the SDK install location is typically \Program Files (x86)\aws-cpp-sdk-all\.
Cmake Command syntax:
cmake {path to source location of aws-sdk-cpp} -DCMAKE_BUILD_TYPE=[Debug | Release] -DCMAKE_PREFIX_PATH={path to install destination}
Generating build files for all AWS services can take quite some time, with flag
-DBUILD_ONLY="s3;ec2", cmake only builds for these two services.
cmake ..\aws-sdk-cpp -DCMAKE_BUILD_TYPE=Debug -DBUILD_ONLY="s3;ec2" -DCMAKE_PREFIX_PATH="C:/Program Files (x86)/aws-cpp-sdk-all"
Note: Even though Windows use back slashes (\) as path separator, for the cmake flag -DCMAKE_PREFIX_PATH to work, it requires the path with forward slash (/)
You can learn more about cmake flags (parameters/variables/switches/options) used in above command here
CMake parameters - AWS SDK for C++ (amazon.com)
cmake-variables(7) — CMake 3.30.2 Documentation
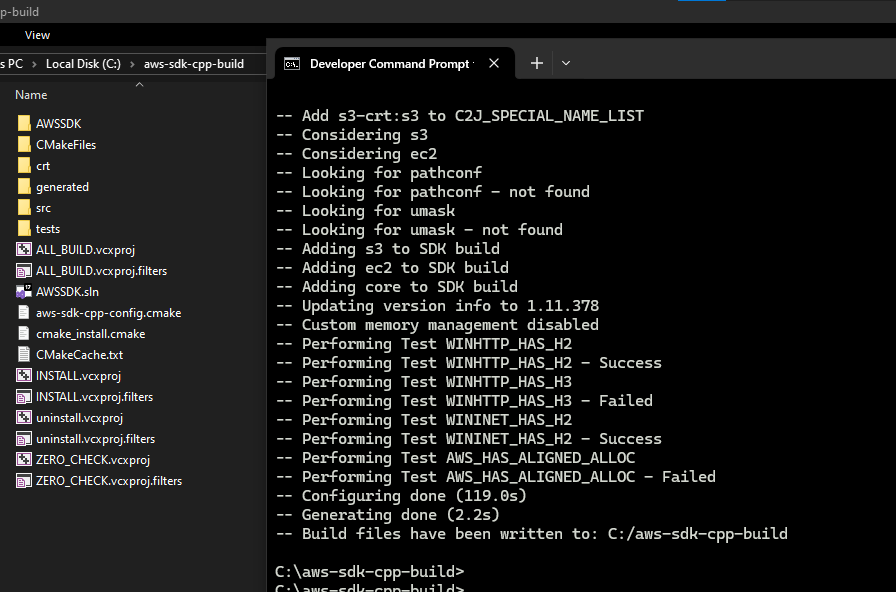
Once build is complete, final Command Prompt state looks like below
Build the SDK Binaries using the build files generated.
Cmake Command: cmake --build . --config=Debug
The build is successful for most of the time.
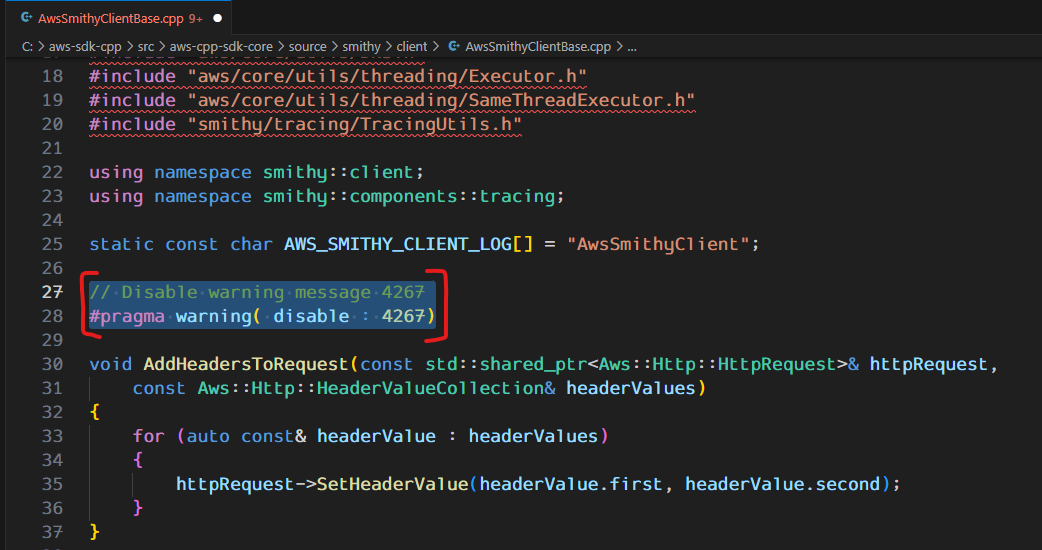
Note: For the unknown reasons on my device, I get below error during this binaries generation step.
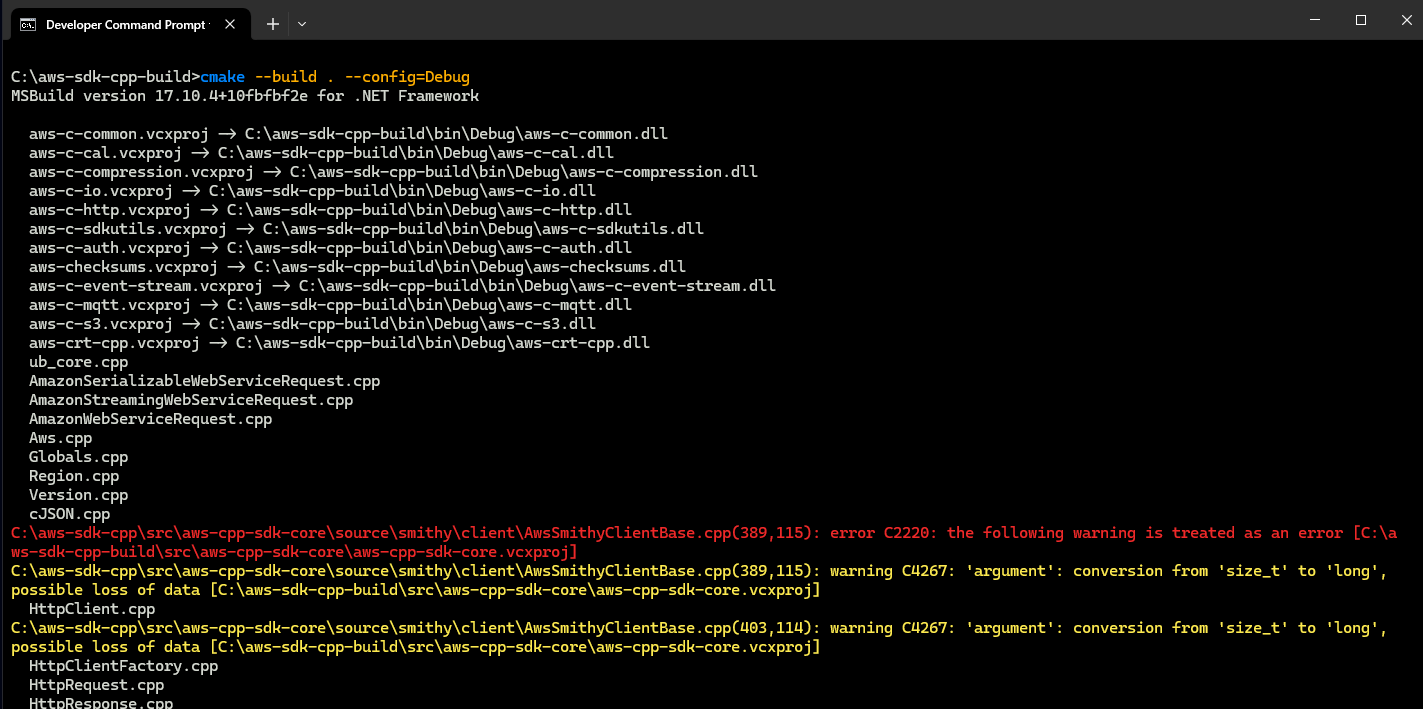
Although I do understand the warning & why the build fails but upon finding neither reason nor solution for this, as a workaround to get this moving, I edited the core file mentioned at the location in the error which was throwing warning & disabled the warning as per below snap. Editing files from SDK is not recommended but it was the only way I found to move forward. You can ignore this workaround if this step does not fails for you.
Install the built Binaries
Start your command prompt as Administrator to install the binaries at location path mentioned in flag -DCMAKE_PREFIX_PATH at step C.3
Cmake Command: cmake --install . --config=Debug

Once installation is complete, you'll have a folder 'aws-cpp-sdk-all' at location C:\Program Files (x86)\
Add bin path as System Environment variable
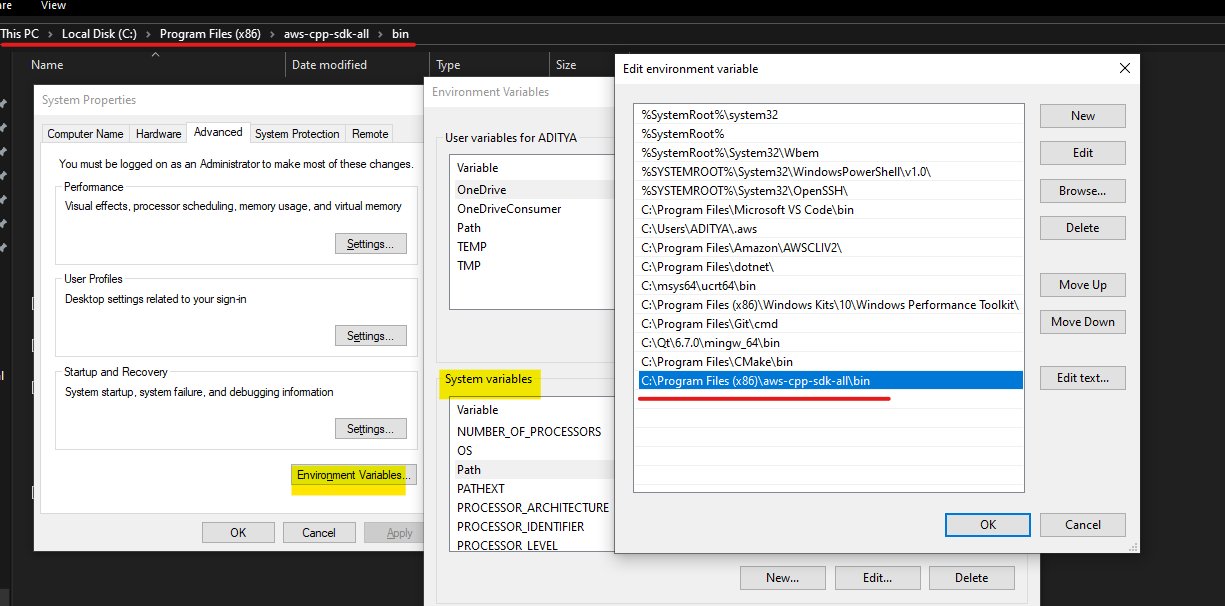
Add path 'C:\Program Files (x86)\aws-cpp-sdk-all\bin' in your environment system variables as below, this will add location of AWS binaries in the executable path during the execution of any AWS C++ program/application.
We have now successfully downloaded AWS C++ SDK source & built the binaries on local device.
D. Hello S3 C++ Application
In this step we create a hello world like C++ application hello_s3.cpp to query our S3 buckets via the written program.
Create a hello_s3.cpp file
Add below code which simply lists the S3 buckets from your AWS Account.
#include <aws/core/Aws.h>
#include <aws/s3/S3Client.h>
#include <iostream>
#include <aws/core/auth/AWSCredentialsProviderChain.h>
using namespace Aws;
using namespace Aws::Auth;
using namespace Aws::Config;

int main(int argc, char** argv) {
    Aws::SDKOptions options;
    // Optionally change the log level for debugging.
    // options.loggingOptions.logLevel = Utils::Logging::LogLevel::Debug;
    Aws::InitAPI(options); // Should only be called once.
    int result = 0;
    {
        //Set the session token / credentials in char buffers manually
        //const char* sSetAWSAccessKeyId("XXXXXXXXXXXX");
        //const char* sSetAWSSecretKey("XXXXXXXXXXXXXX");
        //const char* sSetSessionToken("XXXXXXXXXXXXXX");

        //Set the above char buffers as Environment Variables directly with below function
        //_putenv(sSetAWSAccessKeyId);
        //_putenv(sSetAWSSecretKey);
        //_putenv(sSetSessionToken);

        Aws::Client::ClientConfiguration clientConfig;
        // Optional: Set to the AWS Region (overrides config file).
        // clientConfig.region = "us-east-1";

        // You don't normally have to test that you are authenticated. But the S3 service permits anonymous requests, thus the s3Client will return "success" and 0 buckets even if you are unauthenticated, which can be confusing to a new user.
        auto provider = Aws::MakeShared<DefaultAWSCredentialsProviderChain>("alloc-tag");
        auto creds = provider->GetAWSCredentials();
        if (creds.IsEmpty()) {
            std::cerr << "Failed authentication" << std::endl;
        }

        Aws::S3::S3Client s3Client(clientConfig);
        auto outcome = s3Client.ListBuckets();

        if (!outcome.IsSuccess()) {
            std::cerr << "Failed with error: " << outcome.GetError() << std::endl;
            result = 1;
        }
        else {
            std::cout << "Found " << outcome.GetResult().GetBuckets().size()
                << " buckets\n";
            for (auto& bucket : outcome.GetResult().GetBuckets()) {
                std::cout << bucket.GetName() << std::endl;
            }
        }
    }

    Aws::ShutdownAPI(options); // Should only be called once.
    return result;
}
Create a CMakeLists.txt file
Add below code which will build the above C++ S3 Application
# Set the minimum required version of CMake for this project.
cmake_minimum_required(VERSION 3.13)

# Set the AWS service components used by this project.
set(SERVICE_COMPONENTS s3)

# Set this project's name.
project("hello_s3")

# Set the C++ standard to use to build this target.
# At least C++ 11 is required for the AWS SDK for C++.
set(CMAKE_CXX_STANDARD 11)

# Use the MSVC variable to determine if this is a Windows build.
set(WINDOWS_BUILD ${MSVC})

if (WINDOWS_BUILD) # Set the location where CMake can find the installed libraries for the AWS SDK.
    string(REPLACE ";" "/aws-cpp-sdk-all;" SYSTEM_MODULE_PATH "${CMAKE_SYSTEM_PREFIX_PATH}/aws-cpp-sdk-all")
    list(APPEND CMAKE_PREFIX_PATH ${SYSTEM_MODULE_PATH})
endif ()

# Find the AWS SDK for C++ package.
find_package(AWSSDK REQUIRED COMPONENTS ${SERVICE_COMPONENTS})

if (WINDOWS_BUILD AND AWSSDK_INSTALL_AS_SHARED_LIBS)
    # Copy relevant AWS SDK for C++ libraries into the current binary directory for running and debugging.

    # set(BIN_SUB_DIR "/Debug") # if you are building from the command line you may need to uncomment this
    # and set the proper subdirectory to the executables' location.

    AWSSDK_CPY_DYN_LIBS(SERVICE_COMPONENTS "" ${CMAKE_CURRENT_BINARY_DIR}${BIN_SUB_DIR})
endif ()

add_executable(${PROJECT_NAME}
        hello_s3.cpp)

target_link_libraries(${PROJECT_NAME}
        ${AWSSDK_LINK_LIBRARIES})
Create a build folder inside your hello_s3 folder
Create a run.bat batch file
Add below code in it which will build & run the application.
::This should be executed from within main folder

cd build

cmake ..\

cmake --build . --config=Debug

cd Debug

hello_s3 > hello_s3.txt

move /y hello_s3.txt ./../..

cd ./../..

type hello_s3.txt
The final view should look like below snap

Get the session token for your User & set them as Environment Variables via Command Prompt as per above step B.3.
Final step run the bat file from Command Prompt.
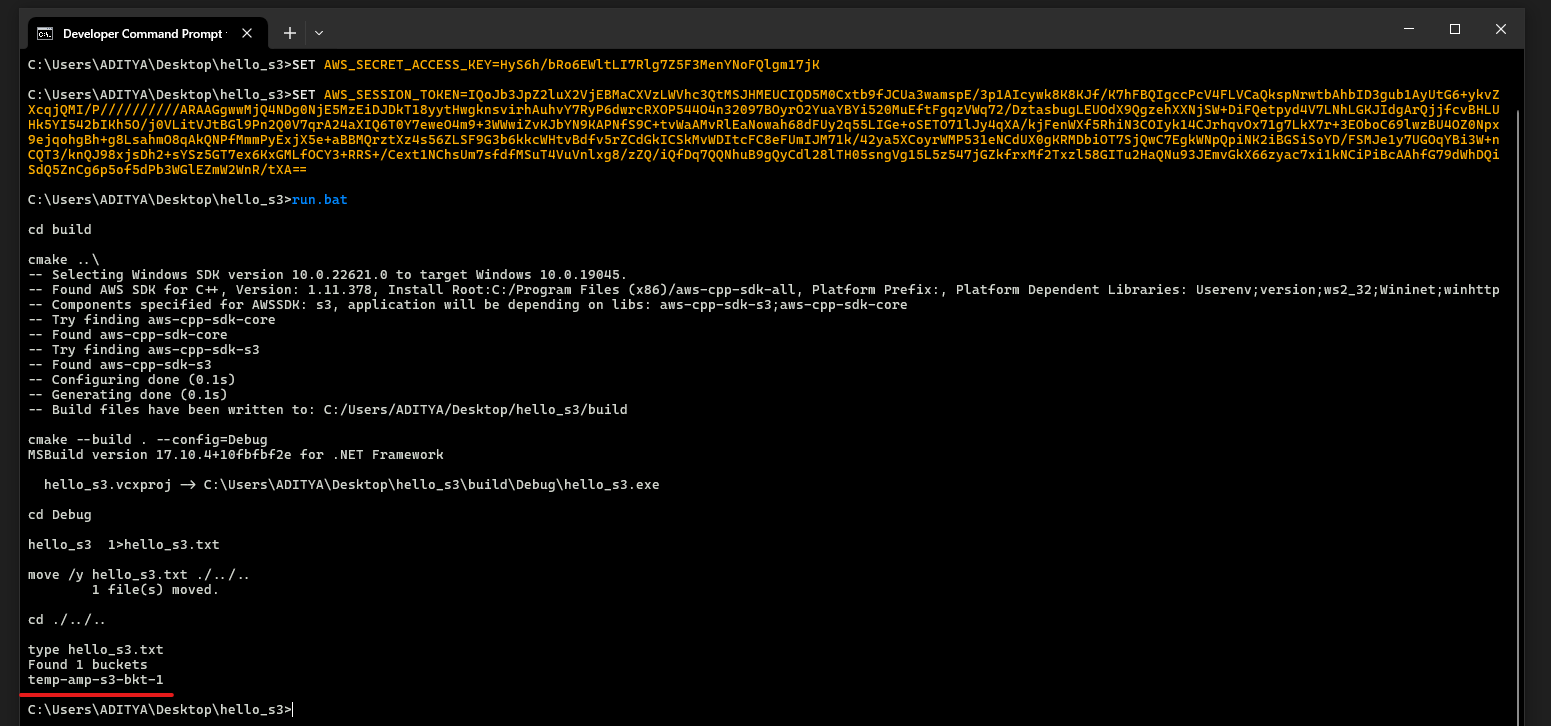
The final output looks like below, listing our S3 bucket created during step B.3.
To conclude in summary, we:
Created a Federated User using IAM Identity Center
Established authentication between installed CLI on local device & AWS Account with session tokens
Created a S3 bucket to query via CLI
Built & installed the AWS C++ SDK binaries from source
Used AWS C++ APIs to create a hello_s3 application
Subscribe to my newsletter
Read articles from Aditya Panchal directly inside your inbox. Subscribe to the newsletter, and don't miss out.
Written by
