How to Use Async Thunk in React with Redux Toolkit
 Shiwanshu Shubham
The first thing I want my readers to understand is that React Tool Kit's Query data fetching API has essentially replaced the Async Thunk. However, it's still important to learn this concept before moving forward. I will also discuss RTK and how to implement it in your projects. We will learn how to create slices, write reducers, set up stores, and use useDispatch with an example. This is a concise guide meant to cover only the basics. Let's understand these concepts by fetching data from the Pokémon API and displaying them.
What is Redux Toolkit?
Redux Toolkit simplifies the use of Redux. It includes many built-in tools that help with centralizing state management. The immer library it uses under the hood also helps with updating the state more efficiently.
Installing Redux Toolkit and react-redux
Inside your React project, use these two commands to install Redux Toolkit and react-redux. We will use react-redux for dispatch and store later.
npm install @reduxjs/toolkit
npm install react-redux
Creating Slices for Redux Toolkit
Slices are sections of your state management where you define the state for specific features. For example, in a large social media app, you might be fetching users, posts, comments, and reactions. Managing all of this in one file would make it hard to read. That's why we create different slices for each feature. Let's create a pokemonSlice to understand it better.
Inside your src folder, create a folder called store, and inside it, create another folder called slices. Next, create a file named pokemonSlice.js. inside the slices folder. We will manage all the states related to Pokémon here.
// src/store/slices/pokemonSlice.js
import { createSlice } from "@reduxjs/toolkit";

const pokemonSlice = createSlice({
  name: "pokemon",
  initialState: {
    data: [],
  },
  reducers: {},
  // extraReducers function
});

export const pokemonReducer = pokemonSlice.reducer; // For store
To create slices, we need to use the createSlice function. This function takes an object with three important properties: name, initialState, and reducers. The name distinguishes it from other slices, and initialState initializes the state. Remember, this state is part of the larger state we will define in the store; it is just a slice. reducers are small functions we use to modify this specific state. However, we will not use them in this project. We will mainly work with extraReducers because we are using thunk.
So, what is the difference between reducers and extraReducers? reducers handle the action types created here. For example, if you create addPokemon inside reducers, it will automatically define your action types. This action creator, combined with dispatch, will be used to change the state. I won't go in-depth on this because our primary goal is to use thunk.
The extraReducer can be used to handle action types from other slices or custom action types from something like thunk. Unlike reducers, it does not create action creator functions.
Defining the Redux store and setting it up
Here we configure the store by defining the reducer. The property we provide here is essentially the state name that we will use to access it with the useSelector hook. All the states from various slices, like pokemon, will be accessible in the large state object that we use in useSelector. For example, we can use state.pokemon.data from the data we defined above in initialState to utilize it. This will become clearer in the later sections.
Configure the store inside the src/store/index.js.
// src/store/index.js
import { configureStore } from "@reduxjs/toolkit";
import { pokemonReducer } from "./slices/pokemonSlice";

export const store = configureStore({
  reducer: {
    pokemon: pokemonReducer,
  },
});
Next, we use the react-redux package's Provider to make the store accessible to all components in our React application. Depending on whether you use Vite or Create React App, open index.jsx or main.jsx inside the src folder to configure the Provider. Pass the store as a prop to the Provider component from react-redux. At this point, you should try running the application to see if everything works or if you encounter any errors.
import React from "react";
import ReactDOM from "react-dom/client";
import App from "./App.jsx";
import { Provider } from "react-redux";
import { store } from "./store/index.js";

ReactDOM.createRoot(document.getElementById("root")).render(
  <React.StrictMode>
    <Provider store={store}>
      <App />
    </Provider>
  </React.StrictMode>
);
If you get an error about extraReducer from pokemonSlice, just comment it out for now. We will set it up in later sections.
Creating an async thunk function
Inside the src/store/thunk folder, create a file called fetchPokemon.js. We will use this file to fetch our Pokémon data.
At this point, you can choose to use either axios or the fetch API to make your API calls. In this case, I am going to use axios. If you want to follow along, I suggest you install it by running npm i axios in your project's root folder.
import { createAsyncThunk } from "@reduxjs/toolkit";
import axios from "axios";

const fetchPokemon = createAsyncThunk("pokemon/fetch", async () => {
  const response = await axios.get("https://pokeapi.co/api/v2/pokemon");
  return response.data;
});

export { fetchPokemon };
Now, why do we use thunks? The reason is that we cannot call asynchronous functions inside reducers. So, we use async thunks or something like RTK Query.
To create a thunk function, we use createAsyncThunk from redux-toolkit. It takes two important arguments. The first one defines the action creator type, which is just a name for how this thunk should behave. The second argument is an asynchronous function where we return data. Similar to Promises, a thunk has three states: pending, fulfilled, and rejected.
pending: When the thunk is pending, it means the request is still in progress. It sets a pending method with the action type that differentiates it. In this instance, it is
fetchPokemon.pending. We can use it in our extraReducer to display something like a loader.fulfilled: When the thunk is fulfilled, whatever data is returned from
response.datais set inside theaction.payload.rejected: In case of rejection, which means something went wrong, an error property is set in the
action.errorwith the error.
Utilizing the Action Creator within extraReducers in Slices
// src/store/slices/pokemonSlice.js
import { createSlice } from "@reduxjs/toolkit";
import { fetchPokemon } from "../thunk/fetchPokemon";

const pokemonSlice = createSlice({
  name: "pokemon",
  initialState: {
    isLoading: false,
    error: null,
    data: [],
  },
  extraReducers(builder) {
    builder.addCase(fetchPokemon.pending, (state, action) => {
      state.isLoading = true;
    });
    builder.addCase(fetchPokemon.fulfilled, (state, action) => {
      state.isLoading = false;
      state.data = action.payload.results;
    });
    builder.addCase(fetchPokemon.rejected, (state, action) => {
      state.isLoading = false;
      state.error = action.error;
    });
  },
});

export const pokemonReducer = pokemonSlice.reducer;
The first thing we do is import the fetchPokemon thunk function. As mentioned earlier, it gives us three different action types that we can use for different behaviors. When pending, we set isLoading to true. When fulfilled, we hide the loader by setting isLoading to false and update state.data with the data received from fetchPokemon's return statement, which is inside action.payload. We use action.payload.results to access the array of Pokémon returned from the API. Lastly, if the request fails or rejected, we set an error after setting isLoading to false and populate the error inside our state object.
Note that we can modify the state directly here because of the immer library used inside redux-toolkit. The state is an immutable object and should not be modified directly.
Displaying the data in our app
import { useEffect } from "react";
import { useSelector, useDispatch } from "react-redux";
import { fetchPokemon } from "./store/thunk/fetchPokemon";
import "./App.css";

function App() {
  const { data, isLoading, error } = useSelector((state) => state.pokemon);
  const dispatch = useDispatch();

  useEffect(() => {
    dispatch(fetchPokemon());
  }, []);
  if (isLoading) return <div>Fetching data...</div>;
  else if (error) return <div>Something went wrong...</div>;
  else
    return (
      <div>
        {data.map((pokemon) => (
          <p key={pokemon.name}>{pokemon.name}</p>
        ))}
      </div>
    );
}

export default App;
Here, we use the useSelector hook to access our state and display the data. The state object represents the overall state of our app. To access the Pokémon part of it, which we defined in our slices, we refer to the property we specified inside our configureStore object. This is why we use state.pokemon. The data, isLoading, and error are defined inside the pokemonSlice. We use the useDispatch hook to call our fetchPokemon thunk function inside the useEffect hook.
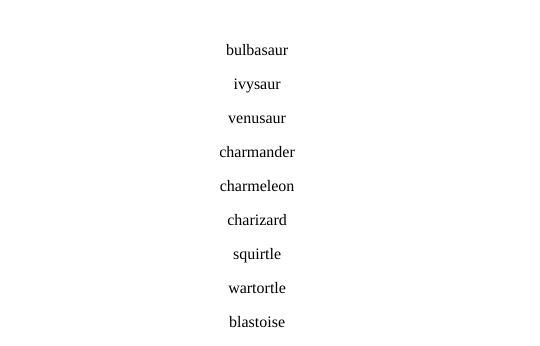
To display the data, we add conditions for different states of our data and display our Pokémon.

Thank you for reading this, and I hope you enjoyed it!
Subscribe to my newsletter
Read articles from Shiwanshu Shubham directly inside your inbox. Subscribe to the newsletter, and don't miss out.
Written by

Shiwanshu Shubham
Shiwanshu Shubham
Hey there, I'm Shiwanshu, a passionate frontend developer and designer hailing from India. With proficiency in NextJS, ReactJS, CSS3, HTML5, Figma, UI Design, and Typescript, I've embarked on a journey into the tech space. This blog is a documentation of my progress as I delve deeper into the world of technology.