Layer 4 Load Balancing Using Nginx
 IKA SAKIB
What is load balancing?
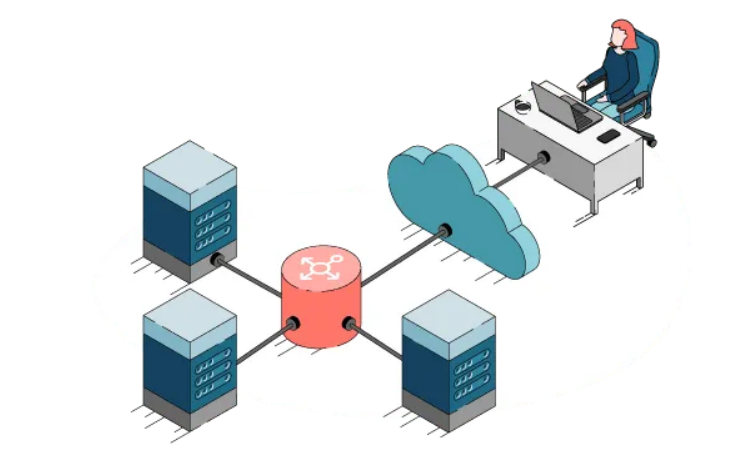
Load balancing lets us distribute incoming network traffic across multiple resources ensuring high availability and reliability by sending requests only to resources that are online. This provides the flexibility to add or subtract resources as demand dictates.

A Load Balancer in action acting as a proxy server that accepts the request from the client. It accepts the request from the client. This request is then distributed across the multiple servers in a fashion specified by the load balancing algorithm configured on the load balancer. Load balancing can be implemented at different layers of the OSI model, such as Layer 4 (transport) or Layer 7 (application).
Nginx as a Load Balancer !
NGINX is more than just a web server; it’s a powerhouse for load balancing, trusted by giants like Adobe and WordPress. Here’s why it’s the go-to solution for handling high-traffic websites:
1. High Performance: NGINX is built for speed and efficiency, handling over 10,000 concurrent requests with minimal memory usage. It’s perfect for sites that need to scale without breaking the bank.
2. Flexibility: Whether you need Round Robin, Least Connections, or IP Hash, NGINX gives you the freedom to choose the best load balancing method for your needs.
3. Reliability: With a proven track record, NGINX ensures your site stays up and running, even under heavy traffic. Its health checks automatically reroute traffic away from unhealthy servers.
4. Advanced Features: Offload SSL/TLS encryption, manage session persistence, and dynamically adjust settings without downtime—all with NGINX.
5. Cost-Effective: As an open-source solution with robust community support, NGINX is both powerful and affordable, making it a top choice for projects of all sizes.
Layer 4 load balancing
Operates at the Transport Layer (OSI Model), specifically focusing on TCP/UDP connections. It doesn’t inspect the actual content of the traffic but rather forwards packets based on IP addresses and ports.
Key Characteristics:
Protocol Agnostic: Works with any protocol (HTTP, HTTPS, FTP, etc.) since it doesn’t analyze the content of the request.
Faster Routing: Because it only deals with IP addresses and ports, Layer 4 load balancing is generally faster and more efficient.
Lower Resource Usage: Uses fewer CPU and memory resources since it doesn’t need to interpret higher-level protocols.

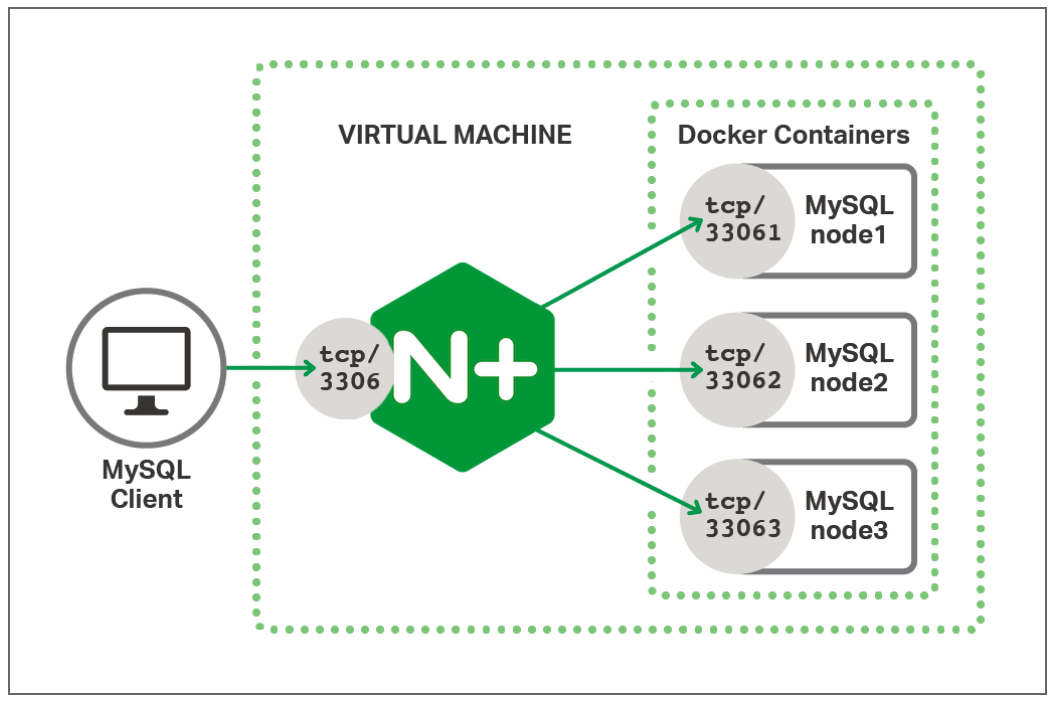
Layer 4 proxying comes in handy when NGINX doesn’t get the protocol (like the MySQL database protocol). It's usually done with the stream module in NGINX, which takes care of TCP and UDP traffic.
Example:
# 'stream' is the NGINX context used for handling TCP and UDP traffic.
stream {

    # 'upstream' defines a group of servers that NGINX will load balance.
    upstream mysql_cluster {
        # First server mysql_node1 on port 33061.
        server mysql_node1:33061;
        # Second server mysql_node2 on port 33062.
        server mysql_node2:33062;
        # Third server mysql_node3 on port 33063.
        server mysql_node2:33062;
    }
    server {
        # Listen on port 3306 for incoming TCP connections.
        listen 3306;
        # 'proxy_pass' forwards traffic to upstream group (mysql_cluster).
        proxy_pass mysql_cluster;
    }
}
When to Use Layer 4?
Layer 4 (Transport Layer):
Ideal for simple, high-performance load balancing where content inspection isn’t required.
Best for Non-HTTP protocols like FTP, SMTP, or database traffic.
A Basic Project to Understand L4 Load Balancing
This NGINX setup acts as a Layer 4 load balancer, distributing TCP traffic across two backend applications (app1 on port 3000 and app2 on port 9999). It listens on port 9000, where incoming connections are forwarded to either app1 or app2.
You can find the project in this [ link ].
events {}
stream {
    upstream apps {
        server app1:3000;
        server app2:9999;
    }
    log_format layer4_format '$remote_addr [$time_local] "$proxy_protocol_addr" '
                             '"$proxy_protocol_port" "$upstream_addr" '
                             '$protocol $status $bytes_sent $bytes_received ';
    server {
        listen 9000;
        proxy_pass apps;
        proxy_timeout 10s;
        proxy_connect_timeout 10s;
        proxy_next_upstream on;

        access_log /var/log/nginx/stream_access.log layer4_format;
        error_log /var/log/nginx/stream_error.log;
    }
}
Configuration Breakdown
events {}:- This is a required context in the NGINX configuration, even if left empty. It handles worker connections and event-related settings. Here, it has no directives.
stream { ... }:- The
streamcontext handles Layer 4 (TCP/UDP) traffic, enabling NGINX to act as a load balancer for non-HTTP protocols.
- The
upstream apps { ... }:- The
upstreamblock defines backend servers for load balancing.server app1:3000;andserver app2:9999;specify the backend serversapp1andapp2, listening on ports3000and9999. These servers will receive the load-balanced traffic.
- The
log_format layer4_format ...:- This directive defines a custom log format called
layer4_formatfor logging Layer 4 traffic.
- This directive defines a custom log format called
server { ... }:listen 9000;: NGINX listens for incoming connections on port9000.proxy_pass apps;: This forwards connections to one of the backend servers defined in theupstreamblock (app1orapp2).
Timeouts and Error Handling:
proxy_timeout 10s;: Closes the connection if a backend server doesn't respond within 10 seconds.proxy_connect_timeout 10s;: Stops trying to connect to a backend server if it takes more than 10 seconds.proxy_next_upstream on;: Forwards the request to the next available backend server if a timeout or error occurs.
Logging:
access_log /var/log/nginx/stream_access.log layer4_format;: Logs TCP connection details to/var/log/nginx/stream_access.logusinglayer4_format.error_log /var/log/nginx/stream_error.log;: Logs errors during TCP connection processing.
Observation
After cloning the [Repository], follow the instructions in the README.md file, and you will be able to run and start the containers.

In your web browser, go to localhost:9000. You will see that NGINX, listening on port 9000 on localhost, forwards the traffic to app2, which is listening on port 9999 as defined in the upstream block.

After refreshing the page several times, you will see that NGINX, listening on port 9000 on localhost, now forwards the traffic to app1, which is listening on port 3000 as defined in the upstream block. That's how the load balancing works.

Strange !!! Why Content Doesn’t Change on Refresh?
Persistent Connections:
- When you visit a website, your browser starts a three-way handshake to set up a TCP connection with the server. Layer 4 load balancers handle traffic at the connection level. Once this connection is made with a specific server, all future requests use the same connection. Even if you refresh the page, the existing connection is reused, so the load balancer keeps sending traffic to the same server.
Reused TCP Connection:
- After the initial three-way handshake, the TCP connection remains open and can be reused for multiple requests. When you refresh the page, if the browser reuses this connection instead of creating a new one, the load balancer doesn’t get the opportunity to reroute your traffic to another server.
How to Test Load Balancing:
Close and reopen the browser: This makes a new TCP connection, which might go to a different server.
Clear session data or use incognito mode: This can also start a new connection, possibly leading to a different server.
Use multiple clients: Testing from different devices or browsers can help check that traffic is being balanced across servers.
Subscribe to my newsletter
Read articles from IKA SAKIB directly inside your inbox. Subscribe to the newsletter, and don't miss out.
Written by
