Packaging The Automation Framework
 Hari Nair
Introduction
In the previous article, we created a modular automation testing framework using Selenium WebDriver, TestNG, Java, and Maven.
In this article, we will add support for packaging the entire project to a JAR file as a prerequisite for running the tests in a containerised environment using Docker.
Update pom.xml file
To ensure the tests can run inside a Docker container, we need to modify the pom.xml file of the project. The first step involves specifying a new directory for our test artefacts to include a <package.directory> property. This will direct Maven to place the packaged test artefacts in a specific directory within the build output.
Here’s how to update the pom.xml.
Step 1 - Add the following to <properties> tag.
<properties>
    <package.directory>${project.build.directory}/tafs</package.directory>
    <testSuite>testng.xml</testSuite>
</properties>
These properties define directories and configurations for a Maven project. The <package.directory> specifies where to place generated files. The testSuite property identifies the TestNG XML file to use for testing. These settings help manage build outputs and testing configurations within the project's build lifecycle.
Step 2 - Add name under <build> tag.
<build>
    <finalName>tafs</finalName>
</build>
The <finalName>tafs</finalName> configuration in Maven specifies the final name of the packaged output (typically a JAR or WAR file) when the project is built. In the context of the previous properties, where directories like <package.directory> and others are defined, <finalName>tafs</finalName> ensures that the resulting artefact (like tafs.jar or tafs.war) is named consistently with these settings. This helps in organising and identifying the built artefact within the specified output directories ${project.build.directory}/tafs during the Maven build process.
In this context,
<fileName>can be any name.
Step 3 - Update <testSuite> property.
<plugin>
    <artifactId>maven-surefire-plugin</artifactId>
    <version>2.22.1</version>
    <configuration>
        <suiteXmlFiles>
            <suiteXmlFile>${testSuite}</suiteXmlFile>
        </suiteXmlFiles>
    </configuration>
</plugin>
The <suiteXmlFiles> section with <suiteXmlFile>${testSuite}</suiteXmlFile> points to the TestNG XML file that is specified by ${testSuite} from the project properties.
Step 4 - Add maven-dependency-plugin
<plugin>
    <groupId>org.apache.maven.plugins</groupId>
    <artifactId>maven-dependency-plugin</artifactId>
    <version>3.6.1</version>
    <executions>
        <execution>
            <id>copy-dependencies</id>
            <phase>prepare-package</phase>
            <goals>
                <goal>copy-dependencies</goal>
            </goals>
            <configuration>
                <outputDirectory>${package.directory}/libs</outputDirectory>
            </configuration>
        </execution>
    </executions>
</plugin>
The above plugin ensures that all project dependencies are gathered and copied to a designated location ${package.directory}/libs before the final packaging. This process supports a clean and organised build, where dependencies are readily available for packaging and testing workflows defined in the Maven project.
Step 5 - Update maven-jar-plugin
<plugin>
    <artifactId>maven-jar-plugin</artifactId>
    <version>3.0.2</version>
    <configuration>
        <outputDirectory>${package.directory}/libs</outputDirectory>
    </configuration>
    <executions>
        <execution>
            <goals>
                <goal>test-jar</goal>
            </goals>
        </execution>
    </executions>
</plugin>
This configuration helps automate the packaging of test classes and resources into a separate JAR file. By setting the outputDirectory to ${package.directory}/libs, the resulting JAR is organised into a specific location, aligning with the overall project build structure. This is particularly useful for projects that require separate distribution or testing of compiled test classes, supporting a streamlined and organised build process.
Step 6 - Add maven-resources-plugin
<plugin>
    <groupId>org.apache.maven.plugins</groupId>
    <artifactId>maven-resources-plugin</artifactId>
    <version>3.2.0</version>
    <executions>
        <execution>
            <id>copy-resources-to-docker</id>
            <phase>prepare-package</phase>
            <goals>
                <goal>copy-resources</goal>
            </goals>
            <configuration>
                <outputDirectory>${package.directory}/test-suites</outputDirectory>
                <resources>
                    <resource>
                        <directory>test-suites</directory>
                    </resource>
                </resources>
            </configuration>
        </execution>
    </executions>
</plugin>
The above configuration copy resources from the test-suites directory to ${package.directory}/test-suites during the prepare-package phase. This setup promotes an organised build structure, ensuring that all required files are bundled correctly in the build output, which streamlines the build process and facilitates smoother packaging, deployment, and testing workflows.
Creating Test Suites
So far, there is only a single testng.xml file in the project root and while test execution it will run all the tests either in parallel or sequentially based on the parallel property.
However, the tests will evolve as we add more test cases to our project, at some point it might get difficult to maintain a single xml file for all the test cases. To handle this, we will create a separate xml file for each test suite, it will modulate the test execution based on the suite property.
Let's create a test-suites directory in project root and add the xml files in it.
.
└── test-suites
    ├── HomePage.xml
    ├── LoginPage.xml
    └── Master.xml
With the above structure, we can execute the test suite based on the
suiteproperty. Also, to note we have added aMaster.xmlfile in thetest-suitesdirectory, this will be used to run all the tests in parallel.
Packaging
Now that all the prerequisites are in place, it's time to package the project.
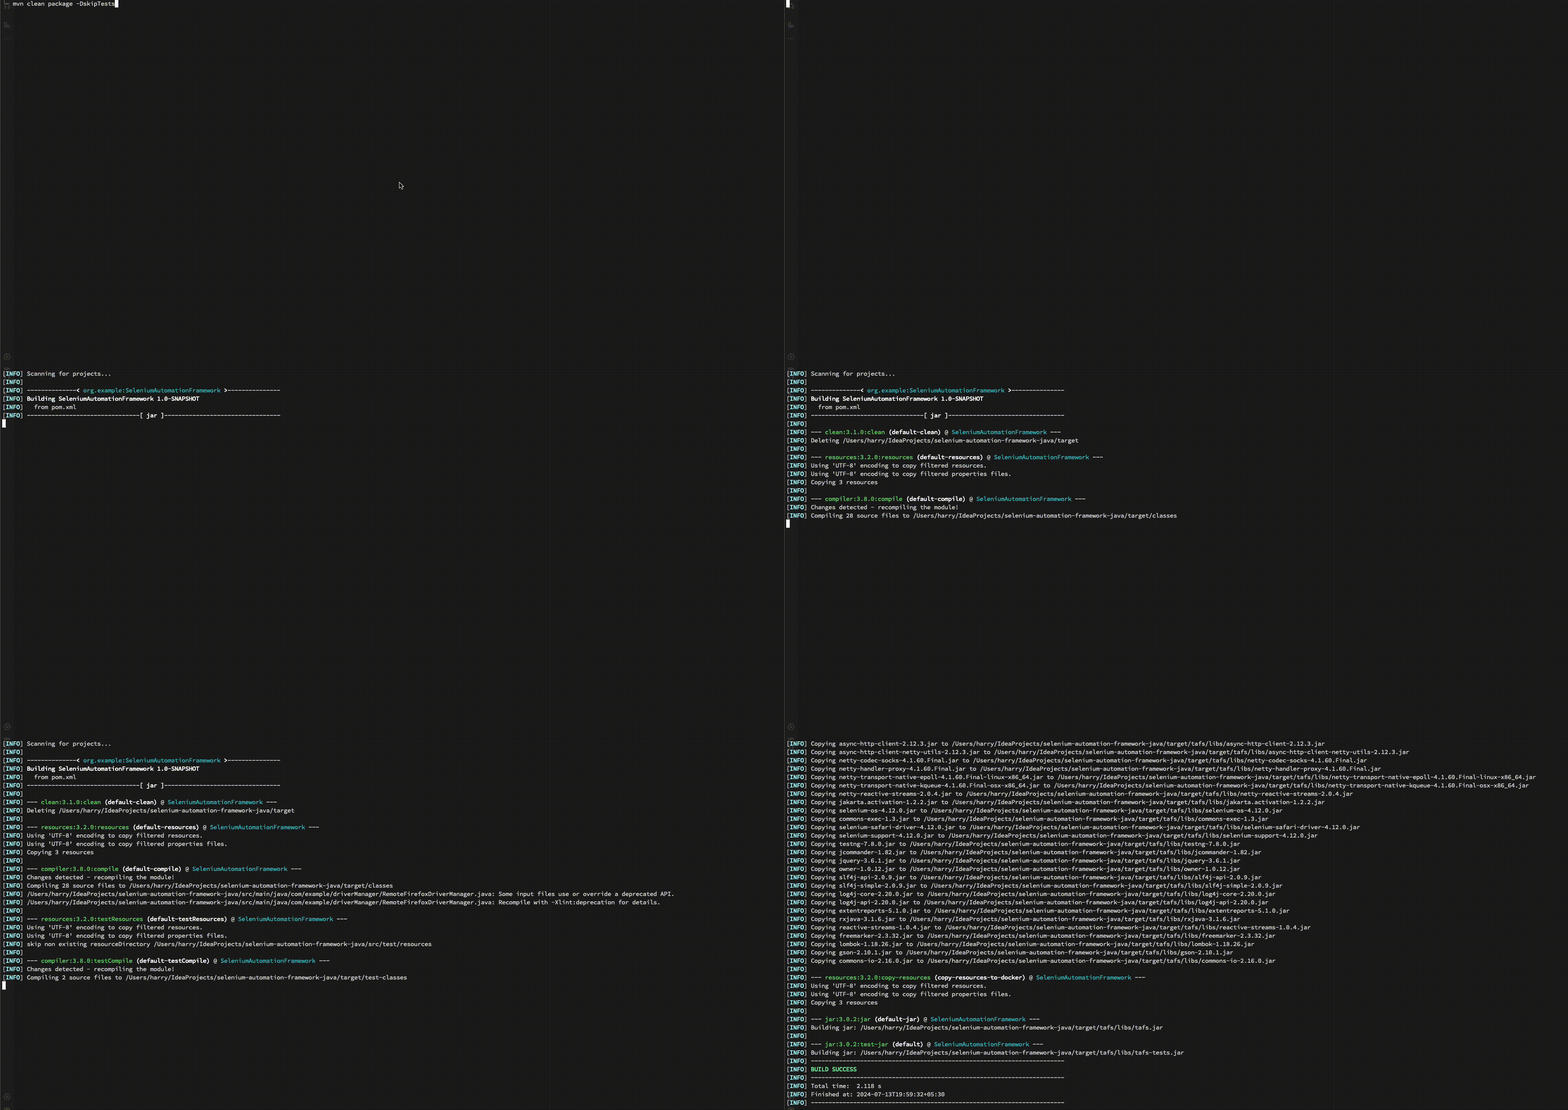
mvn clean package -DskipTests
The above command will clean the project, package it into a JAR file, and skip the test execution phase to speed up the build process.

Target Directory Structure
After the previous command executes successfully, the target directory structure will appear as follows.
│
├── target
│   ├── classes
│   ├── generated-sources
│   ├── generated-test-sources
│   ├── maven-archiver
│   ├── maven-status
│   ├── tafs
│   │   ├── libs
│   │   │   ├── async-http-client-2.12.3.jar
│   │   │   ├── async-http-client-netty-utils-2.12.3.jar
│   │   │   ├── auto-service-annotations-1.1.1.jar
│   │   │   ├── byte-buddy-1.14.5.jar
│   │   │   ├── checker-qual-3.33.0.jar
│   │   │   ├── commons-exec-1.3.jar
│   │   │   ├── commons-io-2.16.0.jar
│   │   │   ├── error_prone_annotations-2.18.0.jar
│   │   │   ├── extentreports-5.1.0.jar
│   │   │   ├── failsafe-3.3.2.jar
│   │   │   ├── failureaccess-1.0.1.jar
│   │   │   ├── freemarker-2.3.32.jar
│   │   │   ├── gson-2.10.1.jar
│   │   │   ├── guava-32.1.2-jre.jar
│   │   │   ├── j2objc-annotations-2.8.jar
│   │   │   ├── jakarta.activation-1.2.2.jar
│   │   │   ├── jcommander-1.82.jar
│   │   │   ├── jquery-3.6.1.jar
│   │   │   ├── jsr305-3.0.2.jar
│   │   │   ├── listenablefuture-9999.0-empty-to-avoid-conflict-with-guava.jar
│   │   │   ├── log4j-api-2.20.0.jar
│   │   │   ├── log4j-core-2.20.0.jar
│   │   │   ├── lombok-1.18.26.jar
│   │   │   ├── netty-buffer-4.1.96.Final.jar
│   │   │   ├── netty-codec-4.1.96.Final.jar
│   │   │   ├── netty-codec-http-4.1.96.Final.jar
│   │   │   ├── netty-codec-socks-4.1.60.Final.jar
│   │   │   ├── netty-common-4.1.96.Final.jar
│   │   │   ├── netty-handler-4.1.96.Final.jar
│   │   │   ├── netty-handler-proxy-4.1.60.Final.jar
│   │   │   ├── netty-reactive-streams-2.0.4.jar
│   │   │   ├── netty-resolver-4.1.96.Final.jar
│   │   │   ├── netty-transport-4.1.96.Final.jar
│   │   │   ├── netty-transport-classes-epoll-4.1.96.Final.jar
│   │   │   ├── netty-transport-classes-kqueue-4.1.96.Final.jar
│   │   │   ├── netty-transport-native-epoll-4.1.60.Final-linux-x86_64.jar
│   │   │   ├── netty-transport-native-epoll-4.1.96.Final.jar
│   │   │   ├── netty-transport-native-kqueue-4.1.60.Final-osx-x86_64.jar
│   │   │   ├── netty-transport-native-kqueue-4.1.96.Final.jar
│   │   │   ├── netty-transport-native-unix-common-4.1.96.Final.jar
│   │   │   ├── opentelemetry-api-1.28.0.jar
│   │   │   ├── opentelemetry-api-events-1.28.0-alpha.jar
│   │   │   ├── opentelemetry-context-1.28.0.jar
│   │   │   ├── opentelemetry-exporter-logging-1.28.0.jar
│   │   │   ├── opentelemetry-extension-incubator-1.28.0-alpha.jar
│   │   │   ├── opentelemetry-sdk-1.28.0.jar
│   │   │   ├── opentelemetry-sdk-common-1.28.0.jar
│   │   │   ├── opentelemetry-sdk-extension-autoconfigure-1.28.0.jar
│   │   │   ├── opentelemetry-sdk-extension-autoconfigure-spi-1.28.0.jar
│   │   │   ├── opentelemetry-sdk-logs-1.28.0.jar
│   │   │   ├── opentelemetry-sdk-metrics-1.28.0.jar
│   │   │   ├── opentelemetry-sdk-trace-1.28.0.jar
│   │   │   ├── opentelemetry-semconv-1.28.0-alpha.jar
│   │   │   ├── owner-1.0.12.jar
│   │   │   ├── reactive-streams-1.0.4.jar
│   │   │   ├── rxjava-3.1.6.jar
│   │   │   ├── selenium-api-4.12.0.jar
│   │   │   ├── selenium-chrome-driver-4.12.0.jar
│   │   │   ├── selenium-chromium-driver-4.12.0.jar
│   │   │   ├── selenium-devtools-v114-4.12.0.jar
│   │   │   ├── selenium-devtools-v115-4.12.0.jar
│   │   │   ├── selenium-devtools-v116-4.12.0.jar
│   │   │   ├── selenium-devtools-v85-4.12.0.jar
│   │   │   ├── selenium-edge-driver-4.12.0.jar
│   │   │   ├── selenium-firefox-driver-4.12.0.jar
│   │   │   ├── selenium-http-4.12.0.jar
│   │   │   ├── selenium-ie-driver-4.12.0.jar
│   │   │   ├── selenium-java-4.12.0.jar
│   │   │   ├── selenium-json-4.12.0.jar
│   │   │   ├── selenium-manager-4.12.0.jar
│   │   │   ├── selenium-os-4.12.0.jar
│   │   │   ├── selenium-remote-driver-4.12.0.jar
│   │   │   ├── selenium-safari-driver-4.12.0.jar
│   │   │   ├── selenium-support-4.12.0.jar
│   │   │   ├── slf4j-api-2.0.9.jar
│   │   │   ├── slf4j-simple-2.0.9.jar
│   │   │   ├── tafs-tests.jar
│   │   │   ├── tafs.jar
│   │   │   └── testng-7.8.0.jar
│   │   └── test-suites
│   │       ├── HomePage.xml
│   │       ├── LoginPage.xml
│   │       └── Master.xml
│   └── test-classes
│
In this setup, all dependent external JAR files will be located in the target/tafs/libs directory, and all test suite files will be stored in the target/tafs/test-suites directory.
The
target/tafs/libsdirectory will also contain two JAR files namedtafs.jarandtafs-tests.jar, which are the packaged project files.
Run Tests
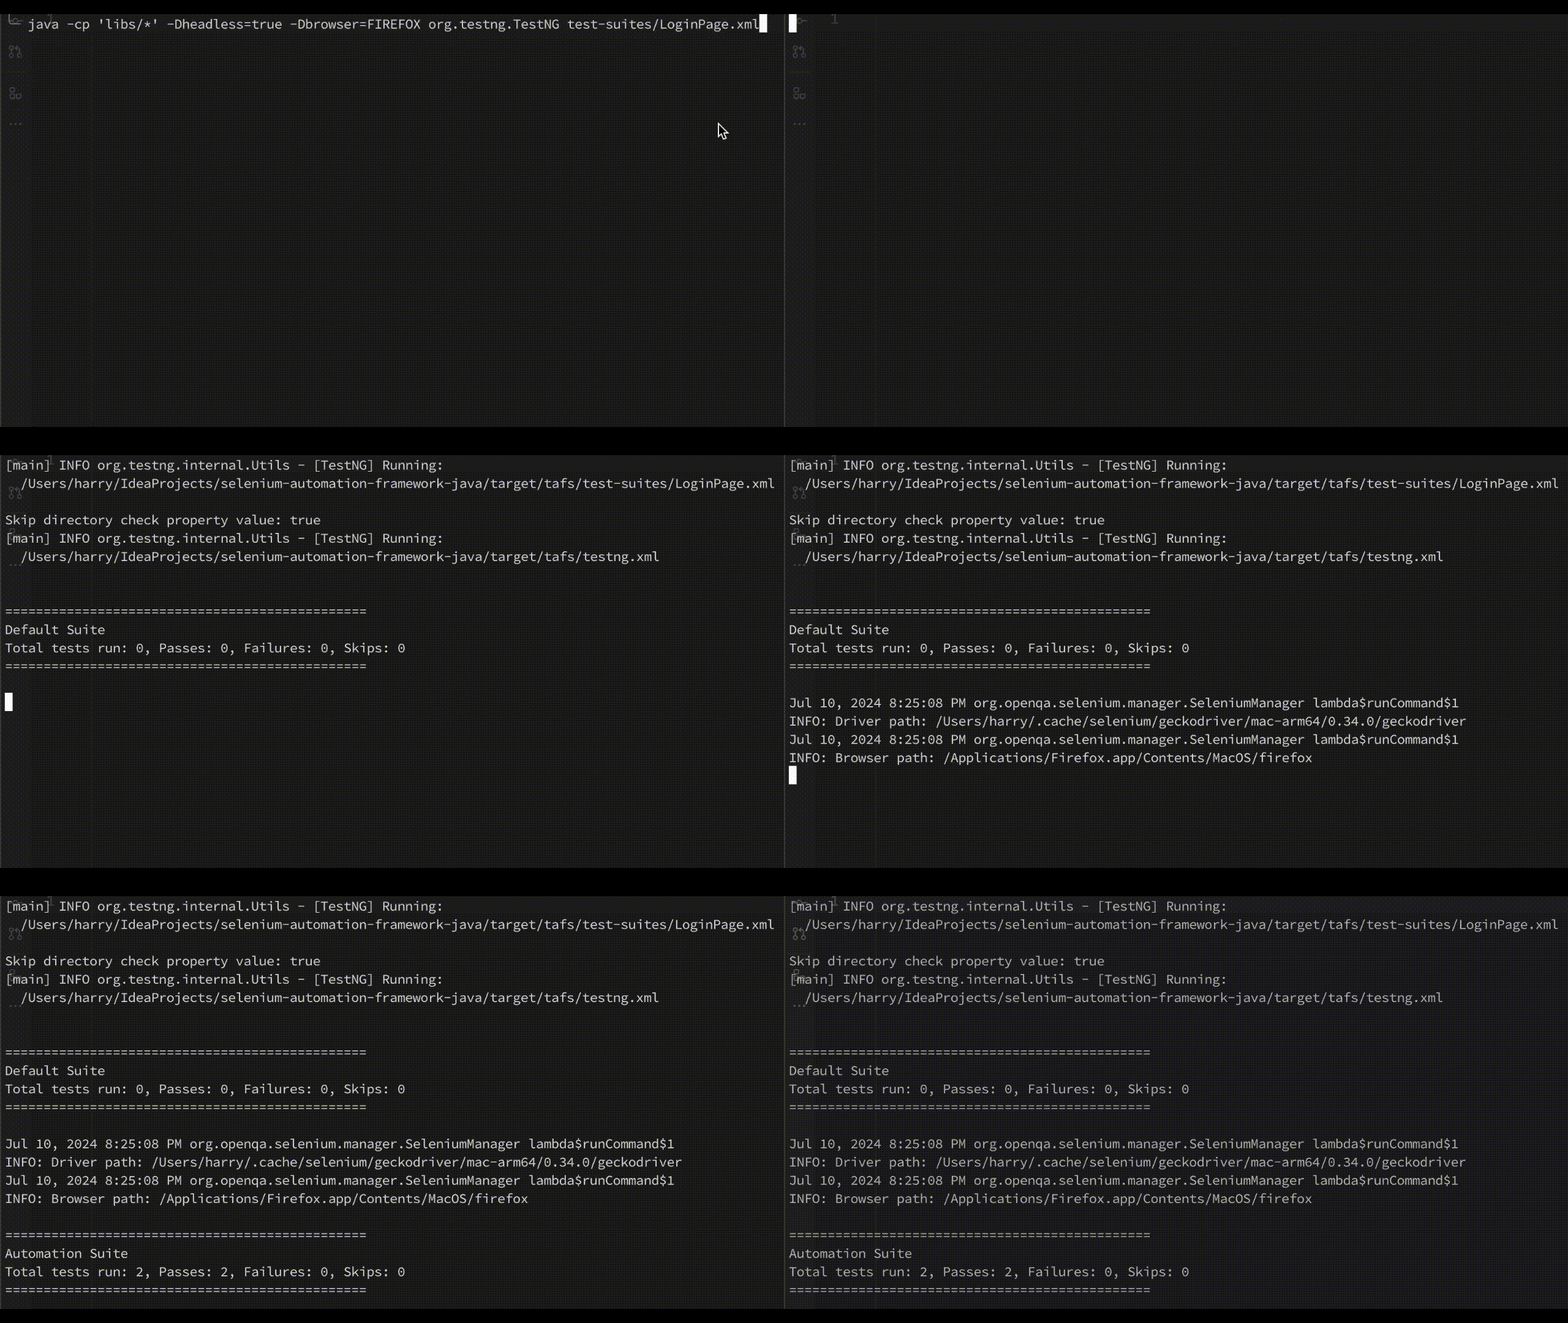
As a best practice, it is recommended to test the build once before proceeding with further steps. From the project root, navigate to the target/tafs directory.
cd target/tafs
Next, execute the below command to run the tests.
java -cp 'libs/*' org.testng.TestNG test-suites/${testSuite}.xml
Here, replace
${testSuite}with actual file name (e.g. LoginPage, Master etc.)

Conclusion
By following the steps outlined above, we have successfully updated our project to package it into a JAR file, ready for execution in a containerised environment using Docker. This process involved modifying the pom.xml file to direct Maven to organise and manage the build outputs effectively. We also introduced separate XML files for different test suites to streamline the test execution process.
With this setup, our automation testing framework is now more modular, organized, and scalable, allowing for easier maintenance and execution of tests in various environments. This approach not only enhances the efficiency of our testing process but also ensures that our test suites are well-structured and manageable as the project grows.
The source code is available on GitHub. If you find the framework helpful, be sure to star the repository to show your support!
In the next article, we will explore how to leverage the packaged project for execution in Docker containers.
If you find this article helpful or have any suggestions, reach out to me on LinkedIn.
Thank you and keep learning!
References
Subscribe to my newsletter
Read articles from Hari Nair directly inside your inbox. Subscribe to the newsletter, and don't miss out.
Written by
