Code First Approach - ASP.NET MVC C#
 Rohit Surwade
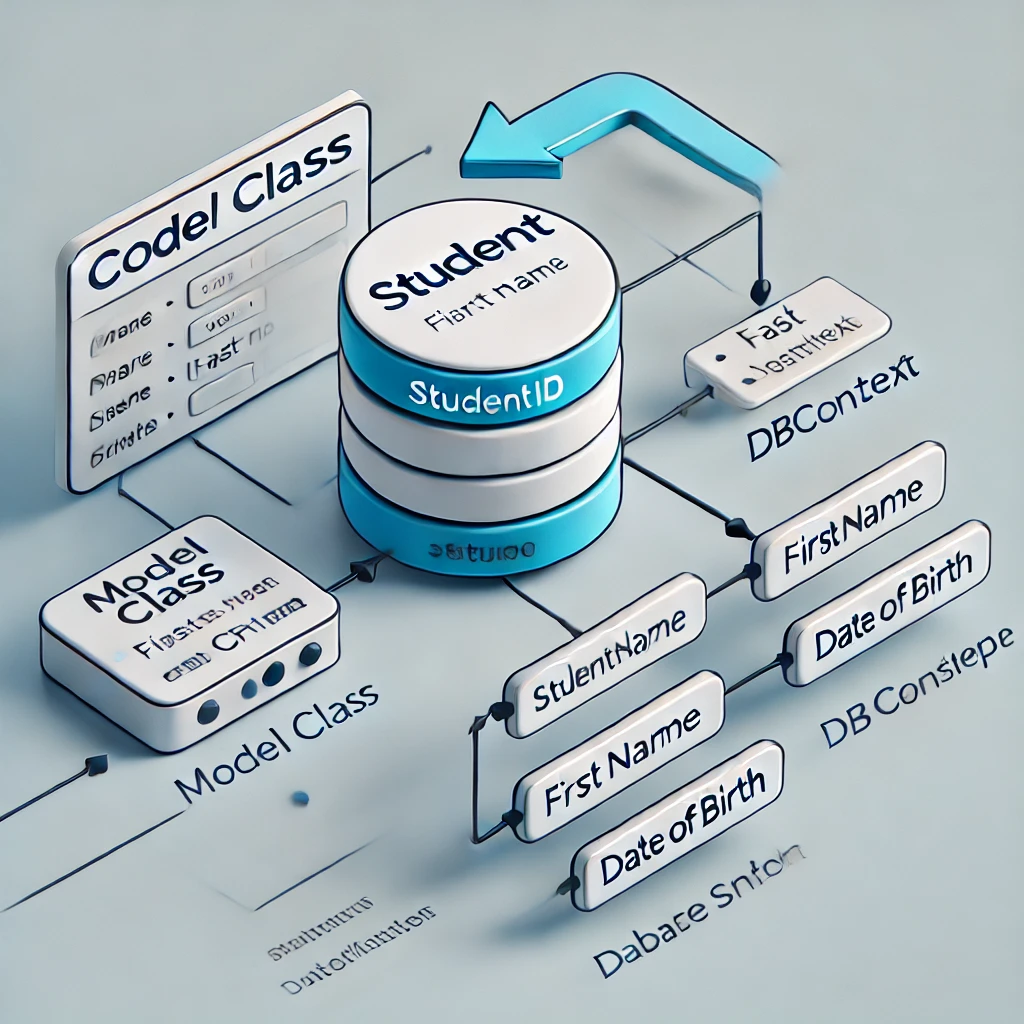
Today, we'll delve into the Code First approach of Entity Framework, a powerful technique for database management in .NET applications. In this tutorial, we'll focus on how to use Code First Entity Framework to generate your database efficiently. By following along, you'll learn how to define your data models and create the corresponding database schema with ease. Whether you're new to Code First or looking to refine your skills, this guide will walk you through the essential steps to get your database up and running using Code First Entity.
The "Code First" approach in ASP DOTNET Core is a way of developing applications where you start by defining your domain model classes in C#. These classes represent the data structure and business logic of your application. Once you've defined your classes, Entity Framework Core (EF Core) automatically generates the database schema based on these classes. This approach is particularly useful because it allows you to focus on your application's code without worrying about the underlying database structure initially.
In short, you will write the code first, and the table and database will be generate automatically according to the model. So, we're going to explore the Code First approach in Entity Framework, and there are five steps to generate the database using Code First Entity.
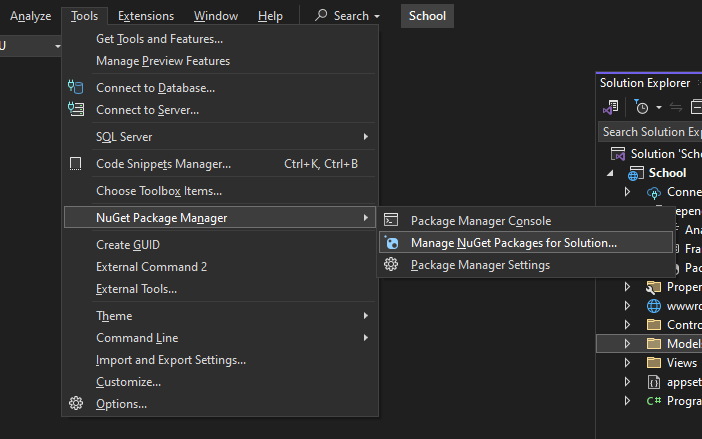
Step 1: Download The Packages From NuGet Packages
Microsoft.EntityFrameworkCore.Design
Microsoft.EntityFrameworkCore.Tools
Microsoft.EntityFrameworkCore.SqlServer
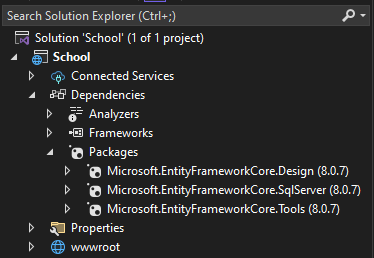
After Installing The Packages, You Will See All The Installed Packages In Dependency/Packages
Step 2: Generate Your Model Class
In this step, we will generate the model class. For example, we will create a model class for a student
using System.ComponentModel.DataAnnotations;
using System.ComponentModel.DataAnnotations.Schema;

namespace School.Models
{
    public class CreateStudent
    {
        [Key]
        public int StudentID { get; set; }

        [Required]
        [Column("Student Name", TypeName = "Varchar(80)")]
        public string Name { get; set; }

        [Column(TypeName = "Varchar(5)")]
        public string Standard { get; set; }

        [Column(TypeName = "Varchar(12)")]
        public string Medium { get; set; }

        [Column(TypeName = "Varchar(12)")]
        public string Mobile { get; set; }
    }
}
Here, we created a model named CreateStudent and added the properties. This model class will help us to create student details.
We have added attributes to the properties:
[Key]: TheKeyattribute identifies the property as the primary key. It ensures that a unique number is generated for every student in the table.[Required]: TheRequiredattribute indicates that the property is mandatory. The user must enter a value; otherwise, the form will not submit.[Column]: TheColumnattribute represents the column in the table. It can define the column name and type, as well as other column attributes.TypeName = "": In theColumnattribute, theTypeNamespecifies the column data type and size. For example,Varchar(80)means the data type isvarchar, and the column can store a minimum of 80 characters."Student Name": This specifies the column name in the table.
Step 3: Create a New DbContext Model Class
In this step, we will create a new DbContext model class. This class will manage the database connection and provide access to the database tables.
using Microsoft.EntityFrameworkCore;

namespace School.Models
{
    public class CreateStudentContext : DbContext
    {
        public CreateStudentContext(DbContextOptions <CreateStudentContext> options) : base(options)
        {
        }
        public DbSet<CreateStudent>StudentData { get; set; }
    }
}
.
Explanation of DB Context - What is DB Context?
Imagine you're organizing a big library. In this scenario:
DbContext is like your library management system.
The books are your data.
The shelves are your database tables.
Now, here's what DbContext does:
It's your middleman:
DbContext talks to the database for you.
You don't have to write complex database queries; you just tell DbContext what you want.
It's your organizer:
It keeps track of which books (data) go on which shelves (tables).
It knows how to add new books, remove old ones, or update information about existing books.
It's your translator:
Your code speaks C# (or another programming language).
The database speaks SQL.
DbContext translates between these two languages so they can understand each other.
It's your memory:
When you're working with data, DbContext remembers what changes you've made.
When you're ready, it can save all those changes to the database at once.
In programming terms:
You create a class that inherits from DbContext.
In this class, you define properties that represent your database tables.
You use this class to read from and write to your database, without writing SQL directly.
DbContext simplifies database operations, making it easier for you to work with your data using familiar programming concepts rather than dealing directly with database commands.
Now, let's explain this in the simplest way:
This code is like creating a special notebook for managing student information in a school.
public class CreateStudentContext : DbContext: We're creating a new type of notebook (calledCreateStudentContext) that knows how to talk to databases.The constructor (the part with
options)This is like setting up our notebook with specific instructions on how to
connect to the database
public DbSet<CreateStudent> StudentData { get; set; }This is like creating a special section in our notebook just for student data.
StudentDatawill represent a table in the database where we store information about students. So, In Database there will be table name StudentData
In simple terms, this code sets up a system that:
Knows how to connect to a database (the
DbContextpart)Has a specific place to store and manage student information (the
StudentDatapart)
When you use this CreateStudentContext in your application, you can easily add, retrieve, update, or delete student information without writing complex database commands. It's like having a smart assistant that handles all the database work for you!
Step 4: Create a Connection String in appsettings.json
In this step, we will define a connection string in the appsettings.json file. This connection string specifies how your application connects to the database.
"AllowedHosts": "*",
"ConnectionStrings": {
  "DBConnect": "Server=YourServerName; Database=YourDatabaseName; TrustServerCertificate=True; Trusted_Connection=True;"
}
Explanation of Connection String:
"ConnectionStrings": This section holds the connection strings for your application.
"DBConnect": This is the name of the connection string. You can choose any name you like
Server: The name of your SQL Server
Database: The name of the database you want to connect to, You can choose any database you like. we're giving "StudentDatabase"
This connection string will be used by your DbContext to connect to the database
Step 5: Registration of Connection String & DB Context In Program.cs
In this step, we will register the connection string and add the DbContext to the Program.cs file, so it can be used throughout your application
var provider = builder.Services.BuildServiceProvider();
var config = provider.GetRequiredService<IConfiguration>();

builder.Services.AddDbContext<CreateStudentContext>(options =>
    options.UseSqlServer(config.GetConnectionString("DBconnect")));

var app = builder.Build();
Maybe, While Implementing The Code In Program.cs You Will Face an Error So, Use This Library In Header using Microsoft.EntityFrameworkCore;
Explanation:
builder.Services.AddDbContext<CreateStudentContext>(options =>:This line registers your
CreateStudentContextDB Context with the dependency injection (DI) container.It configures the
DbContextto use SQL Server by passing the connection string to theUseSqlServermethod.
options.UseSqlServer(builder.Configuration.GetConnectionString("DBconnect")));UseSqlServerconfigures Entity Framework to use SQL Server as the database provider.builder.Configuration.GetConnectionString("DBconnect")retrieves the connection string named"DBconnect"from theappsettings.jsonfile.
By registering the DbContext in Program.cs, you make it available for dependency injection throughout your application. This allows you to inject CreateStudentContext into your controllers, services, and other components that need access to the database.
Step 6: Perform the Migration
In this step, we will perform a migration, which is a process that updates your database schema based on the changes made in your model classes. Entity Framework Core uses migrations to keep your database in sync with your application's data model.
Open the Package Manager Console in Visual Studio
Go to Tools > NuGet Package Manager > Package Manager Console
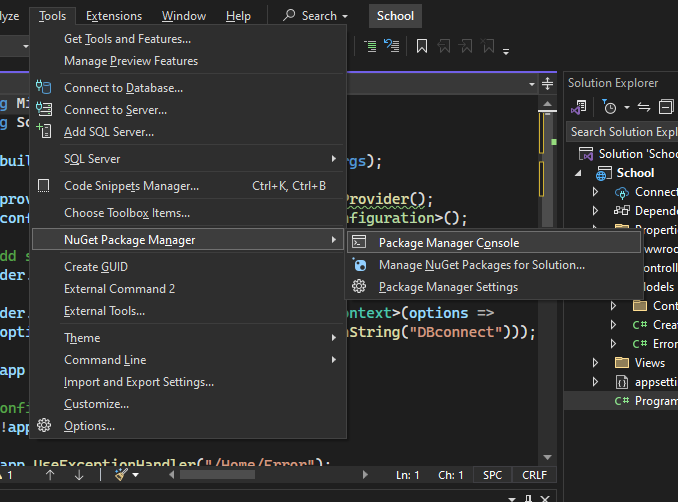
Now, you will see a command prompt in Visual Studio:
- This is where you will enter the migration commands

In the command prompt, type the following command
Add-Migration FirstMigration -context CreateStudentContext
After the build succeeds, apply the migration to the database by running the following command.
update-database -context CreateStudentContext
This command will execute the migration, and your database will be generated or updated according to the model classes. Let's check in SQL Server Management Studio (SSMS)
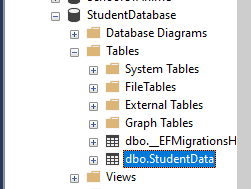
As you can see in above screenshot, our database has been generated and it is showing a table named StudentData
Now, right-click on the table name and select the option 'Select Top 1000 Rows.' This will allow us to view the contents of table.
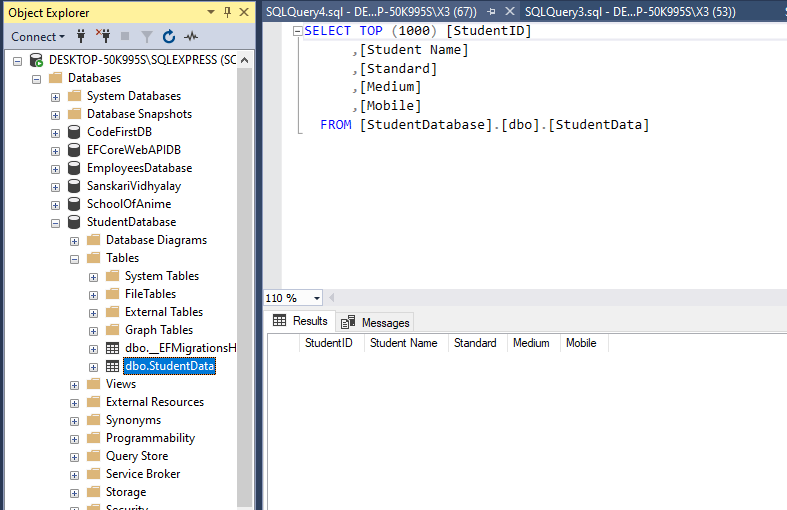
Now, you can see the table and its columns, indicating that the Code First Entity approach has been successfully executed.
I hope you enjoyed this blog. Please follow me for more updates. Thank you!"
Subscribe to my newsletter
Read articles from Rohit Surwade directly inside your inbox. Subscribe to the newsletter, and don't miss out.
Written by

Rohit Surwade
Rohit Surwade
’m a Full Stack Developer with expertise in C# and the ASP.NET framework.