How to Get Data from a Database: A Simple Guide
 Rohit Surwade
Table of contents
- Step 1: Create the Model Class
- Step 2: Set Up the DbContext
- Step 3: Constructor Injection & Declaration of Private Readonly Field
- Step 4: Write the Code in the Action Method In Controller
- Step 5: Create a View Page
- Step 6: Add The Connection String in appsettings.json
- Step 8: Register DbContext in Program.cs

In this blog post, we’ll show you how to retrieve information from a database and make it visible to users
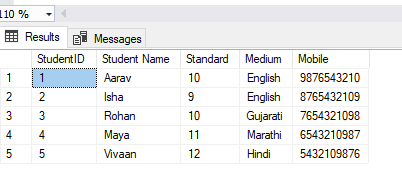
We have some data stored in our database table. In this guide, we’ll show you how to take this data and display it for users to see. This means we’ll fetch the data from the database and present it in a simple way that’s easy for people to view and interact with. Whether it’s customer information, product details, or anything else, we’ll cover the steps to make sure this data is visible to users.

As you can see, we have five entries in our table. Each entry includes details about students, such as their name, standard, medium of instruction, and mobile number.
We'll be starting from the very beginning, so the first step is to create a model class that represents the data in our database. This model will serve as a blueprint for the data we'll be working with and If you already have a model class and DbContext set up, you can skip ahead to step 3. But if you're new to this, don’t worry—we’ll guide you through creating these essential components before moving on to retrieving data
Step 1: Create the Model Class
using System.ComponentModel.DataAnnotations;
using System.ComponentModel.DataAnnotations.Schema;

namespace School.Models
{
    public class CreateStudent
    {
        public int StudentID { get; set; }
        public string Name { get; set; }
        public string Standard { get; set; }
        public string Medium { get; set; }
        public string Mobile { get; set; }
    }
}
We’ve created a model class named CreateStudent to match the table columns in our StudentData table. Since this is a school database, so we gave the name CreateStudent to the model class and this model class includes properties like StudentID, StudentName, Standard, Medium, and Mobile same as table.
Step 2: Set Up the DbContext
Next, we’ll set up the DbContext class, which acts as a middleman between our database and the code. The DbContext will manage the connection to the database and allow us to query and save data using our CreateStudent model.
using Microsoft.EntityFrameworkCore;

namespace School.Data
{
    public class SchoolContext : DbContext
    {
        public SchoolContext(DbContextOptions<SchoolContext> options) : base(options)
        {
        }

        public DbSet<CreateStudent> Students { get; set; }
    }
}
In this step, we set up the SchoolContext class, which inherits from DbContext. This class includes a DbSet<CreateStudent> property named Students, which represents the collection of students in our database. The constructor takes DbContextOptions<SchoolContext> as a parameter and passes it to the base class constructor.
Remember, In DbSet you have to write same table name which is in Database
Step 3: Constructor Injection & Declaration of Private Readonly Field
You can now retrieve data from the database and store it in a List. Open the Controller
using Microsoft.AspNetCore.Mvc;
using School.Models;
using School.Models.Context;
using System.Diagnostics;

namespace School.Controllers
{
    public class HomeController : Controller
    {
        private readonly ILogger<HomeController> _logger;
        private readonly CreateStudentContext _createStudentContext;

        public HomeController(ILogger<HomeController> logger, CreateStudentContext createStudentContext)
        {
            _logger = logger;
            _createStudentContext = createStudentContext; // Constructor Injection
        }
    }
}
In the above code, we have declared a private readonly field and provided constructor injection. You need to do the same in your code.
Step 4: Write the Code in the Action Method In Controller
public IActionResult StudentDetails()
{
   var StudentsData = _createStudentContext.StudentData.ToList();
   return View(StudentsData);
}
We chose the StudentDetails action method because we want to send all the data to the StudentDetails view/page and there our all Data will Display. You should select the action method where you want to send all the data, just as we are doing in the StudentDetails action.
Explanation:
StudentDetailsMethod: This is an action method that handles requests to the"StudentDetails"page of theHomeController._createStudentContext.StudentData.ToList()this will retrieves all student records from the database (Syntax:_privatereferenceofcontext.tablename.ToList();)StudentDataou can think of it as a table in your database that holds student records.ToList()It will converts the query results into aList<StudentData>Return View(StudentData)It will pass the data to the view
Step 5: Create a View Page
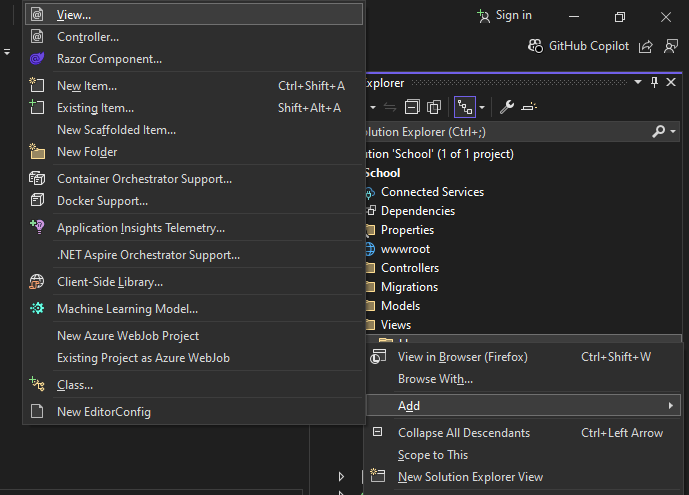
Right-click on the folder corresponding to your controller (e.g., Home), select Add, and then choose New Item.... Select View and name it StudentDetails.cshtml (or any name matching the action method).

Here’s a simple example of how you might define the StudentDetails.cshtml view to display a list of students:
@model IEnumerable<YourNamespace.Models.StudentData>

<!DOCTYPE html>
<html>
<head>
    <title>Student Details</title>
</head>
<body>
    <h2>Student Details</h2>
    <table>
        <thead>
            <tr>
                <th>ID</th>
                <th>Name</th>
                <th>Age</th>
                <th>Grade</th>
            </tr>
        </thead>
        <tbody>
            @foreach (var student in Model)
            {
                <tr>
                    <td>@student.ID</td>
                    <td>@student.Name</td>
                    <td>@student.Age</td>
                    <td>@student.Grade</td>
                </tr>
            }
        </tbody>
    </table>
</body>
</html>
Explanation:
@model List<StudentData>: This line specifies that the view expects a model of typeList<StudentData>, which is the list of students passed from the controller.
Next, we will register the DbContext and add the ConnectionString in appsettings. If your DbContext is already registered and the connection string is already added to appsettings.json, you can skip this step and try to run the project.
Step 6: Add The Connection String in appsettings.json
Open appsettings.json and add your connection string. This string includes details like the database server, database name, and authentication credentials.
  "AllowedHosts": "*",
  "ConnectionStrings": {
    "DBConnect": "Server=your_server_name; Database=database_name; TrustServerCertificate=True; Trusted_Connection=True;"
  }
 }
Step 8: Register DbContext in Program.cs
Open Program.cs and register the DbContext with the service container. This tells ASP.NET Core how to create and manage instances of CreateStudentContext
var provider = builder.Services.BuildServiceProvider();
var config = provider.GetRequiredService<IConfiguration>();

builder.Services.AddDbContext<CreateStudentContext>(options =>
    options.UseSqlServer(config.GetConnectionString("DBconnect")));

var app = builder.Build();
After AddDbContext You Have To Add The Your Db Context Name as We Have The Added AddDbContext<CreateStudentContext>
We are done. Now you can run the project, You've To Search Your Action Our Action Name is StudentDetails

Here, you can see that all the entries from the table are displayed on the page.

I hope this is helpful for you. Thank you, and please follow me for more updates.
Subscribe to my newsletter
Read articles from Rohit Surwade directly inside your inbox. Subscribe to the newsletter, and don't miss out.
Written by

Rohit Surwade
Rohit Surwade
’m a Full Stack Developer with expertise in C# and the ASP.NET framework.