How to set up a custom Mapbox basemap style with React Leaflet and Leaflet Gatsby Starter
 Colby Fayock
Building maps can be pretty powerful, but often you’re stuck with open source options for the map imagery that might not help the readability of your data. How can we leverage Mapbox’s tile APIs to add a custom basemap to our React Leaflet app?
- What are we going to build?
- What is Mapbox?
- Part 1: Creating a custom Mapbox style
- Part 2: Adding a custom TileLayer to React Leaflet
- Part 3: Adding a custom basemap to Gatsby Starter Leaflet
- Securing your Mapbox key
- Want to learn more about maps?
What are we going to build?
We’re going to walk through creating a new basic Mapbox style in our Mapbox account. Once created, we’re going to use their Map API to add a custom basemap to our React Leaflet app.
 Gatsby Starter Leaflet with Mapbox basemap
For our map, we’re going to use this Leaflet Gatsby Starter I created that will allow you to easily spin up a new mapping app. Before we spin that up though, I’ll walk you through how to add it using only React Leaflet components.
A mapping app?
Yup! Maps are used all around the world to study datasets for geographic locations. They're important tools for scientists and others that are trying to help the world.
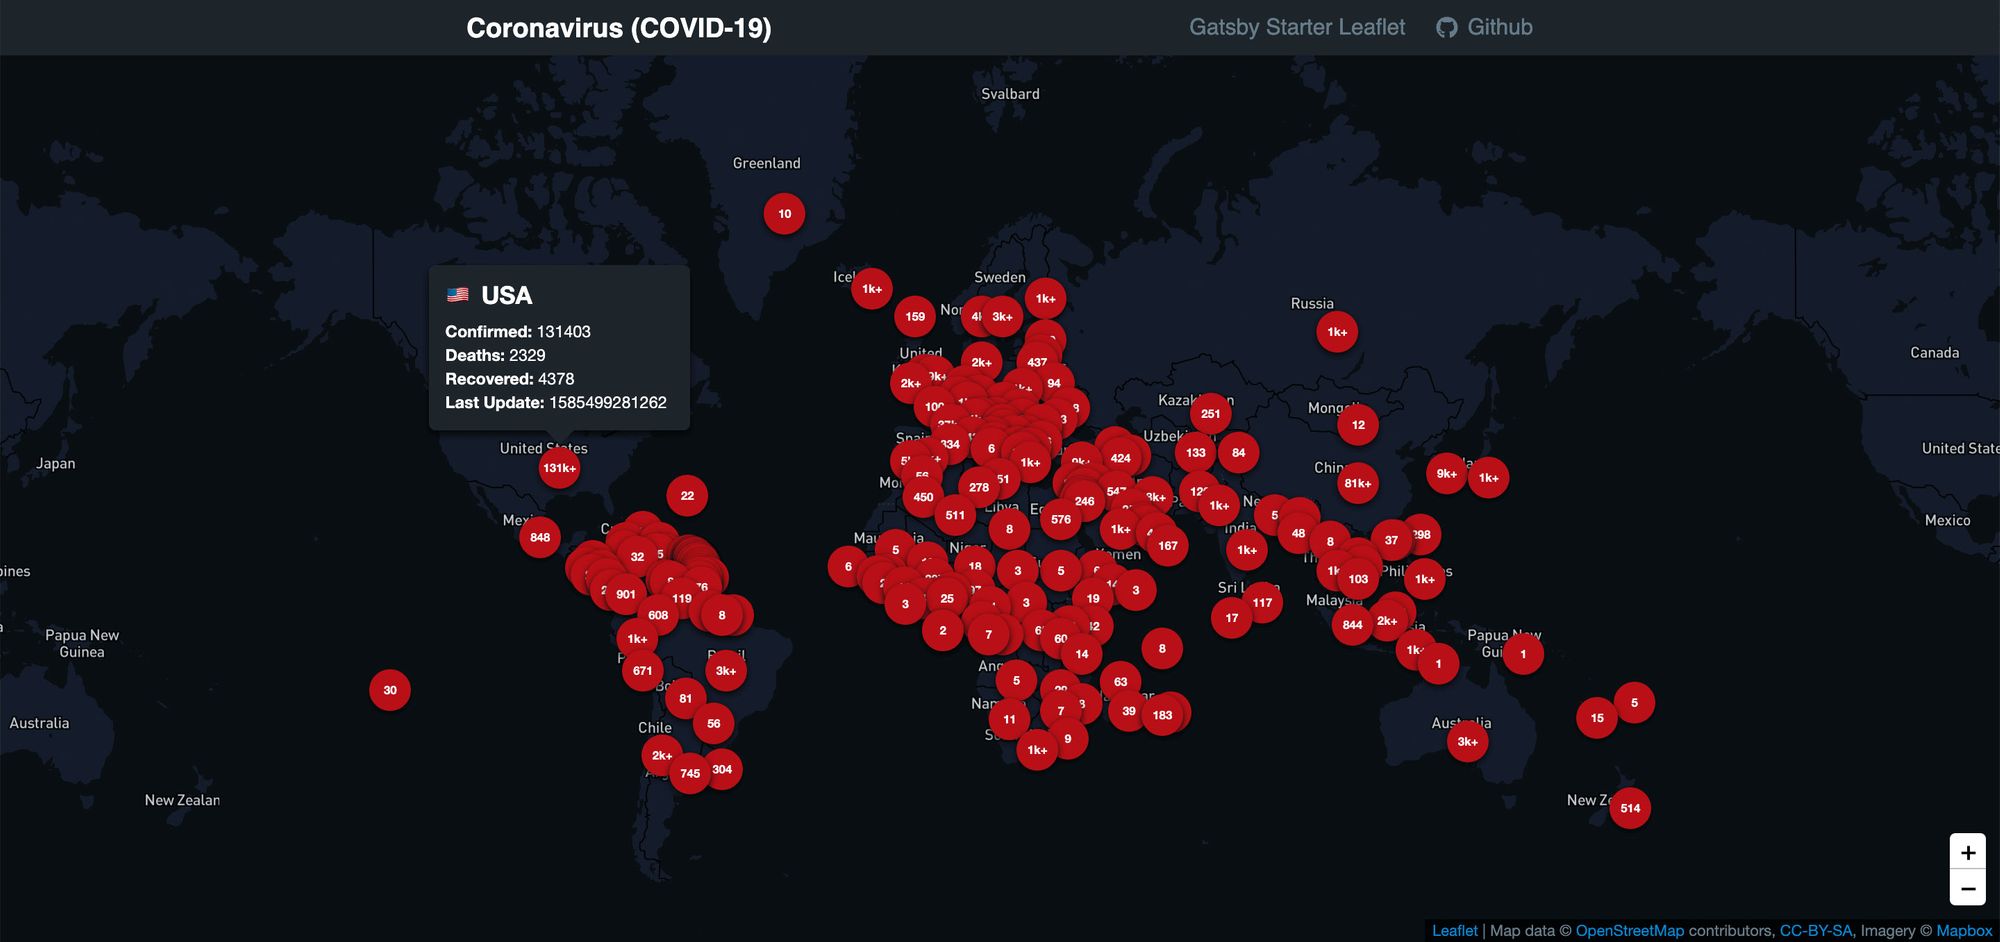 Coronavirus (COVID-19) custom map
If you want to learn more about building a map and adding data to it, you can check out some of my other articles first such as creating a Coronavirus (COVID-19) map or a Summer Road Trip map as well as a little bit of inspiration about why Anyone Can Map.
What is Mapbox?
Mapbox is a mapping platform that allows its customers to create custom mapping solutions. They also leverage a variety of APIs that provide powerful capabilities for building map features.
For our purposes, we’re going to utilize their Map API, specifically their Static Tiles API, to serve a custom map style that we create.
Part 1: Creating a custom Mapbox style
To get the look and feel that we want for our map, it’s important to have a basemap that helps make our data present itself without distractions. Plus, sometimes it’s fun to have a custom map.
Mapbox account
The first thing we’ll need to set up our custom Mapbox style is to have an account. I'm not going to walk you through that process, but you can head over to Mapbox’s website where you can sign up for free: mapbox.com
Creating a new custom style
Creating a new style in Mapbox isn’t as hard as it sounds. While it can get really complex if you want something unique, we can copy one of Mapbox’s default styles to get started.
First, head over to Mapbox’s Studio dashboard by clicking your account link in the top right corner when logged in.
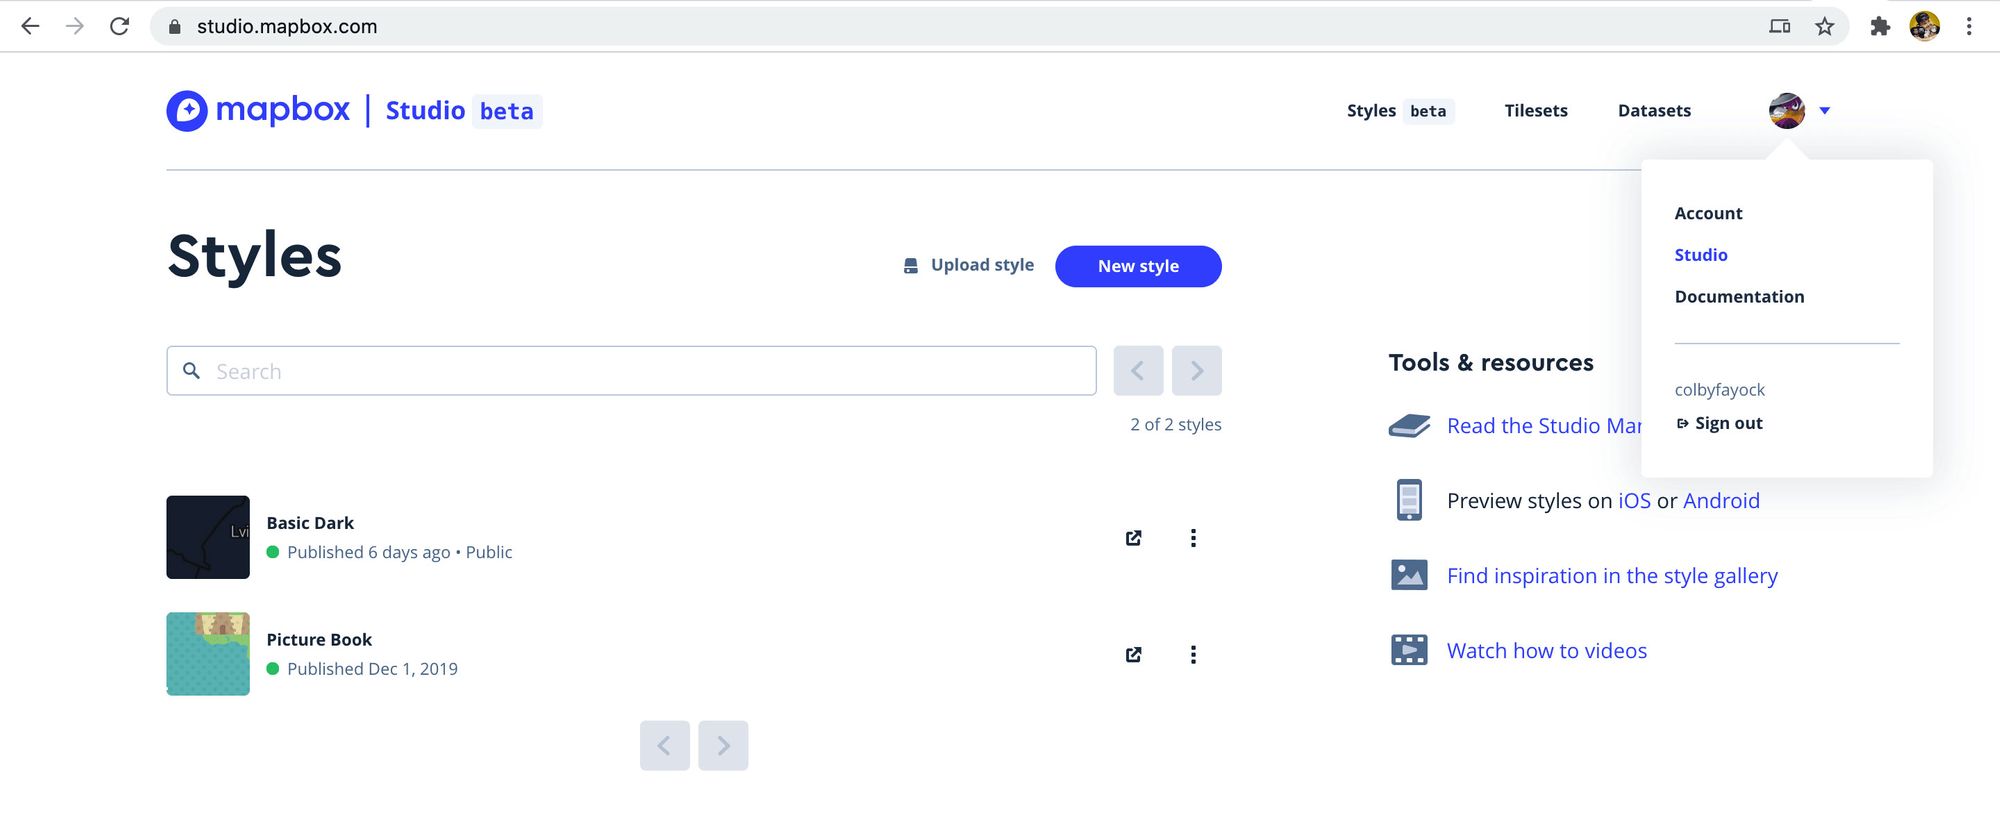 Mapbox Studio
Once we’re on our Studio dashboard, we want to select the New Style button.
 Create a new style in Mapbox Studio
After clicking the button, a modal will pop up allowing you to choose a template. You can choose whatever you want here, but I’m going to choose Monochrome with a variation of Dark. And after you’ve selected your template, click the Customize button.
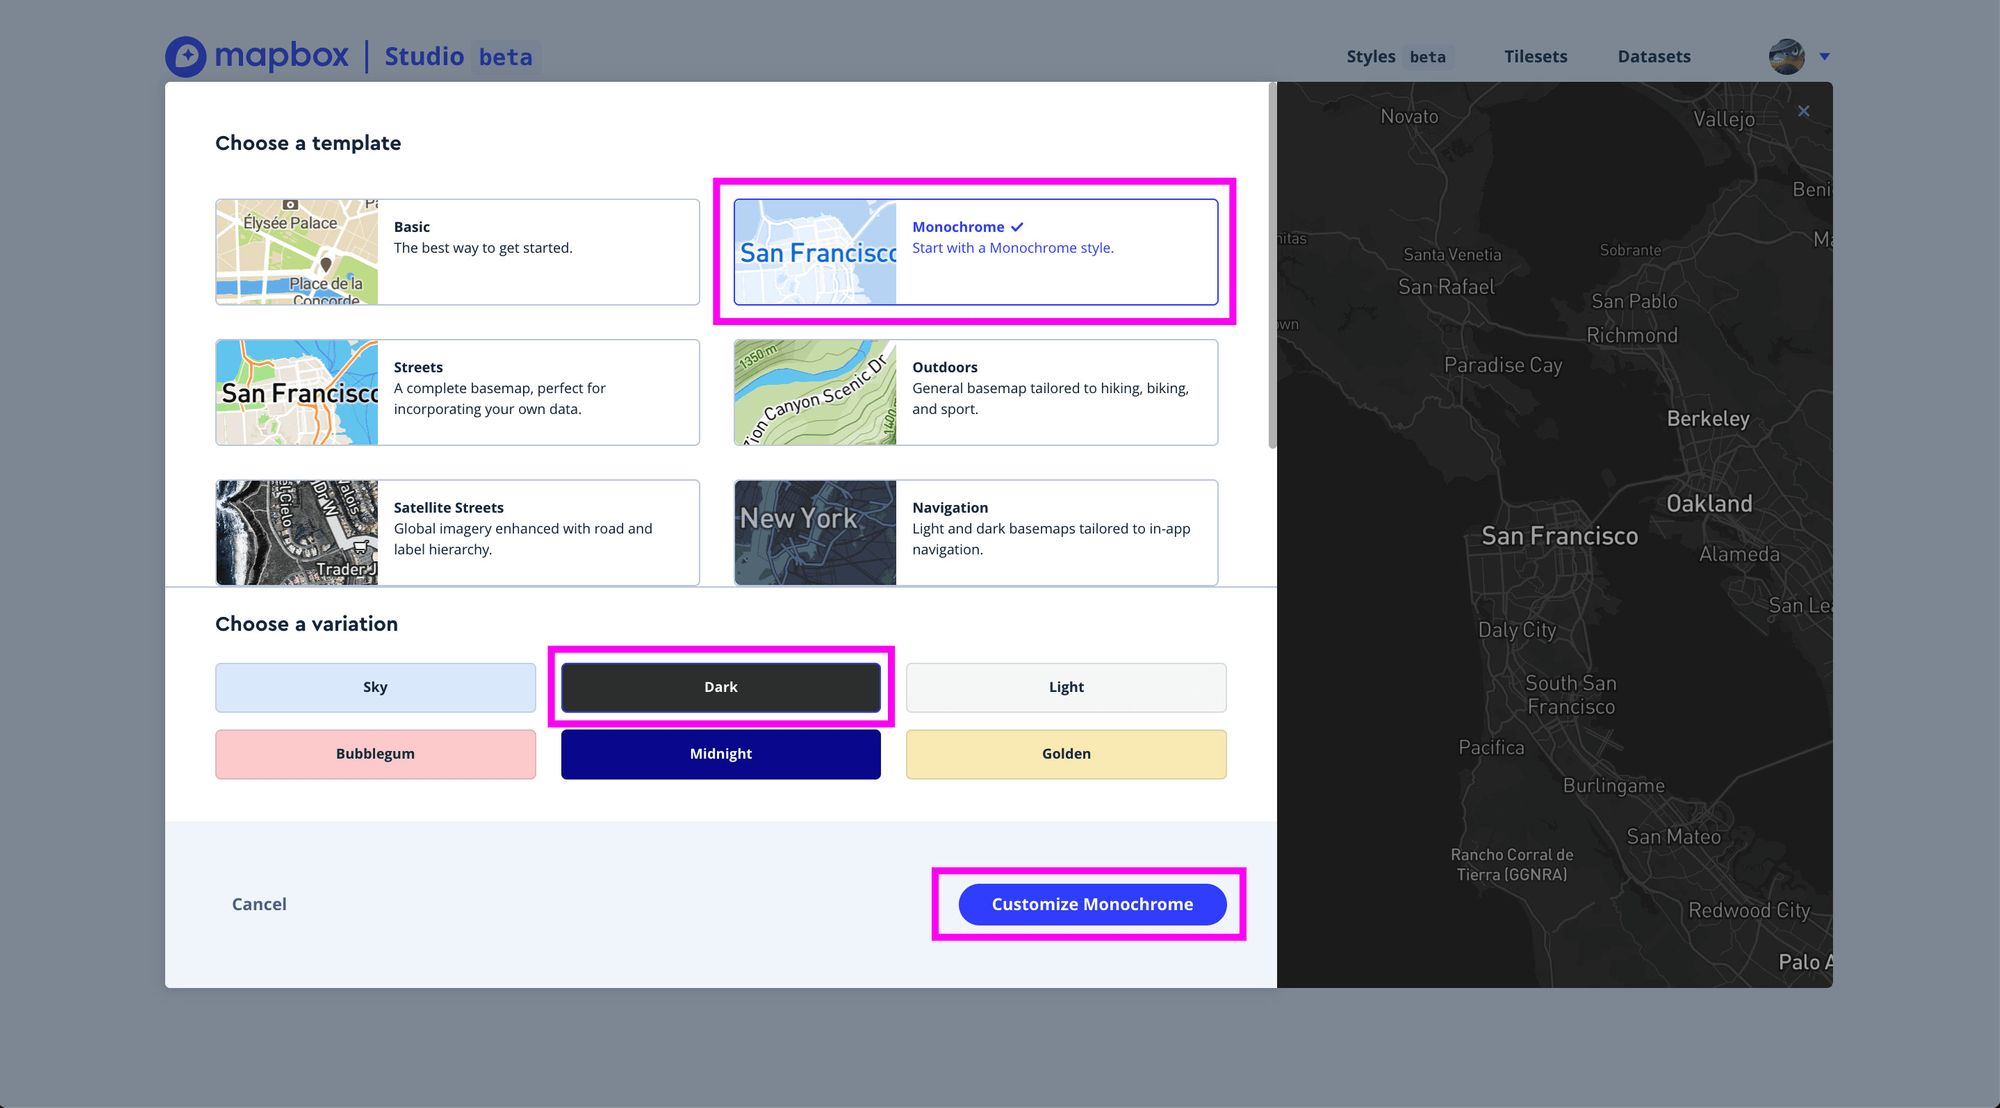 Select and customize a template for a new style in Mapbox Studio
And now we’re dropped into our customization UI.
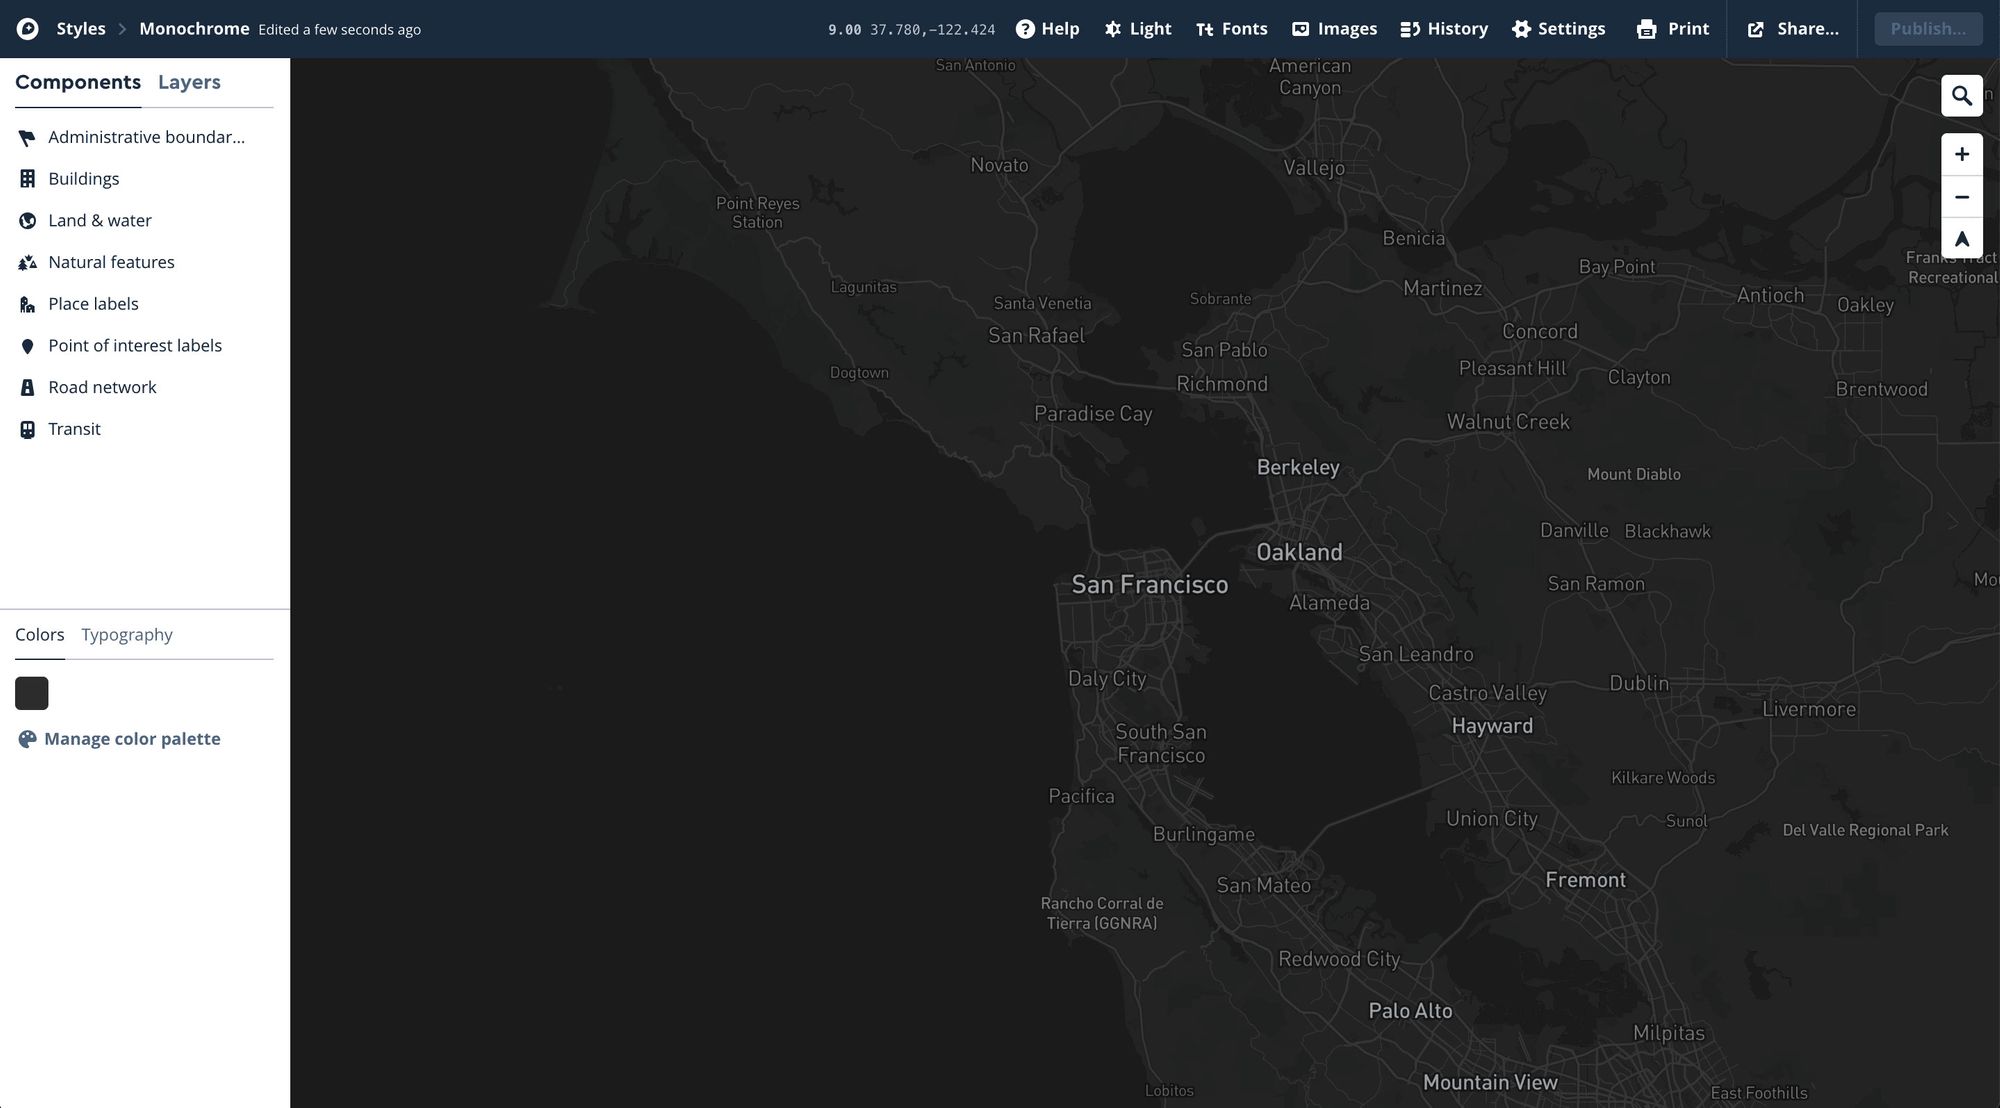 Mapbox customize style UI
From here, you can really do what you’d like. There are a ton of options to customize your map. It’s a little complex to try to dig in here, but Mapbox provides some resources to try to help you get productive.
Generating a Mapbox token
Once you’re happy with your new style and everything’s published, we want to generate a token that we’ll use for providing access to our Map.
Head on over to the Account section of the Mapbox dashboard.
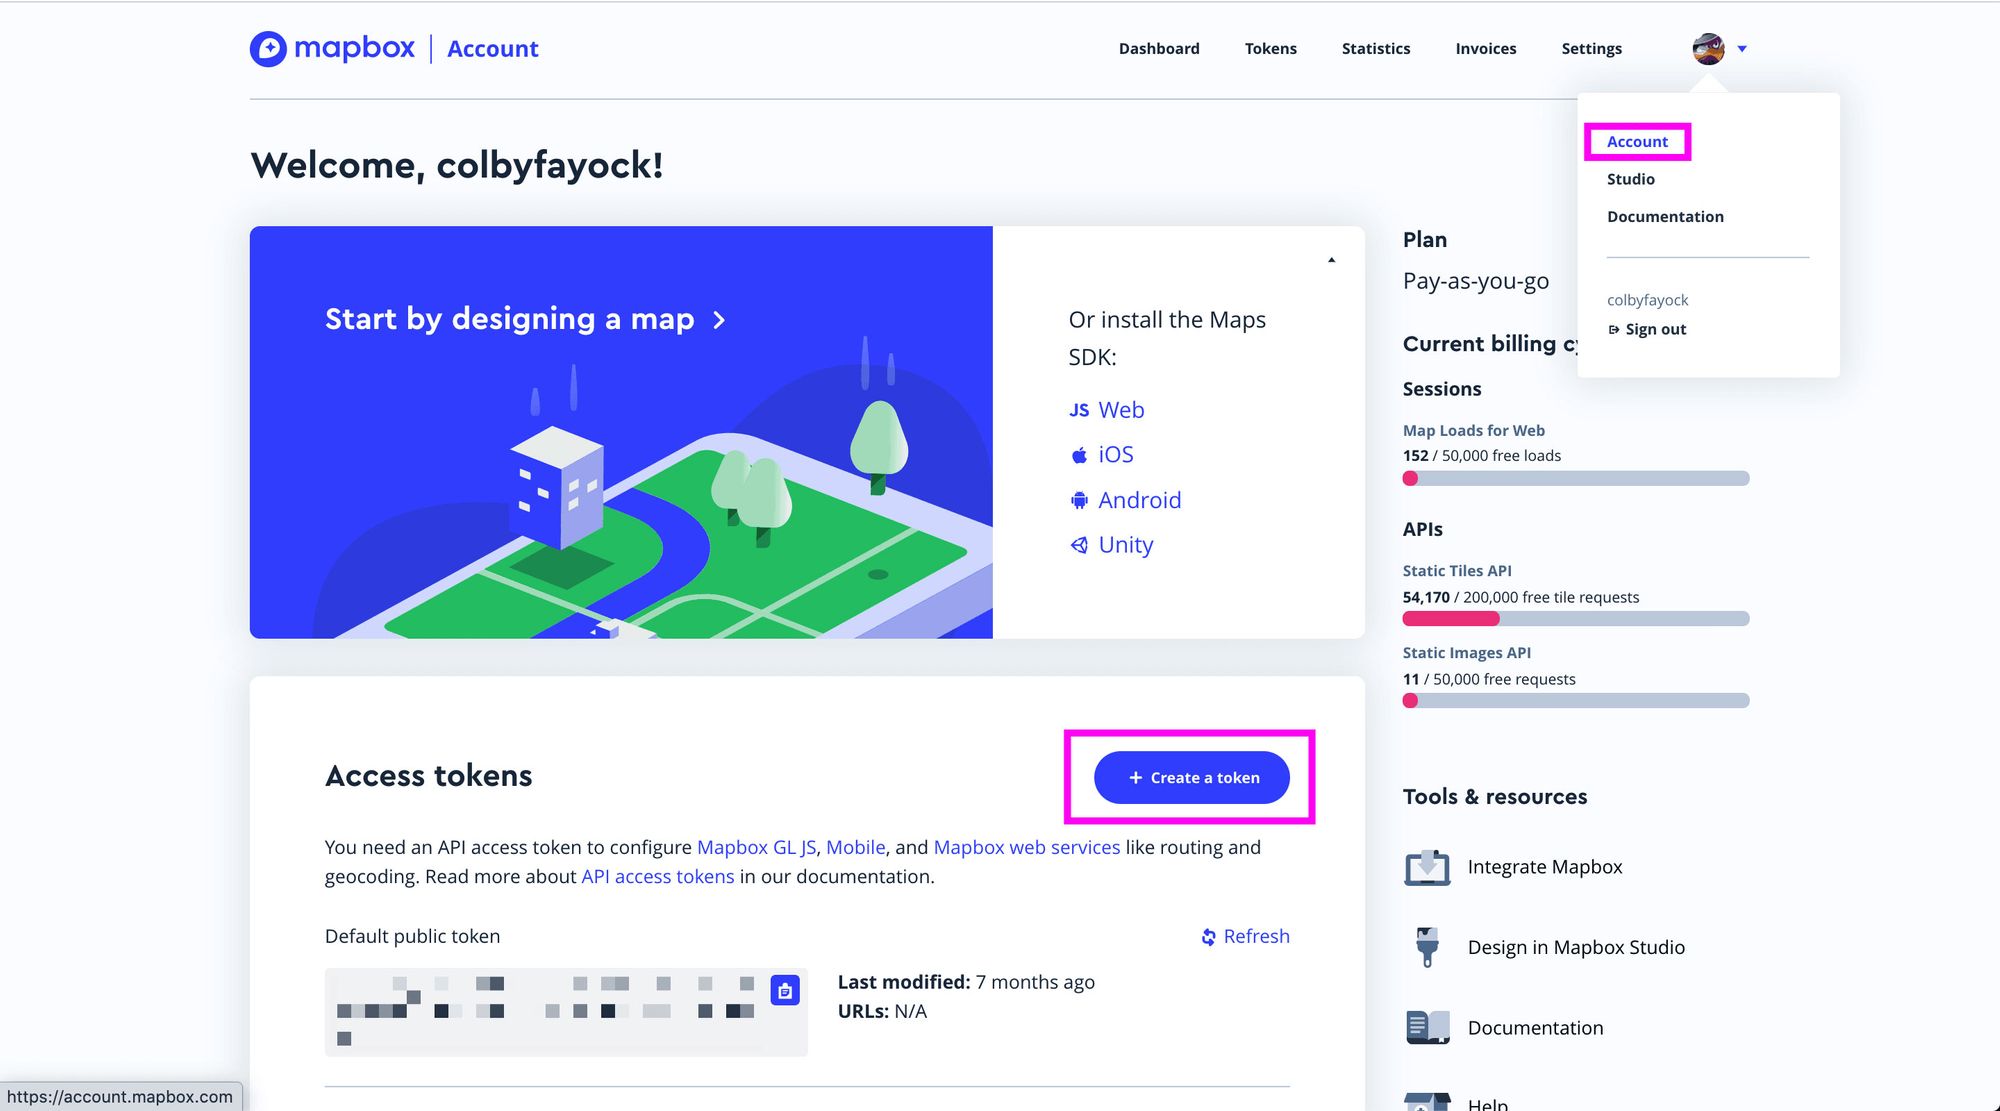 Creating a new token in Mapbox
Mapbox provides you with a “default” token that you can use in your applications. You're free to use this, but I recommend creating a new token that you can provide a unique name, that way if you ever blow past the free tier of Mapbox, you’ll be able to track your usage.
Additionally, it’s best to keep a separate token for each application, that way you can easily rotate an individual key, without having to update every application using it.
Once you click Create a token, you can set up the key how you’d like, with the scopes and permissions you choose, but for our purposes, you can leave all of the Public scopes checked for our map, which they do by default.
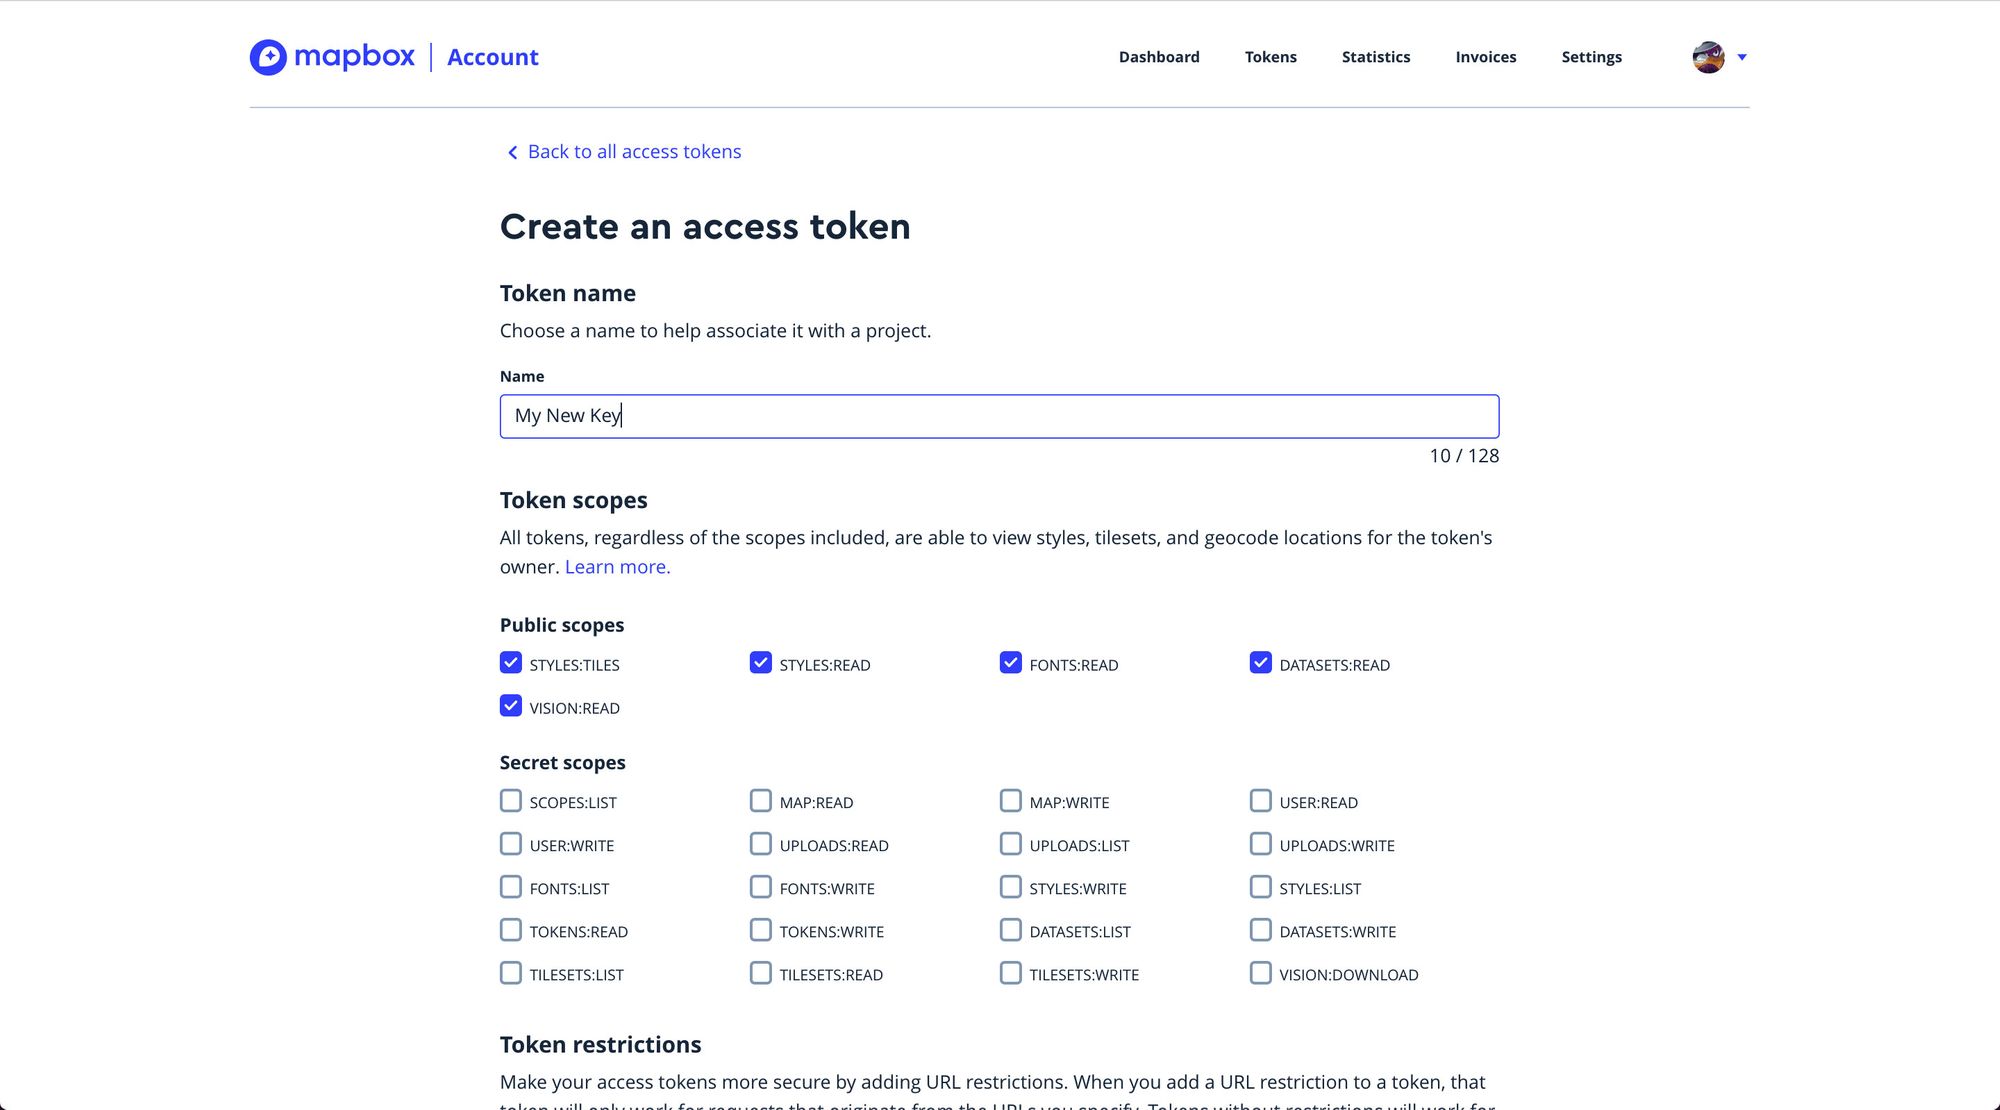 Create a new access token in Mapbox
Configuring our custom endpoint
For this tutorial, we’re going to use Mapbox’s Static Tiles service.
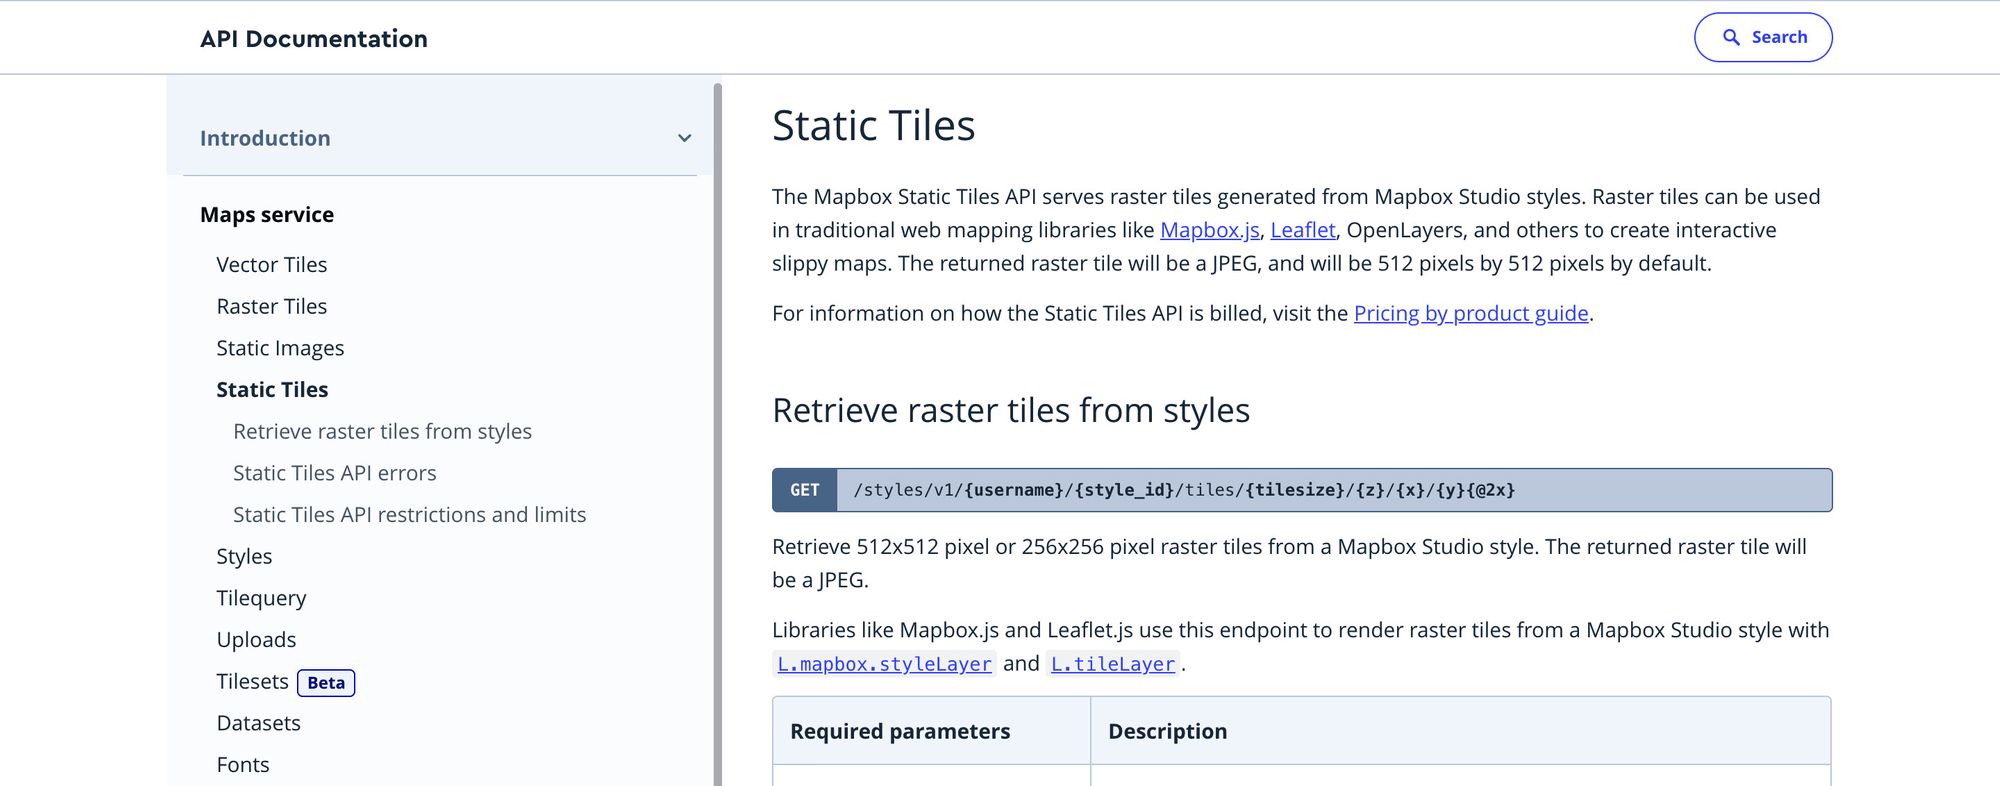 Mapbox Static Tiles Maps API
Our endpoint will look like the following:
https://api.mapbox.com/styles/v1/{username}/{style_id}/tiles/256/{z}/{x}/{y}@2x?access_token={access_token}
There are a few parameters here we need to understand:
- username: this will be your Mapbox account’s username
- style_id: this will be the ID of the style you created before
- z, x, y: these are parameters that Leaflet programmatically swaps out, so we want to leave them as is
- access_token: this is the Mapbox key you created above
To find your username and style ID, we can use the Style URL for our new Mapbox style to get those values.
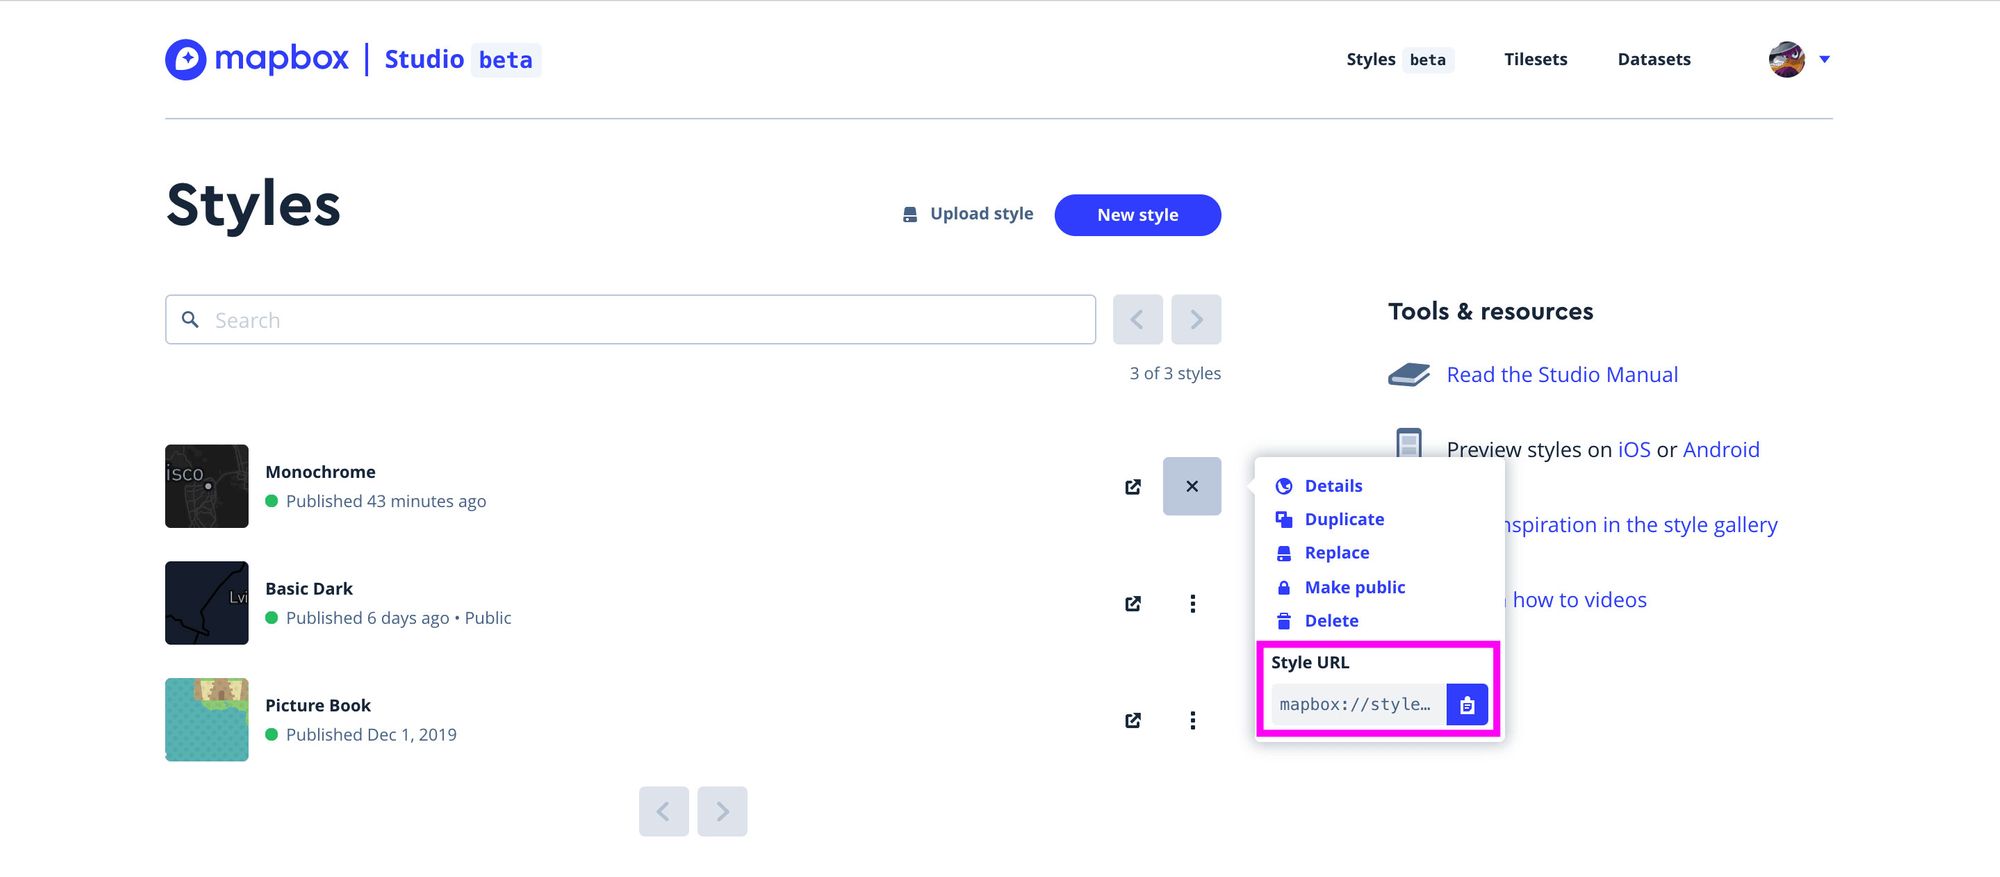 Finding the Style URL in Mapbox Studio
In my example, my Style URL looks like:
mapbox://styles/colbyfayock/ck8lryjfq0jdo1ip9ctmuhc6p
colbyfayock is my username and ck8lryjfq0jdo1ip9ctmuhc6p is my style ID.
And once I update my endpoint parameters, the final tilepoint URL will look like:
https://api.mapbox.com/styles/v1/colbyfayock/ck8lryjfq0jdo1ip9ctmuhc6p/tiles/256/{z}/{x}/{y}@2x?access_token=MYACCESSTOKEN
Part 2: Adding a custom TileLayer to React Leaflet
When building a map with React Leaflet, your main component will be a <Map> that wraps the entirety of the app. This is what sets up your Map instance for Leaflet.
For our purposes here, we’re going to use the example on the React Leaflet homepage as our starting point.
React Leaflet TileLayer Component
Inside of your <Map> component you include a <TileLayer> component, which defines the imagery of the world that you base your map upon.
The example on the React Leaflet homepage uses a public version of OpenStreetMap as their TileLayer, which is an open source map project created and updated by people all around the world.
<Map center={position} zoom={13}>
<TileLayer
url="https://{s}.tile.openstreetmap.org/{z}/{x}/{y}.png"
attribution="© <a href="http://osm.org/copyright">OpenStreetMap</a> contributors"
/>
</Map>
This gives you a basic map, but we want to swap in Mapbox so we can set up a custom look and feel for our map.
Custom Mapbox TileLayer
To add our custom style, we’ll want to update the url and attribution props of the TileLayer component.
For URL, it will simply be the custom style endpoint we created earlier, so in my example, it looks like:
https://api.mapbox.com/styles/v1/colbyfayock/ck8lryjfq0jdo1ip9ctmuhc6p/tiles/256/{z}/{x}/{y}@2x?access_token=MYACCESSTOKEN
For attribution, we want to credit Mapbox as the service, so we want to set our attribution as:
Map data © <a href="https://www.openstreetmap.org/">OpenStreetMap</a> contributors, <a href="https://creativecommons.org/licenses/by-sa/2.0/">CC-BY-SA</a>, Imagery © <a href="https://www.mapbox.com/">Mapbox</a>
When plugged in to our TileLayer, our code should now look like this:
<Map center={position} zoom={13}>
<TileLayer
url="https://api.mapbox.com/styles/v1/colbyfayock/ck8lryjfq0jdo1ip9ctmuhc6p/tiles/256/{z}/{x}/{y}@2x?access_token=MYACCESSTOKEN"
attribution="Map data © <a href="https://www.openstreetmap.org/">OpenStreetMap</a> contributors, <a href="https://creativecommons.org/licenses/by-sa/2.0/">CC-BY-SA</a>, Imagery © <a href="https://www.mapbox.com/">Mapbox</a>"
/>
</Map>
And once we open up our map, we should see our new basemap!
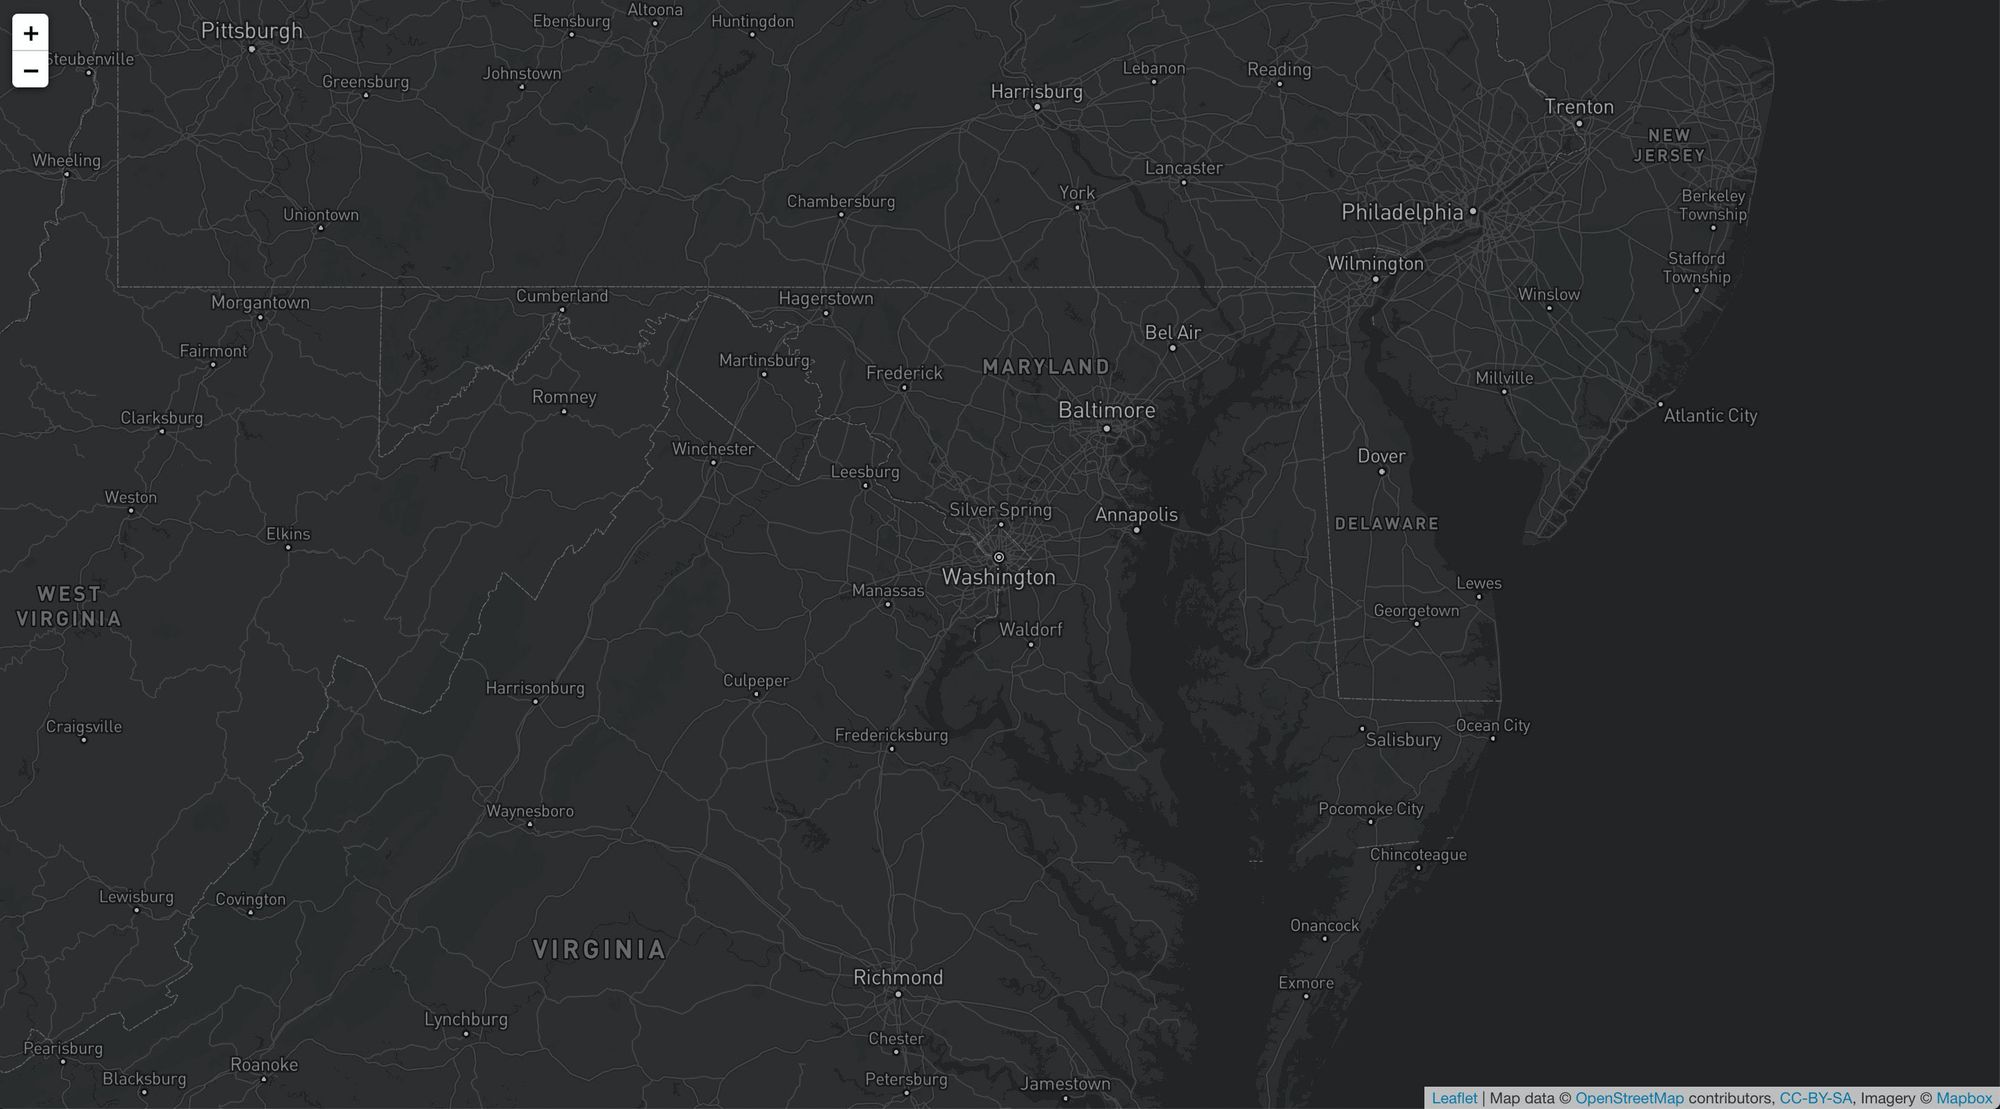 React Leaflet with a Mapbox basemap
See the code!
If you want to see how I did it, check out the diff commit by commit.
The only caveat there is I created an .env.development.local file in the root of my project in which I stored a new environment variable called REACT_APP_MAPBOX_KEY to store my Mapbox key.
Part 3: Adding a custom basemap to Gatsby Starter Leaflet
I’ve written a few other articles on how to get started with my Leaflet Gatsby Starter, but for this part, we’ll want to have a basic app spun up that we can use to change our TileLayer endpoint.
Setting up our React Leaflet Gatsby app
To get started, check out the instructions on the Starter github:
https://github.com/colbyfayock/gatsby-starter-leaflet
Once you’re ready, you should have a basic mapping app ready to go!
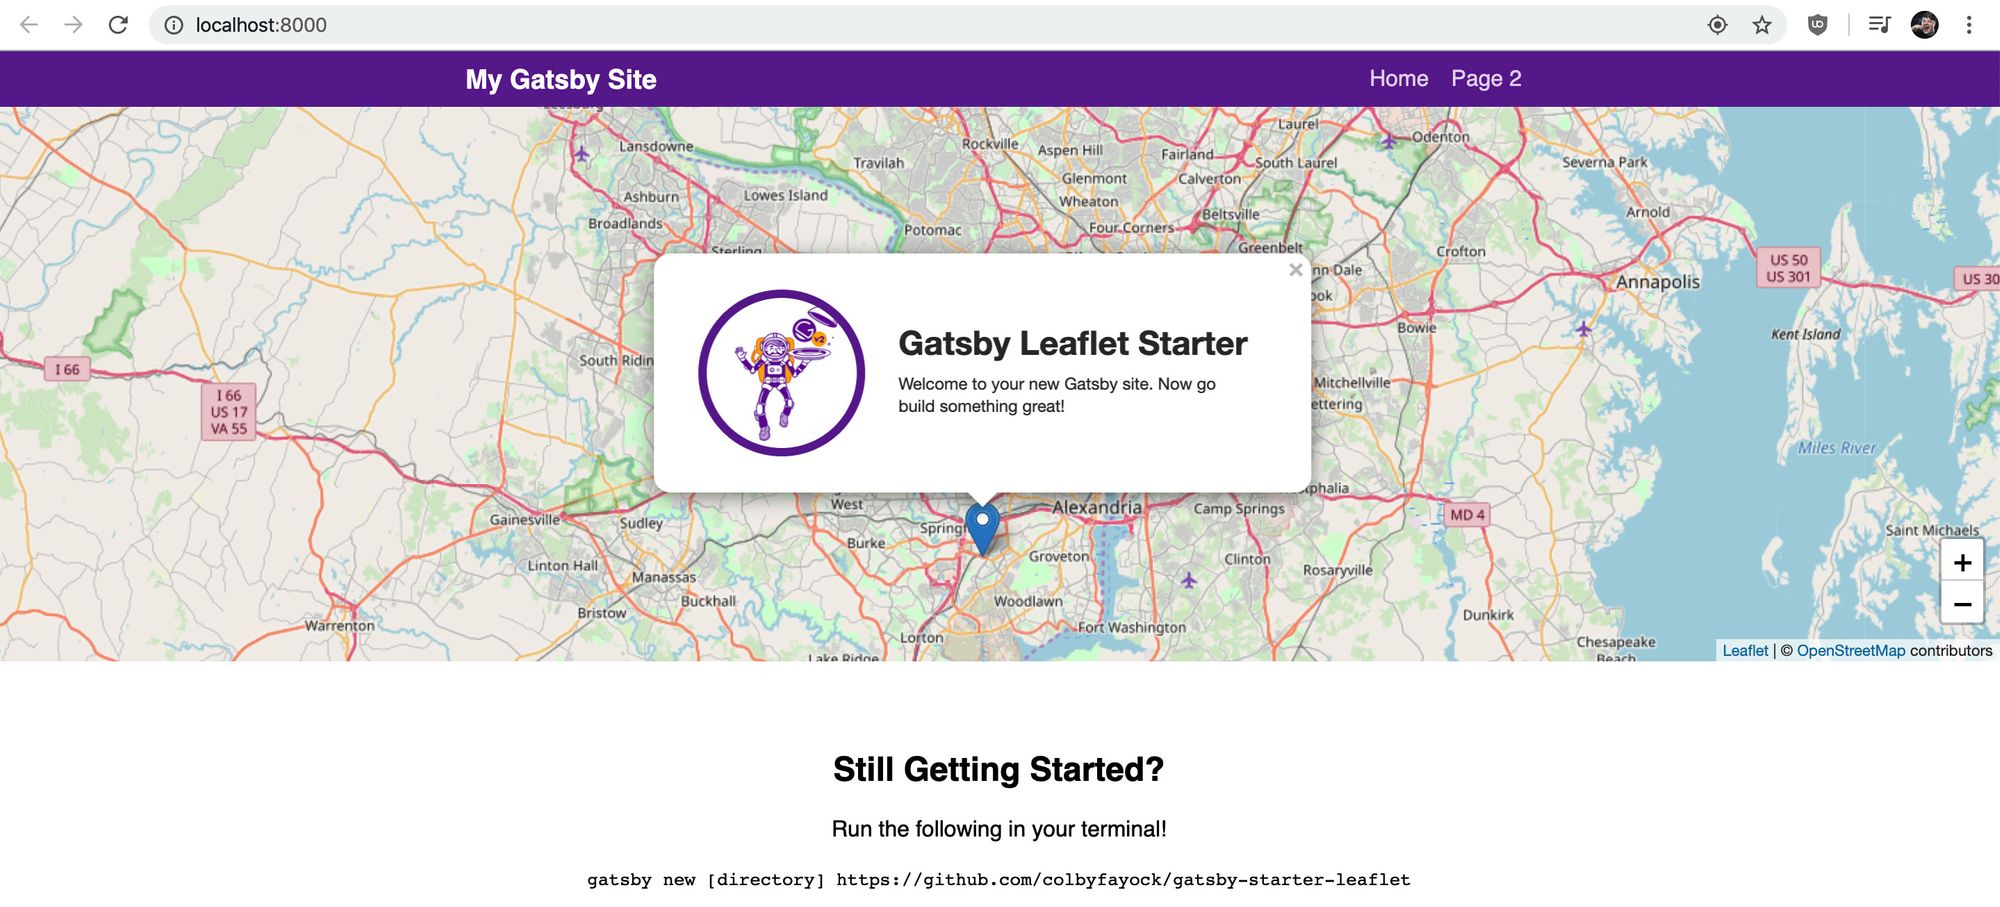 New Leaflet Gatsby app in the browser
Configuring our Mapbox service
The first thing we’ll want to do is add Mapbox as a service in our src/data/map-services.js file.
Taking our custom endpoint URL that we created in Part 1, let’s set up a new object with a name of Mapbox, and with a url and attribution similar to what we did in Part 2.
export const mapServices = [
{
name: ‘OpenStreetMap’,
attribution: '© <a href="http://osm.org/copyright”>OpenStreetMap</a> contributors’,
url: ‘https://{s}.tile.openstreetmap.org/{z}/{x}/{y}.png’
},
{
name: ‘Mapbox’,
attribution: ‘Map data © <a href="https://www.openstreetmap.org/">OpenStreetMap</a> contributors, <a href="https://creativecommons.org/licenses/by-sa/2.0/">CC-BY-SA</a>, Imagery © <a href="https://www.mapbox.com/">Mapbox</a>’,
url: `https://api.mapbox.com/styles/v1/colbyfayock/ck8c2foj72lqk1jnug0g2haw0/tiles/256/{z}/{x}/{y}@2x?access_token=MY_ACCESS_TOKEN`
}
];
Using our Mapbox map service
Once you have your Mapbox service set up, all that’s left is to open up the src/pages/index.js file, find the mapSettings object definition, and update the defaultBaseMap property to Mapbox.
const mapSettings = {
  center: CENTER,
  defaultBaseMap: ‘Mapbox’,
  zoom: DEFAULT_ZOOM,
  mapEffect
};
Save that change, refresh the map in your browser, and you should now see your custom basemap style!
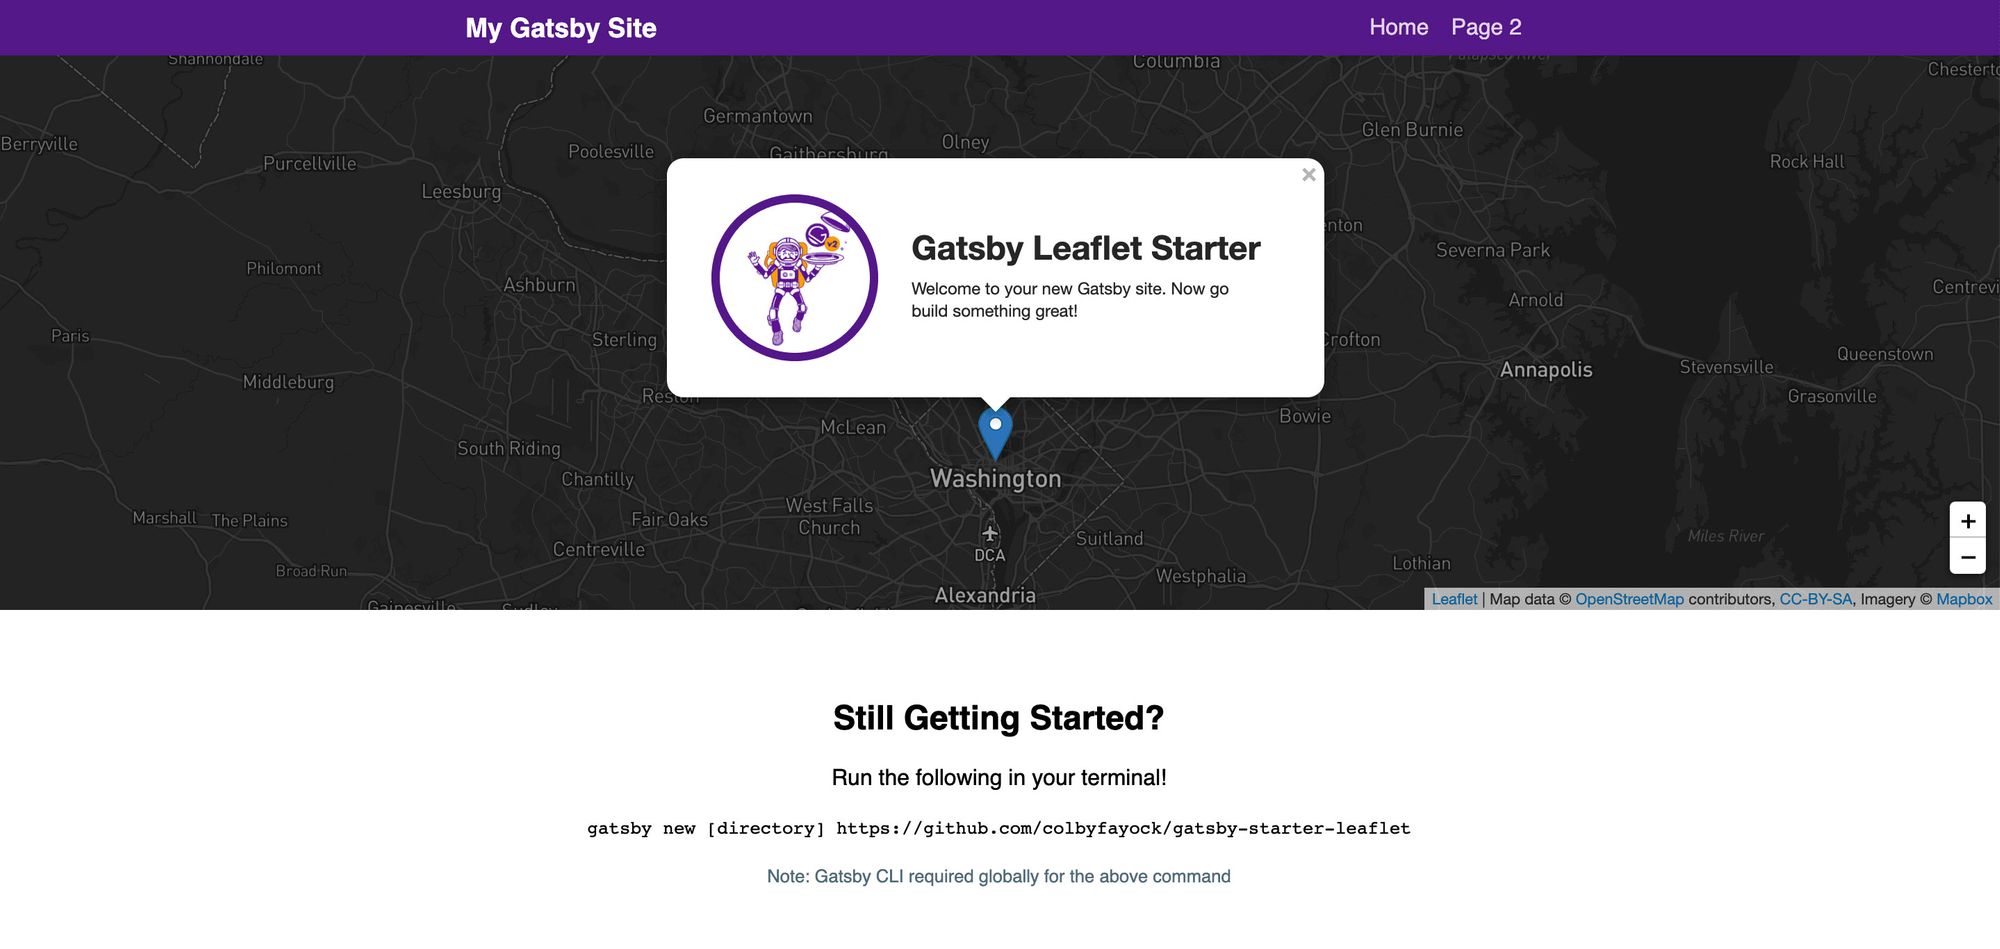 Gatsby Starter Leaflet with custom Mapbox basemap in browser
See the code!
If you want to see how I did it, check out the diff with the commit.
The only caveat there is I created an .env.development file in the root of my project in which I stored a new environment variable called GATSBY_MAPBOX_KEY to store my Mapbox key.
Securing your Mapbox key
Environment variables
Part of most development processes that use individual keys will generally set the keys up as environment variables. Environment variables are configured settings that don’t live in the code itself.
This is important because it prevents your key from being checked in to your code, which is bad from a security perspective, but it also allows you to provide a different key for different environments.
When generating your keys, try to keep this in mind, as it can save you in the long run.
Locking down your Mapbox key
In your settings when creating a token or when editing a token, Mapbox allows you to specify only the URLs you want your key to be accessible from.
Though Mapbox has a generous free tier, you probably want to keep it locked down only to the URLs that you’re using it on. You can create multiple keys, where one could be for public use on your website and one would be for your local development.
This is helpful for instance, where you have a key that will never be used publicly for development purposes, but then you have a key that you deploy with, which can be locked down only to that URL.
If someone grabs your key, they could plug it into their own website and use up all of your free tier, potentially running up your bill!
Want to learn more about maps?
You can check out a few of my other resources to get started:
- How to create a Coronavirus (COVID-19) Dashboard & Map App in React with Gatsby and Leaflet
- Anyone Can Map! Inspiration and an introduction to the world of mapping
- How to Create a Summer Road Trip Mapping App with Gatsby and Leaflet
- How to Create your own Santa Tracker with Gatsby and React Leaflet
- How to build a mapping app in React the easy way with Leaflet
Subscribe to my newsletter
Read articles from Colby Fayock directly inside your inbox. Subscribe to the newsletter, and don't miss out.
Written by

Colby Fayock
Colby Fayock
Director of DevX Engineering @ Cloudinary
