Look at My Data
 Aleksander Stojanowski
In the last few years, Apple has built a very convenient set of frameworks to build applications in their ecosystem. However, sometimes connecting all the bits and pieces together can be a bit cumbersome, especially since there is no one-size-fits-all solution in the software development industry. Every engineer working on code has their own preferences and likings. With all that said, let me show you how I tend to work with the SwiftData and SwiftUI Previews mechanism.
It All Starts With a Model
Every (or almost every) application nowadays stores some kind of data, and to work with SwiftData, we need to create a model. Since this article focuses on working with Previews rather than creating sophisticated data models, we'll use the most clichéd example there is - a to-do item.
import SwiftData

@Model
final class ToDoItem {
    var name = ""
    var done = false

    init(name: String = "", done: Bool = false) {
        self.name = name
        self.done = done
    }
}
That could be it, but I like my models to implement the Codable protocol (my motivation will become clear in the next chapter). If our model class were a simple struct or class, we'd simply add : Codable to its definition. However, since it's wrapped in the @Model macro, we need to explicitly implement this protocol. To do so, we need to add an enum with CodingKey and implement the required methods.
private enum CodingKeys: CodingKey {
    case name
    case done
}

required init(from decoder: Decoder) throws {
    let container = try decoder.container(keyedBy: CodingKeys.self)
    name = try container.decode(String.self, forKey: .name)
    done = try container.decode(Bool.self, forKey: .done)
}

func encode(to encoder: Encoder) throws {
    var container = encoder.container(keyedBy: CodingKeys.self)
    try container.encode(name, forKey: .name)
    try container.encode(done, forKey: .done)
}
Our model class is ready, and we can move further with our work.
Harness the Terminator
The saddest part of working with previews (or rather, working on any UI in any framework and/or technology) for me has always been stub data. Everyone knows Lorem ipsum; everyone has created at least one Item 1, Item 2. All that just to show something on the screen, to see how the final product could look. Everything seems fine, but it has one big disadvantage - the final product contains real data, not some ancient thesis or sequences of generated numbers. Of course, we could write some real examples with actual data, but that's a waste of time. After all, there's a reason why the Lorem ipsum generator is so widely used.
However, nowadays we have tools that can help us with that kind of work and give us the needed data. It's, of course, <here place name of your favorite AI chatbot>! We can use it to generate stubs for our models. Even the free tiers on any given platform should be able to give us reasonable results.
As I mentioned earlier, I have my motivation to make model classes compliant with the Codable protocol, and you might know at this point what it is. With codable models, we can ask a chatbot to generate data in JSON format and easily manage it as a data asset in the project.
Having explained all that, let's create a prompt we can use to make a chatbot generate our stub data (important note here: providing any information to any chatbot may feed it with your data, so be careful what you send to it, especially when working for someone).
Here is my model class:

<code of our model>

Generate for array of 10 items in JSON format.
We get, as a result, a ready-to-use list.
[
    {
        "name": "Buy groceries",
        "done": false
    },
    {
        "name": "Walk the dog",
        "done": true
    },
    {
        "name": "Read a book",
        "done": false
    },
    {
        "name": "Complete homework",
        "done": true
    },
    {
        "name": "Call mom",
        "done": false
    },
    {
        "name": "Pay bills",
        "done": true
    },
    {
        "name": "Schedule dentist appointment",
        "done": false
    },
    {
        "name": "Clean the house",
        "done": true
    },
    {
        "name": "Exercise",
        "done": false
    },
    {
        "name": "Prepare dinner",
        "done": true
    }
]
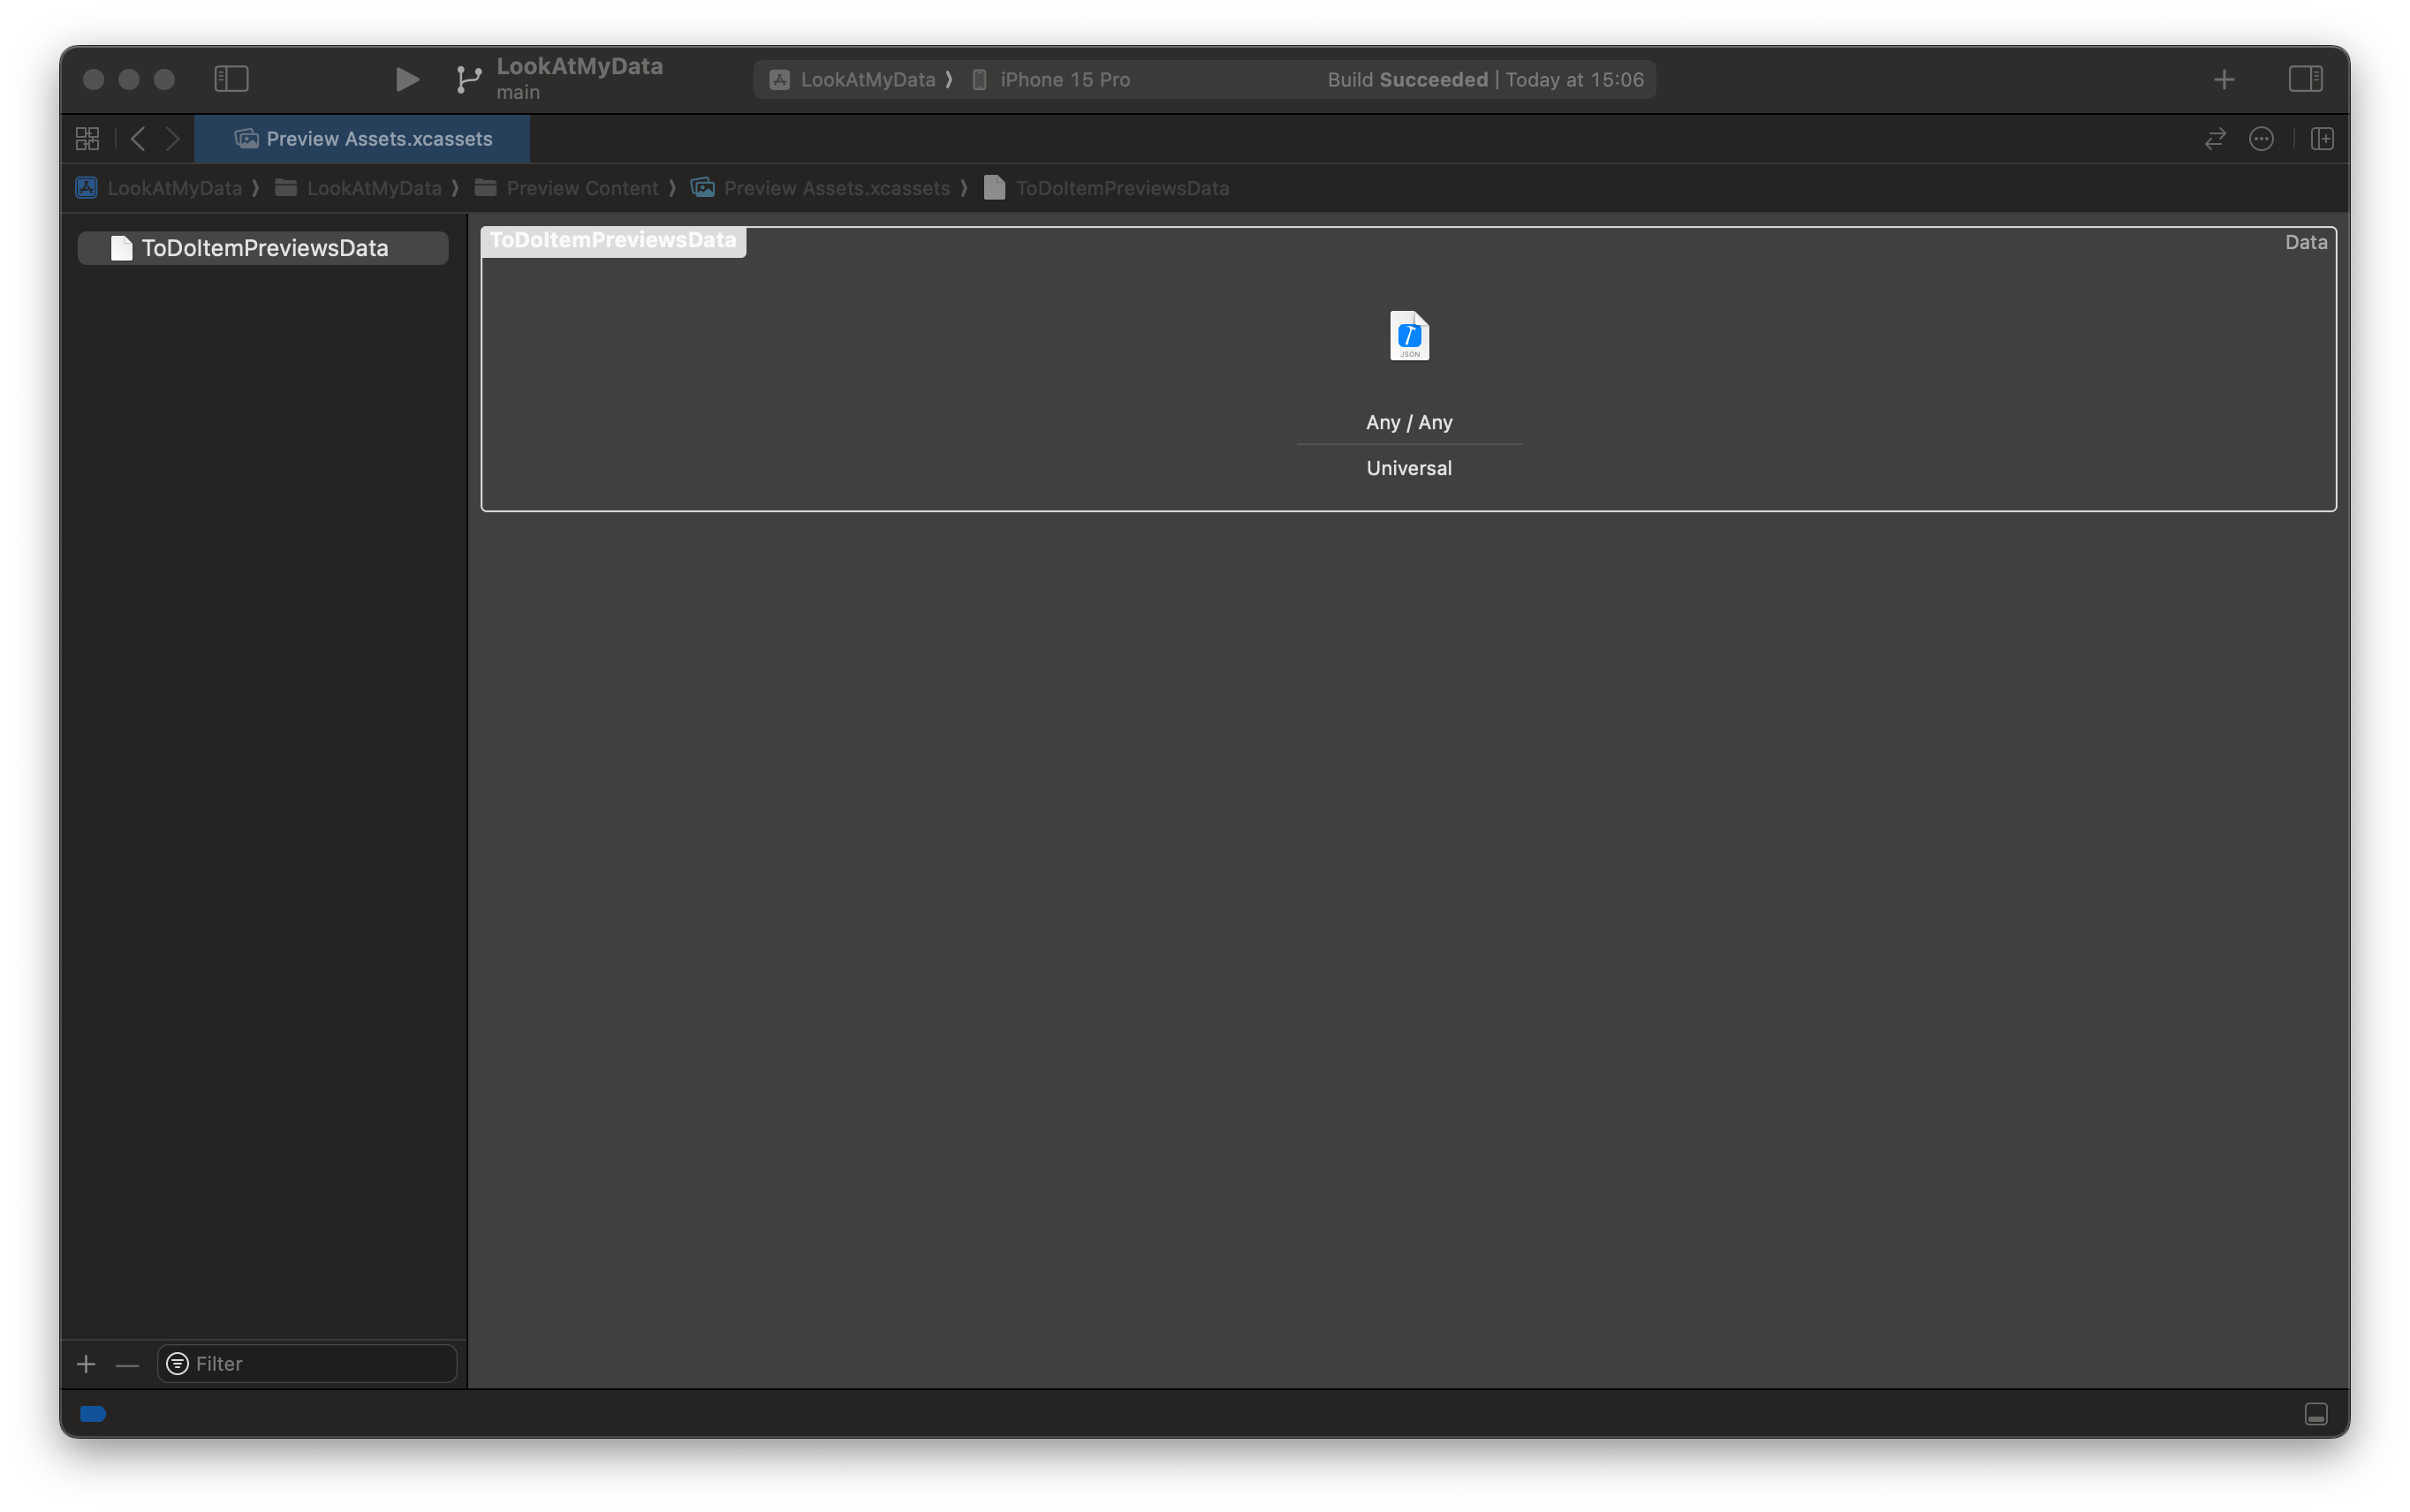
The last thing left to do is to save the result to a file. We'll name it ToDoItemPreviewsData.json and add it to Preview Assets in our project (simply drag the file into Preview Assets in Xcode).

Instead of adding this file to assets, we could add the file as part of the sources (and access it from within the bundle), but since assets can handle data files and not only images, I prefer to do it this way.
Glue It All Together
Our preparation is finished, and we can now start working on using stubs with previews. However, we don't want to create a modelContainer, load data, and create models for each view separately. Instead, we'll create a helper that does all that for us. We need to start somewhere, so let's create a simple singleton provider for our provider class.
import SwiftData

final class PreviewModelContainerProvider {
    static let shared = PreviewModelContainerProvider()

    let modelContainer: ModelContainer

    private init() {
        let configuration = ModelConfiguration(isStoredInMemoryOnly: true)
        do {
            modelContainer = try ModelContainer(for: ToDoItem.self, configurations: configuration)
        } catch {
            fatalError("Could not create ModelContainer")
        }
    }
}
With that, we can use it in our view for its preview.
import SwiftData
import SwiftUI

struct ContentView: View {
    @Query
    private var toDoItems: [ToDoItem]

    var body: some View {
        List {
            ForEach(toDoItems) { toDoItem in
                Label(toDoItem.name, systemImage: toDoItem.done ? "checkmark.circle" : "circle")
            }
        }
    }
}

#Preview {
    ContentView()
        .modelContainer(PreviewModelContainerProvider.shared.modelContainer)
}
All that works, but we don't have any data to show. We'll fix that by loading data from the file inside our PreviewModelContainerProvider constructor. However, as simple as that task sounds, we need to write quite a few lines of code.
First, to insert some models, we need to access the ModelContext of our container. The problem with this is that the mainContext of a ModelContainer is a main actor-isolated property, so we either need to make the constructor async or use @MainActor to isolate the class. We can't do the former because we keep a static instance for the singleton, so we need to isolate the whole class.
@MainActor
final class PreviewModelContainerProvider {
...
}
The second thing we need to do is load data from the file we created in the previous section. Luckily, that's really easy - we just use the NSDataAsset class from UIKit.
// Don't forget to add the UIKit import
import UIKit

@MainActor
final class PreviewModelContainerProvider {
    ...
    private init() {
        ...
        guard let previewData = NSDataAsset(name: "ToDoItemPreviewsData")?.data else {
            fatalError("Preview data not found")
        }

        do {
            let toDoItems = try JSONDecoder().decode([ToDoItem].self, from: previewData)
            for toDoItem in toDoItems {
                modelContainer.mainContext.insert(toDoItem)
            }
        } catch {
            fatalError("Could not decode preview data")
        }
    }
}
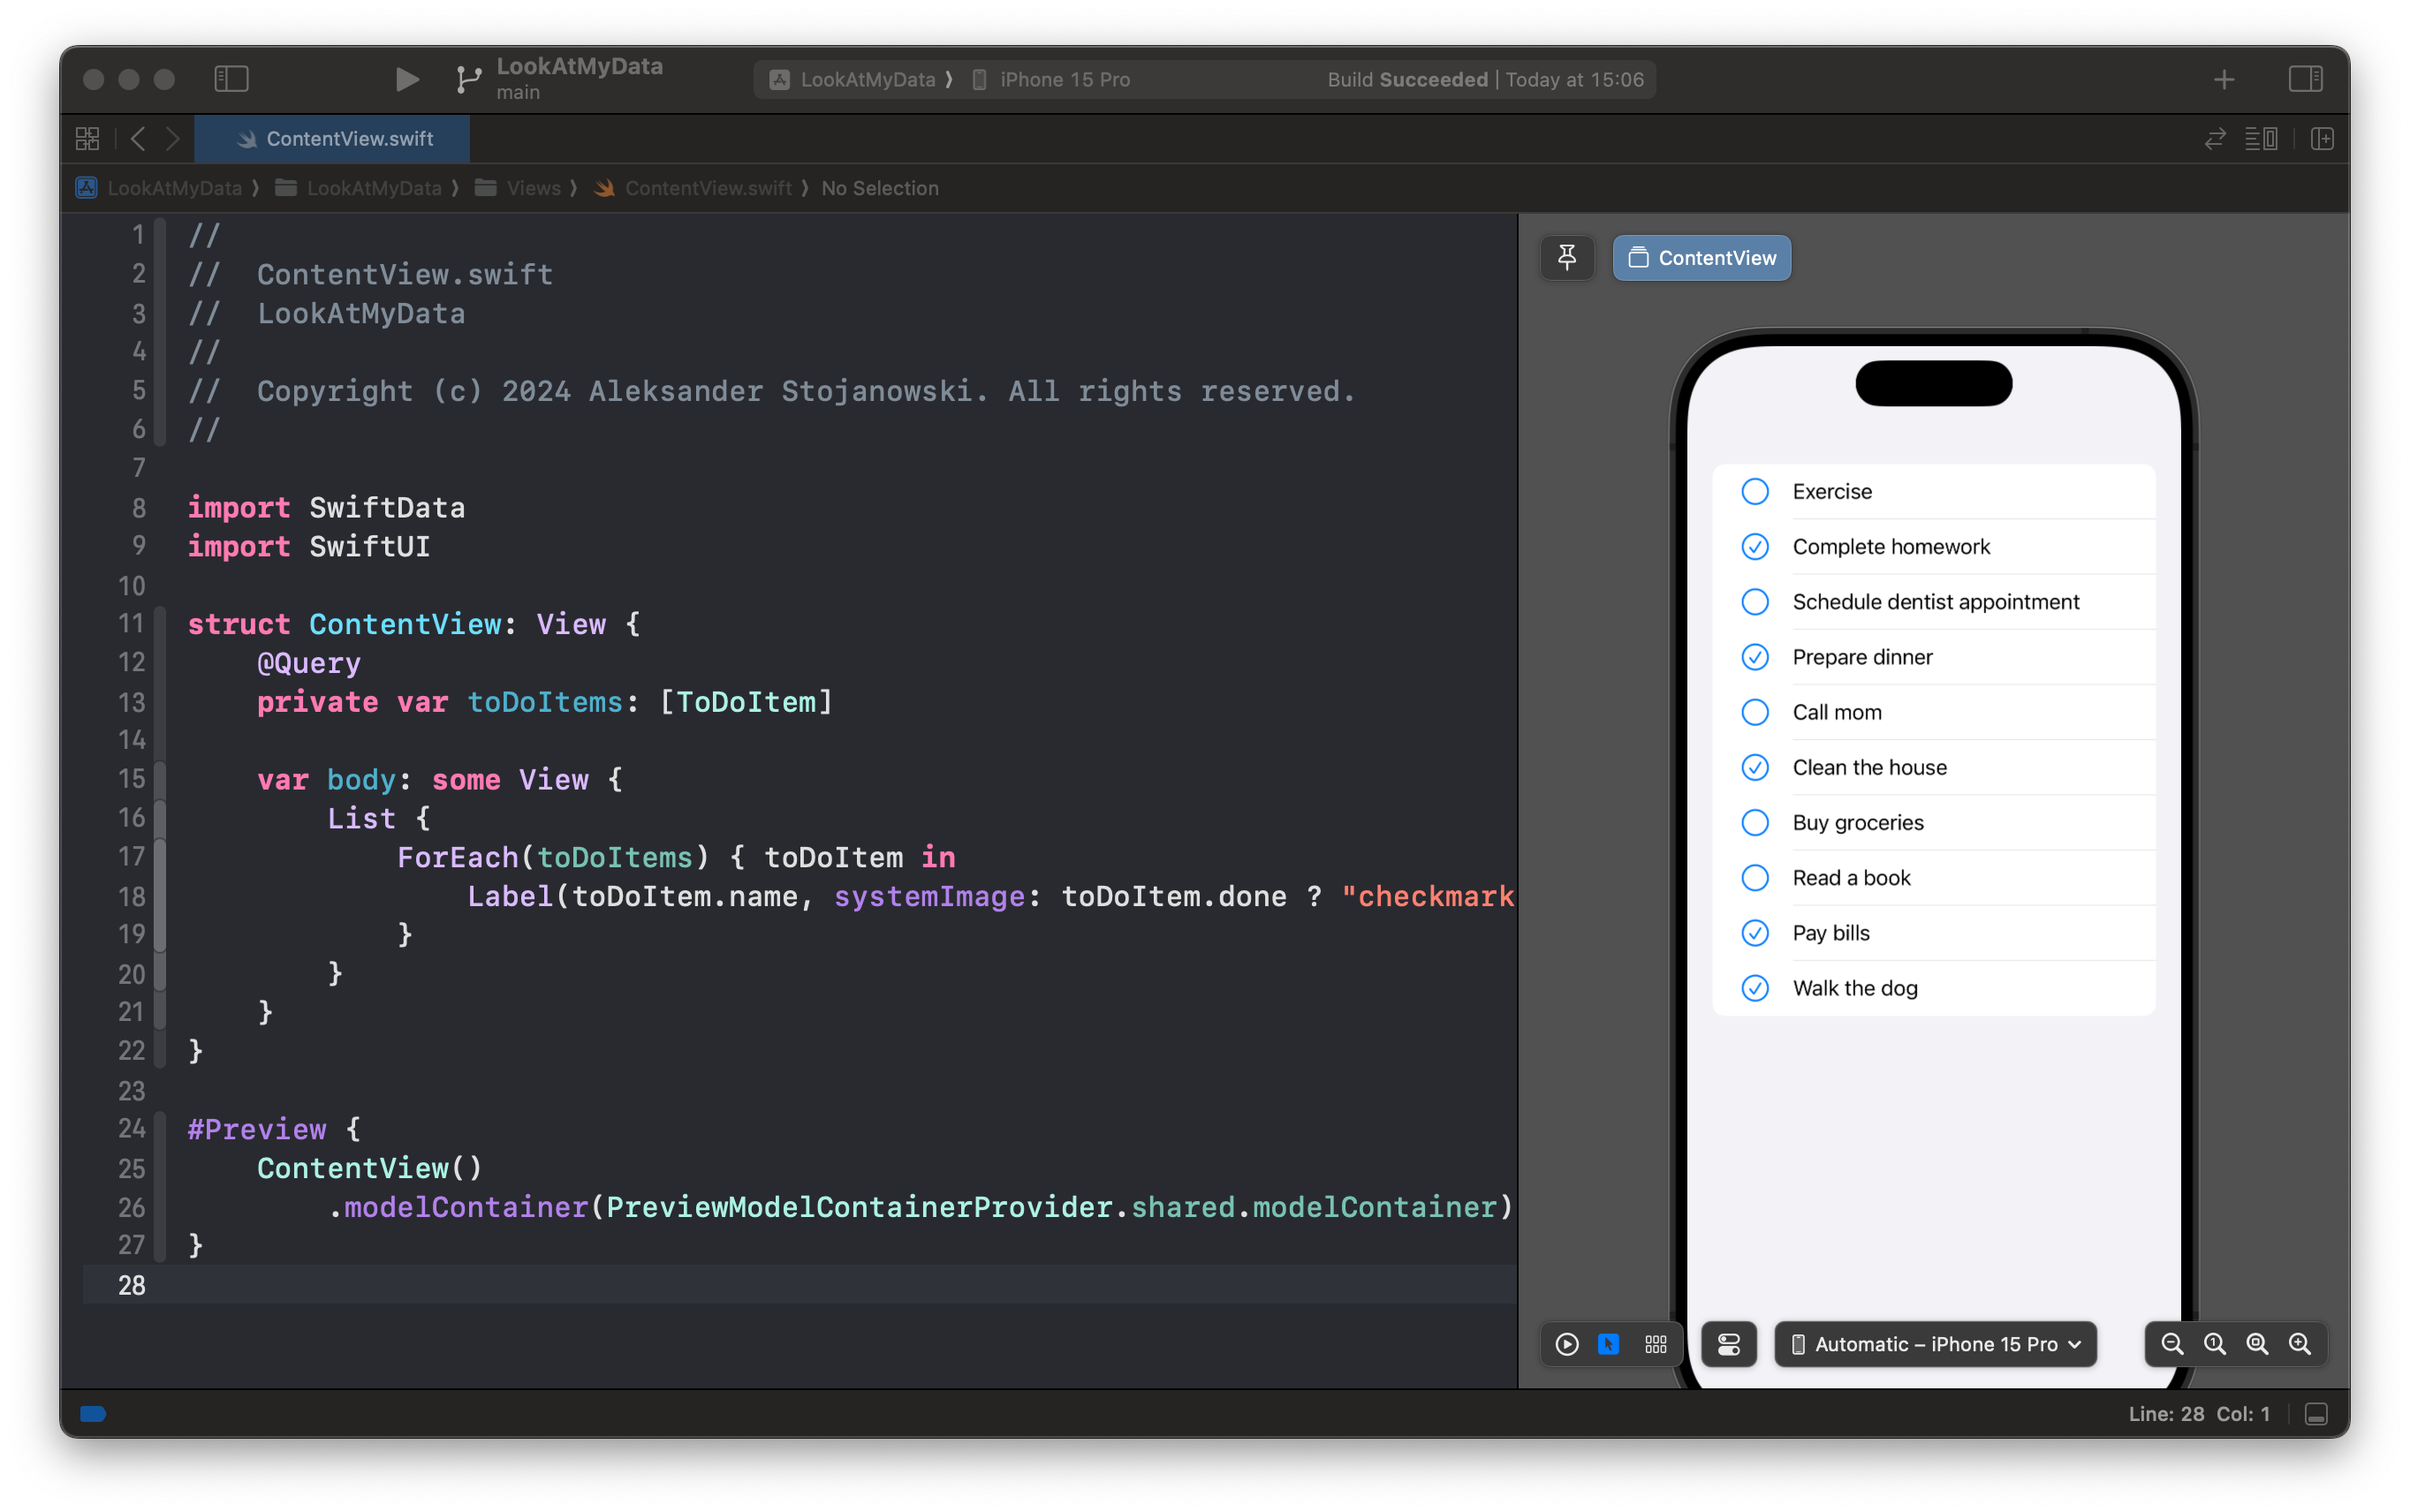
Now we have everything we need to actually use previews with stub data, as you can see in the image below.

What Else Could Be Done?
Functionally, everything is in place. Nonetheless, I like adding some helpers to my container provider that make working with previews even more straightforward.
ModelContext
We access the ModelContext through our ModelContainer instance, and we do it exactly once in this example. With a more complex data schema, we'd need to access it multiple times during initialization alone - not to mention the times we'd need access to the context inside a Preview for some delegate action or something similar. To make our code more readable, we just need to create a property inside the PreviewModelContainerProvider.
@MainActor
final class PreviewModelContainerProvider {
    ...
    var modelContext: ModelContext {
        modelContainer.mainContext
    }

    private init() {
        ...
        for toDoItem in toDoItems {
            // Don't forget to use it instead of modelContainer.mainContext
            modelContext.insert(toDoItem)
        }
        ...
    }
}
Model Instances
Some of the views in the application will use only a single instance of our models and will consume it using a constructor. In that case, we could create a property to access such models from our provider. We have all we need to return such a model, but we don't retain that data. Fortunately, to change that, we just need to create a property in the provider class and store the loaded data in it instead of a local variable.
@MainActor
final class PreviewModelContainerProvider {
    ...
    private let toDoItems: [ToDoItem]
    ...
    private init() {
        ...
        // Store loaded data to property instead of local variable
        toDoItems = try JSONDecoder().decode([ToDoItem].self, from: previewData)
        ...
    }
}
Now all that's left to do is to create a property to access a single ToDoItem instance.
var toDoItem: ToDoItem {
    guard let item = toDoItems.first else {
        fatalError("There is no ToDoItem data loaded")
    }
    return item
}
We could force unwrap the toDoItems.first element, but I want to make sure we get a proper error message in case something went wrong during the initialization. Better safe than sorry, as they say.
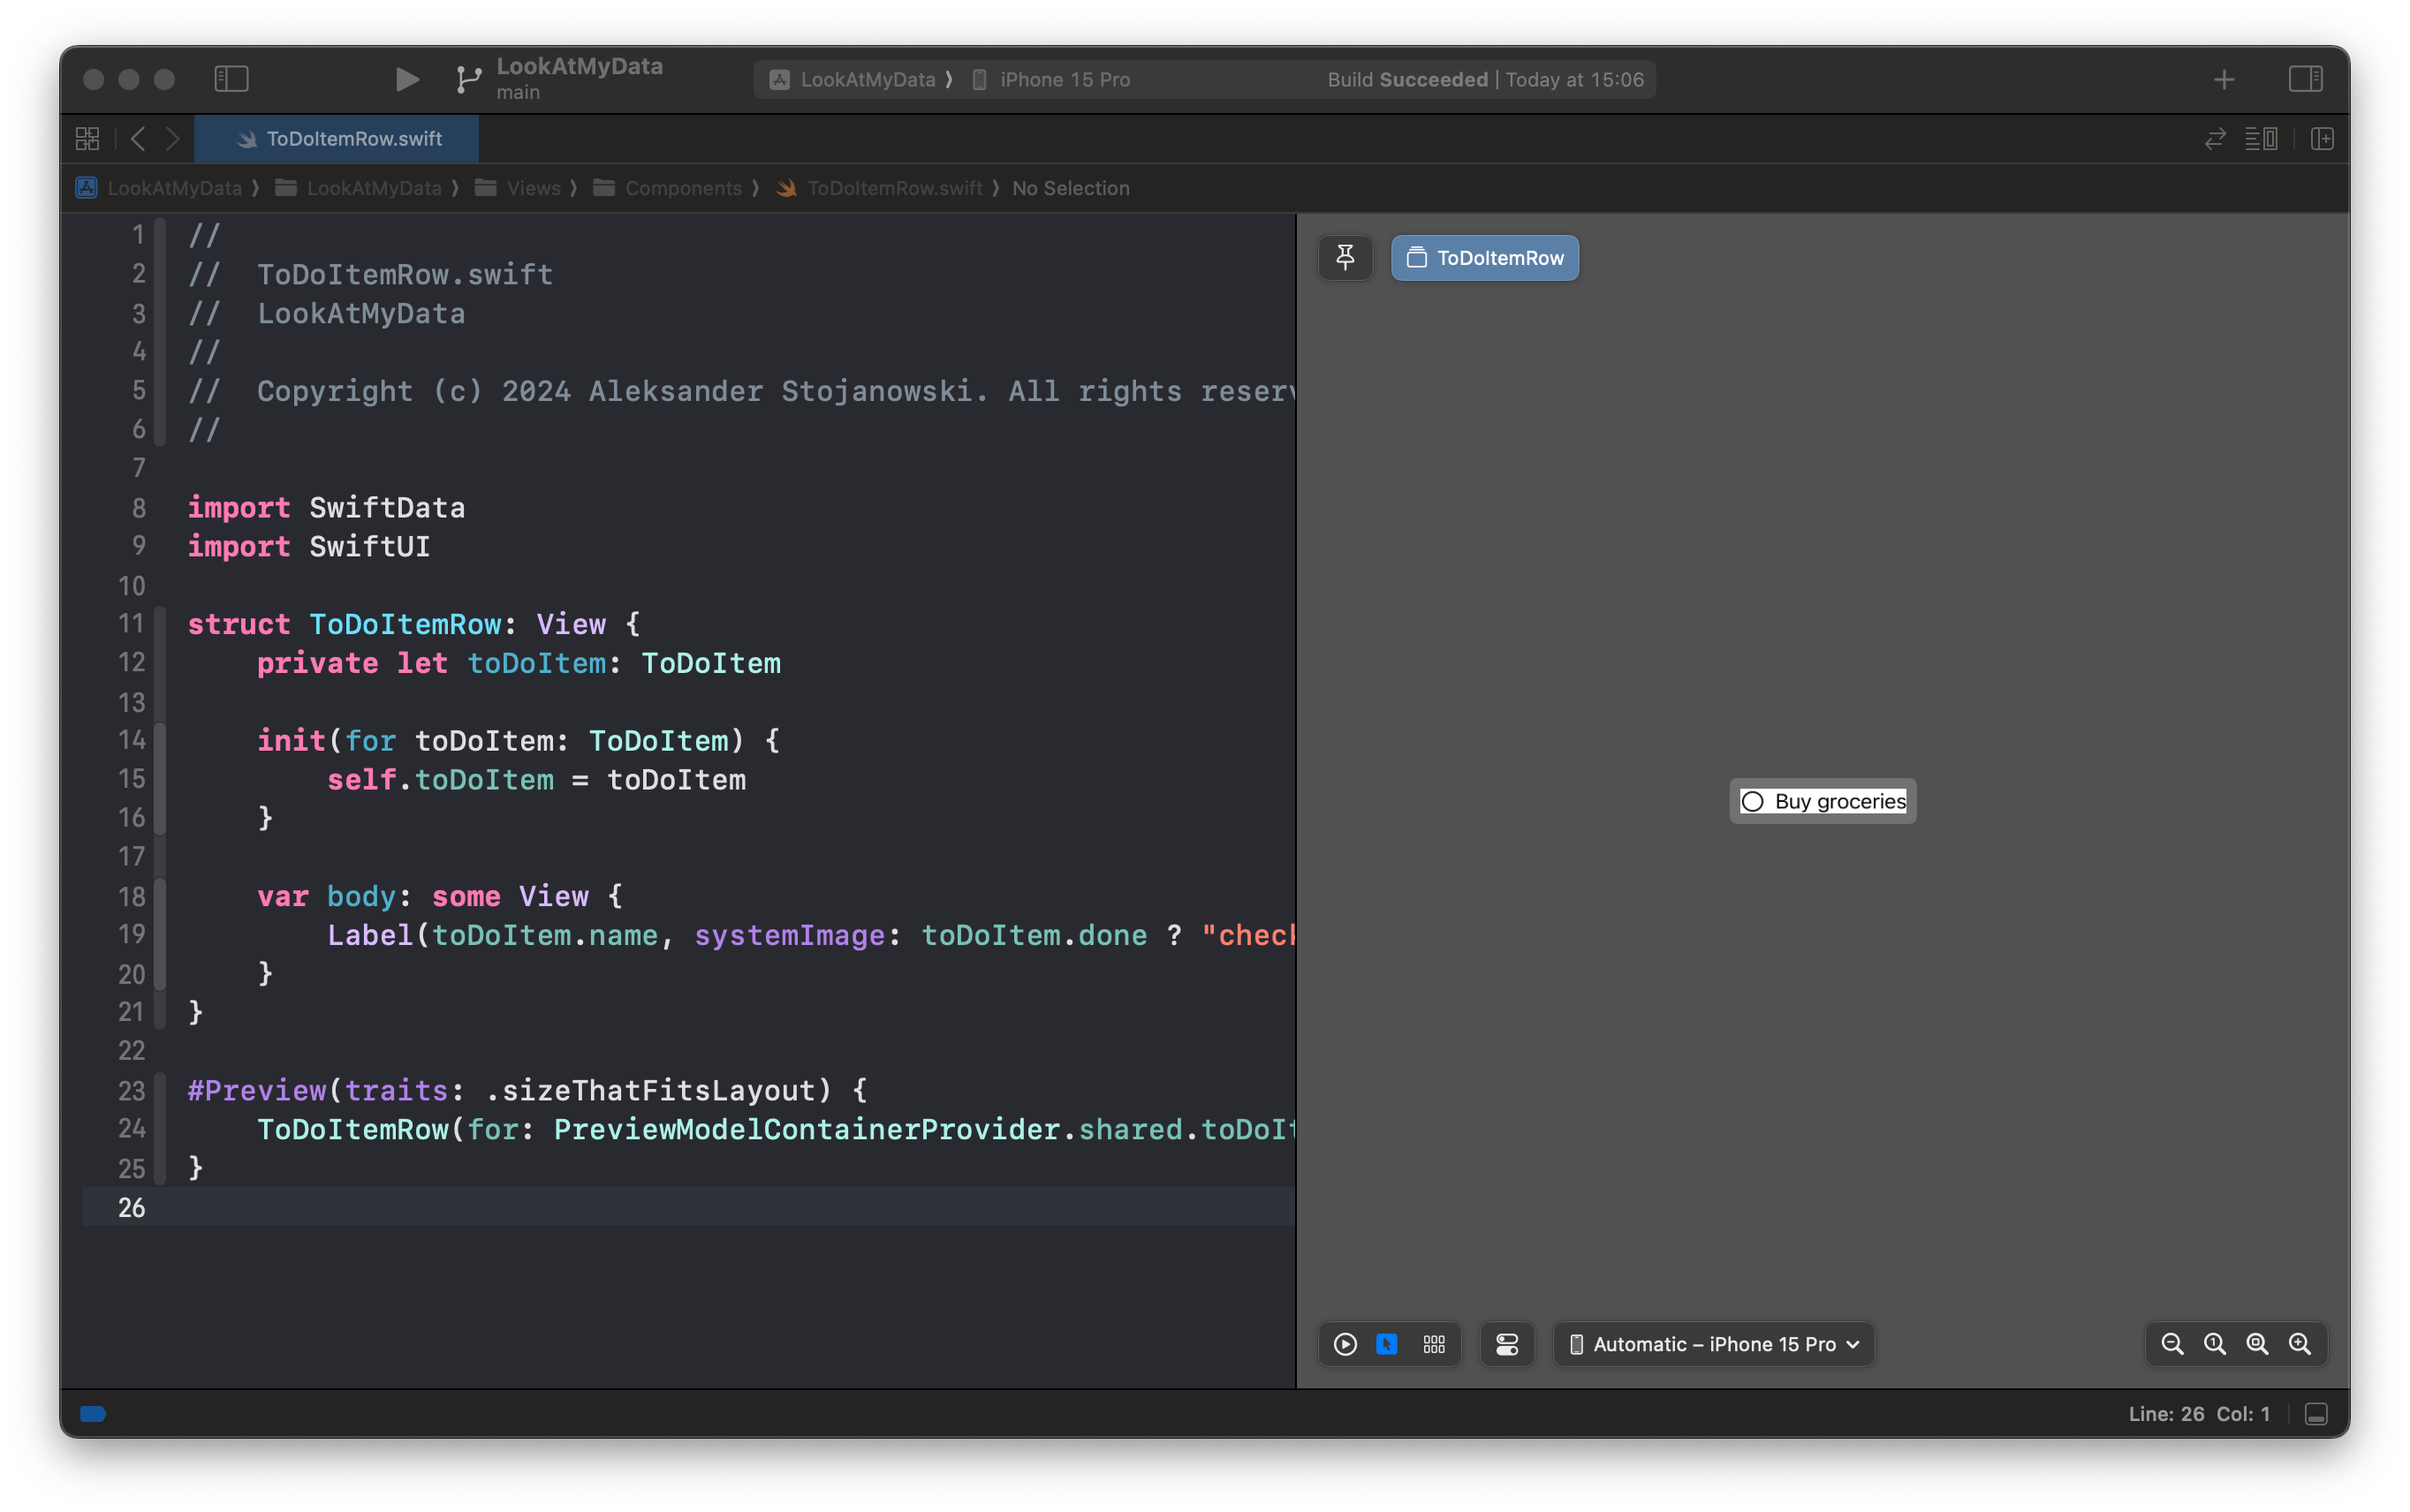
Let's make use of our newly created property and extract the rows showing ToDoItems to a separate view.
import SwiftData
import SwiftUI

struct ToDoItemRow: View {
    private let toDoItem: ToDoItem

    init(for toDoItem: ToDoItem) {
        self.toDoItem = toDoItem
    }

    var body: some View {
        Label(toDoItem.name, systemImage: toDoItem.done ? "checkmark.circle" : "circle")
    }
}

#Preview(traits: .sizeThatFitsLayout) {
    ToDoItemRow(for: PreviewModelContainerProvider.shared.toDoItem)
}

Final Thoughts
With everything we've created here, we can easily use Previews inside our application and effortlessly add new models as the application grows, since everything we need is in just one place. We can also easily modify stub data, as it's stored in a separate, easy-to-read JSON file.
Is this the best solution? It might be, or it might not be. It all depends on your preferences. I wanted to show you how I like to work with Previews in my applications, as I found it challenging to configure everything correctly when I first started working with SwiftData.
The whole solution can be found on my GitHub, and each section of this article is a separate commit in the repository.
Subscribe to my newsletter
Read articles from Aleksander Stojanowski directly inside your inbox. Subscribe to the newsletter, and don't miss out.
Written by

Aleksander Stojanowski
Aleksander Stojanowski
Hi, I'm Olek - short for Aleksander if you're outside of Poland. I'm a software engineer with over 9 years of professional experience, plus many more as an amateur developer. I'm based in Poland, where I currently work as a graphics driver software engineer by day. By night, I'm a passionate Apple platforms developer, constantly exploring new ways to create and innovate.