Demo: Integration of Azure NAT Gateway with Load Balancer
 Mo Abdullah
Introduction
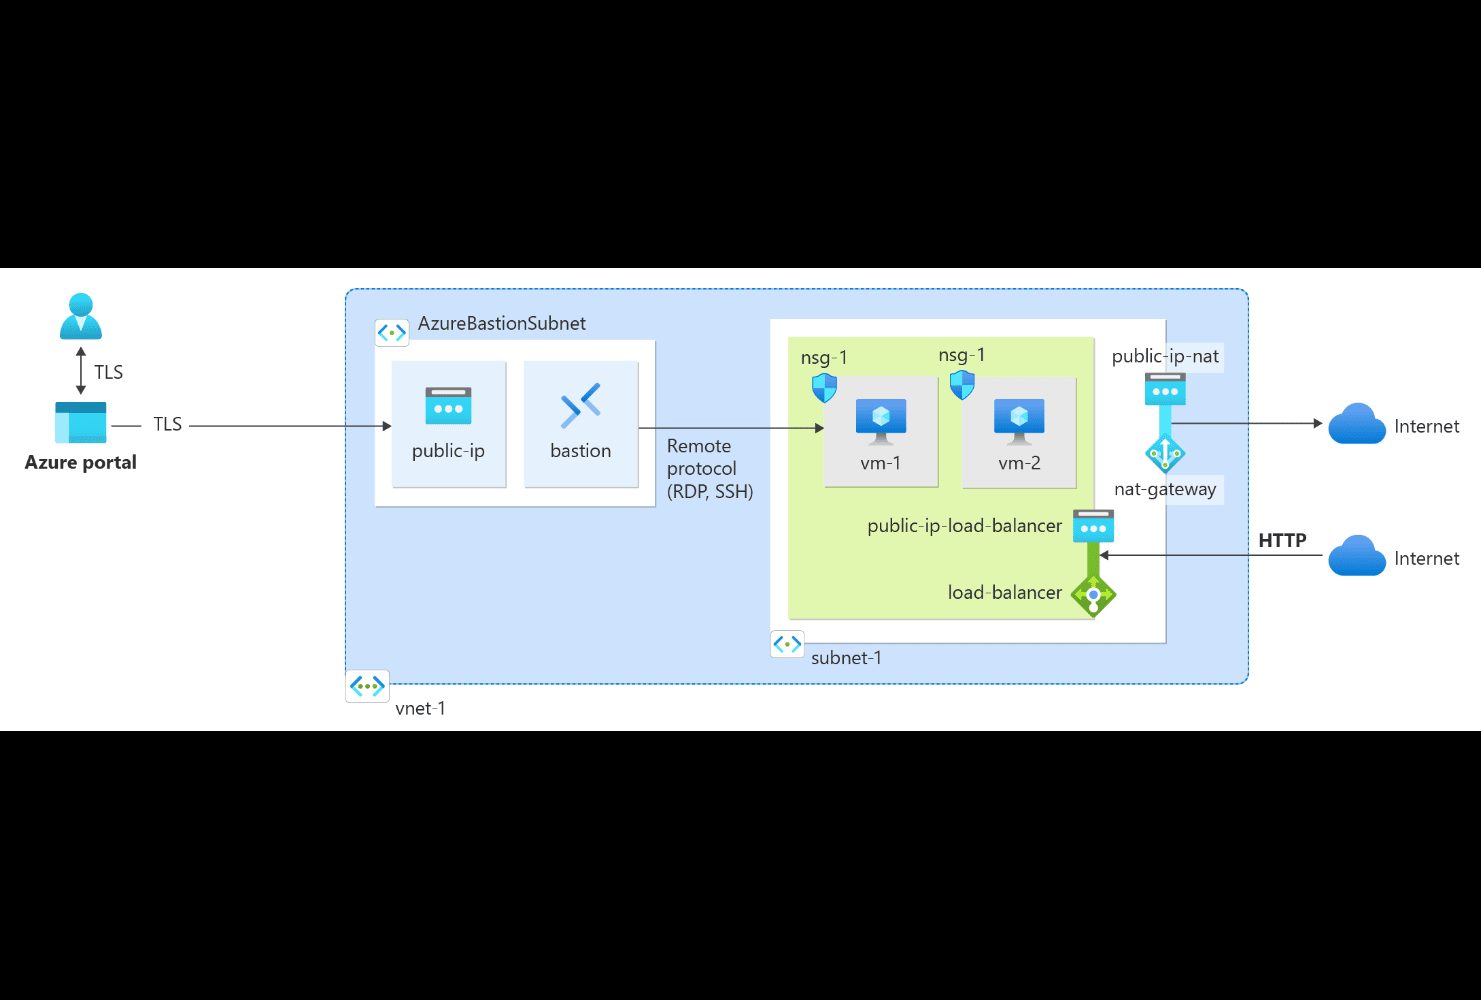
Efficiently managing both inbound and outbound traffic in a cloud environment is essential for maintaining robust and secure infrastructure. Azure's NAT Gateway is designed to handle outbound internet traffic, ensuring that resources in your virtual network can access external services securely. On the other hand, the Azure Load Balancer primarily manages inbound traffic but can also be used for certain outbound scenarios. In this article, we’ll explore how to integrate Azure NAT Gateway with a Load Balancer using Terraform. Through a detailed step-by-step demo, including Terraform code snippets, you'll learn how to set up this integrated solution and validate its configuration in your own environment. But before we dive into the demo, let’s first review Azure NAT Gateway.
Understanding Azure NAT Gateway
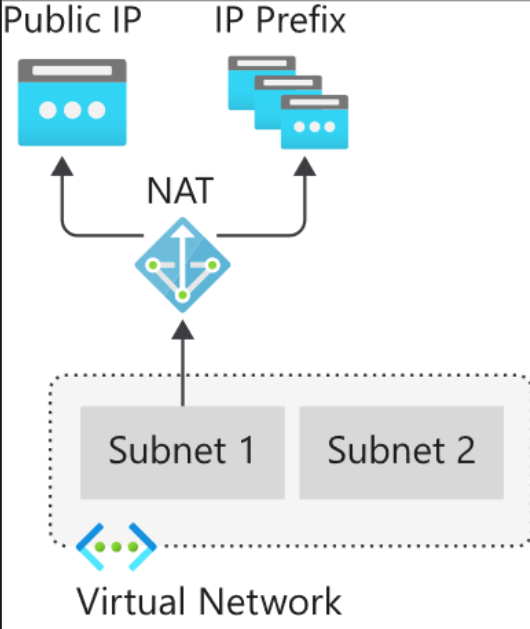
Azure NAT Gateway is a fully managed network address translation service that provides secure and scalable outbound internet connectivity for virtual machines in a virtual network. By mapping private IP addresses to public IP addresses or IP prefixes, NAT Gateway allows VMs to access the internet while keeping their private IPs hidden from external networks.

In a typical setup, NAT Gateway is associated with a subnet within a virtual network. All outbound traffic from VMs within this subnet is routed through the NAT Gateway, which assigns it a public IP address or an IP from a public prefix. This ensures that external resources see a consistent public IP address, even if the originating VM's private IP changes.
Integrating Azure NAT Gateway with Load Balancer
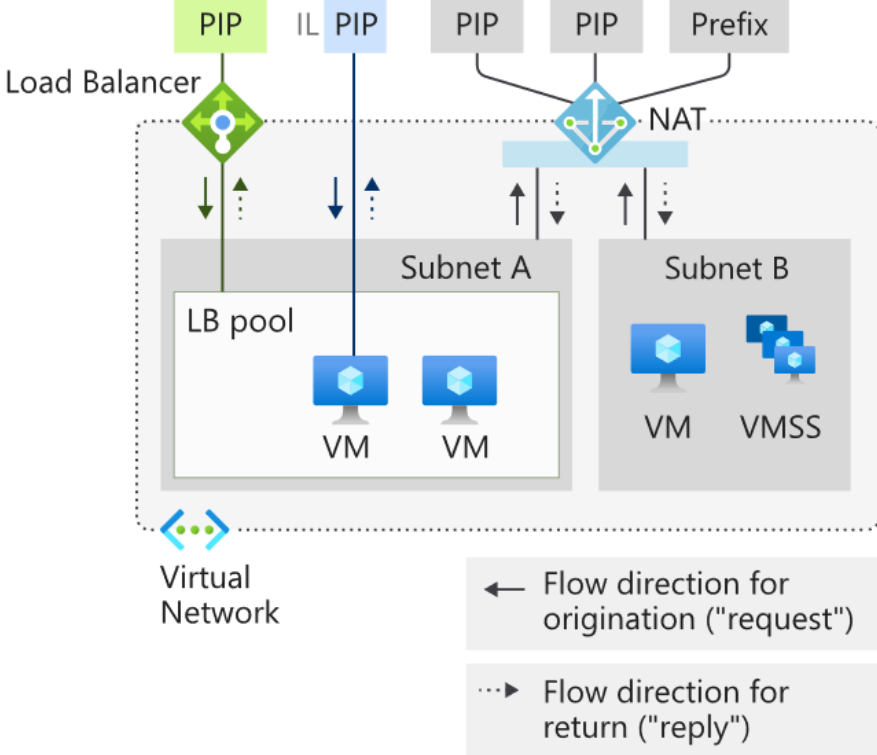
The integration of NAT Gateway with a public load balancer brings together the best of both services. While the NAT Gateway handles outbound traffic, the load balancer manages inbound traffic, distributing it efficiently across multiple VMs or VM scale sets.

This configuration ensures that both outbound and inbound traffic is managed effectively, enhancing the overall performance and security of the network. By utilizing public IP prefixes with NAT Gateway, the setup also allows for greater scalability, supporting dynamic workloads with ease.
Demo: Building the Infrastructure with Terraform
In this section, we'll walk through the steps to build a fully integrated Azure NAT Gateway and Load Balancer setup using Terraform. We'll provision a virtual network, VM scale sets, NAT gateway, load balancer, network security groups, and validate the setup with connectivity checks. The Terraform code snippets provided will guide you through the process.

- Create a Virtual Network
Let's start by creating a Virtual Network that will serve as the foundation for our infrastructure, providing isolated networking for our resources.
# Terraform code snippet to create a virtual network and subnets.
resource "azurerm_virtual_network" "vnet-app" {
  name                = "vnet-app"
  resource_group_name = azurerm_resource_group.rg.name
  location            = azurerm_resource_group.rg.location
  address_space       = ["10.0.0.0/16"]
  dns_servers         = null
}

resource "azurerm_subnet" "subnet-app" {
  name                 = "subnet-app"
  resource_group_name  = azurerm_virtual_network.vnet-app.resource_group_name
  virtual_network_name = azurerm_virtual_network.vnet-app.name
  address_prefixes     = ["10.0.0.0/24"]
}

resource "azurerm_subnet" "subnet-bastion" {
  name                 = "AzureBastionSubnet"
  resource_group_name  = azurerm_virtual_network.vnet-app.resource_group_name
  virtual_network_name = azurerm_virtual_network.vnet-app.name
  address_prefixes     = ["10.0.1.0/24"]
}
- Create a Virtual Machine Scale Set
Let's now deploy a Virtual Machine Scale Set (VMSS) with a script that automatically installs and configures an Nginx application, ensuring the app is ready to serve traffic as the scale set dynamically adjusts to demand.
# Terraform code snippet to create a VM scale set with a script to deploy an Nginx application.
resource "azurerm_linux_virtual_machine_scale_set" "vmss" {
  name                            = "vmss-app"
  resource_group_name             = azurerm_resource_group.rg.name
  location                        = azurerm_resource_group.rg.location
  instances                       = 3
  sku                             = "Standard_B2ats_v2"
  zones                           = ["1", "2", "3"]
  disable_password_authentication = false
  admin_username                  = "azureuser"
  admin_password                  = "Azure12345@"

  custom_data = filebase64("./install-webapp.sh")

  os_disk {
    caching              = "ReadWrite"
    storage_account_type = "Standard_LRS"
  }

  source_image_reference {
    publisher = "Canonical"
    offer     = "0001-com-ubuntu-server-jammy"
    sku       = "22_04-lts"
    version   = "latest"
  }

  network_interface {
    name                      = "nic-vmss"
    primary                   = true
    enable_ip_forwarding      = false
    network_security_group_id = null

    ip_configuration {
      name                                         = "internal"
      primary                                      = true
      subnet_id                                    = azurerm_subnet.subnet-app.id
      load_balancer_backend_address_pool_ids       = [azurerm_lb_backend_address_pool.backend-pool.id]
      application_gateway_backend_address_pool_ids = null
      load_balancer_inbound_nat_rules_ids          = null
    }
  }
}
- Create a NAT Gateway
To manage outbound traffic, we set up a NAT Gateway, enabling our VMs to access the internet securely with a public IP address.
# Terraform code snippet to create a NAT gateway and associate it with a subnet.
resource "azurerm_nat_gateway" "nat-gateway" {
  name                    = "nat-gateway"
  location                = azurerm_resource_group.rg.location
  resource_group_name     = azurerm_resource_group.rg.name
  sku_name                = "Standard"
  idle_timeout_in_minutes = 10
  zones                   = ["1"] # Only one AZ can be defined.
}

resource "azurerm_subnet_nat_gateway_association" "association" {
  subnet_id      = azurerm_subnet.subnet-app.id
  nat_gateway_id = azurerm_nat_gateway.nat-gateway.id
}
- Create a Public IP Address & IP Prefix for NAT Gateway
Now, public IP address needs to be created and associated with our NAT Gateway, allowing it to map internal IP addresses to the public internet.
# Terraform code snippet to create a public IP address for the NAT gateway.
resource "azurerm_public_ip" "pip-nat-gateway" {
  name                = "pip-nat-gateway"
  location            = azurerm_resource_group.rg.location
  resource_group_name = azurerm_resource_group.rg.name
  allocation_method   = "Static"
  ip_version          = "IPv4" # "IPv6"
  sku                 = "Standard"
  zones               = ["1"]
}

resource "azurerm_nat_gateway_public_ip_association" "natgw-pip-association" {
  nat_gateway_id       = azurerm_nat_gateway.nat-gateway.id
  public_ip_address_id = azurerm_public_ip.pip-nat-gateway.id
}

# Terraform code snippet to create a public IP Prefix for the NAT gateway.
resource "azurerm_public_ip_prefix" "pip-prefix-nat-gateway" {
  name                = "pip-prefix-nat-gateway"
  location            = azurerm_resource_group.rg.location
  resource_group_name = azurerm_resource_group.rg.name
  sku                 = "Standard"
  ip_version          = "IPv4" # "IPv6"
  prefix_length       = 29     # between 0 (4,294,967,296 addresses) and 31 (2 addresses)
  zones               = ["1"]  # same zone as the NAT Gateway
}

resource "azurerm_nat_gateway_public_ip_prefix_association" "natgw-pip-prefix-association" {
  nat_gateway_id      = azurerm_nat_gateway.nat-gateway.id
  public_ip_prefix_id = azurerm_public_ip_prefix.pip-prefix-nat-gateway.id
}
- Create an Azure Load Balancer
Next up, we deploy an Azure Load Balancer to distribute incoming HTTP traffic evenly across our VM instances, ensuring high availability and fault tolerance.
# Terraform code snippet to create a public load balancer and configure its required settings.
resource "azurerm_lb" "lb-public" {
  name                = "load-balancer-app"
  location            = azurerm_resource_group.rg.location
  resource_group_name = azurerm_resource_group.rg.name
  sku                 = "Standard" # Standard and Gateway. Defaults to Basic
  sku_tier            = "Regional" # Global and Regional. Defaults to Regional

  frontend_ip_configuration {
    name                 = "pip"
    public_ip_address_id = azurerm_public_ip.pip-lb.id
  }
}

resource "azurerm_lb_backend_address_pool" "backend-pool" {
  name            = "backend-pool"
  loadbalancer_id = azurerm_lb.lb-public.id
}

resource "azurerm_lb_rule" "lb-rule" {
  name                           = "lb-rule"
  loadbalancer_id                = azurerm_lb.lb-public.id
  protocol                       = "Tcp"
  frontend_port                  = 80
  backend_port                   = 80
  frontend_ip_configuration_name = azurerm_lb.lb-public.frontend_ip_configuration.0.name
  idle_timeout_in_minutes        = 4 # between 4 and 30 minutes. Defaults to 4 minutes
  probe_id                       = azurerm_lb_probe.probe-http.id
  backend_address_pool_ids       = [azurerm_lb_backend_address_pool.backend-pool.id]
  load_distribution              = "Default" # Default, SourceIP, SourceIPProtocol. Defaults to Default
  disable_outbound_snat          = true      # Defaults to false
  enable_tcp_reset               = false
  enable_floating_ip             = false # Defaults to false
}

resource "azurerm_lb_probe" "probe-http" {
  name                = "probe-http"
  loadbalancer_id     = azurerm_lb.lb-public.id
  protocol            = "Http"
  port                = 80
  request_path        = "/"
  probe_threshold     = 1 #  Possible values range from 1 to 100. The default value is 1
  interval_in_seconds = 5 # The default value is 15, the minimum value is 5 seconds.
  number_of_probes    = 2 # failed probe attempts after which the backend endpoint is removed from rotation. Default to 2
}

resource "azurerm_lb_outbound_rule" "outbound-rule" {
  name                    = "OutboundRule"
  loadbalancer_id         = azurerm_lb.lb-public.id
  protocol                = "All" # Udp, Tcp or All
  backend_address_pool_id = azurerm_lb_backend_address_pool.backend-pool.id
  idle_timeout_in_minutes = 4

  frontend_ip_configuration {
    name = azurerm_lb.lb-public.frontend_ip_configuration.0.name
  }
}
- Create a Public IP Address for Load Balancer
The Load Balancer requires its own public IP address to handle incoming internet traffic to the Nginx application.
# Terraform code snippet to create a public IP address for the load balancer.
resource "azurerm_public_ip" "pip-lb" {
  name                = "pip-loadbalancer"
  location            = azurerm_resource_group.rg.location
  resource_group_name = azurerm_resource_group.rg.name
  allocation_method   = "Static"
  sku                 = "Standard"
  zones               = ["1", "2", "3"]
}
- Create a Network Security Group (NSG)
Let's configure a Network Security Group to allow HTTP traffic to reach our Nginx application, while also securing other aspects of our network.
# Terraform code snippet to create an NSG to allow traffic to the Nginx application on the VM scale set.
resource "azurerm_network_security_group" "nsg" {
  name                = "nsg-subnet-app"
  location            = azurerm_resource_group.rg.location
  resource_group_name = azurerm_resource_group.rg.name
}

resource "azurerm_network_security_rule" "rule-allow-http" {
  resource_group_name          = azurerm_resource_group.rg.name
  network_security_group_name  = azurerm_network_security_group.nsg.name
  name                         = "rule-allow-http"
  access                       = "Allow"
  priority                     = 1000
  direction                    = "Inbound"
  protocol                     = "Tcp"
  source_address_prefix        = "Internet"
  source_port_range            = "*"
  destination_address_prefixes = azurerm_subnet.subnet-app.address_prefixes
  destination_port_range       = "80"
}

resource "azurerm_subnet_network_security_group_association" "nsg_association" {
  subnet_id                 = azurerm_subnet.subnet-app.id
  network_security_group_id = azurerm_network_security_group.nsg.id
}
- Create an Azure Bastion Host
To securely manage and connect to the virtual machines within our VNet, we need to set up an Azure Bastion Host, enabling remote access via RDP and SSH without exposing the VMs directly to the internet.
# Terraform code snippet to create an Azure Bastion host for secure access to VMs in the virtual network.
resource "azurerm_public_ip" "pip-bastion" {
  name                = "pip-bastion"
  resource_group_name = azurerm_resource_group.rg.name
  location            = azurerm_resource_group.rg.location
  allocation_method   = "Static"
  sku                 = "Standard"
}

resource "azurerm_bastion_host" "bastion" {
  name                   = "bastion"
  resource_group_name    = azurerm_resource_group.rg.name
  location               = azurerm_resource_group.rg.location
  sku                    = "Basic" # "Standard" # "Basic", "Developer"
  copy_paste_enabled     = true
  file_copy_enabled      = false
  shareable_link_enabled = false
  tunneling_enabled      = false
  ip_connect_enabled     = false

  ip_configuration {
    name                 = "configuration"
    subnet_id            = azurerm_subnet.subnet-bastion.id
    public_ip_address_id = azurerm_public_ip.pip-bastion.id
  }
}
- Validate Outbound Connectivity
Now that everything is set up, let's validate that our VMs can successfully reach the internet through the NAT Gateway.
Navigate to the
vmss-app, and then click into one of the VMs.On the
Overviewpage, selectConnect, then select theBastiontab.Select
Use Bastion.Enter the username and password used in terraform file for VMSS. Select
Connect.In the bash prompt, enter the following command:
curl ifconfig.me
- Verify the IP address returned by the command matches the public IP address or IP Prefix range of the NAT gateway.
# Output
azureuser@vm-1:~$ curl ifconfig.me
74.234.147.173
- Validate Inbound Connectivity
Finally, it's time to test inbound connectivity by accessing the Nginx application deployed on the VMs through the Load Balancer's public IP address, ensuring that our setup is fully operational.
- Copy the
IP addressof theLoad Balancerand paste it in the search bar of your browser.
# Results on the Browser
Hi from VM: vmss-app000000, with Private IP addr: 10.0.0.4
Hi from VM: vmss-app000004, with Private IP addr: 10.0.0.12
- We can see Private IP addresses of both VMs by
refreshingthe browser's tab.
Conclusion
Integrating Azure NAT Gateway with a Load Balancer using Terraform provides a powerful, scalable, and secure solution for managing both inbound and outbound traffic in your cloud environment. By following the steps outlined in this article, you can easily deploy and validate this setup, ensuring that your infrastructure is ready to handle dynamic workloads with ease. With the provided Terraform code snippets, you'll have a practical guide to implementing this configuration in your own projects, leveraging the full potential of Azure's networking capabilities.
Subscribe to my newsletter
Read articles from Mo Abdullah directly inside your inbox. Subscribe to the newsletter, and don't miss out.
Written by
