Multi-Container Pods Kubernetes: Setup, Configuration, and Troubleshooting
 SHRIRAM SAHU
Introduction
In today’s blog, we’ll dive deep into the concepts of multi-container Pods, environment variables in Kubernetes, and how to create and utilize init containers within a Pod. These are essential components of Kubernetes, helping you manage your application’s lifecycle and configuration more effectively.
What are Environment Variables in Kubernetes, and How Do We Use Them?
Environment variables in Kubernetes are key-value pairs that can be set within a container's environment. They allow you to inject configuration data, secrets, or other necessary information into your containers without hardcoding them. This ensures flexibility and portability of your applications across different environments.
Environment variables can be defined in the Pod specification using the env field in the YAML file. Here’s an example:
env:
- name: FIRSTNAME
  value: "piyush"

Introduction to Multi-Container Pods in Kubernetes
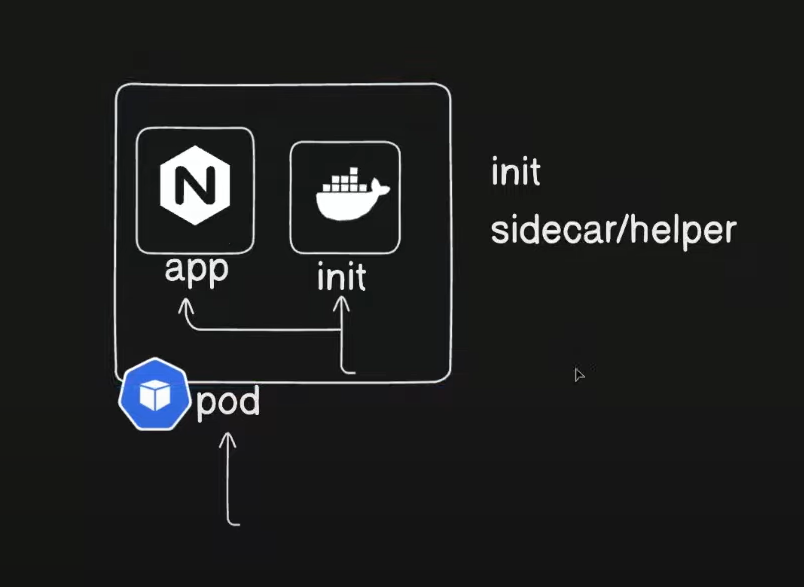
In Kubernetes, a Pod is the smallest deployable unit that can contain one or more containers. Multi-container Pods share the same network namespace and storage volumes, which allows containers to communicate via localhost and share data through shared volumes.
Multi-container Pods are useful for closely related processes that need to share data, or where one container acts as a sidecar, performing tasks such as logging, monitoring, or proxying.
How to Create an Init Container Inside a Pod
Init containers run before the main containers in a Pod. They are used for tasks like setting up the environment, performing preconditions, or initializing configurations. Init containers are defined separately from the main containers and run sequentially.
Commands and Arguments in Kubernetes Pod YAML
In Kubernetes, the command and args fields in a Pod’s YAML file allow you to override the default command and arguments that a container runs. The command field corresponds to the entrypoint of the container, and args are the arguments passed to that entrypoint.
This task will walk you through the steps of creating a multi-container Pod, setting environment variables, adding an init container, and defining custom commands and arguments within your Pod YAML.
Here's a step-by-step guide to creating a multi-container Pod using the provided YAML configuration, along with troubleshooting tips:
Step-by-Step Guide to Creating a Multi-Container Pod
1. Create the YAML File
Save the following YAML configuration to a file named webapp-pod.yaml:
apiVersion: v1
kind: Pod
metadata:
  name: myapp
  labels:
    app.kubernetes.io/name: MyApp
spec:
  containers:
  - name: myapp-container
    image: busybox:1.28
    env:
    - name: FIRSTNAME
      value: "Shriram"
    command: ['sh', '-c', 'echo The app is running! && sleep 3600']
  initContainers:
  - name: init-myservice
    image: busybox:1.28
    command: ['sh', '-c']
    args: ['until nslookup myservice.default.svc.cluster.local; do echo waiting for myservice; sleep 2; done']
  - name: init-mydb
    image: busybox:1.28
    command: ['sh', '-c']
    args: ['until nslookup mydb.default.svc.cluster.local; do echo waiting for mydb; sleep 2; done']
2. Apply the YAML Configuration
Run the following command to create the Pod:
kubectl apply -f webapp-pod.yaml.yaml
3. Verify the Pod Creation
Check the status of the Pod:
kubectl get pods

You should see myapp-pod listed. If it's not in the Running state, there might be an issue.
4. Describe the Pod for Details
Get detailed information about the Pod:
kubectl describe pod myapp
Check the Events section for any errors or issues with the Pod's initialization or execution.
5. Troubleshooting
Pod Status:
CrashLoopBackOffIf the Pod is in a
CrashLoopBackOffstate, check the logs for themyapp-container:kubectl logs myapp -c myapp-container
This will show the output of the container’s command. If there are issues with the command or environment variables, it will be evident here.
Init Containers Issues
If init containers are failing, check their logs:
  kubectl logs myapp -c init-myservice
  kubectl logs myapp -c init-mydb

Ensure that the DNS names
myservice.default.svc.cluster.localandmydb.default.svc.cluster.localare correct and resolvable within your cluster.
To create the deployments and services imperatively, use the kubectl command line tool to create and expose your resources without YAML files. Here’s how you can do it:
1. Create Deployments
To create the myservice and mydb deployments, use the following commands:
# Create deployment for myservice
kubectl create deploy myservice --image nginx --port 80

# Create deployment for mydb
kubectl create deploy mydb --image redis --port 80

2. Expose Services
To create and expose the myservice and mydb deployments as services, use the following commands:
# Create ClusterIP service for myservice
kubectl expose deploy myservice --name myservice --port 80

# Create ClusterIP service for mydb
kubectl expose deploy mydb --name mydb --port 80

3. Verify Deployments and Services
Check the status of your deployments and services to ensure they were created successfully:
kubectl get deployments
kubectl get services

4. Testing and Troubleshooting
Check Pod IP Addresses:
To get the IP addresses of the pods, use:
kubectl get pods
Verify Service Connectivity:
To test connectivity between the pods, use the
kubectl execcommand to enter a pod and perform acurlorwgetagainst the service names:kubectl exec -it <pod-name> -- sh curl http://myservice curl http://mydb
5. Clean Up
To delete the deployments and services:
kubectl delete deployment myservice
kubectl delete deployment mydb
kubectl delete service myservice
kubectl delete service mydb
This approach uses imperative commands to create and manage deployments and services, making it quick and straightforward without needing to write YAML files.
This will remove the Pod and all its associated containers.
By following these steps, you should be able to successfully create and troubleshoot a multi-container Pod in Kubernetes.
Reference
Visual Insight: Day 11 Multi Container Pod
Conclusion
In today’s blog, we explored the essential Kubernetes features of multi-container Pods, environment variables, and init containers. By understanding and utilizing these components, you can better manage and scale your applications, ensuring a more robust and flexible Kubernetes environment. Experiment with the provided examples to see how these features can enhance your deployments and streamline your application's lifecycle management.
Subscribe to my newsletter
Read articles from SHRIRAM SAHU directly inside your inbox. Subscribe to the newsletter, and don't miss out.
Written by
