Seamless RazorPay Integration: Mastering WebHooks for Reliable Payment Processing
 Avik Mukherjee
Recently, my Project encountered a snag concerning RazorPay payments integration. Initially, I integrated Razorpay to facilitate payments and subsequently update the paid order amounts in our database using the data provided by Razorpay. Initially, this data flowed from the front end to the back end via API calls.
However, I encountered an issue where, due to network glitches or other unforeseen problems, the front end sometimes failed to trigger the API call to send the data. As a result, even though payments were made, orders remained un-updated, posing a significant challenge to our project’s functionality.
To address this issue, we implemented a webhook solution. Now, you might be wondering, “What exactly is a webhook, and how does it solve this problem?”
What is WebHook?
Now, let's imagine you are at your favourite fast food chain. Now suppose you ordered your favourite meal. Now instead of the yelling to make you know that your order has been prepared, you give them a magical phone number. This phone number is connected to your personal delivery guy.
Now when your order is ready, the guy calls that number and your personal delivery guy springs into action and brings you the order that you placed.
That's essentially what a webhook is in payment processing, but replace "favourite food" with "payment information" and "delivery guy" with "automated system."
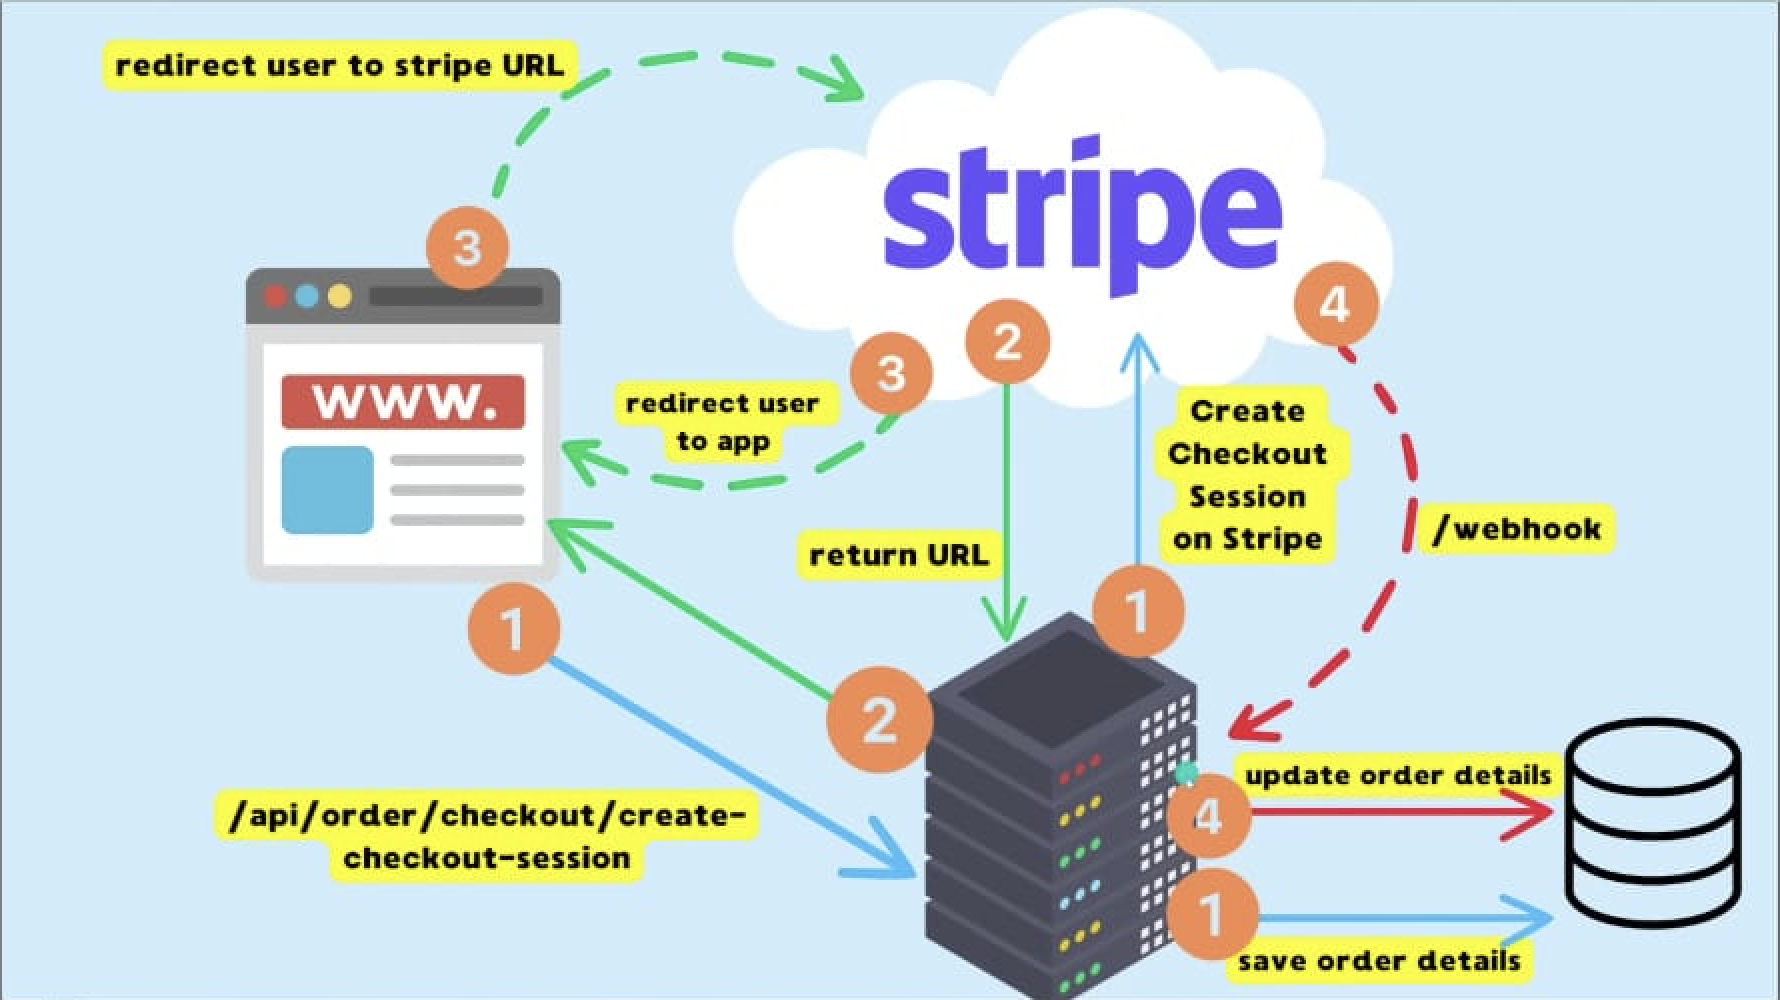
When a payment event occurs (like a successful transaction or a refund), instead of your system constantly asking, "Is it done yet? Is it done yet?", the payment processor uses your webhook (the magical phone number) to notify your system immediately. Your system (server) then jumps into action, updating records, sending confirmation emails, or doing whatever else needs to be done. Here is a detailed diagram of the following for better understanding using our favourite payment method of Stripe.
How can we use webhooks in Razorpay?
Now in Razorpay whenever any payment gets captured, authorized, completed, refund initiated or failed, etc certain events occur. These are payment and order events.
Sample Payment Event for an authorized payment (payment.authorized)
{
  "entity": "event",
  "account_id": "acc_BFQ7uQEaa7j2z7",
  "event": "payment.authorized",
  "contains": [
    "payment"
  ],
  "payload": {
    "payment": {
      "entity": {
        "id": "pay_DESlfW9H8K9uqM",
        "entity": "payment",
        "amount": 100,
        "currency": "INR",
        "status": "authorized",
        "order_id": "order_DESlLckIVRkHWj",
        "invoice_id": null,
        "international": false,
        "method": "netbanking",
        "amount_refunded": 0,
        "refund_status": null,
        "captured": false,
        "description": null,
        "card_id": null,
        "bank": "HDFC",
        "wallet": null,
        "vpa": null,
        "email": "gaurav.kumar@example.com",
        "contact": "+919876543210",
        "notes": [],
        "fee": null,
        "tax": null,
        "error_code": null,
        "error_description": null,
        "error_source": null,
        "error_step": null,
        "error_reason": null,
        "acquirer_data": {
          "bank_transaction_id": "0125836177"
        },
        "created_at": 1567674599
      }
    }
  },
  "created_at": 1567674606
}
Sample order paid event
{
  "entity": "event",
  "account_id": "acc_BFQ7uQEaa7j2z7",
  "event": "order.paid",
  "contains": [
    "payment",
    "order"
  ],
  "payload": {
    "payment": {
      "entity": {
        "id": "pay_DESlfW9H8K9uqM",
        "entity": "payment",
        "amount": 100,
        "currency": "INR",
        "status": "captured",
        "order_id": "order_DESlLckIVRkHWj",
        "invoice_id": null,
        "international": false,
        "method": "netbanking",
        "amount_refunded": 0,
        "refund_status": null,
        "captured": true,
        "description": null,
        "card_id": null,
        "bank": "HDFC",
        "wallet": null,
        "vpa": null,
        "email": "gaurav.kumar@example.com",
        "contact": "+919876543210",
        "notes": [],
        "fee": 2,
        "tax": 0,
        "error_code": null,
        "error_description": null,
        "created_at": 1567674599
      }
    },
    "order": {
      "entity": {
        "id": "order_DESlLckIVRkHWj",
        "entity": "order",
        "amount": 100,
        "amount_paid": 100,
        "amount_due": 0,
        "currency": "INR",
        "receipt": "rcptid #1",
        "offer_id": null,
        "status": "paid",
        "attempts": 1,
        "notes": [],
        "created_at": 1567674581
      }
    }
  },
  "created_at": 1567674606
}
Sample Payment Captured Event
{
  "entity": "event",
  "account_id": "acc_BFQ7uQEaa7j2z7",
  "event": "payment.captured",
  "contains": [
    "payment"
  ],
  "payload": {
    "payment": {
      "entity": {
        "id": "pay_DESlfW9H8K9uqM",
        "entity": "payment",
        "amount": 100,
        "currency": "INR",
        "base_amount": 100,
        "status": "captured",
        "order_id": "order_DESlLckIVRkHWj",
        "invoice_id": null,
        "international": false,
        "method": "netbanking",
        "amount_refunded": 0,
        "amount_transferred": 0,
        "refund_status": null,
        "captured": true,
        "description": null,
        "card_id": null,
        "bank": "HDFC",
        "wallet": null,
        "vpa": null,
        "email": "gaurav.kumar@example.com",
        "contact": "+919876543210",
        "notes": [],
        "fee": 2,
        "tax": 0,
        "error_code": null,
        "error_description": null,
        "error_source": null,
        "error_step": null,
        "error_reason": null,
        "acquirer_data": {
          "bank_transaction_id": "0125836177"
        },
        "created_at": 1567674599
      }
    }
  },
  "created_at": 1567674606
}
Below are the different payment stages diagram for your reference
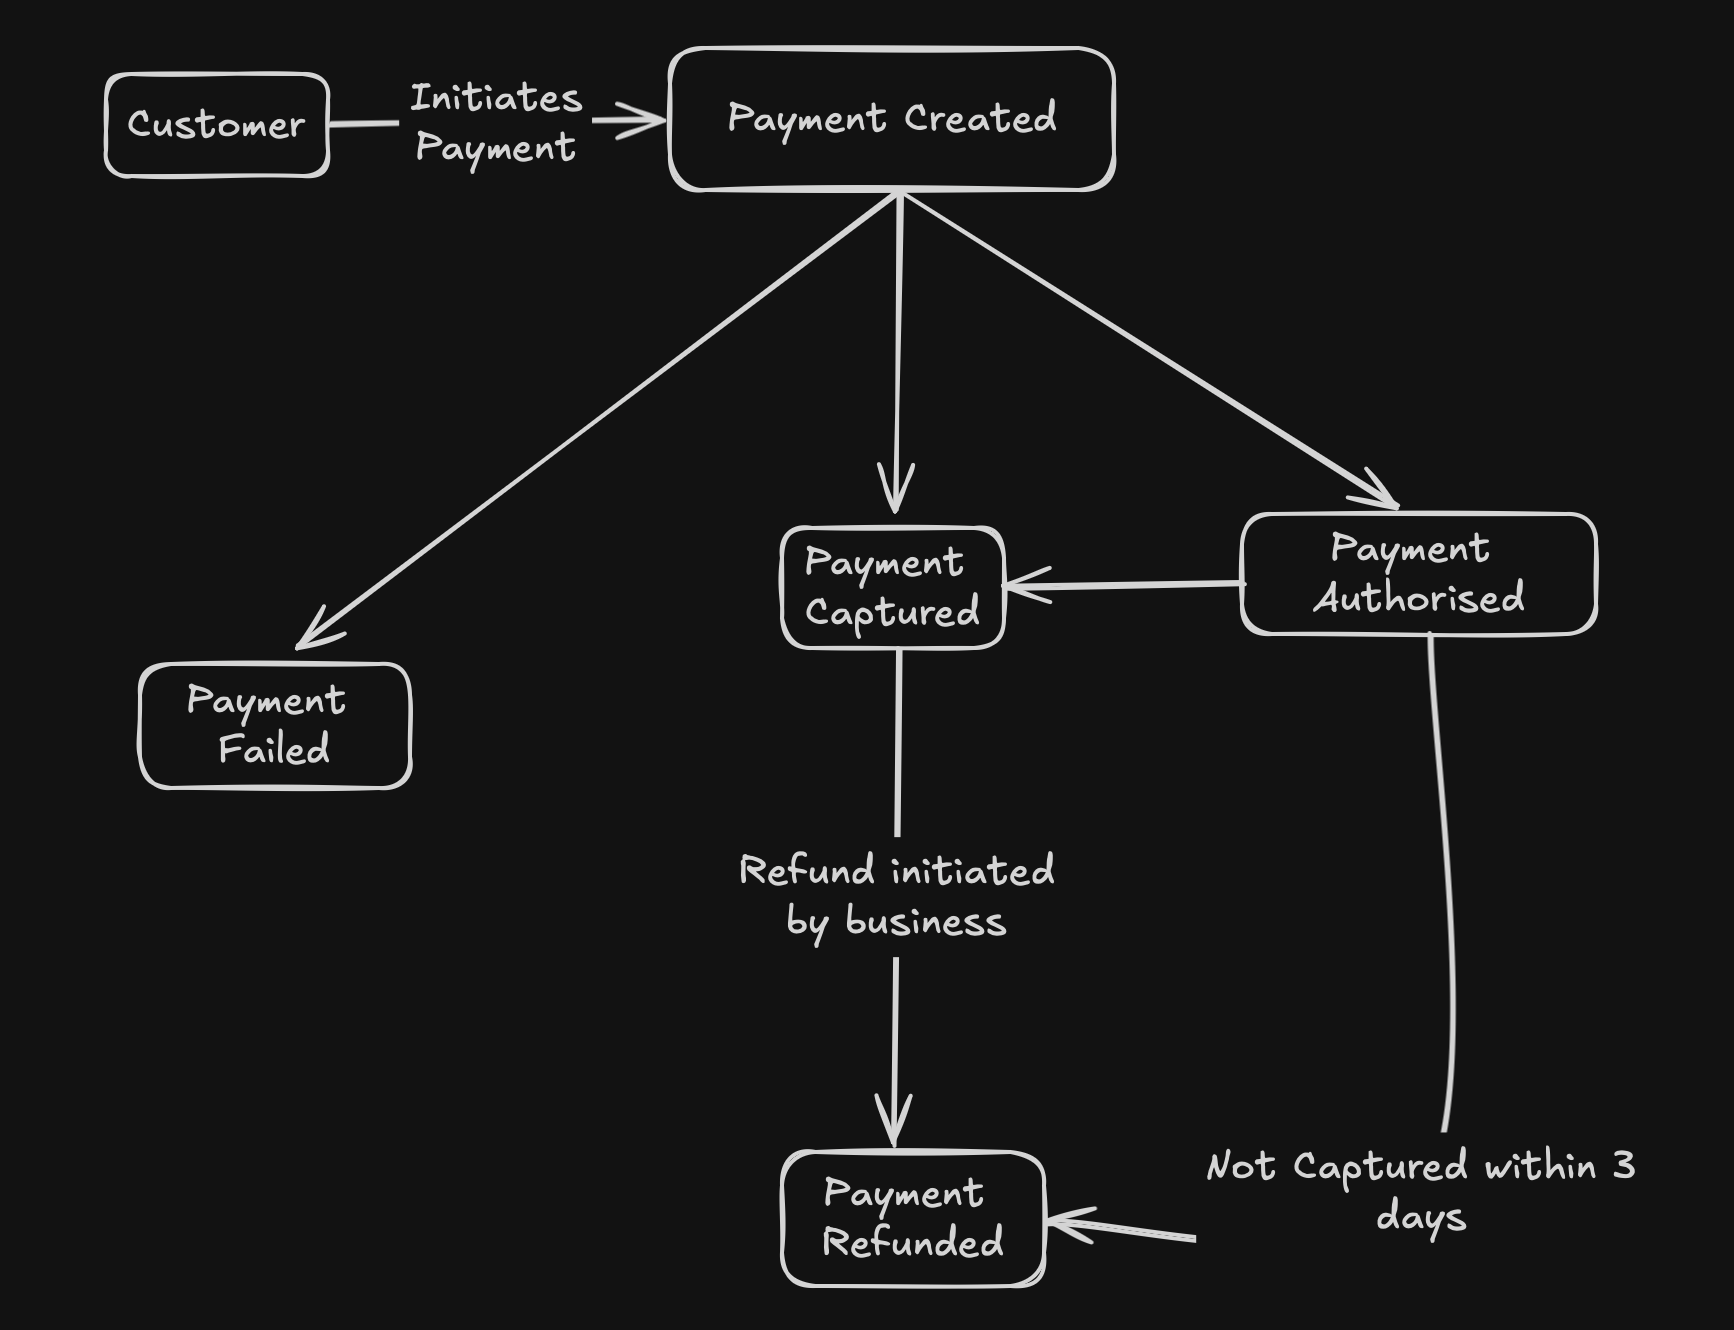
Now till now, you must get an idea of certain events while making a payment. Now these events need to be cached on our server to use them. For this, webhook sends us this data in real-time to the server or application.
Set Up For RazorPay Webhook
Begin by creating an account on the Razorpay dashboard.
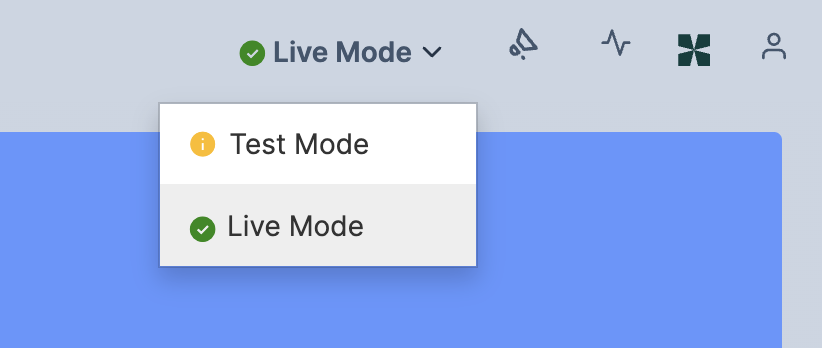
After account creation, switch to test mode within the dashboard to simulate transactions without processing actual payments, which you can do using the drop-down option at the top of the dashboard.
Now you need to set up the webhook endpoint in the project backend. And that endpoint URL will get pasted in the Razorpay webhook section.
 app.post("/api/webhook",async(req,res) => {
 const signature = req.headers["x-razorpay-signature"];
    const isValid = await validateWebhookSignature(
       JSON.stringify(req.body),
       signature,
       process.env.RAZORPAY_WEBHOOK_SECRET
     );
  if (isValid) {
       const { event, payload } = req.body;

       switch (event) {
         case "payment.authorized":
           await handleyourAuthorizedLogic(payload);
           break;
         case "payment.captured":
           await handleyourCapturedLogic(payload);
           break;
         case "payment.failed":
           await handleyourFailedLogic(payload);
           break;
         default:
           // console.log(`Unhandled event: ${event}`);
           break;
       }
     }
    res.status(200).send();

 }
In the Razorpay dashboard, navigate to the webhook section (Developer Option in the Sidebar) and add your endpoint URL (Deployed). Additionally, input the webhook secret key, ensuring that only authorized requests are accepted by your backend.
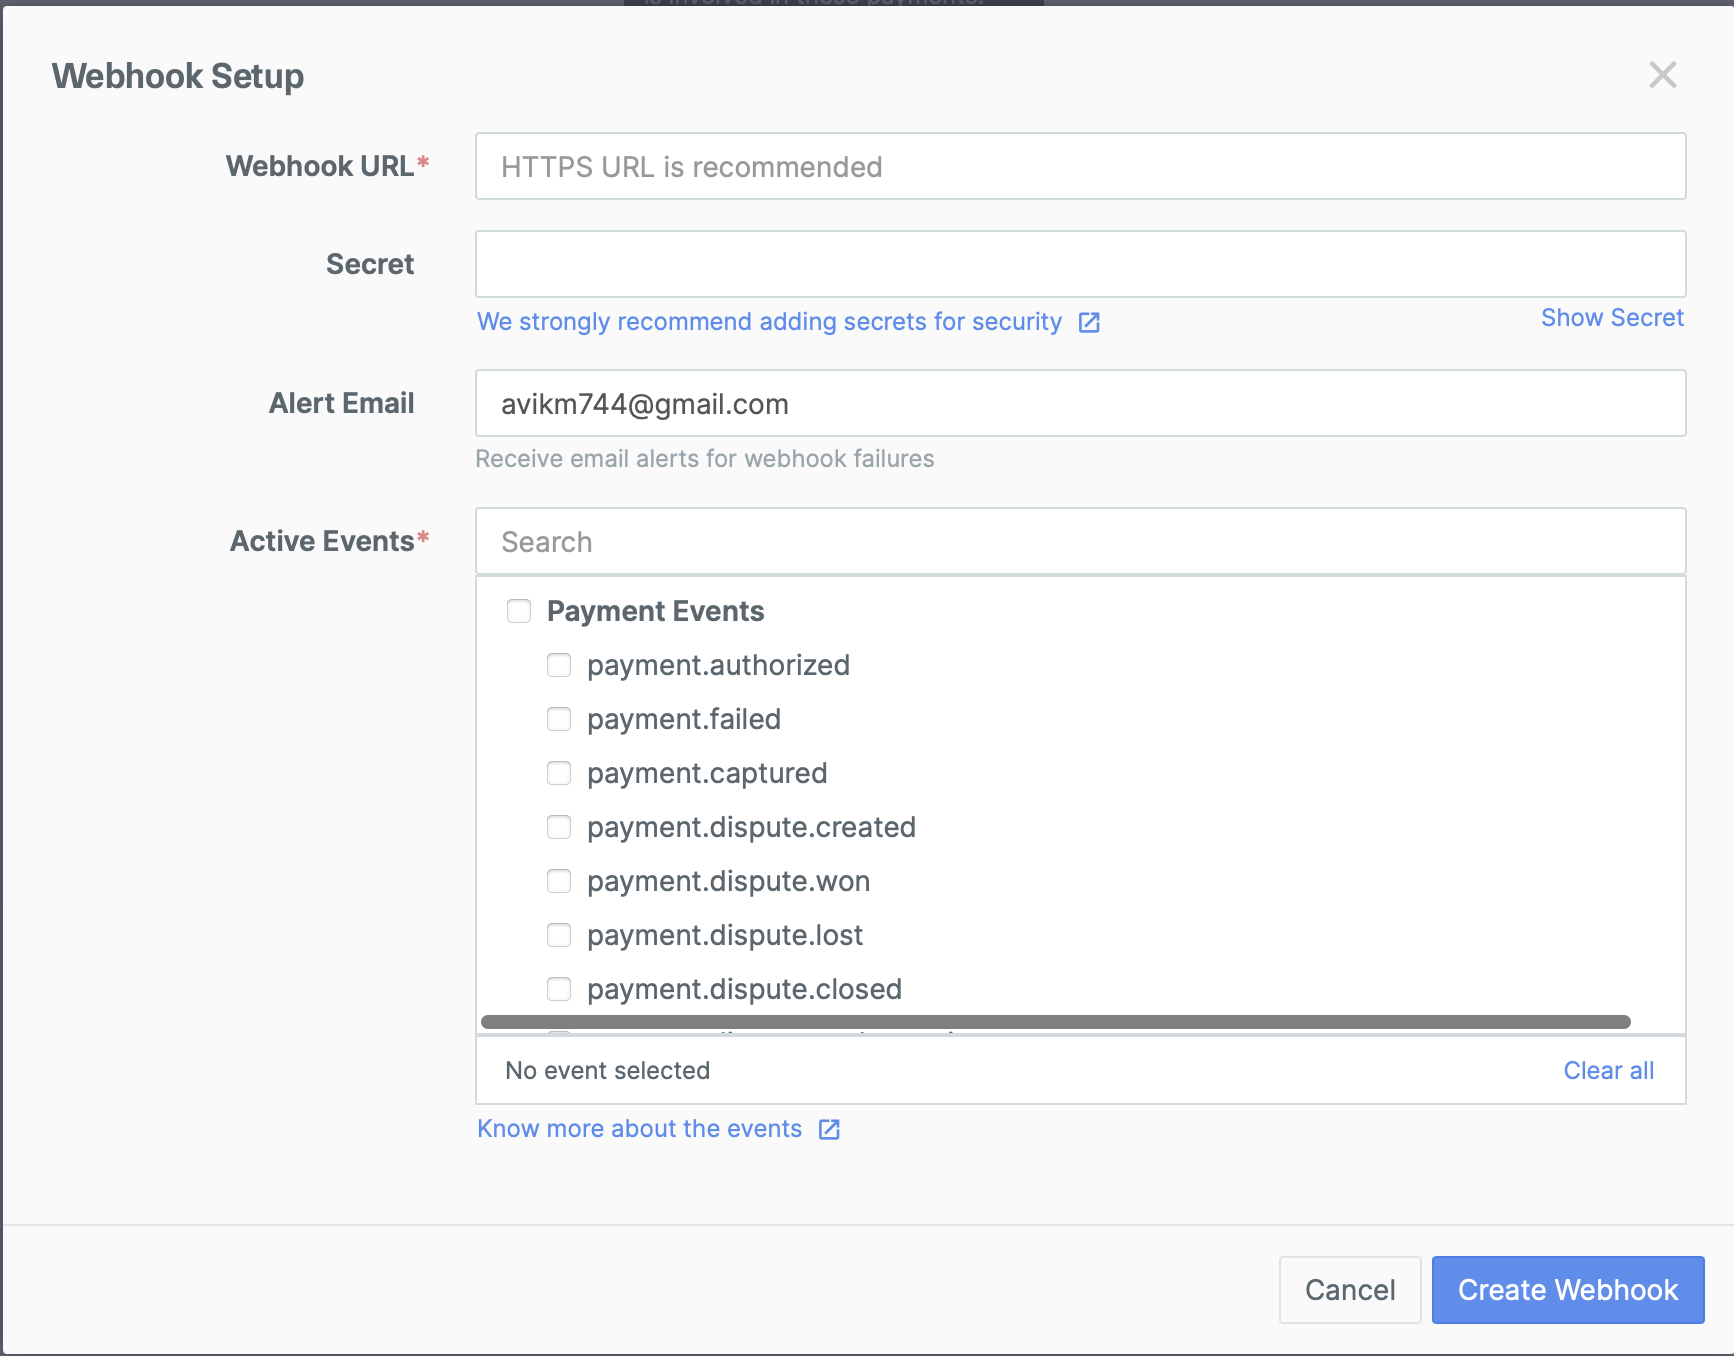
Choose specific events from the list of active events provided by Razorpay based on your application’s requirements. These events include payment and order-related actions such as capture, authorization, completion, refund initiation, and failure.
Once the endpoint URL and webhook secret key are configured, create the webhook in Razorpay. This establishes the connection between Razorpay and your backend, allowing seamless communication and event handling.
Handling of Duplicate Events
Handling duplicate events is crucial to ensure data integrity and prevent processing redundancies. Now there are cases when webhook sends the same event multiple times. For this, we need to handle this. We need to ignore duplicate events and use unique events. Below is a sample of how you can do it.
const processedEventIds = new Set();

const checkDuplicateEvent = (req, res, next) => {
  const eventId = req.headers["x-razorpay-event-id"];

  if (processedEventIds.has(eventId)) {
    // Duplicate event, skip processing
    console.log(`Duplicate event with ID ${eventId}. Skipping processing.`);
    res.status(200).send();
  } else {
    // Not a duplicate, continue with the next middleware or route handler
    processedEventIds.add(eventId);
    next();
  }
};
app.post("/api/webhook", checkDuplicateEvent , async(req,res) => {
   // your api logic
}
Testing of WebHooks in Local Environment
Now I know

And we saw the best example of it during the CrowdStrike Event that made all the windows computers useless. But as a noob programmer like myself, I always like to try it out in the local environment at first before pushing it in the production but the problem lies in the fact that Razorpay WebHook requires deployed URL of your server only, we cannot enter http://localhost:3000 in there as it doesn't adhere to https protocol, And this is where Ngrok comes in. Now, Ngrok is a popular tool used for exposing local servers to the internet, making it especially useful for testing webhooks like those used with Razorpay. It creates a secure tunnel from a public endpoint to your locally running web service, allowing you to receive webhook notifications from external services without the need to deploy your application to a public server or configure complex network settings.
Steps to setup ngrok in your system
Begin by creating an account on the Ngrok website to obtain your authentication token.
Download the Ngrok tool compatible with your operating system from the Ngrok website. After installing Ngrok, you can verify it using the following command in your terminal.
ngrok helpAfter downloading Ngrok, configure it by adding your authentication token using the command:
ngrok config add-authtoken <TOKEN>Launch Ngrok by running the command:
ngrok http <your_backend_server_url>
After running the above command you will get the following sample output:
ngrok                                                                   (Ctrl+C to quit)

Session Status                online
Account                       inconshreveable (Plan: Free)
Version                       3.0.0
Region                        United States (us)
Latency                       78ms
Web Interface                 http://127.0.0.1:4040
Forwarding                    https://84c5df474.ngrok-free.dev -> http://localhost:8080

Connections                   ttl     opn     rt1     rt5     p50     p90
                              0       0       0.00    0.00    0.00    0.00
Now paste the url
https://84c5df474.ngrok-free.dev(example URL) and paste it into the webhook settings of your Razorpay dashboard. This ensures that Razorpay sends webhook payloads to your local development server via Ngrok.With the Ngrok URL configured in Razorpay, simulate events such as payment captures or order updates in your Razorpay sandbox environment. Verify that your local server receives the webhook payloads correctly.
After completing testing and deploying your application, update the webhook URL in the Razorpay dashboard to point to your deployed server. This ensures that webhook payloads are sent to the correct endpoint post-deployment.
Now you have successfully integrated razorPay in your application. Congratulations 🥳
Conclusion:
If you found this blog post helpful, please consider sharing it with others who might benefit. You can also follow me for more content on Javascript, React, and other web Development topics.
For Paid collaboration, mail me at: avikm744@gmail.com
Connect with me on Twitter, LinkedIn, and GitHub.
Thank you for Reading. Adios :)
Subscribe to my newsletter
Read articles from Avik Mukherjee directly inside your inbox. Subscribe to the newsletter, and don't miss out.
Written by

Avik Mukherjee
Avik Mukherjee
I am web Developer from India, who is interested in expanding my learning.