Total.js UI :Two Beginner Projects to understand Paths and Data Binding
 Louis Bertson
Introduction
Total.js UI is a lightweight yet powerful framework designed to create dynamic user interfaces with ease and flexibility. It stands out for its intuitive approach, allowing data to be linked to interface elements without heavy configurations or extensive lines of code. This tutorial aims to guide you through two small projects to help you understand and master the concepts of paths and ui-bind in Total.js UI.
Paths and <ui-bind> are fundamental elements for linking data to user interface elements. Paths are fundamental components that act as representational addresses to data or functions/actions. They allow you to access, manipulate, and observe data effectively within your application, while <ui-bind> dynamically binds this data to the interface, ensuring real-time updates. Mastering these concepts will enable you to create responsive and interactive web applications effortlessly.
Now, let's move on to the projects we'll cover in this tutorial. Here's a brief overview of the table of contents:
1 Prerequisites
2 Project 1: User Information Update Form
3 Project 2: To-Do List
1. Prerequisites
Before diving into this tutorial on Total.js UI, ensure you have the following prerequisites in place to effectively follow along and complete the projects:
1 Basic Knowledge of HTML and JavaScript:
HTML: You should be comfortable with HTML tags, attributes, and basic page structure. Understanding how to create forms, lists, and other common elements is crucial.
JavaScript: Familiarity with JavaScript fundamentals, including variables, functions, and event handling, is necessary. You should be able to write and debug simple scripts that interact with the DOM.
jQuery: Total.js UI integrates jQuery to handle DOM manipulation, event handling, and Ajax, avoiding the need to reinvent the wheel with a new alternative. This ensures a stable, feature-rich experience for building dynamic interfaces. We are not using too much jquery but it is better you have some background of it!
2 Access to a Modern Web Browser:
- Web Browser: Use a modern web browser such as Google Chrome, Mozilla Firefox, or Microsoft Edge. These browsers support the latest web technologies and provide developer tools for debugging and testing your projects.
3 Code Editor:
Code Editor: A good code editor is essential for writing and editing your code. Recommended options include:
Visual Studio Code: A powerful, free code editor with robust features and extensions.
Sublime Text: A versatile and lightweight text editor with a clean interface.
Atom: An open-source editor with a user-friendly interface and customizable features.
4 Basic Knowledge of CSS:
- CSS: Understanding CSS will help you style your web pages and control the layout of your elements. You should know how to use selectors, properties, and values to apply styles to HTML elements.
5 Internet Connection:
- Connectivity: An active internet connection is required to access the CDN links for Total.js UI and any other external libraries used in the projects. Ensure your connection is stable for smooth downloading and integration of resources.
6 Basic Understanding of Data Binding Concepts:
- Data Binding: While we will explain the concepts of
pathsand<ui-bind>in detail, having a foundational understanding of data binding in web development will help you grasp these concepts more efficiently. Data binding involves synchronizing data between the model and the view, and is crucial for creating dynamic and interactive web applications.
7 Basic Knowledge of jQuery:
- jQuery: The projects use jQuery for simplifying DOM manipulation and handling events. Basic knowledge of jQuery, including how to select elements, handle events, and manipulate the DOM, will be beneficial. If you’re unfamiliar with jQuery, you might want to review its documentation or tutorials.
By ensuring you meet these prerequisites, you’ll be well-prepared to follow the tutorial and effectively implement the concepts of paths and <ui-bind> in Total.js UI through the provided projects.
2. Project 1: User Information Update Form
Project Overview:
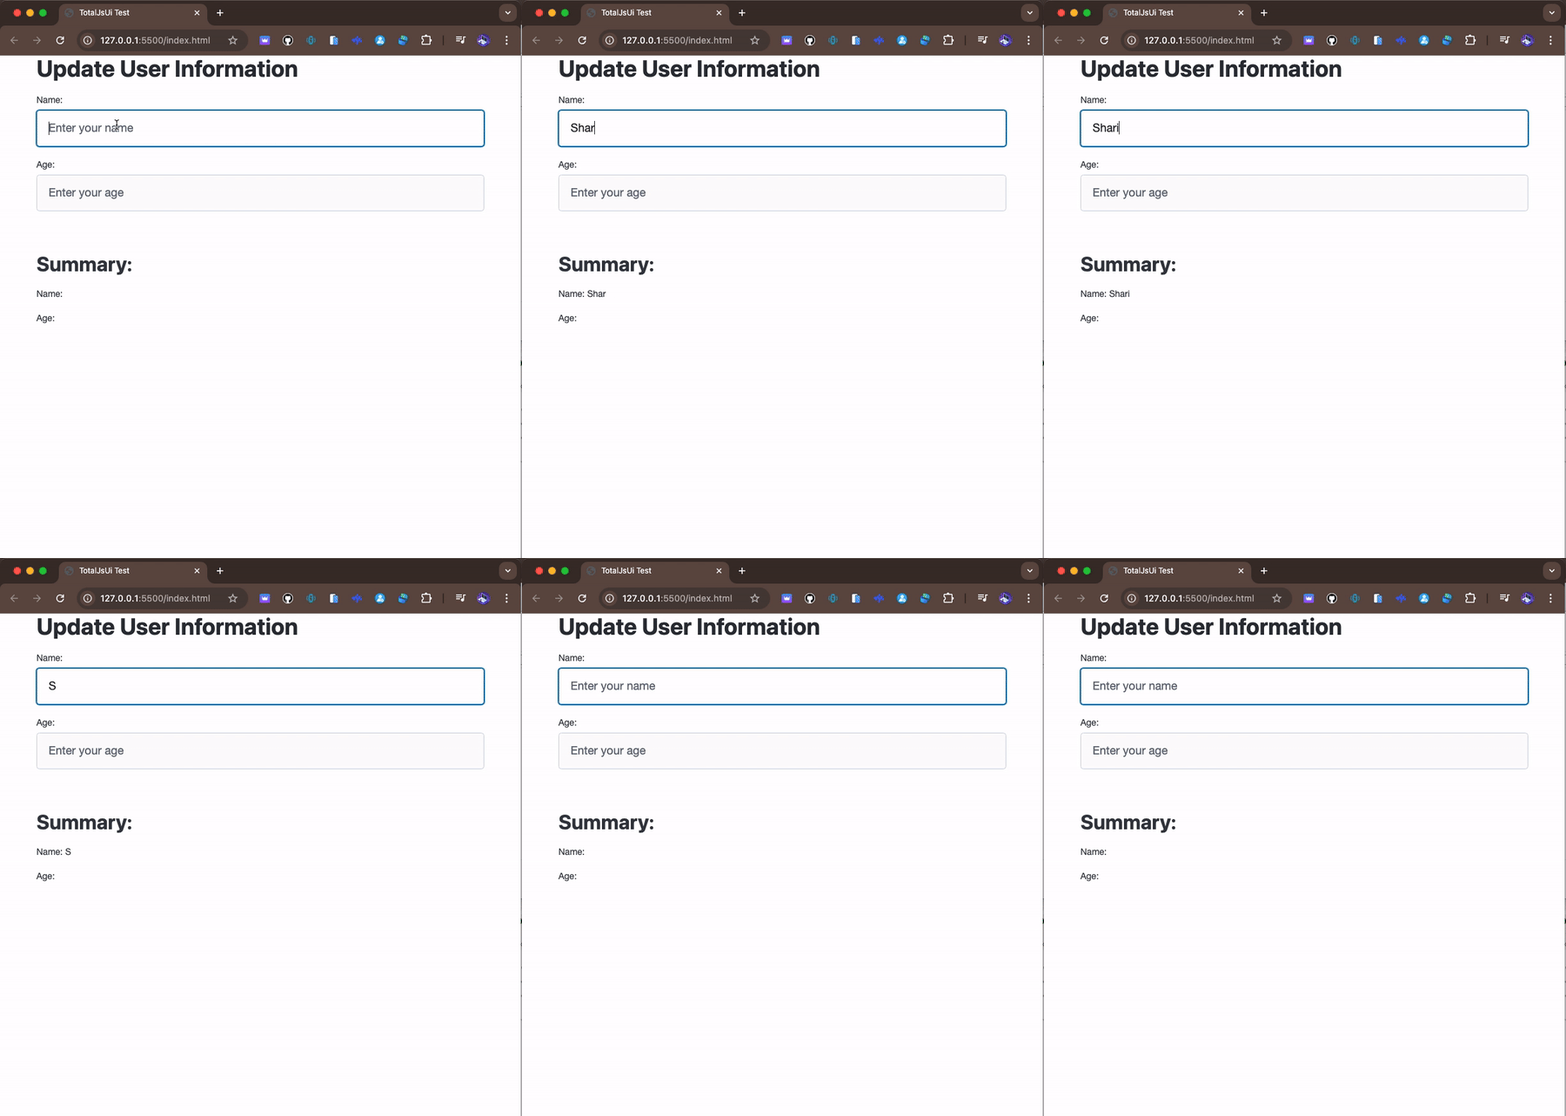
In this first project, we will create a simple form to update user information, such as name and age. The goal is to demonstrate how paths and <ui-bind> can be used to link user data to the interface and display it in real-time when updated.
Key Features:
- Using
paths:Pathsare used to connect the input fields to the user information values (name and age). When a user enters information into the form, these data are directly stored in the associatedpaths.
- Applying
<ui-bind>:<ui-bind>is used to display updated data in real-time. As soon as user information is modified in the form,<ui-bind>automatically updates the display, showing the new values without requiring a page refresh.
This project showcases the efficiency of Total.js UI for creating dynamic interfaces where data and display remain consistently synchronized.
Code:
<!DOCTYPE html>
<html lang="en">
<head>
    <meta charset="UTF-8">
    <meta name="viewport" content="width=device-width, initial-scale=1.0">
    <title>TotalJsUi Test</title>
    <script src="//cdn.componentator.com/spa.min@19.js"></script>
    <link rel="stylesheet" href="//cdn.componentator.com/spa.min@19.css" />
    <link rel="stylesheet" href="https://cdn.jsdelivr.net/npm/@picocss/pico@2/css/pico.min.css">
</head>
<body>
    <div class="container">
    <h1>Update User Information</h1>
    <form id="userInfoForm">
        <label for="userName">Name:</label>
        <input type="text" id="userName" placeholder="Enter your name">

        <label for="userAge">Age:</label>
        <input type="text" id="userAge" placeholder="Enter your age">
    </form>

    <h2>Summary:</h2>
    <p>Name: <ui-bind path="user.name" config="text"></ui-bind></p>
    <p>Age: <ui-bind path="user.age" config="text"></ui-bind></p>
    </div>
    <script>
        // Initialize user data with SET
        SET('user.name', '');
        SET('user.age', '');
         var nameinput = $('#userName');
         var ageinput = $('#userAge');

        // Function to update user information
       $('input#userName').on('input', function(event) {

            SET('user.name', $(this).val());

        });
         $('input#userAge').on('input', function(event) {

            SET('user.age', $(this).val());

        });
    </script>
</body>
</html>
Result preview

This project demonstrates how paths and <ui-bind> enable the creation of dynamic interfaces with Total.js UI, where the display remains constantly synchronized with the data.
3. Project 2: To-Do List
Project Overview:
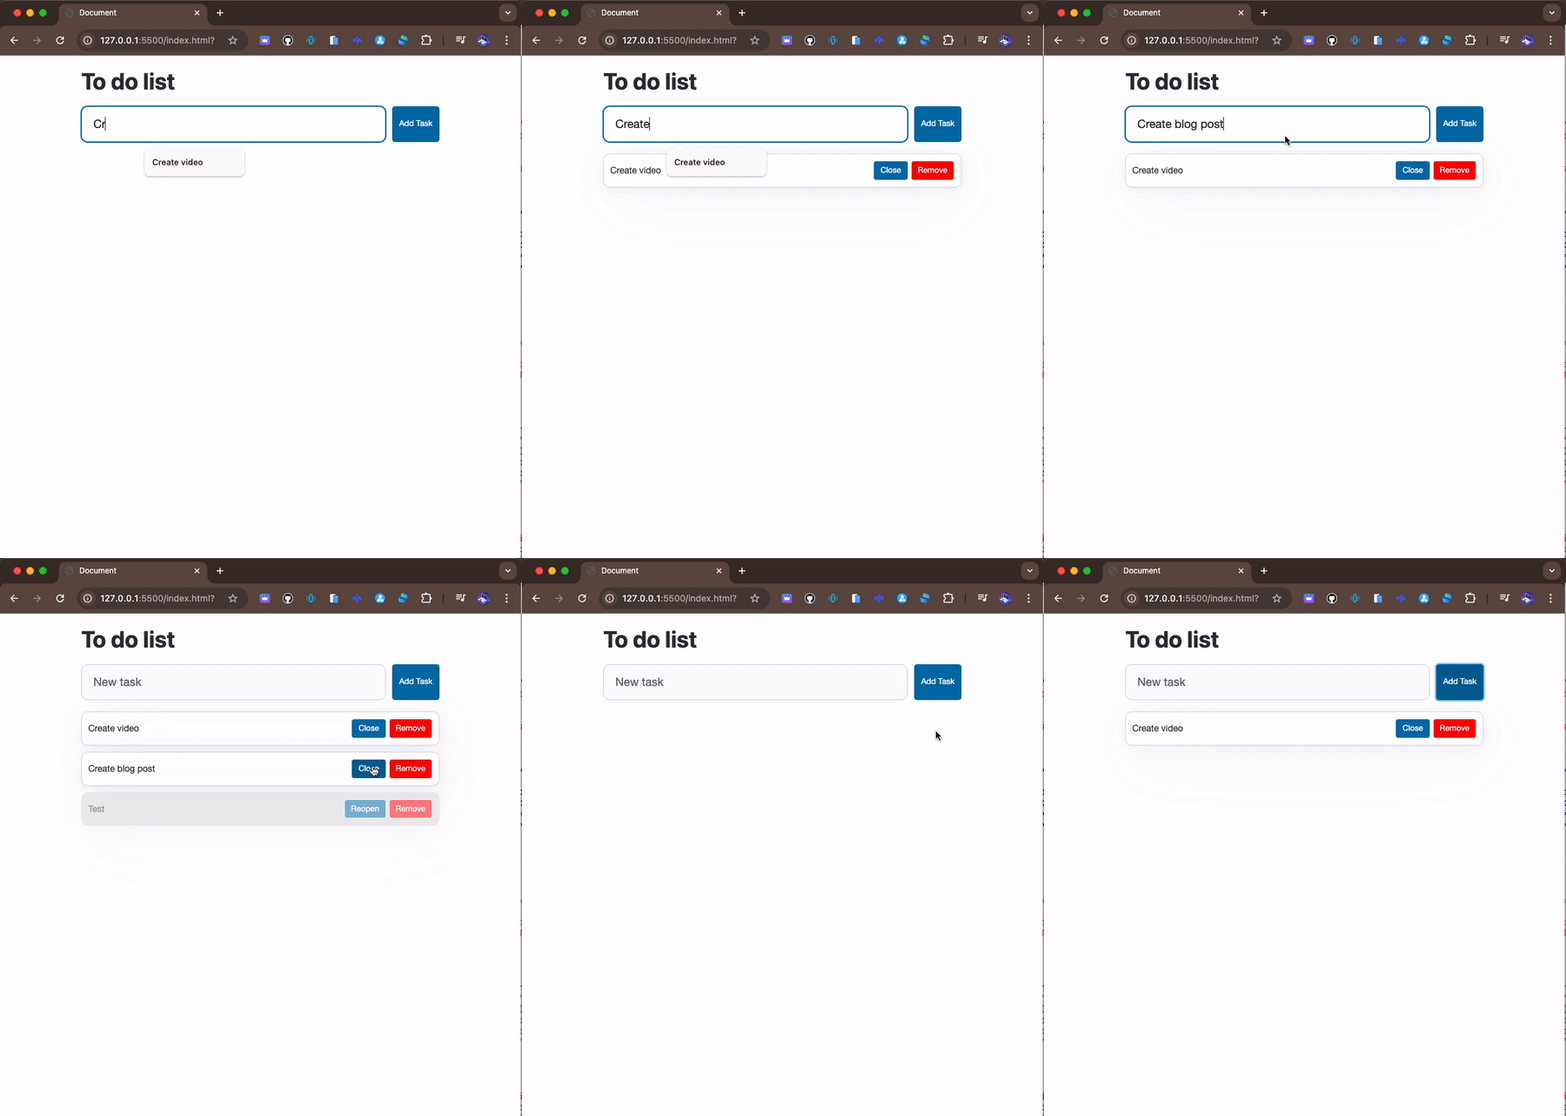
In this second project, we will build a dynamic To-Do List. The goal is to demonstrate how paths can be manipulated to manage a list of items, and how <ui-bind> can be used to make tasks interactive, with actions such as marking a task as completed or removing it.
Key Features:
- Manipulation of
paths:pathsare used to manage the list of tasks. Each task is stored in an array linked to apath(tasks), which facilitates adding, modifying, and removing tasks.
- Usage of
<ui-bind>:<ui-bind>is used to display the list of tasks and to allow direct interactions with them. Users can mark a task as completed or remove it, and these actions are immediately reflected in the interface thanks to the updates to thepaths.
Here is the code for this project:
<!DOCTYPE html>
<html lang="en">
<head>
    <meta charset="UTF-8">
    <meta name="viewport" content="width=device-width, initial-scale=1.0">
    <title>Document</title>
    <script src="//cdn.componentator.com/spa.min@19.js"></script>
    <link rel="stylesheet" href="//cdn.componentator.com/spa.min@19.css" />
    <link rel="stylesheet" href="https://cdn.jsdelivr.net/npm/@picocss/pico@2/css/pico.min.css">
    <style>
        .container {
            max-width: 600px;
            margin: 0 auto;
            padding: 20px;
        }
        #taskForm {
            display: flex;
            gap: 10px;

        }
        #taskInput {
            flex: 1;
            border-radius: 10px;

        }
        #addTaskButton, .complete, .remove {
            font-size: 0.9em;
            padding: 5px 10px;
        }
        #addTaskButton {
            white-space: nowrap;
        }
        .remove {
            background-color: red;
            color: white;
            border-color: white;
        }
        .complete {
            color: white;
            border-color: white;
        }
        article {
            display: flex;
            align-items: center;
            justify-content: space-between;
            margin-bottom: 10px;
            padding: 10px;
            border: 1px solid #ddd;
            border-radius: 10px;
        }

        article.disabled { opacity: .5; background-color: #ddd; }
    </style>
</head>
<body>
    <div class="container">
        <h1>To do list</h1>
        <div id="taskForm">
            <input type="text" id="taskInput" placeholder="New task">
            <button type="button" id="addTaskButton">Add Task</button>
        </div>
        <div id="taskList">
            <ui-bind path="tasks" config="template">
                <template>
                    {{foreach task in value }}
                    <article class="{{ if task.completed }} disabled {{ fi }}">
                        <span>{{ task.text }}</span>
                        <div>
                            <button class="complete">{{ if task.completed }} Reopen {{ else }} Close{{ fi }} </button>
                            <button class="remove">Remove</button>
                        </div>
                    </article>
                    {{end}}
                </template>
            </ui-bind>
        </div>
    </div>
    <script>
        // Initialize the tasks list with SET
        var tasks = [
            { text: 'Learn Total.js UI', completed: false },
            { text: 'Build a To-Do List', completed: false },
        ];
        SET('tasks', tasks);

        // Add a new task
        $('#addTaskButton').on('click', function() {
            var taskText = $('#taskInput').val();
            if (taskText.trim() !== '') {
                tasks.push({ text: taskText, completed: false });
                SET('tasks', tasks);
                $('#taskInput').val('');
            }
        });

        // Complete or remove a task
        $('#taskList').on('click', function(event) {
            var target = event.target;
            if (target.classList.contains('complete') || target.classList.contains('remove')) {
                var article = target.closest('article');
                var index = Array.from(article.parentNode.children).indexOf(article);
                if (target.classList.contains('complete')) {
                    tasks[index].completed = !tasks[index].completed;
                    SET('tasks', tasks);
                } else if (target.classList.contains('remove')) {
                    tasks.splice(index, 1);
                    SET('tasks', tasks);
                }
            }
        });
        $('body').keyup(function (event) {
            if (event.keyCode === 13)
                $('#addTaskButton').click();
        });
    </script>
</body>
</html>
Result preview

This project illustrates how to use paths to manage a dynamic list and how <ui-bind> can be employed to create interactive interfaces with Total.js UI.
Conclusion
In this tutorial, we explored two small projects that highlight the use of paths and <ui-bind> in Total.js UI. These concepts are fundamental for creating reactive and dynamic interfaces.
- Importance of Paths:
Pathsallow you to link data to user interface elements. They are essential for managing states and real-time updates.
- Usage of
<ui-bind>: The<ui-bind>is a powerful feature of Total.js UI that synchronizes data with the user interface, providing a smooth and interactive experience.
By mastering these concepts through projects like the user information update form and the To-Do List, you have gained a solid understanding of the basics of Total.js UI.
I encourage you to continue exploring Total.js UI by experimenting with other projects. The more familiar you become with these concepts, the better you'll be able to create complex and efficient applications. Feel free to test different configurations, combine features, and explore the Total.js UI documentation to deepen your knowledge.
Subscribe to my newsletter
Read articles from Louis Bertson directly inside your inbox. Subscribe to the newsletter, and don't miss out.
Written by

Louis Bertson
Louis Bertson
I am a happy developer. I choose quality over quantity because it makes me happier