Beyond Commercial VPNs: Why Every Professional Should Build Their Own AWS EC2 VPN In 2024
 Anthony Nzuki
The Power of Personal VPNs on Amazon EC2
Introduction
Let's address the elephant in the room - the ever growing threat to our online privacy and security when surfing the internet. We all know its repercussions but often tiptoe around it.
I know you must be wondering why you should bother creating your own VPN when we have lots of them in the market. Let's break down why it is important to create a personal VPN.
Why build your own VPN
Freelancers
Whether you are a digital nomad or a stay-at-home freelancer, you might want to maintain a constant online experience while still accessing your freelance accounts regardless of your physical location.
Those who access their accounts from public Wi-Fi get enhanced security while those who may need to access region-specific websites or services for their work may bypass geo-restrictions.
Industry Professionals
IT professionals can use their private VPN to access company resources remotely from anywhere since the communication is secure (encrypted communication).
Online Content Creators
Content creators can use a personal VPN to add an extra layer of security when uploading or storing their work online hence safeguarding their intellectual property.
Advantages of Private VPNs Over Commercial VPNs
You will have full control of your where your data resides, you have the freedom to choose and configure the security protocol and encryption algorithm to use. For example, we are going to configure
OpenVPNsecurity protocol withAES-256encryption algorithm.You can tailor your VPN server to reside in any location you choose.
It is definitely an invaluable learning experience when you get to learn and understand the inner workings of network security and cloud infrastructure management when building your own VPN.
It can be more economical in the long run to deploy your self-managed VPN than going for subscription-based services.
Enough of all the boring theory – let's roll up our sleeves and build our very own AWS VPN Instance.
Configure your own VPN
Task 1: Creating an Amazon EC2 Instance from the AWS Console.
First, go to the AWS Management Console and launch an EC2 Instance.
Then provide a name for your instance
Afterwards, ensure the Amazon Machine Image (AMI) attached to the instance is
Amazon Linux 2 (HVM) — Kernel 5.10, SSD Volume Type
- Note: Do not use the default AMI - Amazon Linux 2023
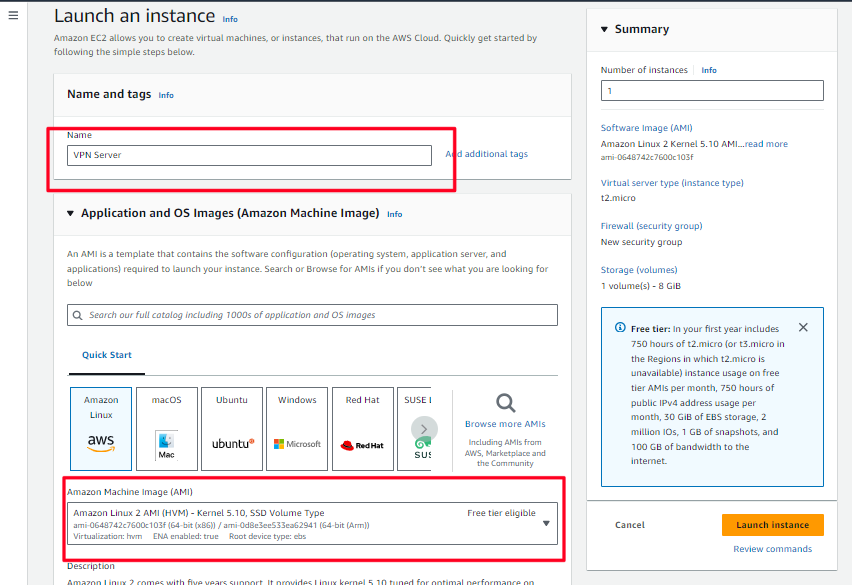
Configure the right instance type for your instance. For my case, I will go for
t2.microwhich is free tier eligibleNext, we will need to generate a key pair that will allow us to SSH to the instance once it has been deployed. So click
Create new key pairand configure your key pair.A private key file will be downloaded on your machine which you will use to authenticate to your instance.
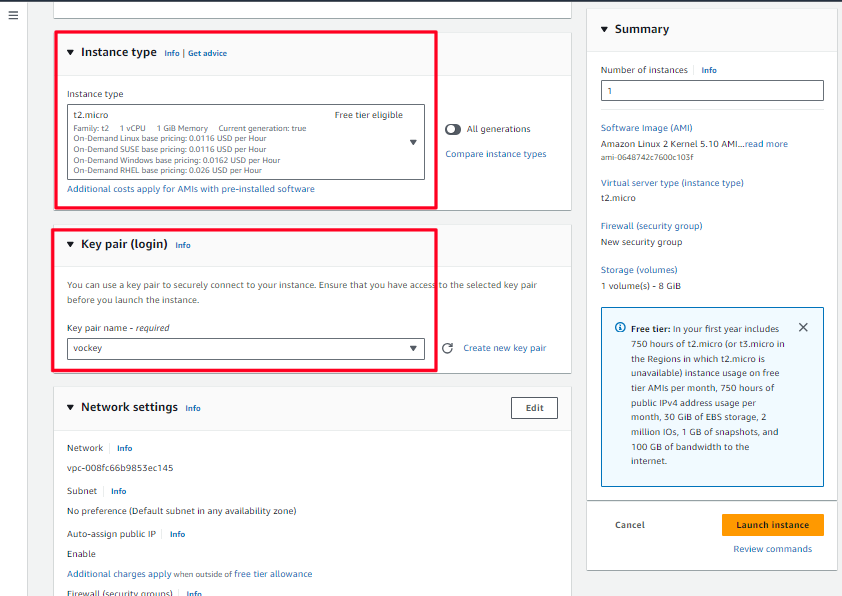
- In the Network settings pane, choose Edit
- Leave everything on default settings and only focus on the security group
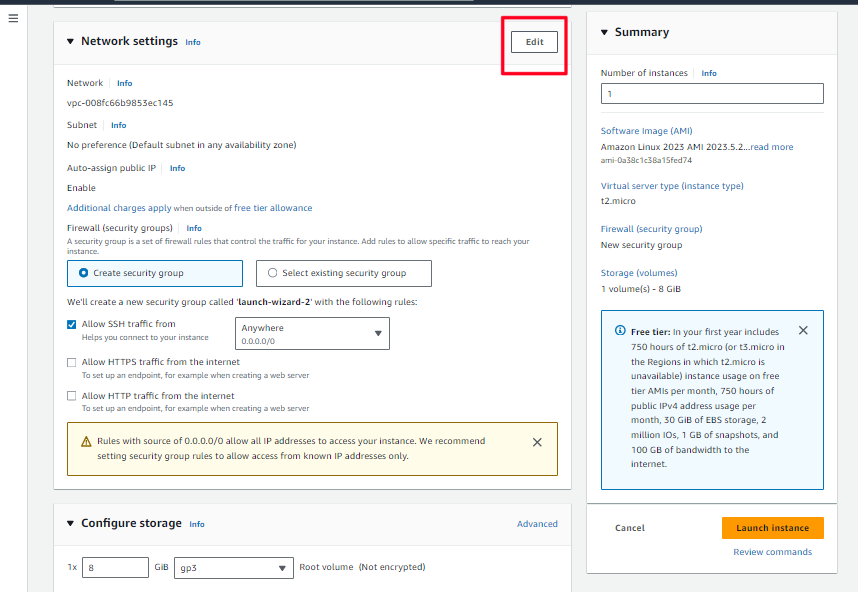
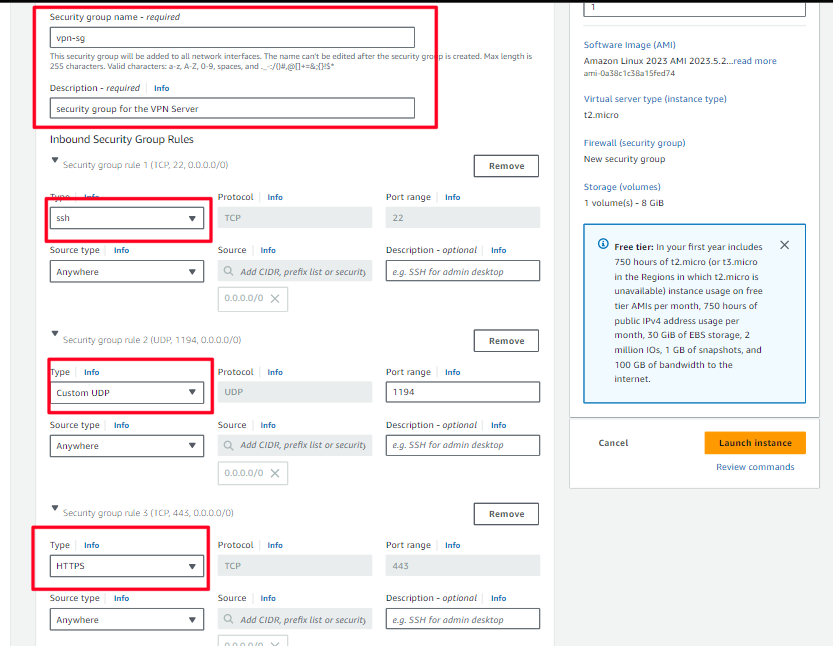
- Still in the Network settings pane, configure the security group as follows:
Security group name - required:
VPN security groupDescription:
Security group for the VPN server
- Under Inbound Security Group rules, you will see SSH by default.
- Source Type: Choose Anywhere IPv4.
- Choose Add Security Group rule.
Configure the following options:
Type: Choose HTTPS.
Source: Choose Anywhere IPv4.
Description: Enter
Permit web requests
- Choose Add Security Group rule again.
Configure the following options:
Type: Choose Custom UDP.
Source: Choose Anywhere IPv4.
Description: Enter
allow traffic from your computer to access the VPN ServerPort range: type
1194
- After configuring the security group, leave everything else on default and click
Launch Instance
Hope you are familiar with putty and its black screen. To configure putty, please follow the instructions here.
And Voila! We are authenticated to our instance.
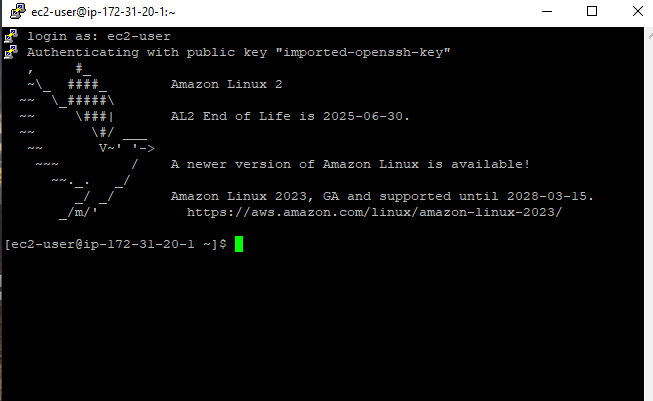
Now this is where the real work begins.
Task 2: Setting up OpenVPN on the server and client
Before we delve into the details, I will take you through a series of configurations that we are going enforce on our instance.
Installation of the OpenVPN Software Package
OpenVPN - Responsible for creating and managing the VPN connections
Since OpenVPN is not available on Yum's default repositories, you have to install EPEL first which gives you access to a wider range of software packages e.g. OpenVPN
The second command now uses the EPEL repository to install OpenVPN.
sudo amazon-linux-extras install epel -y
sudo yum install -y openvpn
Enable IP forwarding and configure NAT using
iptables
Creates a secure route for your traffic through the VPN Tunnel therefore providing private network communication.
These commands are responsible for configuring the Linux system to act as a NAT router which allows multiple devices on a private network to share a single public IP address.
In the end, your source IP address will be replaced with the public IP address of your VPN server
sudo modprobe iptable_nat
echo 1 | sudo tee /proc/sys/net/ipv4/ip_forward
sudo iptables -t nat -A POSTROUTING -s 10.4.0.1/2 -o eth0 -j MASQUERADE
sudo iptables -t nat -A POSTROUTING -s 10.8.0.0/24 -o eth0 -j MASQUERADE
Installation of the Easy-RSA Software Package
Easy-RSA - A tool that is responsible for creating and managing the encryption keys and certificates (PKI) we'll create.
sudo yum install easy-rsa -y - enablerepo=epel
Make an Easy-RSA directory in your installed OpenVPN directory.
sudo mkdir /etc/openvpn/easy-rsa
Copy the files from your Easy-RSA installation (latest version is 3.0.8 as of time of writing) to the new directory(easy-rsa) created above.
Then cd into it.
sudo cp -Rv /usr/share/easy-rsa/3.0.8/* /etc/openvpn/easy-rsa
cd /etc/openvpn/easy-rsa
Now, we have successfully installed Easy-RSA and OpenVPN in our instance.
Setting Up PKI With Easy-RSA for OpenVPN
Next, we will focus on setting up our Public Key Infrastructure (PKI). This step ensures we have secured our VPN connection.
This crucial step creates the certificates and keys necessary for encryption and authentication
The command below initializes a new PKI in the /etc/openvpn/easy-rsa directory.
You will get a disclaimer stating that any existing PKI directory will be deleted and thus you will have to confirm by typing yes.
sudo ./easyrsa init-pki
Next, we are going to configure a new Certificate Authority.
Acts as the go-to-person that will vouch for the authenticity of all the digital certificates we'll use in our VPN
Note: make sure you add a Passphrase and Distinguished Name when prompted to
sudo ./easyrsa build-ca
Next, we are going to create the Diffie-Hellman parameters.
These keys are responsible for creating a secret handshake that only the server and client will know.
sudo ./easyrsa gen-dh
After successfully running the command, you will see this output,
'DH parameters of size 2048 created at /etc/openvpn/easy-rsa/pki/dh.pem'
Next, we are going to use the command below to generate a certificate signing request (CSR) with the server's public key for our VPN server
Also, the command generates a private key for our VPN server and it must be kept secure.
nopass ensures that a password is not set for the private key.
sudo ./easyrsa gen-req server nopass
Next, we will then use the command below to authorize the CA to sign the server's CSR.
You will be prompted for the CA's password that you generated in the previous steps. easyrsa script needs to access the private key of the Root CA to sign the CSR hence why you are asked for the passphrase.
The CA signs the CSR to verify the server's identity to all clients that will connect to it.
sudo ./easyrsa sign-req server server
Similar to what we did with the server, we are going to generate a key pair and CSR for a client using the command below.
You'll repeat this step for each client who will want to connect to your VPN.
sudo ./easyrsa gen-req client nopass
Then finally, we will use the command below to authorize the CA to sign the CSR for our client.
You will be prompted for the CA's password that you generated in the previous steps.
sudo ./easyrsa sign-req client client
By carefully executing the 7 steps, we have developed a PKI that creates a complete set of keys and certificates that OpenVPN will use to initiate an encrypted connection.
Note: The server certificate allows the VPN server to prove its identity to connecting clients, while client certificates allow individual users to authenticate themselves to the VPN server.
We are then going to go back to the OpenVPN directory cd /etc/openvpn and issue the following command.
sudo openvpn --genkey --secret pfs.key
The command above generates a static key which is used in the TLS handshake process between the VPN server and the client, ensuring that both parties can securely exchange cryptographic keys for encrypting their communication.
OpenVPN Server Configuration
Using the specified certificates, keys, and parameters we created in the steps above, we are able to configure our OpenVPN Server with the configurations below so that it can be used to establish secure connections with clients.
port 1194
proto udp
dev tun
ca /etc/openvpn/easy-rsa/pki/ca.crt
cert /etc/openvpn/easy-rsa/pki/issued/server.crt
key /etc/openvpn/easy-rsa/pki/private/server.key
dh /etc/openvpn/easy-rsa/pki/dh.pem
cipher AES-256-CBC
auth SHA512
server 10.8.0.0 255.255.255.0
push "redirect-gateway def1 bypass-dhcp"
push "dhcp-option DNS 8.8.8.8"
push "dhcp-option DNS 8.8.4.4"
ifconfig-pool-persist ipp.txt
keepalive 10 120
comp-lzo
persist-key
persist-tun
status openvpn-status.log
log-append openvpn.log
verb 3
tls-server
tls-auth /etc/openvpn/pfs.key
Starting and Enabling the OpenVPN Service
After setting up the server's configurations, ensure you run the commands below to start and enable the openvpn service.
sudo systemctl start openvpn@server.service
sudo systemctl enable openvpn@server.service
sudo systemctl status openvpn@server.service
You should expect to see such an outcome to confirm the service is running.
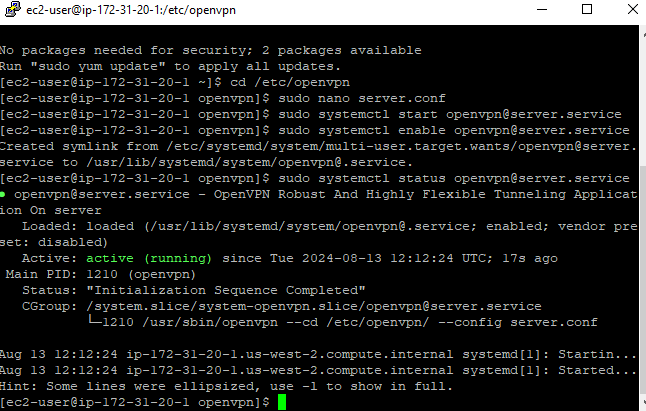
Copying all Keys and Certificates from the VPN Server to your Local Machine.
While in the /etc/openvpn directory, make a directory that will copy all the keys and certificates you created so that you transfer them to your local machine for client authentication and connection.
Run these commands individually to:
Create a directory called
openvpn-keysCopy all the keys and certificates from
/etc/openvpn/easy-rsa/pkito the newly created/etc/openvpn/openvpn-keys
This will make it easy for us to export all keys from our VPN server to our local machine.
Note: You have to be in the /etc/openvpn directory
sudo mkdir openvpn-keys
sudo cp pfs.key openvpn-keys
sudo cp /etc/openvpn/easy-rsa/pki/dh.pem openvpn-keys
sudo cp /etc/openvpn/easy-rsa/pki/ca.crt openvpn-keys
sudo cp /etc/openvpn/easy-rsa/pki/private/ca.key openvpn-keys
sudo cp /etc/openvpn/easy-rsa/pki/private/client.key openvpn-keys
sudo cp /etc/openvpn/easy-rsa/pki/issued/client.crt openvpn-keys
sudo chmod 777 *
Note: Make sure you change the permissions back to how they were to safeguard your openvpn directory.
We will finally use the pscp command on Windows CMD to copy the openvpn-keys directory to your machine.
First, download and install OpenVPN on Windows.
Then download pscp.exe
Move your server's ssh key and pscp.exe to C:\Program Files\OpenVPN\config folder of your windows machine.

Then afterwards open Command Prompt and run as administrator.
Navigate/move to C:\Program Files\OpenVPN\config directory from command prompt as shown below.
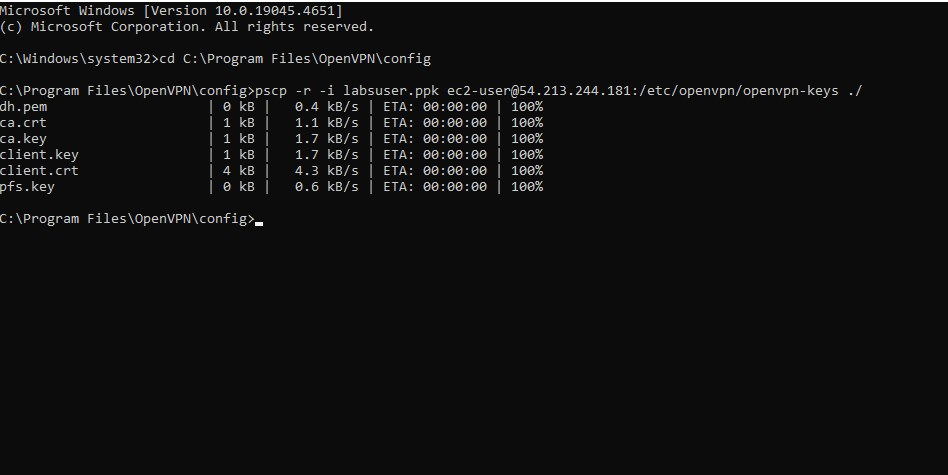
Then run the following command to initiate pscp as done above.
pscp -r -i abc.ppk ec2-user@54.213.244.181:/etc/openvpn/openvpn-keys ./
Creating the Configuration File client.ovpn
Finally, create the config file with name client.ovpn using notepad and copy the following contents to it.
client
dev tun
proto udp
remote YOUR.EC2.INSTANCE.IP 1194
ca ca.crt
cert client.crt
key client.key
tls-version-min 1.2
tls-cipher TLS-ECDHE-RSA-WITH-AES-128-GCM-SHA256:TLS-ECDHE-ECDSA-WITH-AES-128-GCM-SHA256:TLS-ECDHE-RSA-WITH-AES-256-GCM-SHA384:TLS-DHE-RSA-WITH-AES-256-CBC-SHA256
cipher AES-256-CBC
auth SHA512
resolv-retry infinite
auth-retry none
nobind
persist-key
persist-tun
ns-cert-type server
comp-lzo
verb 3
tls-client
tls-auth pfs.key
Note: Replace your-public-ip with your VPN Servers IP address
Ensure the client.ovpn file is located at C:\Program Files\OpenVPN\config alongside all the other keys and certificates.

Task 3: Connecting to the OpenVPN Client
Once everything is set and done, we will need to test out if our VPN Server actually works.
Since OpenVPN is installed on your machine, and the client.ovpn, keys and certificates are all in C:\Program Files\OpenVPN\config, then located it from the hidden icons shown in the image below.
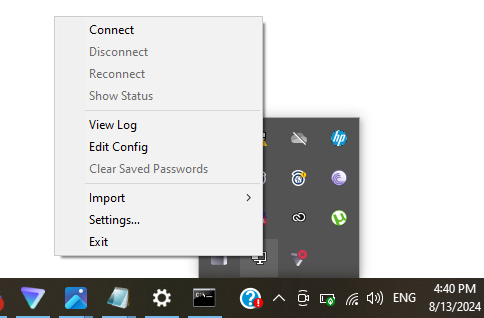
Click 'Connect' and your VPN connection will be initiated successfully.
Task 4: Testing Your VPN Connection
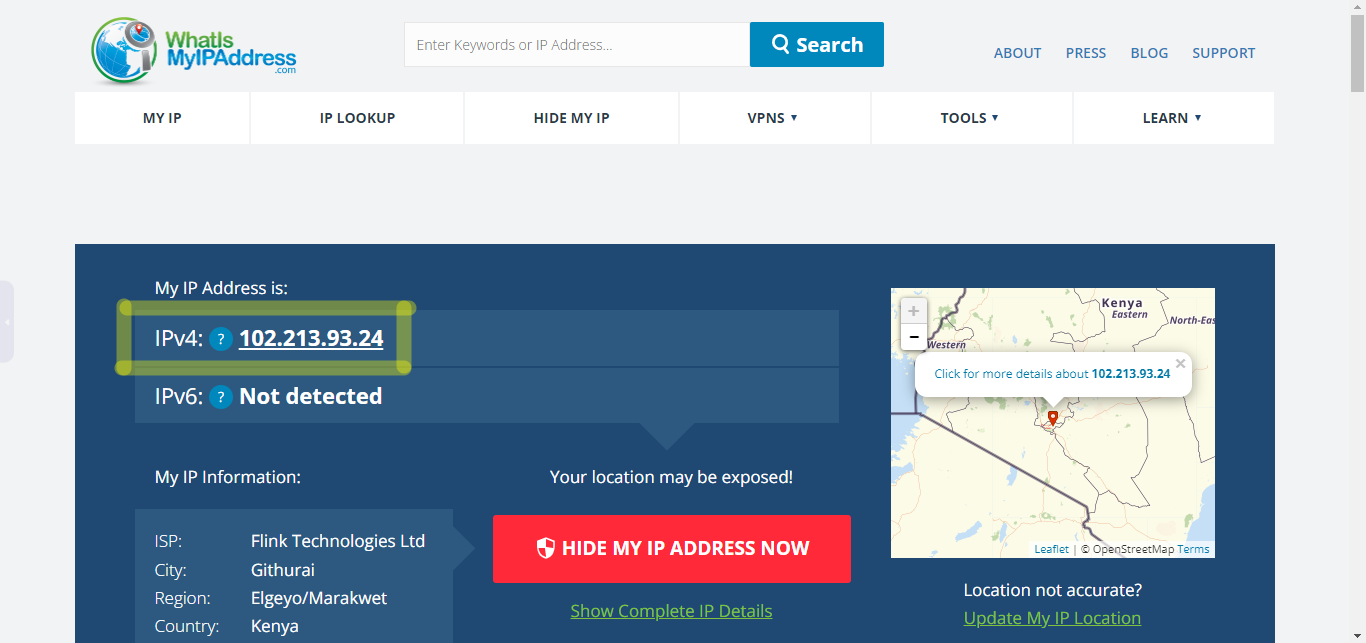
Before connecting to OpenVPN (Country - Kenya)
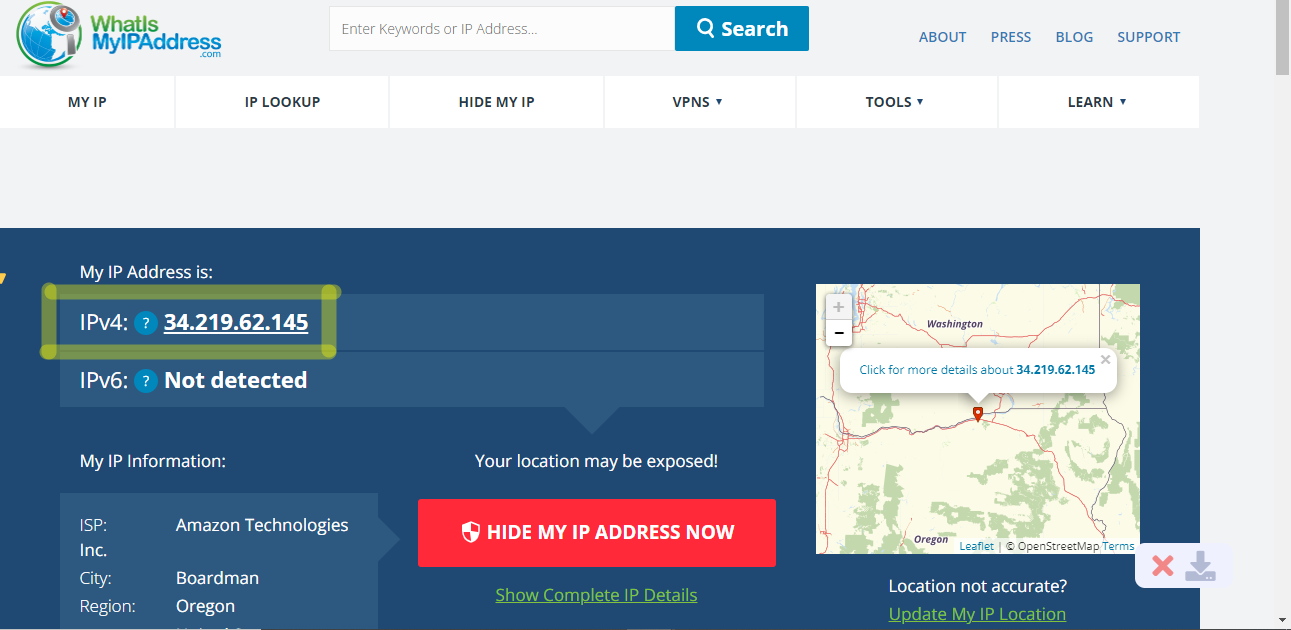
After connecting to OpenVPN (Region - Oregon, City - Boardman)
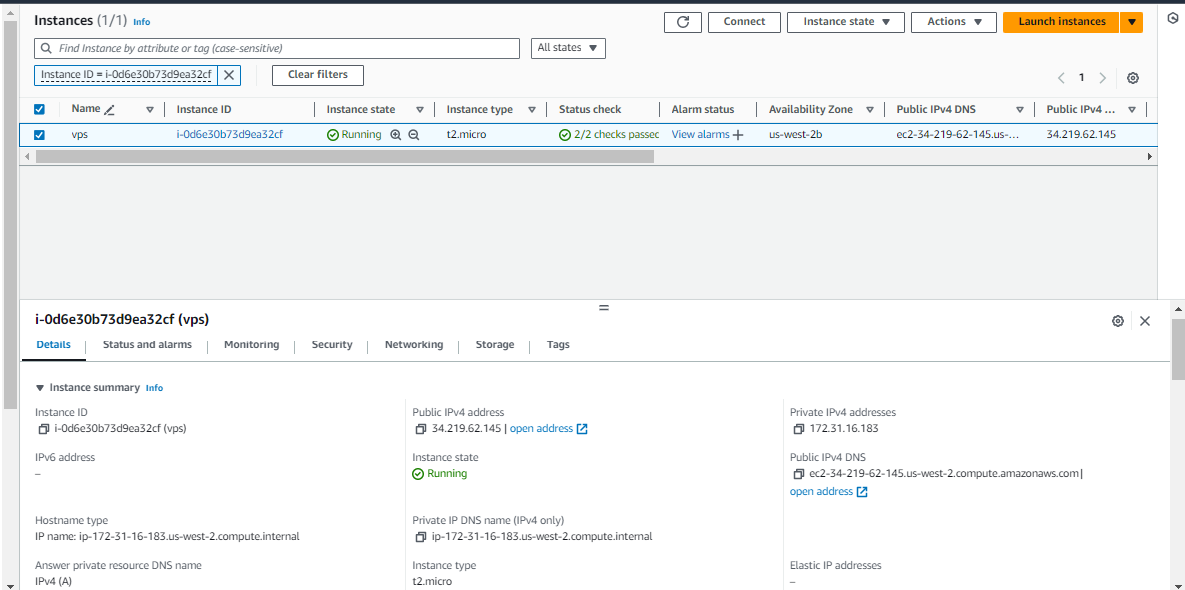
Public IP Address of the VPN Server is similar to what is displayed above.
Challenges to this approach
The VPN connection still experiences minimal DNS/IP Leaks.
You can counter this by add a static route on your client machine. It routes traffic destined for your local network (192.168.8.0/24) through the VPN tunnel.
We used a static key (pfs.key) for authentication which is less secure than using certificates. Certificates are better at provide a higher level of authentication by verifying both the server and the client.
Forgot to mention how I struggled to find work arounds to make this Server work. You need to have a good understanding of the Linux File Hierarchy and how Public Key Infrastructure works. You miss a single step and it's game over 💣
Subscribe to my newsletter
Read articles from Anthony Nzuki directly inside your inbox. Subscribe to the newsletter, and don't miss out.
Written by
