Understanding OAuth2.0 and OpenID Connect: A Simple Guide with Implementation
 Yash Shrivastava
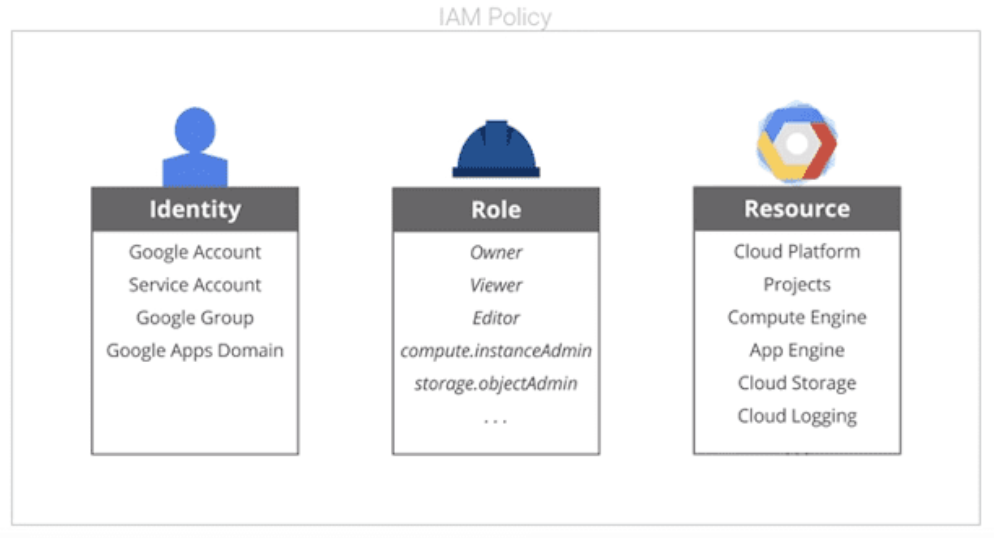
Identity and resource ?
Identity and access management (IAM) deals with making sure who can access what. Only the people with proper access with a limited set of permissions can access or alter a user’s data. There are two aspects to this from an application user point of view, authentication and authorisation, which we will cover in a bit. Any user related data or URI that is requested can be termed as resource here (ex. contacts stored in google account, cloud storage data, etc).
Identity provider vs resource provider?
Usually, authentication servers, are often hosted at a different domain than the resource servers. This is done for the purposes of security, separation of concerns makes it less likely to have a single point of failure or corruption.
The authentication servers are the identity providers (ex. accounts.google.com), which verify user’s identity to the system (user roles and associated permissions are sent back which helps with access management) and validates the resources he has access to.
The resource servers is where the actual resources or URIs are hosted. These can be anything that the user is requesting (ex. contacts.google.com).
Identity provider: internal vs external ?
Storing a users username and password once he signs up on a website in-house in a database, performing his authentication authorisation when he logs into the system, performing session management would mean maintaining his identity internally.
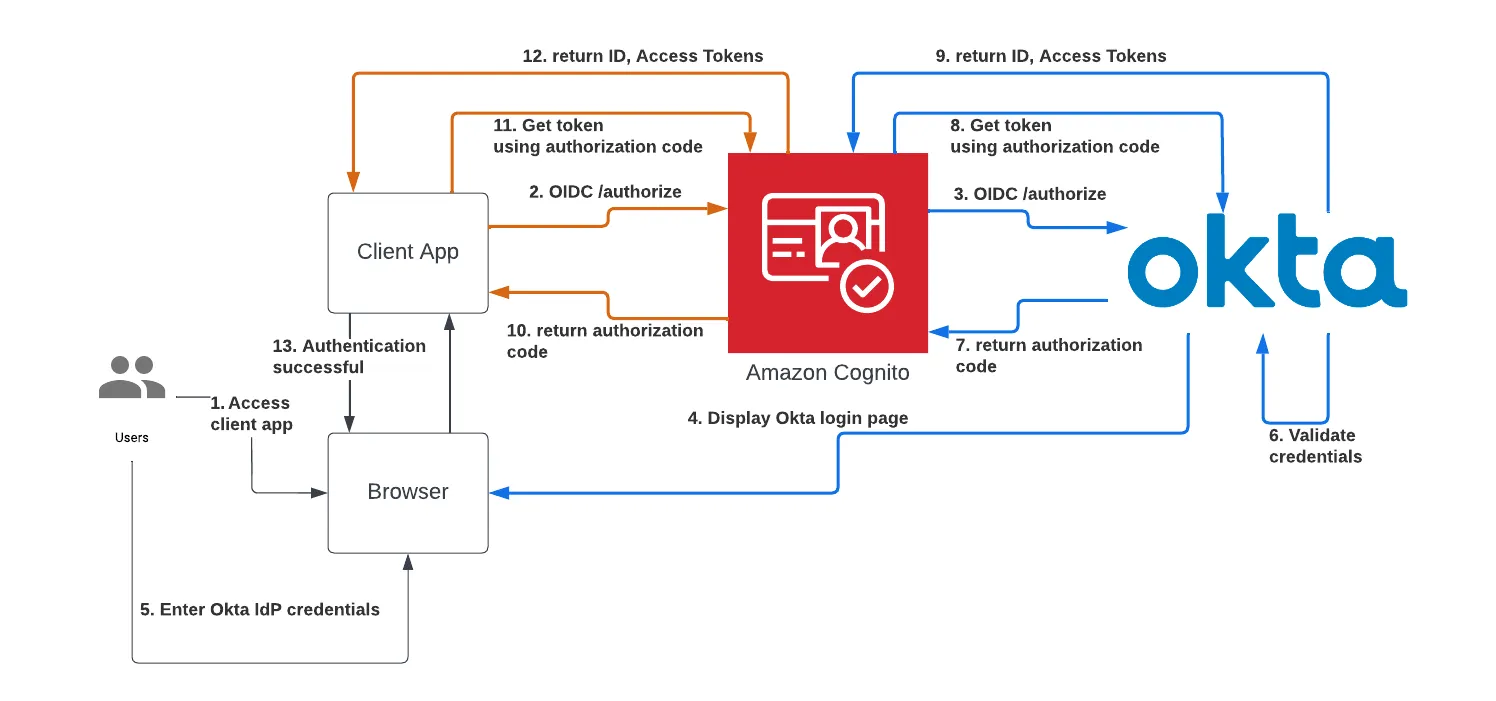
Offloading this task to trusted third-party website, such as Okta would make for an external identity provider. This can be done for ex. via use of aws cognito service which helps with the integration with external identity provider.
OAuth2.0 Intuition (users perspective)
Let's assume a user already has an account on Google. He has some contacts stored and some entries in his google calendar. This data that is stored on Googles servers, all of these resources are owned by the user(Resource owner) on the Resource server. Every time he wants to access this data, he has to verify to Google that he is the true owner which he does with now a days sometimes a two factors of authentication ( 1. username- password, 2. OTP).
Suppose this user logs into a third-party application and wants to provide his contact details to this application. The third-party application can request for a resource that is stored on the resource servers of Google if this users allow for his consent. This authorisation and access/roles/permission providing will take place at the Authorisation server.
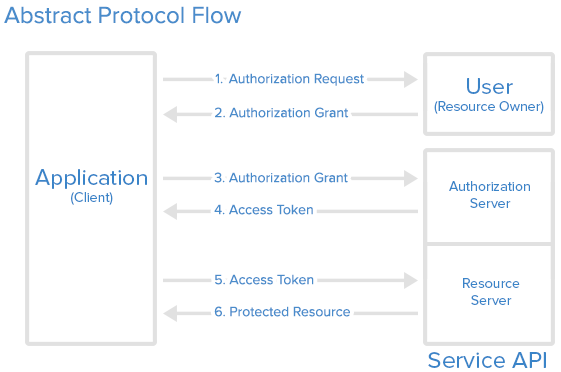
User initiates Auth request at Third party app (client).
Client makes request to Auth Server, which provides grant upon validation of consent.
Client exchanges the grant for an access token from Auth server.
Client uses the access token to access resources at resource server.
This is the whole idea behind OAuth2.0.
OAuth2.0 (authorisation protocol)
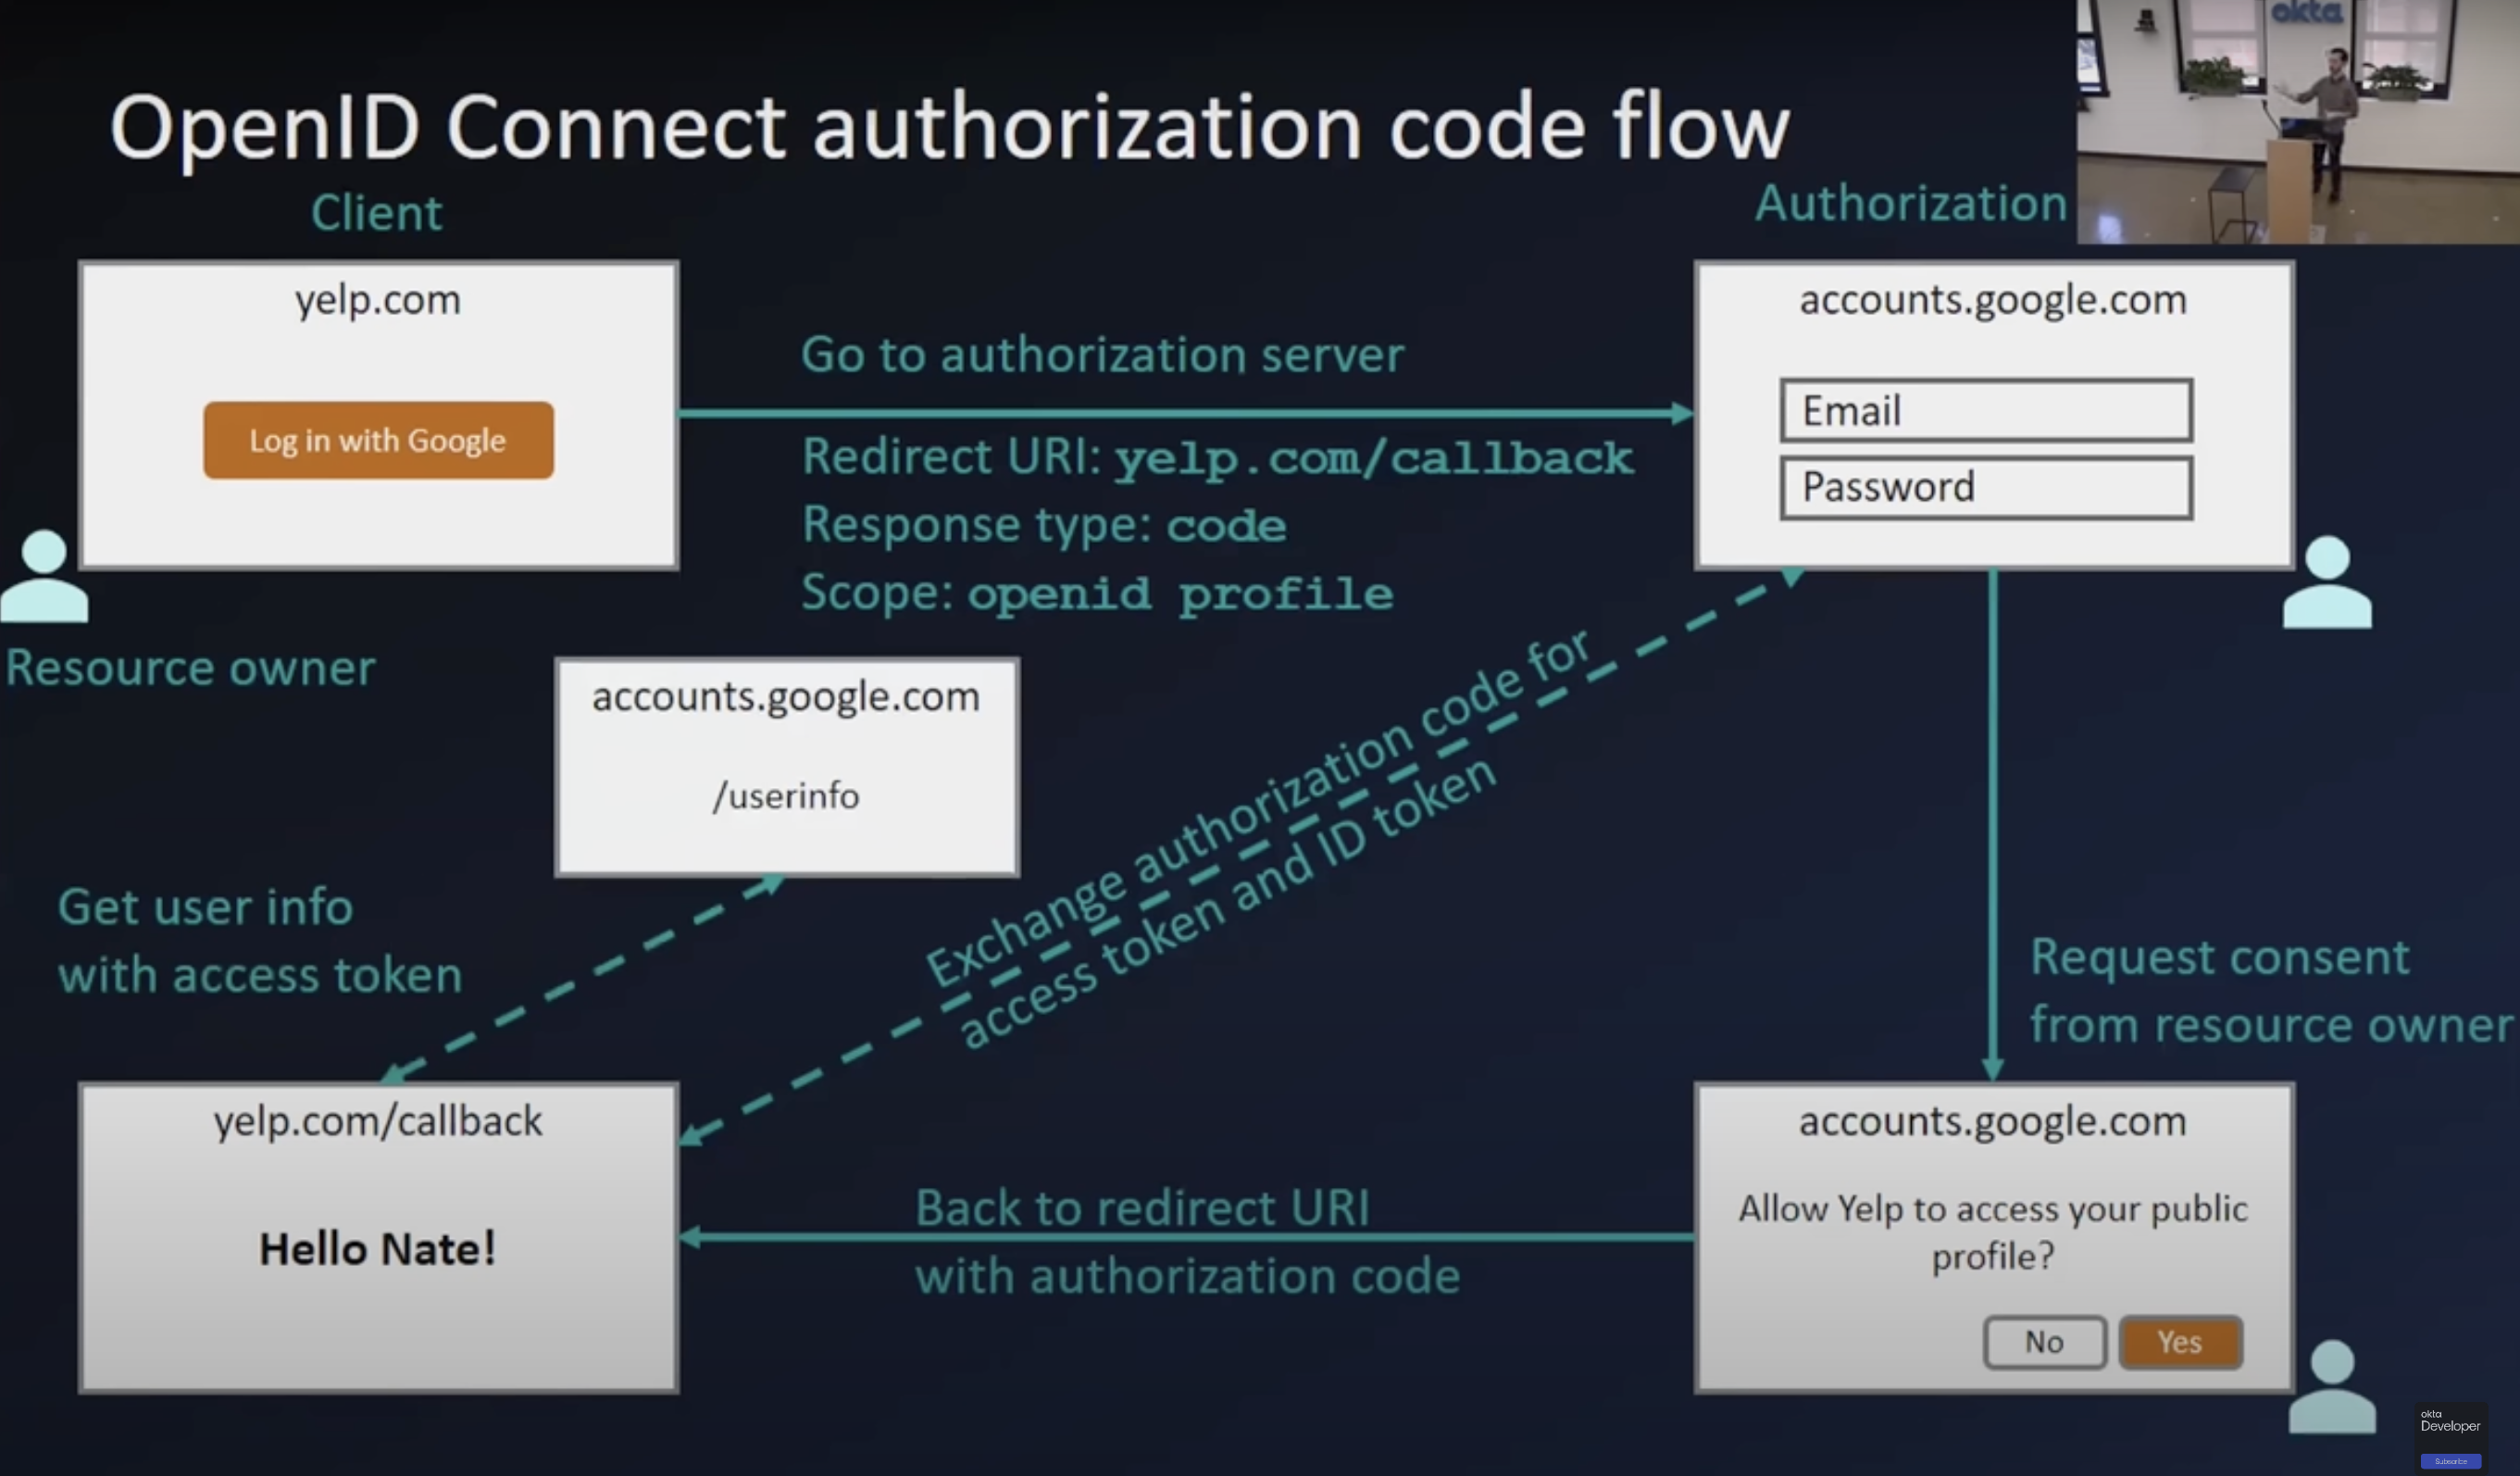
The scenario described above is an authorisation request from a third-party application (GET request with a redirect URI embedded in it) to the authorisation server of Google (accounts.google.com), which prompts a consent screen to the user which will use the redirect URI to go back to the third-party website upon providing consent (the redirect XHR request has an auth code/grant which the third party website exchanges with google for an access token through a back channel.
This request the third-party makes to the authorisation server (accounts.google.com) of Google for the resource specific (contacts/username-xyz-contacts) permissions and access is made be possible with exchange of the auth code/grant for the access token. Once the third-party website has the access token, it can make a request to the resource server (contacts.google.com) with this token and get the data.
This whole process is about securely exchange of tokens between a third-party website and Google’s authorisation server to provide it access to a resource upon user consent is OAuth2.0 in a nutshell.
Open ID connect and single sign on (SSO)
Authentication protocol built on top of OAuth2.0. Basically validating a users identity using an external provider where user already has his creds stored(Google).
In the whole process above for OAuth2.0, along with access token, if the ID tokens are requested, the process helps in authenticating the user, and thats what OpenID connect does, it provides the “ identity layer” with the help of “ID token” Which provides authentication on top of Oauth 2.0.
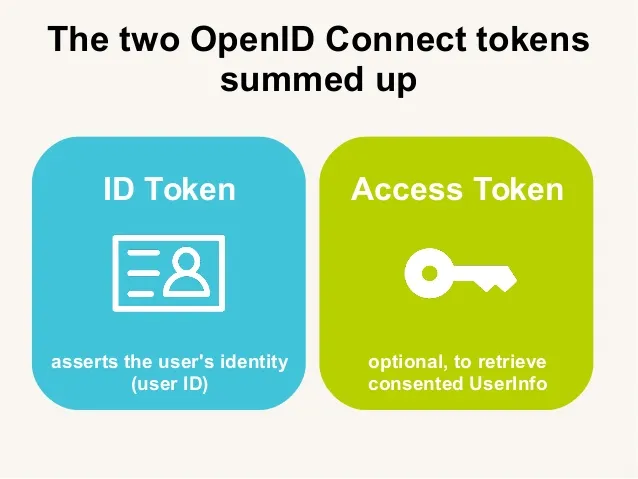
There is also another token called as “refresh token” which is used to obtain new access token upon time expiry without requiring re-authentication.
All these tokens are JWT tokens (https://jwt.io/).
Implementation
An implementation of SSO login can be done in Node.js with the help of a third party library called PassportJS which offer Strategies to link different Identity providers with your application. I have used google strategy and for that I had to set up api credentials on google cloud. API credentials will give you a client id and client secret which will help google identify your application when it makes an SSO request and while setting up this you will have to provide a callback URL which is a route in your application to which google will redirect upon providing of consent. I have attached a video link at the end which will help you with the api credential setup. Using standard implementation guidelines through passportJS, you can set up strategies in your application with a callback function that will bring the profile data upon validation, there are success and failure callback routes which can be set up for proper redirection (refer to the code in the project link below or PassportJS docs for configuration).
import passport from 'passport';
import dotenv from 'dotenv'
import { Strategy as GoogleStrategy } from 'passport-google-oauth20';
dotenv.config();

const GOOGLE_CLIENT_ID = process.env.GOOGLE_CLIENT_ID;
const GOOGLE_CLIENT_SECRET = process.env.GOOGLE_CLIENT_SECRET;
const SERVER_CALLBACK_URI = process.env.SERVER_CALLBACK_URI;

passport.use(new GoogleStrategy({
    clientID: GOOGLE_CLIENT_ID,
    clientSecret: GOOGLE_CLIENT_SECRET,
    callbackURL: SERVER_CALLBACK_URI
},
    function (request, accessToken, refreshToken, profile, done) {
        return done(null, profile);
    })
);

passport.serializeUser(function (user, done) {
    done(null, user);
});

passport.deserializeUser(function (user, done) {
    done(null, user);
});
In the above code, I have set up the important info that any strategy would need to make a SSO request successful:
clientID
clientSecret
callbackURL
callback function
Conclusion
Going over this image should sum things up if you have made it this far:
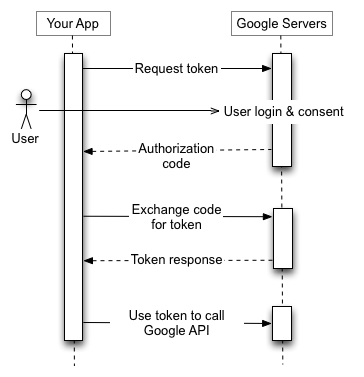
If you wanna take a deeper dive into OAuth2.0, check out these references:
References:
OktaDev official channel OAuth2.0 video for fundamental understanding: https://www.youtube.com/watch?v=996OiexHze0&t=958s
Google documentation for developers realted to Identity and OAuth: https://developers.google.com/identity/protocols/oauth2
Google API creds setup video by AppWrite: https://www.youtube.com/watch?v=tgO_ADSvY1I
An in-progress project i'm making using PassportJs for learning purposes: https://github.com/YashS96/auth-system

Subscribe to my newsletter
Read articles from Yash Shrivastava directly inside your inbox. Subscribe to the newsletter, and don't miss out.
Written by

Yash Shrivastava
Yash Shrivastava
Imma take the topics that confuse me and try to make them not so confusing for ya'll.