Understanding Checkov: The Ultimate Tool for Infrastructure as Code Security
 Balraj Singh
This blog offers a practical, step-by-step guide to integrating Checkov into your Terraform workflow on Ubuntu 24 LTS. It helps you understand its importance and how it can benefit your infrastructure.
In the world of cloud-native applications and DevOps, security is crucial but often overlooked. As infrastructure as code (IaC) becomes standard, the need for a strong security framework that fits smoothly into the development process is more important than ever. This is where Checkov comes in. In this blog, we will explore what Checkov is, why it is essential, its key benefits, and a real-world example that shows its effectiveness. This guide is designed for users working with Ubuntu 24 LTS.
What is Checkov?
Checkov is an open-source static code analysis tool designed specifically for Infrastructure as Code (IaC). It scans your Terraform, CloudFormation, Kubernetes, and other IaC templates to identify potential security misconfigurations, policy violations, and compliance issues before they manifest in your infrastructure. By integrating Checkov into your CI/CD pipeline, you can ensure that your IaC adheres to best practices and security guidelines.
Why Use Checkov?
As organizations increasingly adopt IaC to automate their infrastructure management, the need to secure these configurations becomes paramount. Misconfigurations in IaC templates can lead to significant vulnerabilities, exposing your infrastructure to potential threats. Checkov addresses this challenge by providing a proactive approach to IaC security.
Key Reasons to Use Checkov:
Early Detection of Issues: Checkov allows you to catch security issues early in the development process, reducing the risk of deploying vulnerable configurations to your production environment.
Compliance Assurance: Checkov includes built-in policies for various compliance frameworks like CIS, HIPAA, and SOC 2. This ensures that your infrastructure meets the necessary regulatory requirements.
Customization and Extensibility: You can create custom policies tailored to your organization’s specific needs, making Checkov a flexible solution that can adapt to various environments and requirements.
Seamless Integration: Checkov can be easily integrated into popular CI/CD tools, making it a natural addition to your DevOps workflow without disrupting existing processes.
Benefits of Using Checkov
Checkov offers a range of benefits that make it an invaluable tool for any organization utilizing IaC.
Enhanced Security Posture: By identifying vulnerabilities and misconfigurations early, Checkov helps to enhance your overall security posture, reducing the likelihood of security breaches.
Cost Efficiency: Catching issues early in the development cycle is far less expensive than addressing them after deployment. Checkov helps to minimize the costs associated with post-deployment fixes.
Improved Compliance: With Checkov, you can automate compliance checks, ensuring that your infrastructure consistently adheres to industry standards and best practices.
Developer-Friendly: Checkov provides detailed reports with actionable insights, making it easy for developers to understand and resolve issues without extensive security expertise.
Supported IaC types
Checkov scans these IaC file types:
Terraform (for AWS, GCP, Azure and OCI)
CloudFormation (including AWS SAM)
Azure Resource Manager (ARM)
Serverless framework
Helm charts
Kubernetes
Docker
Prerequisites
Before you can run Checkov, you need to have the following installed on your system:
Python 3.6+: Checkov requires Python 3.6 or higher. Ubuntu 24 LTS comes with Python 3.12, which is compatible.
Pip: Python's package installer, pip, is required to install Checkov and its dependencies.
Virtual Environment (Optional but Recommended): It is a best practice to use a virtual environment to manage Python packages and dependencies.
Checkov CLI
IaC language interpreter (Terraform, CloudFormation, etc)
jq
Use Case: Integrating Checkov with a Terraform Project on Ubuntu 24 LTS
Let’s walk through a practical example where we integrate Checkov with a Terraform project. We’ll use Ubuntu 24 LTS as our operating system.
Task 01. Install Checkov
Step 1: Install Python3 and Pip
Checkov is a Python-based tool, so the first step is to ensure Python3 and Pip are installed on your system.
sudo apt update
sudo apt install python3 python3-pip jq -y
Step 2: Install Checkov
With Python3 and Pip installed, you can now install Checkov using the following command:
pip3 install checkov -y
# Ref link: https://pypi.org/project/checkov/#files
I am getting this error message while installing it.
$ sudo pip3 install checkov
error: externally-managed-environment

× This environment is externally managed
╰─> To install Python packages system-wide, try apt install
    python3-xyz, where xyz is the package you are trying to
    install.

    If you wish to install a non-Debian-packaged Python package,
    create a virtual environment using python3 -m venv path/to/venv.
    Then use path/to/venv/bin/python and path/to/venv/bin/pip. Make
    sure you have python3-full installed.

    If you wish to install a non-Debian packaged Python application,
    it may be easiest to use pipx install xyz, which will manage a
    virtual environment for you. Make sure you have pipx installed.

    See /usr/share/doc/python3.12/README.venv for more information.

note: If you believe this is a mistake, please contact your Python installation or OS distribution provider. You can override this, at the risk of breaking your Python installation or OS, by passing --break-system-packages.
hint: See PEP 668 for the detailed specification.
Solution for error:
Using a Virtual Environment
Install Python Virtual Environment Packages
First, make sure you have the python3-venv package installed, which allows you to create virtual environments:
sudo apt update
sudo apt install python3-venv
Create a Virtual Environment
Create a virtual environment in a directory of your choice:
python3 -m venv ~/checkov-venv
This will create a directory named checkov-venv in your home directory.
Activate the virtual environment:
source ~/checkov-venv/bin/activate
Install Checkov
With the virtual environment activated, you can now install Checkov:
pip install checkov
Verify Checkov version
You can run Checkov from within this virtual environment. For example:
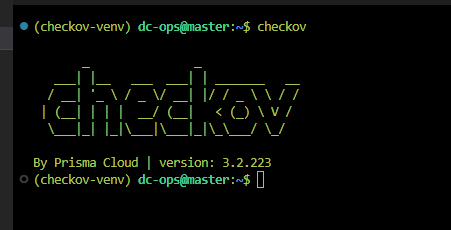
checkov
I am using version 3.2.223

Task 02. Install Terraform:
cd ..

sudo apt-get update && sudo apt-get install -y gnupg software-properties-common curl
curl -fsSL https://apt.releases.hashicorp.com/gpg | sudo gpg --dearmor -o /usr/share/keyrings/hashicorp-archive-keyring.gpg
echo "deb [signed-by=/usr/share/keyrings/hashicorp-archive-keyring.gpg] https://apt.releases.hashicorp.com $(lsb_release -cs) main" | sudo tee /etc/apt/sources.list.d/hashicorp.list
sudo apt update
sudo apt install terraform
- Verify the Terraform installation:
terraform --version

Task 03. Configuring Cloud Credentials:
Ensure your AWS CLI is configured with the necessary credentials.
- Install Required Packages Install unzip and curl, which are required to download and install the AWS CLI.
sudo apt install unzip curl -y
- Download the AWS CLI Installer Download the AWS CLI version 2 installation file using curl.
curl "https://awscli.amazonaws.com/awscli-exe-linux-x86_64.zip" -o "awscliv2.zip"
- Unzip the Installation File Unzip the AWS CLI installation file.
unzip awscliv2.zip
- Run the Installer Run the installer script to install AWS CLI.
sudo ./aws/install
- Verify the Installation After the installation is complete, verify that the AWS CLI was installed correctly by checking its version.
aws --version

# You should see output similar to:
aws-cli/2.17.28 Python/3.11.9 Linux/6.8.0-1009-aws exe/x86_64.ubuntu.24
- Clean Up: Optionally, you can remove the downloaded files to clean up your directory.
rm awscliv2.zip
rm -rf aws
- Configure AWS CLI Finally, configure your AWS CLI with your credentials (Access Key ID and Secret Access Key).
aws configure
You'll be prompted to enter your AWS Access Key ID, Secret Access Key, default region name, and default output format (e.g., json). After this, your AWS CLI will be set up and ready to use.
Task 04. Initialize a Terraform Project:
For demonstration purposes, let’s create a simple Terraform project.
mkdir terraform-checkov
cd terraform-checkov
Task 05. Create a Terraform Configuration File:
Create a basic Terraform configuration file (main.tf):
touch main.tf
vi main.tf
Add the following content to the file:
provider "aws" {
  region = "us-east-1"
}

resource "aws_s3_bucket" "example" {
  bucket = "my-unique-bucket-name"
  acl    = "private"
}
terraform init
Task 06. Scan the Terraform Configuration with Checkov:
With your Terraform configuration in place, you can now run Checkov to scan the file for security issues.
cd ..
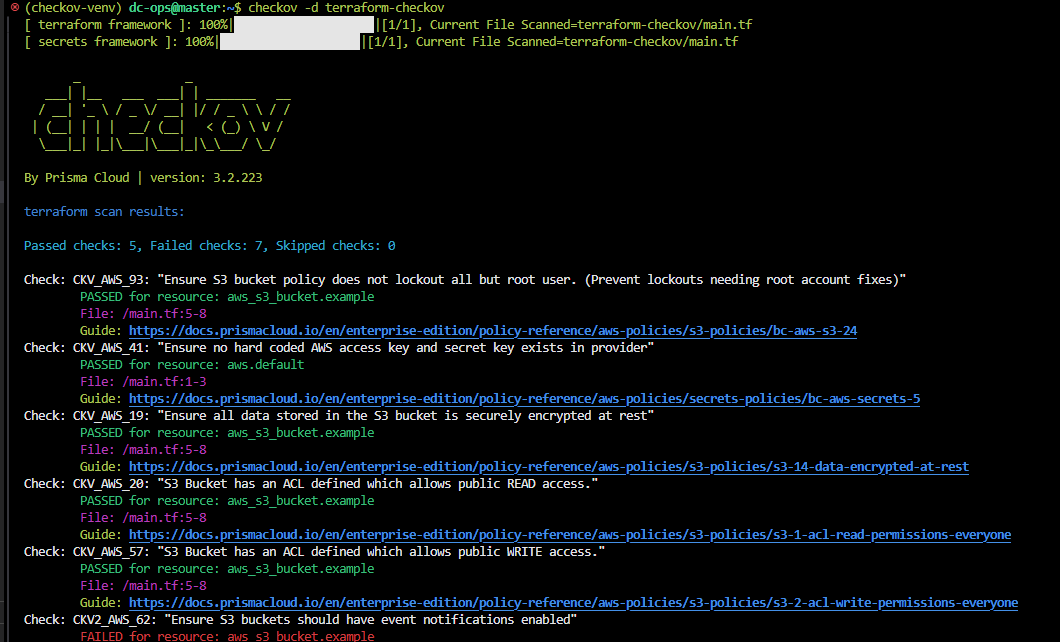
checkov -d terraform-checkov
    or
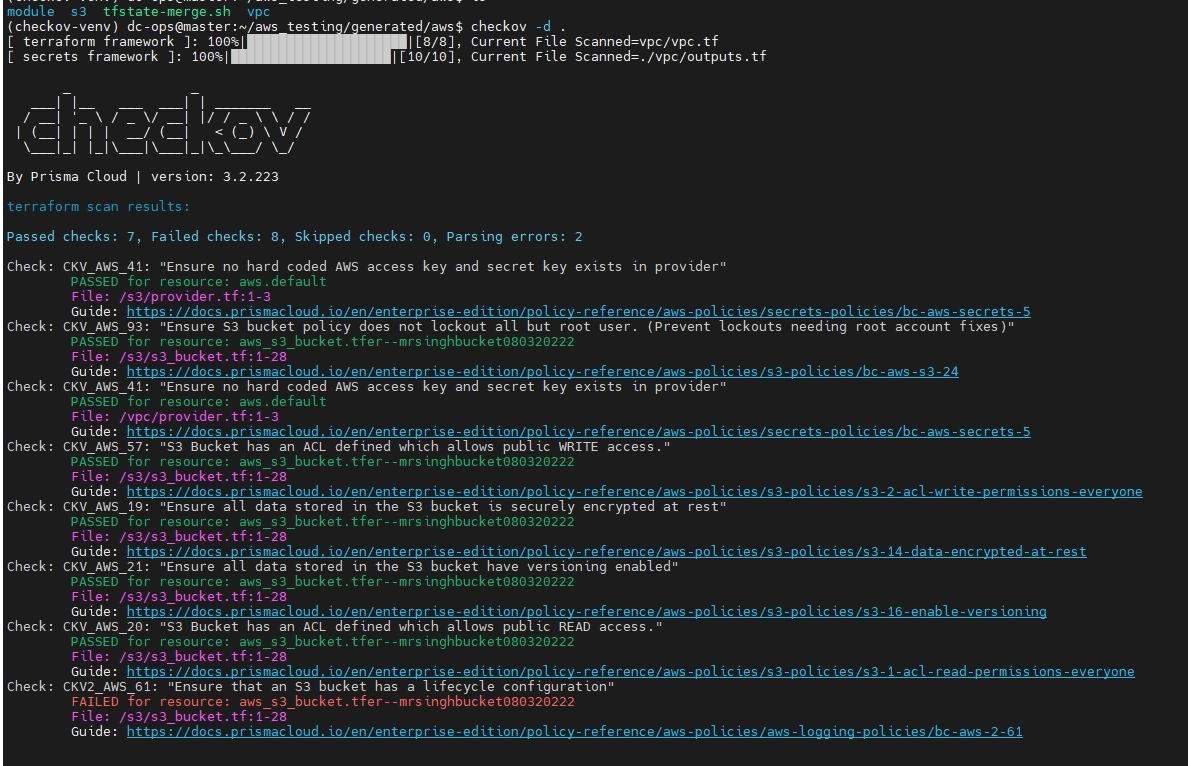
checkov -d .   # all folders/directory to scan.
Checkov will analyze the main.tf file and output any security concerns it identifies.

Task 07. Review and Address Issues:
Checkov will provide a report listing potential issues. Review these issues and update your Terraform configuration as necessary to resolve them.
To scan a directory, use the following command: -d : IaC root directory
checkov --directory <directory path>

To scan a specific file, use this command: -f: file
checkov --file /user/tf/example.tf
To configure multiple specific files:
checkov -f /user/cloudformation/example1.yml -f /user/cloudformation/example2.yml
To configure a Terraform Plan file in JSON:
terraform init
terraform plan -out tf.plan
terraform show -json tf.plan > tf.json
checkov -f tf.json
Task 08. : Run Checkov
Once you’ve installed Checkov and configured your input, you can run Checkov to start scanning your infrastructure as code2. The command is as simple as:
checkov -d /user/tf
https://www.bridgecrew.cloud/dashboard
To deactivate the virtual environment when you're done, simply run:
deactivate
Conclusion
Checkov is a powerful tool that enhances the security of your Infrastructure as Code by providing early detection of vulnerabilities, ensuring compliance, and integrating seamlessly into your CI/CD pipeline. By adopting Checkov in your workflow, you can significantly reduce the risk of security breaches and maintain a robust, secure infrastructure. Whether you're managing a simple Terraform project or a complex Kubernetes deployment, Checkov is an indispensable tool in the modern DevOps toolkit.
Start securing your IaC today with Checkov, and ensure your infrastructure is built on a solid foundation.
Integrating with CI/CD
Visualizing Checkov Output in Prisma Cloud
References - https://www.checkov.io/
Subscribe to my newsletter
Read articles from Balraj Singh directly inside your inbox. Subscribe to the newsletter, and don't miss out.
Written by

Balraj Singh
Balraj Singh
Tech enthusiast with 15 years of experience in IT, specializing in server management, VMware, AWS, Azure, and automation. Passionate about DevOps, cloud, and modern infrastructure tools like Terraform, Ansible, Packer, Jenkins, Docker, Kubernetes, and Azure DevOps. Passionate about technology and continuous learning, I enjoy sharing my knowledge and insights through blogging and real-world experiences to help the tech community grow!