Beginner’s Journey to Expert: Linux from Scratch Tutorial
 Rushikesh Kamble
Hey there, fellow tech enthusiasts! 👋
Welcome back to my DevOps journey. Today, we're delving into the heart of infrastructure: Linux. As any DevOps engineer knows, mastering this powerful operating system is non-negotiable. It's the bedrock upon which we build our automation empires. 🏰 Join me as I share my experiences navigating the Linux landscape and uncover the essential skills needed to excel in this dynamic field. 🚀
Let's get started!
🖥️ Linux: Your Gateway to Tech Mastery
Linux isn’t just an OS (operating system), it's a world. 🌍 From the servers running your favorite websites to the phone in your hand, chances are Linux is involved. It's open-source, super secure, and crazy versatile. Ready to join the Linux club? 🎟️Whether you’re looking to learn Linux for personal use, development, or system administration, understanding its fundamentals is essential. Here’s a concise guide to get you started!
❓ Why Learn Linux as a DevOps Engineer?
Linux is the OS of Choice for Servers: Linux is the most widely used OS for servers, making it a must-know for DevOps Engineers. 🖧
You Need to Work with Servers: As a DevOps Engineer, you'll work with servers daily, and Linux knowledge is essential for tasks like provisioning, deployment, and troubleshooting. 🔧
Installing and Configuring Servers: Knowing how to install and configure Linux servers is crucial for optimal performance, security, and scalability. 🔒
Linux Native Technologies: Familiarity with Linux native technologies like Docker, Kubernetes, and Ansible is vital for efficient application management and deployment. 🐳
🔑 Diving Deep into Linux: Core Concepts Every DevOps Engineer Should Know
PART- 1
🧠 The Heart of Linux: The Kernel
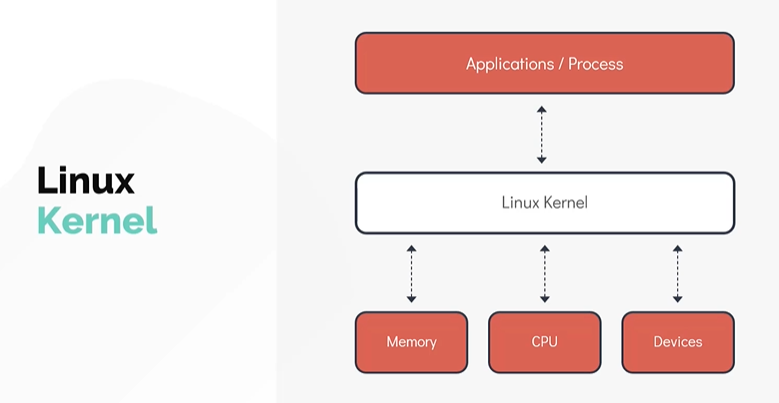
At the core of every Linux system lies the kernel. Think of it as the brain 🧠 that controls everything. It's responsible for managing system resources, handling hardware, and facilitating communication between software and hardware.

Key functions of the Linux kernel:
Memory Management: Allocating and managing system memory efficiently. 🧮
Process Management: Handling multiple tasks and processes running simultaneously. 🔄
Device Drivers: Interfacing with hardware devices like keyboards, mice, and disks. 🖱️
System Calls: Providing an interface for user programs to interact with the kernel. 📞
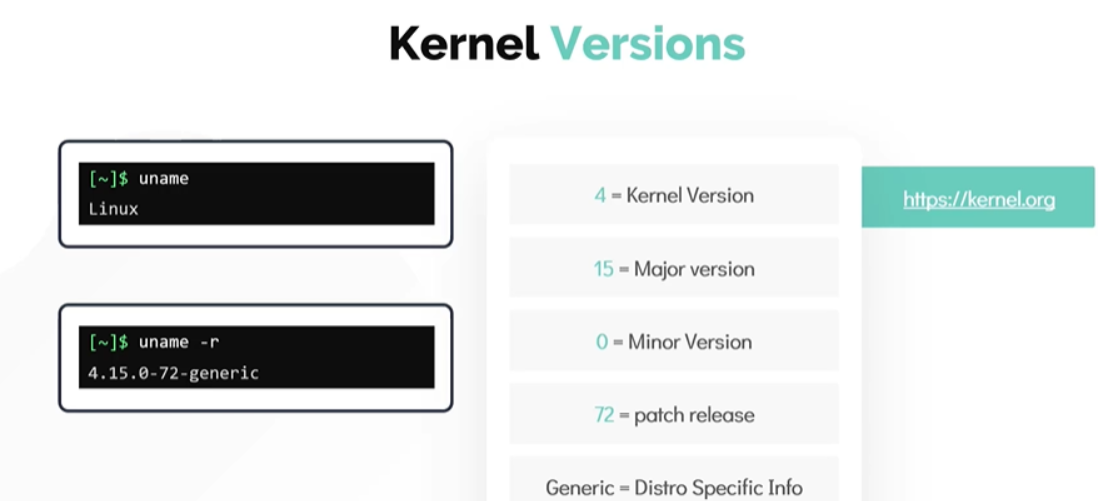
⚙️Kernel Versions
To check your Linux kernel version, use the following command in your terminal:
uname -r

⚙️ Kernel Space vs. User Space
Linux divides system memory into two main areas:
Kernel Space: This is the exclusive domain of the kernel. It houses the kernel code, device drivers, and other system components.🛡️
User Space: This is where user applications and processes reside. It's isolated from the kernel for security reasons.🔒
Let us know see how programs running in the User Space work
All user programs function by manipulating data stored in memory and on disk. User programs access this data by making special requests to the kernel called System Calls, which are requests for kernel services such as reading a file or creating a new process.📝
Examples include, allocating memory by using variables or opening a file or
opening a file such as the
/etc/os-releaseto see the operating system installed, results in asystem call
A Simple Analogy
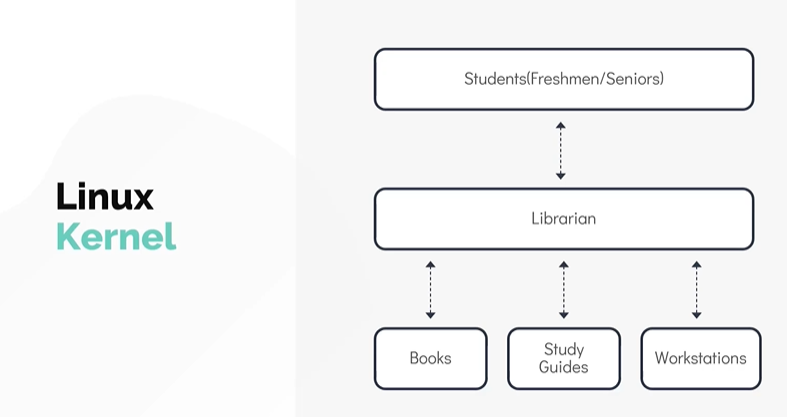
Imagine a college library. The librarian is like the Linux kernel, managing all the books (system resources) and ensuring everyone follows the rules (system calls). The students (user processes) borrow books (system resources) through the librarian.

Understanding Hardware Interaction in Linux
When working with Linux, understanding how it interacts with hardware resources is crucial. This post will guide you through how Linux identifies and manages hardware devices, with practical examples and commands to get detailed information about these devices.
Detecting and Managing Hardware
When you connect a hardware device, such as a USB disk, Linux handles this through a series of steps:
Device Detection: The kernel detects the attached USB device through a device driver.
Generating uevents: This detection generates an event, known as a
uevent, which is sent to the user-space device manager daemon,udev.🔔Device Node Creation:
udevcreates a device node in the/dev/filesystem for the newly attached USB drive.🗂️
Once this process completes, the device should be visible under the /dev/ directory.
Key Commands for Hardware Management
Viewing Kernel Messages: Use the
dmesgcommand to display messages from the kernel's ring buffer. This can be particularly useful for troubleshooting hardware issues.🔍$ dmesg $ dmesg | grep -i usbUsing udevadm:
Query Device Information:
$ udevadm info --query=path --name=/dev/sda5Monitor uevents:
$ udevadm monitor
Listing PCI Devices: List all PCI devices, such as Ethernet cards, RAID controllers, video cards, and wireless adapters.
$ lspciInformation About Block Devices: List information about block devices, including hard drives and USB drives.
$ lsblkCPU Information: Display detailed information about your CPU, including architecture and supported modes.
$ lscpuMemory Information:
Summary:
$ lsmem --summaryUsed and Free Memory:
$ free -m
Detailed Hardware Information: Extract detailed information about all hardware components, Run with Root Privileges:
$ sudo lshw
By understanding and using these commands, you can effectively manage and troubleshoot hardware issues on your Linux system.
🚀 Understanding the Linux Boot Sequence
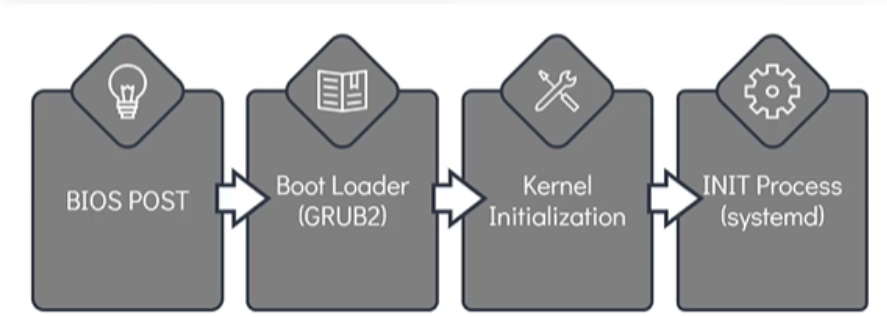
The Linux boot process is a series of steps that transition a system from a powered-off state to an operational state. This process can be simplified into four key stages: BIOS POST, Boot Loader, Kernel Initialization, and the INIT Process.

1. 🔌 BIOS POST
BIOS POST (Power On Self Test) is the very first stage of the boot process. It involves:
Hardware Check: BIOS runs a self-test to ensure that the hardware components are functioning correctly.
POST Failure: If the POST fails, the system will not proceed to the next stage, and the computer may not be operable.
2. 🖥️ Boot Loader
After a successful POST, the system moves on to the Boot Loader stage:
Boot Code Execution: The BIOS loads and executes the boot code from the boot device, usually located in the first sector of the hard disk (
/bootdirectory in Linux).Boot Screen: The boot loader, such as GRUB2 (GRand Unified Bootloader Version 2), presents a boot menu allowing users to choose between different operating systems or kernel versions.
Kernel Loading: Once a selection is made, the boot loader loads the selected kernel into memory and hands over control to it.
3. ⚙️ Kernel Initialization
The Kernel Initialization stage involves:
Kernel Loading: The kernel decompresses and loads into memory.
Initialization Tasks: The kernel initializes hardware, manages memory, and prepares the system for user space operations.
INIT Process Search: Once operational, the kernel looks for the INIT process to continue setting up the environment.
4. 🛠️ INIT Process
In most modern Linux distributions, the kernel initializes the INIT Process:
systemd: Most current systems use
systemd, which handles tasks like mounting filesystems, starting services, and bringing the system to a usable state.SysVinit: Previously,
SysVinit(System V init) was used, seen in older distributions like RHEL 6 or CentOS 6.systemdimproves startup time by parallelizing service startup.Checking Init System: To check which init system is in use, run:
$ ls -l /sbin/initIf
systemdis used, the output will point to/lib/systemd/systemd.
Understanding these stages helps in diagnosing boot issues and configuring systems more effectively.
🎯 Conclusion:
As I continue to explore the vast world of Linux, I’m beginning to see just how crucial it is for a DevOps journey. 🛠️ By understanding the basics of the kernel, hardware management, and the boot process, I'm equipping myself with the skills needed to build, deploy, and manage systems more effectively. 🚀 This is just the beginning—stay tuned for more insights in my upcoming blogs as I dive deeper into Linux. 📚 I’m learning along the way, and I hope you’ll join me on this journey to mastering Linux and enhancing our DevOps projects together. 🌟
Subscribe to my newsletter
Read articles from Rushikesh Kamble directly inside your inbox. Subscribe to the newsletter, and don't miss out.
Written by
Rushikesh Kamble
Rushikesh Kamble
Hi! I’m Rushikesh, a recent Master's graduate in Computer Applications with a strong foundation in DevOps principles and cloud-native technologies. My journey began with a deep dive into tools like Docker, Kubernetes, GitLab, Jenkins, and Linux, where I gained hands-on experience during my internship at ProLeap Academy. I’m an active participant in CNCF meetups and have a keen interest in exploring the world of AI/ML, specifically AI/ML Operations (AIOps/ MLOps). My goal is to leverage cutting-edge technologies to drive innovation and contribute to the open-source community. Here on Hashnode, I share my thoughts on DevOps, Kubernetes, cloud-native tools, and my journey to explore the intersection of AI and technology. I also love writing about learning experiences, new trends, and challenges faced in the tech world. Let’s connect and learn together!