Copying an KMS Encrypted RDS PostgreSQL Snapshot from One AWS Account to Another
 Pradeep AB
Introduction:
This guide outlines the steps to copy an encrypted RDS PostgreSQL snapshot from one AWS account to another using AWS Key Management Service (KMS) custom keys. Follow these instructions carefully to ensure that the snapshot is successfully copied and shared between accounts.
Prerequisites:
Before proceeding, ensure you have:
Console Access to both the source and target AWS accounts.
IAM permissions to manage and use KMS keys and AWS RDS service.
Access to the AWS KMS key used to encrypt the RDS snapshot in both accounts.
Access to the AWS RDS in both accounts.
Step 1: Allow Access to the Target Account on the AWS KMS Key
Log in to the Source Account:
Access the AWS Management Console in the same region as your DB snapshot.
Open the AWS KMS Console.
Create or Select a Customer Managed Key:
Navigate to Customer managed keys from the sidebar.
If you don't have an existing key, create a new one by selecting Create key. For more details, refer to Creating keys.

Edit and Update the Key Policy:
Replace the actual account IDs and IAM user ARNs in the KMS key policy with placeholders before use. Below is a sample policy:
  {
      "Version": "2012-10-17",
      "Id": "key-consolepolicy-3",
      "Statement": [
          {
              "Sid": "Enable IAM User Permissions",
              "Effect": "Allow",
              "Principal": {
                  "AWS": "arn:aws:iam::Your-Source-Account-ID:root"
              },
              "Action": "kms:*",
              "Resource": "*"
          },
          {
              "Sid": "Allow access for Key Administrators",
              "Effect": "Allow",
              "Principal": {
                  "AWS": "arn:aws:iam::Your-Source-Account-ID:user/IAM-User-ARN"
              },
              "Action": [
                  "kms:Create*",
                  "kms:Describe*",
                  "kms:Enable*",
                  "kms:List*",
                  "kms:Put*",
                  "kms:Update*",
                  "kms:Revoke*",
                  "kms:Disable*",
                  "kms:Get*",
                  "kms:TagResource",
                  "kms:UntagResource",
                  "kms:RotateKeyOnDemand"
              ],
              "Resource": "*"
          },
          {
              "Sid": "Allow use of the key",
              "Effect": "Allow",
              "Principal": {
                  "AWS": [
                      "arn:aws:iam::Your-Source-Account-ID:root",
                      "arn:aws:iam::Your-Target-Account-ID:root",
                      "arn:aws:iam::Your-Source-Account-ID:user/IAM-User-ARN"
                  ]
              },
              "Action": [
                  "kms:Encrypt",
                  "kms:Decrypt",
                  "kms:ReEncrypt*",
                  "kms:GenerateDataKey*",
                  "kms:DescribeKey"
              ],
              "Resource": "*"
          },
          {
              "Sid": "Allow attachment of persistent resources",
              "Effect": "Allow",
              "Principal": {
                  "AWS": [
                      "arn:aws:iam::Your-Source-Account-ID:root",
                      "arn:aws:iam::Your-Target-Account-ID:root",
                      "arn:aws:iam::Your-Source-Account-ID:user/IAM-User-ARN"
                  ]
              },
              "Action": [
                  "kms:CreateGrant",
                  "kms:ListGrants",
                  "kms:RevokeGrant"
              ],
              "Resource": "*",
              "Condition": {
                  "Bool": {
                      "kms:GrantIsForAWSResource": "true"
                  }
              }
          }
      ]
  }
Step 2: Copy the RDS Snapshot in the Source Account
Open the RDS Console:
- Log in to the source AWS account and navigate to the RDS Console.
Select the Snapshot:
Locate the RDS snapshot you want to copy. This could be either an automated system snapshot or a manual snapshot.

Initiate the Copy Snapshot Process:
- Choose Copy Snapshot for the selected manual or automated system snapshot.
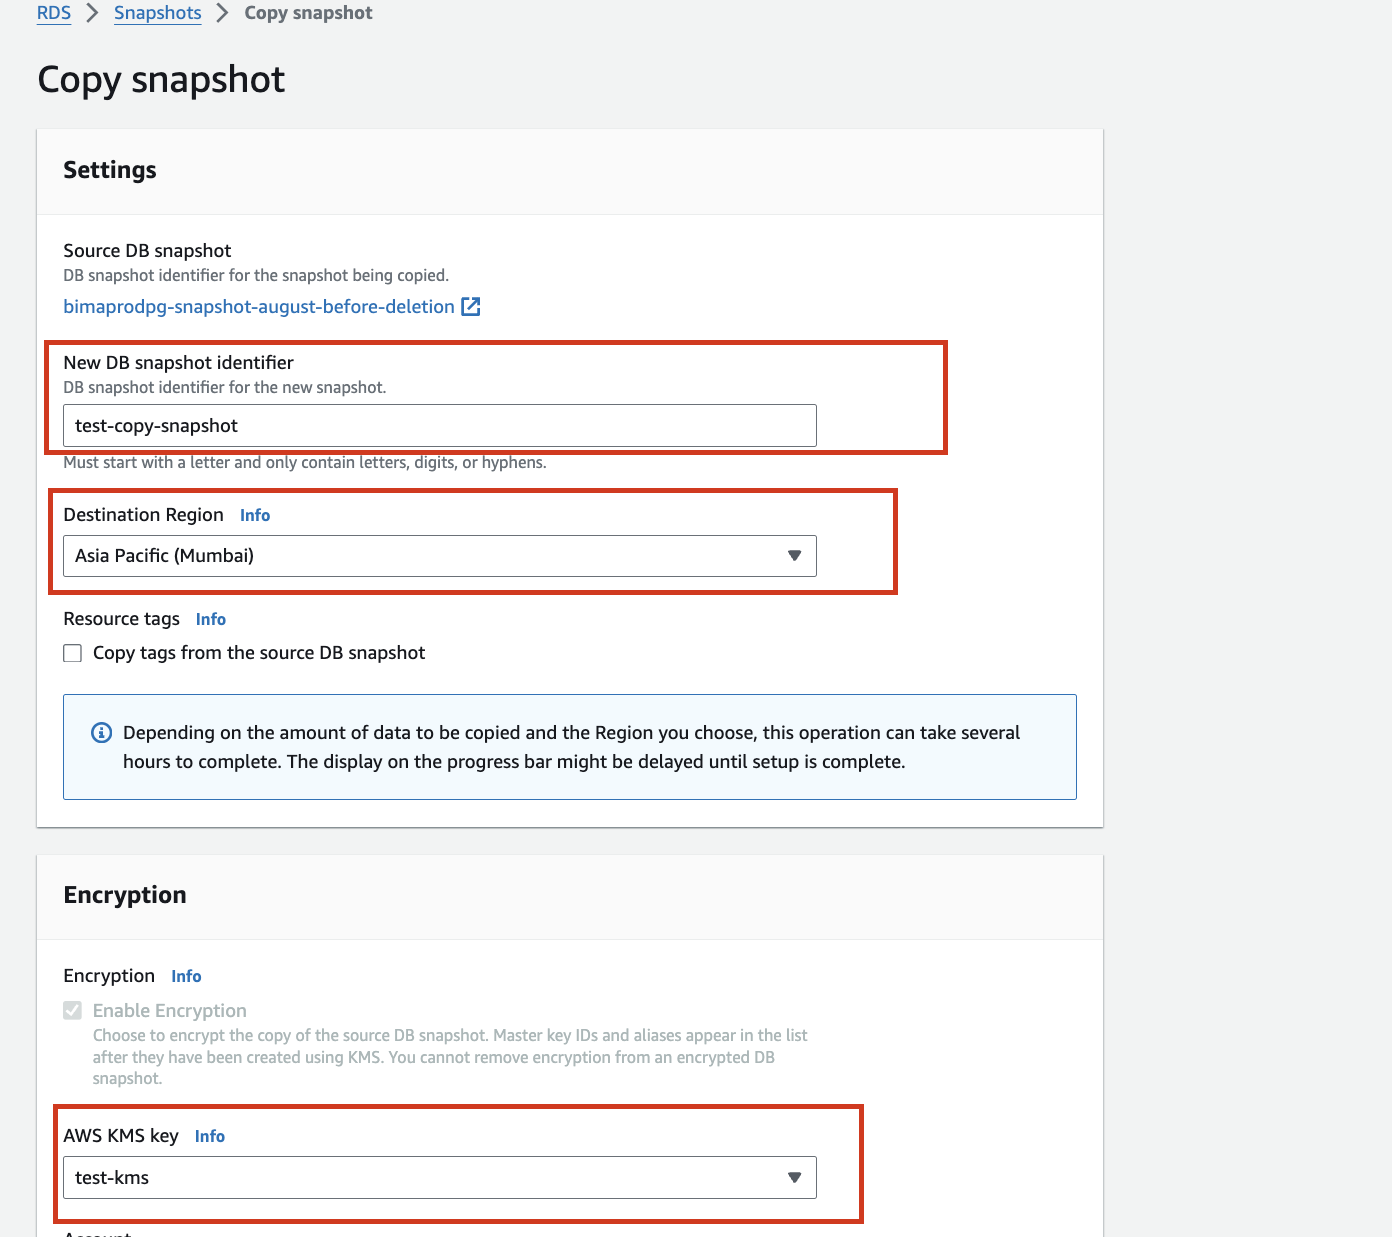
New DB Snapshot Identifier:
Enter a unique name for the new snapshot.
- Example:
test-copy-snapshot
- Example:
Destination Region:
Select the desired region where you want the snapshot to be copied.
- Example:
Asia Pacific (Mumbai)
- Example:
Encryption:
Check the option to Enable Encryption.
In the AWS KMS key dropdown, select the newly created customer-managed KMS key that you configured to allow access to the target account.
Example:
- KMS Key:
test-kms
- KMS Key:
Copy the Snapshot:
After configuring the settings, initiate the copy process by selecting Copy Snapshot.
The progress might take several minutes to hours, depending on the size of the snapshot and the destination region.

Step 3: Share the Copied Snapshot with the Target Account
Locate the Copied Snapshot in Source Account:
In the RDS Console, locate the newly copied snapshot by searching for the New DB Snapshot Identifier you created earlier.
- Example:
test-copy-snapshot
- Example:
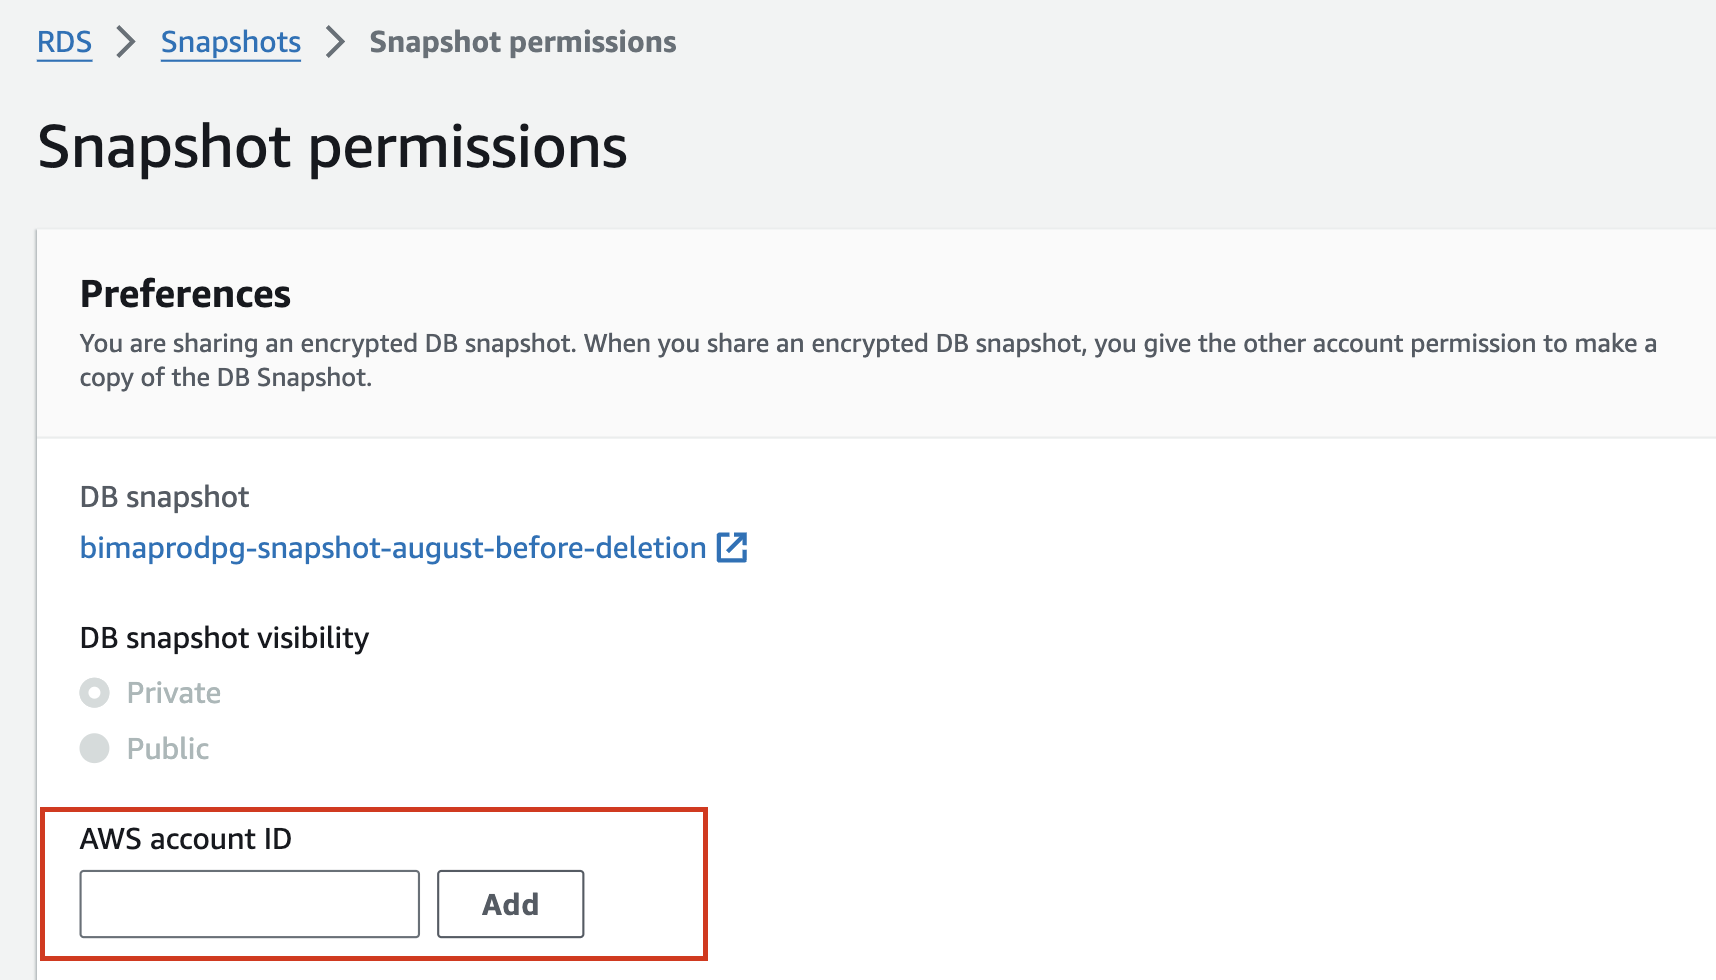
Choose Actions, then select Share Snapshot.
Configure Snapshot Sharing:
In the AWS account ID field, add the AWS account ID of the target account where you want to share this snapshot.
After entering the Target account ID, select Add and Then Save.

Finalize Sharing:
Once the AWS account ID of the target account is added, the snapshot will be shared with that account.
The target account will now have permission to copy the shared, encrypted snapshot.
Step 4: Copy the Shared DB Snapshot in the Target Account
Log in to the Target Account:
- Access the AWS Management Console for the target account, and open the RDS Console.
Access Shared Snapshots:
In the navigation pane, choose Snapshots.
In the Snapshots pane, select the Shared with Me tab.
Select the Shared Snapshot:
- Locate the shared DB snapshot and select it.
Copy the Snapshot:
Choose Actions, then select Copy Snapshot.
Ensure you copy the snapshot into the same AWS Region as the original (e.g.,
ap-south-1in this case).Select a KMS key from the target account to encrypt the copied snapshot.
Complete the Copy:
- After configuring the settings, initiate the copy process. Once completed, you can use the copied snapshot to launch a new RDS instance in the target account.
Conclusion
Copying an encrypted RDS snapshot between AWS accounts can be a complex process, but by carefully following these steps, you can ensure that your data is securely transferred. The key is to correctly configure KMS policies, select the appropriate encryption settings, and maintain consistency in regions. Whether you're migrating data or sharing resources between accounts, these guidelines will help you navigate the process with confidence, ensuring your data remains protected and accessible where it's needed most.
Subscribe to my newsletter
Read articles from Pradeep AB directly inside your inbox. Subscribe to the newsletter, and don't miss out.
Written by

Pradeep AB
Pradeep AB
Passionate Cloud Engineer | AWS Certified Solutions Architect | Multi-Cloud Expertise in AWS, Azure, GCP & Oracle | DevSecOps Enthusiast | Proficient in Linux, Docker, Kubernetes, Terraform, ArgoCD & Jenkins | Building Scalable & Secure CI/CD Pipelines | Automating the Future with Python & Github