Creating an Azure IoT Hub in Azure Portal
 Onoja Bishop
What is Internet of Things (IoT)
The Internet of Things (IoT) is a concept that describes a system of interrelated physical objects embedded with sensors, software, and other technologies for the purpose of connecting and exchanging data with other devices and systems over the internet. These objects, often referred to as "smart" devices, can range from simple household items to complex industrial machinery.
Key Components of IoT:
1. Sensors and Actuators:
- Sensors: Devices that detect changes in the environment (e.g., temperature, humidity, motion) and collect data.
- Actuators: Devices that perform actions based on instructions received (e.g., turning on a light, adjusting a thermostat).
2. Connectivity: Network Communication: IoT devices use various communication protocols like Wi-Fi, Bluetooth, Zigbee, LoRaWAN, and cellular networks to transmit data to and from other devices and systems.
3. Data Processing:
- Edge Computing: Data is processed locally on the device or nearby systems to reduce latency and bandwidth usage.
- Cloud Computing: Data is sent to remote servers for more intensive processing, storage, and analysis.
4. Data Analytics: Analyzing the collected data to generate insights, identify patterns, and make informed decisions. This can involve real-time analytics for immediate action or long-term data analysis for strategic planning.
5. User Interface: Interfaces such as mobile apps, web dashboards, or voice assistants that allow users to interact with the IoT system, monitor device status, and control devices remotely.
Applications of IoT:
- Smart Homes: Automated control of home devices like lighting, heating, security systems, and appliances for improved convenience, energy efficiency, and security.
- Wearable Devices: Fitness trackers and smartwatches that monitor health metrics such as heart rate, steps taken, and sleep patterns.
- Healthcare*:* Remote patient monitoring, smart medical devices, and telemedicine to improve patient care and streamline healthcare operations.
By integrating these components and technologies, IoT enables enhanced automation, improved efficiency, and data-driven decision-making across various domains.
What Is Azure IOT Hub
Azure IoT Hub is a cloud-based service provided by Microsoft Azure that facilitates secure and reliable communication between Internet of Things (IoT) devices and cloud-based applications. It acts as a central message hub for bi-directional communication, allowing IoT devices to send telemetry data to the cloud and receive commands and notifications from cloud-based applications.
Key capabilities include:
1. Device Communication: Devices can send data to the cloud (telemetry) and receive messages from the cloud in form of commands and notifications.
2. Device Identity and Authentication: Each device connecting to the IoT Hub is assigned a unique identity, ensuring secure communication. IoT Hub supports various authentication mechanisms, including X.509 certificates and symmetric keys.
3. Device Management: IoT Hub supports device provisioning, configuration, monitoring, and updates, allowing for large-scale device management. This includes features like remote reboot, firmware updates, and querying device state.
By using Azure IoT Hub, organizations can build IoT solutions that can monitor and control devices, process and analyze data from those devices, and integrate with other Azure services to create comprehensive IoT applications.
There are three stages to creating an IoT hub and connecting it to a Device using Raspberry Pi Simulator
How to Create an Azure IoT Hub
Step 1: Create an IoT Hub
Sign in to the Azure portal: Go to Azure Portal (Portal.azure.com) and sign in with your Azure account.
Create IoT Hub:
Click on the “Search bar” button.
In the search box, type “IoT Hub” and select it from the list.
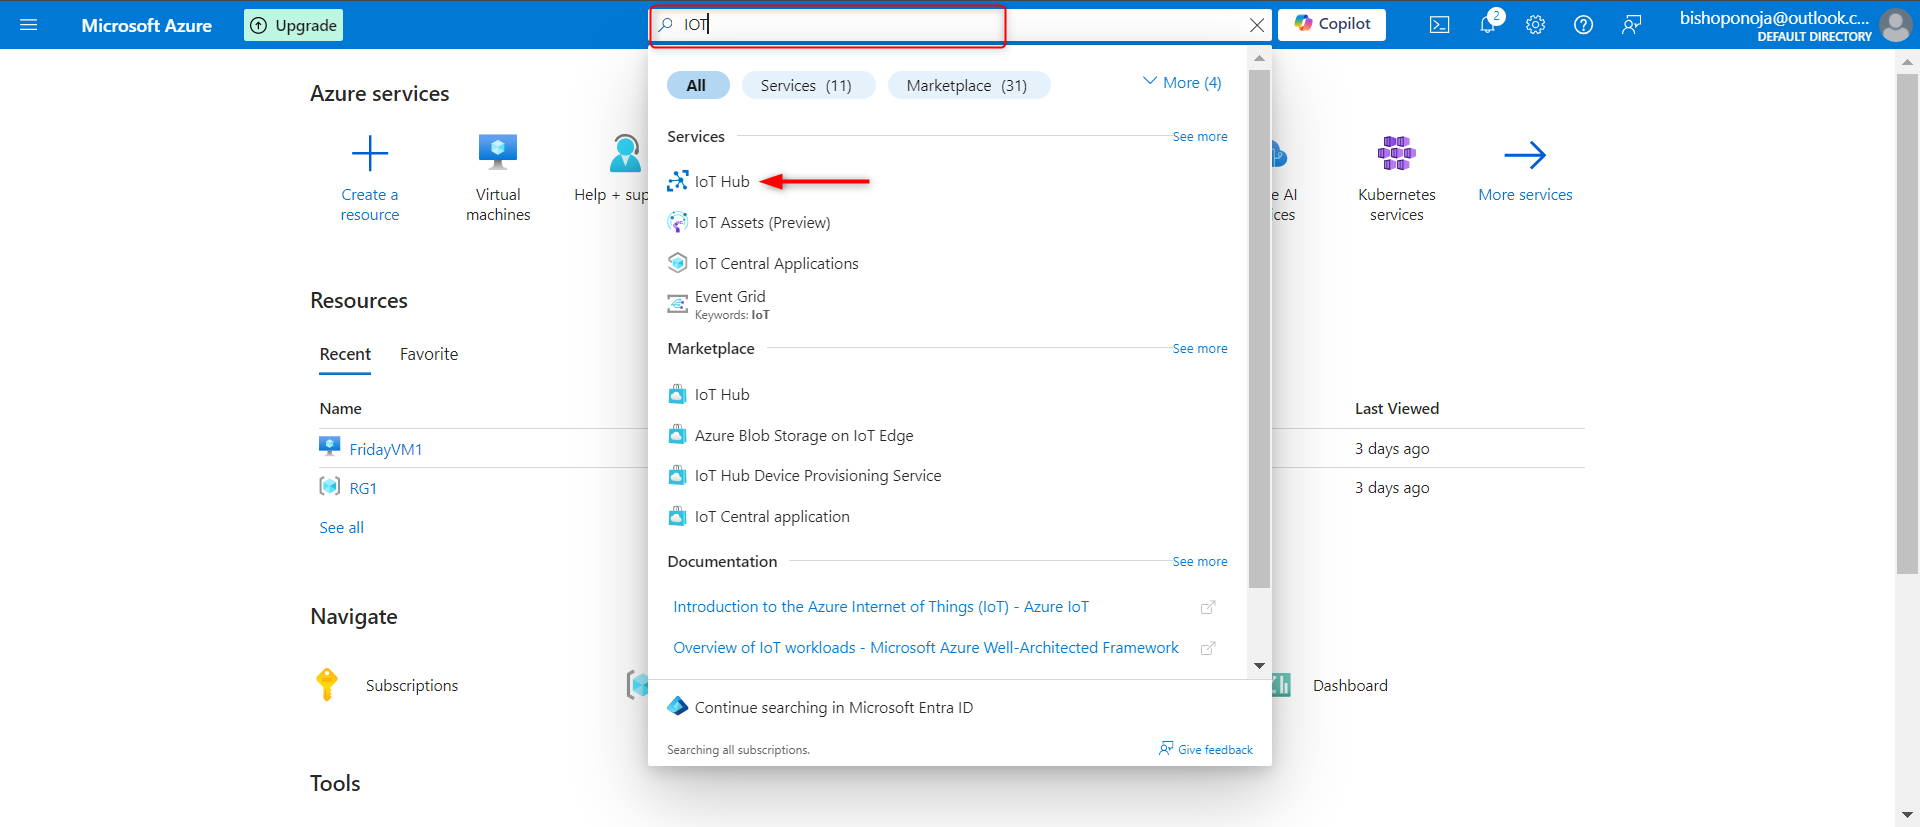
After Selecting this IoT Hub, Click on the Option to "Create"
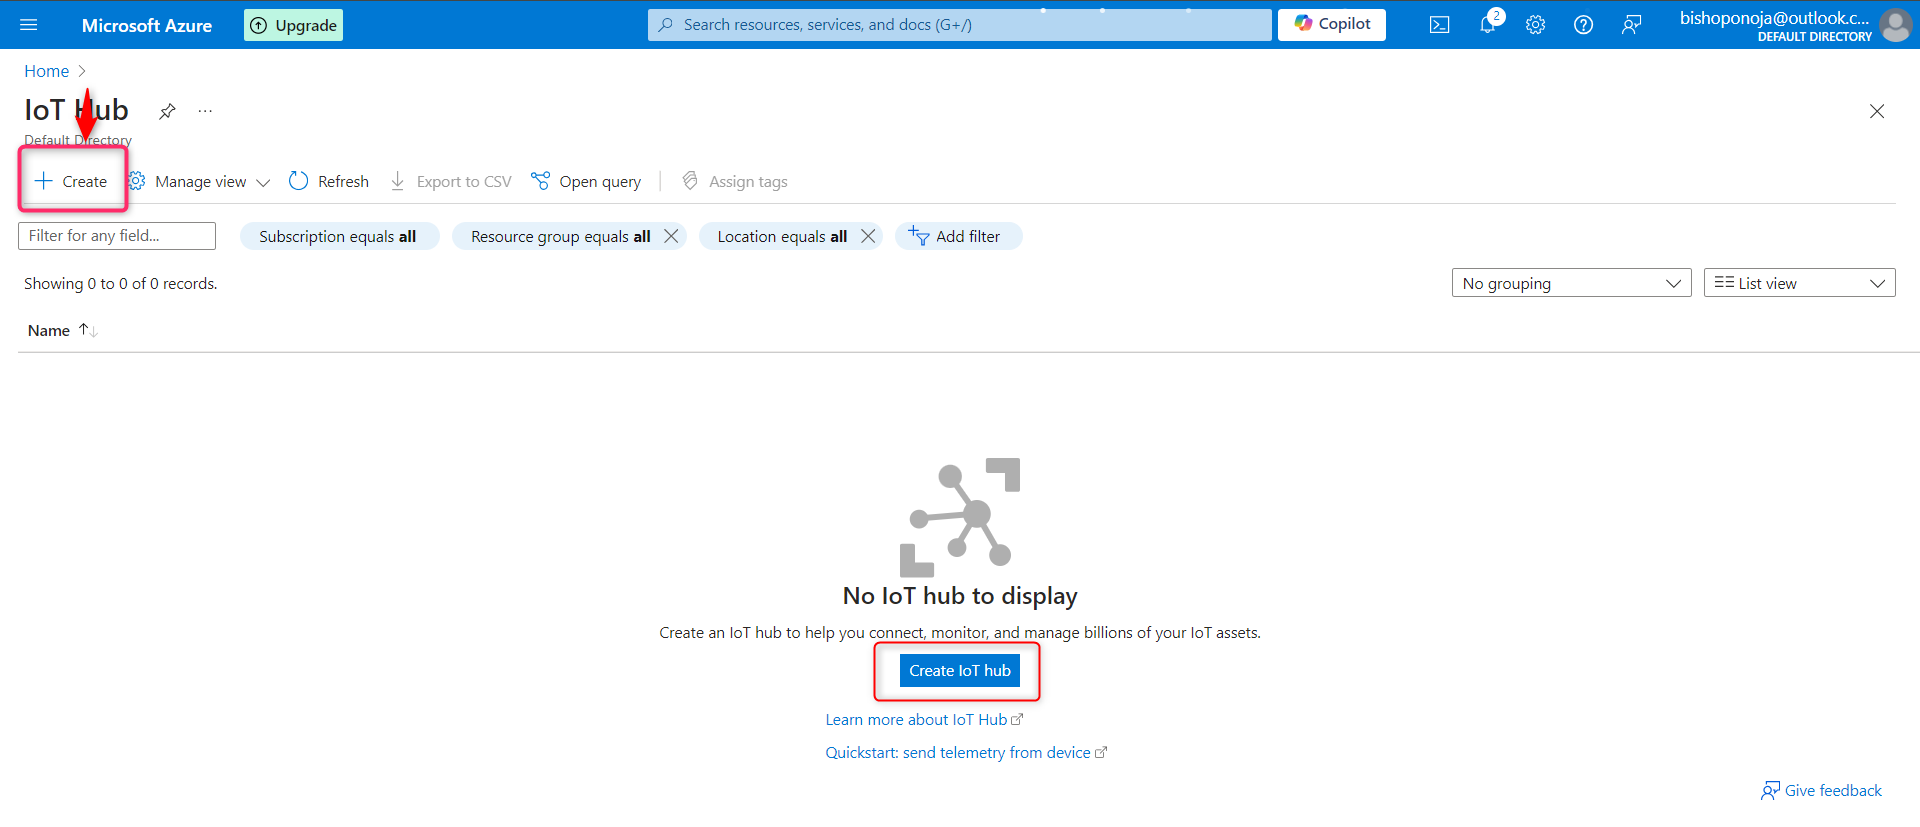
Configure the IoT Hub:
Configure the IoT Hub to your preference
Subscription: Select the subscription you want to use.
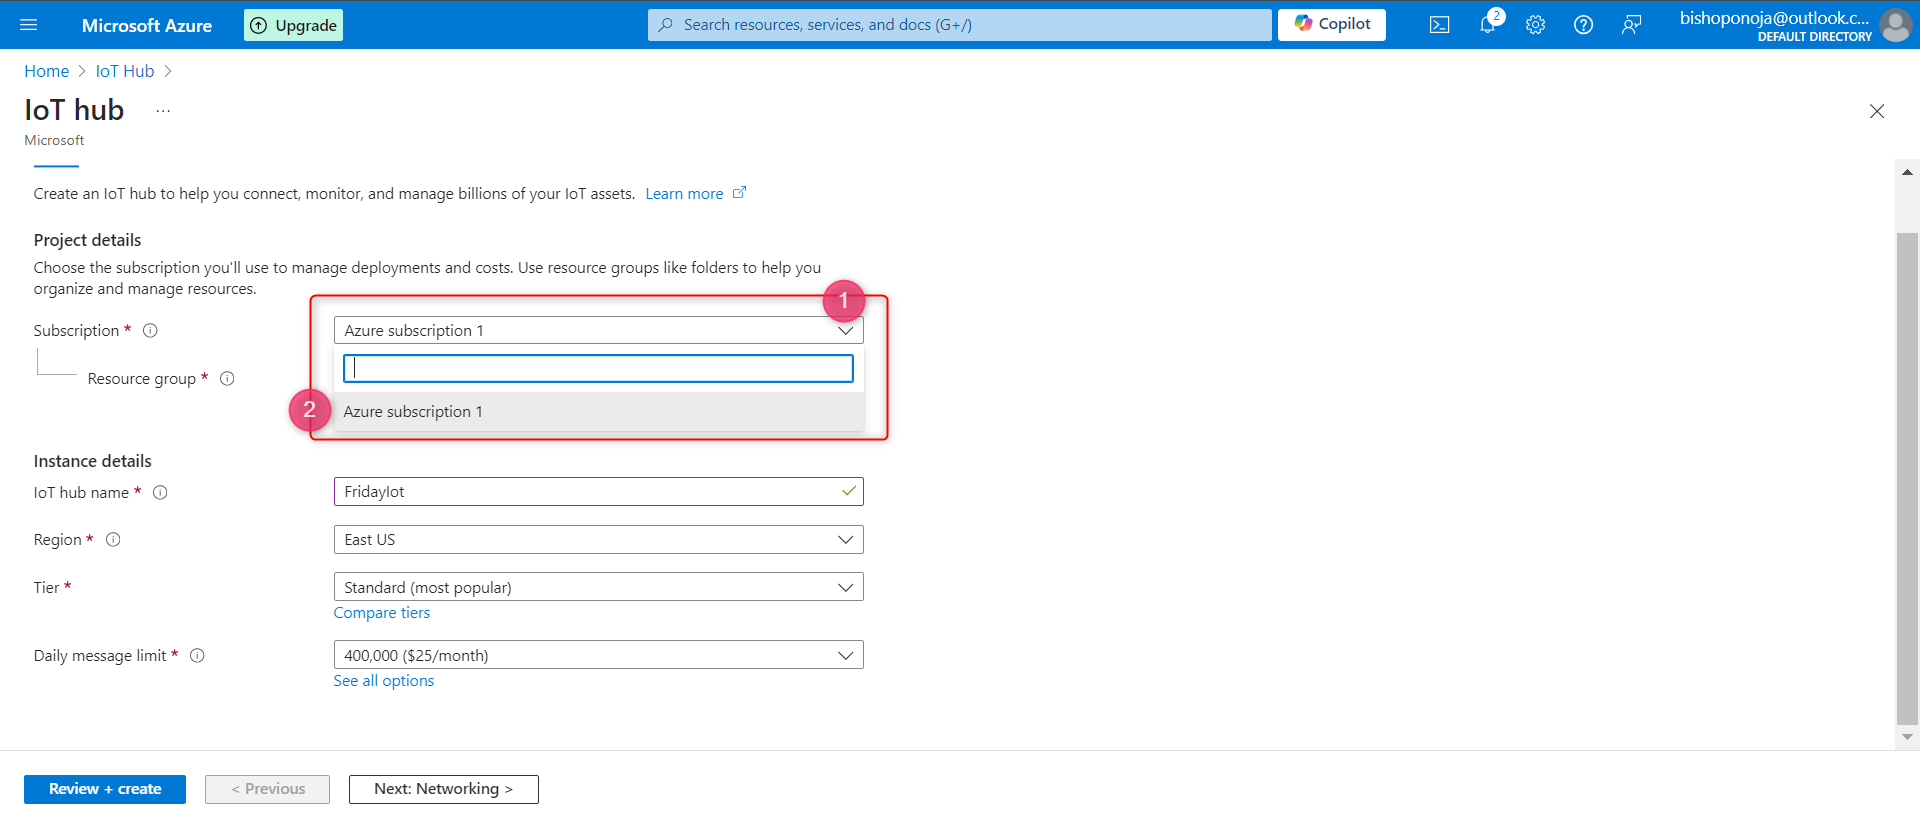
Resource group: Choose an existing resource group or create a new one.
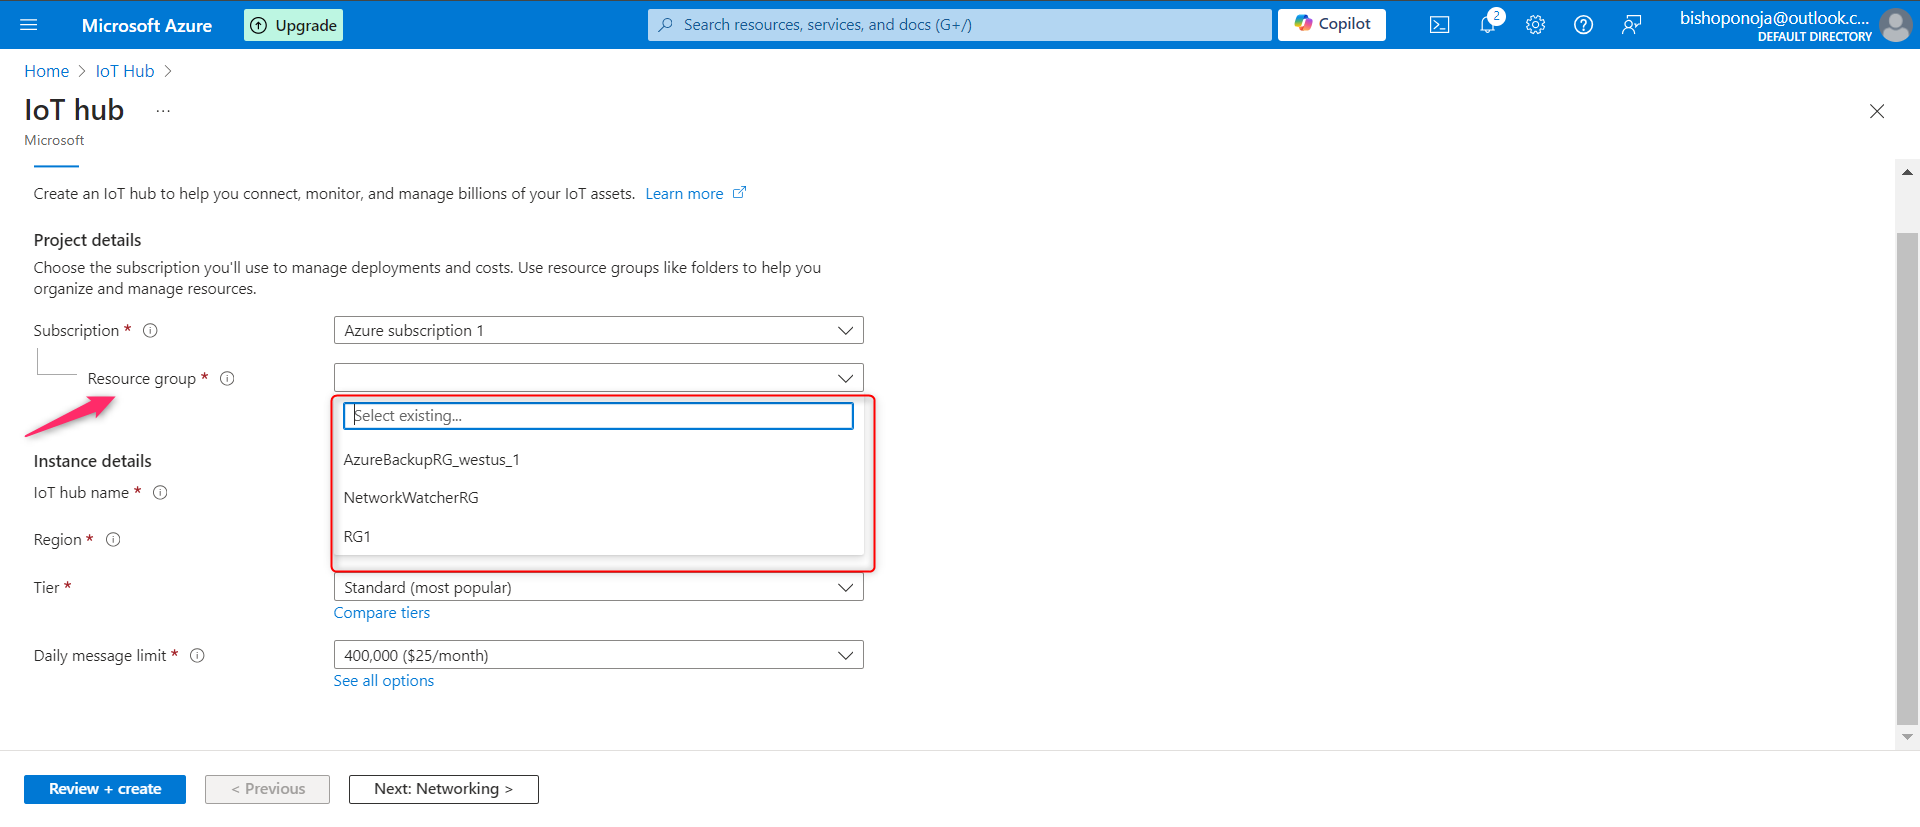
IoT Hub name: Enter a unique name for your IoT Hub.
Region: Select the region closest to you.
Tier: Choose the pricing and scale tier that fits your needs. The free tier is available for testing and evaluation.
Networking:
Review the Networking settings
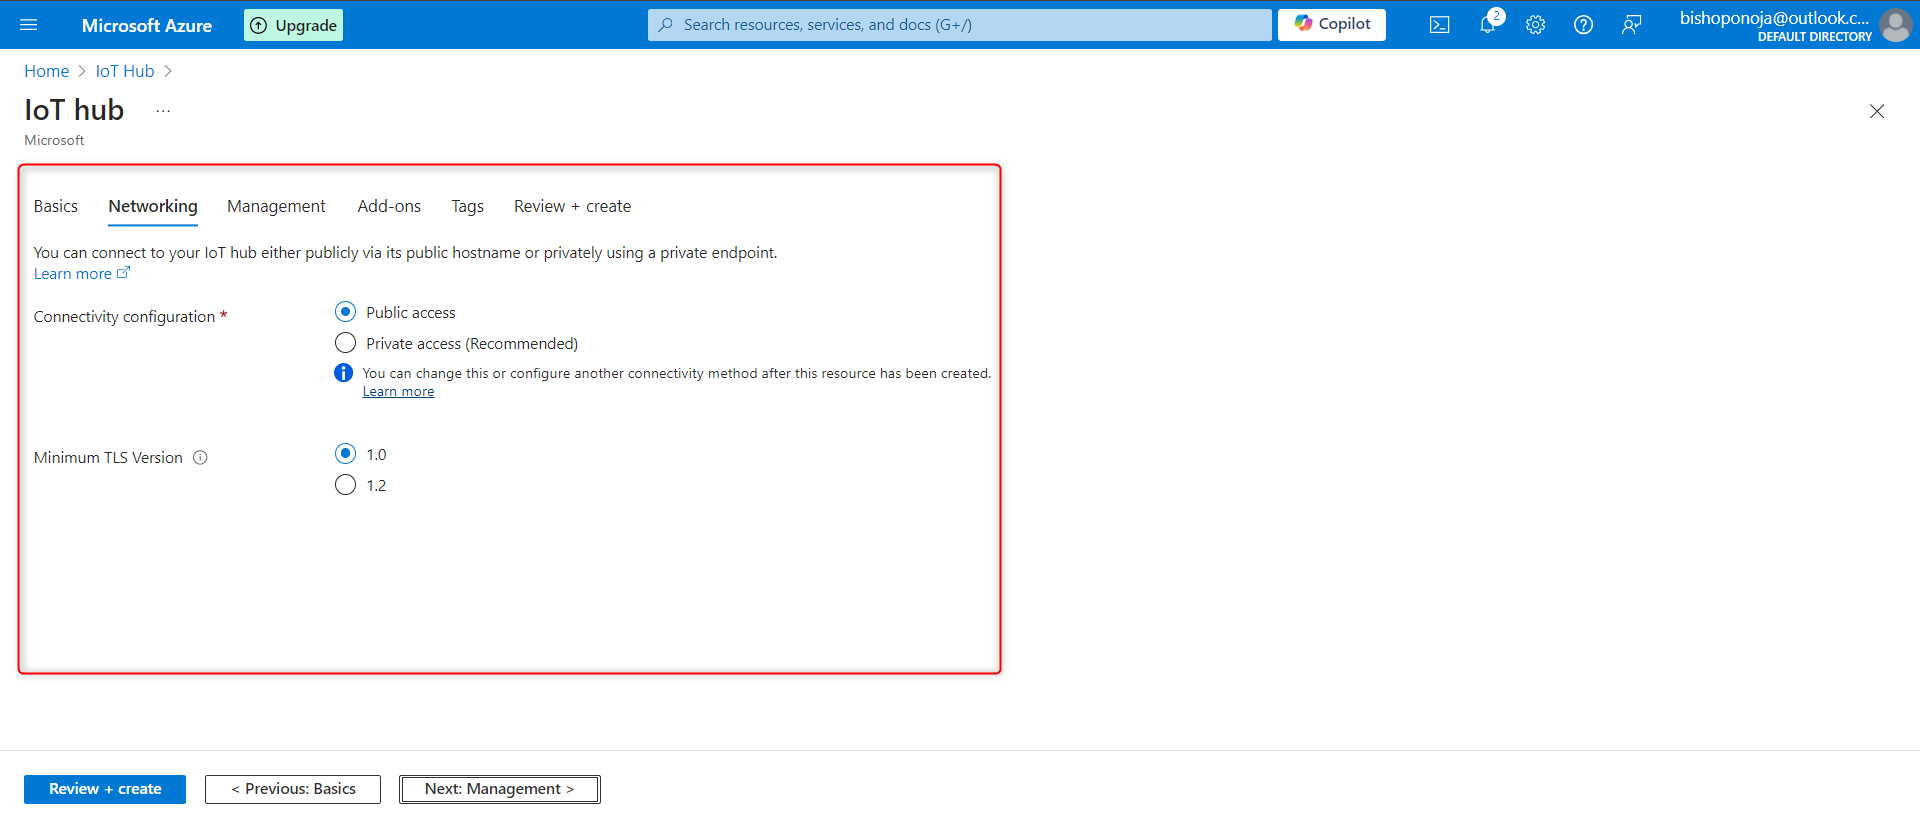
Connectivity Configuration: Set the connectivity to either public or private access.
Minimun TLS version: Select the Minumum TlS version - use the lowest version.
Management
Permission Model: Set the permission model.
Scale: Apply scale on devicet to cloud platforms.
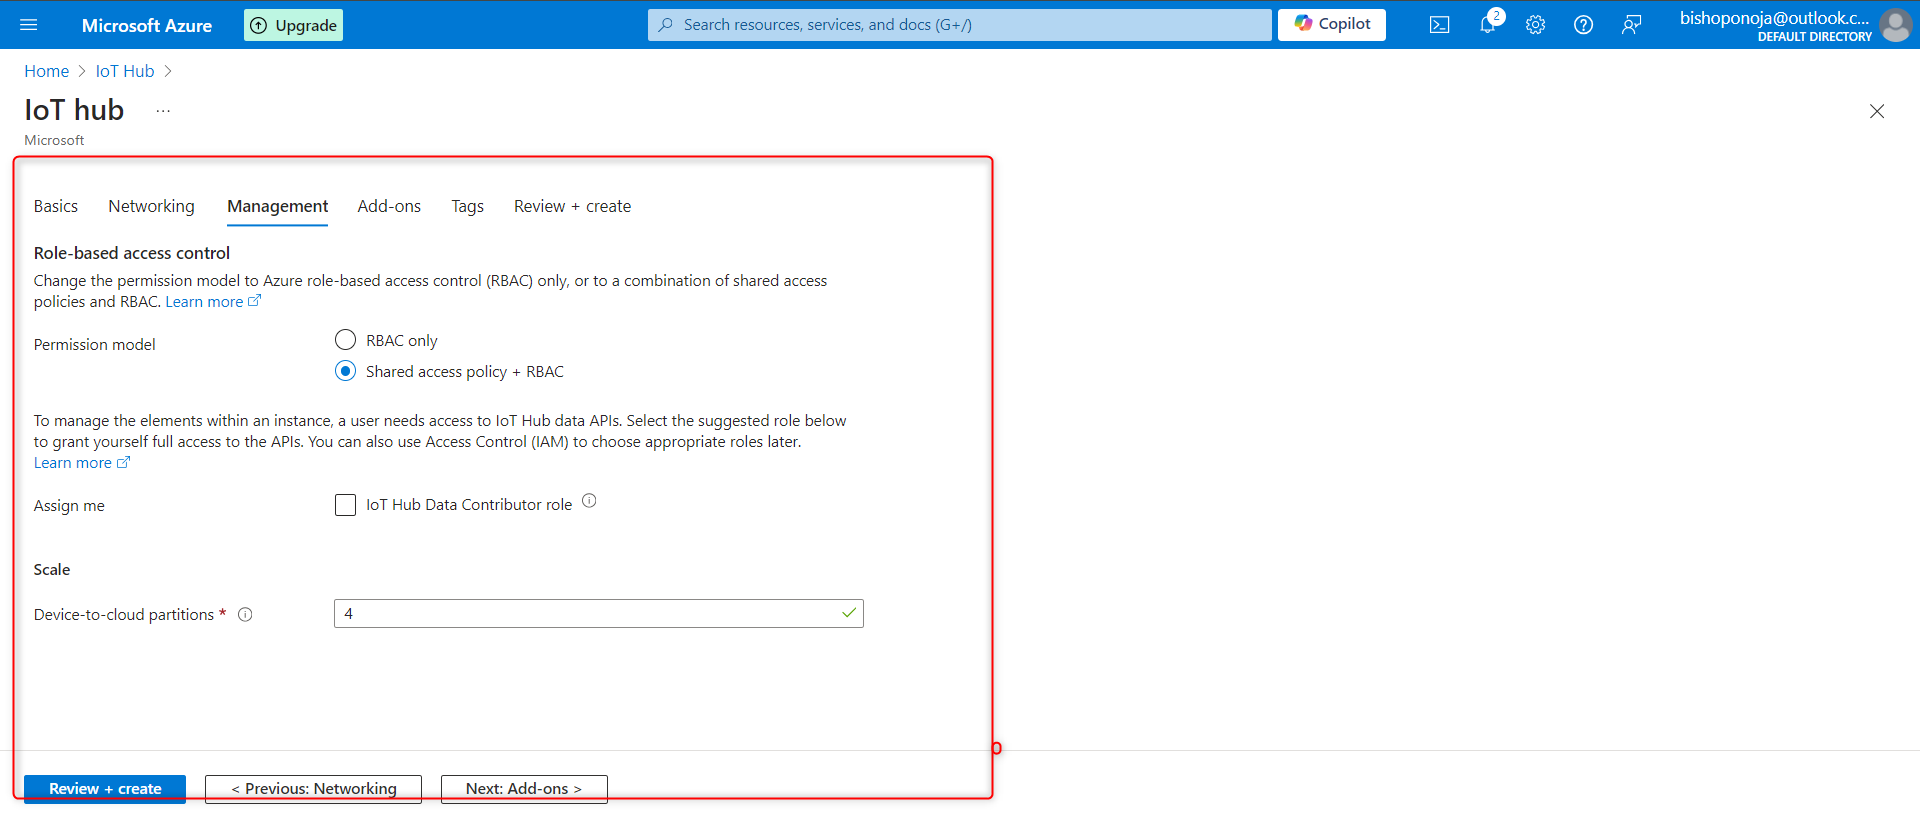
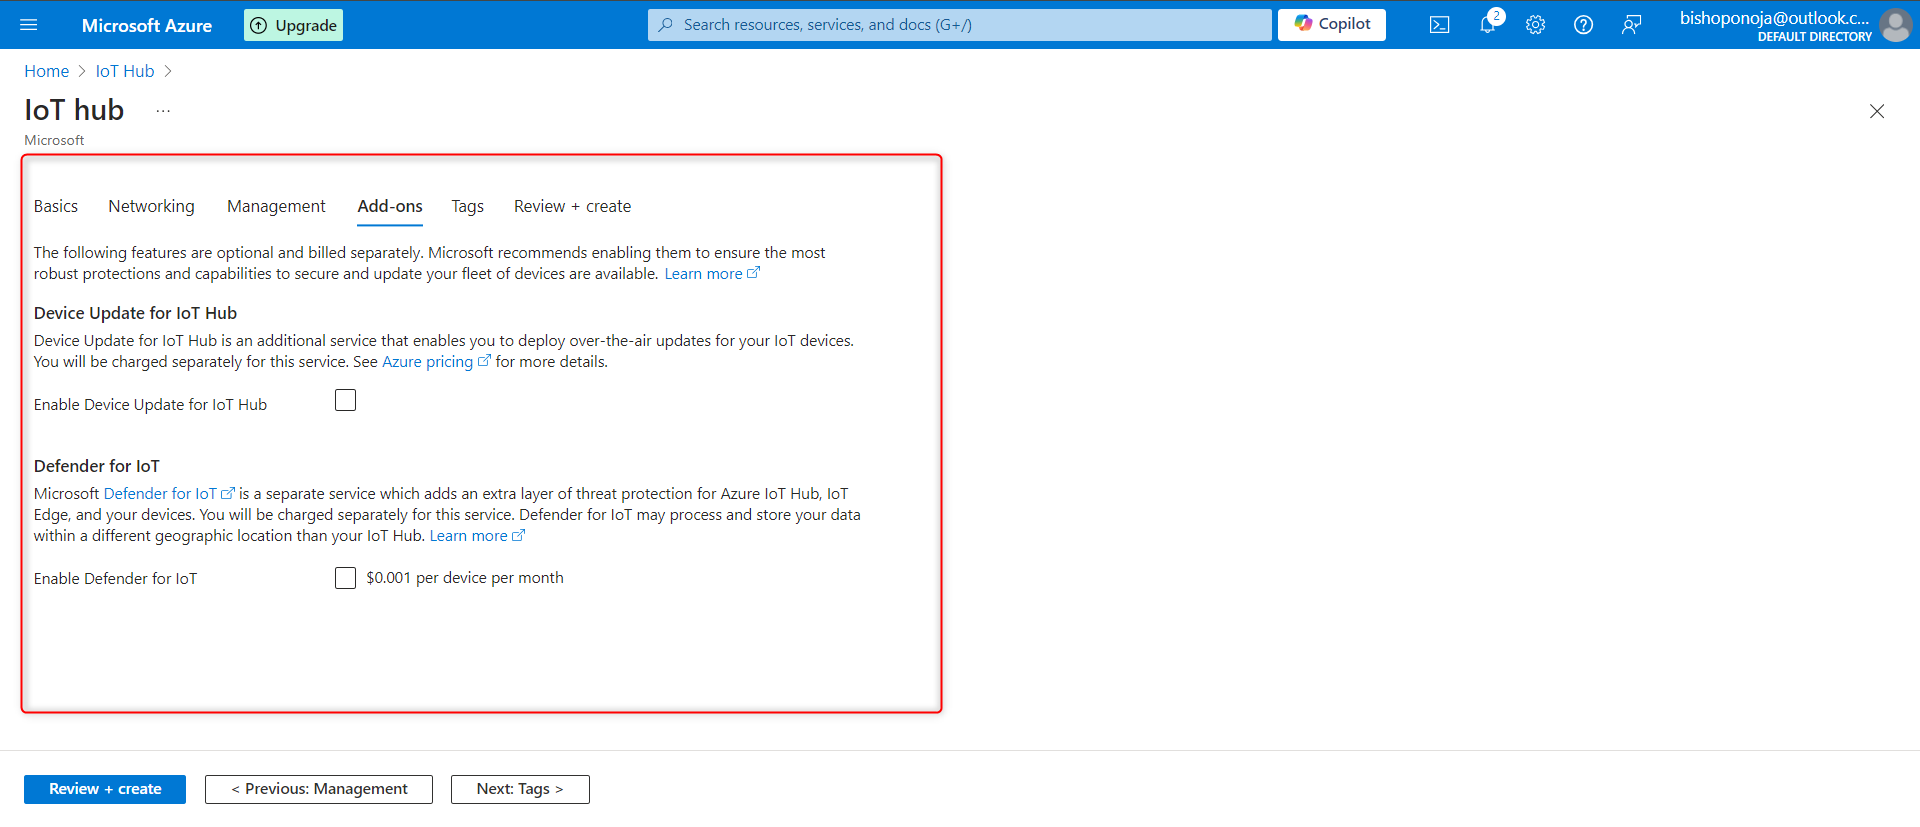
Add-Ons
Review the Add-on settings
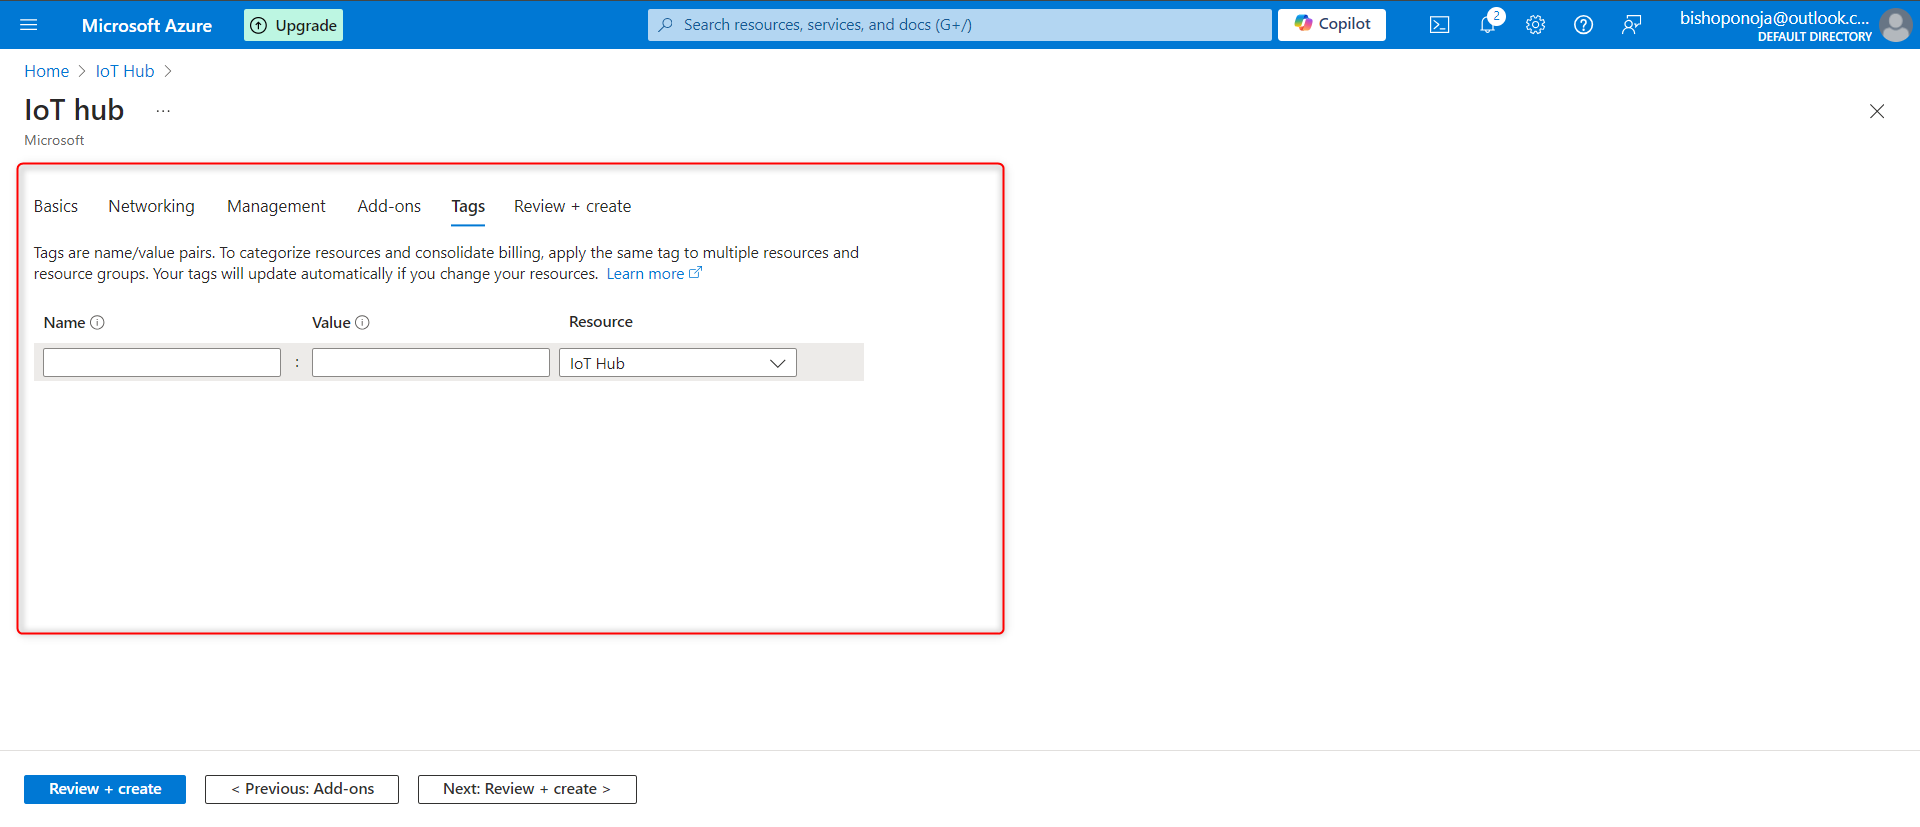
Tags
Add a name and value to the tag
Review and create:
Click on “Review + create” to validate your settings.
Once validated, click on “Create” to deploy the IoT Hub.
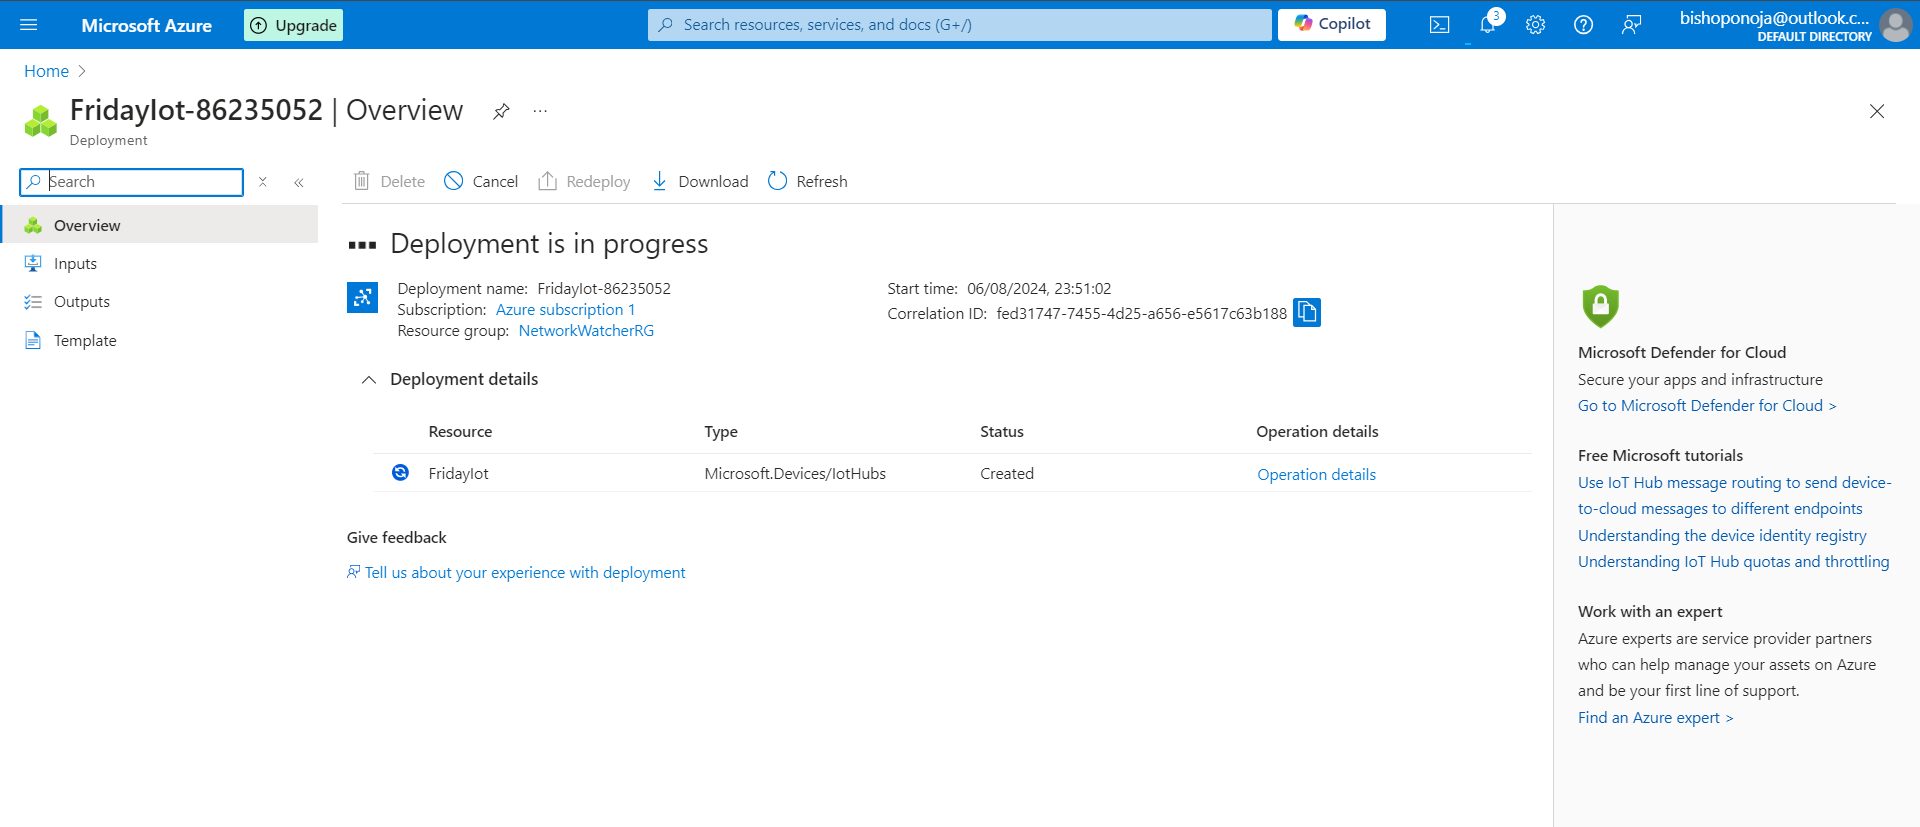
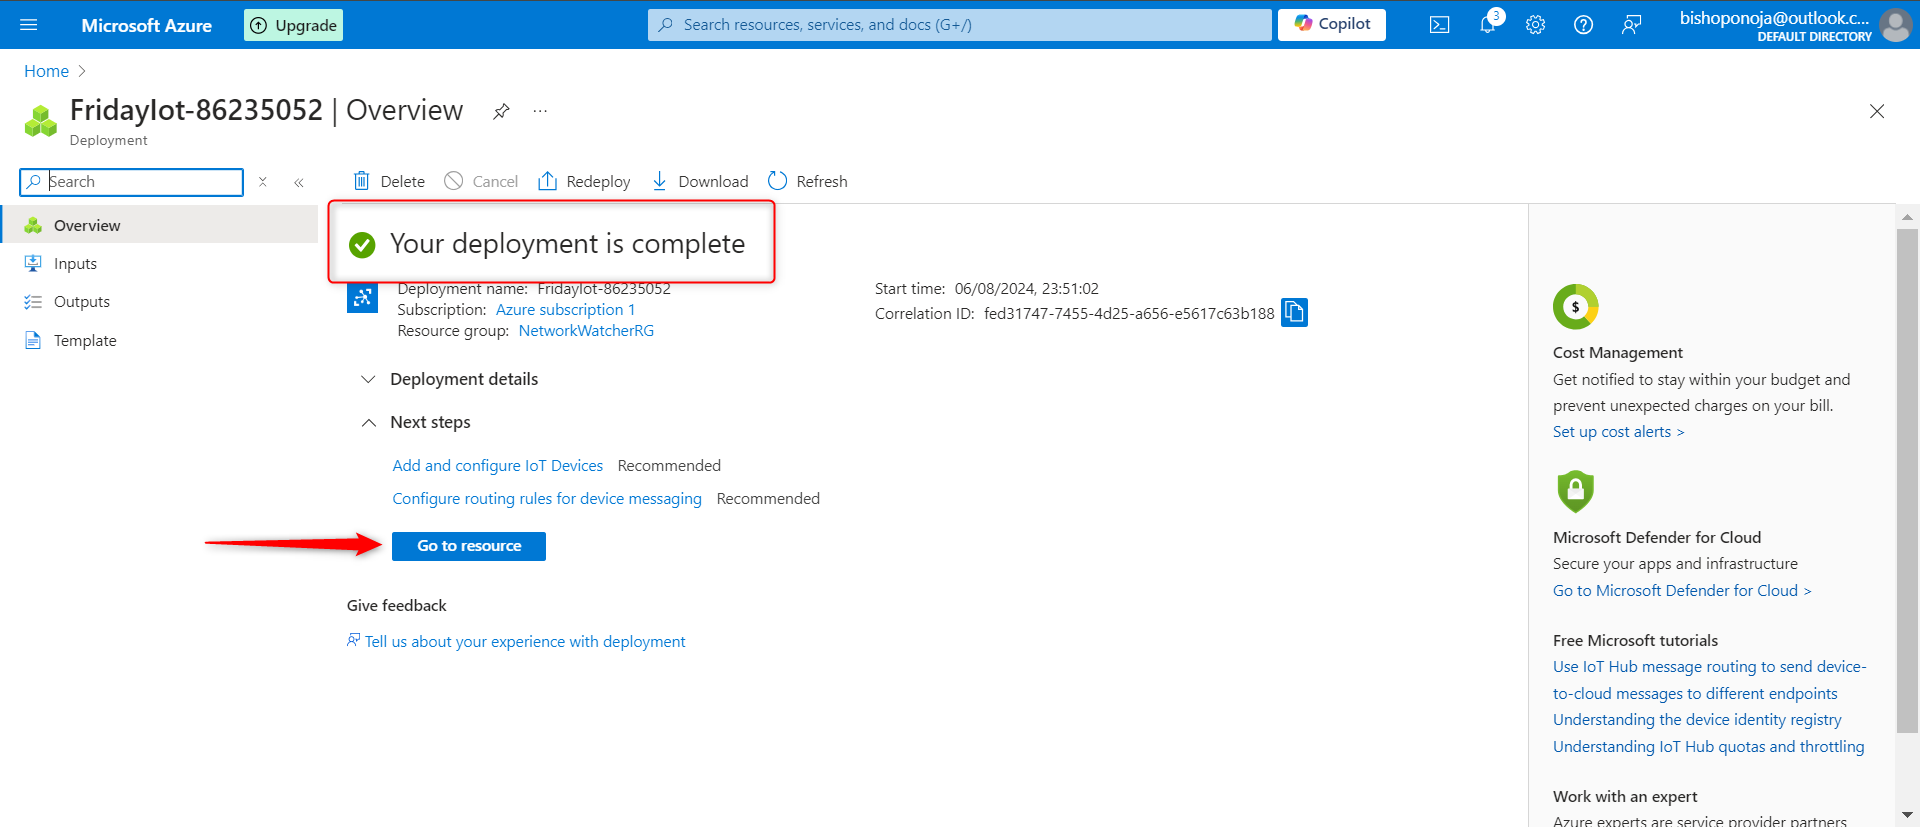
Access your IoT Hub:
After the deployment is complete, go to the resource to view and manage your IoT Hub.
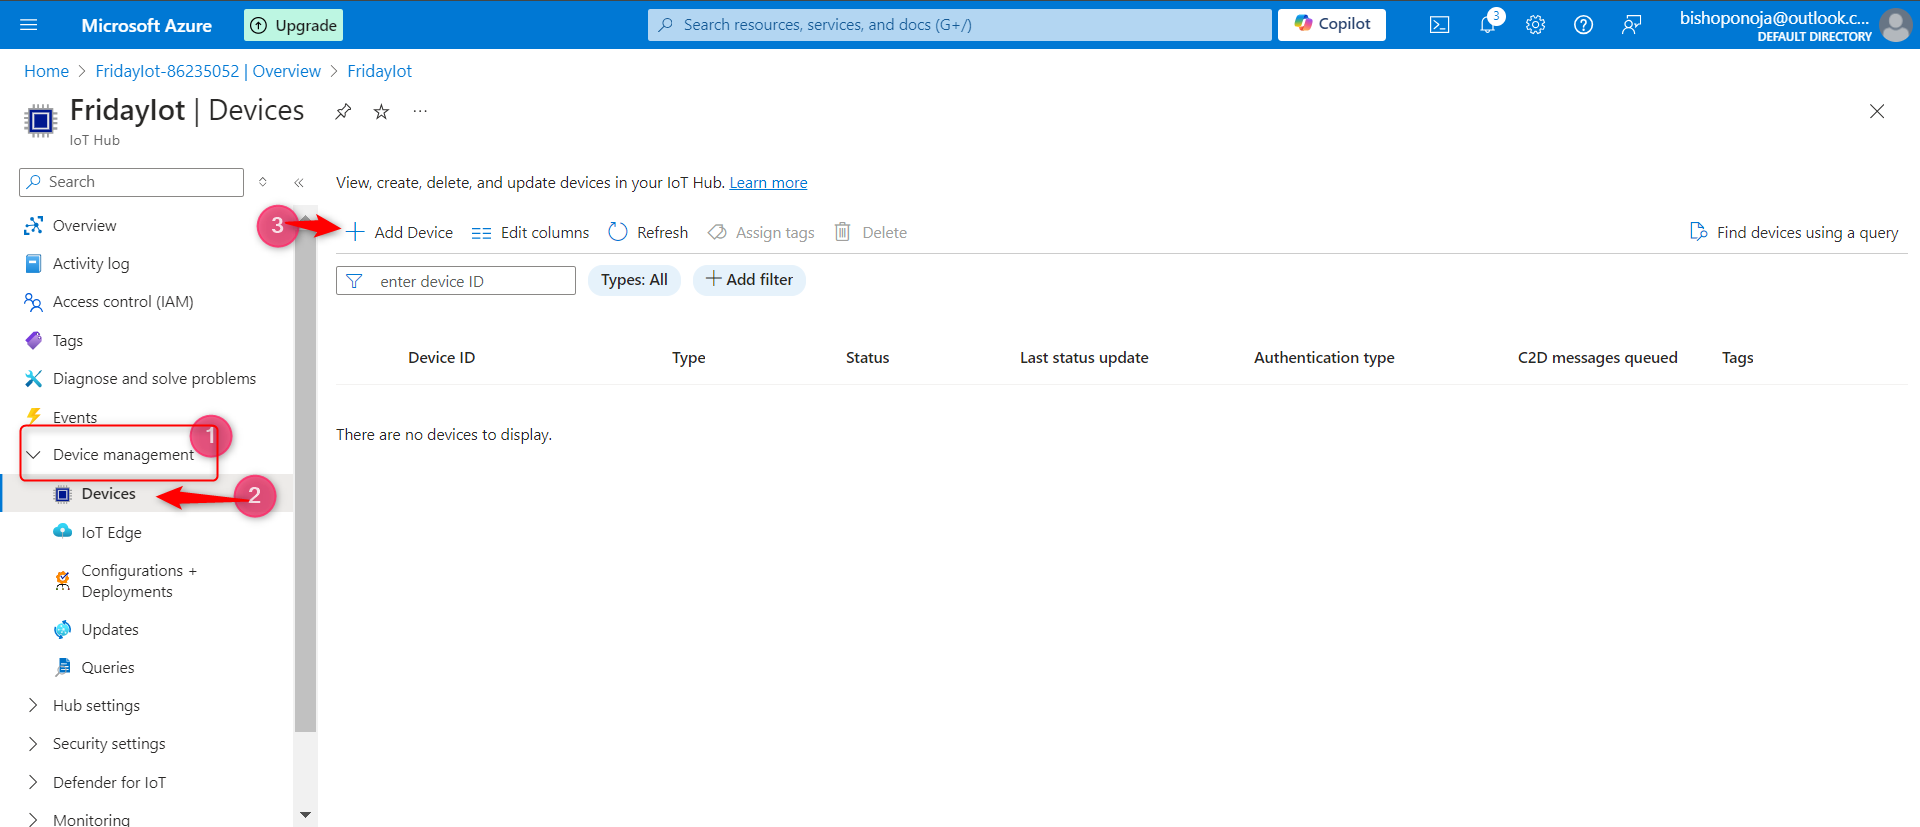
Step 2: Create a Device
A device is needed to link the IoT Hub
- From the newly created IoT hub > click on Device Management > Select Device > click on Add Device
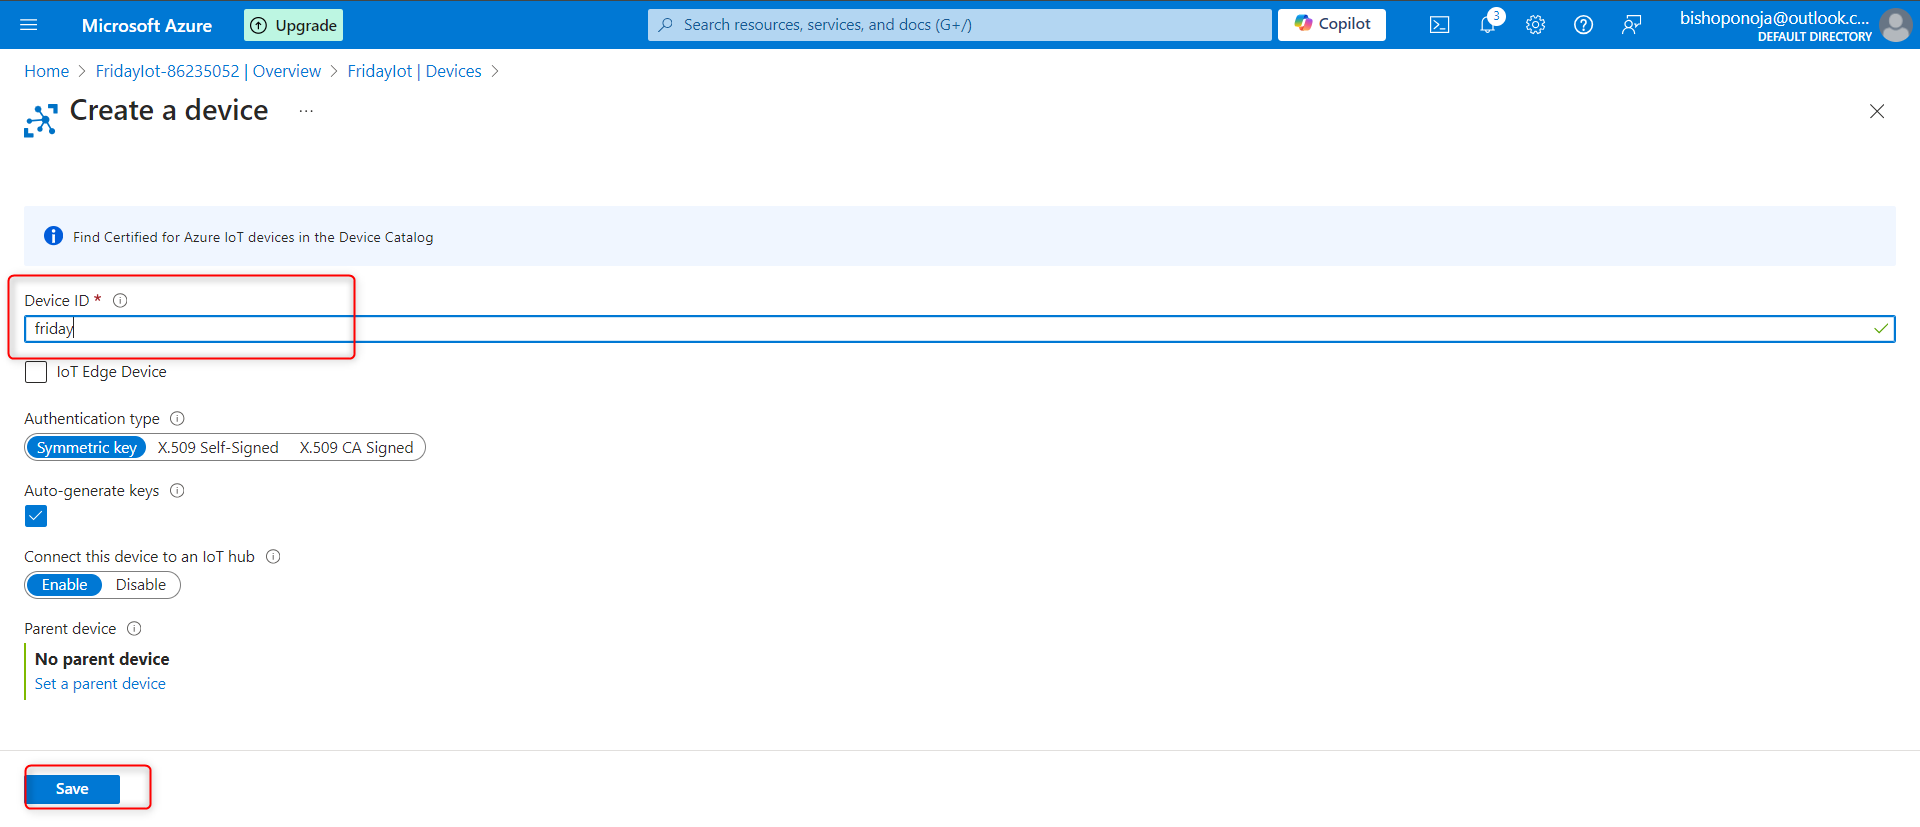
Device ID: Give the device a unique name
Authentication type: Set the authentication type
Connect the Device to IoT Bub: Use Enable to conenct to the created IoT hub or Disable to not connect
When this is Done > click Save
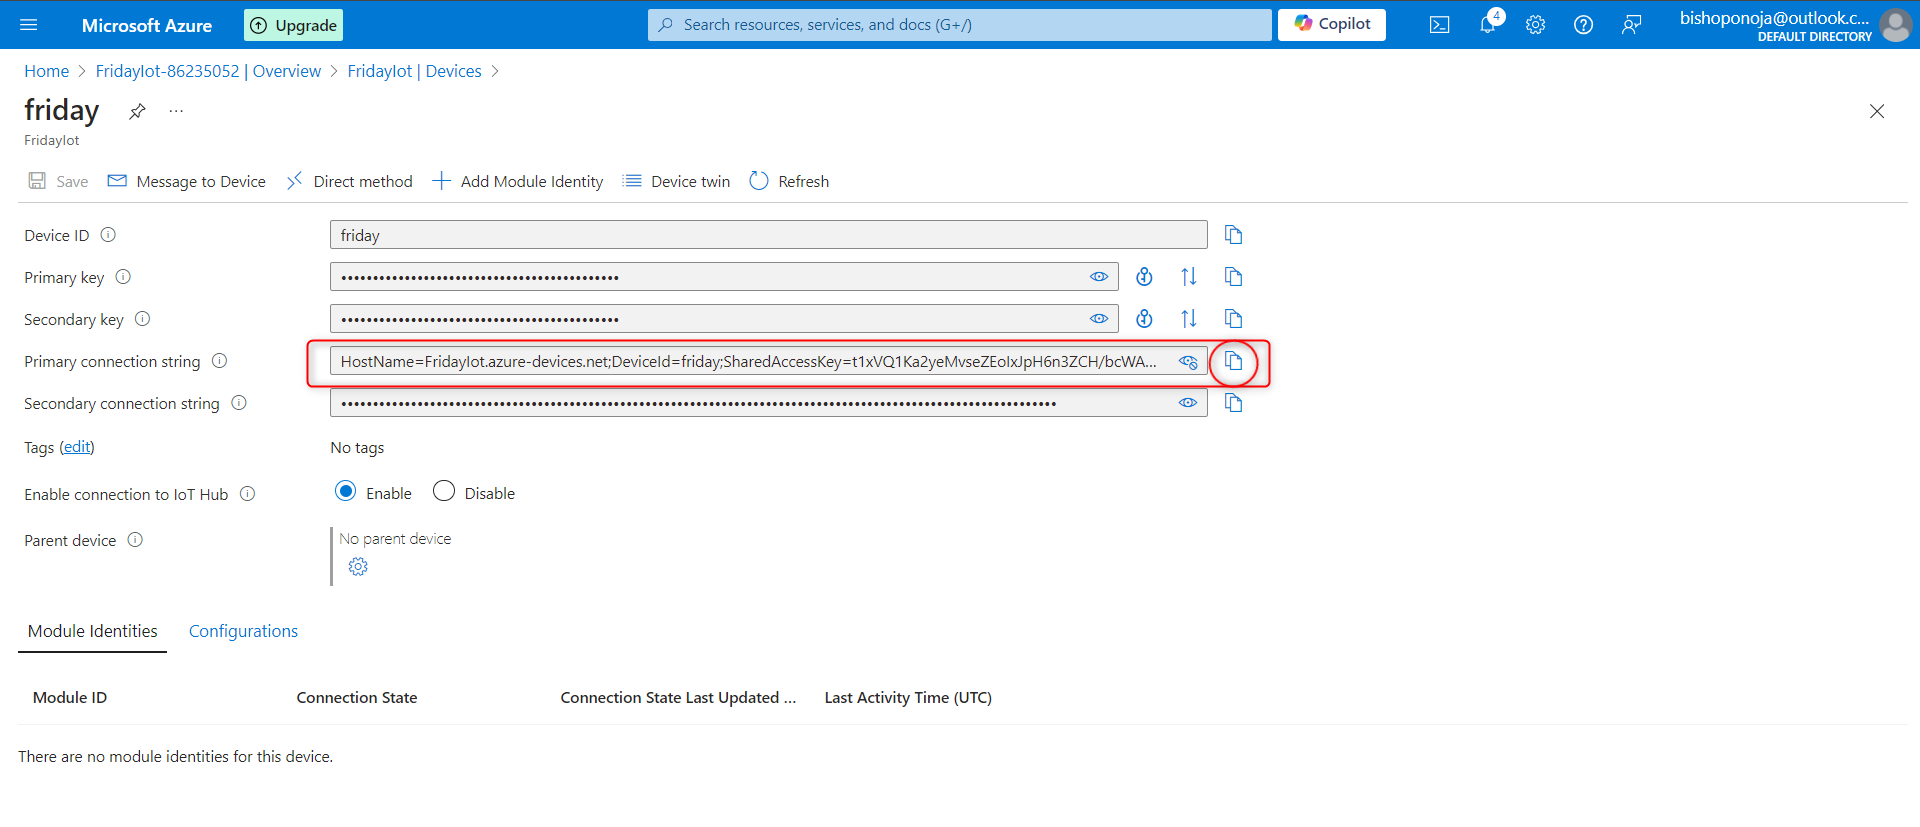
After Device setup, take note for of the "Primary Connection String" as this will be need to connect the Device.
Copy the keywords and save on a notepad
Step 3: Connecting the Device to Raspberry Pi Simulator
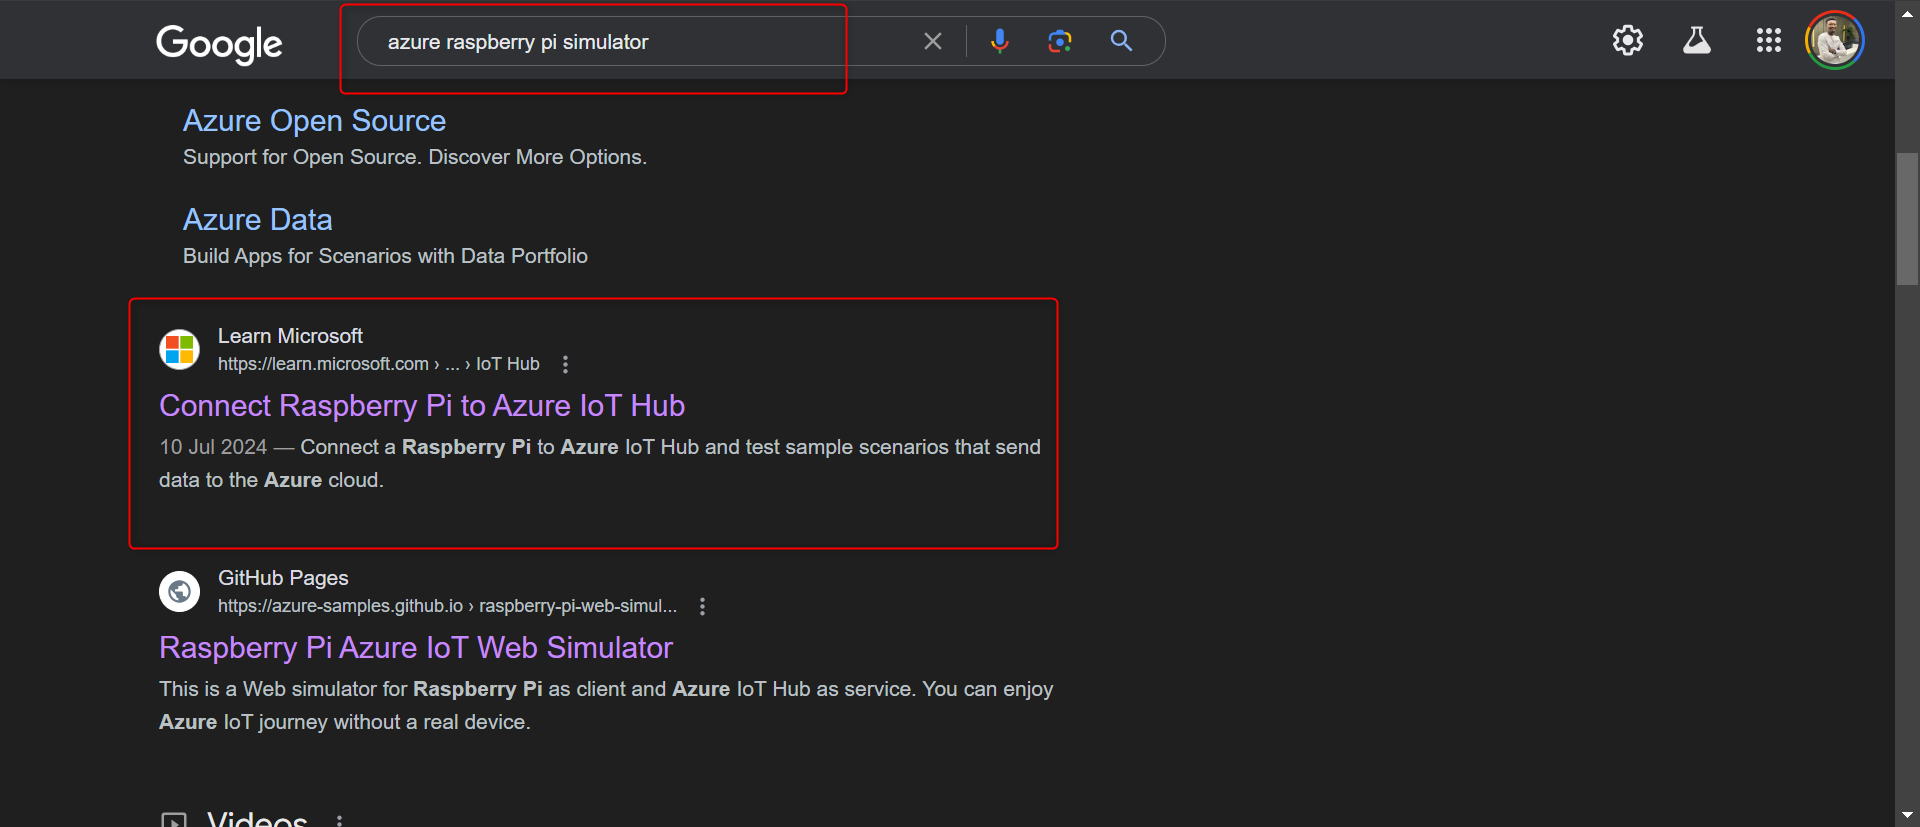
On the browser > Search for Raspberry Pi Simlator
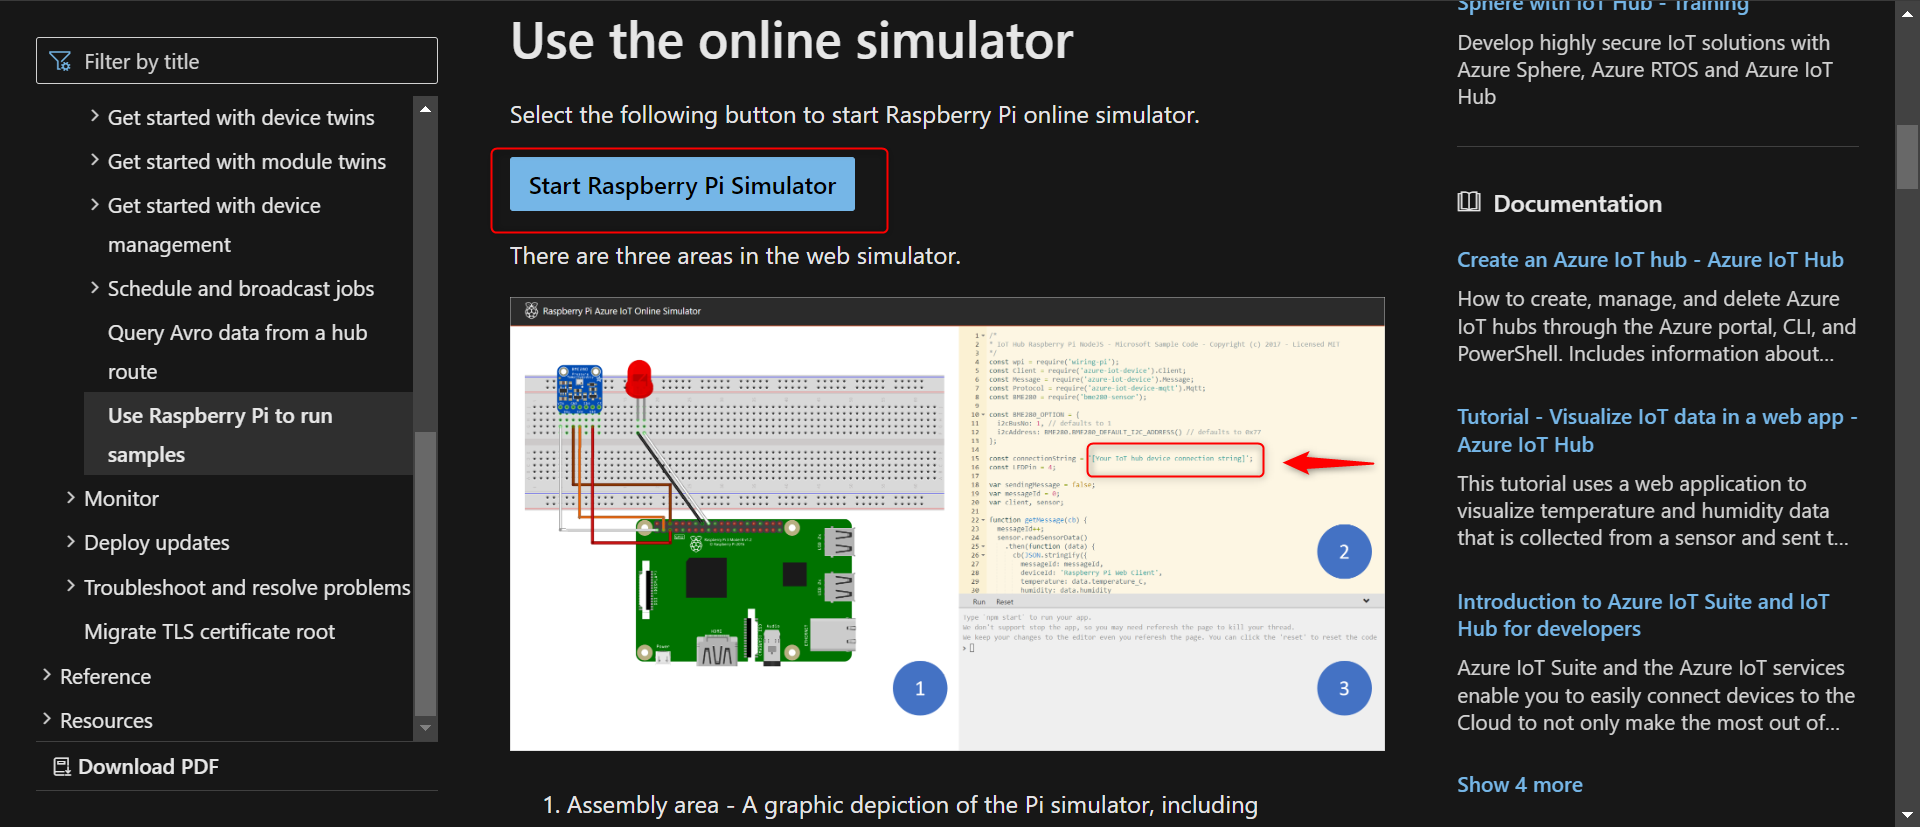
Click the Link to Open the Microsoft Docs > click the option to "Start Raspberry Pi Simulator" > this takes you the the simulator Portal
On the Raspberry Page > locate the Connection string and replace the [Your IoT hub device connection string] with the keywords copied from the device page >
When this is done click on Run Test
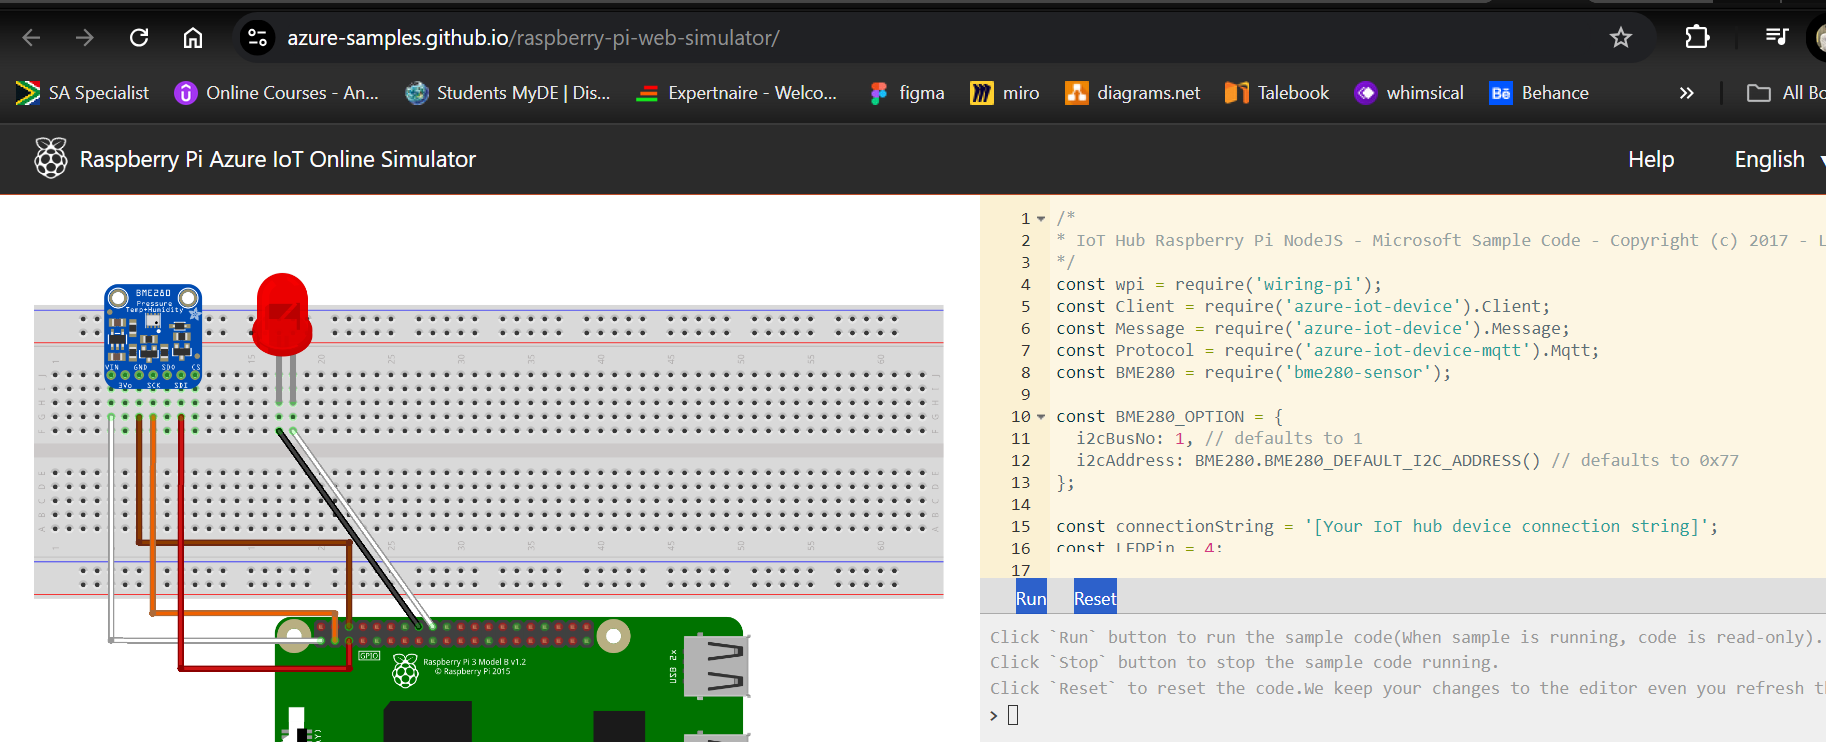
The Simulator begins to blink red which shows the simulator is now actively conencted to the device
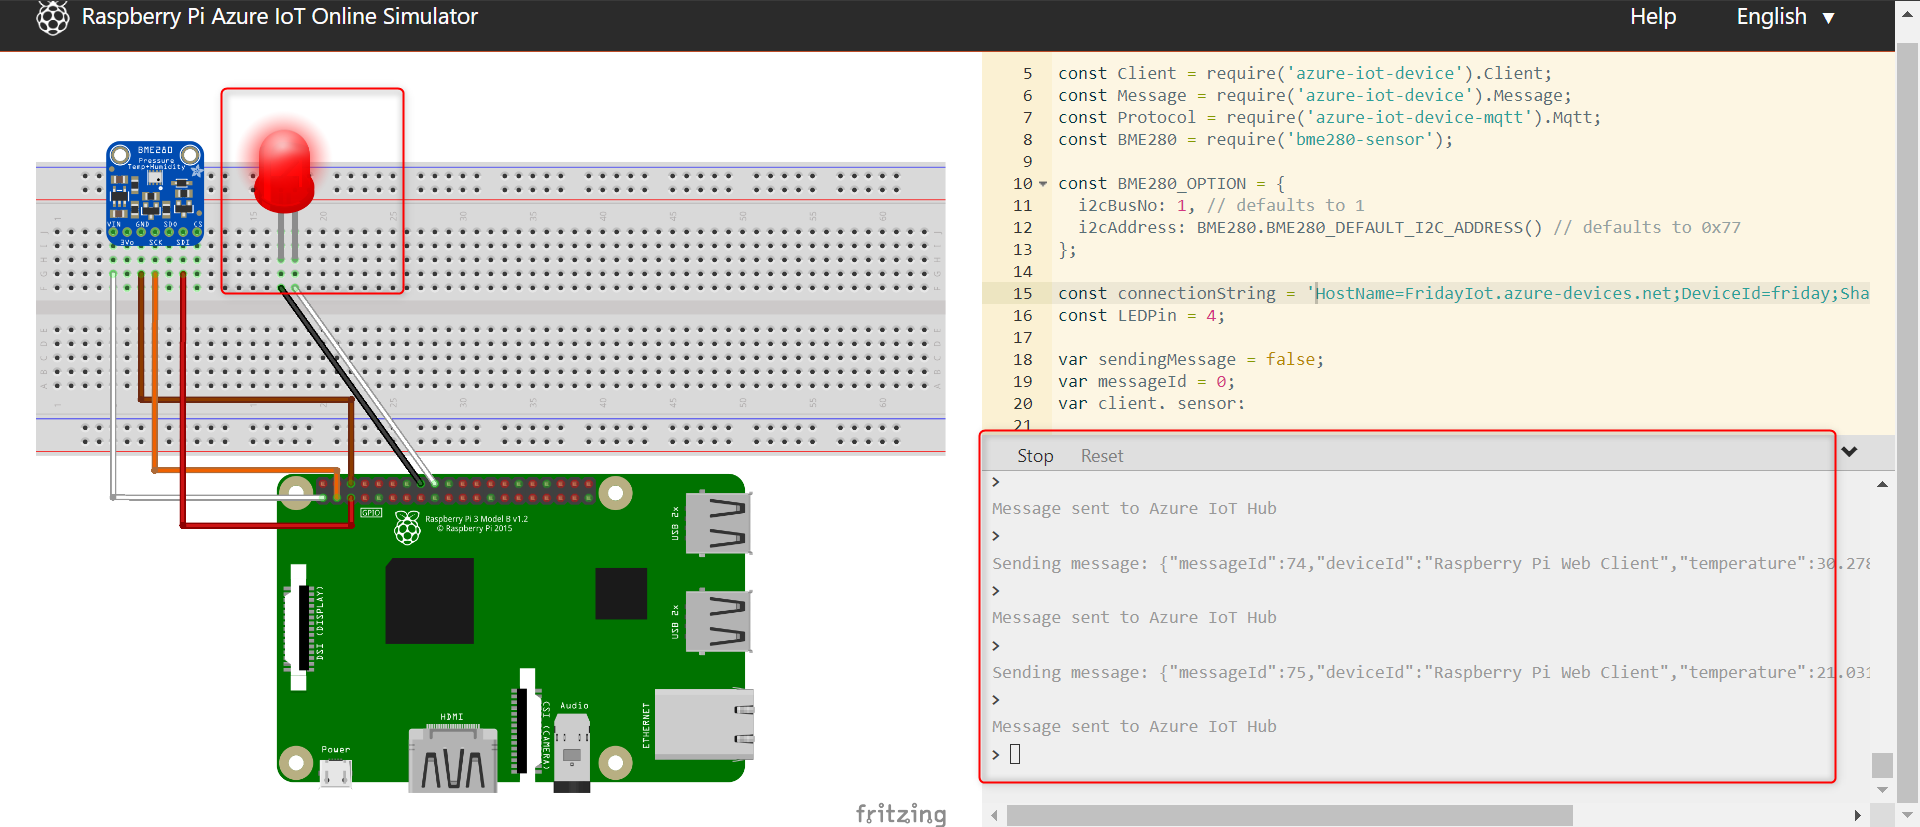
This now sends messages to the Azure IoT Hub
On the IoT Hub > check the IoT dashboard and confirm the Usage reponse to the Raspberry Pi Simulator
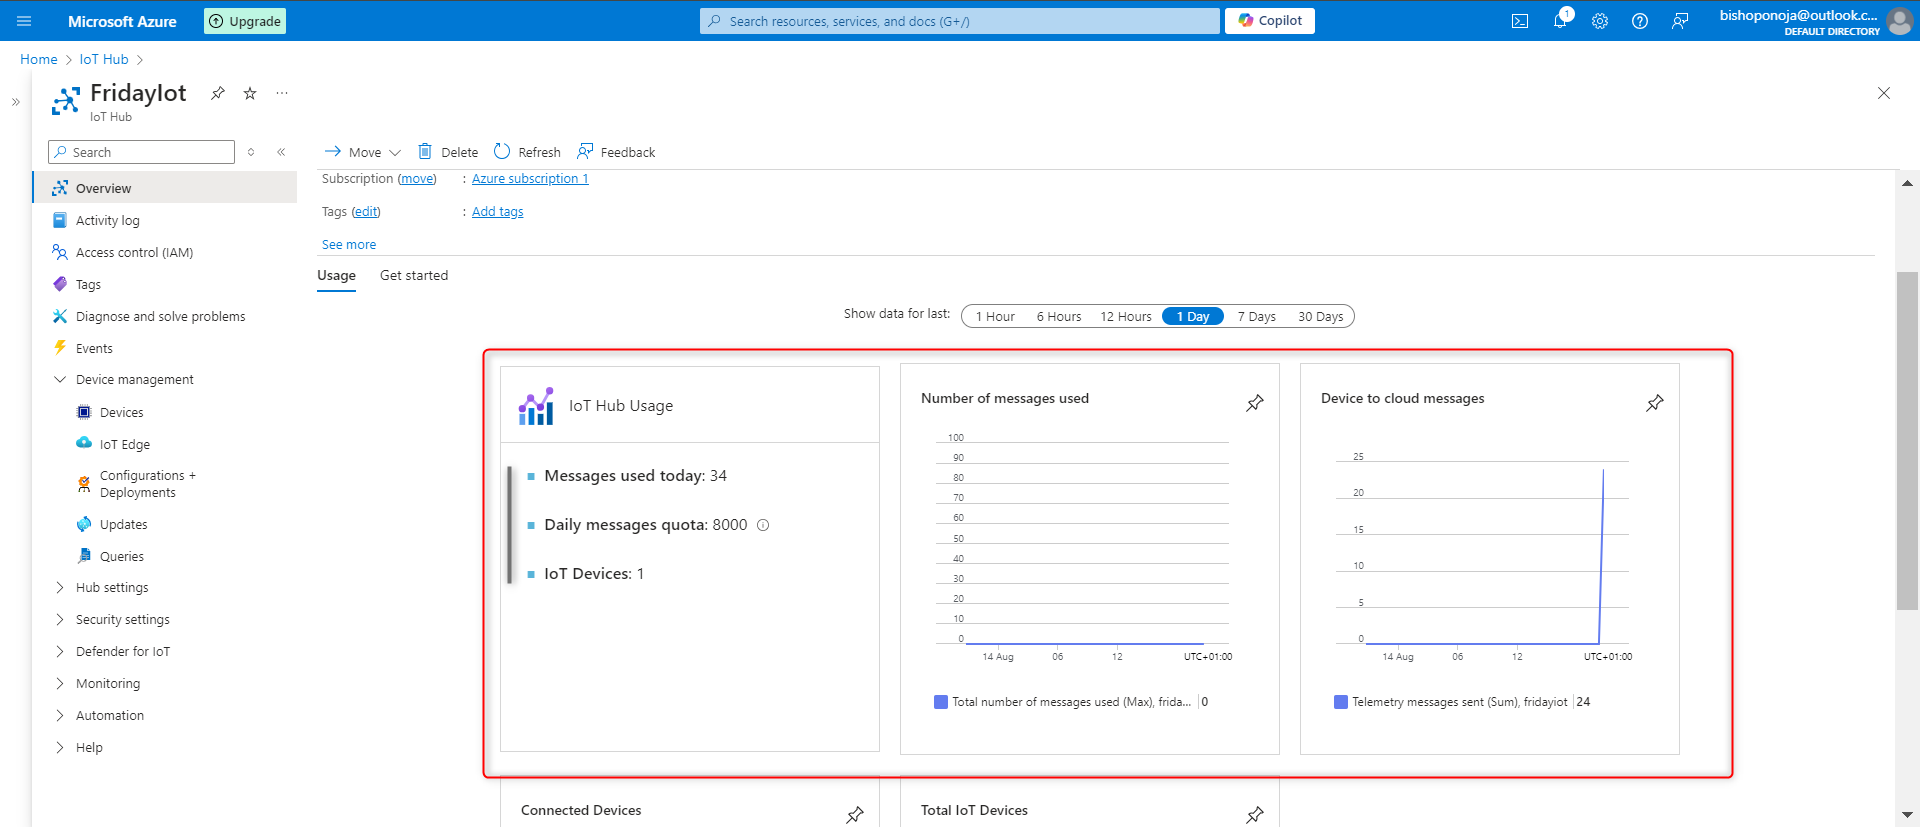
Now Your IoT device is connected and working appropriately.
Thank you for following through.
Subscribe to my newsletter
Read articles from Onoja Bishop directly inside your inbox. Subscribe to the newsletter, and don't miss out.
Written by
