Securely Hosting MySQL with Amazon RDS in Your AWS VPC
 Anthony Nzuki
Introduction
In this blog post, we will explore how to create a MySQL database. We will first have to create a VPC for a couple of reasons:
A VPC provides network isolation, meaning your RDS instance is not exposed directly to the internet. You control who can access your database and from where. For our case, we will have our database isolated within a private subnet.
You can also use network access control lists (ACLs) to provide an additional layer of security by setting rules to allow or deny traffic at the subnet level.
You can use route tables to control the flow of traffic within your VPC and direct traffic from your RDS instance to other services, such as an EC2 instance hosting your application.
Multi-AZ RDS setups require at least two subnets in different AZs. These subnets are part of a DB subnet group, which dictates where your primary and standby databases are placed within the VPC. Without a VPC, you wouldn't have the network infrastructure to define and manage these subnets.
Setting up your VPC

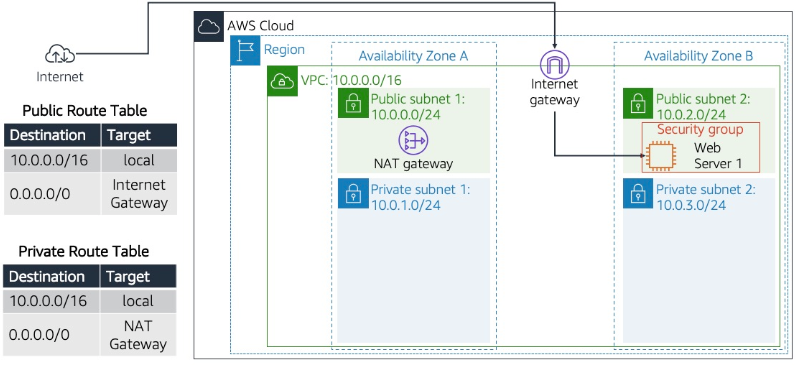
The image above shows the infrastructure that we'll set up for our RDS Database. I will take you through every step of the way until our database is set up and running.
So, you will need to set these configurations in your VPC for you to successfully host your database:
Task 1: Creating the VPC first
First, ensure you are logged into your AWS Management Console.
Once you are in the AWS console, type and search for VPC in the search bar at the top. Select VPC from the list.
You will be redirected to the Amazon VPC dashboard. We will use the Amazon Virtual Private Cloud (Amazon VPC) service to build our VPC.
Choose Create VPC and configure the following options:
Under VPC Settings go to Resources to create: Choose
VPC OnlyName tag - optional: Select the VPC name of your choice i.e.
RDS-VPCIPv4 CIDR: Enter
10.0.0.0/16IPv6 CIDR block: Choose
No IPv6 CIDR block.Tenancy: Choose
Default.Then Choose
Create VPC.
Once your VPC is running, you can refer all your other resources to be set up in the VPC.
Next, let's set up security groups.
Task 2: Creating Security Groups that will be used later in the project
Creating a web server security group
In this task, we'll create a VPC security group, which acts as a virtual firewall for the instance we'll create.
The web server instance will later on be used to connect securely to the database which will be placed in the private subnet.
In the VPC left navigation pane, choose Security Groups.
Choose Create security group.
Configure the security group with the following options:
Security group name: Enter
Web Server Security GroupDescription: Enter
Enable HTTP access
VPC: Choose RDS-VPC.
Under Inbound rules, choose Add rule.
Configure the following options:
Type: Choose
HTTP.Source: Choose
Anywhere IPv4.Description: Enter
Permit web requests
Choose Add rule again.
Configure the following options:
Type: Choose
SSH.Source: Choose
Anywhere IPv4.Description: Enter
Permit SSH access
Choose Create security group.
Creating RDS DB Security Group
In the VPC left navigation pane, choose Security Groups.
Choose Create security group.
Configure the security group with the following options:
Security group name: Enter
RDS DB Security GroupDescription: Enter
Permit access to the DB
VPC: Choose RDS-VPC.
Under Inbound rules, choose Add rule.
Configure the following options:
Type: Choose
MySQL/Aurora.Source: Stick with
custom.In the search box next to Source, type 'sg' and choose the
Web Server Security GroupDescription:
Enter Security group that accepts traffic that is allowed by the web server security group
Choose Create security group.
Now you have the 2 security groups in place. We will use them later on.
Task 3: Creating Subnets
In the VPC left navigation pane, choose Subnets.
Choose Create Subnet and configure the following options:
First Subnet:
VPC ID: From the dropdown list, choose
RDS-VPC.Under Subnet Settings in Subnet 1 of 1 set the following:
Subnet name:
public subnet 1Availability Zone: choose the first availability zone
IPv4 subnet CIDR block:
10.0.0.0/24
Before creating the subnet, ensure you create the other subnets first.
Second Subnet:
click
Add new subnetSubnet name:
private subnet 1Availability Zone: choose the first availability zone
IPv4 subnet CIDR block:
10.0.1.0/24
Third Subnet:
click
Add new subnetSubnet name:
public subnet 2Availability Zone: choose the second availability zone
IPv4 subnet CIDR block:
10.0.2.0/24
Fourth Subnet:
click
Add new subnetSubnet name:
private subnet 2Availability Zone: choose the second availability zone
IPv4 subnet CIDR block:
10.0.3.0/24
Once you are done configuring the subnets, click create subnets
Task 4: Creating the Internet Gateway
From the left navigation pane, select Internet Gateways. Create an Internet Gateway (IGW) by selecting Create internet gateway at the top right corner.
Under Internet gateway settings choose an appropriate name for your internet gateway
- Name tag:
VPC IGW
Once you have created your IGW, you will see Attach to VPC at the top of your screen with a green background. click it.
Under Available VPCs, choose
RDS-VPCFinally click
Attack to VPC
Now your VPC has an internet gateway attached to it.
Task 5: Creating your NAT Gateway
From the left navigation pane, select NAT Gateways. Create a NAT Gateway by selecting Create NAT gateway at the top right corner.
Under NAT gateway settings, configure the following:
Name - optional:
VPC NATSubnet: From the drop down, choose either
public subnet 1orpublic subnet 2Connectivity type:
PublicElastic IP allocation ID: click
Allocate elastic IP
Then finally click create NAT Gateway
Task 6: Creating route tables, associations and routes
Create route tables and their subnet associations
Next, let's configure route tables. We will create a public and private route tables.
In the left navigation pane, choose Route Tables.
Choose Create Route Table
In the Route table settings configure the following:
Name - optional :
public route tableVPC:
RDS-VPC
Then click create route table
Go back to the VPC dashboard and select route tables in the left pane.
Select the newly created public route table
In the lower pane, choose the Subnet associations tab.
Under Subnets without explicit associations, choose Edit subnet associations.
Select the check boxes for public subnet 1 and public subnet 2.
Choose Save associations.
You now configure the route table that is used by the private subnets.
Choose Private Route Table
In the lower pane, choose the Subnet associations tab.
Under Subnets without explicit associations, choose Edit subnet associations.
Select the check boxes for private subnet 1 and private subnet 2.
Choose Save associations.
In the left navigation pane, choose Route Tables again.
Choose Create Route Table
In the Route table settings configure the following:
Name - optional :
private route tableVPC:
RDS-VPC
Then click create route table
Go back to the VPC dashboard and select route tables in the left pane.
Select the newly created private route table
In the lower pane, choose the Subnet associations tab.
Under Subnets without explicit associations, choose Edit subnet associations.
Select the check boxes for private subnet 1 and private subnet 2.
Choose Save associations.
Now you have both the public and private route tables.
Creating Route for the Internet Gateway
Go back to the VPC dashboard and select route tables in the left pane.
Select the newly created public route table
In the lower pane, choose the Routes tab
Under Routes, click edit routes
You will find one route created with a status saying 'Active'
Now, let us configure the second route by clicking Add route:
Under Destination, choose
0.0.0.0/0Under Target, choose
Internet gatewaythen a new cell will appear below starting with 'igw - '. Click on it and select the internet gateway you created earlier i.e. VPC IGW
Then select save changes
Create route for the NAT Gateway
Go back to the VPC dashboard and select route tables in the left pane.
Select the newly created private route table
In the lower pane, choose the Routes tab
Under Routes, click edit routes
You will find one route created with a status saying 'Active'
Now, let us configure the second route by clicking Add route:
Under Destination, choose
0.0.0.0/0Under Target, choose
NAT gatewaythen a new cell will appear below starting with 'nat - '. Click on it and select the NAT gateway you created earlier i.e. VPC NAT
Then select save changes
Now our AWS VPC is fully set up and thus we need to create the web server that will let us securely connect to our database
Creating an Instance that Connects to the Database
Task 7: Creating a Web Server
In this task, we will launch an EC2 instance into the new VPC. We will configure the instance to act as a web server.
On the AWS Management Console, in the Search bar, enter and choose EC2 to go to the EC2 Management Console.
In the left navigation pane, choose Instances.
Choose Launch instances and configure the following options:
In the Name and tags section, Name:
Web Server.In the Application and OS Images (Amazon Machine Image) section, configure the following options:
Quick Start: Choose Amazon Linux.
Amazon Machine Image (AMI): Stick with the default AMI which is
Amazon Linux 2023
In the Instance type section, stick with
t2.micro.In the Key pair (login) section, create your own keys by clicking
create new key pair.Provide a Key pair name:
demo ssh keyPrivate key file format
.pem - for Linux and Mac OS
.ppk - for windows
In the Network settings section, choose Edit and configure the following options:
VPC - required: Choose RDS-VPC.
Subnet: Choose Public Subnet 1 or 2.
Auto-assign public IP: Choose Enable.
Firewall (security groups): Choose Select existing security group.
- Choose Web Server Security Group.
Expand Advanced details
Under User data, copy and paste the following code:
#!/bin/bash
yum -y install httpd
systemctl start httpd
systemctl enable httpd
echo '<html><h1>Hello From Your AWS Restart Web Server!</h1></html>' > /var/www/html/index.html
Then go ahead and Launch Instance
Test out the instance by pasting its public IP address to your web browser and confirming if you will see 'Hello From Your AWS Restart Web Server!'
Creating an Amazon RDS Instance Running MySQL
Task 8: Creating your MySQL Database using Amazon RDS
In this task, we will:
Create a Subnet Group to facilitate high availability by setting up a Multi-AZ deployment.
Configure the RDS DB instance to permit connections from your web server.
Configure MySQL Workbench to connect to the database
Task 8.1: Create a DB Subnet Group
In this task, we will create a DB subnet group that is used to tell RDS which subnets can be used for the database when a Multi-AZ deployment has been set up. It dictates where your primary and standby database instances are going to be placed within the VPC.
Without a VPC, you wouldn't have the network infrastructure to define and manage these subnets. Each DB subnet group requires subnets in at least two Availability Zones.
In the AWS Management Console, select the Services menu, and then select RDS under Database.
In the left navigation pane, click Subnet groups.
If the navigation pane is not visible, click the menu icon in the top-left corner.
Click Create DB Subnet Group then configure:
Name: DB Subnet Group
In the Add subnets section for Availability zones, click the , then:
Select the first Availability zone
Select the second Availability zone
For Subnets, click the , then:
For the first Availability zone, select 10.0.1.0/24
For the second Availability zone, select 10.0.3.0/24
Click Create
This adds Private Subnet 1 (10.0.1.0/24) and Private Subnet 2 (10.0.3.0/24). You will use this DB subnet group when creating the database in the next task.
Task 8.2: Create an Amazon RDS DB Instance
In this task, we will configure and launch a Multi-AZ Amazon RDS for the MySQL database instance.
Amazon RDS Multi-AZ deployments provide enhanced availability and durability for Database (DB) instances, making them a natural fit for production database workloads. When you provision a Multi-AZ DB instance, Amazon RDS automatically creates a primary DB instance and synchronously replicates the data to a standby instance in a different Availability Zone (AZ).
In the left navigation pane, click Databases.
Choose Create database, then under Choose a database creation method select Standard create.
Under the Engine options section, for Engine type, choose MySQL.
For Engine version, choose the latest version or the version you prefer.
For Templates, choose Dev/Test.
For Availability and durability, choose Multi-AZ DB Instance.
Under Settings, configure the following: DB instance identifier: rds-instance
Master username: admin
Under Credential management, choose self-managed
Master password: choose a password of your choice
Confirm password: choose a password of your choice
Under Instance configuration, configure the following for DB instance class:
Select Burstable classes (includes t classes).
Select
db.t3.micro.Under Storage, configure:
- Select General Purpose (SSD) under Storage type.
Under Connectivity, configure:
Compute resource:
Don't connect to an EC2 compute resourceDB Subnet group: The one you created earlier will appear as default
Virtual Private Cloud (VPC):
RDS-VPCPublic access:
NoUnder VPC security group select Choose existing
Under Existing VPC security groups
Use X to Remove default.
Select RDS Security Group to highlight it in blue.
Under Monitoring, expand Additional configuration and then configure the following:
- For Enhanced Monitoring, uncheck Enable Enhanced monitoring.
Scroll down to the Additional configuration section and expand this option. Then configure:
Initial database name:
companyUnder Backup, uncheck Enable automated backups.
This will turn off backups, which is not normally recommended, but will make the database deploy faster for this lab.
Scroll to the bottom of the screen, then click Create database
Your database will now be launched.
Go to the RDS Dashboard and from the left navigation pane, go to databases. You will find rds-instance
You will now need to wait approximately 4 minutes for the database to be available. The deployment process is deploying a database in two different Availability zones.
Wait until the Status changes to Modifying or Available.
Scroll down to the Connectivity & Security section and copy the Endpoint field.
It will look similar to: lab-db.cggq8lhnxvnv.us-west-2.rds.amazonaws.com
Paste the Endpoint value into a text editor.
Now, let's go to Workbench and connect to our web server that will then connect us to the database via SSH.
Using MySQL Workbench to Connect to the Database
Task 9: Connect to your database using MySQL Workbench
Ensure you have installed workbench and its functioning.
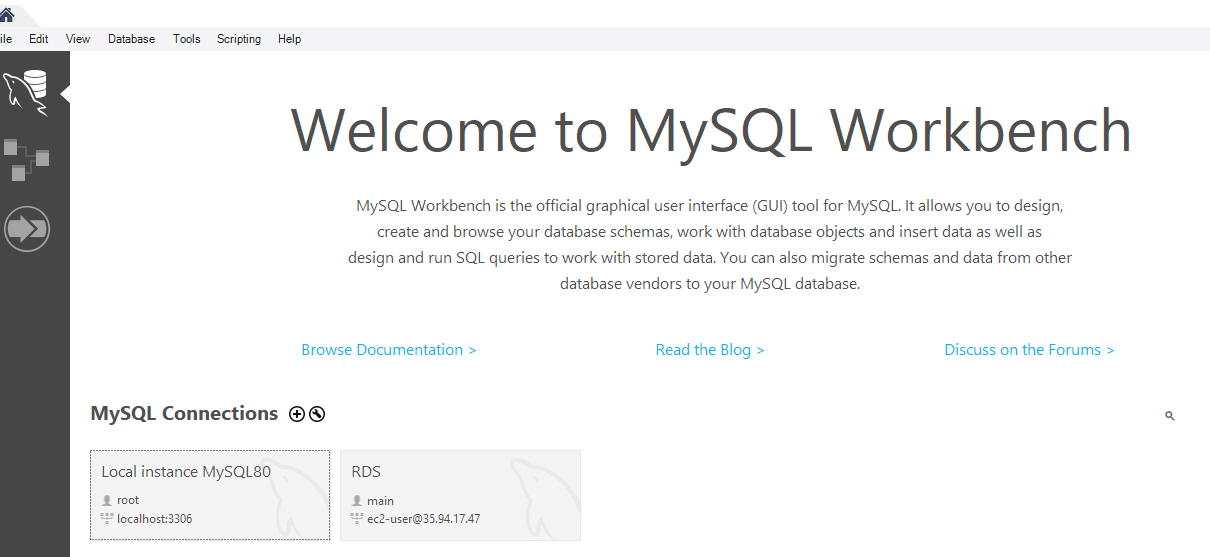
Click '+' under MySQL Connections

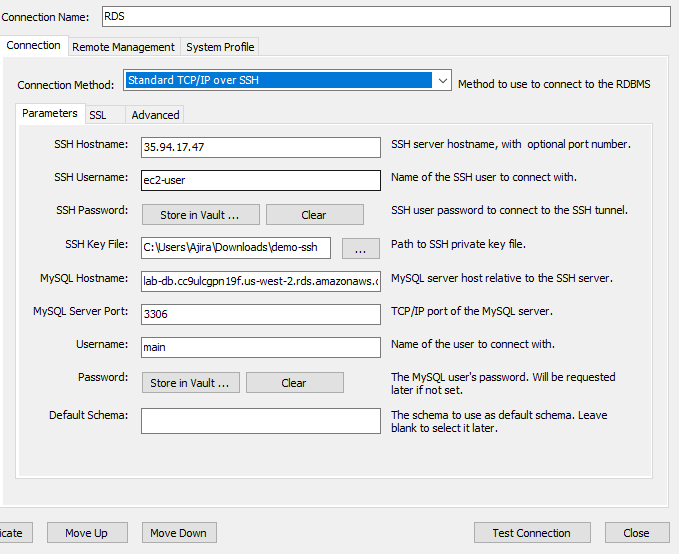
Then follow the following configurations:

Connection Method: Standard TCP/IP over SSH
The "Standard TCP/IP over SSH" method allows you to securely connect to your RDS instance via an SSH tunnel. This method ensures that your database connection is encrypted and protected by routing the traffic through an intermediary SSH server (web server).
- SSH Configuration
SSH Hostname*:* This is the public IP address of the EC2 instance acting as your web server.
SSH Username*:* Typically, AWS EC2 instances running Amazon Linux use the default username
ec2-user. This is the name you’ll use to connect to your EC2 instance.SSH Key File*:* To connect to your EC2 instance, you need an SSH key. This key is a
.pemor.ppkfile that was generated when you created your EC2 instance. For this configuration, ensure that your key file is in OpenSSH format and points to the correct location on your local machine. For example,C:\Users\Ajira\Downloads\demo-ssh.openssh
- MySQL Configuration
MySQL Hostname: This is the endpoint of your RDS instance that you saved in your text editor. The RDS instance endpoint is a DNS name provided by AWS, such as
lab-db.cc9ulcgpn19f.us-west-2.rds.amazonaws.com. This endpoint allows you to connect to your RDS database from within your VPC or through an SSH tunnel.MySQL Server Port: The default port for MySQL is
3306.Username and Password: These are the credentials you set up when creating your RDS instance.
Default Schema: This field is optional. You can specify the default database schema you want to connect to, or leave it blank to select it later.
Testing the Connection
After entering all the required configurations, click the "Test Connection" button to ensure that your setup is correct and that the connection can be established. If successful, MySQL Workbench will connect to your RDS instance securely through the EC2 instance.
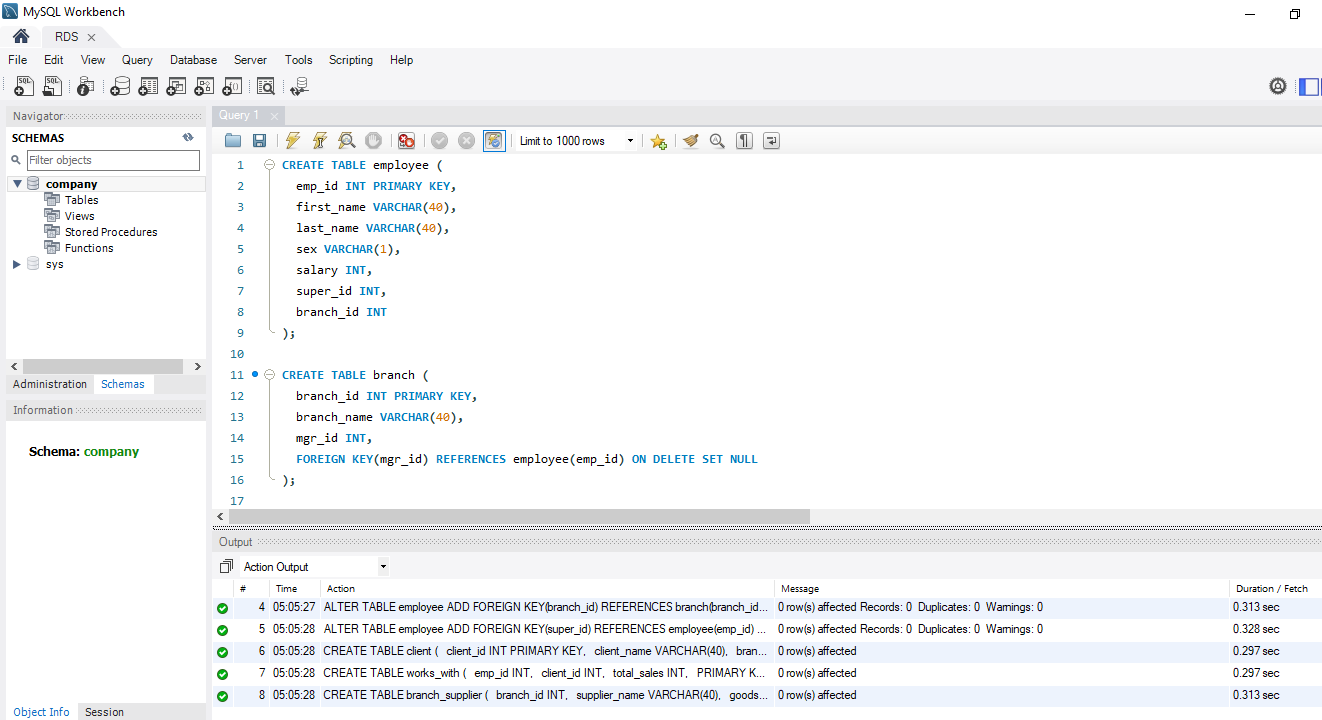
Here is what you see after successfully connecting to your database. I have created different schema for demonstration purposes. Note that the company database exists since we defined it during the RDS Instance creation process.

Subscribe to my newsletter
Read articles from Anthony Nzuki directly inside your inbox. Subscribe to the newsletter, and don't miss out.
Written by
