Connecting Laravel to the IoT Device with MQTT Integration
 Fajar Chaniago
In the era of the Internet of Things (IoT), connecting various devices and systems is becoming increasingly crucial for creating seamless, smart environments. MQTT (Message Queuing Telemetry Transport) is a lightweight messaging protocol designed for low-bandwidth, high-latency, or unreliable networks, making it an ideal choice for IoT applications. Integrating MQTT with a web application framework like Laravel enables developers to connect and communicate with IoT devices efficiently.
This article will guide you through the process of integrating MQTT into a Laravel application, allowing it to communicate with IoT devices seamlessly.
Why MQTT for IoT?
MQTT is specifically designed for constrained devices and unreliable networks. Its publish/subscribe model allows for efficient, real-time communication between multiple devices and applications, making it a preferred protocol for IoT projects.
Key features of MQTT include:
Lightweight and Efficient: MQTT minimizes network bandwidth and device resource requirements.
Scalable: Suitable for large-scale IoT deployments with millions of devices.
Low Power Usage: Ideal for devices with limited battery life.
Prerequisites
Before diving into the integration, ensure you have the following:
A Laravel application set up on your local environment.
An MQTT broker (such as Mosquitto) running locally or accessible via the network.
Basic knowledge of PHP and Laravel.
Step 1: Install the MQTT Client Package
The first step is to install an MQTT client library that integrates well with Laravel. For this tutorial, we'll use the php-mqtt/laravel-client package.
Run the following command in your terminal to install the package:
composer require php-mqtt/laravel-client
Step 2: Publish the Configuration File
Once the package is installed, publish the configuration file to customize the MQTT settings according to your environment.
php artisan vendor:publish --provider="PhpMqtt\Client\MqttClientServiceProvider" --tag="config"
This command will create an mqtt-client.php configuration file in the config directory of your Laravel application.
You can also set these values in your .env file:
MQTT_HOST=mqtt.example.com
MQTT_PORT=1883
MQTT_AUTH_USERNAME=your_username
MQTT_AUTH_PASSWORD=your_password
MQTT_CLIENT_ID=your_client_id
MQTT_ENABLE_LOGGING=true
Step 3: Implement MQTT Publishing
Now, let’s create a simple controller to publish messages to an MQTT topic. This will allow your Laravel application to send messages to your IoT devices.
Create a controller using Artisan:
php artisan make:controller MqttController
In the MqttController.php file, add the following code:
<?php

namespace App\Http\Controllers;

use Illuminate\Http\Request;
use PhpMqtt\Client\Facades\MQTT;

class MqttController extends Controller
{
    public function publish(Request $request)
    {
        $topic = $request->input('topic');
        $message = $request->input('message');

        $mqtt = MQTT::connection();
        $mqtt->publish($topic, $message);
        $mqtt->disconnect();

        return response()->json(['status' => 'Message published']);
    }
}
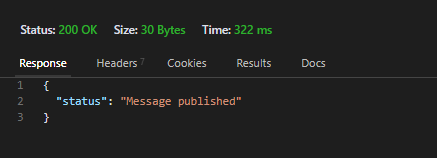
You can now send a POST request to this controller's method to publish messages to a specific topic. for example:


Step 4: Implement MQTT Subscription
To receive messages from an IoT device, you need to subscribe to a topic. The best way to continuously receive and process messages is by creating a long-running Artisan command.
Generate a new Artisan command:
php artisan make:command MqttSubscribe
Then, update the command to subscribe to an MQTT topic:
<?php

namespace App\Console\Commands;

use Illuminate\Console\Command;
use PhpMqtt\Client\Facades\MQTT;

class MqttSubscribe extends Command
{
    protected $signature = 'mqtt:subscribe {topic}';

    protected $description = 'Subscribe to a given MQTT topic and display messages in the terminal';

    public function __construct()
    {
        parent::__construct();
    }

    public function handle()
    {
        $topic = $this->argument('topic');

        $mqtt = MQTT::connection();

        $this->info("Subscribing to topic: {$topic}");

        $mqtt->subscribe($topic, function (string $topic, string $message) {
            $this->info(sprintf("Received message on topic [%s]: %s", $topic, $message));
        });

        $mqtt->loop(true);
    }
}
Run this command in your terminal to start listening for messages:
php artisan mqtt:subscribe lamp
Step 5: Testing the MQTT Integration
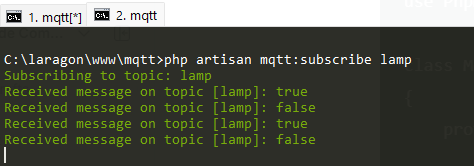
With your MQTT publisher and subscriber set up, you can now test the integration. Use tools like Postman to send POST requests to the publish endpoint of your Laravel application, and observe the messages appearing in your terminal as the MqttSubscribe command processes them. for example:

Conclusion
Integrating MQTT with Laravel opens up numerous possibilities for IoT projects, allowing real-time communication between web applications and physical devices. By following this guide, you've set up a robust framework for sending and receiving messages via MQTT, laying the groundwork for more complex IoT applications.
As IoT continues to evolve, the combination of Laravel and MQTT will empower developers to build innovative, connected solutions that bridge the gap between the digital and physical worlds.
Feel free to expand on this foundation by adding features such as message persistence, device management, and more, as your IoT ecosystem grows.
Subscribe to my newsletter
Read articles from Fajar Chaniago directly inside your inbox. Subscribe to the newsletter, and don't miss out.
Written by

Fajar Chaniago
Fajar Chaniago
suka bicarain tentang teknologi, security, tips & trick coding. subscribe untuk mendapatkan informasi menarik lainnya