Document Object Model (DOM)
 Abhijeet Karmakar
What is DOM?
The Document Object Model (DOM) is the data representation of the objects that comprise the structure and content of a document on the web. It represents the page so that programs can change the document structure, style, and content.
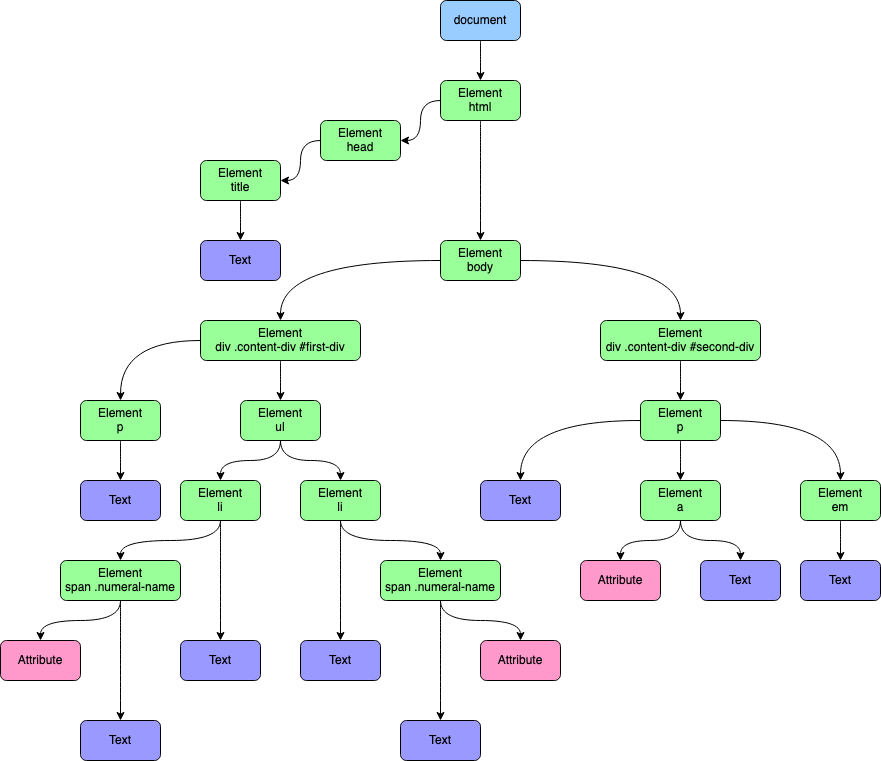
The DOM is a tree-like structure where each node is an object representing a part of the document (e.g., an element, attribute, or text).

There are 12 node types. However, we usually work with 4 of them:
- document – the “entry point” into DOM.
- element nodes – HTML-tags, the tree building blocks.
- text nodes – contain text.
- comments – sometimes we can put information there, it won’t be shown, but JS can read it from the DOM.
Manipulating the DOM With JavaScript
The DOM is not a programming language, but without it, the JavaScript would not have any significance in web development especially front-end development. The DOM is not part of the JavaScript language, but is instead a Web API used to build websites.
The DOM was designed to be independent of any particular programming language to keep the DOM API consistent. Developer mostly use JavaScript and Python for DOM manipulations to create dynamic, interactive user experiences.
Note: DOM API is not a core part of Node.js runtime
Selecting Elements
Before you can manipulate the DOM, you need to select the elements you want to work with. JavaScript provides several methods for this:
- document.getElementById(): Selects an element by its id attribute.
- document.getElementsByClassName(): Selects elements by their class name.
- document.getElementsByTagName(): Selects elements by their tag name.
- document.querySelector(): Selects the first element that matches a CSS selector.
- document.querySelectorAll(): Selects all elements that match a CSS selector.
Creating Elements
Use document.createElement() to create a new element, and then append it to the DOM:
let newDiv = document.createElement("div");
newDiv.textContent = "Hello, World!";
document.body.appendChild(newDiv);
Modifying Elements
You can modify elements using properties and methods:
- element.textContent: Sets or gets the text content of an element.
<div id="myDiv">Original Text</div>

<script>
    let div = document.getElementById('myDiv');
    div.textContent = 'New Text Content';
    // The content of the div is now "New Text Content"
</script>
- element.innerHTML: Sets or gets the HTML content of an element.
<div id="myDiv">Original Text</div>

<script>
    let div = document.getElementById('myDiv');
    div.innerHTML = '<strong>Bold Text</strong> and <em>Italic Text</em>';
    // The content of the div is now "<strong>Bold Text</strong> and <em>Italic Text</em>"
</script>
- element.setAttribute(): Adds or changes an attribute.
<img id="myImage" src="original.jpg" alt="Original Image">

<script>
    let img = document.getElementById('myImage');
    img.setAttribute('src', 'new.jpg');
    img.setAttribute('alt', 'New Image');
    // The image now has its 'src' set to "new.jpg" and 'alt' set to "New Image"
</script>
- element.style.property: Modifies CSS properties directly.
<div id="myDiv">Styled Text</div>

<script>
    let div = document.getElementById('myDiv');
    div.style.color = 'blue';
    div.style.fontSize = '20px';
    div.style.backgroundColor = 'yellow';
    // The div now has blue text, 20px font size, and a yellow background
</script>
Removing Elements
To remove an element, use element.remove():
Copy code
let element = document.getElementById('myElement');
element.remove();
Event Handling in the DOM
Event handling is a crucial aspect of web development that enables interactivity and dynamic behavior in web applications. In the Document Object Model (DOM), events are user interactions or browser actions that you can respond to using JavaScript.
Common Event Types
Some of the most commonly used events include:
click: Triggered when an element is clicked.mouseover: Triggered when the mouse pointer moves over an element.mouseout: Triggered when the mouse pointer moves out of an element.keydown: Triggered when a key is pressed down.keyup: Triggered when a key is released.submit: Triggered when a form is submitted.
Attaching Event Listeners
You can attach event listeners to DOM elements using the addEventListener() method. This method takes two arguments: the event type and a callback function to handle the event.
Example:
<button id="myButton">Click Me</button>

<script>
  let button = document.getElementById("myButton");
  button.addEventListener("click", function () {
    alert("Button clicked!");
  });
</script>
Removing Event Listeners
You can remove event listeners using the removeEventListener() method. This method requires the same event type and callback function used in addEventListener().
Example:
<button id="myButton">Click Me</button>

<script>
  function handleClick() {
    alert("Button clicked!");
  }

  let button = document.getElementById("myButton");
  button.addEventListener("click", handleClick);

  // To remove the event listener
  button.removeEventListener("click", handleClick);
</script>
Event Bubbling
During the bubbling phase, the event propagates up the DOM tree from the target element to the outermost element (window). By default, event listeners are executed during the bubbling phase.
Example:
<div id="parent">
  <button id="child">Click Me</button>
</div>

<script>
  let parent = document.getElementById("parent");
  let child = document.getElementById("child");

  parent.addEventListener("click", function () {
    console.log("Parent clicked (bubbling)");
  });

  child.addEventListener("click", function () {
    console.log("Child clicked");
  });
</script>
Here, clicking the button will log "Child clicked" first, followed by "Parent clicked (bubbling)".
Stopping Event Propagation
You can stop the propagation of an event using event.stopPropagation(), which prevents the event from reaching any other elements.
Example:
<div id="parent">
  <button id="child">Click Me</button>
</div>

<script>
  let parent = document.getElementById("parent");
  let child = document.getElementById("child");

  parent.addEventListener("click", function () {
    console.log("Parent clicked");
  });

  child.addEventListener("click", function (event) {
    console.log("Child clicked");
    event.stopPropagation();
  });
</script>
In this case, clicking the button will only log "Child clicked" because event.stopPropagation() stops the event from bubbling up to the parent.
Event Capturing
In the capturing phase, an event moves from the outermost element (window) towards the target element. Each element along the path can react to the event before it reaches the target. This provides a way to intercept events as they travel down the DOM tree.
Adding Event Listeners in the Capturing Phase
To attach an event listener during the capturing phase, you use the addEventListener() method with true as the third argument. This indicates that the listener should be triggered during the capturing phase instead of the default bubbling phase.
Example:
<div id="outer">
  <div id="middle">
    <button id="inner">Click Me</button>
  </div>
</div>

<script>
  let outer = document.getElementById("outer");
  let middle = document.getElementById("middle");
  let inner = document.getElementById("inner");

  outer.addEventListener(
    "click",
    function () {
      console.log("Outer div clicked (capturing)");
    },
    true
  );

  middle.addEventListener(
    "click",
    function () {
      console.log("Middle div clicked (capturing)");
    },
    true
  );

  inner.addEventListener("click", function () {
    console.log("Inner button clicked");
  });
</script>
Subscribe to my newsletter
Read articles from Abhijeet Karmakar directly inside your inbox. Subscribe to the newsletter, and don't miss out.
Written by
